1
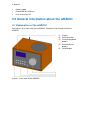
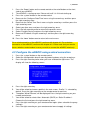
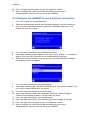
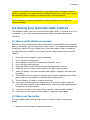
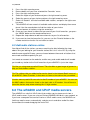
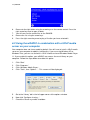
E
EM3710 - wRADIO Internet Radio
2 | ENGLISH
EM3710 - wRADIO Internet Radio
Warnings and points of attention
Due to laws, directives and regulations set out by the European Parliament, this
device could be subject to limitations concerning its use in certain European member
states. In certain European member states the use of this product could be prohibited.
More information regarding this warning can be found in the Declaration of Conformity
on the last page of this document.
Table of contents
1.0 Warranty conditions...............................................................................................2
2.0 Introduction ...........................................................................................................3
2.1 Functions and features ......................................................................................3
2.2 Packing contents ...............................................................................................3
3.0 General information about the wRADIO.................................................................4
3.1 Explanation of the wRADIO ...............................................................................4
4.0 Connecting and starting to use the wRADIO..........................................................6
4.1 Configure date and time ....................................................................................6
4.2 Configure the wRADIO using a wired connection...............................................7
4.3 Configure the wRADIO to use a wireless connection .........................................8
5.0 Saving your favourite radio stations .......................................................................9
5.1 Save a radio station as a preset.........................................................................9
5.2 Save your favourites..........................................................................................9
5.3 Add radio stations online .................................................................................10
6.0 The wRADIO and UPnP media servers. ..............................................................10
6.1 What is a UPnP media server? ........................................................................11
6.2 Using the wRADIO in combination with an Eminent EM4070 LAN disk............11
6.2 Using the wRADIO in combination with a UPnP media server on your
computer ...............................................................................................................12
7.0 Using other connectivity options ..........................................................................13
7.1 Connect your wRADIO to a receiver ................................................................13
7.2 Connect a portable MP3-player or iPod to your wRADIO.................................14
7.3 Connect USB devices to your wRADIO ...........................................................14
8.0 Advanced functions .............................................................................................15
8.1 Log in to the setup page of the wRADIO..........................................................15
9.0 Frequently asked questions.................................................................................15
10.0 Service and Support ..........................................................................................16
1.0 Warranty conditions
The five-year Eminent warranty applies to all Eminent products unless mentioned
otherwise before or during the moment of purchase. When having bought a second-
3 | ENGLISH
hand Eminent product the remaining period of warranty is measured from the moment
of purchase by the product’s first owner. The Eminent warranty applies to all Eminent
products and parts inextricably connected to and/or mounted on the main product.
Power supply adapters, batteries, antennas and all other products not integrated in or
directly connected to the main product and/or products of which, without reasonable
doubt, can be assumed that wear and tear show a different pattern than the main
product are not covered by the Eminent warranty. Products are not covered by the
Eminent warranty when subjected to incorrect/improper use, external influences
and/or when opened by parties other than Eminent.
2.0 Introduction
Congratulations with your purchase of this high-quality Eminent product! This product
has undergone extensive testing by Eminent’s technical experts. Should you
experience any problems with this product, you are covered by a five-year Eminent
warranty. Please keep this manual and the receipt in a safe place.
Register your purchase now on www.eminent-online.com and receive product
updates!
2.1 Functions and features
The wRADIO is a very complete stand-alone Internet radio, that enables you to
receive thousands of radio streams world wide. Moreover, the wRADIO easily streams
music from your computer, USB stick or hard disk. The wRADIO features a USB port,
specially designed to easily connect your USB stick or external hard disk.
•
•
•
•
•
•
•
•
Large LCD display with backlight.
Infrared remote control.
Built-in speaker.
Wireless functionality with WPA en WEP support.
Network connection for wired Internet.
USB connection to connect MP3 players and USB storage devices.
Built-in UPnP client to stream Music from different UPnP media devices, for
instance the Eminent EM4070 Sharebox 3.5" IDE & SATA LAN disk or UPnP
media server software installed on your computer.
Line In and Line out to connect external devices like your audio receiver or Ipod.
2.2 Packing contents
The following parts need to be present in the packing:
•
•
EM3710, wRADIO Internet Radio.
Remote control.
4 | ENGLISH
•
•
•
Power supply.
Detachable wifi antenna.
User manual on CD.
3.0 General information about the wRADIO
3.1 Explanation of the wRADIO
See figure 1 for a front view of the wRADIO. See figure 2 for a back view of the
wRADIO.
(1)
(2)
(3)
(4)
(5)
Figure 1. Front view of the wRADIO.
Display
Volume control
Function/playback
buttons
Number/preset
buttons
On/off button
5 | ENGLISH
(1)
(2)
(3)
(4)
(5)
(6)
(7)
Wifi antenna
On/off switch
Power supply
connection
Network
connection
USB
connection to
connect your
USB stick or
USB hard
disk
Line Out:
Connect your
amplifier or
receiver
Line in:
Connect your
computer or
media player.
Figure 2. Back view of the wRADIO.
3.2 Remote control
The wRADIO is provided with an easy and usable remote control. The most frequently
used buttons on the remote control will be explained in figure 3.
6 | ENGLISH
(1)
(2)
(3)
(4)
(5)
(6)
(7)
(8)
(9)
Selection buttons to switch to other stations
On/off button
Button to return to the main menu
Button to go to the system configurations
Volume control
Button to add a station to your favourites
Button to show your favourites
Button to replay an audio track
Button to save a radio station to your presets
Figure 3. Remote control of the wRADIO.
4.0 Connecting and starting to use the
wRADIO
Follow the steps in this chapter to connect the wRADIO.
1.
2.
3.
4.
5.
Connect the power supply to your wRADIO. See also figure 2, number 3.
Connect the power supply to a power outlet.
If you want to use a wired network, you can now connect the networking cable to
the wRADIO. ee also figure 2, number 4.
Connect the other side of the networking cable to your router or switch.
Turn on the wRADIO by switching the on/of switch on the backside to 1. See also
figure 2, number 2.
Tip! Connecting the wRADIO to a wired network is optional. You can configure your
wRADIO to connect to your wireless network using the remote control.
4.1 Configure date and time
Before we configure the wRADIO to stream Internet radio and local music files, we will
first configure date and time. You can change all configurations that are discussed
below using the LCD display and remote control.
7 | ENGLISH
1.
Press the ‘Power’ button on the remote control or the on/off button on the front
side of your wRADIO.
2. The wRADIO is starting up now. Please wait until it is finished starting up.
3. Press the ‘system’ button on the remote control.
4. Browse to the ‘Configure Date/Time’ menu using the arrow keys and then press
the right arrow key once.
5. Browse to the ‘Select Time Zone’ menu using the arrow keys and then press the
right arrow key once.
6. Select your time zone, and press the right arrow key once.
7. Press the left arrow key once to return to the previous menu.
8. Select ‘Daylight Saving’ and press the right arrow key once.
9. Browse to ‘Enabled’ using the arrow keys and then press the right arrow key
once.
10. Press the ‘home’ button once to return to the main menu.
For a wired connection of the wRADIO, continue with chapter 4.2 For a wireless
connection of the wRADIO, continue with chapter 4.3. Please note that you need to
have a wireless router/modem in case you wish to connect the wRADIO wirelessly.
4.2 Configure the wRADIO using a wired connection
1.
2.
3.
Press the ‘system’ button on the remote control.
Select the ‘configuration wizard’ menu by browsing down using the arrow keys.
Press the right arrow key twice when you have selected the right menu. The
display will show the following screen:
4.
5.
Press the right arrow key.
You will be asked to choose a profile in the next screen. ‘Profile 1’ is selected by
default. Press the right arrow key on the remote control to continue.
The option ‘Wired Ethernet’ will be displayed. Press the right arrow key on your
remote control once.
You will be asked to select either ‘Automatic (DHCP) or ‘Static IP address’.
Choose the first and press the right arrow key once.
Press the right arrow key on your remote control again (when asked for the proxy
settings).
Press the right arrow key on your remote control once to apply all settings.
6.
7.
8.
9.
8 | ENGLISH
10. Press the right arrow key again to save all settings to ‘Profile 1 ‘.
11. After all settings are saved, you will be returned to the main menu.
Congratulations! You can now start using your wRADIO.
4.3 Configure the wRADIO to use a wireless connection
1.
2.
3.
Press the ‘system’ on the remote control.
Select the ‘configuration wizard’ menu by browsing down using the arrow keys.
Press the right arrow key once when you have selected the right menu. The
display will show this screen:
4.
5.
Press the right arrow key on your remote control once.
You will be asked to choose a profile in the next screen. ‘Profile 1’ is selected by
default. Press the right arrow key on the remote control to continue.
Select your wireless network. In case you have an Eminent Wireless N Router,
the following screen will appear:
6.
7.
8.
9.
10.
11.
12.
13.
14.
Press the right arrow key on the remote control.
You will be asked to type in the WPA or WPA2 key of your wireless network. You
can use the remote control to fill out the key.
Press the right arrow key when you’re finished.
You will be asked to select either ‘Automatic (DHCP) or ‘Static IP address’.
Choose the first option and press the right arrow key once.
Press the right arrow key on your remote control.
Press the right arrow key on your remote control once to apply all settings.
Press the right arrow key again to save all settings to ‘Profile 1 ‘.
After all settings are saved, you will be returned to the main menu.
Congratulations! You can now start using your wRADIO.
9 | ENGLISH
Caution! The wRADIO will automatically use the wired network connection when a
cable is connected. If you want to use the wRADIO wirelessly, you will have to unplug
the networking cable and attach the antenna that you found in the box.
Tip! To improve your wireless connection, Eminent advices you to connect the
antenna vertically.
5.0 Saving your favourite radio stations
The wRADIO enables you to save your favourite radio stations as a preset or on a list
of favourites. In this way you can easily find the stations that you listen to most
frequently.
5.1 Save a radio station as a preset
Now that we have configured the Internet connection of the wRADIO using a wired or
wireless connection, we can configure the radio stations. The steps below explain how
to configure a preset. Presets enable you to save radio stations under a number on
the front panel of the wRADIO or the remote control, allowing quick access to these
stations.
1.
2.
3.
4.
5.
6.
7.
Browse to ‘Internet Radio’ using the arrow keys.
Press the right arrow key once.
Browse down until you have selected the ‘Countries’ menu.
Press the right arrow key once.
Select the region of your choice and press the right arrow key once.
Select the country of your choice and press the right arrow key once.
Select ‘All Stations’ to find all available radio stations, and press the right arrow
key once.
8. The wRADIO will now search all available radio stations and display them once
found. Use the arrow buttons to find the station of your choice.
9. You can browse all stations using the arrow keys.
10. If you want to add a station as a preset, you can select that station, and then
press the ‘preset’ button on the remote control. You will then be asked to press a
number on the remote control.
11. If you press number 1, the station will be saved as a preset under number 1.
12. If you want to save a preset under number 2, repeat the steps above.
5.2 Save your favourites
The steps below explain how to access all your favourite stations using just one
button.
1.
Browse to ‘Internet Radio’ using the arrow keys.
10 | ENGLISH
2.
3.
4.
5.
6.
7.
Press the right arrow key once.
Browse down until you have selected the ‘Countries’ menu.
Press the right arrow key once.
Select the region of your choice and press the right arrow key once.
Select the country of your choice and press the right arrow key once.
Select ‘All Stations’ to find all available radio stations, and press the right arrow
key once.
8. The wRADIO will now search all available radio stations and display them once
found. Use the arrow buttons to find the station of your choice.
9. You can browse all stations using the arrow keys.
10. Once you have found a station that you want to your list of favourites, you press
the ‘MARK’ button on the remote control once.
11. Repeat the steps above to add more channels to your list of favourites.
12. If you want to view the favourites list, you can use the ‘Favorite’ button on the
remote control to view the list and select a station.
5.3 Add radio stations online
You did not find all the stations you were searching for after following the steps
above? Are you looking for your favourite station, but it isn’t in the list? By using the
website www.myradio123.com, you can choose between thousands of stations that
were made available especially for you!
Just create an account on the website, and the easy and usable website will enable
you to add any station to the list of favourites of your wRADIO in just a few steps.
Tip! Are you using www.myradio123.com? The site offers a great range of genres to
help you find the best stations.
Tip! The stations that you added online can be found in the ‘Internet Radio’ menu of
the wRADIO. Select ‘Favorites’ in that menu to listen to the stations that you added.
Caution: www.myradio123.com asks for the ID number of your wRADIO. You can use
the MAC address that can be found on the back side as ID number. You will have to
leave the dashes away when entering this 12-digit number.
6.0 The wRADIO and UPnP media servers.
The wRADIO has a built-in UPnP client that enables you to stream music from a
UPnP media server. If you are using an Eminent EM4070 LAN disk in your network, or
if you have a computer that can be used as a UPnP media server, the wRADIO can
find these media servers automatically, and play music and other audio files from
them without the need of copying the music files.
11 | ENGLISH
6.1 What is a UPnP media server?
UPnP media servers are devices or computers that allow you to play (multi)media files
over your network without further configuration. Your computer can be configured as a
UPnP media server when you install special software, or you can use a separate
UPnP media server device, like the Eminent EM4070 LAN disk. Most UPnP servers,
on a computer or as a separate device, allow you to share one or more folders with a
UPnP client.
You will therefore need a UPnP client, that receives the media streams that are sent
out by the UPnP media server in your network. Client and server are able to detect
each other without any further configuration of your network. The client can browse
the content of the server, and play the files on the server over the network using
streaming technology.
6.2 Using the wRADIO in combination with an Eminent
EM4070 LAN disk
We will now explain short how you can use the UPnP client of your wRADIO to
connect to the UPnP media server of the Eminent EM4070 Sharebox 3.5" IDE &
SATA. The EM4070 has a built-in media server, Twonky. The wRADIO will
automatically detect the Twonky module of the EM4070. You can then easily play the
music that is offered through the Twonky module of the EM4070.
1.
2.
3.
4.
5.
Make sure that your EM4070 is configured according to the manual and that you
have installed its Twonky module.
Turn on the wRADIO and wait until it is started up. You can then press the
‘HOME’ button on the remote control.
An extra option will be displayed automatically when a UPnP device is detected.
In the case of the image below, the Twonky module of the EM4070 is detected.
Selected the name of your UPnP media server (e.g. TwonkyMusic) using the
arrow keys, and press the right arrow key once to continue.
The screen ‘UpnP mediaserver’ is displayed, that will look like this:
12 | ENGLISH
6.
7.
8.
9.
Browse to the right folder using the arrow keys on the remote control. Press the
right arrow key once to open a folder.
You will now see the media files on the EM4070
Browse the list using the arrow keys.
Press the right arrow key once to play a file after you have selected it.
6.2 Using the wRADIO in combination with a UPnP media
server on your computer
Your computer does not share media by default. You will have to install a UPnP media
server on your computer to add this functionality. If you are using Windows XP or
Windows Vista, you can use the built in UPnP media service of Windows Media Player
11. If you enable this option, your wRADIO can access the music library on your
computer. Follow the steps below to enable this option:
1.
2.
3.
4.
Click ‘Start’.
Click ‘Programs’.
Click ‘Windows Media Player ‘.
Click ‘Tools’, then ‘Options…’. This screens will be displayed:
5.
6.
7.
Go to the ‘Library’ tab in the left upper corner of the options window.
Now click ‘Configure sharing…’.
Check the ‘Share my media’ checkbox:
13 | ENGLISH
8.
9.
Click ‘Ok’.
A list with detected devices will appear within a few seconds. Select the ‘Internet
radio’.
10. Click ‘Allow’:
11. All files in the media library of Windows Media Player will be shared with your
wRADIO from now on. The media library will be accessible using the remote
control and display of the wRADIO.
Caution! Steps above require Windows Media Player 11, available for download at
http://www.microsoft.com.
Tip! Multiple programs that turn your computer into a UPnP media server are available
for download on the Internet, like tversity,(www.tversity.com) or Twonkymedia,
(www.twonkyvision.de)
7.0 Using other connectivity options
The connections on the back side of the wRADIO enable you to connect a range of
different devices. The most frequent used options will be discussed below.
7.1 Connect your wRADIO to a receiver
The wRADIO is designed with a line out connection on the backside of the device. The
line out connection is marked with the name ‘line out’. To connect the wRADIO to your
hifi set or receiver, you can use a mini jack to RCA plugs adaptor, available in all hifi
14 | ENGLISH
shops. The mini jack should be connected to the line out connection on the backside
of your wRADIO, while both RCA plugs should be connect to the ‘AUX’ or ‘Line in’
connection of your receiver or hifi set. Select the ‘AUX’ or ‘Line in’ input on your
receiver or hifi set to enjoy the music of your wRADIO.
Tip! The internal speaker of the wRADIO is disabled if you use the ‘Line out’
connection. In that case, the remote control can be used to control the output volume
of the wRADIO.
Tip! In case no free ‘AUX’ or ‘Line in’ is available on your receiver, then use the ‘CD’ or
‘DVD’ connection. Please note that you cannot use the ‘Phono’ connection to connect
the wRADIO to your receiver.
7.2 Connect a portable MP3-player or iPod to your
wRADIO
All modern MP3 players, including the iPod, have a mini jack connection for a
headset. This enables you to connect your MP3 player to your wRADIO. You can use
a mini jack to mini jack cable to do this by connecting the headset connection of your
MP3 player to the ‘Line-In’ input of your wRADIO. Now your friends and colleagues
can also enjoy your music!
Tip! If you use the wRADIO near your computer, you can also connect your computer
to the ‘Line in’ connection of the wRADIO. This saves you the room of separate PC
speakers.
7.3 Connect USB devices to your wRADIO
The wRADIO has a USB connection that enables you to play music on an external
USB storage device, like a USB stick or external hard disk.
1.
2.
3.
4.
5.
6.
7.
Connect the USB plug of your USB storage device to the USB port on the
backside of the wRADIO.
Press the ‘home’ button on the remote control.
Use the remote control to browse to the ‘USB’ option that has appeared in the
main menu of the wRADIO.
Press the right arrow key to open the USB menu.
A list of files available on the USB storage device will be displayed.
Use the arrow keys to browser the list.
If you want to listen to a track, you can select it and then press the right arrow
key on the remote control once.
Caution! The option in the main menu will only appear if the USB plug is connected
correctly. Make sure that your USB storage device is turned on.
15 | ENGLISH
Important! The wRADIO only supports the FAT32 file system. Make sure that you
have formatted your storage device in FAT32 mode.
8.0 Advanced functions
The wRADIO has a number of advanced functions.
8.1 Log in to the setup page of the wRADIO
Although you can configure all options of the wRADIO using the remote control, you
can also configure the wRADIO using a computer that is connected to the same
network. Follow the steps below to open the setup page of the wRADIO.
1.
2.
3.
4.
5.
6.
7.
8.
Press the ‘system’ button on the remote control.
Browse to the ‘Device status’ menu using the arrow keys.
Press the right arrow key to open the menu.
Browse to menu 12/19 using the arrow keys.
Press the right arrow key to open the menu.
The IP address is displayed. This IP address can be used to open the setup page
of the wRADIO.
Open your webbrowser (Internet Explorer, Firefox, etc.).
Clear the address bar and type in the IP address of the wRADIO. Press enter to
open the setup page.
Status: View the status of the wRADIO. You will find the connection status, wireless
channel (if connect wireless) and the firmware version here.
Profiles: Here you can view and change the current profile.
Favorites: Here you can view your list of favourites (discussed in 5.2.) and change or
add your favourites manually.
Tip! Manual added favourites should start with mms:// or http://. For instance
mms://livemedia.omroep.nl/radio3-breed for asx/mms streams, or for a MP3 playlist or
stream: http://www.di.fm/mp3/goapsy.pls
9.0 Frequently asked questions
Q: I want to connection wirelessly, but my router cannot be found.
A 1: Make sure that your router is turned on. If that offers no solution you should try a
different channel for your wireless connection. More information about the
channel of your wireless network can be found in the manual of your router.
A 2: You might be outside the range of your wireless network. Place the wRADIO
closer to your router to receive a better signal.
16 | ENGLISH
A 3: Your wireless network might be configured as a ‘Hidden SSID’. Disable this
option, and configure the wireless connection of your wRADIO manually. You can
thereafter enable ‘Hidden SSID’ again if you want to.
Q:
A:
When I try to connect to my wireless network, the wRADIO asks for the network
key. Where can I find this key?
You have once configured the network key (WPA or WPA2) in your router. You
might have written down this key. If not, you can connect to your router using a
wired connection to find the key using the manual of your router.
Q: My radio connection drops now and then. What is the cause?
A 1: A good working Internet connection is required for a radio stream. The quality of
the radio stream therefore also depends on the quality of the Internet connection
of the radio station. If the radio station uses an Internet connection of low quality,
the connection with the station may drop now and then.
A 2: The server of the radio station that you are listening to may be overloaded. This
may happen to popular radio stations.
A 3: Your Internet connection may be occupied by another computer or Internet
device. If someone downloads files using torrents or newsgroups, little bandwidth
remains for others. You should limit the bandwidth of your downloading software.
This can be configured in the software itself. You should reserve about 20
kilobyts/second for a proper radio stream.
A4 : Your Internet connection may be failing temporarily. Check your connection to be
sure that it is working.
Q:
A:
Does www.myradio123.com offer an up to date list of stations?
The list of stations is up to date indeed. The website is based on a database of
stations that is continuously updated. New stations will immediately be added
and discontinued stations will be removed. Over 3200 stations are currently
available.
Q:
I use www.myradio123.com to add favourites. How long does it last until the
stations are added to the list in my wRADIO?
If you Internet connection is working properly, the favourites you add online will
be added to your wRADIO almost immediately.
A:
10.0 Service and Support
This users manual has been carefully written by Eminent’s technical experts. If you
have problems installing or using the product, please contact [email protected].
Declaration of Conformity
To ensure your safety and compliance of the product with the directives and laws
created by the European Commission you can obtain a copy of the Declaration of
Conformity concerning your product by sending an e-mail message to: [email protected]. You can also send a letter to:
Eminent Computer Supplies
P.O. Box 276
6160 AG Geleen
The Netherlands
Clearly state ‘Declaration of Conformity’ and the article code of the product of which
you would like to obtain a copy of the Declaration of Conformity.
EM3710 | 07-2008