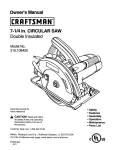
1
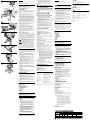
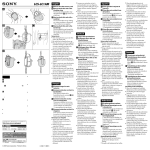
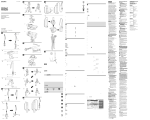
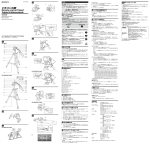
4-146-645-02(1) 三脚機能付シューティング グリップ Shooting Grip With Mini Tripod Poignée de déclenchement avec mini-trépied 日本語 お買い上げいただきありがとうございます。 電気製品は安全のための注意事項を守らないと、 火災や人身事故になることがあります。 この取扱説明書には、事故を防ぐための重要な注意事項と製品 の取り扱いかたを示しています。この取扱説明書をよくお読み のうえ、製品を安全にお使いください。お読みになったあとは、 いつでも見られるところに必ず保管してください。 ソニー製品は安全に充分配慮して設計されています。しかし、 まちがった使いかたをすると、火災などにより人身事故になる ことがあり危険です。事故を防ぐために次のことを必ずお守り ください。 ●安全のための注意事項を守る ●故障したら使わずに、ソニーの相談窓口に相談する 警告表示の意味 取扱説明書では、次のような表示をしています。表示の内容 をよく理解してから本文をお読みください。 この表示の注意事項を守らないと、 感電やそ の他の事故によりけがをしたり周辺の家財に 損害を与えたりすることがあります。 注意を促す記号 行為を指示する記号 下記の注意事項を守らないと、けがをする ことがあります。 ビデオカメラが充分に安定した状態で、落とさないよう にグリップを取り付ける。 落下してカメラを破損したりけがの原因となることが あります。 © 2009 Sony Corporation Printed in Japan 積載ビデオカメラ重量を守る (電池その他含む)を超えると、グリップが 制限重量1kg 倒れたりしてけがの原因となることがあります。三脚 として使用するとき、積載重量を超える力を加えると脚 の部分が破損する恐れがあります。 グリップとして使用するときは、かならずストラップに 手を通して持ってください。 カメラノブは確実に締め付けて固定する 締め付けが弱いと、ずれたりはずれたりして、ビデオカ メラの破損や人にけがを負わせる原因となることがあ ります。 7 脚の開閉、グリップの角度調整には充分注意をはらう 指などをはさみ、思わぬけがをすることがあります。 8 使用上のご注意 9 1 2 3 4 6 13 5 10 12 11 1 1 2 3 安全のために 取扱説明書 Operating Instructions Mode d‘emploi GP-AVT1 グリップとして使う グリップの角度を調整するときは、安全のため操作部に指を 置かないでください。またビデオカメラを片方の手でしっか り持って、落とさないように注意してください。 グリップの角度を調整するときは角度調整ボタンを確実に押 し込んでから行い、調整後は角度調整ボタンが戻りきったこ とを確認してから使用してください。角度調整ボタンが戻ら ない場合は、角度を微調整してください。 三脚として使用するときは、 脚を完全に広げて、水平な場所でご使用ください。 ビデオカメラが転倒しないか、バランスを確認してから手 を離してください。 コンバージョンレンズなどのアクセサリーをご使用の場合 は、バランスを再度確認してください。アクセサリーによっ ては、使用できない場合もあります。 風・振動などで転倒のおそれのある場所でのご使用は避け てください。 落としたり、液体がかかったりしないようにていねいに扱っ てください。 直射日光の当たるところや暖房器具のそばなど温度の高いと ころや、湿気の多いところには置かないでください。 ご使用後はビデオカメラからはずし、付属ポーチに収納して 保管してください。 コードはコードクランパーを使って整理してください。 A/Vリモート端子を抜き差しするときは必ずプラグ部分を 持ってまっすぐ抜き差ししてください。無理に抜き差しする と破損の恐れがあります。 グリップの角度を調整する 角度調整ボタンを押すとグリップの角度を約10̊ずつ変える ことができます。 1 角度調整ボタンを奥まで押し込みながら、グリップを希 望の角度に調整する。 角度調整ボタンを押すときは、片方の手でビデオカメラを 支えてから行ってください。支えていないとビデオカメラ が一気に傾くことがあります。 2 角度調整ボタンが戻りきる角度で固定する。 ビデオカメラの重心を少し前にすると、リモコン操作をし やすくすることができます。 ご注意 角度調整ボタンが戻りきっていることを確認してください。 角度調整ボタンが戻りきっていない場合は固定されていませ ん。ビデオカメラを押さえながらグリップを少し動かして角 度調整ボタンが戻る位置を探してください。 ご使用のビデオカメラによっては、角度を変えるとバランス が不安定になることがあります。その場合は、バランスが安 定する角度に調整し直してください。 グリップの角度によってはリモコン操作ができない場合があ ります。その場合はグリップの角度を再度調整してお使いく ださい。 リモコンで操作する 1 3 動画を撮影するには START/STOPボタンを押す。 撮影を止めるには、もう一度START/STOPボタンを押す。 静止画を撮影するには PHOTOボタンを軽く押したまま画像を確認し、深く押し込 む。 ズームする ズームボタンを押す。 T側(望遠): 被写体が大きく写る。 W側(広角): 被写体が小さく写る。 ズームボタンをさらに押すと速くズーミングします。 ズームボタンの凸部を前後に動かしても操作できます。 A/Vリモート端子非搭載の以下のビデオカメラでもリモコン 操作ができます。 HDR- CX7, CX6, HC9, HC7, HC5, HC3, SR8, SR7, SR5, SR1, UX7, UX5, UX3, UX1 DCR- DVD908, DVD905, DVD808, DVD805, DVD803, DVD755, DVD708, DVD705, DVD703, DVD653, DVD608, DVD605, DVD602, DVD508, DVD506, DVD505, DVD408, DVD406, DVD405, DVD404, DVD403, DVD308, DVD306, DVD305, DVD304, DVD205, DVD203, DVD202, DVD109, DVD108, DVD106, DVD105, DVD103, DVD92, HC96, HC94, HC90, HC48, HC47, HC46, HC45, HC44, HC43, HC42, HC41, HC40, HC39, HC38, HC37, HC36, HC35, HC33, HC32, HC30, HC26, HC24, HC23, HC22, HC21, HC20, HC19, HC17, PC1000, PC55, PC53, SR300, SR290, SR200, SR190, SR100, SR90, SR82, SR80, SR72, SR70, SR62, SR60, SR52, SR50, SR42, SR40, SR33, SR32, SR30 対象のビデオカメラは、すべての国や地域で取り扱いしてい るわけではありません。 お手持ちのビデオカメラの取扱説明書もあわせてお読みくださ い。 ビデオカメラを取り付ける バッテリーやカセット、“メモリースティック”、ディスクなど は、本機を取り付ける前にビデオカメラにセットしてください。 ビデオカメラや本機を落とさないようにご注意ください。 1 本機とビデオカメラをしっかりと手で持った状態でカメラ ボスとカメラネジをビデオカメラ底面の穴に合わせる。 (-1) ご注意 カメラボスは可倒式です。ボス穴の有無に合わせて、倒 したり引き起こしたりしてご使用ください。 ご使用のビデオカメラにボス穴がある場合はカメラボス を立てて取り付けてください。カメラボスが倒れている 場合は、先の細いもので引き起こしてから取り付けてく ださい。 ご使用のビデオカメラにボス穴が無い場合は、カメラボ スを倒してから取り付けてください。 カメラノブを回してカメラネジをゆるく締め、カメラ台を 前後に動かして前後のバランスを調整する。 安定する位置で、カメラノブを止まるまで回してカメラ台 を固定する。 A/V リモート端子をビデオカメラのA/V リモート端子に接 続する。 コードが長い場合は、コードクランパーに挟んでください。 (-4) 2 3 4 三脚として使う 1 2 脚が完全に開いていることを確認する。 前後のバランスを確認する。 カメラ台の角度、ご使用のビデオカメラによっては、バラン スがとれず三脚が不安定になる場合があります。不安定な 状態では使用しないでください。 ご注意 三脚として使う場合は、必ず水平な場所に置いてください。 For the Customers in the U.S.A. CAUTION You are cautioned that any changes or modifications not expressly approved in this manual could void your authority to operate this equipment. NOTE: This equipment has been tested and found to comply with the limits for a Class B digital device, pursuant to Part 15 of the FCC Rules. These limits are designed to provide reasonable protection against harmful interference in a residential installation. This equipment generates, uses, and can radiate radio frequency energy and, if not installed and used in accordance with the instructions, may cause harmful interference to radio communications. However, there is no guarantee that interference will not occur in a particular installation. If this equipment does cause harmful interference to radio or television reception, which can be determined by turning the equipment off and on, the user is encouraged to try to correct the interference by one or more of the following measures: Reorient or relocate the receiving antenna. Increase the separation between the equipment and receiver. Connect the equipment into an outlet on a circuit different from that to which the receiver is connected. Consult the dealer or an experienced radio/TV technician for help. For Customers in the U.S.A. and Canada This device complies with Part 15 of the FCC Rules. Operation is subject to the following two conditions: (1) This device may not cause harmful interference, and (2) this device must accept any interference received, including interference that may cause undesired operation. <Notice for the customers in the countries applying EU Directives> The manufacturer of this product is Sony Corporation, 1-7-1 Konan Minato-ku Tokyo, 108-0075 Japan. The Authorized Representative for EMC and product safety is Sony Deutschland GmbH, Hedelfinger Strasse 61, 70327 Stuttgart, Germany. For any service or guarantee matters please refer to the addresses given in separate service or guarantee documents. 特長 1 カメラネジ 2 カメラボス 3 カメラ台 4 カメラノブ 5 角度調整ボタン 6 A/Vリモート端子 7 START/STOP ボタン 8 PHOTO ボタン 9 ズームボタン 10 脚R 11 脚L 12 グリップ部 13 ストラップ穴 To reduce fire or shock hazard, do not expose the unit to rain or moisture. 電源を入れる ビデオカメラの電源を入れ、スタンバイ状態にする。 ビデオカメラを動画または静止画の状態にする。 ご注意 スタンバイ状態がしばらく続くと、自動的に電源が切れる場合 があります。再びスタンバイ状態にするには、ビデオカメラの 電源を「ON」にします。 1 2 撮影が終わったら 各部の名前 WARNING This Class B digital apparatus complies with Canadian ICES-003. 汚れたら、やわらかい布に中性洗剤溶液を含ませてふいてか ら、乾いた布でからぶきしてください。 海岸など、潮風の当たる所で使用したあとは、乾いた布でよく ふいてください。 脚を広げると三脚としてもお使いいただけるグリップリモコン です。 A/Vリモート端子搭載のビデオカメラに接続し、快適なリモ コン操作ができます。 握りやすいグリップにより、自然な姿勢で撮影できます。ま た左右どちらの手でも操作可能です。 高いアングルから低いアングル、自分撮りなど様々なアング ルで撮影できます。 三脚として安定した撮影ができます。 リモコンには撮影の基本機能(動画撮影、静止画撮影、ズーム) があります。 Thank you for purchasing this Sony Shooting Grip with Mini Tripod. Before operating this unit, please read this manual thoroughly, and retain it for future reference. お手持ちのビデオカメラの取扱説明書もあわせてお読みくださ い。 お手入れについて 4 ハンドストラップを取り付ける。(-1) 脚R、脚Lが開いている場合は、脚R、脚Lを閉じる。 ストラップを手に通してグリップを持つ。(-3) ビデオカメラを片方の手で支えながら、グリップを握って ください。 イラスト-3 のように指を置くと、安定した撮影ができま す。 English ビデオカメラの電源を「OFF」にする。 ビデオカメラを取りはずす 1 2 カメラノブをゆるめ、カメラ台からビデオカメラをはずす。 脚をたたむ。 持ち運びについて キャリングポーチに入れてください。 ご注意 ビデオカメラを取り付けたままで、持ち運ばないでくださ い。 主な仕様 積載カメラ重量 リモコン機能 外形寸法 収納状態 三脚状態 リモートコードの長さ 使用温度範囲 質量 同梱物 1 kg以下(電池その他含む) START/STOPボタン、PHOTOボタン、 ズームボタン(W/T) 約45×132×68 mm (幅/高さ/奥行き) 約127×96×114 mm (幅/高さ/奥行き) 約 250 mm 0 ℃ ∼ 40 ℃ 約114 g シューティンググリップ、ハンドスト ラップ、コードクランパー、キャリング ポーチ、印刷物一式 仕様および外観は、改良のため予告なく変更することがありま す。 保証書とアフターサービス 保証書 この製品には保証書が添付されていますので、お買い上げの 際、お受け取りください。 所定事項の記入および記載内容をお確かめのうえ、大切に保 管してください。 保証期間は、お買い上げ日より1年間です。 アフターサービス 調子が悪いときはまずチェックを この取扱説明書をもう一度ご覧になってお調べください。 それでも具合の悪いときは ソニーの相談窓口にご相談ください。 保証期間中の修理は 保証書の記載内容に基づいて修理させていただきます。詳しく は保証書をご覧ください。 保証期間経過後の修理は 修理によって機能が維持できる場合は、ご要望により有料修理 させていただきます。 部品の保有期間について 当社では本機の補修用性能部品(製品の機能を維持するために 必要な部品)を、製造打ち切り後最低8年間保有しています。こ の部品保有期間を修理可能の期間とさせていただきます。保有 期間が経過したあとも、故障箇所によっては修理可能の場合が ありますので、お買い上げ店か、ソニーの相談窓口にご相談くだ さい。 ご相談になるときは次のことをお知らせください。 型名:GP-AVT1 故障の状態:できるだけ詳しく お買い上げ年月日 For the Customers in Europe Disposal of Old Electrical & Electronic Equipment (Applicable in the European Union and other European countries with separate collection systems) This symbol on the product or on its packaging indicates that this product shall not be treated as household waste. Instead it shall be handed over to the applicable collection point for the recycling of electrical and electronic equipment. By ensuring this product is disposed of correctly, you will help prevent potential negative consequences for the environment and human health, which could otherwise be caused by inappropriate waste handling of this product. The recycling of materials will help to conserve natural resources. For more detailed information about recycling of this product, please contact your local Civic Office, your household waste disposal service or the shop where you purchased the product. Notes on use When adjusting the grip angle, do not put your finger on the control panel to keep the video camera stable. Firmly hold the video camera with your other hand so that it does not drop. When adjusting the grip angle, press the angle adjusting button fully and check that it is fully returned before use. If it is not fully returned, finely adjust the grip angle back and forth. When using this unit as a tripod: Spread the legs fully and set it on a flat surface. Check the video camera is secure and the tripod is balanced before removing your hands. Check that the tripod is balanced after attaching a conversion lens or other accessories. You may not be able to use the tripod with some accessories. Do not use the tripod in a place where it may fall over due to strong wind, vibration etc. Be careful not to drop the tripod or spill liquid on it. Do not leave this unit in direct sunlight, near a heater, or in a very humid place. Detach the tripod from the video camera and store it in the supplied pouch after use. Gather any excess length of cord with the cable clamper. Always insert and remove the A/V remote connector in a straight direction while holding the plug. Forcibly inserting or removing it may damage the A/V remote connector of this unit or the video camera. Cleaning Clean this unit with a soft cloth slightly moistened with a mild detergent solution. After using this unit in a place subject to sea breezes, wipe it well with a dry cloth. Features The GP-AVT1 is a grip with remote control function for video cameras. You can also spread the legs of this unit and use it as a tripod. You can use the built-in remote commander to operate video cameras equipped with a Sony A/V remote connector. The easy-to-hold grip enables recording in a natural posture. The remote commander can be operated by the right or left hand. You can record from various angles: high or low angle, or even mirror image angle. Using this unit as a tripod enables steady recording. The remote control functions include basic recording functions (movie/still recording, zoom). Identifying the parts 1 2 3 4 5 6 7 8 9 10 11 12 13 Camera mounting screw Pin Camera seat Camera mounting knob Angle adjusting button A/V remote connector START/STOP button PHOTO button Zoom button R-Leg L-Leg Grip Strap hole Mounting the Video Camera Install the battery pack and a “Memory Stick” media, disk or cassette in the video camera before mounting to this unit. Be careful not to drop the video camera or this unit. 1 Holding this unit and the video camera firmly, align the pin and camera mounting screw with the positioning holes on the bottom of the video camera. (-1) Notes The pin is retractable. Retract it or pull it out depending on whether your video camera has a positioning hole. If your video camera has a positioning hole for the pin, keep the pin extended from the camera seat and attach the video camera. If the pin is retracted, pull it from the camera seat using a sharppointed object before attaching the video camera. If your video camera has no positioning hole for the pin, retract the pin into the camera seat before attaching the video camera. 2 Lightly tighten the camera mounting screw by turning the camera mounting knob and adjust the balance by sliding the camera seat forwards or backwards. 3 Hold the video camera in a stable position and secure the camera seat by fully tightening the knob. 4 Insert the A/V remote connector into the A/V remote connector of the video camera. Gather any excess length of cord with the cable clamper. (-4) Using as a tripod 1 Check that the legs are spread fully. 2 Check the forward/backward balance of the tripod. The tripod may become unstable due to the angle of the camera seat or if your video camera becomes imbalanced by accessories, battery etc. Do not use in such a case. Notes When using as a tripod, place it on a flat surface. Using as a shooting grip 1 Attach the hand strap into the strap hole. (-1) 2 If the R-leg and L-leg are spread, fold them away. 3 Put your hand through the strap and hold the grip. (-3) When you hold the grip, hold the video camera with your other hand. Putting your fingers on the grip as shown in illustration -3 enables steady recording. Adjusting the grip angle You can change the grip angle in increments of approximately tendegrees by pressing the angle adjusting button . 1 Adjust the grip to the desired angle while fully pressing the angle adjusting button . When pressing the angle adjusting button, hold the video camera with your other hand. If you do not keep the video camera steady, it may tilt to one side. 2 Lock the grip at the angle at which the angle adjusting button is returned. Adjusting the center of gravity slightly further forward makes it easier to operate the remote commander. Notes Check that the angle adjusting button is fully returned. The grip only locks when the angle adjusting button is fully returned. If necessary, adjust the position of the grip slightly while holding the video camera until the angle adjusting button is fully returned. Depending on your video camera, adjusting the grip angle may make the tripod unstable. If this happens, readjust the grip angle. You may be unable to operate the remote commander at certain grip angles. In this happens, readjust the grip angle. Using the Remote Commander For full details, refer to the operating instructions supplied with the video camera. Turn on the power of the video camera 1 Turn on the power of the video camera and set it to standby mode. 2 Set the video camera to movie or still image mode. Notes If you leave the video camera in standby mode for a certain time, it turns off automatically. To resume standby mode, turn the power back on. How to record a moving image Press the START/STOP button. To stop recording, press the START/STOP button again. How to record a still image Lightly press and hold the PHOTO button to check the image and then fully press the button to record it. How to zoom Press the Zoom button. T side (telephoto): Subject appears closer. W side (wide angle): Subject appears farther away. Pressing the Zoom button longer makes zooming faster. You can also zoom in or out by moving the raised central portion of the zoom button back and forth. You can also operate the remote commander when using any of the following video cameras that are not equipped with an A/V remote connector. HDR- CX7, CX6, HC9, HC7, HC5, HC3, SR8, SR7, SR5, SR1, UX7, UX5, UX3, UX1 DCR- DVD908, DVD905, DVD808, DVD805, DVD803, DVD755, DVD708, DVD705, DVD703, DVD653, DVD608, DVD605, DVD602, DVD508, DVD506, DVD505, DVD408, DVD406, DVD405, DVD404, DVD403, DVD308, DVD306, DVD305, DVD304, DVD205, DVD203, DVD202, DVD109, DVD108, DVD106, DVD105, DVD103, DVD92, HC96, HC94, HC90, HC48, HC47, HC46, HC45, HC44, HC43, HC42, HC41, HC40, HC39, HC38, HC37, HC36, HC35, HC33, HC32, HC30, HC26, HC24, HC23, HC22, HC21, HC20, HC19, HC17, PC1000, PC55, PC53, SR300, SR290, SR200, SR190, SR100, SR90, SR82, SR80, SR72, SR70, SR62, SR60, SR52, SR50, SR42, SR40, SR33, SR32, SR30 Not all video cameras are available in all countries or regions. After recording Press the POWER button to turn off the video camera. For full details, refer to the operating instructions supplied with the video camera. Removing the video camera 1 Loosen the camera mounting knob and remove the video camera from the camera seat. 2 Fold the legs away. Carrying this unit Carry this unit in its carrying pouch. Notes Do not carry this unit with a video camera attached to it. Specifications Maximum load Remote Commander functions Dimensions Legs folded 1 kg (35.3 oz) (Including battery and other accessories) START/STOP button, PHOTO button, Zoom button (W/T) Approx. 45 × 132 × 68 mm (w/h/d) (1 3/4 × 5 1/4 × 2 5/8 in.) Legs opened Approx. 127 × 96 × 114 mm (w/h/d) (5 × 3 7/8 × 4 1/2 in.) Cord length Approx. 250 mm (9 7/8 in.) Operating temperature range 0 °C to 40 °C (32 °F to 104 °F) Mass Approx. 114 g (4.1 oz) Included items Shooting grip, Hand strap, Cable clamper, Carrying pouch, Set of printed documentation Design and specifications are subject to change without notice. 并非所有摄像机在所有国家或地区都有售。 Français 7 Merci pour l’achat de cette poignée de déclenchement avec minitrépied Sony. Avant d’utiliser cet article, veuillez lire cette notice avec attention et la conserver pour toute référence future. 8 AVERTISSEMENT 9 Afin de réduire les risques d’incendie ou de décharge électrique, n’exposez pas cet appareil à la pluie ou à l’humidité. 1 2 3 Pour les clients aux É.-U. AVERTISSEMENT 4 Par la présente, vous êtes avisé du fait que tout changement ou toute modification ne faisant pas l’objet d’une autorisation expresse dans le présent manuel pourrait annuler votre droit d’utiliser l’appareil. 6 13 5 10 12 11 1 Note L’appareil a été testé et est conforme aux exigences d’un appareil numérique de Classe B, conformément à la Partie 15 de la réglementation de la FCC. Ces critères sont conçus pour fournir une protection raisonnable contre les interférences nuisibles dans un environnement résidentiel. L’appareil génère, utilise et peut émettre des fréquences radio; s’il n’est pas installé et utilisé conformément aux instructions, il pourrait provoquer des interférences nuisibles aux communications radio. Cependant, il n’est pas possible de garantir que des interférences ne seront pas provoquées dans certaines conditions particulières. Si l’appareil devait provoquer des interférences nuisibles à la réception radio ou à la télévision, ce qui peut être démontré en allumant et éteignant l’appareil, il est recommandé à l’utilisateur d’essayer de corriger cette situation par l’une ou l’autre des mesures suivantes : Réorienter ou déplacer l’antenne réceptrice. Augmenter la distance entre l’appareil et le récepteur. Brancher l’appareil dans une prise ou sur un circuit différent de celui sur lequel le récepteur est branché. Consulter le détaillant ou un technicien expérimenté en radio/ téléviseurs. Pour les clients aux É.-U. et au Canada Cet appareil est conforme à la section 15 des règlements FCC. Son fonctionnement est soumis aux deux conditions suivantes : (1) cet appareil ne doit pas provoquer d’interférences nuisibles, (2) cet appareil doit accepter toute interférence, y compris celles susceptibles de provoquer son fonctionnement indésirable. Cet appareil numérique de la classe B est conforme à la norme NMB003 du Canada. 4 Pour les clients en Europe < Avis aux consommateurs des pays appliquant les Directives UE > Le fabricant de ce produit est Sony Corporation, 1-7-1 Konan Minatoku Tokyo, 108-0075 Japon. Le représentant agréé pour la compatibilité électromagnétique et la sécurité du produit est Sony Deutschland GmbH, Hedelἀnger Strasse 61, 70327 Stuttgart, Allemagne. Pour toute question relative à la garantie ou aux réparations, reportez-vous à ľadresse que vous trouverez dans les documents ci-joints, relatifs à la garantie et aux réparations. Traitement des appareils électriques et électroniques en fin de vie (Applicable dans les pays de l’Union Européenne et aux autres pays européens disposant de systèmes de collecte sélective) Ce symbole, apposé sur le produit ou sur son emballage, indique que ce produit ne doit pas être traité avec les déchets ménagers. Il doit être remis à un point de collecte approprié pour le recyclage des équipements électriques et électroniques. En s’assurant que ce produit est bien mis au rebut de manière appropriée, vous aiderez à prévenir les conséquences négatives potentielles pour l’environnement et la santé humaine. Le recyclage des matériaux aidera à préserver les ressources naturelles. Pour toute information supplémentaire au sujet du recyclage de ce produit, vous pouvez contacter votre municipalité, votre déchetterie ou le magasin où vous avez acheté le produit. 1 Remarques sur l’emploi 3 Lorsque vous ajustez l’angle de la poignée, veillez à ne pas mettre le doigt sur le panneau de commande pour maintenir le caméscope stable. Tenez fermement le caméscope avec l’autre main pour l’empêcher de tomber. Lorsque vous ajustez l’angle de la poignée, appuyez à fond sur le bouton de réglage d’angle et assurez-vous qu’il ressort complètement avant d’utiliser la poignée. S’il ne ressort pas complètement, ajustez plus précisément l’angle de la poignée vers l’arrière ou l’avant. Lorsque cet article est utilisé comme trépied: Écartez complètement les pieds et posez-le sur une surface plane. Assurez-vous que le caméscope est stable et que le trépied est équilibré avant du lâcher. Assurez-vous que le trépied est équilibré après avoir fixé un convertisseur ou un autre accessoire. Vous ne pourrez peut-être pas utiliser le trépied avec certains accessoires. N’utilisez pas le trépied à un endroit où il risque d’être renversé par un vent fort, des vibrations, etc. Veillez à ne pas laisser tomber le trépied et à ne pas répandre de liquide dessus. Ne laissez pas le trépied en plein soleil, près d’un appareil de chauffage ou à un endroit très humide. Détachez le trépied du caméscope et rangez-le dans l’étui fourni après usage. Liez le cordon avec la bride de cordon s’il est trop long. Insérez et retirez toujours le connecteur A/V à distance tout droit en le tenant par la fiche. Si vous l’insérez ou le retirez en forçant, le connecteur A/V à distance de cet article ou du caméscope peut être endommagé. Nettoyage Nettoyez cet article avec un chiffon doux légèrement imprégné d’une solution détergente neutre. Après avoir utilisé cet article à un endroit exposé aux embruns marins, essuyez-le bien avec un chiffon sec. Caractéristiques Le GP-AVT1 est une poignée avec fonction télécommande conçue pour les caméscopes. Vous pouvez aussi écarter ses pieds pour l’utiliser comme trépied. Vous pouvez utiliser la télécommande intégrée pour agir sur les caméscopes pourvus d’un connecteur A/V à distance Sony. La poignée facile à tenir permet des prises de vue dans une position naturelle. La télécommande peut être actionnée par la main droite ou la main gauche. Vous pouvez faire des prises de vue sous différents angles: en position haute ou basse, ou même en position d’image miroir. L’emploi de cet article comme trépied permet une prise de vue plus stable. Les fonctions télécommandables sont les fonctions d’enregistrement de base (enregistrement de films/photos, zoom). Description des éléments 1 2 3 4 5 6 7 8 9 10 11 12 13 Douille de caméscope Axe Support de caméscope Bouton de montage de caméscope Bouton de réglage de l’angle Connecteur A/V à distance Bouton START/STOP Bouton PHOTO Bouton de zoom Pied D Pied G Poignée Oeillet de dragonne Montage du caméscope Installez la batterie et un « Memory Stick », un disque ou une cassette dans le caméscope avant de monter ce produit. Veillez à ne pas laisser tomber le caméscope ou ce produit. 1 Tenez fermement la poignée et le caméscope, alignez l’axe et la douille de caméscope en utilisant les orifices de positionnement sous le caméscope. (-1) Remarques L’axe est rétractable. Rétractez-le ou sortez-le selon que votre caméscope a ou non un orifice de positionnement. Si votre caméscope a un orifice de positionnement pour l’axe, laissez l’axe ressortir du support de caméscope et fixez le caméscope. Si l’axe est rétracté, sortez-le du support de caméscope avec un objet pointu avant de fixer le caméscope. Si votre caméscope n’a pas d’orifice de positionnement pour l’axe, sortez l’axe du support de caméscope avant de fixer le caméscope. 2 Vissez légèrement la douille de caméscope en tournant le bouton de montage de caméscope et ajustez l’équilibre en faisant glisser le support de caméscope vers l’avant ou l’arrière. 3 Tenez le caméscope en position stable et immobilisez le support de caméscope en serrant à fond le bouton. 4 Insérez le connecteur A/V à distance dans le connecteur A/V à distance du caméscope. Liez le cordon avec la bride de cordon s’il est trop long. (-4) Utilisation comme trépied 1 Assurez-vous que les pieds sont complètement écartés. 2 Vérifiez l’équilibre avant/arrière du trépied. Le trépied devient instable selon l’angle du support de caméscope, ou bien si le caméscope est déséquilibré par des accessoires, la batterie, etc. Ne l’utilisez pas dans ce cas. Remarques Lorsque vous utilisez l’article comme trépied, posez-le sur une surface plane. Utilisation comme poignée de déclenchement 1 Rattachez la dragonne à l’oeillet de dragonne. (-1) 2 Si le pied D et le pied G sont dépliés, repliez-les. 3 Passez la main derrière la sangle et tenez la poignée. (-3) Lorsque vous tenez la poignée, tenez le caméscope avec l’autre main. La prise de vue sera plus stable si vous posez les doigts sur la poignée de la façon indiquée sur l'illustration -3. Réglage de l’angle de la poignée Vous pouvez changer l’angle de la poignée par incréments de dix degrés environ en appuyant sur le bouton de réglage de l’angle . 1 Mettez la poignée à l’angle souhaité en appuyant à fond sur le bouton de réglage de l’angle . Lorsque vous appuyez sur le bouton de réglage de l’angle, tenez le caméscope avec l’autre main. Si vous ne le retenez pas bien, il risque de s’incliner d’un côté. 2 Bloquez la poignée à l’angle souhaité de sorte que le bouton de réglage de l’angle ressorte. La télécommande s’utilisera plus facilement si le réglage du centre de gravité est légèrement vers l’avant. Remarques Assurez-vous que le bouton de réglage de l’angle ressort complètement. La poignée ne se bloque que lorsque le bouton de réglage de l’angle ressort complètement. Au besoin, réajustez légèrement la position de la poignée en tenant le caméscope jusqu’à ce que le bouton de réglage de l’angle ressorte. Selon le caméscope utilisé, le réglage de l’angle de la poignée peut rendre le trépied instable. Si c’est le cas, réajustez l’angle de la poignée. Vous ne pourrez peut-être pas actionner la télécommande à certains angles. Si c’est le cas, réajustez l’angle de la poignée. Utilisation de la télécommande Pour de plus amples informations, reportez-vous au mode d’emploi fourni avec le caméscope. Mise sous tension du caméscope 1 Allumez le caméscope et mettez-le en mode d’attente. 2 Réglez le caméscope sur le mode film ou le mode photo. Remarques Si vous laissez le caméscope en mode d’attente un certain temps, il s’éteindra automatiquement. Pour revenir au mode d’attente, rallumezle. Comment filmer Appuyez sur le bouton START/STOP. Pour arrêter l’enregistrement, appuyez une nouvelle fois sur le bouton START/STOP. Comment prendre des photos Appuyez légèrement sur le bouton PHOTO et maintenez-le enfoncé pour vérifier la photo, puis appuyez à fond pour prendre la photo. Comment faire un zoom Appuyez sur le bouton de zoom. Côté T (téléobjectif) : Le sujet paraît plus proche. Côté W (grand angle) : Le sujet paraît plus éloigné. Le zoom sera plus rapide si vous appuyez plus longtemps sur le bouton de zoom. Vous pouvez faire un zoom avant ou arrière en poussant la partie centrale saillante du bouton de zoom vers l’arrière ou l’avant. Vous pouvez aussi utiliser la télécommande pour agir sur les caméscopes suivants bien qu’ils ne soient pas pourvus de connecteurs A/V à distance. HDR- CX7, CX6, HC9, HC7, HC5, HC3, SR8, SR7, SR5, SR1, UX7, UX5, UX3, UX1 DCR- DVD908, DVD905, DVD808, DVD805, DVD803, DVD755, DVD708,DVD705, DVD703, DVD653, DVD608, DVD605, DVD602, DVD508, DVD506, DVD505, DVD408, DVD406, DVD405, DVD404, DVD403, DVD308, DVD306, DVD305, DVD304, DVD205, DVD203, DVD202,DVD109, DVD108, DVD106, DVD105, DVD103, DVD92, HC96, HC94, HC90, HC48, HC47, HC46, HC45, HC44, HC43, HC42, HC41, HC40, HC39, HC38, HC37, HC36, HC35, HC33, HC32, HC30, HC26, HC24, HC23, HC22, HC21, HC20, HC19, HC17, PC1000, PC55, PC53, SR300, SR290, SR200, SR190, SR100, SR90, SR82, SR80, SR72, SR70, SR62, SR60, SR52, SR50, SR42, SR40, SR33, SR32, SR30 Tous ces caméscopes ne sont pas commercialisés dans tous les pays ou toutes les régions. Après l’enregistrement Appuyez sur le bouton POWER pour éteindre le caméscope. Pour de plus amples informations, reportez-vous au mode d’emploi fourni avec le caméscope. 中文(简) 感谢您购买本 Sony 小型三脚架拍摄手柄。 操作本装置之前,请全文阅读本说明书并加以妥善保存,以备将来 参考。 为减少发生火灾或触电的危险,请勿让本装置淋雨或受潮。 使用须知 ˎ 调整手柄角度时,请勿将手指放到控制面板上,以保持摄像机的 稳定。 请用另一只手牢牢握紧摄像机,以免摔落。 ˎ 调整手柄角度时,请将角度调整按钮完全按下,并在使用前检查 它是否完全复位。 如果未完全复位,请前后微调手柄角度。 ˎ 将本装置作为三脚架使用时: ˋ 将三条腿完全展开并放在平坦的表面上。 ˋ 挪开手之前,检查摄像机是否稳固,三角架是否平衡。 ˋ 安装转换镜头或其他配件后,检查三角架是否仍保持平衡。 有些配件不能与三角架一起使用。 ˋ 在可能会因大风或震动等原因而导致三角架倾倒的地方,请 勿使用三角架。 ˎ 小心不要让三角架摔倒或溅上任何液体。 ˎ 请勿将本装置放在直射的阳光下、靠近加热器或非常潮湿的地 方。 ˎ 使用完毕后,请将三角架从摄像机上卸下并保存到随附的袋中。 ˎ 多余的线请用线夹捆扎好。 ˎ 始终应握住插头并径直插入和拔出多功能 A/V 接口。 将其强 行插入或拔出可损坏本装置的多功能 A/V 接口或摄像机。 清洁 ˎ 请用柔性洗涤剂略微打湿的软布清洁本装置。 ˎ 在有海风吹拂的地方使用本装置后,请用干布将其擦干。 特性 GP-AVT1 是一个带有摄像机遥控功能的手柄。 您也可以展开本 装置的三条腿,将它用作三角架。 ˎ 可以使用内置遥控器来操控配备有 Sony 多功能 A/V 接口的 摄像机。 ˎ 此手柄便于持握,令拍摄姿势更为自然。 左、右手均可操作遥 控器。 ˎ 可以从各个角度进行拍摄,包括高角度、低角度,甚至镜像角度。 ˎ 将本装置用作三角架可保持拍摄时的平稳性。 ˎ 遥控功能中包含基本拍摄功能(动态影像/静态影像拍摄、变 焦)。 Ȏ 部件识别 摄像机安装螺丝 销栓 摄像机座 摄像机安装旋钮 角度调整按钮 多功能 A/V 接口 START/STOP 按钮 PHOTO 按钮 变焦按钮 右腿 左腿 手柄 腕带孔 ȏ 安装摄像机 在向本装置上安装摄像机之前,先为摄像机安装好电池及 “Memory Stick” (磁盘或卡式磁带)。 小心不要将摄像机或本装置掉到地上。 1 牢牢握住本装置及摄像机,使销栓及摄像机安装螺丝 与摄像机底端的定位孔对齐。(ȏ-1) 注 ˎ 销栓是可伸缩的。 究竟是缩回还是拉出,取决于您的摄像 机是否有定位孔。 ˎ 如果摄像机上有用于销栓的定位孔,则使销栓从摄像机座上 探出,然后将摄像机安装到上面。 如果销栓缩回,在安装摄 像机之前,请使用尖头的物体将其从摄像机座上拉出。 ˎ 如果摄像机上没有用于销栓的定位孔,则在安装摄像机之前 应使销栓缩入摄像机座。 2 转动摄像机安装旋钮,轻轻将摄像机安装螺丝拧紧,同 时前后滑动摄像机座,调整其平衡状态。 3 将摄像机放在平稳的地方,然后完全拧紧旋钮,将摄像 机座固定好。 4 将多功能 A/V 接口插入摄像机的多功能 A/V 接口中。 多余的线请用线夹捆扎好。(ȏ-4) 用作三角架 1 检查三条腿是否完全展开。 2 检查三角架的前/后平衡状态。 由于摄像机座的角度不同或因配件、电池等因素导致摄像机失 去平衡时,三角架可能会不稳。 注 作为三角架使用时,请将其放到平坦的表面上。 Ȑ 用作拍摄手柄 Retrait du caméscope 1 将腕带系到腕带孔中。(Ȑ-1) 2 如果左右腿已展开,请将其收起。 3 让手穿过腕带并握住手柄。(Ȑ-3) 1 Desserrez le bouton de montage de caméscope et retirez le caméscope du support de caméscope. 2 Pliez les pieds. ȑ 调整手柄角度 Transport de cet article Transportez cet article dans son étui. Remarques Ne portez pas cet article quand il est fixé au caméscope. Spécifications Charge maximale Fonctions Télécommande Dimensions Pieds pliés Pieds ouverts Longueur du cordon Plage de températures de fonctionnement Poids Articles inclus 1 kg (35,3 oz) (avec la batterie et d’autres accessoires) Bouton START/STOP, Bouton PHOTO, Bouton de zoom (W/T) Environ 45 × 132 × 68 mm (l/h/p) (1 3/4 × 5 1/4 × 2 5/8 po.) Environ 127 × 96 × 114 mm (l/h/p) (5 × 3 7/8 × 4 1/2 po.) Environ 250 mm (9 7/8 po.) 0 °C à 40 °C (32 °F à 104 °F) Environ 114 g (4.1 oz) Poignée de déclenchement, Dragonne, Bride de cordon, Étui, Jeu de documents imprimés La conception et les spécifications peuvent être modifiées sans préavis. 抓握手柄时,请用另一只手握住摄像机。 以图 Ȑ-3 所示的方式抓握手柄可保持拍摄时的平稳性。 通过按压角度调整按钮 ʭ,能以大约 10 度为增量单位改变手柄 角度。 1 完全按下角度调整按钮 ʭ,同时将手柄调整到所需的 角度。 按压角度调整按钮时,请用另一只手握住摄像机。 如果摄像 机失稳,就可能会斜向一端。 2 待角度调整按钮复位后,以相应的角度锁定手柄。 调整重心中央使之略向前,会更便于操作遥控器。 注 ˎ 检查角度调整按钮是否完全复位。 只有在角度调整按钮完全 复位的情况下,手柄才会锁定。 必要时,请握住摄像机并微调 手柄位置,直到角度调整按钮完全复位。 ˎ 取决于所用的摄像机,调整手柄角度有时会造成三角架不稳。 这种情况下,请重新调整手柄角度。 ˎ 在某个特定的手柄角度可能无法操作遥控器。 这种情况下,请 重新调整手柄角度。 使用遥控器 有关详细信息,请参阅摄像机随附的使用说明书。 打开摄像机电源 1 打开摄像机电源并将其设为待机模式。 2 将摄像机设为动态影像或静态影像模式。 注 摄像机处于待机模式超过一定的时间后,就会自动关闭电源。 要 恢复待机模式,请重新打开电源。 如何拍摄动态影像 按 START/STOP 按钮。 要停止拍摄,请再次按 START/STOP 按钮。 如何拍摄静态影像 轻轻按下并按住 PHOTO 按钮,检查一下影像,然后完全按下按 钮,从而完成拍摄。 如何变焦 按变焦按钮。 T 端(增距):拍摄主体看起来更近。 W 端(广角):拍摄主体看起来更远。 长按变焦按钮可加快变焦速度。 也可通过前、后移动变焦按钮的中央凸起部分来进行缩小或放大。 ˎ 使用以下未配备多功能 A/V 接口的摄像机时,也可操作遥控器 功能。 HDR- CX7, CX6, HC9, HC7, HC5, HC3, SR8, SR7, SR5, SR1, UX7, UX5, UX3, UX1 DCR- DVD908, DVD905, DVD808, DVD805, DVD803, DVD755, DVD708, DVD705, DVD703, DVD653, DVD608, DVD605, DVD602, DVD508, DVD506, DVD505, DVD408, DVD406, DVD405, DVD404, DVD403, DVD308, DVD306, DVD305, DVD304, DVD205, DVD203, DVD202, DVD109, DVD108, DVD106, DVD105, DVD103, DVD92, HC96, HC94, HC90, HC48, HC47, HC46, HC45, HC44, HC43, HC42, HC41, HC40, HC39, HC38, HC37, HC36, HC35, HC33, HC32, HC30, HC26, HC24, HC23, HC22, HC21, HC20, HC19, HC17, PC1000, PC55, PC53, SR300, SR290, SR200, SR190, SR100, SR90, SR82, SR80, SR72, SR70, SR62, SR60, SR52, SR50, SR42, SR40, SR33, SR32, SR30 并非所有摄像机在所有国家或地区都有售。 结束拍摄后 按 POWER 按钮,关闭摄像机电源。 有关详细信息,请参阅摄像机随附的使用说明书。 卸下摄像机 1 松开摄像机安装旋钮,将摄像机从摄像机座上卸下。 2 将腿收起。 携带本装置 携带本装置时,应将其收入携带包中。 注 携带本装置时,请将摄像机卸下。 规格 最大载荷 遥控器功能 按 POWER 按钮,关闭摄像机电源。 有关详细信息,请参阅摄像机随附的使用说明书。 卸下摄像机 警告 1 2 3 4 5 6 7 8 9 10 11 12 13 结束拍摄后 1 kg(包括电池及其他配件) START/STOP 按钮、PHOTO 按钮、 变焦按钮 (W/T) 1 松开摄像机安装旋钮,将摄像机从摄像机座上卸下。 2 将腿收起。 携带本装置 携带本装置时,应将其收入携带包中。 注 携带本装置时,请将摄像机卸下。 规格 最大载荷 遥控器功能 尺寸 腿收起 腿打开 线长 操作温度范围 质量 所含物品 1 kg(包括电池及其他配件) START/STOP 按钮、PHOTO 按钮、 变焦按钮 (W/T) 约 45 × 132 × 68 mm(长/高/宽) 约 127 × 96 × 114 mm(长/高/宽) 约 250 mm 0° C 至 40 ° C 约 114 g 拍摄手柄、腕带、线夹、携带包、成套印刷文件 设计或规格如有变动,恕不另行通知。 索尼公司 出版日期: 2009 年 6 月