1
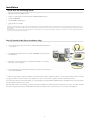
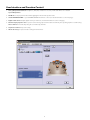
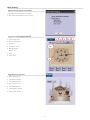
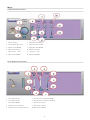
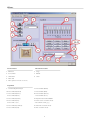
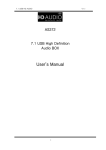
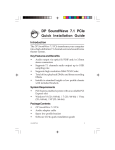
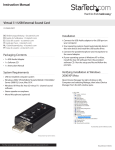
5.1 Channel USB
Gaming Headset
User Manual
English
2
Contents
Introduction
4
Pack Contents
4
System
y
Requirements
q
4
Installation
5
User Interface and Function Control
6
Technical Support
pp
11
Limited Warranty
y Terms
11
WEEE Notice
11
CE Declaration
12
RoHS Compliance
p
12
3
Introduction
Plug the USB connector into your computer and the system will search the USB device automatically. Originally, the volume will show a blue
LED, once Microphone mute is on, the button will show red LED.
Speaker mute
Master Volume Control
MIC mute
Pack Contents:
•
5.1 Channel USB Gaming Headset
•
Quick Start Guide
•
CD containing Software and User Manual
Systems Requirements:
This device must be applied on USB specification products. You should confirm your PC operation USB function, USB 1.1 or 2.0.
No external driver installed:
•
OS Support: Windows 2000, XP, Vista, MAC OS 9.0 / 10.1
•
System recommended: use Intel Pentium III or AMD K6 500 CPU above
•
At least 50MB hard disk space for good sound quality, please adjust your system’s H/W acceleration and sample rate conversion quality to
Full and Best.
•
This device will apply your PC/Notebook default driver as a general USB headset without real/virtual multi-channel surrounding effect.
Note:
Some USB Host Controllers may have a problem with data stream package loss; this will influence output audio data and make some discontinuous sound.
If when you plug in your 5.1 Channel Gaming USB Headset it does not automatically change audio device to USB audio, please switch the audio device to USB audio via ‘Sound and
Audio Devices Properties’ in the control panel.
4
Installation
Install Xear 3D Technology driver:
•
OS Support: Windows 2000, XP, Vista
•
System recommended: use Intel Pentium III or AMD K6 500 CPU above
•
At least 512MB RAM
•
At least 50 MB hard disk space
•
Supports direct sound 3D
Note:
Windows OS has default USB driver support, but does not support HRTF 3D, EAX, and Virtual Multi-channel sounds effect function. If you want to enjoy these additional features, you
must install the Xear 3D sound audio driver. Before you install the Xear 3D sound audio driver, you must make sure that the 5.1 Channel Gaming USB Headset is already connected to
the PC system.
If your PC system has more than one USB connecting port, please remember which one is connected for installation. The next time you plug in your 5.1 Channel Gaming USB Headset
to your PC you have to plug it into the same port.
Xear 3D Sound Audio Driver Installation Step:
1. Turn on the PC system and connect the 5.1 Channel USB Gaming Headset to
the PC system.
2. Insert Application Software CD on your CD / DVD ROM, it will pop up auto
run information.
3. Follow the onscreen instructions to complete the installation. Select either
Vista or XP. Select ‘setup.exe’
4. Select install driver only or both driver and demo program then click ‘Next’ to
continue the installation.
5. When set up program complete installation system will need to restart to initialize the driver. After you reboot and the system is running
up again, you will see a small icon in the lower right of the screen. You can click it to open the Xear 3D Sound driver functions.
If your PC system has more than one USB port, you can just plug the 5.1 Channel Gaming USB Headset to any USB port. If it connects properly,
the driver will detect which port is correct.
When the USB sound icon is showing, it means the Xear3D sound driver was initialized and is working now. If you have more than one USB
port and you forgot which one was installed with the Xear 3D sound driver, this icon will show you are connected to the right port.
5
User Interface and Function Control:
1. Analog Output Channels Mode: Headphone, 2Ch, 4Ch, and 6Ch for selected, and the 6Ch will be set as default.
2. System Output Status
3. DSP Mode: to adjust preferred effect while applying the virtual 7.1Ch speaker mode.
4. Virtual SPEAKER SHIFTER: to open SPEAKER SHIFTER windows for control. (For detail information see the next page)
5. Digital Volume Control: adjust digital volume per channels. (For detail information see the next page)
6. Channel Display & Speaker Test: to present current analog output channel status and directly click speaker graphic for sound testing.
7. Auto Sound Test: automatically testing the sound effect by channels.
8. Stop Auto Sound Test: stop auto testing.
9. Advanced Setting: for personal audio setting at multi-channels.
6
Main Setting:
Multi-Channel Advanced Setting:
1. Exchange the Center/Subwoofer output
2. Bass enhancement with 3 modes selections
Virtual 7.1CH SPEAKER SHIFTER
1. Volume Up Control
2. Volume Down Control
3. Clockwise
4. Counter Clockwise
5. Manual Rotation
6. Manual Shifter
7. Reset
8. Shifter Drag
Digital Volume Control
1. Master Volume Reset
2. Ls Ch Volume Control
3. L Ch Volume Control
4. C Ch Volume Control
5. R Ch Volume Control
6. Sub Ch Volume Control
7. Rs Ch Volume Control
7
Mixer:
Playback Volume Control
1. Balance Control
7. SW Synth Volume Balance
2. Volume Up/Down Control
8. SW Synth Volume Control
3. Master Volume On/Off
9. SW Synth Volume On/Off
4. Wave Volume Balance
10. CD Volume Balance
5. Wave Volume Control
11. CD Volume Control
6. Wave Volume On/Off
12. CD Volume On/Off
Recording Volume Control
1. Stereo Mixer Balance
6. Microphone Record Volume On/Off
2. Stereo Mixer Control
7. Microphone Record Advanced Setting
3. Stereo Mixer On/Off
8. Wave Volume Balance
4. Microphone Record Balance
9. Wave Volume Control
5. Microphone Record Volume Control
10. Wave Volume On/Off
8
Effects:
Environment
Environment Size
1. Bathroom
6. Large
2. Concert Hall
7. Middle
3. Underwater
8. Small
4. Music Pub
5. More options: 27 mode for selected
Equalizer
9. Ten Band Equalizer Adjust
18. Pre-Set Mode (Metal)
10. Pre-Set Mode (Default)
19. Pre-Set Mode (RAP)
11. Pre-Set Mode (Dance)
20. Pre-Set Mode (Classic)
12. Pre-Set Mode (Bass)
21. Pre-Set Mode (Vocal)
13. Pre-Set Mode (Treble)
22. Equalizer User Define On/Off
14. Pre-Set Mode (Live)
23. Pull to select user define mode
15. Pre-Set Mode (Rock)
24. User Define naming key in
16. Pre-Set Mode (Soft-Rock)
25. Add new user define mode
17. Pre-Set Mode (Jazz)
26. Del user define mode
9
Karaoke:
1. On
Click this button to control all karaoke functions
2. Reset
Can reset all settings to default value
3. Start Microphone Echo Function
Select this button to pop up a dialog box to enable microphone function. Click ‘OK’ button to
select recording source and enable microphone
4. Echo Low/High Control Bar
Adjust echo low/high
5. Magic Voice Function (Optional)
This function only supported in multi-channel audio products. When you enable microphone echo
then can pull down the menu to select magic voice. Magic voice provides 5 different effects.
6. Start Key Shifting Function
Select this button to enable key shifting function and control.
7. Key Shifting Low/High Control Bar
This function can adjust tune of background music to fit your singing.
8. Start Vocal Cancellation Function
Select this button to enable vocal cancellation function and control.
9. Vocal Cancelling Control Bar
This function can control singer’s vocal of background music and cancel it as possible.
10
Technical Support:
If you are experiencing difficulty installing or using your Verbatim product, please visit the main Verbatim Technical Support website at
www.verbatim-europe.com. From this page you can access our library of user documentation, read answers to frequently asked questions,
anddownload available software updates. Although most of our customers find this content sufficient to put them back on the right track,
thispage also lists ways in which you can contact the Verbatim Technical Support Team directly.
Europe: For technical support in Europe e-mail [email protected] or call 00 800 3883 2222 in the following countries:
Austria, Belgium, Denmark, Finland, France, Germany, Hungary, Italy, Luxemburg, Monaco, Netherlands, Norway, Poland, Portugal, Republic of
Ireland, Spain, Sweden, Switzerland and the United Kingdom. All other countries call +353 61 226586.
Limited Warranty Terms:
Verbatim Limited warrants this product to be free from defects in material and workmanship for a period of 2 years from date of purchase.
Thiswarranty excludes batteries. If this product is found to be defective within the warranty period, it will be replaced at no cost to you. You
mayreturn it with your original cash register receipt to the place of purchase or contact Verbatim.
In the following European countries, Austria, Belgium, Denmark, Finland, France, Germany, Greece, Hungary, Italy, Luxembourg, Monaco,
Netherlands, Norway, Poland, Portugal, Republic of Ireland, Spain, Sweden, Switzerland, and the United Kingdom call 00 800 3883 2222.
Allother European countries call +353 61 226586. You can email [email protected].
Product replacement is your sole remedy under this warranty, and this warranty does not apply to normal wear or to damage resulting from
abnormal use, misuse, abuse, neglect or accident, or to any incompatibility or poor performance due to the specific computer software or
hardware used. VERBATIM WILL NOT BE LIABLE FOR DATA LOSS OR ANY INCIDENTAL, CONSEQUENTIAL OR SPECIAL DAMAGES, HOWEVER
CAUSED, FOR BREACH OF WARRANTIES OR OTHERWISE. This warranty gives you specific legal rights and you may also have other rights
which vary from state to state or country to country.
WEEE Notice:
The Directive on Waste Electrical and Electronic Equipment (WEEE), which entered into force as European law on 13th February 2003, resulted
in a major change in the treatment of electrical equipment at end-of-life.
The WEEE logo (shown at the left) on the product or on its box indicates that this product must not be disposed of or dumped
with your other household waste. For more information about electronic and electrical waste equipment disposal, recovery,
and collection points, please contact your local municipal household waste disposal service or shop from where you purchased
the equipment.
11
CE Declaration:
It is hereby declared that this product complied with the essential protection requirements of Council Directive 2004/108/EC and its
amendments on the approximation of the laws of the Member States relating to electromagnetic compatibility.
This declaration applies to all specimens manufactured identical to the model submitted for testing/evaluation.
EN 55022 2006 Class B
IEC 61000-4-4: 2004
EN 61000-3-2 2006
IEC 61000-4-5: 1995 + A1 2000
EN 61000-3-3 1995 + A1 2001 + A2 2005
IEC 61000-4-6: 1996 + A1 2000
EN 55024 1998 + A1 2001 + A2 2003
IEC 61000-4-8: 1993 + A1 2000
IEC 61000-4-2: 1995 + A2 2000
IEC 61000-4-11: 1994 + A1 2000
IEC 61000-4-3: 2002
RoHS Compliance:
This product is in compliance with Directive 2002/95/EC of the European Parliament and of the Council of 27 January 2003, on the restriction
of the use of certain hazardous substances in electrical and electronic equipment (RoHS) and its amendments.
THIS DEVICE COMPLIES WITH PART 15 OF THE FCC RULES. OPERATION IS SUBJECT TO THE FOLLOWING TWO CONDITIONS:
(1) THIS DEVICE MAY NOT CAUSE HARMFUL INTERFERENCE, AND
(2) THIS DEVICE MUST ACCEPT ANY INTERFERENCE RECEIVED, INCLUDING INTERFERENCE THAT MAY CAUSE UNDESIRED OPERATION.
12