1
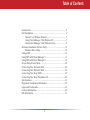
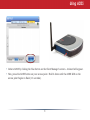
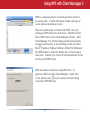
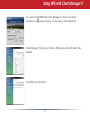
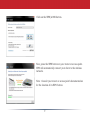
User Manual - WLI-UC-GN
Wireless N USB 2.0 Adapter/Router
www.buffalotech.com
35010856 ver.01 v1.00
Table of Contents
Introduction..............................................................................3
Full Installation.........................................................................4
Connect to a Wireless Network...........................................7
Using Client Manager 3 for Windows XP............................. 7
Using Client Manager V for Windows Vista......................... 8
Alternate Installation (Drivers Only)......................................... 12
Windows Zero Config........................................................ 13
Using AOSS............................................................................. 14
Using WPS with Client Manager 3............................................ 17
Using WPS with Client Manager V............................................ 18
Access Point/Router Mode....................................................... 20
Connecting Your Nintendo DS®............................................... 22
Connecting Your Nintendo Wii®............................................... 24
Connecting Your Sony PSP®.................................................... 27
Connecting Your Sony Playstation 3®...................................... 28
Specifications.......................................................................... 31
Regulatory Compliance Information......................................... 32
Logos and Trademarks............................................................. 44
Contact Information................................................................. 45
GPL Information...................................................................... 47
2
Introduction
Congratulations on your purchase! The WLI-UC-GN wireless USB Adapter connects your
notebook computer or desktop PC to 2.4 GHz wireless n, g, or b networks. It can also serve as
a router/access point for connecting other wireless devices to your existing network. To install
your WLI-UC-GN with all of the available software, turn to the next page. To install the WLI-UCGN with wireless client drivers only, turn to page 12.
3
Full Installation
The installation program will install drivers, Client Manager software, a tool to switch between
client and router modes, and software to let the WLI-UC-GN act as an access point for other
wireless devices. If you only want to install wireless drivers, turn to page 12.
Do not insert the USB key into a USB port yet. Insert the WLI-UC-GN Navigator CD into the CDROM drive.
This window will open on your desktop.
Select Begin Installation.
4
Installation
Click Install to continue. Step through the wizard to install
your software.
The WLI-UC-GN may be installed as either a wireless client
or a wireless access point.
Choose Client Mode Installation if you want to add a wireless
client to your computer, allowing it to connect to existing
wireless networks.
Choose Access Point Mode Installation if you want to
configure the WLI-UC-GN as a simple wireless access point
for connecting AOSS-compatible devices such as game
consoles.
Note: After installation, you will be easily able to switch
between the two modes.
5
Installation
During the installation, the wizard will ask you to insert,
remove, and then reinsert the WLI-UG-GN at various times.
Follow the instructions on each screen.
When the wizard is complete, click Finish.
6
Connect to a Wireless Network: Client Manager 3 for Windows XP
Client Manager software lets you connect your computer to a wireless network. Client Manager
3 software is installed on Windows XP computers. If your computer uses Vista, turn to the next
page instead. To open Client Manager 3, click on the
icon in the systray.
Click on one of the three buttons up top to navigate to the three different
sections of Client Manager. The Scan tab shows a list of available
wireless networks. Highlight one and click Connect at the bottom to
connect to that network.
The Status tab shows information about your current wireless
connection.
The Profiles tab lets you create, store, and prioritize common wireless
connections. The AOSS/WPS button is also located here.
7
Client Manager V for Windows Vista
If your computer uses the Microsoft Vista operating system,
Client Manager V software will have been installed. To use Client
Manager V to connect to your wireless network, click on the
icon in the system tray. In the popup, click Advanced.
Client Manager V will open. Click
on Profile List on the left side of
the window.
In Profile List, click New.
8
The AOSS/WPS button is here. To configure the client
manually, click on the Advanced Setup button.
Now, click on the Connect Manually button.
9
Click on the Search button.
Highlight your network name (SSID) and click Next.
10
Enter the security type and encryption method. Enter
your network’s encryption key or password. Click
Connect.
Client Manager V will connect you to your wireless
network!
11
Alternate Installation (Drivers only)
If you prefer to not install Client Manager, you
may choose to install only wireless drivers. With
a drivers-only installation, you will have to use
different software, such as Windows Zero Config,
to manage your wireless connection. See the
next page for instructions on using Windows Zero
Config. To install only drivers, navigate to the
driver folder on your AirNavigator CD and click on
DrvSetup. Or click Start, then Run, and type d:\
driver\DrvSetup.exe into the Open window, where
“d” is the driveletter of your CD-ROM. Do not
connect the AirStation to your computer until directed to do so by the wizard. Click OK.
Step through the wizard to install wireless client drivers for your AirStation. Plug the AirStation
into a USB port on your computer when directed by the wizard.
12
Using Windows® Zero Config
To use Windows’ built-in wireless utility, click on its icon
open.
in the system tray. Zero Config will
All available wireless networks will be listed. Click on your
network to highlight it and then click Connect.
If your network requires a network key or password to
connect, enter it twice. Click Connect. When the wireless
icon in the systray changes to
, you are connected to the
wireless network.
13
Using AOSS
AOSS (AirStation One-Touch Secure System) is
a simple system for connecting wireless clients
to an access point while enforcing the most
secure possible connection encryption type.
Users no longer need to worry about choosing
the proper security protocols, IP addresses,
or SSID. AOSS will determine the optimal
connection and configure it in seconds.
Your WLI-UC-GN has its AOSS button in the
Client Manager software. If your router or
access point supports AOSS, then you can
connect the WLI-UC-GN to your wireless
network easily and securely. You must have
installed Client Manager to use AOSS with the WLI-UC-GN. Also, your router or access
point must support AOSS to use it. Start Client Manager by double-clicking on the
black antenna icon
in your systray.
In Client Manager 3, the AOSS button is in the Profiles section.
In Client Manager V, the AOSS button is available from the Profiles List page. Click
New to get to the AOSS button.
14
Using AOSS
• Initiate AOSS by clicking the blue button on the Client Manager’s screen. A wizard will appear.
• Now, press the AOSS button on your access point. Hold it down until the AOSS LED on the
access point begins to flash (1-3 seconds).
15
Using AOSS
Once AOSS is complete (about 30 seconds), the connection is archived as a profile for later use.
Click Finish to exit the wizard. You are now connected to the network with a secure wireless connection.
Notes:
AOSS will scan for an AOSS partner for about two minutes. If it times out before finding one, just
press the AOSS buttons again.
Output power is reduced to 25% of normal during AOSS for security reasons. If you’re having
trouble making an AOSS connection, temporarily move the devices closer together.
AOSS will automatically use the highest level of security available for all currently connected
wireless devices.
If you have trouble connecting with AOSS, temporarily disable all personal firewalls on your PC,
such as ZoneAlarm or Microsoft Personal Firewall. These programs may be re-enabled after
AOSS has finished. Also, make sure that any other wireless client manager software is disabled
before using Client Manager.
16
Using WPS with Client Manager 3
WPS is a simple system for connecting wireless clients to
an access point. It works with many brands and types of
access points and wireless routers.
There are several ways to connect with WPS. One is by
clicking the WPS button for each device. The WLI-UC-GN
has its WPS button in the Client Manager software. Start
Client Manager 3 by double clicking on the black antenna
icon
in your systray, or by launching it from your Start
Menu: Programs/ Buffalo/AirStation Utility/Client Manager.
The WPS button is under the Profiles tab, at the bottom of
the screen. Consult your router/AP’s documentation for the
location of its WPS button.
WPS also allows connections using PIN Codes. To
generate a PIN Code from Client Manager 3, right-click
on the antenna icon
in your systray and select Easy
Connection/WPS PIN code.
17
Using WPS with Client Manager V
To connect with WPS from Client Manager V, click on the black
antenna icon
in your systray. In the popup, click Advanced.
Client Manager V will open. Click on Profile List on the left side of the
window.
In Profiles List, click New.
18
Click on the WPS/AOSS button.
Now, press the WPS button on your router or access point.
WPS will automatically connect your client to the wireless
network.
Note: Consult your router or access point’s documentation
for the location of its WPS button.
19
Access Point / Router Mode
Besides its wireless client capability, the WLI-UC-GN can
function as a wireless access point. If your computer
already has a connection to the internet, and you want
to connect AOSS-compatible devices wirelessly, then
choose Access Point Mode during installation. Note: If
you have firewall or antivirus software running on the
computer, temporarily disable it before continuing.
Disconnect your internet connection at the same time
for safety. Step through the wizard to install your WLIUC-GN in Access Point Mode. When you’re done, turn
on your firewall, enable your antivirus software, and
reconnect your internet connection.
You can also switch into Access Point Mode from the
Start menu, in Programs/Buffalo/AirStation Utility/
Router or Client Switch Tool, or by clicking
the icon on your desktop. This tool lets you
easily switch back and forth between Client
Mode and Access Point Mode.
20
AOSS
Many kinds of devices can be connected to the AirStation
WLI-UC-GN in access point mode. Right-click on the
icon and choose Option. You may choose from several
different encryption types on the left side. By default,
all SSIDs and the encryption key are random strings of
characters. You may change them to more user-friendly
names if desired. Select an encryption type and copy the
Pre-Shared Key, which will serve as the “password” for
wireless devices connecting to this access point. Consult
your wireless client’s documentation for instructions on
entering the SSID and key.
To use an AOSS device with the AirStation WLI-UC-GN
in access point mode, double- click on the
icon to
open the window shown at left. Click or push the AOSS
button for the device you want to connect to start AOSS.
Then, click on the AOSS button in this window. AOSS
will set up your connection automatically.
In the following examples, we’ll show how to connect
several common gaming consoles to the AirStation
wirelessly.
21
Connecting Your Nintendo DS®
The DS® uses separate wireless connections for each game. You will
need to do these steps for each game that you play wirelessly.
Turn on your DS®. Click on Wi-Fi Settings. The location of this may vary
depending on what game you're in.
Click on Nintendo Wi-Fi Connection Settings.
Click on any of the 3 available connections.
22
Connecting Your Nintendo DS®
Click on AOSS.
You'll see this screen. Now, click the AOSS button on your desktop (see
page 13).
Your DS® is now connected to the network. Click OK to run a connection
test.
23
Connecting Your Nintendo Wii®
Turn on your Wii®. Click on Wii Options, in the bottom left corner of the
main menu.
Click on Wii Settings.
Click on the right arrow for more options.
24
Connecting Your Nintendo Wii®
Click on Internet.
Click on Connection Settings.
Click on any of the three available connections. If the connection you're
using has settings already saved, clear them.
25
Connecting Your Nintendo Wii®
Click on AOSS.
When you see this screen, click the AOSS button on your PC's desktop
(page 13 for more info).
Your Wii® is now connected to the network. Click OK to run a
connection test.
26
Connecting Your Sony PSP®
Turn on your PSP®.
PSP firmware version 2.0 or later is required to use AOSS. Update your
PSP firmware if necessary.
Select Network Settings.
27
Connecting Your Sony PSP®
Choose Infrastructure Mode.
Choose New Connection.
Choose Automatic.
Select AOSS. Click the AOSS button on your PC's desktop (see page 13
for more info).
In about a minute, the devices will form a
secure connection.
28
Connecting Your Sony PlayStation 3®
Turn on your PlayStation 3® without a game inserted and navigate to
Network Settings.
Open Internet Connection Settings.
Select Yes to continue.
29
Connecting Your Sony PlayStation 3®
Choose Wireless.
Choose Automatic.
Press the "X" button on your controller to initiate AOSS. Then, click
the AOSS button on your PC's desktop (page 13 for more info on
this).
In about a minute, the devices will form a secure connection.
30
Specifications
Standards Compliance:
IEEE802.11g/IEEE802.11b/IEEE802.11nDraft2.0
Access Modes:
Infrastructure (Client Mode/AP Mode)
Ad-hoc (Client Mode/ When using XlinkKAI)
Communication Protocol:
OFDM, DSSS, CCK
Frequency Range:
2412 - 2464MHz (Channels 1 - 11)
Security:
WPA-PSK (TKIP,AES), WPA2-PSK
(TKIP, AES)*, 128/64-bit WEP
*Software Access Point mode does not
support WPA2-PSK.
Interface:
USB 2.0
Dimensions:
0.62” x 1.28” x 0.28” (15.8 x 32.5 x 7.2 mm)
Weight:
~0.14 ounces (4 grams)
Operating Environment:
32° - 104° F; 20-80% non-condensing
OS Support:
Windows® XP, Windows® Vista
31
Regulatory Compliance Information
Federal Communication Commission Interference Statement
This equipment has been tested and found to comply with the limits for a Class B digital
device, pursuant to Part 15 of the FCC Rules. These limits are designed to provide reasonable
protection against harmful interference in a residential installation. This equipment generates,
uses and can radiate radio frequency energy and, if not installed and used in accordance with
the instructions, may cause harmful interference to radio communications. However, there is
no guarantee that interference will not occur in a particular installation. If this equipment does
cause harmful interference to radio or television reception, which can be determined by turning
the equipment off and on, the user is encouraged to try to correct the interference by one of the
following measures:
• Reorient or relocate the receiving antenna.
• Increase the separation between the equipment and receiver.
• Connect the equipment into an outlet on a circuit different from that to which the receiver is
connected.
• Consult the dealer or an experienced radio/TV technician for help.
FCC Caution: Any changes or modifications not expressly approved by the party responsible for
compliance could void the user’s authority to operate this equipment.
This device complies with Part 15 of the FCC Rules. Operation is subject to the following two
conditions: (1) This device may not cause harmful interference, and (2) this device must accept
any interference received, including interference that may cause undesired operation.
32
IMPORTANT NOTE: FCC Radiation Exposure Statement: This equipment complies with FCC
radiation exposure limits set forth for an uncontrolled environment. End users must follow
the specific operating instructions for satisfying RF exposure compliance. To maintain
compliance with FCC RF exposure compliance requirements, please follow operation
instructions as documented in this manual. This device and its antenna(s) must not be colocated or operating in conjunction with any other antenna or transmitter.
SAR compliance has been established in typical laptop computers with USB slot, and product
could be used in typical laptop computer with USB slot. Other applications like handheld PCs
or similar devices have not been verified and may not comply with related RF exposure rule
and such use shall be prohibited.
The availability of some specific channels and/or operational frequency bands are country
dependent and are firmware programmed at the factory to match the intended destination.
This firmware setting is not accessible by the end user.
33
CE Notification
This is a Class B product. In a domestic environment, this product may cause radio interference,
in which case the user may be required to take adequate measures.
Europe - EU Declaration of Conformity:
This device complies with the essential requirements of the R&TTE Directive 1999/5/EC. The
following test methods have been applied in order to prove presumption of conformity with the
essential requirements of the R&TTE Directive 1999/5/EC.
A copy of the Declaration of Conformity can be downloaded by selecting this product from the
list at http://www.buffalo-technology.com/support/downloads/
• EN60950-1:2006
Safety of Information Technology Equipment
• EN 62311:2008
Assessment of electronic and electrical equipment related to human exposure restrictions for
electromagnetic fields (0 Hz-300 GHz).
• EN 300 328 V1.7.1 (2006-10)
Electromagnetic compatibility and Radio spectrum Matters (ERM); Wideband Transmission systems;
Data transmission equipment operating in the 2.4 GHz ISM band and using spread spectrum
modulation techniques; Harmonized EN covering essential requirements under article 3.2 of the
R&TTE Directive.
34
• EN 301 489-1 V1.8.1: (2010-01)
Electromagnetic compatibility and Radio spectrum Matters (ERM) — ElectroMagnetic
Compatibility (EMC) standard for radio equipment and services — Part 1: Common technical
requirements.
• EN 301 489-17 V1.3.2: (2010-07)
Electromagnetic compatibility and Radio spectrum Matters (ERM) — ElectroMagnetic
Compatibility (EMC) standard for radio equipment — Part 17: Specific conditions for 2,4 GHz
wideband transmission systems, 5 GHz high performance RLAN equipment and 5,8 GHz
Broadband.
Intended use
This device is a 2.4 GHz wireless LAN transceiver, intended for indoor home and office use in all
EU and EFTA member states.
EU Countries intended for use
This device is intended for indoor home and office use in the following countries: Austria,
Belgium, Germany, Denmark, Spain, Greece, France, Finland, Italy, Ireland, Luxembourg, The
Netherlands, Portugal, Sweden, United Kingdom, Cyprus, Czech Republic, Estonia, Hungry,
Latvia, Lithuania, Malta, Poland, Slovak Republic and Slovenia. The device is also authorised for
use in all EFTA member states Iceland, Liechtenstein, Norway and Switzerland.
EU countries not intended for use
None
35
Potential restrictive use
This device is a 2.4 GHz wideband transmission system (transceiver), intended for use in all EU
member states and EFTA countries, except in France and Italy where restrictive use applies.
In Italy the end-user should apply for a license at the national spectrum authorities in order to
obtain an authorization to use the device for setting up outdoor radio links and/or for supplying
public access to telecommunications and/or network services.
In Belgium there is a restriction in outdoor use. The frequency range in which outdoor operation in
Belgium is permitted is 2460 – 2483.5 MHz.
This device may not be used for setting up outdoor radio links in France and in some areas the
RF ourput power may be limited to 10 mW EIRP in the frequency range of 2454 - 2483.5 MHz. For
detailed information the end-user should contact the national spectrum authority in France.
36
Declaration of Conformity with Regard to the R&TTE Directive 1999/5/EC
Česky[Czech]
Buffalo Technology Inc. tímto prohlašuje, že tento AirStation WLI-UC-GN je ve shodě se základními
požadavky a dalšími příslušnými ustanoveními směrnice 1999/5/ES.
Dansk[Danish]
Undertegnede Buffalo Technology Inc. erklærer herved, at følgende udstyr AirStation WLI-UC-GN
overholder de væsentlige krav og øvrige relevante krav i direktiv 1999/5/EF.
Deutsch[German]
Hiermit erklärt Buffalo Technology Inc. dass sich das Gerät AirStation WLI-UC-GN in
Übereinstimmung mit den grundlegenden Anforderungen und den übrigen einschlägigen
Bestimmungen der Richtlinie 1999/5/EG befindet.
Eesti[Estonian]
Käesolevaga kinnitab Buffalo Technology Inc. seadme AirStation WLI-UC-GN vastavust direktiivi
1999/5/EÜ põhinõuetele ja nimetatud direktiivist tulenevatele teistele asjakohastele sätetele.
English
Hereby, Buffalo Technology Inc. declares that this AirStation WLI-UC-GN is in compliance with the
essential requirements and other relevant provisions of Directive 1999/5/EC.
Español[Spanish]
Por medio de la presente Buffalo Technology Inc. declara que el AirStation WLI-UC-GN cumple con los
requisitos esenciales y cualesquiera otras disposiciones aplicables o exigibles de la Directiva
1999/5/CE.
37
Ελληνική[Greek]
ΜΕ ΤΗΝ ΠΑΡΟΥΣΑ Buffalo Technology Inc. ΔΗΛΩΝΕΙ ΟΤΙ AirStation WLI-UC-GN ΣΥΜΜΟΡΦΩΝΕΤΑΙ
ΠΡΟΣ ΤΙΣ ΟΥΣΙΩΔΕΙΣ ΑΠΑΙΤΗΣΕΙΣ ΚΑΙ ΤΙΣ ΛΟΙΠΕΣ ΣΧΕΤΙΚΕΣ ΔΙΑΤΑΞΕΙΣ ΤΗΣ ΟΔΗΓΙΑΣ 1999/5/ΕΚ.
Français[French]
Par la présente Buffalo Technology Inc. déclare que l’appareil AirStation WLI-UC-GN est conforme aux
exigences essentielles et aux autres dispositions pertinentes de la directive 1999/5/CE.
Italiano[Italian]
Con la presente Buffalo Technology Inc. dichiara che questo AirStation WLI-UC-GN è conforme ai
requisiti essenziali ed alle altre disposizioni pertinenti stabilite dalla direttiva 1999/5/CE.
Latviski[Latvian]
Ar šo Buffalo Technology Inc. deklarē, ka AirStation WLI-UC-GN atbilst Direktīvas 1999/5/EK
būtiskajām prasībām un citiem ar to saistītajiem noteikumiem.
Lietuvių[Lithuanian]
Šiuo Buffalo Technology Inc. deklaruoja, kad šis AirStation WLI-UC-GN atitinka esminius
reikalavimus ir kitas 1999/5/EB Direktyvos nuostatas.
Nederlands[Dutch]
Hierbij verklaart Buffalo Technology Inc. dat het toestel AirStation WLI-UC-GN in overeenstemming is
met de essentiële eisen en de andere relevante bepalingen van richtlijn 1999/5/EG.
Malti[Maltese]
Hawnhekk, Buffalo Technology Inc. , jiddikjara li dan AirStation WLI-UC-GN jikkonforma mal-ħtiġijiet
essenzjali u ma provvedimenti oħrajn relevanti li hemm fid-Dirrettiva 1999/5/EC.
38
Magyar[Hungarian]
Alulírott, Buffalo Technology Inc. nyilatkozom, hogy a AirStation WLI-UC-GN megfelel a vonatkozó
alapvetõ követelményeknek és az 1999/5/EC irányelv egyéb elõírásainak.
Polski[Polish]
Niniejszym, Buffalo Technology Inc. , deklaruję, że AirStation WLI-UC-GN spełnia wymagania
zasadnicze oraz stosowne postanowienia zawarte Dyrektywie 1999/5/EC.
Português[Portuguese]
Buffalo Technology Inc. declara que este AirStation WLI-UC-GN está conforme com os requisitos
essenciais e outras disposições da Directiva 1999/5/CE.
Slovensko[Slovenian]
Buffalo Technology Inc. izjavlja, da je ta AirStation WLI-UC-GN v skladu z bistvenimi zahtevami in
ostalimi relevantnimi določili direktive 1999/5/ES.
Slovensky[Slovak]
Buffalo Technology Inc. týmto vyhlasuje, že AirStation WLI-UC-GN spĺňa základné požiadavky a
všetky príslušné ustanovenia Smernice 1999/5/ES.
Suomi[Finnish]
Buffalo Technology Inc. vakuuttaa täten että AirStation WLI-UC-GN tyyppinen laite on direktiivin
1999/5/EY oleellisten vaatimusten ja sitä koskevien direktiivin muiden ehtojen mukainen.
Svensk[Swedish]
Härmed intygar Buffalo Technology Inc. att denna AirStation WLI-UC-GN står I överensstämmelse
med de väsentliga egenskapskrav och övriga relevanta bestämmelser som framgår av direktiv 1999/5/
EG.
39
Taiwan:
SAR compliance has been established in typical laptop computer(s) with CardBus slot, and product
could be used in typical laptop computer with CardBus slot. Other application like handheld PC or
similar device has not been verified, may not comply with related RF exposure rules, and such use
shall be prohibited.
NCC Regulatory Information
來自台灣NCC的警告
經型式認證合格之低功率射頻電機,非經許可,公司、商號或使用者均不得擅自變更頻率、加大功率或變更原設
計之特性及功能。
低功率射頻電機之使用不得影響飛航安全及干擾合法通信;經發現有干擾現象時,應立即停用,並改善至無干擾
時方得繼續使用。前項合法通信,指依電信法規定作業之無線電通信。低功率射頻電機須忍受合法通信或工
業、科學及醫療用電波輻射性電機設備之干擾。
Note:
1. 本模組於取得認證後將依規定於模組本體標示審驗合格標籤
2. 系統廠商應於平台上標示「本產品內含射頻模組:
CCAH09LP0170T8 」字樣
40
Tested to comply
With FCC Standards
CCAH09LP0170T8
FCC ID:FDI-09102006-0
Complies with
IDA Standards
DA10.412
BUF-WLIUCGN01
ETA-045/2009-R
41
EU Environmental Information
• The equipment that you have purchased has required the extraction and use of natural
resources for its production.
• The equipment may contain hazardous substances that could impact health and the
environment.
• In order to avoid the dissemination of those substances in our environment and to diminish the
pressure on the natural resources, we encourage you to use the appropriate take-back systems.
• The take-back systems will reuse or recycle most of the materials of your end life equipment in
a sound way.
• The crossed-out wheeled bin symbol invites you to use those systems.
• If you need more information on the collection, reuse and recycling systems, please contact
your local or regional waste administration.
42
Logos and Trademarks
© Buffalo Technology (USA), Inc. Buffalo Technology, Buffalo Technology logo and AOSS logo are
registered trademarks of Buffalo Technology (USA), Inc. The names and logos of other companies
mentioned herein belong to their respective owners. “Nintendo” is a registered trademark of Nintendo
of America Inc. Nintendo owns extensive intellectual property rights in all of its products, including
video game systems, game titles, characters, game software, graphics, artwork, and screen shots.
Nintendo also retains rights in content on Nintendo’s web sites, including articles, artwork, screen
shots and other files. Trademarks and copyrights for third-party games and characters are owned
by the companies that market or license those products. “SONY” is a registered trademark or Sony
Corporation, Inc. Any other product names, service names or logos of SONY used are trademarks or
registered trademarks of Sony Corporation or any of its affiliates. Windows is a registered trademark
of Microsoft Corporation in the United States and other countries.
43
Contact Information (North America)
ADDRESS
Buffalo Technology (USA), Inc.
11100 Metric Blvd., Suite 750
Austin, TX 78758
GENERAL INQUIRIES
Email: [email protected]
TECHNICAL SUPPORT
North American Technical Support by phone is available 24 hours a day, 7 days a week. (USA
and Canada).
Toll-free: (866) 752-6210
44
Contact Information (Europe)
ADDRESS
Buffalo Technology UK Ltd.
2 Bracknell Beeches, Old Bracknell Lane
Bracknell, Berkshire, RG12 7BW
United Kingdom
GENERAL INQUIRIES
Email: [email protected]
TECHNICAL SUPPORT
Buffalo Technology provides technical support in English, German, French, Italian, and
Spanish. For opening hours and relevant telephone numbers, please go to
www.buffalo-technology.com/contact
45
GPL Information
Source code for Buffalo products that use GPL code is available at http://opensource.buffalo.jp.
46


![MC32N0 Regulatory Guide [English] (P/N MN000216A02 Rev. B)](http://vs1.manualzilla.com/store/data/006085477_1-e8060af26a8d96f286d08f3a460ea342-150x150.png)