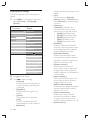
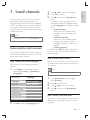
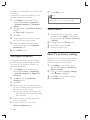
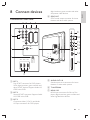
1
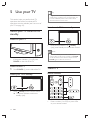
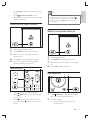
1 Addendum
Enlarge teletext pages
The section “Enlarge teletext pages” in this
user manual instructs you to press OPTION
to enlarge teletext pages.
Use dual screen teletext
The section “Use dual screen teletext” in this
user manual instructs you to press Dual
screen to display normal teletext when dual
screen teletext is enabled.
After updating the TV software (to version
64.67.3 or higher), Dual screen can no
longer be used to display normal teletext.
Use the following instructions in place of the
original instructions:
1
2
After updating the TV software (to version
64.67.3 or higher), OPTION can no longer be
used to enlarge teletext pages.
Use the following instructions in place of the
original instructions to enlarge teletext pages:
1
2
3
4
5
Press TELETEXT and select a teletext
page.
Press
(Picture format) to enlarge the
top part of the page.
Press
(Picture format) again to view
the enlarged lower part of the page.
Press
page.
to scroll through the enlarged
Press
(Picture format) again to return
to the normal page size.
Press Dual screen on your remote
control to enable dual screen teletext.
Press Dual screen again to exit
teletext.
7 Install channels
1 Notice
2
2 Important
4
4
5
5
Safety
Screen care
Environmental care
3 Your TV
TV overview
4 Get started
Position the TV
Wall mount the TV
Connect the antenna cable
Connect the mains cord
Insert the remote control batteries
Switch on the TV
First time setup
5 Use your TV
Switch your TV on/off or to standby
Watch TV
Watch connected devices
Use teletext
6 Use more of your TV
Remote control overview
Use TV menus
Adjust picture and sound settings
Change to Shop or Home mode
Use advanced teletext features
Create favourite lists
Use the Electronic Programme Guide
Use timers and cChild lock
Use subtitles
View photos and listen to music
Listen to digital radio channels
Update your TV software
6
6
8
8
8
9
10
10
10
11
12
12
12
13
13
15
15
16
19
24
24
26
27
28
30
31
33
33
35
35
36
37
37
37
37
38
38
38
Automatically install channels
Manually install channels
Rename channels
Uninstall or reinstall channels
Rearrange channels
Manually update the channel list
Test digital reception
Start a demo
Reset TV to factory settings
8 Connect devices
39
39
40
41
44
45
46
Connection overview
Select connection quality
Connect devices
Setup devices
Use Philips EasyLink
Prepare TV for digital services
9 Technical specifications
48
Product specifications-Supported display
resolutions
Tuner/Reception/Transmission
Multimedia
Remote control
Connections (Rear)
Connections (Side)
Power
10 Troubleshooting
48
48
48
48
48
48
48
49
49
49
49
49
50
50
50
51
General TV issues
TV channel issues
Sound issues
Picture issues
HDMI connection issues
USB connection issues
PC connection issues
Contact us
EN
1
English
Contents
1 Notice
2008 © Koninklijke Philips Electronics N.V. All
rights reserved.
Specifications are subject to change without
notice. Trademarks are the property of
Koninklijke Philips Electronics N.V. or their
respective owners.
Philips reserves the right to change products at
any time without being obliged to adjust earlier
supplies accordingly.
The material in this manual is believed
adequate for the intended use of the system.
If the product, or its individual modules or
procedures, are used for purposes other than
those specified herein, confirmation of their
validity and suitability must be obtained. Philips
warrants that the material itself does not
infringe any United States patents. No further
warranty is expressed or implied.
Warranty
No components are user serviceable. Do not
open or remove covers to the inside of the
product. Repairs may only be done by Philips
Service Centres and official repair shops. Failure
to do so shall void any warranty, stated or
implied.
Any operation expressly prohibited in
this manual, any adjustments, or assembly
procedures not recommended or authorised in
this manual shall void the warranty.
Pixel characteristics
This LCD product has a high number of
colour pixels. Although it has effective pixels of
99.999% or more, black dots or bright points of
light (red, green or blue) may appear constantly
on the screen. This is a structural property of
the display (within common industry standards)
and is not a malfunction.
Open source software
This television contains open source software.
Philips hereby offers to deliver or make
available, upon request, for a charge no more
than the cost of physically performing source
distribution, a complete machine-readable copy
2
EN
of the corresponding source code on a medium
customarily used for software interchange.
This offer is valid for a period of 3 years after
the date of purchase of this product. To obtain
the source code, write to
Philips Consumer Lifestyle
Development Manager
LoB Mainstream Displays
620A Lorong 1, Toa Payoh
Singapore 319762
Compliance with EMF
Koninklijke Philips Electronics N.V. manufactures
and sells many products targeted at consumers
which, like any electronic apparatus, in
general have the ability to emit and receive
electromagnetic signals.
One of Philips’ leading Business Principles is to
take all necessary health and safety measures
for our products, to comply with all applicable
legal requirements and to stay well within
the EMF standards applicable at the time of
producing the products.
Philips is committed to develop, produce and
market products that cause no adverse health
effects. Philips confirms that if its products are
handled properly for their intended use, they
are safe to use according to scientific evidence
available today.
Philips plays an active role in the development
of international EMF and safety standards,
enabling Philips to anticipate further
developments in standardisation for early
integration in its products.
Mains fuse (UK only)
This TV is fitted with an approved moulded
plug. Should it become necessary to replace
the mains fuse, this must be replaced with a
fuse of the same value as indicated on the plug
(example 10A).
1
2
3
Remove fuse cover and fuse.
The replacement fuse must comply with
BS 1362 and have the ASTA approval
mark. If the fuse is lost, contact your dealer
in order to verify the correct type.
Refit the fuse cover.
English
In order to maintain conformity to the EMC
directive, the mains plug on this product must
not be detached from the mains cord.
Copyright
VESA, FDMI and the VESA Mounting Compliant
logo are trademarks of the Video Electronics
Standards Association.
Manufactured under licencse from Dolby
Laboratories. ‘Dolby’, ‘Pro Logic’ and the
double D symbol , are trademarks of Dolby
Laboratories.
Manufactured under licencse from BBE Sound,
Inc. Licensed by BBE, Inc under one or more
of the following US patents: 5510752,5736897.
BBE and BBE symbol are registered trademarks
of BBE Sound Inc.
® Kensington and Micro Saver are registered
US trademarks of ACCO World corporation
with issued registrations and pending
applications in other countries throughout the
world.
All other registered and unregistered
trademarks are the property of their respective
owners.
EN
3
2 Important
Read this user manual before you start to use
this product.
Pay close attention to this section and follow
the safety and screen care instructions. The
product warranty does not apply if damage is
caused by failing to follow these instructions.
The model and serial number of your TV can
be found on the back and side of the TV as well
as on the packaging.
•
•
•
•
•
Safety
•
•
•
•
4
Two people are required to lift and carry
an TV that weighs more than 25 kilos
(55lb). Improper handling of the TV can
result in serious injury.
If transporting the TV in low temperatures
(less than 5°C), open the box and
wait until the TV matches the ambient
temperature of the room before
unpacking.
To avoid short- circuit, do not expose the
TV, remote control or remote control
batteries to rain or water.
To avoid risk of fire or electric shock,
do not place the TV, remote control or
remote control batteries near naked flame
sources (e.g. lighted candles) and other
heat sources including direct sunlight.
EN
•
•
1
2
3
Do not install the TV in a confined space
such as a bookcase. Leave a space of at
least 10cm (four inches) around the TV
for ventilation. Be sure the air flow is not
obstructed.
If placing the TV on a flat, solid surface, be
sure to use only the supplied stand. Do not
move the TV if the stand is not properly
screwed to the TV.
Wall mounting of the TV should only be
performed by qualified personnel. The TV
must only be mounted on an appropriate
wall bracket and on a wall that can safely
hold the weight of the TV. Improper wall
mounting can result in severe injury or
damage. Do not attempt to wall mount
the TV yourself.
If the TV is mounted on a swivel base
or swivel arm, ensure no strain is placed
on the power cord cable when the TV is
swivelled. Strain on the power cord cable
can loosen connections and cause arcing
or fire.
Disconnect the TV from the mains and
antenna before lightning storms. During
lightning storms do not touch any part of
the TV, mains cord cable or antenna cable.
Be sure that you have full access to the
mains cord cable for easy disconnection of
the TV from the mains.
When disconnecting the TV from the
mains, be sure to:
Turn off the TV, then the mains power (if
available).
Unplug the mains cord cable from the
mains socket outlet.
Unplug the mains cord cable from the
power connector at the back of the TV.
Always pull the mains cord cable by the
plug. Do not pull the mains cord.
English
periods of time. Examples include screen
menus, teletext pages, black bars or stock
market tickers. If you must use stationary
images, reduce the screen contrast and
brightness to avoid screen damage.
Environmental care
•
Permanent hearing loss can occur if you
use earphones or headphones at high
volumes. Though high volume may sound
normal over time, it can damage your
hearing. To protect your hearing, limit the
amount of time you use earphones or
headphones at high volume.
Recycling your packaging
The packaging of this product is intended to
be recycled. Contact your local authorities for
information on how to recycle the packaging.
Disposing of your used product
Your product is manufactured with high-quality
materials and components that can be recycled
and reused. When you see the crossed-out
wheel bin symbol attached to a product, it
means the product is covered by the European
Directive 2002/96/EC:
Screen care
•
•
•
•
Turn off and unplug the mains cord cable
before cleaning the screen. Clean the
screen with a soft, dry cloth. Do not use
substances such as household cleaning
agents as theyse may damage the screen.
To avoid deformations or colour fading,
wipe off water droplets as soon as possible.
Do not touch, push, rub or strike the
screen with hard objects as this may
damage the screen permanently.
Where possible, avoid stationary images
that remain on-screen for extended
Do not dispose your used product with
household waste. Ask your dealer for
information on how to safely dispose of the
product. Uncontrolled waste disposal harms
both the environment and human health.
Disposing of used batteries
The supplied batteries do not contain
mercury or cadmium. Dispose supplied and all
other used batteries according to your local
regulations.
Power consumption
The TV consumes minimal energy in standby
mode to minimisze environmental impact.
Active power consumption is displayed at the
back of the TV. For more product specifications,
see the product leaflet at www.philips.com/
support.
EN
5
3 Your TV
Side connectors
Congratulations on your purchase, and
welcome to Philips! To fully benefit from the
support that Philips offers, register your product
at www.Philips.com/welcome.
TV overview
This section gives you an overview of
commonly-used TV controls and functions.
Side controls and indicators
VOLUME
4
3
MENU
PROGRAM
Use the TV side connectors to connect to
mobile devices such as a camera or highdefinition game console. You can also connect a
pair of headphones or a USB memory device.
Back connectors
2
1
POWER
5
a POWER
b Program +/c MENU
d
Volume +/-
e Standby indicator / Remote control
sensor
6
EN
Use the TV back connectors to connect to the
antenna and permanent devices such as a highdefinition disc player, DVD player or VCR (see
‘Connect devices’ on page 39).
Remote control
a
Standby
1
2
c Colour keys
From left: Red, green, yellow, blue
d Navigation keys
Up , Down , Left , Right , OK
e
3
English
b INPUT
Teletext
f MENU
g Program +/h
Volume +/-
4
5
6
7
8
EN
7
4 Get started
Wall mount the TV
Warning
This section helps you position and install the
TV and supplements the information provided
in the Quick Start Guide.
• Wall mounting of the TV should only be performed by
qualified installers. Koninklijke Philips Electronics N.V.
bears no responsibility for improper mounting that
results in accident or injury.
Note
• Refer to the Quick Start Guide for stand mounting
instructions.
Position the TV
In addition to reading and understanding the
safety instructions, consider the following before
positioning your TV:
• The ideal viewing distance for watching TV
is three times its screen size.
• Position the TV where light does not fall on
the screen.
• Connect your devices before you position
your TV.
• Your TV is equipped with a Kensington
Security Slot at on the back of the TV. If
connecting an anti-theft Kensington lock
(not supplied), position the TV within reach
of a permanent object (such as a table)
that can be easily attached to the lock.
Step 1: Purchase a VESA-compatible
wall bracket
Depending on the size of your TV screen,
purchase one of the following wall brackets:
TV screen VESA compatible
Special
size (inches/ wall bracket type
instructions
cm)
(millimetersmillimetres)
32”/81cm
Adjustable 300 x 300 The VESAcompatible
bracket
must be
adjusted
to 200 x
300 before
securing to
the TV
37”/94cm Fixed 300 x 300
None
42”/107cm Fixed 400 x 400
None
or larger
Step 2: Remove the TV stand
These instructions are only applicable to TV
models with mounted stands. If your TV stand
is not mounted, skip to Step 3. TV stands may
differ in shape on some TV models.
1
8
EN
Carefully place the TV face down on a
flat, stable surface that is covered by soft
cloth. The cloth should be thick enough to
protect your screen.
English
2
Using a cross-head screwdriver (not
supplied), unscrew the four bolts that
secure the stand to the TV.
2
Continue with the instructions provided
with your VESA-compatible wall bracket.
Note
• When securing the VESA-compatible wall bracket to
your TV, use M6 bolts for 32 inch models or M8 bolts
for larger models (bolts not supplied).
Connect the antenna cable
3
Firmly pull the stand from the bottom of
the TV. Place both the stand and bolts in a
secure location for future reinstallation.
Cable
1
Step 3: Secure the VESA-compatible
wall bracket to the TV
1
Locate the four mounting nuts at the back
of the TV.
2
3
Locate the TV ANTENNA connector at
the back of the TV.
Connect one end of an antenna cable (not
supplied) to the TV ANTENNA connector.
Use an adaptor if the antenna cable does
not fit.
Connect the other end of the antenna
cable to your antenna outlet, ensuring that
the cable is tightly secured at both ends.
EN
9
Connect the mains cord
Insert the remote control
batteries
Warning
• Verify that your mains voltage corresponds with the
voltage printed at on the back of the TV. Do not insert
the mains cord cable if the voltage is different.
1
To connect the mains cord
Note
• The location of the mains connector varies according
2
to TV model.
3
Open the battery cover on the back of the
remote control.
Insert the two supplied batteries (Size AA).
Be sure the + and - ends of the batteries
line up with the markings inside the case.
Close the cover back into position.
Note
• Remove the batteries if not using the remote control
for an extended period of time.
Switch on the TV
The first time you switch on the TV, check that
the mains cord cable is properly connected.
When ready, turn on the mains (if mains switch
is available), then press POWER on the side of
the TV.
Note
• Certain TV models require you to press and hold
UK - EIRE
1
2
3
10
Locate the AC IN mains connector at the
back or on the bottom of the TV.
Connect the mains cord cable to the AC
IN mains connector.
Connect the mains cord cable to the
mains, ensuring that the cord cable is tightly
secured at both ends.
EN
POWER for up to two seconds. A beep sound
indicates that your TV is switched on. Your TV may take
up to 15 seconds to start.
1
English
First time setup
The first time the TV is switched on, a
language selection menu appears. Select
your language and follow the on-screen
instructions to set up the TV.
Menu language
Please select your
language...
English
Español
Français
Hrvatski
Italiano
using cursor up and
down
Magyar
...
Next
EN
11
5 Use your TV
Tip
• Though your TV consumes very little power when in
standby, energy continues to be consumed. When not
in use for extended periods of time, switch off and
disconnect the TV from the mains.
This section helps you perform basic TV
operations. Instructions on advanced TV
operations are also available (see ‘Use more of
your TV’ on page 15).
Switch on the TV from standby
Switch your TV on/off or to
standby
Switch on your TV
•
Note
POWER
1
•
1
Press POWER (1) on the side of the TV.
Switch your TV to standby
•
• If you cannot locate your remote control and you
want to switch on the TV from standby, press POWER
on the side of the TV. This switches off your TV. Press
POWER again to switch the TV back on.
If the power indicator (1) is off, press
POWER on the side of the TV.
Switch off the TV
Watch TV
Switch channels
Press Standby on the remote control.
» The power indicator switches to
standby (red).
•
12
If the power indicator is in Standby
(red), press Standby on the remote control.
EN
Press a number (1 to 999) or press - P +
on your remote control.
•
Press Program +/- on the side controls of
the TV.
Press
Previous channel on the
remote control to return to the previouslyviewed TV channel.
Note
English
•
• If headphones are connected, adjust volume by
changing headphone volume. You must press the
button on the remote control to mute audio from the
TV speakers. Pressing Volume +/- turns on the TV
speakers again.
Switch channels (digital receiver)
Watch connected devices
1
2
3
4
5
Switch on the digital receiver.
Press INPUT on the remote control.
Select the input your digital receiver is
connected to.
Press OK to select the digital receiver.
Use the remote control of the digital
receiver to select TV channels.
Adjust volume
1
2
3
4
Switch on the device.
Press INPUT on the remote control.
Select the input your device is connected
to.
Press OK to select the device.
Use teletext
•
•
•
Press
+/- on the remote control.
Press
Volume +/- on the side controls
of your TV.
Press on the remote control to mute
the sound. Press again to un-mute the
sound.
1
2
Press Teletext on the remote control.
» The main index page appears.
To select a page:
• Enter the page number with the
number keys.
EN
13
Press - P + or
to view the next or
the previous page.
Press a colour key to select one of the
colour- coded items at the bottom of
the screen.
•
•
3
Press Teletext again to switch off
teletext.
Tip
• Press
Previous channel to return to the previously
viewed page.
Note
• For UK users only:
• Some digital TV channels offer dedicated digital text
services (for example, BBC1).
Advanced information on teletext is available
(see ‘Use advanced teletext features’ on page
24).
14
EN
English
6 Use more of
your TV
1
This section helps you perform advanced TV
operations.
2
3
4
20
19
Remote control overview
18
This section provides a detailed overview of
remote control features.
17
5
6
7
16
8
9
15
10
11
12
14
a
13
Standby
Switches the TV on from standby or back
to standby.
b INPUT
Selects connected devices.
c
Dual Screen
EN
15
Splits the current channel or source on the
left of the screen. Teletext appears on the
right.
d
Picture format
Selects a picture format.
e Colour keys
Selects tasks or teletext pages.
f GUIDE
Toggles the Electronic Programme Guide
on or off. Only active with digital channels.
g OK
Accesses the [All channels] menu or
activates a setting.
t MHEG CANCEL
Cancels digital text or interactive services
(UK only).
Use TV menus
On-screen menus help you install your TV,
adjust picture and sound settings and access
other features. This section describes how to
navigate the menus.
Access the main menu
h Navigation keys
Up, Down, Left and Right keys navigate the
menu.
i
Teletext
Toggles teletext on or off.
j Program +/Switches to the next or previous channel.
k
Mute
Mutes or restores sound.
1
l Number keys
Selects a channel, page or setting.
m
Television
Volume +/Increases or decreases volume.
p MENU
Toggles the [All channels] menu on or off.
q OPTION
Activates the [Quick access] menu.
r DEMO
Toggles the [Demo] menu on or off.
s
Subtitle
Activates or deactivates subtitles.
16
EN
TV menu
Channel list
Previous channel
Returns to the previously-viewed channel.
Programme guide
n INFO
Displays programme information, if
available.
o
Press MENU on the remote control to
display the main menu.
Multimedia
2
•
•
•
Press MENU to exit.
The main menu offers the following items:
[TV menu]
Select this menu for installation, picture,
sound settings and other feature settings.
[Channel list]
Select this item to display the Channel list.
Create your Favourite channel lists here.
[Programme guide]
•
Use the main menu
The following example describes how to use
the main menu.
TV settings
Settings assistant
English
Available when digital channels are installed,
this item displays information about the
digital programs.
[Multimedia]
Select this item to view photos or play
music stored on a USB device (see ‘View
photos and listen to music’ on page 31).
Settings assistant
Reset smart settings Start now
Picture
Sound
4
Press
to select [Picture].
TV settings
Picture
Settings assistant
Contrast
Reset smart settings Brightness
Colour
Picture
Hue
Sound
Sharpness
Tint
1
Pixel Plus
HD Natural Motion
Press MENU on the remote control to
display the main menu.
Dynamic contrast
Noise reduction
TV menu
Television
Channel list
MPEG artefact reduction
Colour enhancement
Programme guide
Multimedia
2
3
Press
Active Control
Light sensor
TV menu
TV settings
TV settings
Features
Installation
Settings assistant
Reset smart settings
Picture
Software update
Sound
Press
Picture format
to enter the [TV menu].
5
Press
to enter the [Picture] settings.
to enter the [TV Settings] menu.
EN
17
Picture
Contrast
Contrast
Brightness
90
47
Colour
Hue
52
0
Sharpness
4
Brightness
Tint
Pixel Plus
HD Natural Motion
6
Press
to select [Brightness].
Picture
Brightness
Contrast
Brightness
98
47
Colour
Hue
52
0
Sharpness
4
8
9
Press
or to adjust the setting.
Press to return to the [Picture] settings
or press MENU to exit.
Note
• More choices are available when digital channels are
installed and broadcast.
Tint
Pixel Plus
HD Natural Motion
7
Press
to enter the [Brightness] setting.
Use the Quick access menu
The [Quick access] menu gives direct access to
some often-needed menu items.
Note
• When digital channels are installed and broadcasted,
the relevant digital options are displayed in the [Quick
access] menu.
1
2
18
EN
Press OPTION on the remote control.
Press, or to select an option:
• [Audio language] (digital)
• [Subtitle language] (digital)
• [Subtitle]
• [Picture format]
• [Equalizer]
• [Clock]
4
5
Press OK to display the selected option
menu.
Press
Navigation keys to adjust the
settings in the menu.
Press OPTION to exit the menu.
Adjust picture and sound
settings
English
3
This section describes how to adjust picture
and sound settings.
Use settings assistant
Use [Settings assistant] to guide you through
picture and sound settings.
1
2
3
4
To display or hide the clock
1
In the [Quick access] menu, select
[Clock] and press OK to display the clock
permanently.
Quick access
5
6
Audio language
Subtitle language
Subtitle
7
Picture format
Press MENU on the remote control and
select [TV menu] > [TV Settings] >
[Settings assistant].
Press to enter.
Press OK to [Start now].
Press the green key on the remote control
to start the assistant.
Press or to select the left or right side
to make your choice.
Press the green key to go to the next
setting.
» You will go through several settings.
When finished, you will be prompted
to store these settings.
Press the green key to store all your
settings.
Equalizer
Clock
2
3
Press OPTION and press
[Clock] again.
to select
Press OK to hide the clock.
EN
19
Adjust picture settings
This section describes how to adjust picture
settings.
1
•
Press MENU on the remote control and
select [TV menu] > [TV Settings] >
[Picture].
•
TV settings
Picture
Settings assistant
Contrast
Reset smart settings Brightness
Colour
Picture
Hue
Sound
Sharpness
Tint
•
Pixel Plus
HD Natural Motion
Dynamic contrast
Noise reduction
MPEG artefact reduction
Colour enhancement
•
•
Active Control
Light sensor
Picture format
2
3
20
Press
to enter the list.
Press
to select a setting:
• [Contrast]
Changes the level of bright parts in
the picture keeping the dark parts
unchanged.
• [Brightness]
Changes the level of light in the
picture.
• [Colour]
Changes the level of saturation.
• [Hue]
If NTSC is broadcast, this level
compensates the colour variations.
• [Sharpness]
EN
•
•
•
•
Changes the level of sharpness of fine
details.
[Tint]
Sets the colours to [Normal],
[Warm] (reddish) or [Cool] (bluish).
Select [Custom] to make a setting of
your own.
[Custom] tint
If [Custom] is selected in the
Tint menu, follow the on-screen
instructions to change the value of:
• [R-WP] (Red White Point)
• [G-WP] (Green White Point)
• [B-WP] (Blue White Point)
• [R-BL] (Red Black Level)
• [G-BL] (Green Black Level)
[Pixel Plus]
Enables or disables Pixel Plus HD,
which fine tunes each pixel to match
surrounding pixels. This produces a
brilliant high definition image.
[HD Natural Motion]
Reduces the field and line flicker
and reproduces smooth movement
especially in movies. Set the level to
Maximum, Minimum or Off.
[Dynamic contrast]
Enhances the contrast in the
picture as the image on the screen
changes. Set the level to Minimum,
Medium, Maximum or Off. Medium is
recommended.
[Noise reduction]
Filters and reduces the noise in the
picture. Set the level to Minimum,
Medium, Maximum or Off.
[MPEG artefact reduction]
Smoothens the transitions on digital
pictures. Switches MPEG artefact
reduction On or Off.
[Colour enhancement]
Makes colours more vivid and
improves the resolution of details
in bright colours. Set the level to
Minimum, Medium, Maximum or Off.
[Active Control]
•
Use smart settings
select [TV menu] > [TV Settings] >
[Picture] > [Picture format].
English
•
Corrects all incoming signals to
provide the best picture possible.
Switches Active control On or Off.
[Light sensor]
Adjusts picture settings to match
lighting conditions in the room.
Switches Light sensor On or Off.
[Picture format]
Change the picture format to suit
your content (see ‘Change picture
format’ on page 21).
2
Press or to select one of the following
picture formats:
• [Auto format] (Not for PC)
Apart from manually adjusting picture settings,
you can use smart settings to set your TV to a
predefined picture and sound setting.
1
2
3
4
Press MENU on the remote control and
select [TV menu] > [TV Settings] >
[Reset smart settings].
Press
to enter the list.
Press or to select one of the following
settings:
• [Current]
Applies manually selected picture and
sound settings.
• [Standard]
Applies natural picture and sound
settings suitable for most living room
conditions.
• [Vivid]
Applies brilliant picture and
sound settings suitable for bright
surroundings.
• [Movie]
Applies dynamic picture and sound
settings suitable for a complete
cinematic experience.
Enlarges the picture automatically to
fill the screen. Subtitles remain visible.
Note
• We recommend you use [Auto format] for minimal
screen distortion.
•
[Super zoom] (Not for HD)
Press the green key to store your
selection.
Change picture format
Change the picture format to suit your content.
1
Press
Picture format on your remote
control. Alternatively, press MENU and
Removes the black bars on the side of
4:3 broadcasts with minimal distortion.
EN
21
[4:3] (Not for HD)
•
Displays the classic 4:3 format.
•
Scales the classic 4:3 format to 16:9.
[Wide screen]
•
Stretches the classic 4:3 format to
16:9
[Unscaled] (Only for HD and PC)
Note
• Constant use of the [4:3] picture format can cause
screen distortion. We recommend you use [Auto
format].
[Movie expand 14:9] (Not for HD)
•
Scales the classic 4:3 format to 14:9.
Note
• Constant use of the 14:9 picture format can cause
screen distortion. We recommend you use [Auto
format].
•
[Movie expand 16:9] (Not for HD)
Maximum sharpness though distortion may
appear on borders. Also, black bars may appear
with pictures from your PC.
Adjust sound settings
This section describes how to adjust sound
settings.
22
EN
2
Press MENU on the remote control and
select [TV menu] > [TV Settings] >
[Sound].
Press
• To enable or disable the volume bar that appears
when you change the volume, press MENU on the
remote control and select [TV menu] > [Installation]
> [Preferences]. Press to enter the list and select
[Volume bar on] or [Volume bar off].
to enter the list.
TV settings
Sound
Settings assistant
Equalizer
Reset smart settings Volume
Balance
Picture
Sound
Tip
•
•
Audio language
Dual I/II
Mono/Stereo
•
Surround mode
•
Headphone volume
Auto volume leveling
Delta volume
Auto surround
3
•
•
Press or to select one of the following
settings:
[Equalizer]
Changes the bass and treble of the sound.
Select each bar to change a setting.
Alternatively, press the colour keys to
select a pre-defined equaliszer setting:
• [Standard]
Equaliszer set to neutral.
• [Speech]
Equaliszer settings maximiszed for
speech-based audio.
• [Multimedia]
Settings maximiszed for different
audio types.
• [Music]
Settings maximiszed for music.
[Volume]
Changes the volume.
English
1
•
•
[Balance]
Sets the balance of the left and right
speakers to best fit your listening position.
[Audio language]
Lists audio languages available for a digital
channel (unavailable on analogue channels).
[Dual I-II]
If available, choose between two different
languages.
[Mono/Stereo]
If stereo broadcasting is available, choose
between mono or stereo.
[Surround mode]
If surround sound is available, enable it for
more spatial sound.
[Headphone volume]
Changes the volume of your headphones.
Note
• When headphones are connected, press the
Mute
button on the remote control to mute audio from the
TV speakers. Pressing Volume +/- buttons un-mutes
the TV speakers.
•
•
•
[Automatic volume leveling]
Reduces sudden volume changes, for
example, during commercials or when
switching from one channel to another.
Select [On] or [Off].
[Delta volume]
Levels out volume differences between
channels or connected devices. You must
switch to the connected device before
changing the Delta volume.
[Auto surround]
Automatically switches the TV to the best
surround sound mode available from a
broadcast. Select [On] or [Off].
EN
23
Change to Shop or Home
mode
1
2
3
4
5
Press MENU on the remote control
and select [TV menu] > [Installation] >
[Preferences] > [Location].
Press
to enter the [Location] menu.
Use or to select the TV mode:
• [Shop]
Sets smart settings to [Vivid], ideal for
a shop environment. The flexibility to
change settings is limited.
• [Home]
Gives home users the full flexibility to
change all TV settings.
Press OK to confirm.
Press MENU to exit.
Use advanced teletext
features
Your TV has a 1,200- page memory that stores
broadcasted teletext pages and subpages. The
teletext memory reduces page loading time.
» The T.O.P. overview appears.
3
4
Use
or
to select a subject.
Press OK to view the page.
Use dual screen teletext
Enabling dual screen teletext displays your
channel or source on the left of the screen.
Teletext is displayed on the right.
1
2
3
Press Dual Screen on your remote
control to enable dual screen teletext.
Press Dual Screen again to display
normal teletext.
Press
Teletext to switch off teletext.
Select teletext subpages
Search teletext
A teletext page can hold several subpages.
Subpages are displayed on a bar next to the
main page number.
Quickly jump to a subject linked to a series of
page numbers or search for specific words in
teletext pages.
1
2
3
Press
Teletext on the remote control.
Select a teletext page.
Press
or
to select a subpage.
Select T.O.P. teletext broadcasts
Table Of Pages (T.O.P.) teletext broadcasts
allow you to jump from one subject to another
without using page numbers. T.O.P. teletext is
not broadcast on all TV channels.
1
2
24
Press
Teletext on the remote control.
Press INFO.
EN
1
2
3
4
5
Press
Teletext on the remote control.
Press OK to highlight the first word or
number.
Press
or
to jump to the next word
or number on the page.
Press OK to search a page which holds the
highlighted word or number.
Press until no word or number is
highlighted to exit [Search].
For more comfortable reading, you can enlarge
the teletext page.
1
2
•
Press Teletext on the remote control
and select a teletext page.
Press OPTION on the remote control to
enlarge the top part of the page.
•
4
5
6
3
4
5
Press OPTION again to view the enlarged
lower part of the page.
Press or to scroll through the
enlarged page.
Press OPTION again to return to the
normal page size.
Use the teletext menu
With the options in the teletext menu you
can reveal hidden information, cycle subpages
automatically and change the character setting.
1
2
Press
Teletext on the remote control.
Press MENU. The [TELETEXT MENU]
menu appears.
Teletext menu
3
Reveal
Off
Cycle subpages
Off
Language
Gr. II
Press or to select an option.
• [Reveal]
Hide or reveal hidden information on
a page, such as solutions to riddles or
puzzles.
[Cycle subpages]
If subpages are available for the
selected page, you can cycle subpages
automatically.
[Language]
Some languages use a different set of
characters. If using a different language,
switch to the appropriate language
group to display the text correctly.
Press OK to change an option:
Press MENU to exit [TELETEXT MENU]
menu.
Press
Teletext to switch off teletext.
Use digital text services (UK only)
Some digital TV broadcasters in UK offer
dedicated digital text or interactive services
(for example, BBC1). These services work like
normal teletext with the addition of number,
colour and navigation keys.
1
2
3
4
5
Press
Press
items.
Teletext on the remote control.
or
to select or highlight
Press one of the colour keys to select an
option.
Press OK to confirm or activate.
Press MHEG CANCEL to cancel digital
text or interactive services.
Digital text services are blocked when subtitles
are broadcasted and [Subtitle On] is set in the
[Features]menu (see ‘Use subtitles’ on page 30).
Use Teletext 2.5
If broadcasted by the TV channel, Teletext 2.5
offers more colours and better graphics than
normal teletext. Teletext 2.5 is switched on by
default.
1
Press MENU on the remote control
and select [TV menu] > [Installation] >
[Preferences] > [Teletext 2.5].
EN
25
English
Enlarge teletext pages
2
3
4
Press
to enter the list.
Select [On] or [Off].
Press OK to change the option.
Create favourite lists
Use the [All channels] list or setup a favourite
list of your own with preferred TV channels and
radio stations. Each member of your family can
create his or her own favourite list.
Select a favourite list
1
Press OK on the remote control.
Alternatively, press MENU and select
[Channel list].
» If this is new installation, the [All
channels] list is displayed.
Setup a favourite list
1
2
3
4
5
6
7
8
All channels
....
EXT 3
HDMI ...
A
1 Analogue channel 1
3 Digital channel 2
4 Radio channel 1
....
Select list
» If this is not a new installation, the last
selected favourite list appears.
3
4
Press the red key to display all favourite
lists.
Press
or
Press the red key to show all favourite lists.
Press
or
to select a list.
Press OK.
Press the green key to enter [Edit list]
mode.
» The selected list displays a full channel
list.
Press
or
to highlight a channel.
Press OK to mark (or unmark) the
highlighted channel.
» The channel is added to (or removed
from) the selected list.
Press the green key again to exit [Edit list]
mode.
» The modified channel list appears
again.
Select a channel from a favourite list
2 Digital channel 1
2
Press OK on the remote control.
» The last selected list appears.
to select a list.
Press OK.
» The selected favourite list appears.
5
Press OK again to exit.
26
EN
1
2
3
Press OK on the remote control. The last
selected channel list appears.
Use
or
to highlight a channel.
Press OK. The TV tunes to that channel.
Tip
Switch on EPG
English
Note
• The first time you use EPG, you may be prompted
to perform an update. If so, follow the on-screen
instructions.
1
Press GUIDE on the remote control.
• Press - P + on the remote control to scan channels in
your selected list. You can select channels not in your list
by pressing the number keys.
Use the Electronic
Programme Guide
EPG is an on-screen guide that displays
scheduled digital TV programs. This guide is
not available with analogue channels. You can
navigate, select and view programs by time, title
or genre.
There are two types of EPG, [Now and Next]
and [7 or 8 day] EPG. [Now and Next] is
always available but the [7 or 8 day] EPG is only
available in certain countries.
With the EPG menu you can:
• View a list of currently broadcast digital
programs
• View upcoming programs
• Group programs by genre
• Set reminders when programs start
• Setup preferred EPG channels
Alternatively, press MENU and select
[Programme guide].
The following EPG types appear:
• [Now and Next]
Detailed information about the
current programme is displayed.
26 BBC1
Tue., 12 Sep
09:17
Title : Commonwealth Games
Info: 7:50 - 12:30 : 280 min
..........
Exit
Next
Press -P+ to change channel.
•
[7 or 8 day]
It may take some time to receive [7
or 8 day] EPG data. When loaded, a
list of TV programs is displayed.
EN
27
Programme guide
Tue., 12 Sep
09:55
Around
BBC ONE
07:50
BBC TWO
five
Commonwealth
Commonwealth
09:50 Tweenies
10:15
Something Special
09:00 The Wright Stuff
10:30 Trisha Goddard
BBC THREE 05:32 This is BBC THREE
12:00 This is BBC THREE
BBC FOUR 05:32 This is BBC FOUR
12:00 This is BBC FOUR
09:20
abc1
Moonlighting
Remind
Watch
13:50 Anastasia
2
3
Next
12:30
10:15
Daddio
Jump to ...
Use the colour keys on the remote control
to activate available actions:
• [Next]
Displays information about the next
programme.
• [Remind]
Marks a programme as a reminder.
• [Watch]
Watch or listen to a current
programme.
• [Jump to...]
Jumps to the next or previous day.
• [Info]
If available, displays information about
a selected programme.
Press GUIDE to exit the EPG.
Press MENU on the remote control. The
[Programme guide] menu appears.
Programme guide
What's on
What's on
12:30 South Today
11:50 Working Lunch
Scheduled remind... 11:55 Melrose Place
Preferred EPG ch... 13:00 In aller Freund
Acquire EPG data
EN
to select a menu option.
Press
to enter.
Press
or
to make a selection.
Press OK or the green key to activate the
selection.
Press GUIDE to exit the EPG.
• Only channels marked as preferred EPG channels
appear in the [Programme guide] menu.
Use timers and Child lock
This section describes how to switch the TV on
or off at a specified time and to use cChild lock.
Automatically switch the TV to
standby (Sleeptimer)
Sleeptimer switches the TV to standby after a
defined period of time.
1
2
3
Press GUIDE on the remote control.
Search by genre
or
Note
0010 - EEN
Searching by genre, scheduling reminders
and more features are available through the
[Programme guide] menu.
28
7
Press
Info
More on ‘7 or 8 day’ EPG
1
2
3
4
5
6
4
Press MENU on the remote control
and select [TV menu] > [Features] >
[Sleeptimer].
Press
to enter the [Sleeptimer] bar.
Press or to set the sleep time.
» This can be up to 180 minutes in steps
of five minutes. If set to zero minutes,
the Sleeptimer is switched off.
Press OK to activate the Sleeptimer.
Note
• You can always switch off your TV earlier or reset
Sleeptimer during the countdown.
Automatically switch the TV on (On
timer)
On timer switches the TV to a specified channel
at a specified time, from standby.
2
3
4
5
Press MENU on the remote control and
select [TV menu] > [Features] > [On
timer].
Press
to enter the [On timer] menu.
Use
or
to select and enter the
menu items to set a channel, day of the
week, frequency and starting time.
Press OK to confirm.
Press MENU to exit.
Tip
To lock or unlock all channels and
connected devices
1
2
In the [Child lock] menu, select [Lock] or
[Unlock].
Press OK.
To lock a programme or all channels
from a certain time
1
In the [Child lock] menu, select [Custom
lock].
• To switch off [On timer], select [Off] in the [On timer]
menu.
Lock TV channels or connected
devices (Child lock)
Lock TV channels or connected devices with
a four- digit code to prevent children from
watching unauthoriszed content.
To set or change the Child lock code
1
2
3
Press MENU on the remote control and
select [TV menu] > [Features] > [Set
code]/[Change code].
Press
to enter the code setup.
Enter your code with the number keys. The
[Features] menu reappears with a message
confirming that your code is created or
changed.
Tip
• If you forget your code, enter ‘8888’ to override any
existing codes.
To enter the Child lock menu
1
2
Press MENU on the remote control and
select [TV menu] > [Features] > [Child
lock] and press to enter your code.
2
3
4
5
6
7
8
9
Child lock
Custom lock
Lock
Custom lock
Lock after
Channel lock
Unlock
Parental rating
Press
to enter the [Custom lock] menu.
Press again to enter the [Lock after]
menu.
Select [On] to enable the [Timer lock].
Press .
Select [Time].
Press .
Enter the time with
or
and .
Press OK.
To lock one or more channels and
connected devices
1
2
3
4
5
6
In the [Child lock]Child lock menu, select
[Custom lock]Custom lock.
Press
to enter.
Press
or
to select [Channel lock].
Press .
Press or to select the channel or
device you want to lock or unlock.
At each selection, press OK to lock or
unlock the channel or device.
Enter your code with the number keys.
EN
29
English
1
To set parental ratings
Some digital broadcasters rate their
programmes according to age. You can set your
TV to display only programmes with age ratings
higher than your child’s.
1
2
3
4
5
6
In the [Child lock] menu, select [Custom
lock].
Press
to enter.
Press
or
to select [Parental rating].
or
to select an age rating.
30
Subtitle
Features
Installation
Subtitle language
Sleeptimer
Software update
Child lock
On timer
Press
Press MENU to exit the [Child lock]
menu.
Common interface
Demo
7
8
Select an analogue TV channel.
Press
Teletext on the remote control.
Enter the three- digit page number of the
subtitle page.
Press
Teletext to switch off teletext.
Press MENU on the remote control
and select [TV menu] > [Features] >
[Subtitle].
Press
EN
to enter the list.
Press or to select [On] to display
subtitles always or [On during mute] to
display subtitles only when the sound is
muted with the key on the remote
control.
Press OK to return to the [Features]
menu.
Note
• You must repeat this procedure to enable subtitles on
each analogue channel.
Enable subtitles on analogue TV
channels
6
TV settings
Press .
You can enable subtitles for each TV channel.
Subtitles are broadcast via teletext or DVBT digital broadcasts. With digital broadcasts,
you have the additional option of selecting a
preferred subtitle language.
4
5
Features
Set/Change code
Use subtitles
1
2
3
TV menu
Enable subtitles on digital TV channels
1
2
Press MENU on the remote control
and select [TV menu] > [Features] >
[Subtitle].
Press
to enter the list.
Features
TV settings
Subtitle
Features
Installation
Subtitle language
Sleeptimer
Software update
Child lock
Set/Change code
On timer
View photos and listen to
music
English
TV menu
Connect an external USB storage device and
view pictures (JPEG format only) or listen to
music (MP3 or Linear PCM formats only).
Note
• Philips will not be held responsible if your USB storage
device is not supported nor shall Philips accept any
liability for damage or loss of stored data.
Common interface
Demo
3
4
Press or to select [On] to display
subtitles always or [On during mute] to
display subtitles only when the sound is
muted with the key on the remote
control.
Press OK to return to the [Features]
menu.
Select a subtitle language on digital TV
channels
Connect a USB storage device
While your TV is on, connect your USB storage
device to the USB port on the side of your
TV (see ‘Connect devices’ on page 39). The
main menu appears automatically and the
name of the USB device is highlighted next to
[Multimedia].
Television
Channel list
Programme guide
Note
• When you select a subtitle language on a digital TV
channel as described below, the preferred subtitle
language set in the [Installation] menu is temporarily
overruled.
1
2
3
4
Press MENU on the remote control and
select [TV menu] > [Features] > [Subtitle
language].
Press to enter the list of available
languages.
Press
or
Press OK.
to select a subtitle language.
TV menu
Multimedia
Disconnect a USB storage device
Caution
• To avoid damaging your USB device, always follow the
procedure described below when disconnecting.
1
2
Press MENU on the remote control to
exit the [Multimedia] menu.
Wait five seconds before disconnecting the
USB device.
EN
31
View your photos
1
After connecting your USB storage
device to the TV, press to enter the
[Multimedia] menu. [Picture] is highlighted.
USB
Picture
Picture
Music
7
8
Press
Jean.jpg
•
•
Afrika_2001
•
3
Afrika_2001
Paris_2005
My_car.jpg
Jean.jpg
Kenya.jpg
Congo.jpg
Victoria.jpg
Mary.jpg
Cairo.jpg
Dakar.jpg
Press or to select a picture or a
picture album on the USB device.
Afrika_2001
Afrika_2001
Kenya.jpg
Cairo.jpg
4
5
6
32
Press OK to view the picture or to start a
slide show of the pictures in the album.
Press OK to pause the slide show. Press
OK again to restart.
Press one of the colour keys on
the remote control to perform the
EN
•
•
•
[No details]/[More details]
Displays the picture name, date, size and
next picture in the slide show.
[Transitions]
Displays the list of available transition styles
of the pictures. Press or to select and
press OK to activate.
[Slide time]
Sets the time lag for picture transitions:
[Short], [Medium] or [Long].
[Rotate]
Rotates a picture.
[Zoom]
Displays a list of available zoom
magnifications.
[Start show]/[Stop show]
Starts or stops a slide show.
View pictures as thumbnails
Thumbnails allow you to view picture albums in
an overview format.
Kenya.jpg
Congo.jpg
Victoria.jpg
Dakar.jpg
Press and select another picture or
another album.
Slide show settings
to enter the [Picture] folder.
Picture
Press the blue key to stop the show and
to see more functions. If the function bar
at the bottom disappears, press any colour
key to make it reappear.
Afrika_2001
Paris_2006
My_car.jpg
Mary.jpg
2
corresponding function shown at the
bottom of the screen.
1
2
3
4
5
6
7
Select a picture album.
Press
to enter the picture list.
Press the green key.
Press
or ,
or
to highlight a picture.
Press OK to view the picture.
Press to return to the thumbnail
overview.
Press the green key again to go back to the
picture list.
1
2
3
4
After connecting your USB storage
device to the TV, press to enter the
[Multimedia] menu.
Select [Music] then press
[Music] folder.
Press or
album.
to enter the
to select a song or a music
Press OK to play the selected song or
album.
Philips continuously tries to improve its
products and we strongly recommend that
you update the TV software when updates are
available. Check www.philips.com/support for
availability.
Check your current software version
1
Music settings
•
•
•
[No details]/[More details]
Displays the file name.
[Repeat: one]/[Repeat: all]
Repeat a song or an album.
[Shuffle]
Play songs in a random sequence.
View a slide show with music
You can view a slide show of your stored
pictures with background music.
1
2
Select an album of songs first then press
OK.
Select an album to display then press OK.
Listen to digital radio
channels
If digital broadcasting is available, digital radio
channels are installed automatically during
installation. You can reorder digital radio
channels after installation (see ‘Rearrange
channels’ on page 37).
1
2
3
Press OK on the remote control. The [All
channels] menu is displayed.
Press MENU on the remote control and
select [TV menu] > [Software update] >
[Current software info].
Check if software updates are
available
Philips periodically transmits messages via digital
broadcast, announcing when software updates
are available:
1
Press MENU on the remote control and
select [TV menu] > [Software update] >
[Announcement].
Update software (digital broadcasts)
If using (DVB-T) digital broadcasts, your TV
automatically receives software updates. If you
receive a message on-screen prompting you to
update your software:
• Select [Now] (recommended) to update
the software immediately.
• Select [Later] to be reminded to update
the software later.
• Select [Cancel] to exit the update (not
recommended). If you cancel the update,
manually update the software by pressing
MENU and selecting [TV menu] >
[Software update] > [Local updates].
Follow the on-screen instructions.
Use the number keys to select a radio
channel.
Press OK.
EN
33
English
Update your TV software
Listen to music
Update software (analogue
broadcasts)
Before performing this procedure be sure to:
• Set aside some time to complete the
entire update.
• Have available a USB storage device with
at least 64MB of storage space.
• Have access to a computer with a USB
port and internet access.
1
2
3
4
5
6
7
34
Press MENU on the remote control and
select [TV menu] > [Software update] >
[Update assistant].
Select [Start now].
Insert the USB storage device and press
the green key. An ID file is copied to the
USB device.
Press the green key to finish.
Connect the USB storage device to your
computer.
In your computer, browse to the USB
storage device and double-click the
‘Update’ HTML file.
Follow the on-screen instructions to
complete the update.
EN
The first time you setup your TV, you will be
prompted to select an appropriate menu
language and to perform automatic installation
of all TV and digital radio channels (if available).
This chapter provides instructions on how to
reinstall channels as well as other useful channel
installation features.
Note
• Re-installing channels modifies the [All channels] list.
Automatically install channels
This section describes how to search and store
channels automatically. Instructions are for both
digital and analogue channels.
Step 1 Select your menu language
Skip to Step 3 if your language settings are
correct.
1
Press MENU on the remote control
and select [TV menu] > [Installation] >
[Languages].
to select your language.
Press OK to confirm.
Select the country where you are located. The
TV installs and arranges channels according to
your country.
Note
• Skip to Step 3 if your country settings are correct.
1
Languages
Country
Time zone
Channel install...
Menu language
Preferred audio
Preferred subtitles
Hearing impaired
2
3
4
to enter the [Languages] menu.
or
Step 2 Select your country
Languages
Press
Press
Press to return to the [Installation]
menu.
In addition to menu language, you can
configure the following language settings
via the [Languages] menu (digital channels
only):
• [Preferred audio]
Select one of the available audio
languages as your preferred audio
language.
• [Preferred subtitles]
Select one of the available subtitle
languages (see ‘Select a subtitle
language on digital TV channels’ on
page 31).
• [Hearing impaired]
If available, select [On] to display the hearing
impaired version of your preferred audio or
subtitle language.
Installation
Preferences
Connections
…
2
3
4
5
In the [Installation] menu, press
select [Country].
Press
to enter the list.
Press
or
to
to select your country.
Press to return to the [Installation]
menu.
Step 3 Select your time zone
This option is only available for countries with
different time zones. Skip this step if it is not
applicable.
EN
35
English
7 Install channels
1
2
3
4
In the [Installation] menu, press
select [Time zone].
Press
to enter the list.
Press
or
to
Step 1 Select your system
Note
to select your time zone.
Press to return to the [Installation]
menu.
• Skip to Step 2 if your system settings are correct.
1
Step 4 Install channels
Your TV searches and stores all available digital
and analogue TV channels as well as digital radio
channels.
1
2
3
4
5
6
7
In the [Installation] menu, press
select [Channel installation].
to
Press to enter the [Channel installation]
menu. [Automatic installation] is
highlighted.
Press
to select [Start now].
Press OK.
Press the green key to start. The installation
may take a few minutes.
When the channel search is completed,
press the red key to return to the
[Installation] menu.
Press MENU to exit.
Press MENU on the remote control
and select [TV menu] > [Installation]
> [Channel installation] > [Analogue:
Manual installation].
Channel install...
Analogue: Manual...
Automatic install... System
Installation update Search
Digital: Test recept... Fine tune
Analogue: Manual... Store current ch...
Rearrange
Store as new ch...
2
3
4
5
Press to enter the [Channel installation]
menu. [System] is highlighted.
Press
to enter the [System] list.
Press or
region.
to select your country or
Press to return to the [Channel
installation] menu.
Tip
• When digital TV channels are found, the list of installed
channels may display empty channel numbers.
Step 2: Search and store new TV
channels
1
Manually install channels
This section describes how to search and store
analogue TV channels manually.
2
3
4
5
36
EN
Press MENU on the remote control
and select [TV menu] > [Installation]
> [Channel installation] > [Analogue:
Manual installation] > [Search].
Press
to enter the [Search] menu.
Press the red key and use the number keys
on the remote control to manually enter
the three digit frequency. Alternatively,
press the green key to automatically search
for the next channel.
Press
when the new channel is found.
Select [Store as new channel] to store the
new channel under a new channel number.
Press
to enter.
Press OK. [Done] appears.
Press MENU to exit.
Tip
• Delete all characters by pressing the yellow key. Delete
only the highlighted character by pressing the blue key.
Fine tune analogue channels
You can manually fine tune analogue channels
when reception is poor.
1
2
3
4
5
6
7
8
Press MENU on the remote control
and select [TV menu] > [Installation]
> [Channel installation] > [Analogue:
Manual installation] > [Fine tune].
Press
to enter the [Fine tune] menu.
Press
or
to adjust the frequency
Press when done.
Select [Store current channel] to store
the fine tuned channel under the current
channel number.
Press
to enter.
Press OK. [Done] appears.
Press MENU to exit.
Rename channels
1
2
3
4
5
6
Press MENU on the remote control
and select [TV menu] > [Installation] >
[Channel installation] > [Rearrange].
Press
to enter the [Rearrange] list.
Press or in the [Rearrange] list to
select the channel you want to rename.
Press the red key.
Press and to select characters or
and to change the characters. Space,
numbers (0-9) and other special characters
are located between z and A.
Press the green key or OK to finish.
Uninstall or reinstall channels
You can uninstall a stored channel or reinstall an
uninstalled channel.
1
2
3
4
5
Press MENU on the remote control
and select [TV menu] > [Installation] >
[Channel installation] > [Rearrange].
Press
to enter the [Rearrange] list.
Press or to select the channel you
want to uninstall or reinstall.
Press the green key to uninstall or reinstall
the channel.
Press MENU to exit.
Rearrange channels
1
2
3
4
5
Press MENU on the remote control
and select [TV menu] > [Installation] >
[Channel installation] > [Rearrange].
Press
to enter the [Rearrange] list.
Press or to select the channel you
want to rearrange.
Press the yellow key to move the channel
up the list or press the blue key to move
the channel down the list.
Press MENU to exit.
Manually update the channel
list
If your TV is in standby mode, an update is
performed every morning. This update matches
channels stored in your channel list with those
available from your broadcaster. If a channel is
EN
37
English
6
7
8
unavailable, it is automatically removed from the
channel list.
In addition to the automatic update, you can
manually update the channel list.
1
2
3
4
5
6
Press MENU on the remote control
and select [TV menu] > [Installation]
> [Channel installation] > [Installation
update].
Press to enter the [Installation update]
menu.
» [Start now] is highlighted.
Press OK.
Press the green key to start the update.
» This may take a few minutes.
When the update is complete, press
the red key to return to the [Channel
installation] menu.
If using digital broadcasts, you can check the
quality and signal strength of digital channels.
This allows you to reposition and test your
antenna or satellite dish.
2
3
4
5
6
38
Press MENU to exit.
Note
• If you have further problems with the reception of your
digital broadcast, contact a specialiszed installer.
Start a demo
1
2
3
4
Press the red key on the remote control.
Alternatively, press MENU on the remote
control and select [TV menu] > [Features]
> [Demo].
Press
to enter the [Demo] menu.
Select a demo and press OK.
Press the red key to exit.
Press MENU to exit.
Test digital reception
1
7
Press MENU on the remote control
and select [TV menu] > [Installation]
> [Channel installation] > [Digital: Test
reception].
Press to enter the [Digital: Test
reception] menu.
Press OK.
Press the green key to automatically start
the test or manually enter the frequency of
the channel you want to test.
» If the signal quality and strength is are
poor, reposition the antenna or satellite
dish and retest.
When complete, press the yellow key to
store the frequency.
Press the red key to return to the
[Channel installation] menu.
EN
Reset TV to factory settings
Resetting your TV to factory settings restores
default picture and sound settings. Channel
installation settings remain the same.
1
2
3
4
Press MENU on the remote control
and select [TV menu] > [Installation] >
[Factory settings].
Press to enter the [Factory settings]
menu. [Reset] is highlighted.
Press OK to reset to factory settings.
Press MENU to exit.
d SPDIF OUT
SPDIF sound output connector for home
theatres and other audio systems.
Connection overview
4 3
SPDIF
OUT
SERV. U
EXT 3
digital receivers, game consoles and other
component video devices.
2
1
EXT 2
EXT 1
(RGB/CVBS)
(RGB/CVBS)
9
Y
L
5
AUDIO OUT
Pb
10
R
Pr
L
AUDIO IN
11
12
13
R
75X
6
TV ANTENNA
14
8
AUDIO IN:
HDMI 3 HDMI 2
HDMI 1
LEFT / RIGHT
HDMI 1 / DVI
HDMI 2 / DVI
HDMI 3 / DVI
15
7
a EXT 1
First SCART connector for DVD players,
VCRs, digital receivers, game consoles and
other SCART devices. Supports Audio L/R,
CVBS in/out, RGB.
b EXT 2
Second SCART connector. Supports Audio
L/R, CVBS in/out, RGB.
e AUDIO OUT L/R
Sound output cinch connectors for home
theatres or other audio systems.
f TV ANTENNA
g HDMI 1/2/3
HDMI input connectors for Blu-ray Disc
players, digital receivers, game consoles and
other high-definition devices.
c EXT 3
Component video (Y Pb Pr) and Audio
L/R input connectors for DVD players,
EN
39
English
8 Connect devices
Note
HDMI - Highest quality
• The number of HDMI connectors available may vary
according to your TV model.
h AUDIO IN
Mini-jack connector for PC audio in (when
connecting a PC via a DVI-HDMI adaptor).
Side connectors
i Headphones
Stereo mini-jack.
j AUDIO L/R
Audio L/R input connectors for composite
and S-Video devices.
k VIDEO
Video input cinch connector for composite
devices.
l S-VIDEO
S-Video input connector for S-Video
devices.
m USB
USB connector for storage devices.
n HDMI
Additional HDMI connector for mobile
high-definition devices.
HDMI produces the best audio visual quality
possible. Both audio and video signals are
combined in one HDMI cable, providing an
uncompressed, digital interface between your
TV and HDMI devices. You must use HDMI to
experience full high-definition video. You must
also use HDMI cables to enable Philips EasyLink
(see ‘Use Philips EasyLink’ on page 45).
Tip
• If your PC only has a DVI connector, use a DVI-HDMI
adaptor to connect your device to a HDMI connector
at the back of the TV. You must connect a separate
audio cable from the device to the AUDIO IN mini-jack
connector.
Note
• Philips HDMI supports HDCP (Highbandwidth Digital
Contents Protection). HDCP is a form of Digital Rights
Management that protects high definition content in
DVD or Blu-ray Discs.
o COMMON INTERFACE
Slot for Conditional Access Modules.
Component (Y Pb Pr) - Higher quality
Select connection quality
This section describes how you can enhance
your audio visual experience by connecting
your devices with the best possible connectors.
After connecting your devices, be sure to
enable them (see ‘Setup devices’ on page 44).
40
EN
Component (Y Pb Pr) video provides better
picture quality than S-Video or composite
video connections. Though component video
supports high-definition signals, picture quality is
lower than HDMI and is analogue.
When connecting a component video
cable, match the cable colours to the EXT 3
connectors on the back of the TV. Also, connect
a Audio L/R cable to the red and white Audio
L/R input connectors at EXT 3.
S-Video - Good quality
English
An analogue connection, S-Video provides
better picture quality than composite video.
When connecting your device with S-Video,
plug the S-Video cable to the S-Video
connector on the side of the TV. You must
connect a separate Audio L/R cable from
the device to the red and white Audio L/R
connectors on the side of the TV.
Component video cable - Red, Green, Blue
S-Video cable and Audio L/R cable (Red, White)
Composite - Basic quality
Composite video provides basic analogue
connectivity, usually combining a (yellow) video
cinch cable with (red and white) Audio L/R
cinch cable. Match the cable colours when
connecting to the composite Video and Audio
L/R input connectors on the side of the TV.
Audio L/R cable - Red, White
SCART - Good quality
SCART combines audio and video signals in
one cable. Audio signals are stereo, while video
signals can be composite or S-Video quality.
SCART does not support high-definition video
and is analogue. Two SCART connectors are
provided on the TV, EXT 1 and EXT 2.
Composite audio/video cable - Yellow, red and
white
Connect devices
This section describes how to connect
various devices with different connectors and
EN
41
supplements examples provided in the Quick
Start Guide.
Caution
• Disconnect the mains cord cable before connecting
devices.
Satellite receiver
To receive analogue channels via antenna
and digital channels via a satellite receiver,
connect an antenna cable and SCART cable as
illustrated:
Note
• Different types of connectors may be used to connect
a device to your TV, depending on availability and your
needs.
Blu-ray disc player
For full high-definition video, connect a HDMI
cable as illustrated:
HDMI
OUT
BLU-RAY DISC PLAYER
DVD player
For DVD video, connect a SCART cable as
illustrated:
SATELLITE RECEIVER
HD digital receiver
To receive analogue channels via antenna
and digital channels via a HD digital receiver,
connect two antenna cables and HDMI cable as
illustrated:
HDMI
OUT
DVD Player
42
EN
OUT
IN
HD DIGITAL RECEIVER / HD SATELLITE RECEIVER
DVD recorder and home theatre
system
To receive analogue channels via antenna and
record programs on a combined DVD recorder
and digital receiver, connect two antenna cables
and one SCART cable as illustrated:
To receive analogue channels via antenna,
output sound to a home theatre system and
record programmes on a DVD recorder,
connect two antenna cables, one SCART cable
and two digital audio cables as illustrated:
OUT
IN
DVD RECORDER
IN
OUT
DVD RECORDER / DIGITAL RECEIVER
Separate DVD recorder and receiver
DIGITAL
AUDIO
IN
HOME THEATRE
Note
• If using a home theatre or other audio system, the best
synchroniszation between images and sound is achieved
by connecting the audio signal from your playback
device to the TV first. Subsequently, channel the audio
signal to the home theatre system or audio device via
the audio connectors on the back of the TV.
IN
OUT
RECEIVER/CABLE
BOX
OUT
DVD RECORDER
IN
To receive analogue channels via antenna
and record programmes on a separate DVD
recorder and receiver, connect three antenna
cables and three SCART cables as illustrated:
EN
43
English
Combined DVD recorder and digital
receiver
Game console or camcorder
The most practical connection for a mobile
game console or camcorder may be at the side
of the TV. You can, for example, connect the
game console or camcorder to VIDEO/S-Video
and AUDIO L/R connectors at the side of the
TV. A HDMI connector is also available for highdefinition devices.
A permanent game console or camcorder can
be connected to a HDMI connector or EXT 3
(component) connectors at the back of the TV.
Personal computer
Before connecting the PC:
• Set the PC monitor refresh rate to 60Hz.
• Change the TV picture format to
[Unscaled] .
To connect a PC to the back of the TV
1
2
44
Using a HDMI to DVI cable or a HDMI-toDVI adaptor (attached to a HDMI cable),
connect a HDMI connector on the back of
your TV to the DVI connector on your PC.
Connect an audio cable from your PC to
the AUDIO IN mini-jack connector at the
back of the TV.
EN
Note
• You must assign the AUDIO IN mini-jack connector to
the HDMI connector (see ‘Adding the AUDIO-IN minijack connector’ on page 45).
Setup devices
When all devices are connected, you must
select the type of device attached to each
connector.
Assign devices to connectors
For easy selection and best signal handling,
assign the device connected to the connectors
on your TV.
1
Press MENU on the remote control
and select [TV menu] > [Installation] >
[Connections].
EXT 1
Connections
AUDIO IN L/R
EXT 1
None
DVD
...
None
HDMI 1
Blu-ray
HDD/DVDR
HDMI 1
HDMI 2
HD rec.
Game
HDMI 3
Side
VCR
AUDIO IN L/R
EXT 2
EXT 3
HDMI 1
HDMI 2
HDMI 3
Side
2
3
4
5
6
7
8
Press
to enter the list.
Press
or
Press
to enter the list.
to select a connector.
2
3
Press
HDMI 2
HDMI 3
to enter the list.
Press or to select the HDMI
connector used by the PC.
Press or to select the device attached
to the connector.
4
Press OK to select the device.
Assign a channel decoder
Repeat the procedure until all devices are
correctly assigned to connectors.
Press MENU to exit.
Adding the AUDIO-IN mini-jack
connector
If you connect audio from a PC to the AUDIO
IN mini-jack connector at the back of the TV,
you must associate it to the HDMI connector.
1
EXT 3
Press MENU on the remote control
and select [TV menu] > [Installation] >
[Connections] > [Audio In L/R].
English
Connections
Press MENU to exit.
Decoders that decode digital channels can be
connected to EXT 1 or EXT 2 (SCART). You
have to assign the TV channel as a channel to
be decoded. Then assign the connection where
the decoder is connected.
1
2
3
4
5
6
Press MENU on the remote control
and select [TV menu] > [Installation] >
[Decoder] > [Channel].
Press
to enter the list.
Press or
decode.
Press
to select the channel to
and go back to select [Status].
Press or to select the connector used
by the decoder.
Press MENU to exit.
Use Philips EasyLink
Your TV supports Philips EasyLink, which
enables one-touch play and one-touch standby
between EasyLink-compliant devices. Compliant
devices must be connected to your TV via
HDMI and assigned.
EN
45
Enable or disable Easylink
1
2
Press MENU on the remote control
then select [TV menu] > [Installation] >
[Preferences] > [EasyLink].
Select [On] or [Off].
Use one-touch play
1
After enabling EasyLink, press play on your
device.
» The TV automatically switches to the
correct source.
Use one-touch standby
1
Press and hold Standby on the TV or
device remote control for at least three
seconds.
» The TV and all connected HDMI
devices switch to standby.
2
Push the CAM in as far as it will go.
Prepare TV for digital services
Scrambled digital TV channels can be decoded
with a Conditional Access Module (CAM) and
a Smart card provided by a digital TV service
operator.
The CAM may enable several digital services,
depending on the operator and services you
choose (for example, pay TV). Contact your
digital TV service operator for more information
about services and terms.
Use the Conditional Access Module
Caution
• Switch off your TV before inserting a CAM. Be sure
to follow the instructions described below. Wrong
insertion of a CAM may damage both the CAM and
your TV.
1
46
Following the directions printed on the
CAM, gently insert the CAM into the
Common Interface on the side of the TV.
EN
3
Turn on the TV and wait for the CAM to
be activated. This may take several minutes.
English
Note
• Do not remove the CAM from the slot. Removing the
CAM will deactivate the digital services.
Access CAM devices
1
After inserting and activating the CAM,
press MENU on the remote control
and select [TV menu] > [Features] >
[Common interface].
This menu option is only available if the CAM
is correctly inserted and activated. On-screen
applications and content are provided by your
digital TV service operator.
EN
47
9 Technical
specifications
Connections (Rear)
•
•
Product specificationsSupported display resolutions
Computer formats
• Resolution - refresh rate:
• 640 x 480 - 60Hz
• 800 x 600 - 60Hz
• 1024 x 768 - 60Hz
• 1920 x 1080i - 60Hz
• 1920 x 1080p - 60Hz
Video formats
• Resolution - refresh rate:
• 480i - 60Hz
• 480p - 60Hz
• 576i - 50Hz
• 576p - 50Hz
• 720p - 50Hz, 60Hz
• 1080i - 50Hz, 60Hz
• 1080p - 24Hz, 25Hz, 30Hz
• 1080p - 50Hz, 60Hz
Tuner/Reception/
Transmission
•
•
•
•
Antenna input: 75ohm coaxial (IEC75)
TV system: DVB COFDM 2K/8K
Video playback: NTSC, SECAM, PAL
DVB Terrestrial (see listed countries on the
back of the TV)
Multimedia
•
•
Connection: USB
Playback formats: MP3, Linear PCM, slide
show (.alb), JPEG
Remote control
•
•
Type: RC4452
Batteries: 2 x AA size
48
EN
•
•
EXT 1 (SCART): Audio L/R, CVBS in/out,
RGB
EXT 2 (SCART): Audio L/R, CVBS in/out,
RGB
EXT 3: Component (Y Pb Pr), Audio L/R in
HDMI 1/2/3
Note
• The number of HDMI connectors available may vary
according to your TV model.
•
•
•
•
SPDIF OUT: Digital audio out (coaxial
cinch-S/PDIF). Display synchroniszed.
AUDIO OUT L/R: Analogue audio out.
TV ANTENNA
AUDIO IN: Mini-jack audio in for PC DVI/
HDMI connections.
Connections (Side)
•
•
•
•
•
•
•
Headphone out (stereo mini-jack)
AUDIO L/R in
Video (CVBS) in
S-Video
USB
HDMI
Common Interface (CAM slot)
Power
•
•
•
•
Mains power: AC 220-240V (±10%)
Power and standby power consumption:
See technical specifications at www.philips.
com
Ambient temperature: 5°C - 35°C
Specifications are subject to change
without notice. For detailed specifications
of this product go to www.philips.com/
support.
This section describes commonly-encountered
issues and accompanying solutions.
General TV issues
The TV does not switch on:
•
Unplug the mains cable, wait for one
minute and plug into the mains again.
•
Verify that the mains cable is properly
connected and that the mains are
powered.
The remote control is not working properly:
•
Verify that the remote control batteries
are correctly inserted according to the
+/- orientation.
•
Replace the remote control batteries if
they are flat or weak.
•
Clean the remote control and TV sensor
lens.
The standby light on the TV blinks red:
•
Turn off the TV and unplug the mains
cable. Wait until the TV cools down before
reinserting the mains cord and turning on
the TV. If the blinking occurs again, contact
our Customer Support Centre.
You forgot your code to unlock Child lock
•
Enter ‘8888’ (see ‘Lock TV channels or
connected devices (Child lock)’ on page
29).
The TV menu is in the wrong language
•
Change the TV menu to your preferred
language.
When turning the TV on/off/to standby, you
hear a creaking sound from the TV chassis:
•
No action is required. The creaking sound
is normal expansion and contraction of the
TV as it cools down and warms up. This
does not impact performance.
TV channel issues
Previously installed channels do not appear in
the channel list:
•
Verify that the correct list is selected.
•
The channel may have been uninstalled
to the [Rearrange] menu. To access the
menu, press MENUon the remote control
and select [TV menu] > [Installation] >
[Channel installation] > [Rearrange].
No digital channels were found during the
installation:
Verify if the TV supports DVB-T in your country.
See the listed countries on the back of the TV.
Sound issues
There is a picture but sound quality is poor:
Note
• If no audio signal is detected, the TV automatically
switches off audio output and does not indicate
malfunction.
•
Check that all cables are properly
connected.
•
Check that the volume is not set to 0.
•
Check that the sound is not muted.
There is picture but sound quality is poor:
Check [Sound] settings, verifying that [Stereo]
is selected and [Equalizer] settings are correct.
If needed, try resetting audio settings to
[Standard].
There is a picture but sound comes from one
speaker only:
Verify that [Balance] is correctly set.
Picture issues
The power indicator is on, but there is no
picture:
•
Verify if the antenna is connected properly.
•
Verify if the correct device is selected.
There is sound but no picture:
•
Verify that picture settings are correctly set
(see ‘Adjust picture settings’ on page 20).
EN
49
English
10 Troubleshooting
You receive poor TV reception from an
antenna connection:
•
Check that the antenna is properly
connected to the TV.
•
Loudspeakers, unearthed audio devices,
neon lights, high buildings or mountains can
influence the picture quality. Try to improve
the reception quality by changing the
antenna direction or moving devices away
from the TV.
•
Verify if the correct TV system is selected
for your region (see ‘Step 1 Select your
system’ on page 36).
•
If reception on only one channel is poor,
try to fine tune this channel. (see ‘Fine tune
analogue channels’ on page 37)
You receive poor picture quality from
connected devices:
•
Check that the devices are connected
properly. Also, be sure to assign devices to
connectors.
•
Verify that picture settings are correctly set
(see ‘Adjust picture settings’ on page 20).
The TV did not save my settings:
•
Verify that the TV is set to Home mode,
which offers you complete flexibility to
change settings.
The picture does not fit the screen, it is too
big or too small:
•
Try using a different picture format (see
‘Change picture format’ on page 21).
•
Assign your device to connectors.
The picture position on screen is not correct:
Picture signals from some devices do not fit the
screen correctly. Check the signal output of the
device.
HDMI connection issues
You encounter problems with HDMI devices
•
HDCP support can delay the time taken
for a TV to display content from a device.
•
If the TV does not recognise the device
and the screen does not display a picture,
try switching from one device to another
and back again to restart.
50
EN
•
•
•
If you experience intermittent sound
disruptions, check the user manual of the
HDMI device to verify that output settings
are correct. Alternatively, try connecting
the audio signal from the HDMI device to
the TV via AUDIO IN at the back of the TV.
If a HDMI-to-DVI adaptor or HDMI to DVI
cable is used, check that an additional audio
cable is connected to AUDIO IN. You must
also assign the audio connector.
USB connection issues
The TV does not display the USB device
content:
•
Set your device to ‘Mass Storage Class’
compliant, as described in your device
documentation.
•
Your USB device may not be compatible
with the TV.
•
Not all audio and picture files are
supported (see ‘Technical specifications’ on
page 48).
Audio and picture files do not play or display
smoothly
•
The transfer performance of the USB
device may limit the transfer rate.
PC connection issues
The PC display on my TV is not stable or is
not synchronised:
Check that a supported resolution and refresh
rate is selected on your PC. (see ‘Technical
specifications’ on page 48)
English
Contact us
If you cannot resolve your problem, refer to the
FAQ for this TV at www.philips.com/support.
If the problem remains unresolved, contact the
Customer Support Centre in your country as
listed in this user manual.
Warning
• Do not attempt to repair the TV yourself. This may
cause severe injury, irreparable damage to your TV or
void your warranty.
Note
• Please have your TV model and serial number available
before contacting us. These numbers are available
on the back and side of your TV, as well as on the
packaging.
EN
51