1
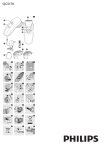
QC5170
1
E
A
B
RGE
G
1
5
F
CHA
2
4
3
3
H
C
I
J
K
D
2
3
4
5
6
7
90º
45º
0º
18
0º
45º
90º
8
9
10
11
12
13
14
15
16
17
18
19
20
21
22
ENGLISH
Introduction
Congratulations on your purchase and welcome
to Philips! To fully benefit from the support that
Philips offers, register your product at www.philips.
com/welcome.
Your new Philips hair clipper with new ergonomic
design and 180° adjustable cutting element allows
you to clip your own hair easily. You can move
the clipper over all areas of your head as easily as
running your fingers through your hair. To enjoy
using the hair clipper, we advise you to read the
following information.
General description (Fig. 1)
A On/off slide
B Charging light
C Adapter (2.5V)
D Precision trimmer
E Cutting element
F Swivel head
G Length setting indication window
H Length selector
I Cleaning brush
J Large comb attachment (13-21mm)
K Small comb attachment (3-11mm)
Important
Read this user manual carefully before you use the
appliance and save it for future reference.
-
-
-
-
Danger
Make sure the adapter does not get wet.
Warning
Check if the voltage indicated on the adapter
and on the appliance corresponds to the
local mains voltage before you connect the
appliance.
The adapter contains a transformer. Do not cut
off the adapter to replace it with another plug,
as this causes a hazardous situation.
This appliance is not intended for use by
persons (including children) with reduced
physical, sensory or mental capabilities, or lack
of experience and knowledge, unless they
have been given supervision or instruction
concerning use of the appliance by a person
responsible for their safety.
Children should be supervised to ensure that
they do not play with the appliance.
Caution
Never immerse the appliance nor rinse it
under the tap.
Do not use the appliance in the bath or in the
shower.
Use, charge and store the appliance at a
temperature between 15°C and 35°C.
Only use the adapter supplied to charge the
appliance.
If the adapter is damaged, always have it
replaced with one of the original type in order
to avoid a hazard.
Do not use the appliance when the clipping
attachment or one of the comb attachments is
damaged or broken, as this may cause injury.
This appliance is only intended for clipping
human scalp hair. Do not use it for any other
purpose.
If the appliance is subjected to a major change
in temperature, pressure or humidity, let the
appliance acclimatise for 30 minutes before you
use it.
Compliance with standards
This Philips appliance complies with all standards
regarding electromagnetic fields (EMF). If handled
properly and according to the instructions in this
4203.000.5531.3
user manual, the appliance is safe to use based on
scientific evidence available today.
Charging
A fully charged appliance has a cordless clipping
time of up to one hour.
Using the swivel head
,
Do not charge the appliance for more than 24
hours.
The ideal charging time is 8 hours.
1 Charge the appliance for 8 hours before
you use it for the first time.
Make sure the appliance is switched off when you
charge it.
2 Insert the appliance plug into the appliance
and insert the adapter into the wall
socket. (Fig. 2)
, The charging light goes on to indicate that the
appliance is charging.
Note:The charging light does not indicate when the
appliance is fully charged.
1 Set the cutting element to the desired
position by turning the swivel head (‘click’). (
Fig. 8)
Always adjust the position of the cutting element
with the swivel head. Do not turn the cutting
element or the comb attachment.
Do not turn the swivel head more than 90° to
the left or right.
,
-
Corded clipping
Only run the appliance from the mains when the
battery is empty.
-
1 Switch off the hair clipper.
2 Connect the hair clipper to the mains and
wait a few seconds before you switch it on.
If the batteries are completely empty, wait a few
minutes before you switch on the appliance.
Using the appliance
Make sure your hair is clean and dry. Do not use
the appliance on freshly washed hair.
1 Comb your hair with a styling comb in the
direction of hair growth (Fig. 3).
Clipping with comb attachment
Use the small or large comb attachment,
depending on the desired hair length. The
remaining hair length after cutting is indicated
in mm on the comb attachments. The selected
hair length setting (1-5) is shown in the two
length setting indication windows on both
sides of the length selector (Fig. 4).
See the table below for an overview of the length
settings and the corresponding hair lengths of each
comb attachment.
,
Small
comb
Large
comb
setting
hair length
setting
hair length
1
3mm/0.12in
1
13mm/0.51in
2
5mm/0.20in
2
15mm/0.59in
3
7mm/0.28in
3
17mm/0.67in
4
9mm/0.35in
4
19mm/0.75in
5
11mm/0.43in
5
21mm/0.83in
1 Attach the comb attachment to the swivel
head (‘click’) (Fig. 5).
Make sure the comb attachment locks properly
into position.
2 Set the comb attachment to the desired hair
length. To do this, press the release button on
the length selector (1) and slide it to the left
or right (2). (Fig. 6)
Do not slide the length selector beyond the
highest hair length setting (5).
3 Switch on the appliance.
From its starting position of 0° (pointing
forwards), you can turn the swivel head 45°
or 90° to the left or right. In this way, you
can adjust the position of the cutting element
to the part of your head you are clipping.
This makes it much easier to clip your own
hair. (Fig. 7)
-
The swivel head allows you to hold and
use the appliance like a brush. (Fig. 9)
Tips
We advise you to start clipping at the highest
setting of the large comb attachment and to
reduce the hair length setting gradually.
If a lot of hair has accumulated in the comb
attachment, remove it from the clipper
and blow and/or shake the hair out of it. When
you remove the comb attachment, the hair
length setting does not change.
Write down the hair length settings you use
to create a certain hairstyle as a reminder for
future clipping sessions.
1 Move the clipper through the hair slowly.
, The hair on different parts of your head
grows in different directions.You may want
to try different clipping directions (upwards,
downwards and across) (Fig. 10).
, To clip in the most effective way, move the
appliance against the direction of hair growth.
2 Turn the swivel head to the position that is
most comfortable for your arm when clipping
the different parts of your head.
3 Make sure that the flat part of the comb
attachment is fully in contact with the scalp to
obtain an even cutting result.
Clipping without comb attachment
You can use the clipper without comb attachment
to clip your hair very close to the skin (0.8mm) or
to contour the neckline and the area around the
ears.
Note:When you use the hair clipper without a comb
attachment, the clipper cuts the hair very close to the
skin.
1 Remove the comb attachment by pulling it off
the swivel head (Fig. 11).
Never pull at the flexible top of the comb
attachment. Always pull at the bottom part.
2 When you contour the hair around the ears,
only cut the hair ends. The hairline should be
close to the ear (Fig. 12).
3 To contour the neckline and the sideburns,
turn the clipper and make downward
strokes (Fig. 13).
4 Move slowly and smoothly. Just follow the
natural hairline.
5 Adjust the position of the swivel head to
make contouring easier.
Using the precision trimmer
You can use the appliance with the precision
trimmer to contour the neckline and the area
around the ears more easily and more precisely.
2/9
1 Make sure the appliance is switched off.
2 Remove the comb attachment by pulling it off
the swivel head. (Fig. 11)
3 Apply pressure to the centre of the cutting
element to open it. Remove the cutting
element from the swivel head (Fig. 14).
4 Insert the lug of the precision trimmer into
the slot and push the precision trimmer onto
the swivel head (‘click’). (Fig. 15)
Guarantee and service
If you need service or information or if you have a
problem, please visit the Philips website at
www.philips.com or contact the Philips Consumer
Care Centre in your country (you find its phone
number in the worldwide guarantee leaflet). If
there is no Consumer Care Centre in your country,
go to your local Philips dealer.
Cleaning
Do not use abrasives, scourers or liquids such as
alcohol, petrol or acetone to clean the appliance.
Only clean the appliance and the adapter with the
brush supplied.
Be careful that the cutting element does not fall
on the floor.
1 Clean the appliance every time you have used
it.
2 Make sure the appliance is switched off
and disconnected from the mains before
you clean it.
3 Remove the comb attachment (Fig. 11).
4 Apply pressure to the centre of the cutting
element to open it. Remove the cutting
element from the swivel head (Fig. 14).
5 Clean the cutting element with the brush
supplied (Fig. 16).
6 Clean the swivel head with the brush
supplied (Fig. 17).
7 Insert the lug of the cutting element into the
slot and push the cutting element back onto
the swivel head (‘click’) (Fig. 18).
The appliance does not need any lubrication.
Replacement
Only replace a worn or damaged cutting
element with an original Philips cutting element.
Environment
Removing the batteries
Only remove the batteries when you discard the
appliance. Make sure the batteries are completely
empty when you remove them.
Do not connect the appliance to the mains again
after the batteries have been removed.
-
-
Do not throw away the appliance with the
normal household waste at the end of its life,
but hand it in at an official collection point for
recycling. By doing this, you help to preserve
the environment (Fig. 19).
The built-in rechargeable batteries contain
substances that may pollute the environment.
Always remove the batteries before you
discard and hand in the appliance at an official
collection point. Dispose of the batteries at
an official collection point for batteries. If you
have trouble removing the batteries, you can
also take the appliance to a Philips service
centre. The staff of this centre will remove the
batteries for you and will dispose of them in an
environmentally safe way (Fig. 20).
1 Disconnect the appliance from the mains and
let the appliance run until the motor stops.
2 Remove the upper housing part of the
appliance (Fig. 21).
3 Remove the batteries. Pry them out of the
appliance. (Fig. 22)
4 Cut the wires with a pair of household
scissors and dispose of the batteries properly.
4203.000.5531.3
3/9
ITALIANO
Introduzione
Congratulazioni per l’acquisto e benvenuti
in Philips! Per trarre il massimo vantaggio
dall’assistenza Philips, registrate il vostro prodotto
su www.philips.com/welcome.
Grazie all’esclusivo design ergonomico e al blocco
lame regolabile di 180°, il nuovo regolacapelli
Philips è lo strumento più semplice per tagliare i
capelli. Basta far scorrere l’apparecchio su tutte le
zone delle testa come quando si passano le dita
tra i capelli. Per utilizzare al meglio il regolacapelli, vi
consigliamo di leggere le seguenti istruzioni.
Descrizione generale (fig. 1)
A Cursore on/off
B Spia di ricarica
C Adattatore (2,5 V)
D Rifinitore di precisione
E Gruppo lame
F Testina girevole
G Display di indicazione della lunghezza impostata
H Selettore lunghezza
I Spazzolina per la pulizia
J Pettine grande (13 - 21 mm)
K Pettine piccolo (3 - 11 mm)
Importante
Prima di utilizzare l’apparecchio, leggete
attentamente il presente manuale e conservatelo
per eventuali riferimenti futuri.
-
-
-
-
-
Pericolo
Evitate assolutamente il contatto della spina
con l’acqua.
Avvertenza
Prima di collegare l’apparecchio, controllate
che la tensione indicata sull’adattatore e
sull’apparecchio corrisponda a quella locale.
L’adattatore contiene un trasformatore. Non
tagliate l’adattatore per sostituirlo con un’altra
spina onde evitare situazioni pericolose.
L’apparecchio non è destinato a persone
(inclusi bambini) con capacità mentali, fisiche
o sensoriali ridotte, fatti salvi i casi in cui
tali persone abbiano ricevuto assistenza o
formazione per l’uso dell’apparecchio da una
persona responsabile della loro sicurezza.
Adottate le dovute precauzioni per evitare che
i bambini giochino con l’apparecchio.
Attenzione
Non immergete l’apparecchio nell’acqua e non
risciacquatelo sotto l’acqua corrente.
Non utilizzare l’apparecchio nella vasca da
bagno o nella doccia.
Utilizzate, ricaricate e riponete l’apparecchio a
una temperatura compresa tra 15°C e 35°C.
Per ricaricare l’apparecchio, utilizzate solo
l’adattatore in dotazione.
Nel caso in cui l’adattatore fosse danneggiato,
dovrà essere sostituito esclusivamente con un
adattatore originale al fine di evitare situazioni
pericolose.
Non utilizzate l’apparecchio quando il
regolacapelli o uno dei pettini è danneggiato o
rotto, per evitare il rischio di lesioni.
Questo apparecchio è stato realizzato
unicamente per tagliare i capelli delle persone.
Non utilizzatelo per altri scopi.
Se l’apparecchio è sottoposto a un forte sbalzo
di temperatura, pressione o umidità, attendete
30 minuti prima di utilizzarlo.
Conformità agli standard
Questo apparecchio Philips è conforme a tutti gli
standard relativi ai campi elettromagnetici (EMF).
Se utilizzato in modo appropriato seguendo le
istruzioni contenute nel presente manuale utente,
4203.000.5531.3
l’apparecchio consente un utilizzo sicuro come
confermato dai risultati scientifici attualmente
disponibili.
Come ricaricare l’apparecchio
Un apparecchio completamente carico ha
un’autonomia di taglio di circa un’ora.
Non caricate l’apparecchio per più di 24 ore.
Il tempo di ricarica consigliato è di 8 ore.
1 Prima di utilizzare l’apparecchio per la prima
volta, ricaricatelo per 8 ore.
Prima di ricaricare l’apparecchio, verificate che sia
spento.
2 Inserite lo spinotto nell’apparecchio e
l’adattatore nella presa di corrente a
muro. (fig. 2)
, Quando l’apparecchio viene ricaricato, si
accende la spia di ricarica.
Nota la spia di ricarica non indica quando
l’apparecchio è completamente carico.
Come tagliare i capelli con
l’apparecchio collegato alla presa di
corrente
se la batteria è scarica, utilizzate l’apparecchio
collegato alla presa di corrente.
1 Spegnete il regolacapelli.
2 Collegate il regolacapelli alla presa di
corrente e attendete qualche istante prima di
accenderlo.
Se le batterie sono completamente scariche,
attendete qualche minuto prima di accendere
l’apparecchio.
Modalità d’uso dell’apparecchio
assicuratevi che i capelli siano puliti e asciutti. Non
utilizzate l’apparecchio con i capelli ancora bagnati.
1 Pettinate i capelli nella direzione di
crescita (fig. 3).
Come tagliare i capelli usando il pettine
regolacapelli
Scegliete il pettine da usare in base alla
lunghezza dei capelli desiderata. La lunghezza
ottenuta dopo il taglio viene indicata in mm
sul pettine regolacapelli. La lunghezza dei
capelli selezionata (1-5) viene visualizzata
sui display di indicazione della lunghezza su
entrambi i lati del selettore (fig. 4).
Consultate la tabella riportata in basso per un
riepilogo delle impostazioni e della lunghezza
corrispondente per ciascun pettine.
,
Pettine
piccolo
Pettine
grande
impostazione
lunghezza
capelli
impostazione
lunghezza
capelli
1
3
mm/0,12”
1
13
mm/0,51”
2
5
mm/0,20”
2
15
mm/0,59”
3
7
mm/0,28”
3
17
mm/0,67”
4
9
mm/0,35”
4
19
mm/0,75”
5
11
mm/0,43”
5
21
mm/0,83”
1 Inserite il pettine sulla testina girevole
(“clic”) (fig. 5).
Assicuratevi che il pettine scatti correttamente in
posizione.
2 Impostate la lunghezza dei capelli desiderata
premendo il pulsante di sgancio del selettore
lunghezza (1) e ruotandolo verso sinistra o
destra (2). (fig. 6)
Non ruotate il selettore lunghezza oltre
l’impostazione massima (5).
3 Accendete l’apparecchio.
Uso della testina girevole
,
Rispetto alla posizione iniziale di 0° (rivolta
in avanti), potete ruotare la testina di 45° o
90° verso destra o sinistra. In questo modo,
è possibile dirigere la posizione del blocco
lame verso i capelli da tagliare facilitando
l’operazione. (fig. 7)
1 Impostate il blocco lame sulla posizione
desiderata ruotando la testina girevole fino a
farla scattare in posizione. (fig. 8)
Regolate la posizione del blocco lame sempre in
combinazione con la testina girevole. Non ruotate
il blocco lame o il pettine.
non ruotate la testina girevole oltre i 90° verso
destra o sinistra.
,
-
La testina girevole consente di impugnare
e utilizzare l’apparecchio come una
spazzola. (fig. 9)
Consigli
Si consiglia di iniziare a tagliare i capelli con il
pettine grande, riducendo progressivamente la
lunghezza.
Estraete il pettine regolacapelli per rimuovere
i capelli accumulatisi. Rimuovendo il pettine, la
lunghezza impostata viene modificata.
Prendete nota delle impostazioni di lunghezza
utilizzate per un determinato taglio come
promemoria per le sessioni successive.
1 Passare il regolacapelli con movimenti lenti.
, I capelli crescono in direzioni differenti a
seconda della zona della testa. È possibile
che sia necessario utilizzare il regolacapelli in
diverse direzioni (verso l’alto, verso il basso o
trasversalmente) (fig. 10).
, Per ottenere un risultato ottimale, utilizzate
l’apparecchio in senso opposto rispetto alla
crescita dei peli.
2 Ruotate la testina girevole nella posizione più
comoda a seconda della zona interessata.
3 Per ottenere un taglio uniforme, assicuratevi
che la parte piatta del pettine regolacapelli sia
sempre a contatto con il cuoio capelluto.
Come tagliare i capelli senza pettine
regolacapelli
Potete utilizzare il regolacapelli senza il pettine per
ottenere capelli molto corti (0,8 mm) o rifinire i
contorni della nuca e la zona intorno alle orecchie.
Nota utilizzando il regolacapelli senza il pettine, i
capelli verranno tagliati molto vicino al cuoio capelluto.
1 Togliete il pettine estraendolo dalla testina
girevole (fig. 11).
Non tirate mai la parte flessibile del pettine ma
estraetelo dalla parte inferiore.
2 Quando rifinite la zona intorno alle orecchie,
tagliate solo le punte dei capelli (fig. 12).
3 Per rifinire il contorno della nuca e le basette,
ruotate il regolacapelli e passatelo dall’alto
verso il basso (fig. 13).
4 Effettuate movimenti lenti e uniformi
seguendo la linea naturale dei capelli.
5 Regolate la posizione della testina girevole
per rifinire i contorni più facilmente.
4/9
Uso del rifinitore di precisione
Il rifinitore di precisione consente di definire
i contorni della nuca e della zona intorno alle
orecchie in maniera più semplice e precisa.
1 Controllate che l’apparecchio sia spento.
2 Togliete il pettine estraendolo dalla testina
girevole. (fig. 11)
3 Esercitate una lieve pressione al centro del
blocco lame per aprirlo. Estraete il gruppo
lame dalla testina girevole (fig. 14).
4 Inserite la linguetta del rifinitore di precisione
nella fessura e premete il rifinitore sulla
testina girevole (“clic”). (fig. 15)
3 Rimuovete le batterie estraendole
dall’apparecchio. (fig. 22)
4 Tagliate i cavi con un comune paio di forbici
e smaltite correttamente le batterie.
Garanzia e assistenza
Per assistenza o informazioni e in caso di
problemi, visitate il sito Web Philips all’indirizzo
www.philips.com oppure contattate il Centro
Assistenza Clienti Philips del vostro paese (per
conoscere il numero di telefono consultate
l’opuscolo della garanzia). Se nel vostro paese non
esiste un Centro Assistenza Clienti, rivolgetevi al
vostro rivenditore Philips.
Pulizia
non pulite l’apparecchio con detergenti abrasivi,
spugnette o liquidi come alcool, benzina o
acetone.
pulite l’apparecchio e l’adattatore solo con la
spazzola fornita in dotazione.
Fate attenzione a non far cadere il blocco lame a
terra.
1 Pulite l’apparecchio dopo ogni utilizzo.
2 Verificate che l’apparecchio sia spento e
scollegato dalla presa di corrente prima di
pulirlo.
3 Rimuovete il pettine regolacapelli (fig. 11).
4 Esercitate una lieve pressione al centro del
blocco lame per aprirlo. Estraete il gruppo
lame dalla testina girevole (fig. 14).
5 Pulite il blocco lame con la spazzola fornita in
dotazione (fig. 16).
6 Pulite la testina girevole con la spazzola
fornita in dotazione (fig. 17).
7 Inserite la linguetta del gruppo lame nella
fessura e premete il gruppo lame sulla testina
girevole (“clic”) (fig. 18).
L’apparecchio non necessita di lubrificazione.
Sostituzione
Sostituite il blocco lame danneggiato o usurato solo
con un pezzo originale Philips.
Tutela dell’ambiente
Rimozione delle batterie
rimuovete le batterie solo al momento dello
smaltimento dell’apparecchio. Prima di rimuoverle,
assicuratevi che siano completamente scariche.
dopo aver rimosso le batterie, non collegate
l’apparecchio alla presa di corrente.
-
-
Per contribuire alla tutela dell’ambiente,
non smaltite l’apparecchio insieme ai rifiuti
domestici ma consegnatelo a un centro di
raccolta ufficiale (fig. 19).
Le batterie ricaricabili integrate contengono
sostanze potenzialmente nocive per l’ambiente.
Rimuovete sempre le batterie prima di smaltire
l’apparecchio e consegnarlo a un centro di
raccolta ufficiale. Smaltite le batterie in un
apposito centro di raccolta. In caso di difficoltà
durante la rimozione delle batterie, consegnate
l’apparecchio a un centro di assistenza Philips,
che si occuperà della rimozione e del corretto
smaltimento dell’apparecchio (fig. 20).
1 Scollegare l’apparecchio dalla presa di
corrente e lasciarlo in funzione fino al
completo arresto.
2 Rimuovete la parte superiore
dell’alloggiamento dell’apparecchio (fig. 21).
4203.000.5531.3
5/9
DEUTSCH
Einführung
Herzlichen Glückwunsch zu Ihrem Kauf und
willkommen bei Philips! Um den Support von
Philips optimal nutzen zu können, registrieren Sie
Ihr Produkt bitte unter www.philips.com/welcome.
Ihr neuer Philips Haarschneider mit modernem
ergonomischem Design und einem um 180°
drehbaren Schneidesystem erleichtert es Ihnen, Ihr
Haar selbst zu schneiden. Der Umgang mit dem
Haarschneider ist so einfach, wie das Gleiten Ihrer
Finger durch das Haar. Damit Sie möglichst viel
Freude an Ihrem neuen Gerät haben, empfehlen
wir Ihnen, die nachstehenden Informationen zu
lesen.
Allgemeine Beschreibung (Abb. 1)
A Ein-/Ausschalter
B Ladeanzeige
C Adapter (2,5 V)
D Präzisionstrimmer
E Schneideelement
F Schwenkkopf
G Optische Schnittlängenanzeige
H Schnittlängeneinstellung
I Reinigungsbürste
J Großer Kammaufsatz (13 - 21 mm)
K Kleiner Kammaufsatz (3 - 11 mm)
Wichtig
Lesen Sie diese Bedienungsanleitung vor dem
Gebrauch des Geräts aufmerksam durch, und
bewahren Sie sie für eine spätere Verwendung auf.
-
-
-
-
-
-
-
Gefahr
Achten Sie darauf, dass der Adapter nicht nass
wird.
Warnhinweis
Prüfen Sie vor Inbetriebnahme, ob die
Spannungsangabe am Adapter und am Gerät
mit der örtlichen Netzspannung übereinstimmt.
Der Adapter enthält einen Transformator.
Ersetzen Sie den Adapter keinesfalls durch
einen anderen Stecker, da dies den Benutzer
gefährden kann.
Dieses Gerät ist für Benutzer (einschl. Kinder)
mit eingeschränkten physischen, sensorischen
oder psychischen Fähigkeiten bzw. ohne
jegliche Erfahrung oder Vorwissen nur dann
geeignet, wenn eine angemessene Aufsicht
oder ausführliche Anleitung zur Benutzung
des Geräts durch eine verantwortliche Person
sichergestellt ist.
Achten Sie darauf, dass Kinder nicht mit dem
Gerät spielen.
Achtung
Tauchen Sie das Gerät niemals in Wasser;
spülen Sie es auch nicht unter fließendem
Wasser ab.
Benutzen Sie das Gerät nicht in der Badewanne
oder Dusche.
Benutzen und laden Sie das Gerät bei
Temperaturen zwischen 15 °C und
35 °C. Bewahren Sie es auch in diesem
Temperaturbereich auf.
Verwenden Sie zum Laden des Geräts
ausschließlich den mitgelieferten Adapter.
Wenn der Adapter defekt oder beschädigt
ist, darf er nur durch ein Original-Ersatzteil
ausgetauscht werden, um Gefährdungen zu
vermeiden.
Um Verletzungen zu vermeiden, benutzen Sie
das Gerät nicht, wenn die Schneideaufsatz oder
einer der Kammaufsätze beschädigt oder defekt
sind.
4203.000.5531.3
-
Das Gerät ist ausschließlich zum Schneiden
von menschlichem Kopfhaar vorgesehen.
Verwenden Sie es nicht für andere Zwecke.
Wird das Gerät hohen Temperatur-, Druckoder Feuchtigkeitsschwankungen ausgesetzt,
sollten Sie es vor Gebrauch 30 Minuten an die
Umgebung anpassen lassen.
-
Normerfüllung
Dieses Philips Gerät erfüllt sämtliche Normen
bezüglich elektromagnetischer Felder (EMF).
Nach aktuellen wissenschaftlichen Erkenntnissen
ist das Gerät sicher im Gebrauch, sofern
es ordnungsgemäß und entsprechend den
Anweisungen in dieser Bedienungsanleitung
gehandhabt wird.
Laden
Mit einer vollen Akkuladung können Sie das Gerät
ca. eine Stunde lang kabelfrei verwenden.
Laden Sie das Gerät nicht länger als 24 Stunden.
Die ideale Ladezeit beträgt 8 Stunden.
1 Laden Sie das Gerät vor dem ersten
Gebrauch mindestens 8 Stunden lang auf.
Achten Sie darauf, dass das Gerät zum Laden
ausgeschaltet ist.
2 Stecken Sie den Gerätestecker in das Gerät
und den Adapter in die Steckdose. (Abb. 2)
, Die Ladeanzeige leuchtet auf und zeigt an,
dass das Gerät aufgeladen wird.
Hinweis: Die Ladeanzeige zeigt Ihnen nicht an, wenn
der Ladevorgang abgeschlossen ist.
Das Gerät mit Netzstrom betreiben
Betreiben Sie das Gerät nur bei leeren Akkus am
Stromnetz.
1 Schalten Sie den Haarschneider aus.
2 Schließen Sie das Gerät an das Stromnetz an
und warten Sie einige Sekunden, bevor Sie es
einschalten.
Bei völlig leeren Akkus sollten Sie einige Minuten
warten, bevor Sie das Gerät einschalten.
Das Gerät benutzen
Ihr Haar muss sauber und trocken sein. Verwenden
Sie das Gerät nicht bei frisch gewaschenem Haar.
1 Kämmen Sie Ihr Haar mit einem Frisierkamm
in Wuchsrichtung durch (Abb. 3).
Kleiner
Kammaufsatz
5
Verwenden Sie, je nach gewünschter
Haarlänge, den kleinen oder den großen
Kammaufsatz. Auf den Aufsätzen ist die nach
dem Schneiden verbleibende Haarlänge
in Millimetern angegeben. Die gewählte
Haarlängeneinstellung (1 - 5) sehen Sie in
den Anzeigefenstern an beiden Seiten der
Schnittlängeneinstellung (Abb. 4).
In der nachstehenden Tabelle finden Sie eine
Übersicht über die Schnittlängeneinstellungen und
die jeweils auf den Kammaufsätzen angegebenen
Haarlängen.
Kleiner
Kammaufsatz
Großer
Kammaufsatz
Einstellung
Haarlänge
Einstellung
Haarlänge
1
3 mm
1
13 mm
2
5 mm
2
15 mm
3
7 mm
3
17 mm
4
9 mm
4
19 mm
11 mm
5
21 mm
1 Stecken Sie den Kammaufsatz auf
den Schwenkkopf auf bis er hörbar
einrastet (Abb. 5).
Vergewissern Sie sich, dass der Kammaufsatz richtig
eingerastet ist.
2 Stellen Sie den Kammaufsatz auf die
gewünschte Schnittlänge ein. Drücken
Sie dazu die Entriegelungstaste an der
Schnittlängeneinstellung (1), und schieben Sie
sie nach links oder rechts (2). (Abb. 6)
Schieben Sie die Schnittlängeneinstellung
nicht über die höchste Einstellung (5) hinaus.
3 Schalten Sie das Gerät ein.
Den Schwenkkopf verwenden
,
Von seiner Ausgangsposition aus (0°,
Schwenkkopf weist nach vorne) können Sie
den Schwenkkopf um 45° oder 90° nach
links oder rechts drehen. Dadurch ist es
möglich, die Position des Schneidesystems
auf die Haarpartie einzustellen, die
Sie gerade schneiden. Das erleichtert
das Haareschneiden am eigenen Kopf
erheblich. (Abb. 7)
1 Stellen Sie das Schneidesystem auf
die gewünschte Position ein, indem Sie
den Schwenkkopf drehen, bis er hörbar
einrastet. (Abb. 8)
Verändern Sie die Position des Schneidesystems
nur über den Schwenkkopf. Drehen Sie nicht das
Schneidesystem oder den Kammaufsatz selbst.
Drehen Sie den Schwenkkopf nicht um mehr als
90° nach links bzw. rechts.
,
-
-
Haare mit dem Kammaufsatz
schneiden
,
Großer
Kammaufsatz
-
Durch den Schwenkkopf können Sie
das Gerät wie eine Bürste halten und
verwenden. (Abb. 9)
Tipps
Wir raten Ihnen, mit der höchsten Einstellung
des großen Kammaufsatzes zu beginnen und
die Schnittlängeneinstellung stufenweise zu
verringern.
Haben sich im Kammaufsatz viele Haare
angesammelt, nehmen Sie ihn vom
Haarschneider ab und blasen bzw. schütteln Sie
die Haare heraus. Die Schnittlängeneinstellung
verändert sich nicht, wenn Sie den
Kammaufsatz abnehmen.
Notieren Sie die für eine bestimme Frisur
gewählten Einstellungen, um sie für spätere
Haarschnitte wieder zur Verfügung zu haben.
1 Bewegen Sie den Haarschneider langsam
durch das Haar.
, Ihr Haar wächst an den verschiedenen
Stellen Ihres Kopfes in unterschiedliche
Richtungen. Wir empfehlen, mehrere
Schnittrichtungen (nach oben, unten und
quer) auszuprobieren (Abb. 10).
, Die besten Ergebnisse erzielen Sie, wenn
Sie das Gerät gegen die Haarwuchsrichtung
führen.
2 Drehen Sie den Schwenkkopf so, dass Sie
Ihren Arm beim Schneiden der verschiedenen
Haarpartien möglichst bequem halten können.
3 Um gleichmäßige Schnittergebnisse
zu erzielen, muss die flache Seite des
Kammaufsatzes immer auf dem Kopf
aufliegen.
6/9
Ohne Kammaufsatz schneiden
Sie können den Haarschneider auch ohne
Kammaufsatz verwenden, um Ihr Haar ganz kurz
(0,8 mm) zu schneiden oder die Konturen im
Nacken und um die Ohren zu definieren.
Ersatz
Tauschen Sie abgenutzte oder beschädigte
Schneidesysteme nur durch Original Philips
Schneidesysteme aus.
Umweltschutz
Die Akkus herausnehmen
Hinweis: Ohne Kammaufsatz werden die Haare sehr
dicht über der Kopfhaut abgeschnitten.
1 Ziehen Sie den Kammaufsatz vom
Schwenkkopf (Abb. 11).
Ziehen Sie niemals an der beweglichen Spitze des
Kammaufsatzes, sondern nur am unteren Teil.
2 Beim Schneiden der Konturen um die Ohren
sollten Sie nur die Haarspitzen schneiden.
Die Haarlinie sollte nahe bei den Ohren
verlaufen (Abb. 12).
3 Drehen Sie den Haarschneider und führen Sie
ihn nach unten, um die Konturen im Nacken
und an den Koteletten zu schneiden (Abb. 13).
4 Bewegen Sie das Gerät langsam und
gleichmäßig. Folgen Sie dabei der natürlichen
Haarlinie.
5 Stellen Sie sich den Schwenkkopf so ein, dass
Sie die Konturen möglichst bequem schneiden
können.
Den Präzisionstrimmer benutzen
Mithilfe des Präzisionstrimmers können Sie die
Konturen im Nacken und um die Ohren noch
bequemer und exakter schneiden.
1 Vergewissern Sie sich, dass das Gerät
ausgeschaltet ist.
2 Ziehen Sie den Kammaufsatz vom
Schwenkkopf. (Abb. 11)
3 Drücken Sie zum Öffnen des Schneidesystems
auf dessen Mitte. Entfernen Sie das
Schneidesystem vom Schwenkkopf (Abb. 14).
4 Stecken Sie die Führung des
Präzisionstrimmers in den Schlitz, und
drücken Sie den Präzisionstrimmers
auf den Schwenkkopf, bis er hörbar
einrastet. (Abb. 15)
Reinigung
Verwenden Sie für die Reinigung keine
Scheuermittel oder Lösungsmittel wie Alkohol,
Benzin oder Azeton.
Nehmen Sie die Akkus nur zur Entsorgung des
Geräts heraus.Vergewissern Sie sich, dass die
Akkus beim Herausnehmen vollständig leer sind.
Nach Entnahme der Akkus darf das Gerät nicht
mehr an eine Steckdose angeschlossen werden.
-
-
Werfen Sie das Gerät am Ende der
Lebensdauer nicht in den normalen Hausmüll.
Bringen Sie es zum Recycling zu einer offiziellen
Sammelstelle. Auf diese Weise tragen Sie zum
Umweltschutz bei (Abb. 19).
Die integrierten Akkus enthalten Substanzen,
die die Umwelt gefährden können. Entfernen
Sie die Akkus, bevor Sie das Gerät an
einer offiziellen Recyclingstelle abgeben.
Geben Sie die gebrauchten Akkus bei einer
Batteriesammelstelle ab. Falls Sie beim
Entfernen der Akkus Probleme haben,
können Sie das Gerät auch an ein Philips
Service-Center geben. Dort werden die
Akkus ausgebaut und umweltgerecht
entsorgt (Abb. 20).
1 Trennen Sie das Gerät vom Stromnetz und
lassen Sie es so lange laufen, bis es zum
Stillstand kommt.
2 Nehmen Sie den oberen Teil des
Gerätegehäuses ab (Abb. 21).
3 Entfernen Sie die Akkus aus dem
Gerät. (Abb. 22)
4 Durchtrennen Sie die Drähte mithilfe einer
Haushaltsschere und entsorgen Sie die Akkus
ordnungsgemäß.
Garantie und Kundendienst
Benötigen Sie weitere Informationen oder treten
Probleme auf, besuchen Sie bitte die Philips
Website (www.philips.com), oder setzen Sie sich
mit einem Philips Service-Center in Ihrem Land in
Verbindung (Telefonnummer siehe Garantieschrift).
Sollte es in Ihrem Land kein Service-Center geben,
wenden Sie sich bitte an Ihren Philips Händler.
Reinigen Sie das Gerät und den Adapter nur mit
der beiliegenden Bürste.
Lassen Sie das Schneidesystem nicht fallen.
1 Reinigen Sie das Gerät nach jedem Gebrauch.
2 Achten Sie vor dem Reinigen darauf, dass
das Gerät ausgeschaltet und nicht an das
Stromnetz angeschlossen ist.
3 Nehmen Sie den Kammaufsatz vom
Gerät (Abb. 11).
4 Drücken Sie zum Öffnen des Schneidesystems
auf dessen Mitte. Entfernen Sie das
Schneidesystem vom Schwenkkopf (Abb. 14).
5 Reinigen Sie das Schneidesystem mit der
beiliegenden Bürste (Abb. 16).
6 Reinigen Sie den Schwenkkopf mit der
beiliegenden Bürste (Abb. 17).
7 Stecken Sie die Führung des Schneidesystems
in den Schlitz, und drücken Sie das
Schneidesystem wieder auf den Schwenkkopf,
bis es hörbar einrastet (Abb. 18).
Das Gerät braucht nicht geölt oder geschmiert zu
werden.
4203.000.5531.3
7/9
FRANÇAIS
Introduction
Félicitations pour votre achat et bienvenue dans
l’univers Philips ! Pour profiter pleinement de
l’assistance Philips, enregistrez votre produit sur le
site à l’adresse suivante : www.philips.com/welcome.
Votre nouvelle tondeuse Philips au design
ergonomique et à tête pivotante à 180° vous
permet de vous couper les cheveux en toute
simplicité. Vous pouvez la déplacer sur toutes les
zones de la tête, comme si vous passiez vos doigts
dans vos cheveux. Avant de l’utiliser, nous vous
conseillons de consulter les informations ci-dessous.
Description générale (fig. 1)
A Bouton marche/arrêt
B Voyant de charge
C Adaptateur (2,5 V)
D Tondeuse de précision
E Bloc tondeuse
F Tête pivotante
G Indication de la longueur de coupe
H Sélecteur de longueur de coupe
I Brosse de nettoyage
J Grand sabot (13-21 mm)
K Petit sabot (3-11 mm)
Important
Lisez attentivement ce mode d’emploi avant
d’utiliser l’appareil et conservez-le pour un usage
ultérieur.
-
-
-
-
Danger
Veillez à ce que l’adaptateur ne soit pas en
contact avec de l’eau.
Avertissement
Avant de brancher l’appareil, vérifiez que la
tension indiquée sur l’adaptateur et l’appareil
correspond à la tension secteur locale.
L’adaptateur contient un transformateur.
Afin d’éviter tout accident, n’essayez pas de
remplacer la fiche de l’adaptateur.
Cet appareil n’est pas destiné à être utilisé
par des personnes (notamment des enfants)
dont les capacités physiques, sensorielles
ou intellectuelles sont réduites, ou par des
personnes manquant d’expérience ou de
connaissances, à moins que celles-ci ne soient
sous surveillance ou qu’elles n’aient reçu des
instructions quant à l’utilisation de l’appareil par
une personne responsable de leur sécurité.
Veillez à ce que les enfants ne puissent pas
jouer avec l’appareil.
Attention
Ne plongez jamais l’appareil dans l’eau et ne le
rincez pas sous le robinet.
N’utilisez jamais l’appareil dans le bain ni sous
la douche.
Utilisez, rechargez et conservez l’appareil à une
température comprise entre 15 °C et 35 °C.
Utilisez exclusivement l’adaptateur fourni pour
charger l’appareil.
Si l’adaptateur est endommagé, remplacez-le
toujours par un adaptateur de même type
pour éviter tout accident.
Afin d’éviter tout accident, n’utilisez pas
l’appareil si le sabot pour cheveux ou l’un des
sabots est endommagé ou cassé.
Cet appareil a été conçu uniquement pour
tondre les cheveux. Ne l’utilisez jamais à
d’autres fins.
Si l’appareil devait être soumis à une forte
variation de température, de pression ou
d’humidité, laissez-le s’acclimater pendant
30 minutes avant de l’utiliser.
4203.000.5531.3
Conformité aux normes
Cet appareil Philips est conforme à toutes les
normes relatives aux champs électromagnétiques
(CEM). Il répond aux règles de sécurité établies sur
la base des connaissances scientifiques actuelles s’il
est manipulé correctement et conformément aux
instructions de ce mode d’emploi.
Charge
Un appareil complètement chargé offre une
autonomie de coupe d’une heure environ.
Ne chargez jamais l’appareil pendant plus de
24 heures.
bouton de déverrouillage du sélecteur de
longueur de coupe (1), puis faites-le glisser
vers la gauche ou vers la droite (2). (fig. 6)
Ne positionnez pas le sélecteur de longueur de
coupe au-delà du réglage maximum (5).
3 Allumez l’appareil.
Utilisation de la tête pivotante
,
La durée de charge optimale est de 8 heures.
1 Chargez l’appareil pendant 8 heures avant la
première utilisation.
Assurez-vous que l’appareil est éteint avant de le
mettre en charge.
2 Insérez la fiche de l’adaptateur dans l’appareil,
puis branchez l’adaptateur sur la prise
secteur. (fig. 2)
, Le voyant de charge s’allume pour indiquer
que l’appareil se charge.
Remarque : Le voyant n’indique pas lorsque la charge
de l’appareil est terminée.
Utilisation de la tondeuse sur secteur
Utilisez l’appareil sur secteur uniquement lorsque
la batterie est vide.
1 Placez le bloc tondeuse dans la position
souhaitée en faisant tourner la tête pivotante
(vous devez entendre un clic). (fig. 8)
Réglez toujours la position du bloc tondeuse
au moyen de la tête pivotante. Ne faites jamais
tourner le bloc tondeuse ni le sabot.
Ne faites pas pivoter la tête pivotante de plus de
90° vers la gauche ou vers la droite.
,
-
1 Éteignez la tondeuse à cheveux.
2 Branchez la tondeuse à cheveux sur le
secteur et attendez quelques secondes avant
de le mettre en marche.
Si les batteries sont entièrement déchargées,
patientez quelques minutes avant de mettre
l’appareil en marche.
Utilisation de l’appareil
Assurez-vous que vos cheveux sont secs et
propres. N’utilisez pas l’appareil sur des cheveux
qui viennent d’être lavés.
1 Démêlez vos cheveux à l’aide d’un peigne
dans le sens de leur pousse (fig. 3).
Utilisation avec sabot
Utilisez le petit ou le grand sabot en fonction
de la longueur de coupe souhaitée. Celleci est indiquée en mm sur les sabots. La
longueur de coupe sélectionnée (1-5) est
indiquée dans les deux cercles situés de
chaque côté du sélecteur de longueur de
coupe (fig. 4).
Consultez le tableau ci-dessous pour connaître
les réglages et les longueurs de coupe
correspondantes de chaque sabot.
,
Petit
sabot
Grand
sabot
Réglage
Longueur
de coupe
Réglage
Longueur
de coupe
1
3 mm
1
13 mm
2
5 mm
2
15 mm
3
7 mm
3
17 mm
4
9 mm
4
19 mm
5
11 mm
5
21 mm
À partir de sa position initiale de 0° (orientée
vers l’avant), la tête pivotante peut pivoter de
45° ou 90° vers la gauche ou vers la droite.
Vous avez donc la possibilité d’adapter la
position du bloc tondeuse à la partie de votre
tête que vous souhaitez tondre. Il n’a jamais
été aussi simple de se couper les cheveux soimême ! (fig. 7)
-
-
La tête pivotante vous permet de tenir et
d’utiliser l’appareil comme une brosse. (fig. 9)
Conseils
Nous vous conseillons d’opter tout d’abord
pour la longueur de coupe la plus élevée
du grand sabot et de passer ensuite
progressivement à des longueurs de coupe
inférieures.
Si des cheveux se sont accumulés dans le sabot,
retirez-le et enlevez les cheveux en soufflant
sur le sabot et/ou en le secouant. Le retrait du
sabot ne modifie pas la longueur de coupe.
Notez votre longueur de coupe préférée en
vue des prochaines utilisations.
1 Déplacez la tondeuse lentement.
, Vos cheveux ne poussent pas dans le même
sens sur toutes les parties du crâne. Il
est possible que vous souhaitiez essayer
différents sens de coupe (vers le haut, vers le
bas et perpendiculairement) (fig. 10).
, Pour obtenir des résultats optimaux, déplacez
l’appareil dans le sens inverse de la pousse
des cheveux.
2 Placez la tête pivotante dans une position
confortable pour votre bras lorsque vous
utilisez la tondeuse sur les différentes parties
de votre tête.
3 Assurez-vous que la partie plate du sabot est
toujours en contact avec le cuir chevelu pour
obtenir un résultat uniforme.
Utilisation sans sabot
Vous pouvez utiliser la tondeuse sans le sabot afin
de couper les cheveux au plus près du cuir chevelu
(0,8 mm) ou pour tondre les contours de la nuque
et le tour des oreilles.
Remarque : Si vous utilisez la tondeuse sans le sabot,
vos cheveux seront coupés au plus près du cuir
chevelu.
1 Tirez sur le sabot de la tondeuse pour le
retirez de la tête pivotante (fig. 11).
Ne tirez jamais sur la partie supérieure flexible
du sabot. Tirez toujours sur la partie inférieure.
1 Fixez le sabot à la tête pivotante (vous devez
entendre un clic) (fig. 5).
Vérifiez que le sabot est correctement enclenché.
2 Lorsque vous tondez les cheveux autour des
oreilles, coupez uniquement les pointes en
suivant le contour de l’oreille (fig. 12).
2 Réglez le sabot sur la longueur de coupe
souhaitée. Pour ce faire, appuyez sur le
3 Pour tondre la nuque et les favoris, retournez
la tondeuse et déplacez-la vers le bas (fig. 13).
8/9
4 Déplacez l’appareil lentement en suivant
l’implantation des cheveux.
5 Réglez la position de la tête pivotante afin
d’obtenir des contours précis.
Utilisation de la tondeuse de précision
La tondeuse de précision permet de tondre avec
précision et en toute simplicité les contours de la
nuque et les tours des oreilles.
1 Assurez-vous que l’appareil est éteint.
2 Tirez sur le sabot de la tondeuse pour le
retirez de la tête pivotante. (fig. 11)
3 Exercez une pression au centre du bloc
tondeuse pour l’ouvrir. Retirez le bloc
tondeuse de la tête pivotante (fig. 14).
4 Insérez la languette de la tondeuse de
précision dans la fente prévue à cet effet, et
faites glisser la tondeuse de précision sur
la tête pivotante (vous devez entendre un
clic). (fig. 15)
Nettoyage
N’utilisez pas de détergents abrasifs, de tampons
à récurer ni de liquides tels que de l’alcool, de
l’essence ou de l’acétone pour nettoyer l’appareil.
dernier dans un Centre Service Agréé Philips
qui prendra toute l’opération en charge pour
préserver l’environnement (fig. 20).
1 Débranchez l’appareil de la prise secteur et
laissez-le fonctionner jusqu’à l’arrêt complet
du moteur.
2 Retirez la partie supérieure de
l’appareil (fig. 21).
3 Retirez les batteries en les soulevant. (fig. 22)
4 Coupez les fils à l’aide d’une paire de ciseaux
et mettez les batteries au rebut.
Garantie et service
Si vous souhaitez obtenir des informations
supplémentaires ou faire réparer l’appareil, ou si
vous rencontrez un problème, rendez-vous sur le
site Web de Philips à l’adresse www.philips.com
ou contactez le Service Consommateurs Philips
de votre pays (vous trouverez le numéro de
téléphone correspondant sur le dépliant de
garantie internationale). S’il n’existe pas de
Service Consommateurs Philips dans votre pays,
renseignez-vous auprès de votre revendeur Philips
local.
Nettoyez l’appareil et l’adaptateur uniquement à
l’aide de la brosse fournie.
Veillez à ne pas laisser tomber le bloc tondeuse.
1 Nettoyez l’appareil après chaque utilisation.
2 Assurez-vous que l’appareil est éteint et
débranché avant de le nettoyer.
3 Retirez le sabot (fig. 11).
4 Exercez une pression au centre du bloc
tondeuse pour l’ouvrir. Retirez le bloc
tondeuse de la tête pivotante (fig. 14).
5 Nettoyez le bloc tondeuse à l’aide de la
brosse fournie (fig. 16).
6 Nettoyez la tête pivotante à l’aide de la
brosse fournie (fig. 17).
7 Insérez la languette du bloc tondeuse dans la
fente prévue à cet effet, puis remettez le bloc
tondeuse en place sur la tête pivotante (vous
devez entendre un clic) (fig. 18).
L’appareil n’a pas besoin d’être lubrifié.
Remplacement
Un bloc tondeuse usé ou endommagé doit être
remplacé uniquement par un bloc tondeuse Philips
d’origine.
Environnement
Retrait des batteries
Retirez les batteries uniquement lorsque vous
mettez l’appareil au rebut. Assurez-vous que les
batteries sont complètement déchargées lorsque
vous les jetez.
Ne branchez pas l’appareil sur le secteur après
avoir retiré les batteries.
-
-
Lorsqu’il ne fonctionnera plus, ne jetez pas
l’appareil avec les ordures ménagères, mais
déposez-le à un endroit assigné à cet effet, où il
pourra être recyclé. Vous contribuerez ainsi à la
protection de l’environnement (fig. 19).
Les batteries rechargeables intégrées
contiennent des substances qui peuvent nuire
à l’environnement. Veillez à toujours retirer les
batteries avant de mettre l’appareil au rebut ou
de le déposer à un endroit assigné à cet effet.
Déposez les batteries usagées à un endroit
assigné à cet effet. Si vous n’arrivez pas à les
retirer de l’appareil, vous pouvez apporter ce
4203.000.5531.3
9/9