1
Eclipse_III_KB.qxd
31/07/2008
10:35
Page 1
Saitek
®
TM
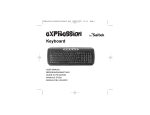
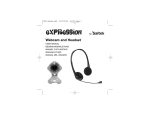
Backlit Multimedia Keyboard
USER MANUAL
BEDIENUNGSANLEITUNG
GUIDE D’UTILISATION
MANUALE D’USO
MANUAL DEL USUARIO
Eclipse_III_KB.qxd
31/07/2008
10:35
Page 2
ECLIPSE III BACKLIT MULTIMEDIA KEYBOARD
Congratulations on buying your Eclipse III Backlit Keyboard. The keyboard features a sleek design,
touch-sensitive lighting and volume controls, and a range of Windows Office and multimedia keys.
Features
•
Adjustable, multi-color backlighting
•
Touch sensitive control panel
•
Two stage height adjustment and removable wrist rest
•
Pass through headphone and microphone audio ports
•
Time-saving Windows and Internet shortcut keys
•
USB plug and play
•
Color and keyboard settings remain even after system reboot
•
Laser-etched, soft-touch, durable keys
System compatibility
PC running Windows XP/XP64/Vista
Installation for all platforms
1 First plug plug the USB connector of the keyboard into one of your
computer's USB ports.
2 Follow the device installation wizard to complete the installation of the
new USB device to the system.
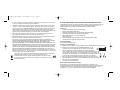
3 If you intend to use headphones, speakers, headset or microphone, also plug the pink and
green mini jackplugs into the corresponding audio in and out sockets of your
k
l
PC. Now plug your headset, speaker cables etc into the pink audio in (k) and
green audio out (l) sockets at the rear right side of your keyboard.
4 Go to http://www.saitek.com/uk/down/drivers.htm to download the Eclipse III
software driver. The Eclipse III keyboard’s volume indicators will not illuminate
unless you install a driver.
5 Your keyboard is now ready to use.
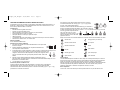
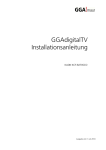
Touch sensitive panel controls
The panel at the top of your Eclipse III keyboard controls backlighting
color and intensity, as well as your PC’s media player. To change the
brightness of your keyboard backlighting, press the brightness control
(a) and then “-” (c) or “+” (d) to decrease or increase brightness.
a
b
c
To change the color of the key backlighting, first press the color selector control (b) and then “-” (c)
or “+” (d) to scroll through the backlighting colors.
Press the backlighting on/off control (e)
g
e
h
j
f
i
to switch the keyboard backlighting on
or off. To increase or decrease the
volume of your PC’s media player,
press the “-” or “+” on the volume control (f). The mute control (g) temporarily mutes all sound
from your PC and play/pause (h), previous track (i) and next track (j) control the tracks playing on
your PC media player.
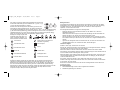
The Eclipse III has six buttons at each side of the keyboard which control various Windows and
Office functions.
Internet home
Sleep (press for 3 seconds to operate)
Internet browser forward
My computer
Internet browser back
Search
New tab
Open Outlook
Internet page reload
Open media player
Open favorites
Open calculator
Sleep function
d
Your Eclipse III keyboard features a sleep button which is operated by pressing for three seconds.
Please note that for Vista users, the sleep button may have a different function depending on your
PC settings. To check that the sleep button will make your PC sleep, go to Windows Start, Control
panel, Power options. Click on the “Choose what the power buttons do" link on the left hand side of
the window, under “When I press the sleep button on my computer”, select “Sleep” from the drag
down menu.
Eclipse_III_KB.qxd
31/07/2008
10:35
Page 4
Important notice
In certain circumstances, using a keyboard may cause injury to hands, wrists, arms, back or neck.
If you do experience pain, numbness or weakness in these areas during or after using the
keyboard, seek help from a qualified medical professional.
The following guidelines will minimise the risk of injury:
- Adjust your chair height and distance from the keyboard so your wrists are straight.
- Keep your shoulders relaxed with your elbows at your side. Position your keyboard and mouse
so you don't have to reach.
- Take frequent breaks to rest your hands and arms. Leave your computer and walk around at
least twice an hour and try to vary what you do during the day.
- Avoid resting your wrists on sharp edges and if you have a wrist or palm rest, don't use it while
typing.
Technical Support
Can't get started - don't worry, we're here to help you!
Nearly all the products that are returned to us as faulty are not faulty at all - they have just not
been installed properly.
If you experience any difficulty with this product, please first visit our website www.saitek.com. The
technical support area will provide you with all the information you need to get the most out of your
product and should solve any problems you might have.
If you do not have access to the internet, or if the website cannot answer your question, please
contact your local Saitek Technical Support Team. We aim to offer quick, comprehensive and
thorough technical support to all our users so, before you call, please make sure you have all the
relevant information at hand.
To find your local Saitek Technical Support Center, please see the separate Technical Support
Center sheet that came packaged with this product.
Information for Customers in the United States
FCC Compliance and Advisory Statement
Warning: Changes or modifications to this unit not expressly approved by the party responsible for
compliance could void the user's authority to operate the equipment.
This device complies with Part 15 of the FCC Rules. Operation is subject to the following two
conditions:
1 This device may not cause harmful interference, and;
2 This device must accept any interference received, including interference that may cause
undesired operation.
NOTE: This equipment has been tested and found to comply with the limits for a Class B digital
device, pursuant to Part 15 of the FCC Rules. These limits are designed to provide reasonable
protection against harmful interference in a residential installation. This equipment generates, uses
and can radiate radio frequency energy and, if not installed and used in accordance with the
instructions, may cause harmful interference to radio communications. However, there is no
guarantee that interference will not occur in a particular installation. If this equipment does cause
harmful interference to radio or television reception, which can be determined by turning the
equipment off and on, the user is encouraged to try to correct the interference by one or more of
the following measures:
•
Reorient or relocate the receiving antenna;
•
Increase the separation between the equipment and receiver;
•
Connect the equipment into an outlet on a circuit different from that to which the receiver is
connected;
•
Consult the dealer or an experienced radio/TV technician for help.
Mad Catz, Inc, 7480 Mission Valley Rd, Suite 101, San Diego, CA 92108-4406
Canada ICES-003
Operation is subject to the following two conditions:
1. This device may not cause interference, and;
2. This device must accept any interference, including interference that may cause undesired
operation of the device.
This Class B digital apparatus complies with Canadian ICES-003.
Cet appareil numérique de la classe B est conforme à la norme NMB-003 du Canada.
Conditions of Warranty
1
2
3
4
Warranty period is 2 years from date of purchase with proof of purchase submitted.
Operating instructions must be followed.
Specifically excludes any damages associated with leakage of batteries.
Note: Batteries can leak when left unused in a product for a period of time, so it is advisable to
inspect batteries regularly.
Product must not have been damaged as a result of defacement, misuse, abuse, neglect,
accident, destruction or alteration of the serial number, improper electrical voltages or currents,
repair, alteration or maintenance by any person or party other than our own service facility or
an authorized service center, use or installation of non-Saitek replacement parts in the product
or the modification of this product in any way, or the incorporation of this product into any other
Eclipse_III_KB.qxd
5
6
7
31/07/2008
10:35
Page 6
products, or damage to the product caused by accident, fire, floods, lightning, or acts of God,
or any use violative of instructions furnished by Saitek plc.
Obligations of Saitek shall be limited to repair or replacement with the same or similar unit, at
our option. To obtain repairs under this warranty, present the product and proof of purchase
(eg, bill or invoice) to the authorized Saitek Technical Support Center (listed on the separate
sheet packaged with this product) transportation charges prepaid. Any requirements that
conflict with any state or Federal laws, rules and/or obligations shall not be enforceable in that
particular territory and Saitek will adhere to those laws, rules, and/or obligations.
When returning the product for repair, please pack it very carefully, preferably using the
original packaging materials. Please also include an explanatory note.
IMPORTANT: To save yourself unnecessary cost and inconvenience, please check carefully
that you have read and followed the instructions in this manual.
This warranty is in lieu of all other expressed warranties, obligations or liabilities. ANY
IMPLIED WARRANTIES, OBLIGATIONS, OR LIABILITIES, INCLUDING BUT NOT LIMITED
TO THE IMPLIED WARRANTIES OF MERCHANTABILITY AND FITNESS FOR A
PARTICULAR PURPOSE, SHALL BE LIMITED IN DURATION TO THE DURATION OF THIS
WRITTEN LIMITED WARRANTY. Some states do not allow limitations on how long an implied
warranty lasts, so the above limitations may not apply to you. IN NO EVENT SHALL WE BE
LIABLE FOR ANY SPECIAL OR CONSEQUENTIAL DAMAGES FOR BREACH OF THIS OR
ANY OTHER WARRANTY, EXPRESS OR IMPLIED, WHATSOEVER. Some states do not
allow the exclusion or limitation of special, incidental or consequential damages, so the above
limitation may not apply to you. This warranty gives you specific legal rights, and you may also
have other rights which vary from state to state.
This symbol on the product or in the instructions means that your electrical and electronic
equipment should be disposed at the end of its life separately from your
household waste. There are separate collection systems for recycling in the EU.
For more information, please contact the local authority or your retailer where you
purchased the product.
ECLIPSE III MULTIMEDIA-TASTATUR MIT HINTERGRUNDBELEUCHTUNG
Wir beglückwünschen Sie zum Kauf Ihrer Eclipse III Tastatur mit Hintergrundbeleuchtung. Die
Tastatur verfügt über ein elegantes Design, berührungsempfindliche Beleuchtungs- und
Lautstärkenregler und eine Reihe von Windows Office und Multimediatasten.
Funktionen
•
Anpassbare mehrfarbige Hintergrundbeleuchtung
•
Berührungsempfindliches Bedienfeld
•
Zweistufige Höhenanpassung und abnehmbare Handgelenkauflage
•
Pass-through- Kopfhörer- und Mikrofon-Audioanschlüsse
•
Zeitsparende Windows- und Internet-Schnelltasten
•
USB Plug-and-Play
•
Farb- und Tastatureinstellungen bleiben auch nach Systemneustart erhalten
•
Lasergeschnittene, langlebige Soft-Touch-Tasten
Systemkompatibilität
PC mit Windows XP/XP64/Vista
Installation für alle Plattformen
1 Schließen Sie den USB-Anschluss der Tastatur an einen USB-Anschluss Ihres Computers an.
2 Befolgen Sie die Anweisungen des Installationsassistenten, um die
Installation des neuen USB-Geräts auf dem System fertig zu stellen.
3 Falls Sie Kopfhörer, Lautsprecher, Headset oder Mikrofon verwenden
wollen, schließen Sie auch die rosafarbenen und grünen Miniklinkenkabel an die
entsprechenden Audioeingangs- und Ausgangsbuchsen des PC an. Stecken Sie k
l
nun Headset, Lautsprecherkabel usw. in die rosafarbene Audioeingangsbuchse
(k) und die grüne Audioausgangsbuchse (l) rechts hinten an der Tastatur.
4 Gehen Sie auf http://www.saitek.com/uk/down/drivers.htm und laden Sie den
Eclipse III Software-Treiber herunter. Die Lautstärkeanzeigen der Eclipse III Tastatur leuchten
nicht, wenn kein Treiber installiert ist..
5 Die Tastatur ist jetzt betriebsbereit.
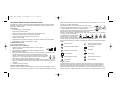
Berührungsempfindliche Bedienfeldregler
Das Bedienfeld an der Oberseite der Eclipse III Tastatur dient zur Einstellung der
Hintergrundbeleuchtung und -intensität sowie des Mediaplayers Ihres PC. Zur Anpassung der
Helligkeit der Tasten-Hintergrundbeleuchtung drücken Sie den Helligkeitsregler (a) und
anschließend "-" (c) bzw. "+" (d) zum Erhöhen oder Reduzieren der Helligkeit.
Eclipse_III_KB.qxd
31/07/2008
10:36
Page 8
Zum Ändern der Farbe der Tasten-Hintergrundbeleuchtung drücken Sie
zunächst die Farbauswahl (b) und anschließend auf "-" (c) bzw. "+" (d),
um durch die Hintergrundfarben zu schalten.
c
a
d
b
Drücken Sie auf den Hintergrund-Ein-/Ausschalter (e) zum Ein- oder
Ausschalten der Hintergrundbeleuchtung. Zum Senken oder Erhöhen
der Lautstärke des Mediaplayers Ihres PC drücken Sie auf "-" bzw. "+" auf der Lautstärkenregelung
(f). Die Stummschaltungskontrolle (g) schaltet vorübergehend den PC stumm, und Play/Pause
(Abspielen/Pausieren) (h), Previous Track (vorheriger Titel) (i) und Next Track (nächster Titel) (j)
dienen zur Kontrolle der Titel, die vom PC Mediaplayer abgespielt werden.
Die Eclipse III verfügt auf jeder Seite
der Tastatur über sechs Tasten, mit
denen verschiedene Windows- und
Office-Funktionen kontrolliert werden.
e
g
f
h
i
Wichtiger Hinweis:
Unter bestimmten Umständen kann die Verwendung einer Tastatur zu Verletzungen an Händen,
Handgelenken, Armen, Rücken oder Nacken führen. Wenn Sie während oder nach Verwendung
der Tastatur Schmerzen, ein Taubheitsgefühl oder eine Schwäche in diesen Körperteilen
empfinden, so suchen Sie einen Arzt auf.
Die nachfolgenden Richtlinien verringern das Verletzungsrisiko:
-
j
-
Stellen Sie die Höhe und den Abstand Ihres Stuhls von der Tastatur ein, so dass Ihre
Handgelenke gerade sind.
Halten Sie Ihre Schultern entspannt und nehmen Sie die Ellbogen auf die Seite. Stellen Sie
Tastatur und Maus so auf, dass Sie sich nicht danach strecken müssen.
Gönnen Sie Händen und Armen öfter eine Pause. Verlassen Sie Ihren Computer und gehen
Sie mindestens zweimal pro Stunde herum und versuchen Sie, Ihr tägliches Arbeitspensum zu
variieren.
Legen Sie Ihre Handgelenke nicht auf scharfen Kanten ab, und wenn Sie eine Gelenk- oder
Handflächenablage haben, so verwenden Sie diese, während Sie tippen.
Internet Home
Sleep-Funktion (zum Aktivieren 3
Sekunden lang drücken)
-
Internetbrowser weiter
Mein Computer
Technischer Support
Probleme - keine Angst, wir lassen Sie nicht im Stich!
Internetbrowser zurück
Suche
Wussten Sie, dass fast alle Produkte, die als fehlerhaft an uns zurückgeschickt werden, überhaupt
nicht defekt sind? Sie wurden einfach nicht richtig installiert!
Neuer Tab
Outlook öffnen
Internetseite aktualisieren
Mediaplayer öffnen
Sollten Sie Probleme mit diesem Produkt haben, besuchen Sie bitte zuerst unsere Website
www.saitek.de. Unsere Website, speziell der Bereich Technischer Support, wurde erstellt, damit Sie
von Ihrem Saitek-Produkt die bestmögliche Leistung erhalten.
Favoriten öffnen
Taschenrechner öffnen
Sleep-Funktion
Die Eclipse III Tastatur verfügt über eine Sleep-Taste, die zur Aktivierung drei Sekunden lang
gedrückt wird. Vista-Benutzer sollten beachten, dass der Sleep-Taste ggf. je nach den PCEinstellungen eine andere Funktion zugewiesen wurde. Um zu überprüfen, ob die Sleep-Taste
Ihren PC in den Bereitschaftsmodus versetzt, gehen Sie zu Windows Start, Systemsteuerung,
Energieoptionen. Klicken Sie auf die Verknüpfung "Auswahl der Stromschalter-Funktionen" auf der
linken Seite des Fensters. Wählen Sie unter "Beim Drücken der Sleep-Taste auf meinem
Computer" die Option "Sleep" aus dem Drag-Down-Menü.
Sollten Sie trotzdem noch Probleme haben oder keinen Internetzugang haben, dann stehen Ihnen
unsere Produktspezialisten im Saitek Technical Support Team zur Verfügung, die Sie telefonisch
um Rat und Hilfe bitten können.
Wir möchten, dass Sie viel Freude an Ihrem Gerät haben. Bitte rufen Sie uns an, falls Sie
Probleme oder Fragen haben. Bitte stellen Sie auch sicher, dass Sie alle relevanten Informationen
zu Hand haben, bevor Sie anrufen.
Rufnummern und Adressen finden Sie auf der mit dem Produkt gelieferten Liste der Zentren für
Technischen Support.
Garantiebedingungen
1 Die Garantiezeit beträgt 2 Jahre ab dem nachgewiesenen Kaufdatum.
2 Die Bedienungsanleitung ist zu beachten.
Eclipse_III_KB.qxd
3
4
5
6
7
31/07/2008
10:36
Page 10
Schäden im Zusammenhang mit dem Auslaufen von Batterien sind spezifisch aus dem
Garantieumfang ausgenommen.
Hinweis: Batterien können auslaufen, wenn sie über einen längeren Zeitraum ungenutzt in
einem Gerät verbleiben. Es ist daher ratsam, die Batterien regelmäßig zu überprüfen.
Die Garantie ist ausgeschlossen bei
Verunstaltung des Geräts, unsachgemäßer oder missbräuchlicher Benutzung, mangelnder
Sorgfalt, Unfall, Beseitigung oder Änderung der Seriennummer; Anschluss an eine falsche
Spannung oder Stromart; Reparatur, Umbau oder Wartung des Geräts durch fremde Personen
außerhalb unserer Serviceeinrichtung oder eines autorisierten Servicecenters; Verwendung
oder Einbau von nicht von Saitek stammenden Ersatzteilen in das Gerät oder sonstigen
Veränderungen: Einbau in andere Geräte; Beschädigung des Geräts durch höhere Gewalt
(z.B. Unfall, Brand, Hochwasser oder Blitzschlag) oder eine den Anweisungen von Saitek
zuwider laufende Benutzung des Geräts.
Die Garantiepflicht beschränkt sich darauf, dass Saitek das Gerät nach eigener Wahl
entweder repariert oder durch ein gleiches oder ähnliches Gerät ersetzt. Zur Inanspruchnahme
der Garantie sind dem autorisierten Saitek Technical Support Center (Anschrift liegt dem Gerät
in der Verpackung bei) Gerät und Kaufbeleg (z.B. Kassenzettel oder Rechnung) frachtfrei zu
übersenden.
Bei Einsendung des Geräts zur Reparatur ist eine angemessene Verpackung (vorzugsweise
die Originalverpackung) zu wählen und eine Schilderung des Problems beizufügen.
WICHTIGER HINWEIS: Achten Sie zur Vermeidung unnötiger Kosten und
Unannehmlichkeiten darauf, die Anweisungen in dieser Bedienungsanleitung sorgfältig
durchzulesen und zu beachten.
Dieses Produkt darf am Ende seiner Lebensdauer nicht über den normalen
Haushaltsabfall entsorgt werden, sondern muss an einem Sammelpunkt für das
Recycling von elektrischen und elektronischen Geräten abgegeben werden. Das
Symbol auf dem Produkt, der Gebrauchsanleitung oder der Verpackung weist
darauf hin.
ECLIPSE III BACKLIT MULTIMEDIA KEYBOARD
Félicitations, vous venez d'acheter votre Eclipse III Backlit Keyboard. Ce clavier possède une
conception fine, des commandes à effleurement pour l'éclairage et le volume, et une série touches
de raccourcis pour Windows Office et le smultimédia.
Fonctions
•
Rétro-éclairage réglable et multicolore
•
Panneau de commande à effleurement
•
Repose poignet à deux hauteurs ajustable et démontable
•
Connecteurs audio pour les écouteurs et le microphone
•
Touches de raccourcis pour Windows et Internet
•
USB Plug and play
•
Les réglages de la couleur et du clavier sont mémorisés même après la remise à zéro de
l'ordinateur
•
Touches découpées au laser, résistantes, et à touché souple
Compatibilité système
PC sous Windows XP /XP64/Vista
Installation pour toutes les plates-formes
1 Premièrement, branchez le connecteur USB du clavier dans un des
ports USB de votre ordinateur.
2 Suivez les instructions de l'assistant d'installation pour terminer
l'installation du nouveau périphérique USB sur votre ordinateur.
3 Si vous avez l'intention d'utiliser des écouteurs, des haut-parleurs, un casque
k
l
ou un microphone, branchez également les prises mini jack roses et vertes sur
les prises audio de votre PC. Branchez maintenant votre casque, câble de
haut-parleurs, etc. dans les prises audio rose (k) et verte (i) situées à l'arrière
de votre clavier.
4 Allez sur le site http://www.saitek.com/uk/down/drivers.htm pour télécharger le pilote de
l'Eclipse III. Les indicateurs de volume de l'Eclipse III keyboard ne s'illumineront pas sans que
vous installiez le pilote.
5 votre clavier est maintenant prêt à l'emploi.
Eclipse_III_KB.qxd
31/07/2008
10:36
Page 12
Panneau de commandes à effleurement
Le panneau supérieur de votre Eclipse III keyboard commande la
couleur et l'intensité du rétro-éclairage, ainsi que le lecteur multimédia
de votre PC. Pour changer la luminosité du rétro-éclairage de votre
clavier, pressez le contrôle de luminosité (a) et puis " - " (c) ou " + " (d)
pour diminuer ou augmenter la luminosité.
a
c
d
b
Pour changer la couleur du rétro-éclairage des touches, pressez d'abord la commande de
sélecteur de couleur (b) et puis " - " (c) ou " + " (d) pour faire défiler les couleurs de rétro-éclairage.
Pressez la commande "Marche/Arrêt" du rétro-éclairage (e) pour allumer ou éteindre le rétro
éclairage. Pour augmenter ou diminuer le volume du lecteur multimédia de votre PC, pressez " - "
ou " + " sur la commande de volume (f). La commande silence (g) coupe temporairement le son de
votre PC et Lecture/Pause (h), Piste
g
e
h
j
f
i
précédente (i) et Piste suivante (j)
commandent les pistes lues dans le
lecteur multimédia de votre PC.
L'Eclipse III possède six boutons sur chaque côté du clavier qui commandent diverses fonctions de
Windows et du pack Office.
fonction différente selon les réglages de votre PC. Pour vérifier que le bouton de veille mettra votre
PC en veille, allez dans Démarrer de Windows, Panneau de configuration, Options d'alimentation.
Cliquer sur " Choisir l'action des boutons d'alimentation " sur le côté gauche de la fenêtre, et sous "
Lorsque j'appuie sur le bouton de mise en veille ", sélectionnez " Veille " dans le menu déroulant.
Avertissement important
Dans certaines circonstances, l'utilisation d'un clavier peut engendrer des douleurs aux mains, aux
poignets, aux bras, au dos ou au cou. Si vous ressentez des douleurs, un engourdissement ou une
faiblesse de l'une de ces parties de votre corps pendant ou après l'utilisation du clavier, veuillez
consulter un médecin qualifié.
Les recommandations suivantes permettront de diminuer les risques de blessure :
- Ajustez la hauteur de votre chaise et la distance de votre clavier de façon à ce que vos poignets
soient toujours droits.
- Vérifiez que vos épaules sont bien détendues, et que vos coudes soient sur les côtés.
Positionnez votre clavier et votre souris de façon à ce qu'ils soient toujours directement à portée
de main (sans avoir à s'avancer).
- Faites régulièrement des pauses pour reposer vos mains et vos bras. Levez-vous et marchez
un petit peu au moins deux fois par heure et essayez de varier vos tâches pendant la journée.
- Evitez de reposer vos poignets sur des rebords pointus. Si vous disposez d'un repose-poignet,
ne l'utilisez pas pendant que vous tapez au clavier.
Page d'accueil Internet
Veille (presser pendant 3 secondes)
Page précédente du navigateur
Internet
Mon ordinateur
Support Technique
Je ne peux pas démarrer. Ne vous inquiétez pas, nous sommes là pour vous aider !
Page suivante du navigateur Internet
Rechercher
La plupart des produits qui nous sont retournés comme étant défectueux ne le sont pas du tout en
réalité : ils n'ont tout simplement pas été installés correctement.
Nouvel onglet
Ouvrir Outlook
Recharger la page Internet
Ouvrir le lecteur multimédia
Si vous rencontrez la moindre difficulté avec ce produit, merci de vous rendre tout d'abord sur
notre site web www.saitek.com. La section " Support Technique " vous fournira toute l'information
dont vous avez besoin pour tirer le meilleur parti de votre produit, et devrait vous aider à résoudre
tous les problèmes que vous pourriez éventuellement rencontrer.
Ouvrir les favoris
Ouvrir la calculatrice
Fonction veille
Votre clavier Eclipse III comporte un bouton de Veille qui fonctionne en étant appuyé pendant trois
secondes. Veuillez noter que pour les utilisateurs de Vista, le bouton de Veille peut avoir une
Si vous n'avez pas accès à Internet, ou si vous ne trouvez pas de réponse à votre question sur
notre site web, merci de bien vouloir contacter l'équipe locale du Support Technique Saitek. Notre
objectif consiste à offrir un support technique complet et approfondi à tous nos utilisateurs, donc,
avant de nous appeler, merci de bien vouloir vérifier que vous avez toute l'information requise à
portée de main.
Pour trouver votre équipe locale du Support Technique Saitek, merci de vous référer à la feuille
" Centre de Support Technique " qui vous a été fournie dans l'emballage de ce produit.
Eclipse_III_KB.qxd
31/07/2008
10:36
Page 14
Conditions de garantie
1 La période de garantie est de deux ans à compter de la date d'achat, avec soumission d'une
preuve d'achat.
2 Les instructions de fonctionnement doivent être correctement suivies.
3 Sont exclus spécifiquement tous les dommages dus à une fuite des piles.
NB : Les piles risquent de fuir si elles sont laissées trop longtemps à l'intérieur d'un appareil. Il
est donc recommandé d'inspecter les piles de façon régulière.
4 Le produit ne doit pas avoir été endommagé par une dégradation, une utilisation non
conforme, une négligence, un accident, une destruction ou une altération du numéro de série,
l'utilisation de voltages ou courants électriques inadaptés, la réparation, la modification ou la
maintenance par toute personne ou tiers autre que notre propre Service Après Vente ou un
centre de réparation agréé, l'utilisation ou l'installation de pièces de remplacement qui ne
soient pas des pièces Saitek, ou la modification du produit de quelque manière que ce soit, ou
l'introduction de ce produit dans n'importe quel autre produit, ou des dommages causés au
produit par un accident, le feu, des inondations, la foudre, les catastrophes naturelles, ou toute
utilisation allant à l'encontre des instructions fournies par Saitek PLC.
5 Les obligations du revendeur de produits Saitek sont limitées au remplacement par un produit
identique ou similaire, ou au remboursement du produit ou à l’émission d’un avoir à sa
convenance. Afin d’obtenir un échange, un remboursement ou un avoir en fonction de la
politique en vigueur du revendeur, veuillez présenter le produit avec son emballage et sa
preuve d’achat (c'est-à-dire le ticket de caisse ou une facture) à votre revendeur. Toute
condition en contradiction avec des lois, règles et/ou obligations fédérales ou étatiques ne
pourra pas être appliquée dans ce territoire spécifique et Saitek adhèrera à ces lois, règles
et/ou obligations.
6 Lors du renvoi du produit en vue d'une réparation, veillez s'il vous plaît à l'emballer
soigneusement, en utilisant de préférence l'emballage d'origine. Merci également de bien
vouloir inclure une note explicative.
IMPORTANT : afin de vous permettre d'éviter des coûts et des désagréments inutiles, merci
de vérifier soigneusement que vous avez lu et suivi les instructions figurant dans ce manuel.
Cette garantie agit en lieu et place de toutes les autres garanties, obligations et
responsabilités. TOUTES GARANTIES, OBLIGATIONS OU RESPONSABILITES IMPLICITES,
INCLUANT SANS RESTRICTION LES GARANTIES ET CONDITIONS IMPLICITES DE
QUALITE OU D'ADAPTABILITE A UN USAGE SPECIFIQUE, SONT LIMITEES, EN DUREE,
A LA DUREE DE CETTE GARANTIE LIMITEE ECRITE. Certains Etats n'autorisent pas de
restrictions de durée de la garantie, auquel cas les restrictions décrites ci-dessus ne vous sont
pas applicables. EN AUCUN CAS NOUS NE POURRONS ETRE TENUS POUR
RESPONSABLES POUR DES DEGATS SPECIFIQUES OU RESULTANT D'UNE
INFRACTION A CETTE GARANTIE OU A TOUTE AUTRE GARANTIE, EXPRESSE OU
IMPLICITE, QUELLE QU'ELLE SOIT. Certains Etats n'autorisent pas l'exclusion ou la
restriction des dégâts accidentels, indirects, spéciaux ou induits, auquel cas la restriction cidessus ne vous est pas applicable. Cette garantie vous accorde des droits légaux spécifiques,
et vous pouvez également bénéficier d'autres droits variant d'un Etat à l'autre.
Ce symbole sur le produit ou dans le manuel signifie que votre équipement électrique et
électronique doit être, en fin de vie, jeté séparement de vos déchets ménagers. Il
existe en France des systèmes de collecte différents pour les déchets
recyclables. Pour plus d'information, veuillez contacter les autorités locales ou le
revendeur chez qui vous avez acheté le produit.
Eclipse_III_KB.qxd
31/07/2008
10:36
Page 16
TASTIERA MULTIMEDIALE RETROILLUMINATA ECLIPSE III
Congratulazioni per avere acquistato la vostra tastiera multimediale retroilluminata Eclipse III. La
tastiera ha un elegante design, controlli dell'illuminazione e del volume sensibili al tocco, e una
serie di tasti per Windows Office e multimedia.
Caratteristiche
•
Retroilluminazione regolabile multi-colore
•
Pannello di controllo sensibile al tocco
•
Altezza regolabile a due posizioni e supporto per i polsi rimovibile
•
Porte audio passanti per cuffia e microfono
•
Tasti rapidi Windows e Internet per risparmiare tempo
•
USB plug and play
•
Le impostazioni dei colori e della tastiera si conservano anche dopo il ri-avvio del sistema
•
Tasti durevoli e soffici al tocco, con incisioni laser
Sistemi compatibili
PC con Windows XP/XP64/Vista
Installazione per tutte le piattaforme
1 Per prima cosa inserite il connettore USB della tastiera in una porta USB
del vostro computer.
2 Seguite l'assistente di installazione per completare l'installazione del
nuovo dispositivo USB nel sistema.
3 Se intendete usare auricolari, altoparlanti, cuffia o microfono, inserite gli spinotti mini jack rosa
e verde nelle prese audio di ingresso e uscita corrispondenti del vostro PC. Ora k
l
collegate i cavi della vostra cuffia, altoparlante, etc alla presa di ingresso audio
rosa (k) e all'uscita audio verde (l) nella parte posteriore destra della vostra
tastiera.
4 Scaricate il driver software della tastiera Eclipse III dall'indirizzo Internet
http://www.saitek.com/uk/down/drivers. Gli indicatori di volume della tastiera Eclipse III non si
illuminano se non installate il driver.
5 La vostra tastiera è ora pronta all'uso.
Controlli del panello sensibile al tocco
Il panello nella parte alta della vostra tastiera Eclipse III controlla colore e intensità della
retroilluminazione, oltre al media player del vostro PC. Per variare la luminosità della
retroilluminazione della vostra tastiera, premete il controllo di luminosità (a) e poi "-" (c) o "+" (d)
per diminuire o aumentare la luminosità.
Per cambiare il colore della retroilluminazione dei tasti, premete il
controllo della selezione dei colori (b) e poi "-" (c) o "+" (d) per fare
scorrere i colori della retroilluminazione.
a
c
d
b
Premete il controllo on/off della retroilluminazione (e) per accendere o
spegnere la retroilluminazione della tastiera. Per aumentare o diminuire
il volume del media player del vostro PC, premete "-" o "+" sul controllo del volume (f). Il controllo
del muto (g) esclude temporaneamente
g
e
h
j
f
i
tutti i suoni del vostro PC, mentre
play/pause (h), previous track (i) e next
track (j) controllano le tracce del media
player del vostro PC.
Eclipse III ha sei tasti ai due lati della tastiera che controllano varie funzioni di Windows e di Office.
Internet home
Sleep (premere per 3 secondi)
Internet browser forward
My computer
Internet browser back
Search
New tab
Open Outlook
Internet page reload
Open media player
Open favorites
Open calculator
Funzione Sleep
La vostra tastiera Eclipse III è dotata di un tasto "sleep" che si attiva premendolo per tre secondi.
Per gli utenti di Vista, il tasto sleep può avere funzioni differenti che dipendono dalle impostazioni
del PC. Per verificare se il bottone sleep sospende il vostro PC, andate su Windows Start,
Pannello di controllo, Opzioni risparmio energia. Fate click sul link nella parte sinistra della finestra
"Cambia comportamento dei pulsanti di alimentazione", alla voce "Quando viene premuto il
pulsante di sospensione", selezionate "sospensione" dal menu a tendina.
Avviso importante
In alcuni casi, l'uso di una tastiera può causare problemi alle mani, ai polsi, alle braccia, alla
Eclipse_III_KB.qxd
31/07/2008
10:36
Page 18
schiena o al collo. Se si avverte dolore, insensibilità o debolezza in queste aree durante o dopo
l'uso della tastiera, rivolgersi al personale medico.
Per ridurre al minimo il rischio di danni, attenersi alle seguenti linee guida:
- Regolare l'altezza e la distanza della sedia dalla tastiera di modo che i polsi siano dritti.
- Tenere le spalle rilassate con i gomiti ai lati. Posizionare la tastiera e il mouse in maniera tale
che non sia necessario allungarsi.
- Fare pause frequenti per far riposare mani e braccia. Allontanarsi dal computer e alzarsi e
camminare almeno due volte all'ora, cercando di variare le attività giornaliere.
- Non poggiare i polsi su bordi acuti ed evitare di usare un poggiapolso/palmo durante l'uso della
tastiera.
Assistenza tecnica
Avvio impossibile? Non preoccupatevi, siamo qui per aiutarti!
Quasi tutti i prodotti che ci vengono resi come difettosi non sono affatto difettosi - non sono stati
semplicemente installati correttamente.
Se avete delle difficoltà con questo prodotto, visitate prima di tutto il nostro sito Web
www.saitek.com. L'area dell'assistenza tecnica vi fornirà tutte le informazioni che vi occorrono per
ottenere il meglio dal vostro prodotto e per risolvere qualsiasi problema da voi riscontrato.
Se non avete accesso all'Internet o il sito Web non è in grado di rispondere alla vostra domanda,
rivolgetevi al vostro Team Assistenza Tecnica Saitek locale. Offriamo l'assistenza tecnica rapida,
vasta e completa a tutti i nostri utenti. Prima di chiamarci accertatevi di avere tutte le informazioni
pertinenti a portata di mano.
Troverete nel foglio separato fornito con questo prodotto i dati relativi al vostro Centro di
Assistenza Tecnica locale.
Condizioni della garanzia
1 Il periodo di garanzia è di 2 anni dalla data d'acquisto con presentazione della prova
d'acquisto.
2 Seguire le istruzioni per il funzionamento.
3 Esclude espressamente qualsiasi danno associato alla perdita delle batterie.
NB: le batterie possono perdere se sono lasciate inutilizzate in un prodotto per un periodo di
tempo prolungato, e per questo è consigliabile controllarle regolarmente.
4 Il prodotto non deve essere stato danneggiato a causa di deturpazione, uso errato, abuso,
negligenza, incidente, distruzione o alterazione del numero di serie, incorrette tensioni o
correnti elettriche, riparazione, modificazione o manutenzione effettuata da qualsiasi persona o
5
6
7
8
parte eccetto dal nostro servizio di manutenzione o un centro di manutenzione autorizzato,
utilizzo o installazione di parti di ricambio non Saitek nel prodotto o la modifica di questo
prodotto in qualsiasi modo, o l'incorporazione di questo prodotto in qualsiasi altro prodotto, o
danni al prodotto provocato da incidente, incendio, inondazione, fulmini o forza maggiore, o
qualsiasi uso che contravviene alle istruzioni fornite da Saitek plc.
Gli obblighi di Saitek saranno limitati alla riparazione o sostituzione con la stessa unità o con
un'unità simile, a scelta di Saitek. Per ottenere le riparazioni ai sensi della presente garanzia,
presentare il prodotto e la prova d'acquisto (ad es. la ricevuta o la fattura) al Centro Assistenza
Tecnica Saitek (elencato nel foglio separato contenuto nella confezione di questo prodotto),
con le spese di trasporto prepagate. Qualsiasi requisito che è in conflitto con qualsiasi legge,
regolamento e/o obbligo statale o federale non sarà applicabile in quel territorio particolare e
Saitek aderirà a quelle leggi, regole e/o obblighi.
Quando il prodotto viene reso per la riparazione, imballarlo molto attentamente,
preferibilmente utilizzando i materiali d'imballaggio iniziali. Includere inoltre una nota
esplicativa.
IMPORTANTE: per risparmiare costi e inconvenienti inutili, controllare attentamente di aver
letto e seguito le istruzioni in questo manuale.
Questa garanzia sostituisce tutte le altre garanzie, gli obblighi o le responsabilità esplicite. LA
DURATA DI QUALSIASI GARANZIA, OBBLIGO, O RESPONSABILITÀ IMPLICITI,
COMPRESI MA NON LIMITATI ALLE GARANZIE IMPLICITE DI RESPONSABILITÀ E
IDONEITÀ PER UNO SCOPO PARTICOLARE, SARÀ LIMITATA ALLA DURATA DELLA
PRESENTE GARANZIA LIMITATA SCRITTA. Alcuni Stati non consentono limitazioni sulla
durata di una garanzia implicita, perciò le suddette limitazioni possono non essere pertinenti
nel vostro caso. NON SAREMO MAI RESPONSABILI PER QUALSIASI DANNO SPECIALE O
CONSEGUENTE PER VIOLAZIONE DI QUESTA O DI QUALSIASI ALTRA GARANZIA,
ESPLICITA O IMPLICITA, DI QUALSIASI TIPO. Alcuni Stati non consentono l'esclusione o la
limitazione di danni speciali, incidentali o conseguenti, per cui la suddetta limitazione può non
applicarsi nel vostro caso. La presente garanzia vi conferisce diritti legali speciali, e potete
avere anche altri diritti che variano da uno Stato all'altro.
Questo simbolo riportato sul prodotto o nelle istruzioni indica che, al termine della loro vita,
le apparecchiature elettriche ed elettroniche devono essere smaltite
separatamente dai rifiuti domestici. Nell'Unione Europea sono disponibili sistemi
per la raccolta separata e il riciclaggio dei rifiuti.
Per richiedere ulteriori informazioni contattare le autorità locali o il rivenditore
dove è stato effettuato l'acquisto del prodotto.
Eclipse_III_KB.qxd
31/07/2008
10:37
Page 20
TECLADO MULTIMEDIA CONTRA ILUMINADO ECLIPSE III
Enhorabuena por comprar el Teclado contra iluminado Eclipse III. El teclado presenta un diseño
impecable, controles de volumen e iluminación con sensibilidad al tacto y una gama de teclas
multimedia y Windows Office.
Características
•
Contra iluminación multi-color ajustable
•
Panel de control sensible al tacto
•
Ajuste de altura de dos niveles y soporte para la muñeca desmontable
•
Puertos audio de paso directo para micrófonos y auriculares
•
Teclas de atajo de Internet y Windows que ahorran tiempo
•
Enchufar y escuchar USB
•
Permanencia de configuraciones de teclado y color incluso después de reiniciar el sistema
•
Teclas duraderas, suaves al tacto, grabadas con láser
Compatibilidad del sistema
PC con Windows XP/XP64/Vista
Instalación para todas las plataformas
1 Primero enchufe el conector USB del teclado en uno de los puertos
USB de su ordenador.
2 Siga al asistente de instalación para realizar la instalación del nuevo
dispositivo USB en el sistema.
3 Si tiene intención de utilizar auriculares, altavoces, cascos auriculares o micrófonos, también
enchufe las mini clavijas rosa y verde en los correspondientes enchufes de
k
l
entrada y salida de audio de su PC. Ahora enchufe su casco auricular, cables
de altavoz, etc. en los enchufes de entrada de audio rosa (k) y de salida de
audio verde (I) en la parte posterior derecha de su teclado.
4 Vaya a http://www.saitek.com/uk/down/drivers.htm para descargar el controlador de software
Eclipse III. Los indicadores de volumen del teclado Eclipse III no se iluminarán si no instala un
controlador.
5 Su teclado ya está listo para usar.
Controles de panel sensibles al tacto
El panel en la parte superior de su teclado Eclipse III controla el color y la intensidad de la contra
iluminación, así como el reproductor de media de su PC. Para cambiar la luminosidad de la contra
iluminación de su teclado, presione el control de luminosidad (a) y a continuación "-" (c) o "+" (d)
para reducir o aumentar la luminosidad.
Para cambiar el color de la contra iluminación de las teclas, primero
presione el control seleccionador de color (b) y a continuación "-" (c) o
"+" (d) para deslizarse por los colores de contra iluminación.
a
c
d
b
Presione el control (e) encender/apagar (on/off) de la contra iluminación
para encender o apagar la contra iluminación del teclado. Para
aumentar o reducir el volumen del reproductor de media de su PC, presione "-" o "+" en el control
de volumen (f). El control de silencio
g
e
h
j
f
i
(g) temporalmente enmudece todos los
sonidos de su PC y escuchar/pausar
(h), pista anterior (i) y pista siguiente (j)
controlan las pistas que puede escuchar en el reproductor de media de su PC.
Eclipse III tiene seis botones en cada lado del teclado que controlan varias funciones de Windows
y Office.
IInicio de internet
En espera (presione durante 3
segundos para que funcione)
Navegador de internet adelante
Mi ordenador
Navegador de internet atrás
Búsqueda
Nuevo tabulador
Abrir Outlook
Recargar página de internet
Abrir reproductor de media
Abrir favoritos
Abrir calculadora
Función en espera
Su teclado Eclipse III dispone de un botón en espera que funciona si lo presiona durante tres
segundos. Por favor tome nota que para los usuarios de Vista, el botón en espera podría tener
otra función dependiendo de las configuraciones de su PC. Para comprobar que el botón en
espera pone su PC en espera, vaya a Iniciar Windows, Panel de control, Opciones de suministro
eléctrico. Haga clic en el enlace "Elija lo que hacen los botones de suministro eléctrico" ("Choose
Eclipse_III_KB.qxd
31/07/2008
10:37
Page 22
what the power buttons do") en la parte izquierda de la ventana, debajo de "Cuando presiono el
botón en espera de mi ordenador" ("When I press the sleep button on my computer"), seleccione
"en espera" ("Sleep") del menú desplegable debajo.
2
3
Aviso importante
En algunos casos, el uso de un teclado puede causar lesiones en manos, muñecas, brazos,
espalda o cuello. Si siente dolor, debilidad en estas áreas o se le quedan dormidas durante el uso
del teclado o posteriormente, busque la asistencia de un profesional médico cualificado.
4
Las siguientes directrices reducirán al mínimo el riesgo de lesiones:
-
Ajuste la altura de la silla y la distancia del teclado de manera que las muñecas estén rectas.
Mantenga los hombros relajados con los codos a cada lado y coloque el teclado y el ratón de
manera que no tenga que estirarse.
Tome descansos frecuentes para reposar las manos y los hombros. Deje el ordenador y
camine un poco al menos dos veces cada hora e intente variar lo que hace durante el día.
Evite posar las muñecas en bordes agudos y si tiene un reposamuñecas o reposapalmas, no
lo utilice mientras teclea.
5
Asistencia técnica
¿No puede empezar?: No se preocupe, ¡aquí estamos para ayudarle!
Casi la totalidad de los productos que nos devuelven como averiados no tienen ningún fallo: es
simplemente que no se han instalado correctamente.
6
Si experimenta alguna dificultad con este producto, rogamos que visite primeramente nuestro sitio
web: www.saitek.com.
7
El área de asistencia técnica le proporcionará toda la información que necesita para obtener el
mayor rendimiento de su producto y debería resolver cualesquiera problemas que pudiese tener.
8
Si no dispone de acceso a Internet o si no encuentra en el sitio web respuesta a su pregunta,
rogamos que se ponga en contacto con el equipo de asistencia técnica de Saitek. Nuestro objetivo
es ofrecer asistencia técnica rápida y completa a todos nuestros usuarios, así que le rogamos que
antes de llamar tenga a mano toda la información relevante.
Para hallar el Centro de asistencia técnica de Saitek de su localidad, rogamos que consulte la hoja
de Centros de asistencia técnica incluida en el paquete de este producto.
Condiciones de la garantía
1
El período de garantía es de 2 años desde la fecha de compra con presentación de
comprobante.
Se deben seguir las instrucciones de funcionamiento.
Se excluye específicamente cualquier daño asociado con pérdidas de pilas.
Nota: Las pilas pueden perder cuando se dejan en un producto sin usar durante cierto tiempo,
por lo que se recomienda inspeccionar las pilas regularmente.
El producto no se deberá haber dañado como resultado de modificación, uso indebido, abuso,
negligencia, accidente, destrucción o alteración del número de serie, tensiones o corrientes
eléctricas inadecuadas, reparación, modificación o mantenimiento por parte de cualquier
persona que no sea de nuestras instalaciones de servicio o de un centro de servicio
autorizado, uso o instalación de piezas de repuesto que no sean de Saitek en el producto o
modificación de este producto de cualquier manera o la incorporación de este producto en
cualesquiera otros productos o daños causados por accidente, incendio, inundación, rayos o
fuerza mayor o por cualquier uso que viole las instrucciones suministradas por Saitek plc.
Las obligaciones de Saitek se limitarán a reparar o sustituir la unidad por otra igual o similar,
según optemos. Para obtener reparaciones de acuerdo a esta garantía, deberá presentar el
producto y comprobante de compra (p. ej., una factura o un albarán) al Centro de asistencia
técnica de Saitek autorizado (listado en una hoja separada empaquetada con este producto) y
pagando los gastos de transporte. Cualesquiera requisitos que entren en conflicto con
cualesquiera leyes, normas y/u obligaciones estatales o federales no serán aplicables en
dicho territorio en particular y Saitek se atendrá a dichas leyes, normas y/u obligaciones.
Cuando se devuelva el producto para reparar, rogamos que se empaquete con mucho
cuidado, preferentemente utilizando los materiales de envasado originales. Se ruega adjuntar
una nota explicativa.
IMPORTANTE: Para ahorrarse costes e inconvenientes innecesarios, rogamos que
compruebe cuidadosamente que ha leído y seguido las instrucciones de este manual.
Esta garantía sustituye a cualesquiera otras garantías, obligaciones o responsabilidades
explícitas. CUALESQUIERA GARANTÍAS, OBLIGACIONES O RESPONSABILIDADES
IMPLÍCITAS, INCLUYENDO, SIN LIMITARSE A LO MISMO, LAS GARANTÍAS IMPLÍCITAS
DE COMERCIABILIDAD Y APTITUD PARA UN FIN PARTICULAR, SE LIMITARÁN EN
CUANTO A DURACIÓN AL PERÍODO DE ESTA GARANTÍA LIMITADA ESCRITA. Algunos
estados no permiten limitaciones en cuanto al tiempo de duración de una garantía implícita,
así que las limitaciones anteriores podrían no ser aplicables para usted. EN NINGÚN CASO
SEREMOS RESPONSABLES DE NINGÚN DAÑO ESPECIAL O INDIRECTO POR
INCUMPLIENTO DE ESTA O CUALESQUEIRA OTRAS GARANTÍAS, EXPLÍCITAS O
IMPLÍCITAS Y DE LA NATURALEZA QUE FUESEN. Algunos estados no permiten la
exclusión o limitación de daños especiales, incidentales o indirectos, así que la limitación
Eclipse_III_KB.qxd
31/07/2008
10:37
Page 24
anterior podría no aplicarse a usted. Esta garantía le da derechos legales específicos y
también podría tener otros derechos, que varían entre estados.
Vista/
Este símbolo en el producto o en las instrucciones significa que no debería tirar a
la basura doméstica el equipo eléctrico o electrónico al final de su vida útil. En los
países de la UE existen sistemas de recogida separados para reciclaje. Para más
información, rogamos que se ponga en contacto con la autoridad local o con el
vendedor al que compró el producto.
HR
/Vista
NL Systeem compatibiliteit
PC met Windows XP/XP64/Vista
Het aansluiten van het apparaat
Met uw PC in geschakeld, sluit de USB connector aan op de PC. Volg de installatiestappen
van het apparaat om zo de installatie te voltooien van het nieuwe USB apparaat op het
systeem.
CZ
/Vista
Eclipse_III_KB.qxd
31/07/2008
10:37
Page 26
GR
/Vista
SE Maskinvarukrav
DK PC med windows XP/XP64/Vista
NO Anslutning / Installation
Starta din dator, koppla in enheten till din dators USB port. Följ anvisningarna för att slutföra
installationen av den nya USB-enheten.
RU
/Vista
HU Rendszerkövetelmények
PC Windows XP/XP64/Vista
Csatalakoztatás a számítógéphez
Csatlakoztassa Saitek egerét számítógépe USB portján keresztül.
Kövesse a telepítési varázsló utasításait a sikeres installálás érdekében.
TK
PL
/Vista
/Vista
PT Compatibilidade com sistema
PC Windows XP/XP64/Vista
Como conectar o aparelho
Ligue o computador, inserte o plugue USB do aparelho com uma das entradas USB do
computador. Siga as intruções indicadas para completar a instalação do novo aparelho no
sistema do computador.
Eclipse_III_KB.qxd
31/07/2008
10:37
Page 28
Saitek
®
TM
Backlit Multimedia Keyboard
www.saitek.com
© 2008 Saitek Ltd. Made and printed in China.
All trademarks are the property of their respective owners.
V.1.0 01/08/08
PK24