1
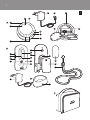
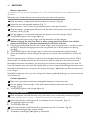
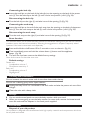
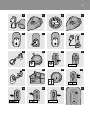
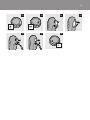
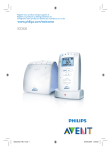
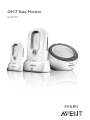
DECT Baby Monitor
SCD590
10
9
4
1
12
5
1
2
11
6
7
8
3
5
6
1
7
11
2
3
4
8
9
12
10
13
14
15
16
17
13
SCD590
English 6
English
Introduction
Philips Avent is dedicated to producing caring, reliable products that give parents the reassurance
they need. This Philips Avent baby monitor provides round-the-clock support by ensuring you can
always hear your baby clearly without any distracting noise. The DECT technology guarantees zero
interference from other wireless appliances and a clear signal between the baby unit and the parent
unit.
This appliance comes with two parent units and two chargers instead of one, so that your baby can
be monitored by two persons at the same time.
IMPORTANT SAFETY INSTRUCTIONS
Some of the following information may not apply to your particular product; however, when using
baby monitor equipment, basic safety precautions should always be followed to reduce the risk of
fire, electric shock and injury to persons, including the following:
1 Read this user manual carefully before you use the appliance and save it for future reference.
2 This baby monitor is intended as an aid. It is not a substitute for responsible and proper adult
supervision and should not be used as such.
3 Use this product for its intended household use as described in this manual. Do not use
attachments not recommended by Philips Electronics North America Corporation.
4 Unplug this product from the wall outlet before cleaning. Do not use liquid cleaners or aerosol
cleaners. Use a damp cloth for cleaning.
5 Products should not be used while you are in a bathtub, shower or pool. Immersion of the
product in water could cause an electrical shock.
6 Slots and openings in the casing back or bottom are provided for ventilation, to protect it from
overheating. These openings should not be blocked or covered. The openings should never be
blocked by placing the product on a bed, sofa, rug, or other similar surface.This product should
not be placed in a built-in installation unless proper ventilation is provided.
7 This product should be operated only from the type of power source indicated on the type
plate of the adapters (A9,B15). If you are not sure of the type of power supply to your home,
consult your dealer or local power company.
8 Do not allow anything to rest on the power cord. Do not locate this product where the cord
will be abused by persons walking on it.
9 Do not overload wall outlets and extension cords as this can result in the risk of fire or electric
shock.
10 Never push objects of any kind into this product through casing slots as they may touch
dangerous voltage points or short out parts that could result in a risk of fire or electric shock.
Never spill liquid of any kind on the product.
11 To reduce the risk of electric shock, do not disassemble this product, but take it to qualified
service personnel when service or repair work is required. Opening or removing covers (except
battery compartment lids) may expose you to dangerous voltage or other risks. Incorrect
reassembly can cause electric shock when the appliance is subsequently used.
12 Do not expose the product to extreme temperatures such as near a hot radiator or stove or in
a hot car.
13 Do not place lighted candles, cigarettes, cigars, etc., on the product.
14 Unplug this product from the wall outlet, discontinue use and return the product to the Philips
Service Location for examination and repair under the following conditions:
- When the power supply cord or plug is damaged or frayed.
- If the product has been exposed to rain or water.
- If the product does not operate normally even though it is used according to the instructions in
the user manual.
- If the product’s casing has been damaged.
- If the product exhibits a distinct change in performance.
English
15 Do not place this product on an unstable cart, stand or table.The product may fall and
sustain serious damage.
16 Make sure the baby unit and the power cord are always out of reach of the baby (at least 1
meter/3 feet away).
17 Never place the baby unit inside the baby’s bed or playpen.
18 Never cover the baby monitor (with a towel, blanket, etc.).
If your product utilizes batteries, the following additional precautions should be
observed:
1 Use only the type and size of batteries specified in the user manual.
2 Do not dispose of batteries in fire. They may explode. Check with local regulations for possible
special disposal instructions.
3 Exercise care in handling batteries in order not to short out the batteries with conducting
materials such as rings, bracelets and keys. Overcharging, short circuiting, reverse charging,
mutilation, or incineration of batteries must be avoided to prevent one or more of the following
occurrences: release of toxic materials, release of hydrogen and/or oxygen gas, rise in surface
temperature.
4 Do not attempt to recharge batteries provided with or identified for use with this product that
are not intended to be charged. The batteries may leak corrosive electrolyte or explode.
5 Do not attempt to rejuvenate the batteries provided with or identified for use with this product
by heating them. Sudden release of battery electrolyte may occur, causing burns or irritation to
eyes or skin.
6 If and when necessary, the batteries must be replaced with identical new ones from the same
manufacturer. If a battery to be replaced is connected with other batteries in series, it is
recommended that the other batteries be replaced with new ones at the same time.
7 Reverse polarity installation of the batteries in the end product must be avoided. Reverse
insertion of batteries can cause charging, and that may result in leakage or explosion.
8 Remove batteries from this product if you store the product over 30 days because the batteries
could leak and damage the product.
9 Discard ‘dead’ batteries as soon as possible since ‘dead’ batteries are more likely to leak in a
product. If a battery has leaked or vented, it should be replaced immediately using protective
gloves.
10 Do not store this product, or the batteries provided with or identified for use with this product,
in high-temperature areas. Batteries that are stored in a freezer or refrigerator for the purpose
of extending shelf life should be protected from condensation during storage and defrosting.
Batteries should be stabilized at room temperature prior to use after cold storage.
11 If your product uses rechargeable batteries, charge the batteries only in accordance with the
instructions and limitations specified in the user manual.
12 There is a risk of explosion if batteries are replaced with an incorrect type. For both parent
units, always use rechargeable batteries.
SAVE THESE INSTRUCTIONS
CAUTION: Unplug power cord before replacing batteries.
Use only the adapter supplied with this baby monitor. Incorrect adapter polarity or voltage can
seriously damage the baby monitor.
Adapters for baby unit and charger:
- Input: 120 VAC 60 Hz
- Output: 9 VDC 300 mA
CAUTION:THERE IS A RISK OF EXPLOSION IF THE BATTERIES ARE
REPLACED BY AN INCORRECT TYPE. DISPOSE OF USED BATTERIES
ACCORDING TO THE INSTRUCTIONS.
For the baby unit, only use 1.5V AA alkaline batteries (batteries not supplied).
For both parent units, only use 1.2V AAA NiMH rechargeable batteries (batteries supplied).
English
Compliance information
The FCC ID number is located on the casing bottom of the parent unit and in the battery
compartment of the baby unit.
The term ‘IC’ before the certification number signifies that Industry Canada technical specifications
were met. This certification means that the equipment meets certain radio communications and
operational requirements.
This device complies with Part 15 of the FCC Rules and ICES-003 of Industry Canada. Operation is
subject to the following two conditions: (1) this device may not cause harmful interference, and (2)
this device must accept any interference received, including interference that may cause undesired
operation.This device complies also with RSS-213 of Industry Canada.
Radio Interference
This equipment has been tested and found to comply with the limits for a Class B digital device,
pursuant to Part 15 of the FCC Rules and applicable Industry Canada specifications. These limits are
designed to provide reasonable protection against harmful interference in a residential installation.
This equipment generates, uses and can radiate radio frequency energy and, if not installed and used
in accordance with the instructions, may cause harmful interference to radio communications.
However, there is no guarantee that interference will not occur in a particular installation. If this
equipment does cause harmful interference to radio or television reception, which can be
determined by turning the equipment off and on, the user is encouraged to try to correct the
interference by one or more of the following measures:
- Reorient or relocate the receiving antenna.
- Increase the separation between the equipment and receiver.
- Connect the equipment to an outlet on a circuit different from that to which the receiver is
connected.
RF Radiation Exposure Statement
This equipment complies with FCC RF radiation exposure limits set forth for an uncontrolled
environment. This equipment should be installed and operated with a minimum distance of 20
centimeters between the radiator and your body. For handheld operation, this equipment has been
tested and meets the FCC RF exposure guidelines. Use of other accessories may not ensure
compliance with FCC RF exposure guidelines. For body-worn operation, this product has been
tested and meets the FCC RF exposure guideline when used with the belt clip or neck strap
supplied with this product. The user must maintain a separation distance of 3mm between the back
of the unit and the body to ensure compliance. Use of other accessories may not ensure
compliance with FCC RF exposure guidelines. This transmitter must not be co-located or operating
in conjunction with any other antenna or transmitter. This equipment also complies with Industry
Canada RSS-102 with respect to Canada’s Health Code 6 for Exposure of Humans to RF Fields.
Do not attempt to repair or modify this equipment
Any repairs or alterations made by the user to the equipment may void the warranty and
compliance of the equipment. Refer servicing to authorized or designated service centers.
General description (Fig. 1)
A Baby unit
1
2
3
4
5
6
7
8
9
On/off button 3
ON light
Volume +/– buttons
Battery check light T
Nightlight
Nightlight button Q PAGE button
Microphone
Adapter
English
10 Small plug
11 Battery compartment lid
12 Inlet for small plug
13 Battery compartment
B Parent unit (2 pieces, only one is shown)
1 TALK button
2 LINK light 3 SENSITIVITY button
4 On/off button 3 5 Opening for belt clip and neck strap
6 Sound level lights
7 Volume +/– buttons
8 Battery check light T 9 Microphone
10 Loudspeaker
11 Battery compartment
12 Belt clip
13 Battery compartment lid
14 Neck strap
15 Adapter
16 Charger
17 POWER light
C Travel pouch
Preparing for use
Baby unit
You can operate the baby unit directly from the power supply or on batteries. Even if you are going
to operate the unit from the power supply, we advise you to insert batteries. This guarantees
automatic back-up in case of power failure.
Corded operation
1 Put the small plug in the baby unit and put the adapter in a wall outlet (Fig. 2).
Battery operation
The baby unit runs on four 1.5V R6 AA batteries (not included). We strongly advise you to use
Philips LR6 PowerLife batteries.
Make sure your hands and the unit are dry when you insert the batteries.
1 Turn the battery compartment lid to the left ( Á OPEN) with the palm of your hand. (Fig. 3)
2 Remove the lid.
3 Insert four 1.5V R6 AA batteries (Fig. 4).
, Place two batteries on top of each other and make sure the + and – poles of the batteries
point in the right direction.
4 Put the battery compartment lid back onto the unit and turn it to the right (CLOSE ª) with
the palm of your hand to close it. (Fig. 5)
Note: When the batteries are running low, the battery check light ( T) lights up red.
Parent unit
This appliance comes with two parent units and two chargers instead of one, so that your baby can
be monitored by two persons at the same time.
10
English
Battery operation
The parent unit runs on two rechargeable 1.2V AAA NiMH batteries that are supplied with the
appliance.
Make sure your hands and the unit are dry when you insert the batteries.
1 Slide the battery compartment lid downwards to remove it (Fig. 6).
2 Insert the two rechargeable batteries (Fig. 7).
, Make sure the + and – poles of the batteries point in the right direction.
3 Slide the battery compartment lid back onto the back of the parent unit until it locks into
position (‘click’) (Fig. 8).
4 Put the adapter in a wall outlet and place the parent unit in the charger (Fig. 9).
, The POWER light on the charger lights up.
5 Leave the parent unit in the charger until the batteries are fully charged
, When charging for the first time or after a long period of disuse: turn off the
parent unit and let it charge continuously for at least 10 hours.
, Charging normally takes 8 hours, but it takes longer when the parent unit is turned on while
charging. To keep the charging time as short as possible, turn off the parent unit during
charging.
, The POWER light on the charger stays on, even when the batteries are fully charged.
, When the batteries are fully charged, the parent unit can be used cordlessly for at least 24
hours.
Note:The operating time of 24 hours is based on the assumption that the baby unit transmits 25% of
the time and is in standby mode for the rest of the time (when the baby does not make any sound).
Note:When the parent unit batteries are charged for the first time, the operating time is less than 24
hours.The batteries only reach their full capacity after you have charged and discharged them four times.
Note:When the batteries are running low, the battery check light ( T) flashes red. Place the parent unit
in the charger.
Note:When the parent unit is not in the charger, the batteries gradually discharge, even when the parent
unit is turned off.
Corded operation
1 Make sure you have inserted the rechargeable batteries in the parent unit
2 Put the adapter of the charger in the wall outlet and place the parent unit in the
charger (Fig. 9).
, The POWER light on the charger lights up.
Using the appliance
1 Place the parent unit and the baby unit in the same room to test the connection (Fig. 10).
Make sure the baby unit is at least 1 meter/3 feet away from the parent unit.
2 Press and hold the on/off button 3 on the baby unit for 2 seconds. (Fig. 11)
, The nightlight lights up briefly.
, The ON light lights up.
3 Press and hold the on/off button 3 on the parent unit for 2 seconds. (Fig. 12)
, The sound level lights light up blue briefly.
, The battery check light ( T) lights up red briefly.
English 11
,
,
,
The LINK light flashes red briefly and then starts to flash green while the parent unit tries to
establish connection with the baby unit.
The LINK light on the parent unit flashes green until connection has been established.
This takes up to 30 seconds. The LINK light on the parent unit then lights up green
continuously (Fig. 13).
If no link is established after 30 seconds, the LINK light on the parent unit flashes red and the
parent unit beeps from time to time.
4 Place the baby unit at least 1 meter/3 feet away from your baby (Fig. 14).
5 Position the parent unit within the operating range of the baby unit. Make sure it is at least 1
meter/3 feet away from the baby unit (Fig. 15).
For more information on the operating range, see section ‘Operating range’ below.
Operating range
The operating range of the baby monitor is 300 meters/900 feet in open air. Depending on the
surroundings and other disturbing factors, this range may be smaller. Indoors the operating range is
up to 50 meters/150 feet.
Dry materials
Material thickness
Loss of range
Wood, plaster, cardboard, glass
(without metal, wires or lead)
< 30cm/12in
0-10%
Brick, plywood
< 30cm/12in
5-35%
Reinforced concrete
< 30cm/12in
30-100%
Metal grilles or bars
< 1cm /0.4in
90-100%
Metal or aluminium sheets
< 1cm/0.4in
100%
For wet and moist materials, the range loss may be up to 100%.
Features
Adjusting loudspeaker volume
1 Briefly press the volume + and – buttons on the baby unit until the desired loudspeaker
volume for the baby unit has been reached (Fig. 16).
2 Briefly press the volume + and – buttons on the parent unit until the desired loudspeaker
volume for the parent unit has been reached (Fig. 17).
Note: If you press the volume + and – buttons too long, the volume is not adjusted.
Note:You only have to adjust the baby unit volume when you use the talk function (see below).
Note: If the volume is set to a high level, the units consume more power.
Adjusting microphone sensitivity
You can set the microphone sensitivity of the baby unit to the desired level. You can only change the
microphone sensitivity when a connection between the baby unit and the parent unit has been
established, i.e. when the LINK light on the parent unit lights up green continuously.
1 Briefly press the SENSITIVITY button on the parent unit (Fig. 18).
, The sound level lights on the parent unit light up for approx. 2 seconds to indicate the
current sensitivity level. 12
English
2 Briefly press the volume + and – buttons on the parent unit until the desired microphone
sensitivity level for the baby unit has been reached.
Note: If you press the SENSITIVITY button and/or the volume + and – buttons too long, the microphone
sensitivity is not adjusted.
- one light on = minimum sensitivity level
- all lights on = maximum sensitivity level
Note:When the microphone sensitivity of the baby unit is set to a high level, it picks up more sounds and
therefore transmits more often. As a result, the units consume more power.
Talk function
You can use the TALK button on the parent unit to talk to your baby (e.g. to comfort your baby).
1 Press and hold the TALK button and talk clearly into the microphone (Fig. 19).
2 Release the TALK button when you have finished talking.
Note:When you press the TALK button, you can no longer hear your baby.
Silent baby monitoring
1 Briefly press the volume down (–) button on the parent unit until the volume is turned off
completely (Fig. 20).
The volume is completely turned off when all sound level lights are out.
, As long as the baby unit does not detect a sound, all sound level lights on the parent unit are
out (Fig. 21).
, When the baby unit picks up a sound, one or more sound level lights on the parent unit
come on. The louder the sound, the more lights come on.
Nightlight
1 Briefly press the nightlight button Q on the baby unit to turn on the nightlight. (Fig. 22)
2 Press the nightlight button Q again briefly to turn off the nightlight.
, The nightlight dims gradually before it goes out completely.
Note: If you press the nightlight button Q too long, the nightlight does not come on or go out.
Tip:Turn off the nightlight when you operate the baby unit on batteries.This saves power.
Paging the parent unit
If you have misplaced the parent unit and its volume is turned off, you can use the PAGE button on
the baby unit to locate the parent unit.
1 Briefly press the PAGE button on the baby unit (Fig. 23).
, The parent unit automatically resets to medium volume level and produces a paging alert
tone.
2 To stop the paging alert tone, press the PAGE button again briefly or press any button on the
parent unit.
Note: If you press the PAGE button too long, the parent unit does not produce the paging alert tone.
Belt clip and neck strap
If the batteries of the parent unit are sufficiently charged, you can take the unit with you inside and
outside the house if you attach the unit to your belt or waistband with the belt clip or if you hang it
round your neck with the neck strap. This allows you to monitor your baby while you are moving
around.
English 13
Connecting the belt clip
1 Insert the small pin on the back of the belt clip into the opening on the back of the parent
unit (1). Turn the belt clip to the left (2) until it locks into position (‘click’) (Fig. 24).
Disconnecting the belt clip
1 Turn the belt clip to the right (1) and take it out of the opening (2) (Fig. 25).
Connecting the neck strap
1 Insert the small pin at the end of the neck strap into the opening on the back of the parent
unit (1). Turn the neck strap to the left (2) until it locks into position (‘click’) (Fig. 26).
Disconnecting the neck strap
1 Turn the neck strap to the right (1) and take it out of the opening (2) (Fig. 27).
Reset function
This function allows you to reset the baby monitor to the default settings. You can use this function if
problems occur that cannot be solved by following the suggestions in chapter ‘Frequently asked
questions’. You have to reset each unit separately.
1 Press and hold the on/off button 3 for 2 seconds to turn on the unit. (Fig. 11)
2 Then immediately press and hold the volume down (-) button until the appliance
beeps. (Fig. 28)
, The unit has now been reset to the default factory settings.
Now do the same for the other two units.
Default settings
Parent unit
- Loudspeaker volume: 1
- Microphone sensitivity: 3
Baby unit
- Loudspeaker volume: 3
- Nightlight: off
Cleaning and maintenance
Do not immerse the units in water and do not clean them under the tap.
Do not use a cleaning spray and/or liquid cleaners.
1 Unplug the baby unit if it is connected to the wall outlet and take the parent unit out of the
charger.
2 Clean the units with a damp cloth.
Storage
,
,
You can use the travel pouch to store the baby monitor while you travel.
When you are not going to use the baby monitor for some time, remove the batteries and
store the units and the adapters in the travel pouch supplied.
Environment
Disposal of your old product
Your product is designed and manufactured with high-quality materials and components, which can
be recycled and reused.
14
English
Please inform yourself about the local separate collection system for electrical and electronic
products. Please act according to your local rules and do not dispose of your old products with your
normal household waste. The correct disposal of your old product helps prevent potential negative
consequences for the environment and human health.
Assistance
For assistance, call toll-free:
1-800-243-7884
or visit our website:
www. philips.com
Information is available 24 hours a day, 7 days a week.
Warranty
FULL TWO YEAR WARRANTY
Philips Electronics North America Corporation warrants each new Philips Babycare product against
defects in materials or workmanship for a period of two years from the date of purchase, and
agrees to repair or replace any defective product without charge.
IMPORTANT: This warranty does not cover damage resulting from accident, misuse or abuse, lack
of reasonable care, the affixing of any attachment not provided with the product or loss of parts or
subjecting the product to any but the specified voltage.* Use of unauthorized replacement parts will
void this warranty.
PHILIPS ELECTRONICS NORTH AMERICA CORPORATION WILL NOT PAY FOR
WARRANTY SERVICE PERFORMED BY A NON-AUTHORIZED REPAIR SERVICE
AND WILL NOT REIMBURSE THE CONSUMER FOR DAMAGE RESULTING
FROM WARRANTY SERVICE PERFORMED BY A NON-AUTHORIZED REPAIR
SERVICE. NO RESPONSIBILITY IS ASSUMED FOR ANY SPECIAL, INCIDENTAL
OR CONSEQUENTIAL DAMAGES.
In order to obtain warranty service, simply ship the product postage prepaid to the Philips Norelco
Service Location (information available online at www.philips.com or at 1-800-243-7884). It is
suggested that, for your protection, you return shipments of product by insured mail, insurance
prepaid. Damage occurring during shipment is not covered by this warranty.
Note: No other warranty, written or oral, is authorized by Philips Electronics North America
Corporation. This warranty gives you specific legal rights, and you may also have other rights which
vary from state to state. Some states do not allow the exclusion or limitation of incidental or
consequential damages, so the above exclusion and limitations may not apply to you. * Read enclosed instructions carefully.
Manufactured for:
Philips Domestic Appliances and Personal Care Company
A Division of Philips Electronics North America Corporation
1010 Washington Blvd., Stamford, CT 06912-0015
This symbol on the product’s type plate means it is listed by Underwriters’ Laboratories, Inc.
PHILIPS is a Registered Trademark of Koninklijke Philips Electronics N.V.
z2006 Philips Electronics North America Corporation. All Rights Reserved.
English 15
Frequently asked questions
This chapter lists the questions most frequently asked about the appliance. If you cannot find the
answer to your question, contact the Customer Care Centre in your country.
Question
Answer
Why don’t the ON light
on the baby unit and the
LINK light on the parent
unit come on when I press
the on/off buttons of the
units?
Perhaps the batteries of the parent unit are empty and the parent
unit is not in the plugged-in charger. Put the adapter of the charger
in the wall outlet and place the parent unit in the charger. Then press
the on/off button to establish connection with the baby unit.
Perhaps the batteries of the baby unit are empty and the baby unit is
not connected to the power supply. Replace the batteries or put the
small plug in the baby unit and put the adapter in a wall outlet. Then
press the on/off button to establish connection with the parent unit.
The baby unit and the parent unit may be out of range of each
other. Move the parent unit closer to the baby unit, but not closer
than 1 meter/3 feet.
If the LINK light on the parent unit still does not start to flash, use
the reset function to reset the units to their default settings.
Why does the parent unit
beep?
If the parent unit beeps while the LINK light flashes red, the
connection with the baby unit is lost. Move the parent unit closer to
the baby unit.
If the parent unit beeps, the LINK light flashes red and the battery
check light lights up red, the batteries are running low. Recharge the
batteries.
Why does the appliance
produce a high-pitched
noise?
The units may be too close to each other. Make sure the parent unit
and the baby unit are at least 1 meter/3 feet away from each other.
The volume of the parent unit may be set too high. Decrease the
volume of the parent unit.
Why don’t I hear a sound/
Why can’t I hear my baby
cry?
The volume of the parent unit may be set too low or may be turned
off. Increase the volume of the parent unit.
The microphone sensitivity level of the baby unit may be set too low.
Increase the microphone sensitivity level with the SENSITIVITY
button on the parent unit.
The baby unit and the parent unit may be out of range of each
other. Reduce the distance between the units.
Why does the parent unit
react too quickly to other
sounds?
The baby unit also picks up other sounds than those of your
baby. Move the baby unit closer to the baby (but observe the
minimum distance of 1 meter/3 feet).
The microphone sensitivity level of the baby unit may be set too
high. Decrease the microphone sensitivity level with the
SENSITIVITY button on the parent unit.
16
English
Question
Answer
Why does the parent unit
react slowly to the baby’s
crying?
The microphone sensitivity level of the baby unit may be set too low.
Increase the microphone sensitivity level with the SENSITIVITY
button on the parent unit.
Why do the batteries of
the baby unit run low
quickly?
The microphone sensitivity level of the baby unit may be set too
high, which causes the baby unit to transmit more often. Decrease
the microphone sensitivity level with the SENSITIVITY button on the
parent unit.
The volume on the baby unit may be set too high, which causes the
baby unit to consume a lot of energy. Decrease the volume of the
baby unit.
Perhaps you have turned on the nightlight. If you want to use the
nightlight, we advise you to run the baby unit from the power supply.
Why does the charging
time of the parent unit
exceed 8 hours?
The parent unit may be turned on during charging. Turn off the
parent unit during charging.
The specified operating
range of the baby monitor
is 300 meters/900 feet.
Why does my baby
monitor manage a much
smaller distance than that?
The specified range is only valid outdoors in open air. Inside your
house, the operating range is limited by the number and type of
walls and/or ceilings in between. Inside the house, the operating
range is up to 50 meters/150 feet.
Why is the connection lost
every now and then? Why
are there sound
interruptions?
The baby unit and the parent unit are probably close to the outer
limits of the operating range. Try a different location or decrease the
distance between the units. Please note that it takes about 30
seconds each time before a connection between the units is
established.
What happens during a
power failure?
If the parent unit is sufficiently charged, it continues to operate
during a power failure, both inside and outside the charger. If there
are batteries in the baby unit, it automatically switches to battery
operation in case of power failure.
Is my baby monitor secure
from eavesdropping and
interference?
The DECT technology of this baby monitor guarantees no
interference from other equipment and no eavesdropping.
Some buttons do not
seem to work when I
press them. What do I do
wrong?
You have to press all buttons (except the on/off buttons and the
TALK button) briefly. If you press them too long, they do not work.
The operating time of the
parent unit is supposed to
be at least 24 hours. Why
is the operating time of
my parent unit shorter?
When the parent unit batteries have been charged for the first time,
the operating time is less than 24 hours. The batteries only
reach their full capacity after you have charged and discharged
them at least four times.
The volume of the parent unit may be set too high, which causes the
parent unit to consume a lot of energy. Decrease the volume of the
parent unit
English 17
Question
Answer
The microphone sensitivity level of the baby unit may be set too
high, which causes the parent unit to consume a lot of energy.
Decrease the microphone sensitivity level with the SENSITIVITY
button on the parent unit.
Why doesn’t battery
check light on the parent
unit light up when I start
to recharge the parent
unit.
It may take a few minutes before the battery check light lights up
when you charge the parent unit for the first time or after a long
period of disuse.
18
2
3
4
5
6
7
8
9
10
11
12
13
14
15
16
17
18
19
20
21
19
22
23
24
26
27
28
25
4222.002.6467.2