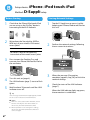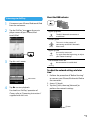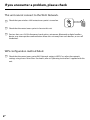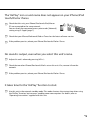
1
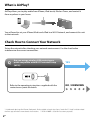
Personal Audio Docking System RDP-XA700iP Operating Instructions US Mode d’emploi FR Manual de instrucciones ES Owner’s Record The model and serial numbers are located on the bottom of the unit. Record these numbers in the space provided below. Refer to them whenever you call upon your Sony dealer regarding this product. Serial No. Model No. Keep the lithium battery out of the reach of children. Should the battery be swallowed, immediately consult a doctor. Dispose of used battery promptly. Keep away from children. The dating code and the nameplate are located on the bottom exterior. For customers in the USA Please register this product on line at http://www.sony.com/productregistration Proper registration will enable us to send you periodic mailings about new products, services, and other important announcements. Registering your product will also allow us to contact you in the unlikely event that the product needs adjustment or modification. Thank you. WARNING To reduce the risk of fire or electric shock, do not expose this apparatus to dripping or splashing, and do not place objects filled with liquids, such as vases, on the apparatus. To reduce the risk of fire, do not cover the apparatus with newspapers, tablecloths, curtains, etc. Do not place the naked flame sources such as lighted candles on the apparatus. Do not install the appliance in a confined space, such as a bookcase or built-in cabinet. As the main plug is used to disconnect the unit from the mains, connect the unit to an easily accessible AC outlet. Should you notice an abnormality in the unit, disconnect the main plug from the AC outlet immediately. Do not expose batteries or apparatus with batteryinstalled to excessive heat such as sunshine, fire or the like. CAUTION You are cautioned that any changes or modifications not expressly approved in this manual could void your authority to operate this equipment. Danger of explosion if battery is incorrectly replaced. Replace only with the same or equivalent type. Replace the battery with a Sony CR2025 lithium battery. Use of another battery may present a risk of fire or explosion. Do not hold or touch the unit or the AC adaptor for an extended period when connected to the mains. It may cause a low temperature burn to your skin. For customers in the United States Customer Support Information If you have any questions about this product, you may call; Sony Customer Information Service Center 1-800-222-7669 or http://esupport.sony.com FOR UNITED STATES CUSTOMERS. NOT APPLICABLE IN CANADA, INCLUDING IN THE PROVINCE OF QUEBEC. POUR LES CONSOMMATEURS AUX ÉTATSUNIS. PAS APPLICABLE AU CANADA, Y COMPRIS LA PROVINCE DE QUÉBEC. Battery may explode if mistreated. Do not recharge, disassemble or dispose of in fire. The unit is not disconnected from the mains as long as it is connected to the AC outlet, even if the unit itself has been turned off. 1US Declaration of Conformity Trade Name: Model No.: Responsible Party: Address: Telephone No.: SONY RDP-XA700iP Sony Electronics Inc. 16530 Via Esprillo, San Diego, CA 92127 USA 858-942-2230 This device complies with Part 15 of the FCC Rules. Operation is subject to the following two conditions: (1) This device may not cause harmful interference, and (2) this device must accept any interference received, including interference that may cause undesired operation. NOTE: This equipment has been tested and found to comply with the limits for a Class B digital device, pursuant to Part 15 of the FCC Rules. These limits are designed to provide reasonable protection against harmful interference in a residential installation. This equipment generates, uses and can radiate radio frequency energy and, if not installed and used in accordance with the instructions, may cause harmful interference to radio communications. However, there is no guarantee that interference will not occur in a particular installation. If this equipment does cause harmful interference to radio or television reception, which can be determined by turning the equipment off and on, the user is encouraged to try to correct the interference by one or more of the following measures: – Reorient or relocate the receiving antenna. – Increase the separation between the equipment and receiver. – Connect the equipment into an outlet on a circuit different from that to which the receiver is connected. – Consult the dealer or an experienced radio/TV technician for help. Important Safety Instructions 1) 2) 3) 4) 5) 6) 7) 2US Read these instructions. Keep these instructions. Heed all warnings. Follow all instructions. Do not use this apparatus near water. Clean only with dry cloth. Do not block any ventilation openings. Install in accordance with the manufacturer’s instructions. 8) Do not install near any heat sources such as radiators, heat registers, stoves, or other apparatus (including amplifiers) that produce heat. 9) Do not defeat the safety purpose of the polarized or grounding-type plug. A polarized plug has two blades with one wider than the other. A grounding type plug has two blades and a third grounding prong. The wide blade or the third prong are provided for your safety. If the provided plug does not fit into your outlet, consult an electrician for replacement of the obsolete outlet. 10)Protect the power cord from being walked on or pinched particularly at plugs, convenience receptacles, and the point where they exit from the apparatus. 11)Only use attachments/accessories specified by the manufacturer. 12)Use only with the cart, stand, tripod, bracket, or table specified by the manufacturer, or sold with the apparatus. When a cart is used, use caution when moving the cart/apparatus combination to avoid injury from tip-over. 13)Unplug this apparatus during lightning storms or when unused for long periods of time. 14)Refer all servicing to qualified service personnel. Servicing is required when the apparatus has been damaged in any way, such as power-supply cord or plug is damaged, liquid has been spilled or objects have fallen into the apparatus, the apparatus has been exposed to rain or moisture, does not operate normally, or has been dropped. This equipment must not be co-located or operated in conjunction with any other antenna or transmitter. This equipment complies with FCC/IC radiation exposure limits set forth for an uncontrolled environment and meets the FCC radio frequency (RF) Exposure Guidelines in Supplement C to OET65 and RSS-102 of the IC radio frequency (RF) Exposure rules. This equipment should be installed and operated keeping the radiator at least 20 cm or more away from person's body (excluding extremities: hands, wrists, feet and ankles). For customers in Canada This device complies with Industry Canada licenceexempt RSS standard(s). Operation is subject to the following two conditions: (1) this device may not cause interference, and (2) this device must accept any interference, including interference that may cause undesired operation of the device. Under Industry Canada regulations, this radio transmitter may only operate using an antenna of a type and maximum (or lesser) gain approved for the transmitter by Industry Canada. To reduce potential radio interference to other users, the antenna type and its gain should be so chosen that the equivalent isotropically radiated power (e.i.r.p.) is not more than that necessary for successful communication. This Class B digital apparatus complies with Canadian ICES-003. For the State of California, USA only Perchlorate Material - special handling may apply, See www.dtsc.ca.gov/hazardouswaste/perchlorate Perchlorate Material: Lithium battery contains perchlorate. 3US Table of Contents Overview of this Personal Audio Docking System .....................................................5 Guide to Parts and Controls ..........................6 Main unit .................................................6 Remote control ........................................9 Getting Started Preparing the Unit and the Remote Control ...................................................10 Connecting to an AC power source .......10 Preparing the remote control .................10 Turning on the unit ................................11 Connecting Your Network .........................12 Connecting to a Wi-Fi network .............12 Connecting to a wired network ..............12 Option 3: Wi-Fi Connection using Access Point Scan ..................................13 Enjoying the Audio Content Listening to iPod .........................................16 Listening with the “AirPlay” Function .......17 Listening to Other Components ..................19 Updating the Software ................................19 Initializing the Unit .....................................20 Additional Information Troubleshooting ..........................................21 Specifications .............................................24 Compatible iPod Models and Computers .............................................25 System Requirements for the Computer for Setting up the “AirPlay” Function .........25 Precautions .................................................26 4US Overview of this Personal Audio Docking System iPod You can enjoy sound from an iPod, iPhone or iPad by setting it on the Docking Tray of this unit, while charging it at the same time (page 16). AirPlay You can enjoy sound from an iPhone/iPod touch/iPad or iTunes with this unit anywhere in your home (page 17). You will need to set your iPhone/iPod touch/iPad to a Wi-Fi network, and connect this unit to that network. Portable Audio Player, etc. You can listen to sound from an optional component, such as a portable audio player, by connecting it to the AUDIO IN jack of this unit (page 19). 5US Guide to Parts and Controls Main unit Top/Front A Docking Tray Press the Docking Tray on the front of the unit to open or close it. Set your iPod on the Docking Tray when you want to operate it on the tray or charge it (page 16). Green (flashing): The unit is being turned on. Red: The unit is in the standby mode. Amber: The unit is in the network standby mode. B Remote sensor (inside) • When the unit is in the network standby mode and receives a command to playback on an “AirPlay” device, the unit turns on and starts playback automatically. • To switch the unit between the standby mode and network standby mode, press and hold the ?/1 button until the color of the ?/1 indicator changes. C Reaction indicator (inside) Flashes when the operation is started. Flashes three times when the volume is set to minimum or maximum. D ?/1 (On/Standby) button, indicator Turns the unit on (page 11), or places in standby/network standby mode. Indicates the power status of the unit. Green (lit): The unit is turned on. 6US Tips E “iPod,” AUDIO IN buttons, indicators Selects a source device (page 16, 19). Lights up amber when the unit is in the iPod/AUDIO IN mode. F “AirPlay” indicator Lights up green when the unit is in the “AirPlay” mode. G LINK indicator Indicates the connection status of the wired/Wi-Fi network. Green (lit): Wi-Fi connection has been established. Green (flashing): Wi-Fi connection is being established. Amber (lit): Wired connection has been established. Amber (flashing): Wired connection is being established. Red (flashing): One of the following has occurred. – This unit cannot find the wireless LAN router/access point. – The security method/password selected for the wireless LAN router/access point is wrong. – An error has occurred. Not lit: The Wi-Fi network setting process is not finished. H UPDATE button, indicator Press and hold to start updating the software of the unit (page 19). Indicates the update status of the unit. Green (lit): The unit can be updated. Green (flashing): The unit is updating. Not lit: The unit does not need updating. I u (Play/Pause) button Starts playback of iPod. Press repeatedly to pause/resume playback. J VOLUME +/– button Adjusts the volume. 7US Rear A WPS button Use to connect the unit to your Wi-Fi network, refer to the supplied “AirPlay via Wi-Fi Network Setup” for details. B LAN port Connect a network (LAN) cable (not supplied, page 12). C ALL RESET button Press and hold to reset the unit to the factory default settings (the ?/1 indicator starts flashing). Use a thin object, such as a small pin. D DC IN 19.5 V jack Connect the supplied AC adaptor (page 10). E AUDIO IN jack Connect to the line output jack of an external component (page 19). 8US Remote control A “iPod,” AUDIO IN buttons Selects a source device (page 16, 19). B u (Play/Pause) button Starts playback of iPod. Press repeatedly to pause/resume playback. V (Up)/v (Down) button Selects a menu item or track for playback. E VOL (Volume) +/– button Adjusts the volume. > (Forward) button Go to the next track. Press and hold to locate a desired point. . (Backward) button Go back to the previous track. During playback, this operation returns to the beginning of the current track. To go back to the previous track, press twice. Press and hold to locate a desired point. C ?/1 (On/Standby) button Turns the unit on (page 11), or places in standby/network standby mode. D MENU button Returns to the previous menu of the iPod on the Docking Tray. ENTER button Enters the selected menu item or begin playback. 9US Getting Started Preparing the Unit and the Remote Control Connecting to an AC power source 1 Connect the supplied AC power cord to the supplied AC adaptor. 2 Connect the AC adaptor to the DC IN 19.5 V jack on the unit. Preparing the remote control Before using the remote control for the first time, remove the insulation film. To replace the battery of the remote control If the remote control stops working, replace the battery (CR2025) with a new one. j the e side facing up Note on the AC adaptor Use the Sony supplied AC adaptor only. The polarity of the plugs of other manufactures may be different. Failure to use the supplied AC adaptor may cause the unit to malfunction. 3 10US Plug the AC power cord to a wall outlet (the mains). Turning on the unit Press the ?/1 button The ?/1 indicator starts flashing. You can operate the unit when the ?/1 indicator stops flashing and lights up green. The LINK indicator also starts flashing. You can set up or use the “AirPlay” function when it stops flashing. It may take a while for these indicators to stop flashing. Note After playback of the connected device has finished, if no operation is performed for about 20 minutes, the unit will automatically enter standby/network standby mode. 11US Connecting Your Network See the following descriptions to determine the correct way to set up. Connecting to a Wi-Fi network Option 1: Wi-Fi Connection using WPS Push Button Configuration Method Setup device: Wireless LAN router/access point Refer to A in the supplied “AirPlay via Wi-Fi Network Setup” for details. Option 2: Wi-Fi Connection using D-Sappli* Setup device: iPhone/iPod touch/iPad Refer to B in the supplied “AirPlay via Wi-Fi Network Setup” for details. * For details on D-Sappli, see page 16. Option 3: Wi-Fi Connection using Access Point Scan (page 13) Setup device: Mac or PC 12US Connecting to a wired network Option 4: Wired Connection Connect the unit and a wireless LAN router/ access point by network (LAN) cable (not supplied). Then turn this unit on. The LINK indicator lights up amber when the connection is established (about 90 seconds later). For Mac Start Safari and select [Bonjour] under [Bookmarks], then select [RDPXA700iP]. Option 3: Wi-Fi Connection using Access Point Scan 1 Prepare for the following devices. For PC Start the browser and input either of the following URLs into the browser’s address bar. • This unit • Mac or PC • Wireless LAN router/access point • Network (LAN) cable (not supplied) if needed 2 • When using a network (LAN) cable Have your wireless network name (SSID) and Security Key (if applicable) available for reference. • When connecting wirelessly SSID (Wireless Network Name) Security Key (WEP or WPA key) Refer to the operating instructions of the wireless LAN router/access point. 3 5 Select the desired language when the [Language Setup] screen appears. 6 Select [Network Settings] from the menu. Connect the unit and the Mac or PC using a network (LAN) cable (not supplied). Then turn this unit on. Wait for about 4 minutes until the LINK indicator lights up amber. Tip You can also perform this procedure wirelessly. See “To connect wirelessly” (page 14). 4 Access the [Sony Network Device Setting] screen. Network Settings 13US 7 Select the SSID of the wireless LAN router/access point, then input the Security Key (if applicable). For Windows 7 Turn on PC. Click icon on the bottom of the screen. Select [RDP-XA700iP_Setup] from the network list. For Windows Vista Turn on PC. Click icon on the bottom of the screen. Click [Connect to a network]. Select [RDP-XA700iP_Setup] from the network list. 5 Perform steps 4 to 8 above. SSID 8 9 Select [Apply]. Disconnect the network (LAN) cable from the unit following the on-screen instructions. The unit restarts automatically, then the LINK indicator lights up green when the connection is established. To connect wirelessly Note Before starting this procedure, be aware that your Wi-Fi network will not be protected until the setting is complete. After the setting is complete, your Wi-Fi network will be protected again when you set a wireless LAN security. 1 Turn the unit on. 2 Press and hold the ALL RESET button on the rear of the unit with a thin object such as a small pin until the ?/1 indicator starts flashing. 3 Turn the unit on again. Then wait for about 70 seconds – 120 seconds until the LINK indicator turns off. 4 Connect the unit and a Mac or PC. For Mac OS X Turn on Mac. Click icon on the top of the screen. Turn on the Wi-Fi or AirPort. Then select [Open Network Preferences…]. Select [RDP-XA700iP_Setup] from the network list. 14US The unit restarts automatically, then the LINK indicator lights up green when the connection is established. 6 Reconnect the Mac or PC to your network. Note This procedure needs to be completed within 10 minutes. If you cannot complete, start over from step 2. About the LINK indicator Note Once you press and hold the ALL RESET button, the settings of the unit are reset to the factory default settings. Lights up green. (Green) The Wi-Fi network connection is established. Flashes green. (Green) This unit is in the process of connecting to the Wi-Fi network. Please wait. Lights up amber. (Amber) The wired network connection is established. Flashes amber. (Amber) This unit is in the process of connecting to the wired network. Please wait. Flashes red k Lights up red (Red) An error has occurred. Try again from the beginning, or adjust your network settings. The indicator turns off. (Nothing) No connection is established. Tips • You can also connect the unit to your wireless or wired network by other methods including Manual Setup, WPS PIN, etc. • You can set up Fixed IP, as required. • You can set up a Proxy Server, as required. When a problem occurs while you are making the network settings Press and hold the ALL RESET button on the rear of the unit with a thin object such as a small pin (page 8). 15US Enjoying the Audio Content Listening to iPod 1 Press the Docking Tray on the front of the unit to open it. • Do not carry the unit with an iPod set on the Docking Tray. Doing so may cause a malfunction. • When placing or removing the iPod, hold the Docking Tray securely. • Before disconnecting the iPod, pause playback. • If the battery of your iPod is extremely low, charge it for a while before operation. • Sony cannot accept responsibility in the event that data recorded to an iPod is lost or damaged when using an iPod connected to this unit. • For details of environmental conditions for operating your iPod, check the website of Apple Inc. To use the unit as a battery charger 2 Set your iPod on the Docking Tray. You can use the unit as a battery charger. The charging status appears in the “iPod” display. For details, see the user's guide of your iPod. About D-Sappli A dedicated dock app for iPod touch, iPhone, and iPad available at Apple App Store. Search for “D-Sappli” and download the free app to find out more about the functions. Features Tip If a pop-up message appears on the display of the iPod, refer to “AirPlay via Wi-Fi Network Setup” or see “About D-Sappli” (page 16). 3 4 • D-Sappli can be used to connect the unit to your network. Refer to the supplied “AirPlay via Wi-Fi Network Setup” for details. • The Sound EQ function allows you to create your own equalizer settings. You can select equalizer presets, or customize settings to your taste. This function is available only when an iPhone, iPod touch or iPad is set on the Docking Tray. Press the “iPod” button. Press the u button. The iPod begins to play back. You can operate the connected iPod via this unit or the iPod itself. Notes • Remove the case or cover from your iPod before setting in the Docking Tray if a good connection cannot be ensured. • When placing or removing the iPod, hold the iPod at the same angle as that of the connector of the Docking Tray. Do not twist or bend the iPod as it may damage the connector. 16US • D-Sappli includes three timer functions: Music Play Timer, Sleep Timer and Alarm. The Music Play Timer allows you to play/pause desired music at a desired time. The Sleep Timer allows you to specify a time at which the music playback will stop. The Alarm includes a repeat function and snooze function. You can select iPod or a preset sound as the sound source. These three functions work in combination with the power supply of the unit. • D-Sappli also includes a clock display enlarge feature. Notes • If the App to link with this unit is not downloaded to your iPod, a pop-up message prompting you to download D-Sappli may appear repeatedly. Deactivate the App’s link function to stop the popup message. • To deactivate the App’s link function, connect the AC adaptor and the AC power cord, then press the ?/1 button to turn on the unit. Remove your iPod from the Dock connector, and then press and hold the VOLUME – and u buttons simultaneously for more than 2 seconds. (The indicator for iPod flashes rapidly when deactivated.) • To re-activate the App’s link function, repeat the above steps. The indicator for iPod will flash slowly. • When you remove the iPod from the Docking Tray, the Sound EQ function setting will return to the default. • When the sound volume is high, the Sound EQ function may not be effective. Listening with the “AirPlay” Function 1 Check that the unit and your iPhone, iPod touch, iPad or iTunes are connected to your network. For details on how to connect the unit to the network, see page 12. Tips • Update the software of your iPhone, iPod touch or iPad to the latest version beforehand. • For details on how to operate iPhone, iPod touch, iPad or iTunes, refer to the operating instructions or the help documentation of your device or software. 2 Tap/click on the icon at bottom right of the iPhone, iPod touch or iPad screen or iTunes window. iPhone, iPod touch or iPad iTunes 17US 3 Select “RDP-XA700iP” on the “AirPlay” menu of iTunes or your iPhone, iPod touch or iPad. iPhone, iPod touch or iPad To control “AirPlay” playback You can use the VOLUME +/– button on the unit and the VOLUME +/–, . and > buttons on the remote control. Operation from the unit and the remote control is active only when the unit is selected as the device for output. When you use iTunes, set it to accept control from the unit and the remote control when you want to use the unit and the remote control to operate iTunes. Note RDP-XA700iP iTunes RDP-XA700iP 4 Start playing back audio content on the iPhone, iPod touch, iPad or iTunes. The unit starts playing back automatically. Tip If playback does not start, perform the process again from step 1. 18US Loud sound may output from the unit if you set the volume too high via the iPhone, iPod touch, iPad or iTunes. Listening to Other Components You can enjoy the sound from an optional component, such as a portable digital music player, through the speakers of this unit. Be sure to turn off the power of each component before making any connections. 1 2 Firmly connect the line output jack of a portable digital music player (or other component) to the AUDIO IN jack on the rear of the unit, using a suitable audio connecting cable (not supplied). Press the ?/1 button to turn on the unit. 3 Turn the connected component on. 4 Press the AUDIO IN button to select the source. 5 Play the connected component. The sound from the connected component is output from the speakers of this unit. Updating the Software When a new update is available, the UPDATE indicator lights up green while the unit is connected to the Internet. 1 Check that the UPDATE indicator lights up green. 2 Press and hold the UPDATE button on the top of the unit. The unit beeps, then quits or stops all operations automatically and the update starts. The UPDATE indicator flashes during the update. When the update has completed, the UPDATE indicator turns off. Notes • When an error occurred, the UPDATE indicator flashes quickly and all other indicators light up. Then the unit restarts automatically. • You cannot operate the unit until updating has completed. • It may take about 20 minutes to update the software. The time required depends on the size of the update content and type of Internet connection you are using. • Do not disconnect the AC adaptor and the AC power cord during the update. Notes • The audio connecting cable required depends on the component. Make sure the cable is correct for the component to be connected. • If the volume is low, adjust the volume level on the connected component first. If the volume is still too low, adjust the volume level on the unit. 19US Initializing the Unit You can initialize the unit. All settings of the unit are reset to the factory default settings when you initialize the unit. 1 Press the ?/1 button to turn on the unit. 2 Remove the iPod from the Docking Tray. 3 Press and hold the ALL RESET button for at least 2 seconds. After resetting, the ?/1 indicator flashes for 2 seconds. 20US Additional Information Troubleshooting If you run into any problems using the unit, use the following checklist. Should any problem persist, consult your nearest Sony dealer. General The unit does not turn on. • Make sure the AC adaptor and the AC power cord are connected correctly. There is no sound. • Adjust the volume. There is noise. • Make sure the unit is not in the vicinity of in-use portable phones, etc. • If connecting the unit via a device with a built-in radio or tuner, broadcasts may not be received, or sensitivity may be reduced. Locate the unit farther away from the device and check whether you can listen to the broadcasts satisfactorily. The unit does not turn off. • The unit enters standby or network standby mode when you turn off the power. If you want to completely turn off the power, disconnect the AC adaptor. • If you turn the unit to standby mode immediately after turning on it, it may take a while for the unit to enter standby mode. The unit turns on and starts playback automatically. • When the unit is in the network standby mode and receives a command to playback on the “AirPlay” device, the unit turns on and starts playback automatically (page 6). The unit turns off automatically. • The unit enters the selected standby mode when it is idle for 20 minutes. The ?/1 indicator flashes red. • The unit is in protect mode. • Disconnect and reconnect the AC adaptor, then turn the unit on again. If the ?/1 indicator still flashes, consult your nearest Sony dealer. This unit does not operate if you press the buttons of this unit or those of the remote control. • Buttons do not work while initializing or starting up. • Buttons do not work while you are updating the software. • Buttons other than the ?/1 button do not work in the network standby or standby mode. The unit and the AC adaptor are getting hot. • This is not a malfunction. iPod There is no sound. • Make sure the iPod is playing back. • Make sure the iPod is connected firmly. • Update the unit and the iPod to use the latest software beforehand. • Make sure the iPod is compatible. • Make sure the function for iPod is selected. Operation is not performed. • Make sure the iPod is connected firmly. The iPod does not charge. • Make sure the iPod is connected firmly. • Make sure the AC adaptor and the AC power cord are connected firmly. 21US Network The browser screen does not appear. • Check the proxy setting of the browser. This unit does not support proxies. Change the browser setting to one connecting this unit without a proxy. WPS configuration method failed. • You cannot connect to a network using WPS when the wireless LAN router/ access point is set to WEP (page 27). Set up the network using D-Sappli or Access Point Scan (page 12). The unit cannot connect to the network. (The unit cannot be found or recognized by other devices that are on the home network.) • Check that the wireless LAN router/access point is close to the unit. • Move the unit and the wireless LAN router/access point closer to each other and perform the setup again. • Make sure that the wireless LAN router/ access point is turned on. • Turn the unit off and then on again, and reboot the wireless LAN router/access point. • Devices that use a 2.4 GHz frequency band such as microwave, Bluetooth or digital cordless device, may interrupt the communication. Move this unit away from such devices, or turn off the devices. The unit cannot connect to the network via a Wi-Fi connection. • Make sure a network (LAN) cable is not connected to the unit. The unit automatically tries to connect to the network over a wired LAN connection when a network (LAN) cable is connected to the unit. • Confirm that the wireless LAN router/ access point setting is correct. For details on the wireless LAN router/access point setting, refer to the operating instructions of the wireless LAN router/access point. 22US Resetting the network settings of the unit (default network setting) • Press and hold the ALL RESET button on the rear of the unit with a thin object such as a small pin (page 8). Once you press and hold the ALL RESET button, the settings of the unit are reset to the factory default settings. AirPlay The “AirPlay” icon or unit name does not appear on iPhone/iPod touch/ iPad or iTunes. • Make sure the LINK indicator lights up green or amber. See “The unit cannot connect to the network. (The unit cannot be found or recognized by other devices that are on the home network.)” (page 22) if the LINK indicator turns off or lights up red. • Check that this unit, your iPhone/iPod touch/iPad, Mac or PC are connected to the same network. • Update the software version of the unit to the latest version (page 19). • Check that your iPhone/iPod touch/iPad or iTunes has the latest software version. • If the problem persists, reboot your iPhone/iPod touch/iPad or iTunes. • Check your set-up of the firewall of the security software. Refer to the operating instructions or the help documentation of your device or software for details. Audio content automatically changed/ started/stopped. • When the unit is turned on or in the network standby mode, it is under the control of an “AirPlay” device. If you want to reject requests from the “AirPlay” device, turn the unit to the standby mode by pressing and holding ?/1 button until the color of the ?/1 indicator changes. There is no sound. • Check that no other iPhone/iPod touch/ iPad is set on this unit. If so, remove it from the network. • If the problem persists, reboot your iPhone/iPod touch/iPad or iTunes. The sound is too loud. • Loud sound may output from the unit if you set the volume too high via the iPhone, iPod touch, iPad or iTunes. The sound skips. • The sound may skip depending on factors such as the network environment in which you use the Wi-Fi network. • Wi-Fi networks are influenced by electromagnetic radiation emitted by microwave ovens and other devices. Move the unit away from these devices. • The bandwidth of your Wi-Fi network may be too low. Move the unit and the wireless LAN router/access point closer to each other, without any obstacles between them. This unit cannot be operated. • Update the software version of the iPhone, iPod touch or iPad to the latest version. • Update the software version of the unit to the latest version (page 19). • Make sure another device is not streaming to the “AirPlay” compatible device at the same time. Buttons such as . and > do not work. • Make sure that the settings that allow iTunes to accept control from this unit are active. • The unit is not selected as the remote speaker on the iPhone, iPod touch, iPad or iTunes. Select the unit as the network speaker. It takes time for the “AirPlay” function to start. • Use this unit in the network standby mode (page 6). This mode shortens the startup time when using the “AirPlay” function, but increases standby power consumption. AUDIO IN There is no sound. • Make sure the audio connecting cable (not supplied) is connected firmly. • Make sure the AUDIO IN function is selected. The sound is low. • Confirm the volume of the connected external component. • Confirm the volume level on the unit. Remote control The remote control does not function. • Replace the battery in the remote control with a new one if it is weak. • Make sure that you are pointing the remote control at the remote sensor on the unit. • Remove any obstacles in the path of the remote control and the unit. • Make sure the remote sensor is not exposed to strong light such as direct sunlight or fluorescent lamp light. • Move closer to the unit when using the remote control. 23US Mass Specifications Approx. 3.4 kg (7 lb 8 oz) Supplied accessories: AUDIO POWER SPECIFICATIONS POWER OUTPUT AND TOTAL HARMONIC DISTORTION: Power Output (reference) 15 W + 15 W + 30 W (at no more than 10 % harmonic distortion) Section for iPod DC out: 5 V MAX: 2.1 A Section for Wireless LAN Compatible standards IEEE 802.11 b/g (WEP 64 bit, WEP 128 bit, WPA/WPA2-PSK (AES), WPA/WPA2-PSK (TKIP)) Radio frequency 2.412 GHz – 2.462 GHz (2.4 GHz ISM Band, 11 Channels) Channel 1 – Channel 11 General Speakers Satellite 4.8 cm (1 15/16 inches) dia. 8 Ω Subwoofer 9.0 cm (3 5/8 inches) dia. 4 Ω AUDIO IN ANALOG φ 3.5 mm stereo mini jack Network port 10BASE-T/100BASE-TX (Auto Polarity) Power requirements DC IN 19.5 V Dimensions (w/h/d) (including projecting parts and controls) Approx. 401 mm × 176 mm × 160 mm (15 7/8 inches × 7 inches × 6 3/8 inches) 24US Remote control (1) AC adaptor (1) AC power cord (1) Operating Instructions (this document) (1) AirPlay via Wi-Fi Network Setup (1) CR2025 lithium battery (1) (Pre-installed in the remote control for trial use) Warranty card (2) Design and specifications are subject to change without notice. Compatible iPod Models and Computers Compatible iPod models and computers are shown below. Update the software of your iPod to the latest version before using it with this unit. Compatible iPod Models for the Docking Tray iPod touch (4th generation) iPod touch (3rd generation) iPod touch (2nd generation) iPod nano (6th generation)* iPod nano (5th generation) iPod nano (4th generation) iPod nano (3rd generation) iPod classic iPhone 4S iPhone 4 iPhone 3GS iPhone 3G iPad 2 iPad * The iPod nano (6th generation) cannot be controlled by the remote when “MENU,” “V,” “v,” or “ENTER” is pressed. Compatible iPod models and computers for the “AirPlay” function iPod touch (4th generation) iPod touch (3rd generation) iPhone 4S iPhone 4 iPhone 3GS iPad 2 iPad PC or Mac with iTunes 10.1 or later System Requirements for the Computer for Setting up the “AirPlay” Function • Compliant computer: IBM PC/AT or compatible computers Apple Mac • Operating systems: Windows 7 Ultimate Windows 7 Professional Windows 7 Home Premium Windows 7 Home Basic Windows 7 Starter Windows Vista Ultimate Windows Vista Business Windows Vista Home Premium Windows Vista Home Basic Windows XP Professional (other than 64 bit) Windows XP Home Edition Mac OS X v10.7 Lion Mac OS X v10.6 Snow Leopard Mac OS X v10.5 Leopard Mac OS X v10.4 Tiger Mac OS X v10.3 Panther Mac OS X v10.2 Jaguar • Suitable browsers Internet Explorer 7 or later Safari (latest version at the time of Mac OS X v10.2 Jaguar being released, or later) 25US Note Precautions • To disconnect the AC power cord, pull it out by the plug, not the cord. • Since a strong magnet is used for the speaker, keep credit cards using magnetic coding or spring-wound watches, CRTbased TVs, or projectors, etc., away from the unit to prevent possible damage from the magnet. • Do not leave the unit in a location near a heat source such as a radiator or airduct, or in a place subject to direct sunlight, excessive dust, mechanical vibration, or shock. • Allow adequate air circulation to prevent internal heat build-up. Do not place the unit on a surface (a rug, a blanket, etc.) or near materials (a curtain). • Should any solid object or liquid fall into the unit, unplug the unit and have it checked by qualified personnel before operating it any further. • Do not handle the unit with wet hands. • Do not place the unit anywhere near water. • Properly shielded and grounded cables and connectors must be used for connection to the wireless LAN router/access point in order to comply with the limit for EMC regulations. Notes on unit placement • When playing the unit at loud volume, the unit may move due to vibration, depending on where the unit is placed. • Check that the unit is placed where it will not fall down due to vibration. NOTES ON LITHIUM BATTERY • Wipe the battery with a dry cloth to assure a good contact. • Be sure to observe the correct polarity when installing the battery. • Do not hold the battery with metallic tweezers, otherwise a short-circuit may occur. 26US • In the Operating Instructions, “iPod” is used as a general reference to functions on an iPod, iPhone or iPad, unless otherwise specified by the text or illustrations. If you have any questions or problems concerning your unit, please consult your nearest Sony dealer. If the TV picture or monitor display is magnetically distorted This unit is not magnetically shielded, and the picture on nearby TV sets may become magnetically distorted. In this situation, turn off the TV, wait 15 to 30 minutes, and turn it back on. If there is no improvement, move the speakers farther away from the TV. On copyrights • AirPlay, the AirPlay logo, iPhone, iPod, iPod classic, iPod nano and iPod touch are trademarks of Apple Inc., registered in the U.S. and other countries. iPad is a trademark of Apple Inc. • iTunes, Safari, Mac, and Mac OS X are trademarks of Apple Inc., registered in the U.S. and other countries. • “Made for iPod,” “Made for iPhone,” and “Made for iPad” mean that an electronic accessory has been designed to connect specifically to iPod, iPhone, or iPad, respectively, and has been certified by the developer to meet Apple performance standards. Apple is not responsible for the operation of this device or its compliance with safety and regulatory standards. Please note that the use of this accessory with iPod, iPhone, or iPad may affect wireless performance. • Microsoft, Windows, Windows Vista, and Windows 7 are trademarks or registered trademarks of Microsoft Corporation in the United States and/or other countries. • This product is protected by certain intellectual property rights of Microsoft Corporation. Use or distribution of such technology outside of this product is prohibited without a license from Microsoft or an authorized Microsoft subsidiary. • The Wi-Fi Logo is a certification mark of the Wi-Fi Alliance. • The Wi-Fi Protected Setup™ Mark is a mark of the Wi-Fi Alliance. • Other trademarks and trade names are those of their respective owners. About wireless LAN security Since communication via the wireless LAN function is established by radio waves, the wireless signal may be susceptible to interception. To protect wireless communication, this unit supports various security functions. Be sure to correctly configure the security settings in accordance with your network environment. No Security Although you can easily make settings, anyone can intercept wireless communication or intrude into your wireless network, even without any sophisticated tools. Keep in mind that there is a risk of unauthorized access or interception of data. WEP WEP applies security to communications to prevent outsiders from intercepting communications or intruding into your wireless network. WEP is a legacy security technology that enables older devices, which do not support TKIP/AES, to be connected. WPA-PSK (TKIP), WPA2-PSK (TKIP) TKIP is a security technology developed to correct for the deficiencies of WEP. TKIP assures a higher security level than WEP. WPA-PSK (AES), WPA2-PSK (AES) AES is a security technology that uses an advanced security method that is distinct from WEP and TKIP. AES assures a higher security level than WEP or TKIP. WPA Supplicant Copyright (c) 2003-2006, Jouni Malinen <[email protected]> and contributors All Rights Reserved. Redistribution and use in source and binary forms, with or without modification, are permitted provided that the following conditions are met: 1 Redistributions of source code must retain the above copyright notice, this list of conditions and the following disclaimer. 2 Redistributions in binary form must reproduce the above copyright notice, this list of conditions and the following disclaimer in the documentation and/or other materials provided with the distribution. 3 Neither the name(s) of the above-listed copyright holder(s) nor the names of its contributors may be used to endorse or promote products derived from this software without specific prior written permission. THIS SOFTWARE IS PROVIDED BY THE COPYRIGHT HOLDERS AND CONTRIBUTORS “AS IS” AND ANY EXPRESS OR IMPLIED WARRANTIES, INCLUDING, BUT NOT LIMITED TO, THE IMPLIED WARRANTIES OF MERCHANTABILITY AND FITNESS FOR A PARTICULAR PURPOSE ARE DISCLAIMED. IN NO EVENT SHALL THE COPYRIGHT OWNER OR CONTRIBUTORS BE LIABLE FOR ANY DIRECT, INDIRECT, INCIDENTAL, SPECIAL, EXEMPLARY, OR CONSEQUENTIAL DAMAGES (INCLUDING, BUT NOT LIMITED TO, PROCUREMENT OF SUBSTITUTE GOODS OR SERVICES; LOSS OF USE, DATA, OR PROFITS; OR BUSINESS INTERRUPTION) HOWEVER CAUSED AND ON ANY THEORY OF LIABILITY, WHETHER IN CONTRACT, STRICT LIABILITY, OR TORT (INCLUDING NEGLIGENCE OR OTHERWISE) ARISING IN ANY WAY OUT OF THE USE OF THIS SOFTWARE, EVEN IF ADVISED OF THE POSSIBILITY OF SUCH DAMAGE. 27US • The system names and product names indicated in this manual are generally the trademarks or registered trademarks of the manufacturer. • In this manual, Microsoft Windows XP Home Edition and Microsoft Windows XP Professional are referred to as Windows XP. • In this manual, Microsoft Windows Vista Home Basic, Microsoft Windows Vista Home Premium, Microsoft Windows Vista Business and Microsoft Windows Vista Ultimate are referred to as Windows Vista. • In this manual, Microsoft Windows 7 Starter, Microsoft Windows 7 Home Basic, Microsoft Windows 7 Home Premium, Microsoft Windows 7 Professional, and Microsoft Windows 7 Ultimate, are referred to as Windows 7. • ™ and ® marks are omitted in this manual. 28US END-USER LICENSE AGREEMENT FOR SONY SOFTWARE You should carefully read the following agreement before using the SONY SOFTWARE (defined below). Using the SONY SOFTWARE indicates your acceptance of the agreement. If you do not agree with it, you are not authorized to use the SONY SOFTWARE. IMPORTANT - READ CAREFULLY: This End-User License Agreement (“EULA”) is a legal agreement between you and Sony Corporation (“SONY”), the manufacturer of your Sony hardware device (the “PRODUCT”) and the licensor of the SONY SOFTWARE. All Sony software and third party software (other than such software subject to its own separate license) included with your PRODUCT and any updates and upgrades thereto shall be referred to herein as the “SONY SOFTWARE”. You may use the SONY SOFTWARE only with the PRODUCT. By using the SONY SOFTWARE, you agree to be bound by the terms of this EULA. If you do not agree to the terms of this EULA, SONY is unwilling to license the SONY SOFTWARE to you. In such event, you should not use the SONY SOFTWARE. SONY SOFTWARE LICENSE The SONY SOFTWARE is protected by copyright laws and international copyright treaties, as well as other intellectual property laws and treaties. The SONY SOFTWARE is licensed, not sold. GRANT OF LICENSE All title, copyright and other rights in and to the SONY SOFTWARE are owned by SONY or its licensors. This EULA grants you the right to use the SONY SOFTWARE for personal use only. DESCRIPTION OF REQUIREMENTS, RESTRICTIONS, RIGHTS AND LIMITATIONS Limitations. You may not copy, modify, reverse engineer, decompile or disassemble the SONY SOFTWARE in whole or in part. Separation of Components. The SONY SOFTWARE is licensed as a single product. Its component parts may not be separated. Use on Single PRODUCT. The SONY SOFTWARE may only be used with a single PRODUCT. Rental. You may not rent or lease the SONY SOFTWARE. Software Transfer. You may permanently transfer all of your rights under this EULA only when the SONY SOFTWARE is transferred together with and as part of the PRODUCT, provided that you retain no copies, transfer all of the SONY SOFTWARE (including but not limited to all copies, component parts, media, instruction manuals, other printed materials, electronic documents, recovery disks and this EULA) and the recipient agrees to the terms of this EULA. Termination. Without prejudice to any other rights, SONY may terminate this EULA if you fail to comply with the terms of this EULA. In such event, when requested by SONY, you must send the PRODUCT to an address designated by SONY, and SONY will send back the PRODUCT to you as soon as practicable after the SONY SOFTWARE has been deleted from the PRODUCT. Confidentiality. You agree to keep confidential information contained in SONY SOFTWARE which is not publicly known and not to disclose such information to others without SONY’s prior written approval. HIGH RISK ACTIVITIES The SONY SOFTWARE is not fault-tolerant and is not designed, manufactured or intended for use or resale as on-line control equipment in hazardous environments requiring fail-safe performance, such as in the operation of nuclear facilities, aircraft navigation or communication systems, air traffic control, direct life support machines or weapons systems, in which the failure of the SONY SOFTWARE could lead to death, personal injury or severe physical or environmental damage (“High Risk Activities”). SONY and its suppliers specifically disclaim any express or implied warranty of fitness for High Risk Activities. 29US EXCLUSION OF WARRANTY ON SONY SOFTWARE You expressly acknowledge and agree that use of the SONY SOFTWARE is at your sole risk. The SONY SOFTWARE is provided “AS IS” and without warranty of any kind, and SONY, its vendors and SONY’s licensors (for purposes of this SECTION only, collectively, “SONY”) EXPRESSLY DISCLAIM ALL WARRANTIES, EXPRESS OR IMPLIED, INCLUDING BUT NOT LIMITED TO THE IMPLIED WARRANTIES OF MERCHANTABILITY AND FITNESS FOR A PARTICULAR PURPOSE. SONY DOES NOT WARRANT THAT THE FUNCTIONS CONTAINED IN THE SONY SOFTWARE ARE FREE FROM ERRORS OR BUGS OR WILL MEET YOUR REQUIREMENT, AND SONY DOES NOT WARRANT THAT THE OPERATION OF THE SONY SOFTWARE WILL BE CORRECTED. FURTHERMORE, SONY DOES NOT WARRANT OR MAKE ANY REPRESENTATIONS REGARDING THE USE OR THE RESULTS OF THE USE OF THE SONY SOFTWARE IN TERMS OF ITS CORRECTNESS, ACCURACY, RELIABILITY OR OTHERWISE. NO ORAL OR WRITTEN INFORMATION OR ADVICE GIVEN BY SONY OR A SONY AUTHORIZED REPRESENTATIVE SHALL CREATE A WARRANTY OR IN ANY WAY INCREASE THE SCOPE OF THIS WARRANTY. SOME JURISDICTIONS DO NOT ALLOW THE EXCLUSION OF IMPLIED WARRANTIES, IN WHICH CASE THE ABOVE EXCLUSION WOULD NOT APPLY TO YOU. Without limiting any of the foregoing, it is specifically provided that the SONY SOFTWARE is not designed or intended for use on any product other than the PRODUCT. SONY provides no warranty that any product, software, content or data created by you or a third party will not be damaged by the SONY SOFTWARE. LIMITATION OF LIABILITY SONY, ITS SUPPLIERS AND SONY’S LICENSOR’S (for purposes of this SECTION ONLY, collectively, “SONY”) SHALL NOT BE LIABLE FOR ANY INCIDENTAL OR CONSEQUENTIAL DAMAGES RELATING TO THE SONY SOFTWARE ARISING FROM OR BASED ON BREACH OF ANY EXPRESS OR IMPLIED WARRANTY, BREACH OF CONTRACT, NEGLIGENCE, STRICT LIABILITY OR ANY OTHER LEGAL THEORY. SUCH DAMAGES INCLUDE, BUT ARE NOT LIMITED TO, LOSS OF PROFITS, LOSS OF REVENUE, LOSS OF DATA, LOSS OF USE OF THE PRODUCT OR ANY ASSOCIATED EQUIPMENT, DOWN TIME AND USER’S TIME, REGARDLESS OF WHETHER SONY HAS BEEN ADVISED OF THE POSSIBILITY OF SUCH DAMAGES. IN ANY CASE, SONY’S ENTIRE LIABILITY TO YOU UNDER ANY PROVISION OF THIS EULA SHALL BE LIMITED TO THE AMOUNT ACTUALLY PAID ALLOCABLE TO THE SONY SOFTWARE. EXPORTS If you use or transfer the SONY SOFTWARE in or to a country other than your country of residence, you shall comply with applicable laws and regulations relating to exports, imports and customs. GOVERNING LAW This EULA shall be construed, governed, interpreted and applied in accordance with the laws of Japan, without regards to any conflict of laws provisions. Any dispute arising out of this EULA shall be subject to the exclusive venue and jurisdiction of the courts in Tokyo, Japan, and you and SONY hereby consent to the venue and jurisdiction of such courts. YOU AND SONY WAIVE THE RIGHT TO TRIAL BY JURY WITH RESPECT TO ANY MATTERS ARISING UNDER OR RELATING TO THIS EULA. SEVERABILITY If any part of this EULA is held invalid or unenforceable, other parts will remain valid. Should you have any questions in connection with this EULA or the limited warranty provided hereunder, you may contact SONY by writing to SONY at the designated contact address mentioned in the warranty card included in the product package. 30US ~ iPod DiPhone 0 iPad Madefor (1 flFi) 11 , CERTIFIED• a~ ©2012 Sony Corporation Printed in China 4-417-447-11(1) Personal Audio Docking System AirPlay via Wi-Fi Network Setup © 2012 Sony Corporation Printed in China 4-417-839-11(1) RDP-XA900iP / RDP-XA700iP AirPlay via Wi-Fi Network Setup GB Guide de configuration FR d’AirPlay via le réseau Wi-Fi Configuración de AirPlay ES e través de la red Wi-Fi What is AirPlay? AirPlay allows you to play audio from iPhone, iPod touch, iPad or iTunes, and control it from anywhere in your home. You will need to set your iPhone/iPod touch/iPad to a Wi-Fi Network, and connect this unit to that network. Check How to Connect Your Network Set up the network after checking your network environment. Use the chart below to determine the correct connections. Q Are you using a wireless LAN router/access point compatible with Wi-Fi Protected Setup (WPS)? Refer to the operating instructions supplied with the router/access point for details. YES NO / UNKNOWN * A dedicated dock app for iPhone, iPod touch, iPad available at Apple App Store. Search for “D-Sappli” and download the free app to find out more about the functions. ** RDP-XA700iP is used for illustration purposes. GB For Access Point Scan using your Mac or PC Refer to “Connecting Your Network” of “Operating Instructions” supplied with this unit. Set up using Set up using D-Sappli* with iPhone/iPod touch/iPad (page 6). WPS Push-Button Configuration Method (page 4). GB WPS compatible Wireless LAN router/access point Method: WPS Push-Button Configuration Method Setup device: Before Starting 1 Place this unit close to the wireless LAN router/access point. 2 Turn this unit on. Starting Network Settings 1 Press and hold the WPS button on this unit until the beep sound is output from this unit. Rear of this unit The LINK indicator (page 5) starts to flash green. 3 2 Wait for about 70 seconds until the LINK indicator turns off. Press and hold the WPS button on the router/access point within 90 seconds after step1. Note While it is connected to a Wi-Fi Network, do not turn this unit off. * The position and shape of the WPS button differ depending on the model of the router/access point. Tip For details on the WPS button, refer to the operating instructions of the router/access point. 3 Check the status of the LINK indicator (page 5). When the LINK indicator lights up green, the connection is established. GB About the LINK indicator Listening via AirPlay 1 Check that the iPhone/iPod touch/iPad you are using as the “AirPlay” device is connecting to the Wi-Fi Network. Lights up green. (Green) 2 The Wi-Fi Network connection is established. Flashes green. Tap the “AirPlay” icon on the music player screen of your iPhone/iPod touch/iPad. (Green) This unit is in the process of connecting to the Wi-Fi Network. Please wait. Lights up red. (Red) An error has occurred. Try again from the beginning, or adjust your network settings. The indicator turns off. No connection is established. (Nothing) 3 Tap this unit’s name. unit name 4 Tap to start playback. For details on “AirPlay” operation of iTunes, refer to “Operating Instructions” supplied with this unit. GB iPhone / iPod touch/ iPad Method: D-Sappli setup Setup device: Before Starting 1 Check that the iPhone/iPod touch/iPad you are using as the “AirPlay” device is connecting to the Wi-Fi Network. 2 Write down the Security Key (WEP or WPA key) of your wireless LAN router/ access point. Starting Network Settings 1 Tap the D-Sappli icon to access it while keeping your iPhone/iPod touch/iPad on this unit. 2 Perform the network settings, following the on-screen instructions. 3 When the message [Connection complete.] appears, tap [OK] to finish the network settings. 4 Check the status of the LINK indicator (page 7). For details, refer to the operating instructions of the router/access point. 3 Press to open the Docking Tray, and connect your iPhone/iPod touch/iPad to the connector. 4 Turn this unit on (page 4). The LINK indicator (page 7) starts to flash green. 5 Wait for about 70 seconds until the LINK indicator turns off. Tip If the message to download D-Sappli appears, follow the on-screen instructions and download it. Notes While it is connected to a Wi-Fi Network, do not turn this unit off, press the Home button, or disconnect your iPhone/iPod touch/iPad. When a problem occurs during Wi-Fi settings, disconnect your iPhone/iPod touch/iPad and connect it again. GB When the LINK indicator lights up green, the connection is established. About the LINK indicator Listening via AirPlay 1 Disconnect your iPhone/iPod touch/iPad from the connector. 2 Tap the “AirPlay” icon on the music player screen of your iPhone/iPod touch/iPad. Lights up green. (Green) The Wi-Fi Network connection is established. Flashes green. (Green) This unit is in the process of connecting to the Wi-Fi Network. Please wait. Lights up red. (Red) 3 An error has occurred. Try again from the beginning, or adjust your network settings. The indicator turns off. Tap this unit’s name. No connection is established. (Nothing) To adjust the network settings at a later time unit name 1 Perform the procedure of “Before Starting” to connect your iPhone/iPod touch/iPad to the connector. 2 Access D-Sappli. 4 Tap to start playback. 3 Tap the [i] icon, then tap [Network] to perform the network settings. For details on “AirPlay” operation of iTunes, refer to “Operating Instructions” supplied with this unit. [i] icon GB If you encounter a problem, please check This unit cannot connect to the Wi-Fi Network. ☐ Check that your wireless LAN router/access point is turned on. ☐ Check that the router/access point is close to this unit. ☐ Devices that use a 2.4GHz frequency band such as microwave, Bluetooth or digital cordless device, may interrupt the communication. Move this unit away from such devices, or turn off the devices. WPS configuration method failed. ☐ GB Check that the router/access point Wi-Fi Network setting is WEP. If so, adjust the network settings using Access Point Scan. For details, refer to “Operating Instructions” supplied with this unit. The “AirPlay” icon or unit name does not appear on your iPhone/iPod touch/iPad or iTunes. ☐ Check that this unit, your iPhone/iPod touch/iPad, Mac or PC are connected to the same network. You can check the connected access point under [Network] setting using D-Sappli (page 7). ☐ Check that your iPhone/iPod touch/iPad or iTunes has the latest software version. ☐ If the problem persists, reboot your iPhone/iPod touch/iPad or iTunes. No sound is output, even when you select this unit’s name. ☐ ☐ ☐ Adjust this unit’s volume by pressing VOL+/-. Check that no other iPhone/iPod touch/iPad is set on this unit. If so, remove it from the network. If the problem persists, reboot your iPhone/iPod touch/iPad or iTunes. It takes time for the “AirPlay” function to start. ☐ Use this unit in the network standby mode. This mode shortens the startup time when using the “AirPlay” function, but increases standby power consumption. For details, refer to “Operating Instructions” supplied with this unit. GB Personal Audio Docking System AirPlay via Wi-Fi Network Setup © 2012 Sony Corporation Printed in China 4-417-839-11(1) RDP-XA900iP / RDP-XA700iP AirPlay via Wi-Fi Network Setup GB Guide de configuration FR d’AirPlay via le réseau Wi-Fi Configuración de AirPlay ES e través de la red Wi-Fi SONY. Garantie d'un an protegeant les consommateurs Preuve d'achat : La presente garantie limitee s'applique au produit acompter de Ia date d'achat originelle au detail. Par consequent, le proprietaire doit presenter une preuve d'achat originelle au detail. Sony du Canada ltee (Sony), so us reserve des modalites et conditions indiquees aux presentes, garantit le present produit contre tout defaut de fabrication ou toute defaillance des materiaux entrant dans sa fabrication pour Ia periode de garantie specifiee. Si un defaut de fabrication ou une detail lance des materiaux survient pendant Ia periode de garantie specifiee, Sony veillera a reparer le produit en y effectuant to us les rem placements de pieces necessaires par des pieces neuves ou remises neuf et ce, sans frais quant aux pieces ou Ia main-d'rnuvre. Produit vises par Ia presente garantie : La presente garantie limitee s'applique aux produits Sony suivants, et peut aussi s'appliquer ad'autres produits s'ils font partie de l'emballage d'origine du produit: a a La periode de garantie est Ia suivante : Main-d'rnuvre et pieces: UN an acompter de Ia date d'achat originelle au detail. Conditions: Modifications, reparations, abus non autorises, etc. : La presente garantie limitee est nulle si : (i) l'unite a ete alteree, modifiee ou installee aux fins d'usage commercial, ou reparee ou entretenue par une personne autre qu'un centre de reparation auto rise par Sony afin d'effectuer de tels services. (ii) le numero de serie de !'unite a ete altere ou retire, ou (iii) l'unite a subi un accident, un mauvais usage, un abus ou a ete utilisee pour un usage contraire aux directives du mode d'emploi. L'opinion de Sony aeel effet est sans appel. Usage commercial ou location : Ce produit n'est pas con~u pour usage commercial ou location. Advenant que cette unite so it utili see ades fins commerciales ou com me unite en location, Ia periode de garantie limitee pour les pieces et Ia main-d'rnuvre est reduite a90 jours apres Ia date d'achat originelle. L'opinion de Sony aeel effet est sans appel. Exclusions : La presente garantie limitee exclut les armoires, accessoires ou piles brises ou endommages; les antennes et stylets exposes, ou Ia defaillance de pieces decoulant de leur usure normale. La presente garantie limitee exclut l'entretien n§gulier des produits, tels que le nettoyage, Ia lubrification ou les verifications. La presente garantie limitee ne couvre que l'equipement fourni avec le produit. Elle ne couvre aucune assistance technique quant a!'usage d'equipement ou de logiciel et ne couvre aucun logiciel, fourni ou non avec le produit. De tels logiciel sont fournis « TELS QUELS ",saul aux termes d'une garantie limite de logiciel comprise dans l'emballage. Veuillez consulter les ententes d'usager comprises avec le produit pour connaitre vos droits et obligations relativement aux logiciels. La presente garantie n'est val ide qu'au Canada. Livraison : L'unite doit etre livree en personne a l'un des centres de reparation Sony du Canada, ou expediee, dans son emballage d'origine ou un emballage equivalent accordant un niveau de protection equivalent, ainsi que des directives indiquant !'emplacement au Canada ou !'unite peut etre retournee. Si !'unite est expediee a un centre de reparation, !'unite reparee sera retournee au client port paye. Tousles accessoires compris avec I' unite doivent etre enumeres individuellement sur le bordereau d'expedition aux fins de documentation d'expedition. Les accessoires defectueux doivent etre expedies a Sony atitre d'article distinct a reparer. Sony n'est pas responsable des pertes ou dommages des articles en transit expedies aux centres de reparation. Toute piece remplacee aux termes de Ia presente garantie limitee devient Ia propriete de Sony. Vous i!tes responsable de faire une copie de sauvegarde de toutes donnees, logiciels ou autres que vous auriez pu stocker ou conserver sur votre unite. II est fort probable que des donnees, logiciels ou autres seront perdus ou reformates pendant Ia reparation, et Sony n'est pas responsable de tels dommages ou pertes. Accessoires audio I video Produits audio I video pour !'automobile Cameras video et accessoires connexes Cameras photos numeriques de type Cyber-shot® et accessoires connexes Radios-reveil mllilis d'un lecteur CD Lecteurs numeriques de mediasiLecteurs numeriques de musique Imprimantes I scanners de photos numerisees Enregistreurs numeriques de Ia parole Enregistreurs numeriques acircuits integres Systemes audio pour Ia maison Systemes de cinema-maison Lecteurs et enregistreurs video pour Ia maison Produits de navigation mobile Magnetophones amicrocassettes Baladeurs Net MDIH-MMD Baladeu rs reseau Lecteurs CD portables I munis d'un recepteur radio Lecteurs DVD portables Radios portables de type " casque d'ecoute stereo , Enregistreursl lecteurs portables aMiniDisques Radios portables et lecteurs CD I avec lecteur cassettes Radios portables Recepteurs-enregistreurs radiophoniques combines Magnetoscopes acassettes et accessoires connexes Baladeurs video SAUF DANS LA MESURE OU LA LOI APPLICABLE L'INTERDIT, TOUTES LES AUTRES GARANTIES ET CONDITIONS, EXPRESSES OU IMPLICITES, RELEVANT OU NON D'UNE LOI , D'UN ACTE LEGISLATIF, D'HABITUDES COMMERCIALES ETABLIES OU D'USAGES DU COMMERCE, Y COMPRIS, NOTAMMENT TOUTE GARANTIE IMPLICITE DE QUALITE MARCHANDE OU DE L'ADAPTA,BILITE AUNE FIN PARTICULIERE, SONT DESAVOUEES. SONY NE SAURAIT EN AUCUN CAS ETRE RESPONSABLE D'UN MONTANT SUPERIEUR AU PRIX REEL D'ACHAT DU PRODUIT; ET SONY NE SAURAIT EN AUCUN CAS ETRE RESPONSABLE DE DOMMAGES SPECIAUX, ACCESSOIRES OU CONSECUTIFS SUBIS RELATIVEMENT AU PRODUIT. SONY N'ASSUME Nl N'AUTORISE AUCUN REPRESENTANT OU QUICONQUE AASSUMER EN SON NOM UNE OBLIGATION OU RESPONSABILITE AUTRE QUE GELLES QUI SONT EXPRESSEMENT DECRITES AUX PRESENTES. L'EXCLUSION DE GARANTIES ET CONDITIONS IMPLICITES N'EST PAS AUTORISEE DANS CERTAINS TERRITO! RES. Enregistrement du produit : Me rei d'avoir choisi un produit Sony. Chez Sony, no us no us effor~ons decreer des produits de Ia plus haute qualite afin de renforcer votre experience et votre satisfaction. Afin d'assurer le meilleur soutien qui soit a votre produit, nous vous demandons de remplir une fiche d'enregistrement de produit sur le site www.fr.SonyStyle.ca/enregistrement dans les quatre-vingt-dix (90) jours suivant Ia date d'achat. Pour obtenir de !'aide concernant le service ou obtenir des renseignements sur le produit ou concernant !'enregistrement du produit, veuillez appeler le 1-877899-7669. Pour obtenir des renseignements concernant Ia garantie prolongee Sony Care, veuillez appeler le 1-800-773-9667. Pour le support technique et les mises ajour en ligne en tout temps, vous pouvez visiter le www.fr.sony.ca/sonycalview/frenchlsupporLelectronics.shtml, ou appeler le Centre d'information aIa clientele Sony au 1-877-899-7669. SONY. Consumer 1 Year Warranty Sony of Canada Ltd. ("Sony") hereby warrants, subject to the terms and condi· tions herein set forth, this product against defects in material and workman· ship dur.ing the specified warranty period. In the event of a defect of material or workmanship during the specified warranty period, Sony will repair the same, effecting all necessary parts replacements with either new or refurbished parts, without charge for either parts or labour. The warranty period is as follows: Labour and Parts: ONE year from the date of original purchase at retail. Conditions: Unauthorized Modification, Repair, Abuse, Etc.: This limited warranty is void if: (i) the unit has been previously altered, modi· fied, installed or mounted for commercial use, or repaired or serviced by any· one other than the service facilities authorized by Sony to render such ser· vices, (ii) the serial number on the unit has been altered or removed, or (iii) the unit has been subject to accident, misuse, abuse or operated contrary to the instructions contained in the Owner's Manual. The opinion of Sony with re· spect to this matter shall be final. Commercial Use or Rental: This product is not intended for commercial use or rental. Should this unit be used at any time for commercial purposes or as a rental unit, the limited war· ranty period for parts and labour shall be 90 days from the date of original purchase at retail. The opinion of Sony with respect to this matter shall be final. Exclusions: This limited warranty does not extend to broken or damaged cabinets, accessories, batteries, exposed antennas and styluses, or to parts wearing out due to normal wear and tear. This limited warranty does not cover regular product maintenance such as cleaning, lubrication or check-ups. This limited warranty covers only the hardware components packaged with the product. It does not cover technical assistance for hardware or software usage and it does not cover any software products whether or not contained in the product. Any such software is provided "AS IS" unless expressly provided for in any enclosed software limited warranty. Please refer to the End User License Agreements included with the product for your rights and obligations with re· spec! to the software. This limited warranty is valid only in Canada. Delivery: The unit must be delivered in person to one of the nearest Sony service facili· ties in Canada, or shipped, freight prepaid, in either its original package or similar package affording an equal degree of protection and with instructions indicating a location within Canadato which the unit may be returned. If shipped to the service facility, the repaired unit will be returned to customer freight prepaid. All accessories that are enclosed with the unit must be listed individu· ally on the packing slip for the shipping documentation. Defective accessories should be shipped to Sony as a separate repair item. Sony shall have no liabil· ity whatsoever for loss or damage in transit of items shipped to service facili· ties. Any parts replaced under this limited warranty will become the property of Sony. It is your responsibility to back up any data, software or other materi· als you may have stored or preserved on your unit. It is likely that such data, software, or other materials will be lost or reformatted during service and Sony will not be responsible for any such damage or loss. Subject Products: This limited warranty is applicable to the following Sony Products, and may also be applicable to other Sony products if enclosed in the product's original packaging: AudioNideo Accessories Car AudioNideo Products Camcorders and related accessories Cyber·shot® Digital still Camera and related accessories Clock Radio/with CD Players Digital Media Players/ Digital Music Players Digital Photo Printers/Scanners Digital Voice Recorder IC Chip Recorders Home Audio Systems Home Theatre System Home Video Player and Recorders Mobile Navigation Products Microcassette recorder Net MD/H·MMD Walkman Network Walkman Portable CD Players/ with Radio Portable DVD Players Portable Headset Stereo Radios Portable MiniDisc Recorder/Players Portable Radio CD Players /with Cassette Portable Radio Radio Cassette Combinations Video Cassette Recorders and related accessories Video Walkman EXCEPT TO THE EXTENT PROHIBITED BY APPLICABLE LAW, ALL OTHER WARRANTIES AND CONDITIONS, EXPRESS OR IMPLIED, WHETHER ARIS· lNG BY LAW, BY STATUTE, BY COURSE OF DEALING OR USAGE OF TRADE, INCLUDING WITHOUT LIMITATION IMPLIED WARRANTIES OF MERCHANT· ABILITY, MERCHANTABLE QUALITY AND FITNESS FOR A PARTICULAR PUR· POSE ARE DISCLAIMED. UNDER NO CIRCUMSTANCES SHALL SONY BE Ll· ABLE FOR AN AMOUNT GREATER THAN THE ACTUAL PURCHASE PRICE OF THE UNIT OR FOR ANY SPECIAL, INCIDENTAL OR CONSEQUENTIAL DAM· AGES SUSTAINED IN CONNECTION WITH SAID UNIT AND SONY NEITHER ASSUMES NOR AUTHORIZES ANY REPRESENTATIVE OR OTHER PERSON TO ASSUME FOR IT ANY OBLIGATION OR LIABLILITY OTHER THAN SUCH AS IS EXPRESSLY SET FORTH HEREIN. SOME JURISDICTIONS DO NOT ALLOW THE EXCLUSION OF IMPLIED WARRANTIES AND CONDITIONS. Product Registration: Thank you for choosing a Sony product. At Sony, we strive to create products of the highest quality to enhance your experience and enjoyment. To provide the best support for your product, we request that you complete a product registration form at www.SonyStyle.ca/reqistration within 90 days of purchase. For service assistance, product information, or product registration please call: 1·877·899·7669. For information about a Sony Care Extended Warranty, please call 1·800·773-9667. For online product support and updates at any time, please visit: www.sony.ca/sonyca/view/enqlish/supporLelectronics.shtml, or call the Sony Customer Information Centre at 1·877-899·7669. Proof of Purchase: This limited warranty applies to the product from the original date of purchase at retail. The owner must furnish proof of original purchase at retail. 2·652·131·02 Printed in China 111111111111111111111111111111111111111111111111111111111111 4-557-145-42 !Portable Audio I SON~ LIMITED WARRANTV(u.s.only) Sony Electronics Inc. ("Sony") warrants this product against defects in material or workmanship for the time periods and as set forth below when purchased directly from Sony or a Sony Retailer. Pursuant to this Limited Warranty, Sony will, at its option, (i) repair the product using new or refurbished parts or (ii) replace the product with a new or refurbished product. For purposes of this Limited Warranty, "refurbished" means a product or part that has been returned to its original specifications. In the event of a defect, these are your exclusive remedies. Labor: For a period of one (1) year from the original date of purchase of the product ("Labor Warranty"), Sony will, at its option, repair or replace with new or refurbished product, product determined to be defective. If Sony elects to replace the product after this Labor Warranty has expired but while the Parts Warranty below is still in effect, it will do so for the applicable labor charge. Parts: For a period of one (1) year from the original date of purchase of product ("Parts Warranty"), Sony will supply new or refurbished replacement parts in exchange for parts determined to be defective. This Limited Warranty covers only the hardware components packaged with the Product. It does not cover technical assistance for hardware or software usage and it does not cover any software products whether or not contained in the Product; any such software is provided "AS IS" unless expressly provided for in any enclosed software Limited Warranty. Please refer to the End User License Agreements included with the Product for your rights and obligations with respect to the software. Instructions: To obtain warranty service, you must deliver the product, freight prepaid, in either its original packaging or packaging affording an equal degree of protection to the Sony authorized service facility specified. It is your responsibility to backup any data, software or other materials you may have stored or preserved on your unit. It is likely that such data, software, or other materials will be lost or reformatted during service and Sony will not be responsible for any such damage or loss. A dated purchase receipt from Sony or a Sony Retailer is required. For specific instructions on how to obtain warranty service for your product, Visit Sony's Web Site: www.sony.com/support Or call the Sony Customer Information Service Center 1-800-222-SONV (7669) For an accessory or part not available from your authorized dealer, call: 1-800-488-SONY (7669) Repair I Replacement Warranty: This Limited Warranty shall apply to any repair, replacement part or replacement product for the remainder of the original Limited Warranty period or for ninety (90) days, whichever is longer. Any parts or product replaced under this Limited Warranty will become the property of Sony. This Limited Warranty only covers product issues caused by defects in material or workmanship during ordinary consumer use; it does not cover product issues caused by any other reason, including but not limited to product issues due to commercial use, acts of God, misuse, limitations of technology, or modification of or to any part of the Sony product or product purchased from other than Sony or a Sony Retailer. To determine if a retailer is part of the Sony Retailer Network, please contact Sony's Customer Service Call Center or go to www.sony.com/ support. This Limited Warranty does not cover Sony products sold AS IS or WITH ALL FAULTS or consumables (such as fuses or batteries). This Limited Warranty is invalid if the factory-applied serial number has been altered or removed from the product. This Limited Warranty is valid only in the United States. LIMITATION ON DAMAGES: SONY SHALL NOT BE LIABLE FOR ANY INCIDENTAL OR CONSEQUENTIAL DAMAGES FOR BREACH OF ANY EXPRESS OR IMPLIED WARRANTY ON THIS PRODUCT. DURATION OF IMPLIED WARRANTIES: EXCEPT TO THE EXTENT PROHIBITED BY APPLICABLE LAW, ANY IMPLIED WARRANTY OF MERCHANTABILITY OR FITNESS FOR A PARTICULAR PURPOSE ON THIS PRODUCT IS LIMITED IN DURATION TO THE DURATION OF THIS WARRANTY. . Some states do not allow the exclusion or limitation of incidental or consequential damages, or allow limitations on how long an implied warranty lasts, so the above limitations or exclusions may not apply to you. This Limited Warranty gives you specific legal rights and you may have other rights which vary from state to state. Printed in China