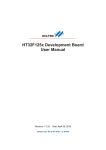
1
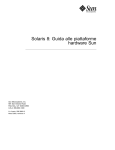
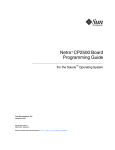
Netra™ ct Server Product Notes
Sun Microsystems, Inc.
901 San Antonio Road
Palo Alto, CA 94303
U.S.A. 650-960-1300
Part No. 806-3299-15
August 2001, Revision A
Send comments about this document to: [email protected]
Copyright 2001 Sun Microsystems, Inc., 901 San Antonio Road, Palo Alto, CA 94303-4900 U.S.A. All rights reserved.
This product or document is distributed under licenses restricting its use, copying, distribution, and decompilation. No part of this product or
document may be reproduced in any form by any means without prior written authorization of Sun and its licensors, if any. Third-party
software, including font technology, is copyrighted and licensed from Sun suppliers.
Parts of the product may be derived from Berkeley BSD systems, licensed from the University of California. UNIX is a registered trademark in
the U.S. and other countries, exclusively licensed through X/Open Company, Ltd.
Sun, Sun Microsystems, the Sun logo, AnswerBook2, docs.sun.com, Netra, and Solaris are trademarks, registered trademarks, or service marks
of Sun Microsystems, Inc. in the U.S. and other countries. All SPARC trademarks are used under license and are trademarks or registered
trademarks of SPARC International, Inc. in the U.S. and other countries. Products bearing SPARC trademarks are based upon an architecture
developed by Sun Microsystems, Inc.
The OPEN LOOK and Sun™ Graphical User Interface was developed by Sun Microsystems, Inc. for its users and licensees. Sun acknowledges
the pioneering efforts of Xerox in researching and developing the concept of visual or graphical user interfaces for the computer industry. Sun
holds a non-exclusive license from Xerox to the Xerox Graphical User Interface, which license also covers Sun’s licensees who implement OPEN
LOOK GUIs and otherwise comply with Sun’s written license agreements.
Federal Acquisitions: Commercial Software—Government Users Subject to Standard License Terms and Conditions.
DOCUMENTATION IS PROVIDED “AS IS” AND ALL EXPRESS OR IMPLIED CONDITIONS, REPRESENTATIONS AND WARRANTIES,
INCLUDING ANY IMPLIED WARRANTY OF MERCHANTABILITY, FITNESS FOR A PARTICULAR PURPOSE OR NON-INFRINGEMENT,
ARE DISCLAIMED, EXCEPT TO THE EXTENT THAT SUCH DISCLAIMERS ARE HELD TO BE LEGALLY INVALID.
Copyright 2001 Sun Microsystems, Inc., 901 San Antonio Road, Palo Alto, CA 94303-4900 Etats-Unis. Tous droits réservés.
Ce produit ou document est distribué avec des licences qui en restreignent l’utilisation, la copie, la distribution, et la décompilation. Aucune
partie de ce produit ou document ne peut être reproduite sous aucune forme, par quelque moyen que ce soit, sans l’autorisation préalable et
écrite de Sun et de ses bailleurs de licence, s’il y en a. Le logiciel détenu par des tiers, et qui comprend la technologie relative aux polices de
caractères, est protégé par un copyright et licencié par des fournisseurs de Sun.
Des parties de ce produit pourront être dérivées des systèmes Berkeley BSD licenciés par l’Université de Californie. UNIX est une marque
déposée aux Etats-Unis et dans d’autres pays et licenciée exclusivement par X/Open Company, Ltd.
Sun, Sun Microsystems, le logo Sun, AnswerBook2, docs.sun.com, Netra, et Solaris sont des marques de fabrique ou des marques déposées, ou
marques de service, de Sun Microsystems, Inc. aux Etats-Unis et dans d’autres pays. Toutes les marques SPARC sont utilisées sous licence et
sont des marques de fabrique ou des marques déposées de SPARC International, Inc. aux Etats-Unis et dans d’autres pays. Les produits portant
les marques SPARC sont basés sur une architecture développée par Sun Microsystems, Inc.
L’interface d’utilisation graphique OPEN LOOK et Sun™ a été développée par Sun Microsystems, Inc. pour ses utilisateurs et licenciés. Sun
reconnaît les efforts de pionniers de Xerox pour la recherche et le développement du concept des interfaces d’utilisation visuelle ou graphique
pour l’industrie de l’informatique. Sun détient une licence non exclusive de Xerox sur l’interface d’utilisation graphique Xerox, cette licence
couvrant également les licenciés de Sun qui mettent en place l’interface d’utilisation graphique OPEN LOOK et qui en outre se conforment aux
licences écrites de Sun.
LA DOCUMENTATION EST FOURNIE “EN L’ETAT” ET TOUTES AUTRES CONDITIONS, DECLARATIONS ET GARANTIES EXPRESSES
OU TACITES SONT FORMELLEMENT EXCLUES, DANS LA MESURE AUTORISEE PAR LA LOI APPLICABLE, Y COMPRIS NOTAMMENT
TOUTE GARANTIE IMPLICITE RELATIVE A LA QUALITE MARCHANDE, A L’APTITUDE A UNE UTILISATION PARTICULIERE OU A
L’ABSENCE DE CONTREFAÇON.
Please
Recycle
Netra ct Server Product Notes
This document gives late-breaking information for the Netra™ ct server.
Late-Breaking News
For late-breaking news on the Netra ct server, go to:
http://www.sun.com/netra
Netra ct Server Product Line Name
The Netra ct 800 servers and the Netra ct 400 servers are part of the Netra ct server
product line, also known as the Netra ct 1600 server product line.
1
Notes on the Solaris Operating
Environment Installation
If you are installing the Solaris operating environment onto a Netra ct 800 server or
a Netra ct 400 server, make the following selections when you begin installing
software from the Supplement CD:
1. In the Software Installation window, you will be asked if you want to go through
a Default Installation or a Custom Installation. Choose the Custom Installation
option in this window.
2. In the Custom Installation window, make the following changes to the pre-set
custom software installation choices:
■
■
■
Select No Install for the SunFDDI PCI software package.
Select No Install for the SunFDDI SBus software package.
Select Custom Install for the Netra ct Platform software package.
Leave the remaining pre-set selections as they are in the Custom Installation
window.
Patches Available for Netra ct Servers
This document assumes the Solaris 8 1/01 operating environment is installed on
your Netra ct server. You should install the following patches on your Netra ct
server, where the dash levels are the same or higher than those shown in TABLE 1:
TABLE 1
2
Solaris 8 1/01 Operating Environment Patches
Patch Number
Description
109815-04
scsb driver fix; hot swap/I2C fix
109584-19
Various alarm card fixes
109585-09
Environment monitoring daemon (envmond)
109586-04
Element management
110790-03
OpenBoot™ PROM (OBP) update
Netra ct Server Product Notes • August 2001
To determine if you have the latest version of the patch installed already, enter the
following command:
% showrev -p | grep ‘patch_id’
where patch_id is the patch number given in TABLE 1, without the dash level. For
example, to see if the latest version of patch 109586 is installed, enter the following
command:
% showrev -p | grep ‘109586’
■
If you see no output after entering the command, then that patch has not been
installed yet. Go to http://sunsolve.sun.com to download the patch (note
that you will automatically get the latest version of the patch from the sunsolve
web site). Refer to the patch README files for any patch-specific information.
Reboot the server after installing the patch.
■
If you see output similar to the following after entering the command:
% Patch: 109586-01 Obsoletes: Requires: Incompatibles: Packages:
then the patch has been installed already.
■
■
If the dash level is the same or higher than that shown in TABLE 1, then you have
the correct version of the patch installed on your server.
If the dash level is the lower than that shown in TABLE 1, then you must install
the latest version of the patch onto your server. Go to
http://sunsolve.sun.com to download the patch (note that you will
automatically get the latest version of the patch from the sunsolve web site).
Refer to the patch README files for any patch-specific information. Reboot the
server after installing the patch.
Netra ct Server Product Notes
3
Removing and Replacing a DVD or DAT
Drive (Netra ct 800 Server Only)
The instructions for removing and replacing a DVD or DAT drive in the Netra ct
Server Service Manual (806-3296) are incomplete. Following are the complete
instructions for removing and replacing a DVD or DAT drive in a Netra ct 800
server:
▼
Removing a DVD or DAT Drive
1. Log in to the server and kill the Volume Manager daemon.
As root, enter:
# /etc/init.d/volmgt stop
2. If you are removing a DAT drive, enter the following command to rebuild the
device tree:
# devfsadm -i st
This command is not necessary if you are removing a DVD drive.
3. Get the attachment-point ID for the removeable media drive installed in your
server.
As root, enter:
# cfgadm -a c0
4
Netra ct Server Product Notes • August 2001
If you have a DVD drive installed in your server, you should get feedback similar
to the following:
■
Ap_Id
c0
c0::dsk/c0t0d0
c0::dsk/c0t1d0
c0::dsk/c0t6d0
c0::rmt/0
Type
Receptacle
scsi-bus
connected
disk
connected
disk
connected
CD-ROM
connected
unavailable connected
Occupant
Condition
configured
unknown
configured
unknown
configured
unknown
configured
unknown
unconfigured unknown
In the sample feedback above, the attachment-point ID for the DVD drive is
c0::dsk/c0t6d0, shown as CD-ROM under the Type column.
If you have a DAT drive installed in your server, you should get feedback similar
to the following:
■
Ap_Id
c0
c0::dsk/c0t0d0
c0::dsk/c0t1d0
c0::dsk/c0t6d0
c0::rmt/0
Type
Receptacle
scsi-bus
connected
disk
connected
disk
connected
unavailable connected
tape
connected
Occupant
Condition
configured
unknown
configured
unknown
configured
unknown
unconfigured unknown
configured
unknown
In the sample feedback above, the attachment-point ID for the DAT drive is
c0::rmt/0, shown as tape under the Type column.
4. Deactivate the removeable media drive.
As root, enter:
# cfgadm -c unconfigure ap_id
where ap_id is the attachment-point ID for the removeable media drive that you
want to remove. For example, to deactivate the DVD drive using the feedback given
above, as root, enter:
# cfgadm -c unconfigure c0::dsk/c0t6d0
Note that the attachment-point ID would be different for the DAT drive.
If you have envmond running, you should get the following feedback:
scsi.so:Removable Media Module (RMM) is Ok to Remove.
Netra ct Server Product Notes
5
5. Verify that the removeable media drive has been deactivated.
As root, enter:
# cfgadm -a c0
You should get feedback similar to the following:
Ap_Id
c0
c0::dsk/c0t0d0
c0::dsk/c0t1d0
c0::dsk/c0t6d0
c0::rmt/0
Type
Receptacle
scsi-bus
connected
disk
connected
disk
connected
unavailable connected
unavailable connected
Occupant
Condition
configured
unknown
configured
unknown
configured
unknown
unconfigured unknown
unconfigured unknown
The entry under the Type column for the drive you removed should be
unavailable, and the entry under the Occupant column should be
unconfigured.
You can also use the removeable media module (RMM) LEDs on the system status
panel to verify that the removeable media drive has been deactivated. The Okay to
Remove LED (
) on the system status panel for the removeable media module
should go ON, indicating that you can remove the removeable media drive from the
slot.
6. Go to the server and attach the antistatic wrist strap to your wrist.
7. Using a No. 2 Phillips screwdriver, loosen the captive screw that holds the
removeable media module in place.
8. Pull the module from the system as shown in FIGURE 1 and place it on the
electrostatic discharge mat.
6
Netra ct Server Product Notes • August 2001
FIGURE 1
Removing the Removeable Media Module from a Netra ct 800 Server
If you have envmond running, you should get the following feedback on the console:
scsi.so:Removable Media Module (RMM) Removed.
▼
Installing a DVD or DAT Drive
1. Go to the server and attach the antistatic wrist strap to your wrist.
Netra ct Server Product Notes
7
2. Insert the removeable media module into the server.
The Okay to Remove LED (
) and the Power LED (
panel for the removeable media module should go ON.
) on the system status
If you have envmond running, you should get the following feedback:
scsi.so:Removable Media Module (RMM) Installed.
scsi.so:Removable Media Module (RMM) is Ok to Remove.
3. Using a No. 2 Phillips screwdriver, tighten the captive screw on the removeable
media module to secure it to the server.
4. Remove the antistatic wrist strap.
5. Log in to the server and, as root, activate the replacement removeable media drive:
# cfgadm -c configure c0
6. If you installed a DAT drive into your server, enter the following command to
rebuild the device tree:
# devfsadm -i st
This command is not necessary if you installed a DVD drive into your server.
7. Verify that the removeable media drive has been activated.
As root, enter:
# cfgadm -a c0
■
Ap_Id
c0
c0::dsk/c0t0d0
c0::dsk/c0t1d0
c0::dsk/c0t6d0
c0::rmt/0
8
If you installed a DVD drive in your server, you should get feedback similar to
the following:
Type
Receptacle
scsi-bus
connected
disk
connected
disk
connected
CD-ROM
connected
unavailable connected
Netra ct Server Product Notes • August 2001
Occupant
Condition
configured
unknown
configured
unknown
configured
unknown
configured
unknown
unconfigured unknown
Locate the line with the attachment point c0::dsk/c0t6d0 listed in the Ap_Id
column. Verify that the following entries appear for the DVD drive that you just
installed:
c0::dsk/c0t6d0
CD-ROM
■
■
connected
configured
unknown
If you see CD-ROM in the Type column and configured in the Occupant
column, then the DVD drive was activated. Go to Step 8.
If you see unavailable instead of CD-ROM in the Type column and unconfigured
instead of configured in the Occupant column, then the DVD drive was not
activated. Enter the following command to activate the DVD drive:
# cfgadm -c configure c0::dsk/c0t6d0
Enter the cfgadm -a c0 command a second time to verify that the
DVD drive was activated. You can also use the removeable media module
(RMM) LEDs on the system status panel to verify that the removeable media
drive has been activated. The Okay to Remove LED (
) on the system status
panel for the removeable media drive should go OFF, indicating that the
removeable media drive has been activated. Go to Step 8.
■
If you installed a DAT drive in your server, you should get feedback similar to the
following:
Ap_Id
c0
c0::dsk/c0t0d0
c0::dsk/c0t1d0
c0::dsk/c0t6d0
c0::rmt/0
Type
Receptacle
scsi-bus
connected
disk
connected
disk
connected
unavailable connected
tape
connected
Occupant
Condition
configured
unknown
configured
unknown
configured
unknown
unconfigured unknown
configured
unknown
Locate the line with the attachment point c0::rmt/0 listed in the Ap_Id column.
Verify that the following entries appear for the DAT drive that you just installed:
c0::rmt/0
tape
■
connected
configured
unknown
If you see tape in the Type column and configured in the Occupant column,
then the DAT drive was activated. Go to Step 8.
Netra ct Server Product Notes
9
■
If you see unavailable instead of tape in the Type column and unconfigured
instead of configured in the Occupant column, then the DAT drive was not
activated. Enter the following command to activate the DAT drive:
# cfgadm -c configure c0::rmt/0
Enter the cfgadm -a c0 command a second time to verify that the DAT drive
was activated.
You can also use the removeable media module (RMM) LEDs on the system
status panel to verify that the removeable media drive has been activated. The
Okay to Remove LED (
) on the system status panel for the removeable media
drive should go OFF, indicating that the removeable media drive has been
activated.
8. Start the Volume Manager daemon.
As root, enter:
# /etc/init.d/volmgt start
Rebuilding the Device Tree after Reboots
for a Netra ct 800 Server
If you have a Netra ct 800 server with a DAT drive installed, the cfgadm utility will
lose the entry for the DAT drive whenever you reboot your Netra ct 800 server;
however, the DAT drive will still be accessible through the standard DAT software
utilities. You must rebuild the device tree after every server reboot to rebuild the
entry in the cfgadm utility.
Enter the following command after every server reboot to rebuild the device tree for
a Netra ct 800 server with a DAT drive installed:
# devfsadm -i st
This command is not necessary if you have a Netra ct 400 server or if you have a
Netra ct 800 server with a DVD drive installed.
10
Netra ct Server Product Notes • August 2001
Setting the Fan Trays to Run at
Maximum Speed Constantly
By default, the fan trays in the Netra ct servers are set so that their speeds will vary
between 75% and 100%, depending on the temperature (refer to the section “Fan
Tray and Fans” in the Netra ct Server Product Overview for more information). If you
want to disable the fan speed control circuitry so that the fan trays operate at
maximum speed constantly, regardless of the temperature, follow these instructions.
1. Remove the system status panel and remove the fan trays from the Netra ct server.
Refer to the Netra ct Server Service Manual for those instructions.
2. Locate the J0104 two-pin jumper at the rear of the fan tray.
3. Insert a jumper shunt over the J0104 two-pin jumper.
The jumper shunt should be a shunt designed to fit over two standard jumper pins
that are 100 mil apart, measured from the center of each pin.
4. Reinsert the fan trays and the system status panel on the Netra ct server.
Refer to the Netra ct Server Service Manual for those instructions.
Changes in RSC Variables
These changes affect certain RSC variables and their documentation in the Sun
Remote System Control (RSC) User’s Guide for the Netra ct Server Alarm Card.
■
A new variable, serial2_hw_flowcontrol, controls whether RSC uses
hardware flow control on the serial port. Valid values are true and false. The
default is false. If set to true, and if the hardware supports hardware flow
control, hardware flow control and modem control are enabled. If set to false, or
if the hardware does not support hardware flow control, hardware flow control is
disabled.
■
A new variable, serial2_inactivity, controls whether RSC disconnects a
session on serial port 2 after 10 minutes of inactivity. Valid values are true and
false. The default is false. If set to true, RSC disconnects a session connected
to serial port 2 after 10 minutes of inactivity. If set to false, RSC never
disconnects a session on serial port 2 because of inactivity. For example, if the
serial2_inactivity variable is set to false, and a cable is removed from
serial port COM2, the session will not be disconnected.
Netra ct Server Product Notes
11
■
The variable serial2_hw_handshake has been removed from RSC.
■
A new status code, 03 offline, has been added to the messages that the
envmond daemon can send to the alarm card, depending on how the alarm
variables are set. Offline means that the power supply has been switched off.
Problems with DHCP and PPP
In the Configuring RSC Software section in the Remote System Control (RSC) User’s
Guide for the Netra ct Server Alarm Card manual, when you are running the RSC
configuration script (rsc-config), at one point you will be asked to choose the RSC
IP Mode, and you will be given config or DHCP as choices. Do not choose DHCP;
DHCP is not supported at this time in the RSC software. Choose config instead at
this point.
In addition, instructions are given in the same section for configuring PPP. Disregard
these instructions; PPP is not supported on serial port COM 2 on the alarm card at
this time.
Safety and Compliance Information
Class A Devices
Both the Netra ct 800 server and the Netra ct 400 server are FCC Class A devices.
Torque Specifications
Following are the torque specifications for the Netra ct server:
12
■
If you are installing a card into the Netra ct server, tighten the screws to a torque
of 0.28 N.m (2.5 in.-lb)
■
If you are connecting a cable to a card installed in the Netra ct server, tighten the
screws on the cable to a torque of 0.23 N.m (2 in.-lb)
Netra ct Server Product Notes • August 2001
Limited High Availability Hot Swap
Features
The Netra ct server hardware supports basic and full hot swap. It also supports
some features of high availability hot swap, such as the following high availability
signals:
■
■
HEALTHY#
LOCAL_PCI_RESET#
Changing Configurations for External
Peripherals
If you have an external peripheral connected to the Netra ct server and you want to
make a change to the configuration of the external peripheral (for example, if you
want to move the peripheral to a different controller, add or remove a peripheral to
the SCSI chain, or add or remove a disk), there are several things you must keep in
mind:
1. If you have more than one SCSI device in a SCSI chain, you must set the SCSI
address for the SCSI device closest to the controller to the lowest address, raising
the SCSI addresses for other SCSI devices in the chain so that the address for the
SCSI device furthest from the controller has the highest address.
2. You can connect external SCSI devices to the SCSI port on either the CPU
transition card or a network interface card. Keep in mind that if you connect
external SCSI devices to the SCSI port on the CPU transition card, those external
SCSI devices will be on the same SCSI chain as your boot drive, so any errors in
SCSI termination or target address overlaps may panic your server. This is not an
issue if you connect external SCSI devices to the SCSI port on a network interface
card, which would be on a different SCSI chain than your boot drive.
Netra ct Server Product Notes
13
14
Netra ct Server Product Notes • August 2001