1
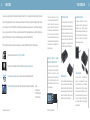
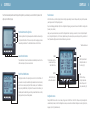
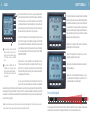
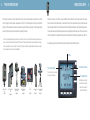
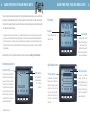
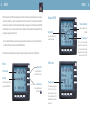
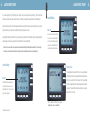
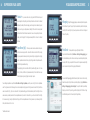
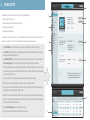
DSI Computer
User Manual
English
2
THe modules
WELCOME
Thank you for purchasing the Driver Safety and Information Computer (DSI). A high quality product like the Stinger DSI, should
come with an equally high level of service. Therefore please note that you can direct all your questions regarding the DSI to Stinger
by simply calling us on +31 (0) 252 418095. Useful information is also available at www.stinger.com. This User Manual will quickly
bring you up to speed with your DSI to help you get optimal enjoyment from Stinger applications such as SpotList Alerting, Radar
Alerting*, SPECS Alerting, Laser Alerting*, LaserShield*, MileageLog, Safety Signals and PoliceCheck.
If after reading this manual you still have some questions, you can obtain additional information in the following way:
Via the Stinger information line: +31 (0) 252 418095
At our website www.stinger.com, for example under ‘Frequently Asked Questions’
In a personal meeting at the Stinger offices, preferably upon making an appointment:
*Available where allowed
Computer Center
Spectrum Analyzer
The Computer Center is the Stinger DSI’s
brain, directing and coordinating all other
modules and functions. All modules are
therefore connected directly or indirectly
to the Computer Center. If Stinger brings
out a new module, it can be added simply
by plugging it in. The Computer Center
has flash memory and a GPS module.
All relevant microwaves you encounter
are analyzed in patterns, frequencies and
amplitudes by your Stinger’s Spectrum
Analyzer, which uses a phased array radar in
the form of a patch antenna for the receiver
section. It is extremely slim, particularly
accurate and hypersensitive.
Memory Display, Display
Holder and PC Interface
Through the online manuals which can be found at www.stinger.com/manuals
stinger.com
The DSI is a modular system. This not
only has the advantage that the DSI can
easily be configured to your personal
wishes, but also makes it ‘future proof’.
If Stinger makes a new module available
for the DSI, it can easily be clicked into
the system. Software updates can simply
be downloaded via the Stinger Desktop.
Your Stinger can be equipped with the
following modules:
Stinger
Arnoudstraat 6
2182 DZ Hillegom
The Netherlands
The Stinger DSI is operated using the
Memory Display. The Memory Display’s
LCD screen also shows all relevant
information. Using the PC Interface, you
can link the Memory Display to your PC
and pass data to and from the car such
as the MileageLog.
*Available where allowed
Extension Box
To connect additional modules quickly and
easily, we recommend using the Extension
Box when the DSI is installed. The Extension
Box is placed under the bonnet of the car and
connects the Spectrum Analyzer and Laser
Analyzer Box to the Computer Centre.
Laser Analyzer
All laser activities – transmitting and
receiving – are coordinated in the Laser
Analyzer Box (which is in turn controlled by
the Computer Centre). The Laser Analyzer
Box drives a maximum of four Lasers, which
do the actual transmitting and receiving of
laser light: sending laser Safety Signals,
Laser Alerting (detection and warning) and
LaserShielding*.
3
4
CONTROLS
CONTROLS
Your DSI will automatically switch on and off along with the ignition of your vehicle and you can control the DSI by means of the
Favorite screen
eight keys on the Memory Display.
After the DSI switches on, the Memory Display first shows the Stinger logo and during 10 seconds notifies you that by using the DSI you declare
yourself in agreement with the Stinger User Agreement.
If you have the MileageLog functionality on (Main Menu > Configuration > MileageLog), next you will see the screen that offers the route type options
(business, private, commute).
Lastly, you will see your favourite screen, as selected in the Configurations Menu. Depending on your selection, this can be the Spectrum Analysis*
screen, the Signal Strength screen*, or the Pilot screen (depicted below), which conveniently shows your current speed, the time, your direction of
travel, the SpeedSense (SpS) value and all active functionalities at any given moment.
Function buttons at the right side
The three larger buttons to the right are usually used to select functions or choose settings.
The top and bottom buttons of the three are mostly used for navigating up and down
between settings and functions. The middle button functions as the ‘enter’ button.
Lower Function buttons
The actual functions of the lower four buttons are described directly above them on the
LCD screen and may vary from one screen to another.
The OFF and ERASE button
The slightly smaller button in the topmost right corner at the front is the OFF button. If
you have driven in a country where Radar Alerting is allowed and now drive into a country
where that is not allowed, pressing the OFF button will take you to the ERASE screen.
Here, pressing the ERASE button (the rightmost of the lower four function buttons), will
immediately erase the Radar Alerting, Laser Alerting and LaserShield functions – instantly
bringing you into compliance with local regulations.
*Available where allowed
BACK
This button takes you to the
previous menu untill you
reach the Main Menu
MUTE
Button that temporarily
switches off a sound alert
MEM
Button that puts FalseList
and SpotList lcoation into
the memory (p.14)
SpS
With this button you
change the speed value
under which you will not
get any audio alerts (p.14)
Configuration menu
Pressing the BACK button one time or more will always bring you back to the Main Menu. From the Main Menu you cannot just navigate to the
various functionality screens, but also to the Configuration menu where you can customise a multitude of settings such as volume, brightness, time,
language, mph or km/h, SpeedSense level, etc.
5
LEGAL
6
SAFETY SIGNALS
1
2
1
2
If you are leaving a country where Radar
Alerting is allowed and now drive into a
country where that is not allowed, pressing
the OFF button will take you to ERASE
screen.
Here, pressing the ERASE button, will
immediately erase the Radar Alerting,
Laser Alerting and LaserShield functions –
instantly bringing you into compliance with
local regulations.
Many countries within the E.U. have their own, unique regulations when it
comes to drivers being alerted for or protected from speed traps. Depending on
the country, citizens may or may not have the freedom to receive information
concerning speed traps and to be alerted accordingly. In some countries radar
can be freely picked up, in others it’s made illegal. The freedom to pick up the
information from laser guns, also differs on a per country basis.
The Stinger DSI incorporates a unique safety system. At considerable
distances, your DSI is able to receive so-called Safety Signals that can
be transmitted by ambulances, by police, at road construction sites
or around school zones. These signals will be recognized and used
to give you a real-time warning for possible road safety hazards. In
these cases Safety Signals will provide you with both an advanced
visual warning and a special audio warning.
In order to offer its products to car drivers throughout the so called “common
market’ of the E.U., Stinger in certain markets only supplies versions of the DSI
that are incapable of certain functionalities. Radar Alerting and Laser Alerting
are not available on this version. When powered up this version of the Stinger
DSI can be easily recognized in the Pilot screen by means of the text “RADAR
ALERTING NOT POSSIBLE”.
Depending on the application, Safety Signals can technically be
generated based on one of three methods:
Based on GPS and SpotList: For example to warn you when
approaching unguarded railway crossings.
Please remember it is your responsibility to know and abide by the law.
Therefore, always thoroughly check local legislation before first using your
Stinger DSI. If you are driving in a country where you do have the freedom
to use Radar Alerting and/or Laser Alerting, you can download and install the
software appropriate for that country.
Of course you can later delete this (new) functionality with the touch of a
button, in order to easily and completely stay in compliance of local legislation
whenever entering a country that does not allow for Radar and/or Laser Alerting. Erasing is achieved by first pressing the OFF key.
In the subsequent screen just choose ERASE. This will turn your DSI in a version that is incapable of Radar Alerting, Laser Alerting
and LaserShield. A new software download and installation (available where allowed) is required in order to once again change the
version of your DSI (see page 18).
Note: Under no circumstance does your Stinger constitute a license to exceed the posted speed limits. Alerts from your Stinger serve as an
effective reminder to mind your speed. Always drive responsibly and pay full attention to traffic.
Based on radar: For example around school zones to warn drivers
in the surrounding area.
Based on laser: For more pinpointed communication, e.g. to cars
on a specific stretch of road traveling in a certain direction. This
is also what enables car-to-car Safety Signals.
Car-to-car Safety Signals
A vehicle equipped with a Stinger DSI or Stinger Card with Laser that has to suddenly hit the breaks, can instantly give following cars
with Stinger Laser an early warning for this dangerous traffic situation. A function that can literally save lives.
7
8
Induction loops
Types of speed traps
Police in Europe use quite a few ways to check motorists for speed, and an even greater variety of equipment to carry out these
Induction loop camera’s, such as Truvelo, use loops embedded in the road, instead of radar, to measure speed. These camera’s
checks. Each type of speed trap requires a special approach of the Card. For the different types of speed traps for which it offers
therefore cannot be found by Radar Alerting or a radar detector. However, by their nature induction loops are in fixed locations and
protection, the DSI has particular audio-visual alerts, activated on approach of the specific speed trap. The following pages provide
Stinger has mapped virtually all of them and incorporated them in the Stinger SpotList database. Stinger SpotList Alerting warns you
a summary of the various types of speed traps and the corresponding DSI screens.
in time using an audio signal and display message whenever you are approaching an induction loop camera. The most recent version
of the Stinger SpotList can be downloaded from stinger.com and be installed via the Stinger Desktop application on your Mac or PC.
Note: The rules regarding protection against speed traps vary from country to country. Some countries have taken away your freedom to use
some or any of the speed trap protection functionalities that Stinger offers. Please acquaint yourself with the rules and regulations of the region
in which you would like to use your Stinger DSI. To assist you with this, please use the Stinger Desktop application and make sure you answer
correctly the questions concerning the regional configurations.
On approaching a speed camera with induction loops SpotList Alerting will generate the following screen:
The time
Your current speed
Your GPS speed, more accurate
than your car’s speedometer.
Induction Loops:
Fixed
Page 9
Radar Speed Trap:
Fixed
Page 10
Radar Speed Trap:
Mobile (tripod)
Page 10
Radar Speed Trap:
Mobile (car)
Page 10
SPECS
Page 12
Laser Speed Trap:
Gun
Page 14
Laser Speed Trap:
AutoVelox
Page 14
The direction of travel
The SpotList Alert
The DSI displays a warning 15
seconds before the loop trap
and shows the speed limit it
has stored for that location
9
10
radar speed traps: fixed and mobile units
radar speed traps: fixed and mobile units
There are two types of radar speed traps: fixed and mobile. The SpotList Alerting described on page 9 can warn you about the fixed
radar locations. Stinger’s Radar Alerting feature*, however, can expertly alert you to both types of radar traps: fixed and mobile.
Pilot screen
Your Stinger DSI can utilise the Spectrum Analyzer with patch antenna to recognize police radars at often double the distance that
some radar detectors manage to achieve.
Band type
Note: Some countries have taken away your freedom to use the radar alerting functionality. If you travel to a country where radar alerting is
permitted, you can download the appropriate Stinger Operating Software. To assist you with this, please use the Stinger Desktop application for
your Mac or PC (see page 16). On returning to the country where Radar Alerting is not permitted, you can erase this function again by pressing
the OFF button (in the top right corner) and then the ERASE button (the rightmost of the lower four function buttons). See Page 4 for the ERASE
function description.
Your DSI indicates the radar
band here (K or Ka).
Radar Alerting offers a choice of three different preferred screens (which you can indicate in Settings > Preferred Screen):
Spectrum Analysis screen
The signal strenght
The higher the peak displayed by the
Spectrum Analysis screen, the stronger
the signal. The stronger the signal, the
more likely it is to be an actual trap. Also,
the closer to the centre of the graph the
peak is, the more likely it is to be police
radar. In this example, it appears to be
an actual speed trap for two reasons:
peak height and signal location.
*Available where allowed
Signal strenght
The signal strength – Your DSI
displays a relatively high signal
strength value of 225 here,
whereas the maximum is 255.
Therefore it is very likely that this
concerns an actual speed trap.
Signal Strenght screen
Exact frequency
Your DSI indicates the
exact radar frequency
here – in this case,
24.126 GHz.
The signal strenght
Your DSI detects a strong K-band
frequency, as the K indicator bar is
almost full. This suggests an actual
speed trap in the area, not a false
alarm. The Ka band is completely
empty, so there is no Ka trap in the
area. There is no Laser (La) signal
present either.
The precise frequency
The closer the measured
frequency
approaches
the
official K band axis frequency of
24.125 GHz (or in the case of the
Ka band, 34.3 GHz), the more
likely it is to be a speed trap as
opposed to a false alarm.
11
SPECS
12
SPECS
SPECS Alerting warns you of SPECS checks and guides you through them. These checks use cameras above the road to record your
car at point A, regardless of your speed. This is repeated at the end of the route at point B. The central system therefore knows
During the SPECS
Remaining distance
how long it took you to drive from A to B and will automatically calculate your average speed. The DSI takes you through the SPECS
check with various screens. You will always be aware of when a route begins, what the approximate remaining length of the route
is and what your average speed is at that time.
Be careful: many SPECS checks now also measure your average speed over sub-sections of a route. To offer full information
Route length
Your relative position on the
route is shown visually.
your Stinger will treat each sub-section as an individual SPECS location.
On the Pilot screen, which provides clear visual support, you will see the following screens in the event of a SPECS check:
Notice
Current speed
End of route
Speed limit
The speed limit stored in
your Stinger for the route.
Warning
You will receive a warning when
you approach a SPECS check.
Adjust speed
You can adjust the speed
limit using the
Average speed
This is your final average speed
for the entire route. If your
average exceeds the speed
limit, an unhappy face will be
displayed and a camera sound
will be heard.
Remaining distance within
the SPECS
Average speed
This is your real-time average
speed over the route covered so
far. A happy, neutral or sad face
show you whether you’re average
speed is okay or over the limit.
13
14
Laser speed traps
If you have equipped your DSI with Stinger Laser modules, it can protect you against laser speed traps*, using the latest laser
technology. Laser traps involve lasers being shot at your car, with the gun calculating your speed based on the reflected laser.
Laser speed traps
LaserShielding
Stinger Laser offers two forms of protection against laser beams. Laser Alerting* involves a visual and audio alarm in case your car
gets shot at by laser; your Stinger can even indicate the type of gun the police are using.
LaserShielding* takes the protection further: your Stinger pulls up a protective laser shield of light, making it virtually impossible for
speed trap lasers to measure your speed. Note: The LaserShield is for use where permitted.
Note: Even if you own a DSI version capable of the LaserShield functionality it initially will be switched off. To activate it go
to Settings > Laser and switch ‘LaserShield’ on. Before using the LaserShield please check your local legislation.
Warning
When speed trap lasers are detected,
this screen will be displayed and you
will hear the corresponding warning. If
you have the LaserShield function on,
your Shield will automatically deploy.
Laser Alerting*
Shield-up time
The LaserShield will remain in effect for 4 to 10 seconds, depending
on the ‘Shield-up’ time you have selected (the factory Shield-up time
Warning
setting is 6 seconds). After this ‘Shield-up Time’ the LaserShield
A LASER ALERT message will appear on
your Memory Display as soon as your
Stinger detects a laser. The type of laser
gun can also be displayed.
protection will automatically end, enabling the speed gun to measure
your speed. The LaserShield will never be active when your speed is
below 30 km/h (or 19 mph).
Select the duration of the Shield Up time by going to:
Configuration > Laser > LaserShield
*Available where allowed
15
16
SUPpressing false alertS
FalseList*
MileageLog and PoliceCheck
If you receive a false alarm, simply press the MEM button and you will
see a message that this specific signal at this specific location will be stored in the FalseList
MileageLog
database. If you drive past the location again, you will no longer hear an audio alarm; you will
At the start of each trip, select the type of trip and to record fuel stops and other interruptions,
still see a warning on your display however, indicating that the alarm has been suppressed
press ‘pitstop’ after resuming the trip. If you wish, you can also enter the current mileage at
by FalseList. Your DSI will still sound an audio alarm in case of a real speed trap at the same
the time of the pitstop
Stinger’s MileageLogging keeps your business and private trips separate.
location, since the ‘fingerprint’ for that signal will usually differ from the one in the FalseList
database.
SpeedSense (SpS)
Of course you could receive an audio alert when you are
not likely to exceed any speed limits. You could for instance be stuck in traffic, be looking
for your way around a business park or simply be searching for a parking spot at a shopping
centre. SpeedSense eliminates these by simply letting you indicate the speed below which
the DSI will not give audible warnings.
The accompanying pilot screen indicates that the SpeedSense (SpS) value is 25. Below
PoliceCheck
This unique function helps you fight unjust traffic fines. If you have PoliceCheck switched on (Main Menu > Settings > MileageLogging), your
DSI will automatically keep track of where and when you encountered speed traps (radar,
laser, loops, SPECS, etc), your speed at that time as well as the frequencies used permitting
you to check wether they fall within the legally permitted bandwith.
25 km/h, therefore, the DSI will not produce audio alerts (but it will indicate them on your
Memory Display screen), keeping things nice and quiet in your car.
You can configure SpeedSense on your DSI under Main Menu > Settings > SpeedSense, in which you can set a ‘high’ and a ‘low’ SpeedSense
value. The high value is meant for motorways, the low one for secondary roads (many people set the high value at or around 100 km/h and the low
value at or around 50 km/h). If you turn on ‘auto switch’ in the SpeedSense settings, your DSI will automatically switch from the high to the low
value as soon as your actual speed reaches the low SpeedSense value. If you do not turn ‘auto switch’ on, you will be able to switch from the high
to the low value only by pressing the SpS button. Switching up from the low SpeedSense value to the high value can only be done using the SpS
button, whether ‘auto switch’ is on or not.
*Available where allowed
To save and edit MileageLogging and PoliceCheck data (which can also be done in Excel),
follow these two steps. First, put the data on your Memory Display by going to Main Menu >
Settings > MileageLogging > Data to display. Then export the data from your Memory
Display to your Mac or PC by connecting your Memory Display to the PC Interface. To copy
and edit the data, please refer to the next chapter: Stinger Desktop.
17
Stinger Desktop
18
5
Stinger Desktop is an easy to use application for your Mac or PC that has been specifically developed to:
1
Update your Stinger DSI in an easy manner.
6
7
Upload (new) fixed speed trap locations, the Stinger SpotList, to your DSI.
2
Store and manage your MileageLog data.
Store and browse your PoliceCheck data.
The Stinger Desktop comes with your DSI on a CD-rom and can be downloaded from stinger.com/downloads. Before you can start using the Stinger
Desktop, it must be installed on your Mac or PC. More information regarding the installation can be found on www.stinger.com .
3
1. Under “STINGER DEVICE” you will see wich Stinger device has been attached (to the USB PC-Interface), in this case a Memory Display.
4
2. Under “DATABASE” you will find the name of the opened MileageLog and/or PoliceCheck data base. Within these data bases, you can save, browse
and manage imported MileageLog and PoliceCheck data.
8
9
3. Under “MILEAGELOG FOLDERS” you can create and manage your own folders in order to neatly organize your trips. To create a new folder, click on
File > New MileageLog Folder. This allows you, for instance, to group all trips from one month, by dragging those into the folder.
4. Smart folders will fully automatically keep your folders up-to-date based on filters you set. The criteria for these filters you can set up when creating
the folder, and can comprise such variables as kind of trip, destination, distance and period. To illustrate, this would allow you to automatically collect
in one folder all business trips from one year.
5. Here you can see the status of the actions being conducted, such as when data are being copied from the Memory Display.
6. Click this button in order to import the MileageLog data, that came from the DSI in your car, into the open data base.
7.
Click this button after you have imported data from your Memory Display, in order to empty the Memory Display, therewith creating space on your
Memory Display for the recording of new MileageLog and PoliceCheck data.
8. Click this button to check for DSI software updates. If updates are available, a window on which you can start the updates will automatically appear.
11
9. After you have downloaded the newest Stinger SpotList from www.stinger.com, you can click this button to copy the SpotList to your Memory Display
enabling to install the new SpotList onto the DSI in your car.
10. Click under DATABASE on MileageLog to obtain a complete overview of all your trips.
11. You can sort your trips based on the column title, by clicking on this title one or more times.
10
17
Copyright © 2009 Stinger
All rights reserved
DSI Computer User Manual
©2009 Stinger
DSI-UMv1.0.INT
www.stinger.com
+31 (0) 252 418095