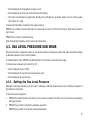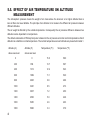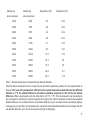
1
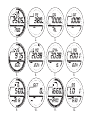
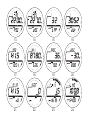
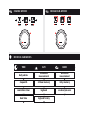
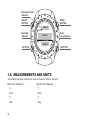
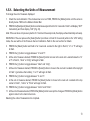
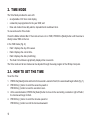
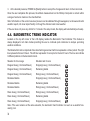
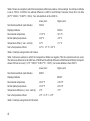
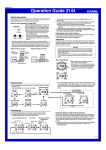
en
SUUNTO SPARTAN
USER’S GUIDE
1.
2.
3.
4.
5.
6.
7.
8.
9.
10.
11.
12.
13.
14.
15.
16.
17.
18.
19.
20.
21.
22.
23.
24.
25.
26.
27.
29.
30.
31.
28.
CHANGE MODES
TIME
ALTI
CHANGE SUB-MODES
BARO
MODES & SUB-MODES
TIME
ALTI
BARO
daily alarms
difference
measurement
difference
measurement
stopwatch
24 hour memory
4 day memory
countdown timer
logbook
sea level pressure
dual time
logbook history
Table of Contents
1.Introduction............................................................................. 9
1.1.General Information............................................................................................... 9
1.2.MAIN FUNCTIONS (MODES).......................................................................................... 9
1.2.1.Backlight Features...................................................................................................... 9
1.2.2.Water Resistance........................................................................................................ 9
1.3.Button Functions................................................................................................... 10
1.3.1.The [Mode] Button ................................................................................................... 10
1.3.2.The [+] Button........................................................................................................... 10
1.3.3.The [-] Button............................................................................................................ 10
1.3.4.The [Select] Button................................................................................................... 11
1.4.LCD DISPLAY................................................................................................................. 11
1.5.MEASUREMENTS AND UNITS..................................................................................... 12
1.5.1.Selecting the Units of Measurement......................................................................... 13
1.6.PRESSURE SENSOR CALIBRATION........................................................................... 14
1.7.CARE AND MAINTENANCE.......................................................................................... 14
1.7.1.Battery Replacement................................................................................................ 14
2.TIME MODE.................................................................................. 16
2.1.HOW TO SET THE TIME............................................................................................... 16
2.2.DAILY ALARM SUB MODE............................................................................................ 18
2.2.1.How to Set the Daily Alarms..................................................................................... 18
2.3.STOPWATCH SUB MODE............................................................................................. 19
2.3.1.How to Use the Stopwatch........................................................................................ 19
2.4.COUNTDOWN TIMER SUB MODE............................................................................... 20
2.4.1.How to Set the Countdown Timer............................................................................. 21
2.4.2.How to Start the Countdown Timer........................................................................... 21
6
2.5.DUAL TIME SUB MODE................................................................................................. 21
2.5.1.Setting the Dual Time................................................................................................ 22
3.ALTIMETER MODE....................................................................... 23
3.1.SETTING THE ALTIMETER........................................................................................... 24
3.2.ALTITUDE DIFFERENCE MEASUREMENT SUB MODE............................................. 25
3.2.1.How to Start the Altitude Difference Measurement................................................... 26
3.3.24-HOUR MEMORY SUB MODE................................................................................... 26
3.4.LOGBOOK SUB MODE.................................................................................................. 27
3.4.1.How to Start and Stop a Logbook............................................................................. 28
3.4.2.Fast Cumulative Button............................................................................................. 29
3.5.LOGBOOK HISTORY SUB MODE................................................................................. 29
3.5.1.Clearing the Logbook History.................................................................................... 30
4.BAROMETER MODE..................................................................... 31
4.1.PRESSURE DIFFERENCE MEASUREMENT SUB MODE........................................... 32
4.1.1.How to Start the Pressure Difference Measurement................................................ 32
4.2.4-DAY MEMORY SUB MODE........................................................................................ 32
4.3.SEA LEVEL PRESSURE SUB MODE............................................................................ 33
4.3.1.Setting the Sea Level Pressure................................................................................ 33
4.4.BAROMETRIC TREND INDICATOR.............................................................................. 34
5.FREQUENTLY ASKED QUESTIONS............................................. 35
5.1.GENERAL....................................................................................................................... 35
5.1.1.Is the Wristop Computer water resistant?................................................................. 35
5.1.2.How long will the battery last?.................................................................................. 35
5.1.3.What do the segments on the circumference mean?............................................... 35
5.1.4.Why do the segments on the circumference go to the left (counterclockwise)?....... 35
5.1.5. Why are there two symbols above the Mode Indicator Bar and what do they mean?....36
7
5.2.TIME............................................................................................................................... 36
5.2.1.Why do the segments on the circumference increase and decrease when
I am in the Time mode?............................................................................................ 36
5.2.2.What is the longest time I can set in the timer?........................................................ 36
5.3.ALTIMETER.................................................................................................................... 36
5.3.1.How do you clear the logbook?................................................................................. 36
5.3.2.How does the logbook self-erase?............................................................................ 36
5.3.3.How many logbooks can you record?....................................................................... 37
5.3.4.What is the duration readout?................................................................................... 37
5.3.5.What is the maximum capacity of total vertical ascent or descent feet/meters
in the logbook history?.............................................................................................. 37
5.3.6.If hiking from a level of 5,000 ft down hill to 3,000 ft and then back up to
8,000 feet, how is the Vector going to read this or average it out?........................... 37
5.3.7.Why does the vertical ascent/descent measurement show different readings
even though I am inside and staying in the same room?......................................... 38
5.4.BAROMETER................................................................................................................. 39
5.4.1.What is the little box on the top left of the display?................................................... 39
5.4.2.Does the Wristop Computer show future trends in weather conditions?.................. 39
5.4.3.What does “absolute pressure” and “relative pressure” mean?................................ 39
5.4.4.What is temperature compensation?........................................................................ 39
5.5.EFFECT OF AIR TEMPERATURE ON ALTITUDE MEASUREMENT............................ 40
6.ABBREVIATIONS.......................................................................... 43
7.Technical specifications .................................................... 43
8.Suunto limited warranty.................................................... 44
9.DISPOSAL OF THE DEVICE.......................................................... 45
8
1. Introduction
1.1. General Information
The Wristop Computer is a reliable high precision electronic instrument, intended for recreational use. The
outdoor enthusiast who enjoys venturing in sports like skiing, kayaking, mountain climbing, hiking and biking
can rely on the Wristop Computer’s accuracy.
The ergonomically designed Wristop Computer weighs only 2.3 ounces or 65 grams and is accompanied by
an LCD featuring a large number display intended to be clearly visible in almost any condition.
Note: The Wristop Computer should not be substituted for acquiring measurements that require professional or
industrial precision and should not be used to acquire measurements when skydiving, hang gliding, paragliding,
gyrocopter riding and flying small aircraft.
IMPORTANT NOTE: A PULLOUT PAGE LOCATED ON THE FRONT INSIDE COVER OF THIS MANUAL
GRAPHICALLY ILLUSTRATES AND IDENTIFIES THE PROPERTIES OF THE WRISTOP COMPUTER
AND LCD DISPLAY. THIS PAGE IS DESIGNED TO FACILITATE THE USER’S UNDERSTANDING OF
THE FUNCTIONS AND PROCESSES TO SETUP THOSE FUNCTIONS.
1.2. MAIN FUNCTIONS (MODES)
The main functions (modes) in Suunto Spartan are Time, Altimeter and Barometer.
In each of the functions, associated sub modes provide further enhancements to the usefulness of its owner.
All key features and sub modes are discussed in detail following this section.
1.2.1. Backlight Features
The Wristop Computer has an electroluminescent backlight. This is initiated by pressing and holding the [Mode]
button for 2 seconds. The backlight will remain on for 5 seconds. Pressing the [Mode] button during this time
will restart the 5 second period, continuing the backlight feature.
1.2.2. Water Resistance
This product is water resistant. Water resistance is tested to 30m/100ft according to ISO 2281 standard (www.iso.ch).
Note: The Wristop computer is not a dive instrument.
9
1.3. Button Functions
Four buttons are used to operate the Wristop Computer: [Mode], [+] (ON/OFF), [-] and [Select].
1.3.1. The [Mode] Button
Is located on the top right of the Wristop Computer.
• In the main mode level, pressing the [Mode] button allows the user to select or move from one mode or
function to the next (TIME, ALTI, BARO, COMP).
• In the sub mode level, pressing the [Mode] button returns the user to the main mode level.
• In the setup process, pressing the [Mode] button accepts the changes or preferences. Pressing the button
again will return the user to the main mode level.
• Pressing the button for 2 seconds activates the backlight feature.
1.3.2. The [+] Button
Is located on the bottom right of the Wristop Computer.
• In the setup process, pressing the [+] button changes or scrolls the value upward.
• In the timing and logbook functions, this button can act as a start/stop (or On/Off) button.
1.3.3. The [-] Button
Is located on the bottom left of the Wristop Computer.
• In the setup process, pressing the [-] button changes or scrolls the value downward.
• This button is also called the “Fast Cumulative” button. Pressing the [-] button in any of the main modes will
quickly display the cumulative information of the current logbook recording.
Note: Details of this feature can be located on Page 29 of this manual.
10
1.3.4. The [Select] Button
Is located on the top left of the Wristop Computer.
• In the main mode level, pressing the [Select] button allows the user to enter into the sub modes of the
particular function or return to the main mode the user is in.
• In the main mode or sub mode, pressing and holding the [Select] button for more than 2 seconds allows
the user to enter the setup process.
• In the setup process, the [Select] button allows the user to move between settable units or values and
determine preferences.
1.4. LCD DISPLAY
The display is designed to offer maximum clarity and simplicity to the user.
The display is divided into several regions or areas.
• The Outer Circumference encompasses the outer boundary of the LCD display. The peripheral segments
are found in the Outer Circumference.
• A Barometric Trend Indicator provides a quick reference for forecasting weather conditions.
• Field 1 displays values either numbers or text depending on the mode or sub mode the user is in.
• Field 2 displays large numbers and/or related unit of measure of the function.
• A Mode Indicator Bar displays the main modes (functions) of the Wristop Computer (a triangle arrow located
just below the bar indicates the mode the user is viewing).
• Field 3 displays numbers and/or text.
11
Barometer Trend
Indicator
MODE
BUTTON
SELECT
BUTTON
Field 1
Mode Bar
Indicator
Field 2
Field 3
- BUTTON
1.5. MEASUREMENTS AND UNITS
The Wristop Computer supplies two units of measure: metric or imperial.
Metric Unit of Measure Imperial Unit of Measure
m ft
m/min ft/min
°C °F
mbar inHg
12
Outer
Circumference
+ BUTTON
1.5.1. Selecting the Units of Measurement
To change the unit of measure displayed:
1. Check the mode indicator. If the mode arrow is not on TIME, PRESS the [Mode] button until the arrow is
directly below TIME on the Mode Indicator Bar.
2. PRESS the [Mode] and [Select] buttons simultaneously and hold in for 3 seconds. Field 1 will display “SET”
momentarily and then display “UNI” (Fig. 30).
Note: If the user does not press any button for 1 minute in the setup mode, the display will automatically exit setup.
WARNING: If the user presses the [Select] button (and does not hold for 2 seconds) while in the “UNI” setting
mode, the user will be in the Pressure Sensor Calibration. Refer to the next section for details.
3. PRESS the [Select] button and hold in for 2 seconds. Located to the right in Field 2, “m” or “ft” will begin
to flash.
4. PRESS the [+] button to toggle between “m” and “ft”.
5. At the unit of measure desired, PRESS the [Select] button to move to the next unit. Located below the “m”
or ft” in Field 2, “mbar” or “inHg” will begin to flash.
6. PRESS the [+] button to toggle between “mbar” and “inHg”.
7. At the unit of measure desired, PRESS the [Select] button to move to the next unit. Located at the top right
in Field 1 (just above the bubble), °C or °F will begin to flash.
8. PRESS the [+] button to toggle between °C and °F.
9. At the unit of measure desired, PRESS the [Select] button to move to the next unit. Located at the top
center in Field 1, “m/min” or “ft/min” will begin to flash.
10. PRESS the [+] button to toggle between “m/min” and “ft/min”.
11. At the unit of measure desired, PRESS the [Mode] button to accept the changes. PRESS the [Mode] button
again to return to the main time mode.
Selecting the units of measurement is complete.
13
1.6. PRESSURE SENSOR CALIBRATION
This is a FACTORY SETTING CALIBRATION. If you are in this mode we highly suggest that you exit this setting
by pressing the [Mode] button. Calibrating this setting will ADVERSELY IMPACT all altitude and barometric
settings of the Wristop Computer.
In this setting, the user will be viewing “SNR” (Sensor) in Field 1. Do not press the [+] or [-] button to adjust
the pressure. Simply exit this setting by pressing the [Select] button to return to the “UNI” setting mode or by
pressing the [Mode] button to return to the main mode (Fig. 31).
If the Pressure Setting Calibration has been altered, in error, please contact our Product Support Department.
1.7. CARE AND MAINTENANCE
Perform only the detailed processes discussed in this manual. Do not perform any other service to the Wristop
Computer or attempt to open the case or remove the buttons or the bezel.
Protect your Wristop Computer from shocks, extreme heat and prolonged exposure to direct sunlight. If not in
use, your Wristop Computer should be stored in a clean, dry environment at room temperature.
The Wristop Computer can be wiped clean with a lightly moistened (warm water) cloth. Applying a mild soap
to the area can clean stubborn stains or marks.
Avoid exposing the Wristop Computer to strong chemicals like gasoline, cleaning solvents, acetone, alcohol,
adhesives, and paint, as they will damage the unit’s seals, case and finish.
Never attempt to take the Wristop Computer apart or service it yourself. Make sure the area around the sensors
(backside of the instrument) is kept free of dirt and sand. Never insert any objects into the sensor openings
of the Wristop Computer.
1.7.1. Battery Replacement
The Wristop Computer operates on a three-volt lithium cell Type: CR 2430. The maximum life expectancy is
approximately 12-18 months.
A low battery-warning indicator is activated when 5-15 percent of the battery capacity is still available. When
this occurs we recommend replacement of the battery.
14
Extreme cold weather will activate the low battery-warning indicator. Though the indicator is activated, the
battery may not need to be replaced due to this condition. In temperatures above 10°C (50°F) and the low
battery warning indicator is activated, the battery will need to be replaced.
Note: Heavy use of the electroluminescent backlight, altimeter, and compass will significantly reduce the life
of the battery.
To replace the battery:
1. turn the Wristop Computer to view the backside;
2. insert a coin in the coin slot located on the battery compartment cover;
3. turn the coin counterclockwise to the open position marked on the back of the case;
4. remove the battery compartment cover;
5. remove the old cell from the battery compartment and ensure the o-ring and all surfaces are clean, dry and
not damaged. Do not stretch the o-ring;
6. place the new cell into the battery compartment (negative side down, positive side up);
7. ensure that the o-ring is in its place to keep the Wristop Computer waterproof. Place the battery compartment
cover back onto the backside of the Wristop Computer;
8. insert a coin back into the coin slot; and
9. turn the coin clockwise to the close position marked on the back of the case.
Note: Battery replacement should be performed with extreme care so as to ensure the Wristop Computer
continues to remain waterproof. It is the operator’s responsibility to take due care to ensure that the Wristop
Computer remains waterproof.
15
2. TIME MODE
The Time Mode provides the user with:
• an adjustable 24/12 hour clock display;
• a calendar pre-programmed to the year 2089; and
• three sub modes: three daily alarms, stopwatch and countdown timer.
To view and use the Time mode:
Check the Mode Indicator Bar. If the mode arrow is not on TIME, PRESS the [Mode] button until the arrow is
directly below TIME on the bar.
In the TIME mode (Fig. 6):
• Field 1 displays the day of the week.
• Field 2 displays the current time.
• Field 3 displays the date (month/day).
• The Outer Circumference graphically displays time in seconds.
The Time mode and all sub modes can be adjusted through the setup program of the Wristop Computer.
2.1. HOW TO SET THE TIME
To set the Time:
1. PRESS the [Select] button and hold in for 2 seconds. Located in Field 3, the seconds will begin to flash (Fig. 7).
2. PRESS the [+] button to scroll the seconds upward or
PRESS the [-] button to reset the seconds to zero.
3. At the seconds desired, PRESS the [Select] button to move to the next setting. Located on right of Field 2,
the minutes will begin to flash.
4. PRESS the [+] button to scroll the minutes upward or
PRESS the [-] button to scroll the minutes downward.
16
5. At the minutes desired, PRESS the [Select] button to move to the next setting. Located in the center of
Field 2, the hour will begin to flash.
6. PRESS the [+] button to scroll the hour upward or
PRESS the [-] button to scroll the hour downward.
7. At the hour desired, PRESS the [Select] button to move to the next setting. Located in Field 1, the 24 or
12 hour clock setting will begin to flash.
8. PRESS either the [+] or the [-] button to toggle between the 24hr and 12hr.
Note: If the 12 hour clock is chosen either AM/PM will appear below the hour in Field 2.
9. At the clock setting desired, PRESS the [Select] button to move to the next setting. Located in the center
of Field 2, the year will begin to flash (Fig. 8).
10. PRESS the [+] button to scroll the year upward or
PRESS the [-] button to scroll the year downward.
11. At the year desired, PRESS the [Select] button to move to the next setting. Located in the center of Field
3, the month represented by a number will begin to flash.
12. PRESS the [+] button to scroll the month upward or
PRESS the [-] button to scroll the month downward.
13. At the month desired, PRESS the [Select] button to move to the next setting. Located to the right of Field
3, the date will begin to flash.
14. PRESS the [+] button to scroll the date upward or
PRESS the [-] button to scroll the date downward.
Note: Once the user has determined the year, month and day, the Wristop Computer will supply the day of the
week in Field 1. The American month/day -view can not be changed to a day/month -view.
15. At the desired date, PRESS the [Mode] button to accept the changes and return to the main mode.
Note: If the user does not press any button for 1 minute in the setup mode, the display will automatically exit setup.
Setting the time is now complete.
17
2.2. DAILY ALARM SUB MODE
The Wristop Computer allows the user to select and enter settings for up to three alarms.
In the TIME mode, PRESS the [Select] button once to enter this sub mode.
In the Daily Alarm sub mode (Fig. 26):
• Field 1 displays “ON” or “OFF” (the activation status of a particular alarm),
• Field 2 displays the time of a particular alarm, and
• Field 3 displays the alarm (1, 2, or 3) the user is viewing.
Press the [+] or [-] button to select alarms 1,2, or 3. Then, change the settings in the manner described in the
following section.
2.2.1. How to Set the Daily Alarms
1.
2.
3.
4.
PRESS the [+] or the [-] button to select the desired alarm to be set (1,2, or 3).
PRESS the [Select] button and hold in for 2 seconds. Located in Field 1, the “ON” or “OFF” will begin to flash.
PRESS either the [+] or the [-] button to toggle between “ON” and “OFF”.
At the setting desired, PRESS the [Select] button to move to the next setting. Located in the center of Field 2,
the hour will begin to flash.
5. PRESS the [+] button to scroll the hour upward or
PRESS the [-] button to scroll the hour downward.
6. At the hour desired, PRESS the [Select] button to move to the next setting. Located on the right of Field 2,
the minutes will begin to flash.
7. PRESS the [+] button to scroll the minutes upward or
PRESS the [-] button to scroll the minutes downward.
8. At the minutes desired, PRESS the [Mode] button to accept the changes and exit the setup program.
A small bell will appear at the bottom left side in Field 2 to signify an alarm has been activated.
The Alarm setup is complete. To activate up to three alarms, please repeat steps 1-8 for the selected alarm
(1, 2, or 3).
Note: The Alarm volume can not be changed.
18
2.3. STOPWATCH SUB MODE
The Wristop Computer stopwatch sub mode can provide split time measurement and two finish times up to
23 hours 59 minutes and 59 seconds.
In the TIME mode, PRESS the [Select] button twice to enter this sub mode.
In the Stopwatch sub mode (Fig. 27):
• Field 1 displays the seconds and tenths of a second,
• Field 2 displays the current time, and
• Field 3 displays hours and minutes and to the far right “stopwatch”.
2.3.1. How to Use the Stopwatch
There are three timing modes the user can employ:
• an elapsed time measurement;
• a split time measurement; and
• a two finish time measurement.
In the elapsed time mode:
1. PRESS the [+] button to start, stop, and restart the stopwatch in the stopwatch sub mode.
2. PRESS the [-] button to reset the stopwatch to zero once the stopwatch has stopped.
In the split time mode:
1.
PRESS the [+] button to start the stopwatch in the stopwatch sub mode.
2.
PRESS the [-] button once to stop the stopwatch and to display a split time.
3.
PRESS the [-] button a second time to release the split time display and resume the stopwatch.
4.
PRESS the [+] button to stop the stopwatch.
5.
PRESS the [-] button to reset the stopwatch to zero once the stopwatch has stopped.
19
In the two finish time mode:
1.
PRESS the [+] button to start the stopwatch in the stopwatch sub mode.
2. PRESS the [-] button once to stop the stopwatch to display the finish time of the first person.
3.
PRESS the [+] button to stop the stopwatch.
4. PRESS the [-] button a second time to release and display the finish time of the second person.
5.
PRESS the [-] button to clear and to reset the stopwatch.
Note: When the stopwatch function is activated, the stopwatch will continue and remain in the background if
the user is in other modes or sub modes. The user can identify the stopwatch is still activated by the flashing
text “stopwatch” in Field 3.
2.4. COUNTDOWN TIMER SUB MODE
In the TIME mode, PRESS the [Select] button three times to enter this sub mode.
In the countdown timer sub mode (Fig. 28):
• Field 1 displays the seconds,
• Field 2 displays the current time, and
• Field 3 displays the hours and minutes and to the bottom far right the text “timer”.
20
2.4.1. How to Set the Countdown Timer
1. PRESS the [Select] button and hold in for 2 seconds. Located in Field 1, the seconds will begin to flash.
2. PRESS the [+] button to scroll the seconds upward or
PRESS the [-] button to scroll the seconds downward.
3. At the seconds desired, PRESS the [Select] button to move to the next setting. Located on right of Field 3,
the minutes will begin to flash.
4. PRESS the [+] button to scroll the minutes upward or
PRESS the [-] button to scroll the minutes downward.
5. At the minutes desired, PRESS the [Select] button to move to the next setting. Located in the center of
Field 3, the hour will begin to flash.
6. PRESS the [+] button to scroll the hour upward or
PRESS the [-] button to scroll the hour downward.
7. At the hour desired, PRESS the [Mode] button to accept the changes and exit the setup program.
8. The countdown timer setup is complete.
2.4.2. How to Start the Countdown Timer
To start the countdown timer:
1. PRESS the [+] button to start, stop, and restart the timer in the countdown timer sub mode.
2. PRESS the [-] button to reset the timer to zero once the timer has stopped.
Note: When the countdown timer is activated, the countdown timer will continue and remain in the background
if the user is in other modes or sub modes. The user can identify the countdown timer still activated by
the flashing text “timer” in Field 3.
2.5. DUAL TIME SUB MODE
In the TIME mode, PRESS the [Select] button four times to enter this sub mode.
21
In the dual time mode (Fig. 29):
• Field 1 displays dUA indicating “dual time”,
• Field 2 displays the current time, and
• Field 3 displays the dual time (e.g. your home time).
The user can display the seconds while in this sub mode by pressing the [+] button, in Field 3 the seconds will
appear for 10 seconds. Afterwards the display returns back to showing the dual time.
2.5.1. Setting the Dual Time
In the dual time sub mode:
1. PRESS the [Select] button and hold in for 2 seconds. Located in Field 3, the hours will begin to flash.
2. PRESS the [+] button to scroll the hours upward or
PRESS the [-] button to scroll the hours downward.
3. At the hour desired, PRESS the [Select] button to move to the next setting. Located in Field 3 to the right
of the hour value, the minutes will begin to flash.
4. PRESS the [+] button to scroll the minutes upward or
PRESS the [-] button to scroll the minutes downward.
5. At the minutes desired, PRESS the [Mode] button to accept the changes and exit the setup program.
6. The dual time setup is complete.
The dual time stays the same, even though the time in the main time mode is adjusted. For example, if you set
the dual time to show your home time, your home time will always be displayed in this sub mode even though
you travel to a different time zone and adjust the time in the main time mode.
Note: The dual time function is completely independent and does not affect the alarms or the memory functions.
These are dependent of the current local time.
22
3. ALTIMETER MODE
The Altimeter mode provides the user with:
• an adjustable unit of measure either meter or feet: meter range -500 to 9,000; ft range -1,600 to 29,500;
• a resolution of 5m or 10ft;
• a display up-date on the rate of vertical movement in intervals of 1 second for 3 minutes, then every
10 seconds or less;
• an automatic 24-hour memory in one hour intervals showing altitude and vertical ascent/descent rate; and
• a logbook, recording approximately 3800 sets of data (one set = altitude, vertical ascent/descent rate and time).
To view and use the Altimeter mode:
Check the Mode Indicator Bar. If the mode arrow is not on ALTI, PRESS the [Mode] button until the arrow is
directly below ALTI on the bar.
In the ALTIMETER mode (Fig. 1):
• Field 1 displays the vertical ascent or descent rate;
• Field 2 displays the current altitude in increments of 5 meters or 10 feet (depending on the unit of measure
selected); and
• Field 3 displays the current time.
• The Outer Circumference graphically displays the altitude in hundreds of meters or feet over a full thousand
where one complete circle is equivalent to 1000.
IMPORTANT NOTE: IN ORDER TO SET THE ALTITUDE IN THE ALTIMETER MODE, THE ALTITUDE MUST
BE KNOWN. THAT INFORMATION CAN BE FOUND BY UTILIZING A TOPOGRAPHICAL MAP, IDENTIFYING
THE CURRENT LOCATION WITH THE ASSOCIATED ALTITUDE MARKED. THE USER CAN PROCEED
AND FOLLOW THE INSTRUCTIONS, SETTING THE ALTIMETER, PROVIDED IN THE SECTION BELOW.
DETAILS REGARDING THE EFFECT OF AIR TEMPERATURE ON ALTITUDE MEASUREMENT ARE SHOWN
ON PAGE 40 OF THIS MANUAL.
IF THE ALTITUDE IS NOT KNOWN, THE USER CAN SET THE SEA LEVEL PRESSURE IN THE BAROMETRIC
MODE (REFER TO PAGE 33, SETTING THE SEA LEVEL PRESSURE).
23
SETTING THE SEA LEVEL PRESSURE WILL ADJUST THE ALTIMETER TO THE CURRENT ALTITUDE
WITHIN SOME TEN METERS OR FEW HUNDRED FEET.
INFORMATION ON THE CURRENT SEA LEVEL PRESSURE CAN BE OBTAINED THROUGH NEWSPAPERS,
LOCAL NEWS AND RADIO WEATHER REPORTS, THE LOCAL AIRPORT FACILITY OR THROUGH
THE INTERNET UNDER LOCAL WEATHER.
3.1. SETTING THE ALTIMETER
In setting the Altimeter, there are three processes that can be performed:
• the Reference Altitude (known altitude at the current location),
• the Altitude Alarm (signifies the user when a certain altitude, programmed, is reached), and
• the Logbook Recording Interval (allows the user to view the altitude and rate of vertical movement within
a chosen interval of time).
To begin:
1. PRESS the [Select] button and hold in for 2 seconds. Located in Field 1 is the text “RE” (indicating reference
altitude), located in Field 2, the current altitude will begin to flash (Fig. 2).
2. PRESS the [+] button to scroll the altitude upward or
PRESS the [-] button to scroll the altitude downwards.
3. At the desired reference altitude, either PRESS the [Mode] button to accept the changes and return to
the main mode or PRESS the [Select] button to move to the next setting. Located in Field 1, the “ON” or
“OFF”will begin to flash (Fig. 3).
4. PRESS either the [+] or the [-] button to toggle between the “ON” and “OFF” for the Altitude Alarm.
5. At the desired setting, PRESS the [Select] button to move to the next setting. Located in the center of Field
2, the alarm altitude will begin to flash.
6. PRESS the [+] button to scroll the altitude upward or
PRESS the [-] button to scroll the altitude downwards.
7. At the desired altitude, either PRESS the [Mode] button to accept the changes and return to the main mode
or PRESS the [Select] button to move to the next setting. Located in Field 1, the text INT and located in
Field 2 the time interval will begin to flash (Fig. 4).
24
8. PRESS either the [+] or the [-] button to scroll through the intervals. There are four time intervals 20 seconds,
1 minute, 10 minutes or 60 minutes.
Recommended interval to use:
Activity Interval
Skiing 20 sec or 1 minute
Biking 20 sec or 1 minute
Hiking 10 Minute
Mountaineering 10 minute or 60 minute
Note: In selecting the interval, the user chooses a) the time period for recording the altitude, the vertical ascent/
descent rate as well as the current time to be stored into the logbook and b) the timeout or maximum recording
time of a logbook. The shorter the interval the more accurate the information due to the fact the sampling rate
is faster. Timeouts are discussed on page 28.
9. At the desired interval, PRESS the [Mode] button to accept the changes and exit the setup program.
Once the user completes the process in setting the reference altitude of the current location to the known
altitude, the Wristop Computer will also correct the sea level pressure, and therefore, it will not be necessary
for this function to be set.
Note: If the user does not press any button for 1 minute in the setup mode, the display will automatically exit setup.
Note: A 10-minute recording interval means that the Wristop Computer records data every 10 minutes.
3.2. ALTITUDE DIFFERENCE MEASUREMENT SUB MODE
In the Altimeter mode, PRESS the [Select] button once to enter this sub mode.
In the Altitude Difference measurement sub mode (Fig. 9):
• Field 1 displays the vertical ascent or descent rate;
• Field 2 displays the current altitude in increments of 5 meters or 10 feet depending on the unit of measure
selected; and
• Field 3 displays the running time; to the left of the time is the text “differ”.
25
• The Outer Circumference graphically displays the altitude in hundreds of meters or feet over a full thousand
where one complete circle is equivalent to 1000.
The running time is displayed up to 39 hours and 59 minutes; after which three dashes (-:--) appear on the display
in Field 3. If the user allows the difference measurement sub mode to remain on visual display continuously for
12 hours, the Wristop Computer will automatically return to the main time mode.
This mode does continue in the background and allows the user to move to other modes and at the convenience
of the user can return to this sub mode to display the current status.
Note: The difference measurement mode is a relative measurement. Any change in the reference altitude during
the altitude difference measurement will effect the measured altitude. We recommend that the reference altitude
always be checked and set again prior to beginning a new measurement.
3.2.1. How to Start the Altitude Difference Measurement
1. PRESS the [Select] button and hold in for 2 seconds. Located in Field 1 is the text “SET”; located in Field 2,
zero will begin to flash (Fig. 10).
2. PRESS the [Mode] button to accept the flashing zero and start the difference measurement.
If the user does not desire to begin the difference measurement, PRESS either the [+] or the [-] button to toggle
to the current altitude then PRESS the [Mode] button to exit the setup program.
Note: If the user does not press any button for 1 minute in the setup mode, the display will return to the main
mode without zeroing the altimeter.
3.3. 24-HOUR MEMORY SUB MODE
In the Altimeter mode, PRESS the [Select] button twice to enter this sub mode.
In the 24-hour memory sub mode (Fig. 11):
• Field 1 displays the vertical ascent or descent rate;
• Field 2 displays the current altitude in increments of 5 meters or 10 feet depending on the unit of measure
selected; and
• Field 3 displays the particular hour and to the left the text “memory”.
26
• The Outer Circumference displays graphically the altitude in hundreds of meters or feet over a full thousand
where one complete circle is equivalent to 1000.
To view the information compiled in the 24-hr memory:
1. PRESS the [-] button to scroll back down in increments of one hour and view the vertical ascent/descent
rate and the altitude for that particular hour.
2. PRESS the [+] button to scroll back up.
Note: Replacing the battery will not erase this information.
3.4. LOGBOOK SUB MODE
In the Altimeter mode, PRESS the [Select] button three times to enter this sub mode. The logbook mode features
five displays. The displays automatically rotate showing the first display for 7 seconds then proceeds showing
displays 2 through 5 at 4 second intervals.
In the first display (Fig. 12):
• Field 1 displays the year;
• Field 2 displays the text “LO” with the current logbook number flashing; and
• Field 3 displays the month and day of the particular logbook number. To the left of the month/day, is the text
“Log Book”.
The user can PRESS the [-] to scroll down to view previous logs captured and then PRESS [+] to scroll up to
the current logbook.
The second display shows the ascent information for the particular logbook that is being viewed (Fig. 13).
• Field 1 displays the average ascent rate during the event;
• Field 2 displays the total vertical ascent ; and
• Field 3 displays the text “ASC” along with the text “Log Book” to the left.
The third display shows the descent information for the particular logbook that is being viewed (Fig. 14).
• Field 1 displays the average descent rate during the event;
• Field 2 displays the total vertical descent; and
27
• Field 3 displays the text “dSC” along with the text “Log Book” to the left.
The fourth display shows the number of laps (runs; either ascents or descents) completed for the particular
logbook that is being viewed (Fig. 15).
Field 2 displays the total number of ascents or descents ; and
Field 3 displays the text “LAP” along with the text “Log Book” to the left.
Note: A Lap is a vertical movement either ascent or descent equaling 150 ft (50 meters) or above.
The fifth display shows the time duration of recording information in the particular logbook that is being viewed
(Fig. 16).
• Field 2 displays the total time of the log ; and
• Field 3 displays the text “dUr” along with the text “Log Book” to the left.
Note: If the logbook is recording, based on the interval chosen the logbook will record up to that particular time
period. Once the time period has been reached the Wristop Computer, will alert the user that the logbook recording
has expired (known as a timeout). For setting the logbook interval refer to Setting the Altimeter on Page 24.
The timeouts are as follows:
Logbook intervals Maximum recording time
20 second 10 hours
1 minute 12 hours
10 minute 7 days
60 minute 10 days
3.4.1. How to Start and Stop a Logbook
Logbook recording starts by pressing the [+] button twice within 2 seconds. Logbook recording stops by pressing
the [+] button twice as well within 2 seconds.
Note: In order to prevent accidental starts/stops of a logbook, the Spartan should be in another function other
than the altimeter mode. If the logbook is activated the logbook will continue to recorded even if the Spartan
is in another mode.
28
Note: Logbooks are self-erasing and cannot be cleared by the user.
Note: If you desire greater precision, start new logbooks more often or lower the recording interval.
3.4.2. Fast Cumulative Button
This allows the user to check the cumulative vertical ascent/descent in feet or meters, as well as number of
runs of the current logbook while recording.
Accessing this information is performed by pressing the [-] button in any of the main modes. When activated,
three displays will automatically rotate in intervals of four seconds.
• The first display shows the accumulative vertical ascent since the beginning of the current logbook.
• The second display shows the accumulative vertical descent since the beginning of the current logbook.
• And finally, the third display shows the number of runs accomplished during the current logbook.
After the third display is shown, the Wristop Computer automatically return to the main mode in which the
user was viewing.
Note: During this process, pressing the [-] button allows the user to move on to the next of the three displays.
3.5. LOGBOOK HISTORY SUB MODE
The Logbook history shows a summation of all logs recorded.
In the Altimeter mode, PRESS the [Select] button four times to enter this sub mode. The logbook history mode
features four displays.
In the first display (Fig. 17):
• Field 1 displays the year when the logbook history has been last cleared;
• Field 2 displays the text “HIS”; and
• Field 3 displays the month and day when the logbook history has been last cleared. To the left of the month/
day, displayed is the text “Log Book”.
PRESS [+] to scroll through the different displays.
29
In the second display (Fig. 18):
• Field 1 displays the text “HI”;
• Field 2 displays the highest altitude recorded since the last date cleared; and
• Field 3 displays the date when it was reached with the text “Log Book” to the left.
In the third display (Fig. 19):
• Field 1 displays the text “ASC”;
• Field 2 and 3 show up to an 8 digit accumulative vertical ascent since the last reset. Field 2 is activated
• when the value of the vertical ascent is beyond the 3 digit value displayed in Field 3.
In the fourth display (Fig. 20):
• Field 1 displays the text “dSC”;
• Field 2 and 3 show up to an 8 digit accumulative vertical descent since the last reset. Field 2 is activated
when the value of the vertical ascent is beyond the 3 digit value displayed in Field 3.
3.5.1. Clearing the Logbook History
To clear the history of the logbook (Fig. 21):
1. In any of the logbook history displays, PRESS the [Select] button and hold in for 2 seconds. Located in
Field 1 is the text “CLR”; in Field 2 the text “HIS”; and in Field 3, “nO” will begin to flash.
2. PRESS the [+] button to toggle between “YES” and “NO”.
3. PRESS the [Mode] button to accept the option “YES”.
The logbook history is erased and a new starting date is set to begin new cumulative measurements.
Note: If the user does not press any button for 1 minute in the setup mode, the display will automatically
exit setup.
We recommend that the logbook history be cleared prior to beginning logbook recording(s).
30
4. BAROMETER MODE
The Barometer mode provides the user with:
• an adjustable unit of measure mbar or inHg; mbar range 300 to 1 100 mbar, inHg range 8.90 to 32.40;
• a resolution of 1 mbar or 0.05 inHg;
• a one hour interval measuring to estimate barometric trend;
• an automatic 4-day memory of atmospheric pressure for the last 6 hours in 1-hour intervals, thereafter, in
6-hour intervals;
• temperature compensation (temperature does not effect the pressure within the specified temperature range)
• a temperature range -20 to 60 ºC or -5 to 140 ºF; and
• a temperature resolution of 1º or ºF.
Note: Body heat will effect temperature when the Wristop Computer is worn on the wrist. To achieve an accurate
reading remove the Wristop Computer from the wrist and allow at least 15 minutes before reading the temperature.
If you’ve been in the barometric mode for more than 15 minutes with no rate of vertical movement, you should
allow 1 hour for the Wristop Computer to adjust the temperature. To acquire a quicker up-date of the temperature,
press the [Mode] button 4 times to re-enter the mode.
To view and use the Barometer mode:
Check the Mode Indicator Bar. If the mode arrow is not on BARO, PRESS the [Mode] button until the arrow is
directly below BARO on the bar.
In the Barometer mode (Fig. 5):
• Field 1 displays the current temperature.
• Field 2 displays the current absolute atmospheric pressure.
• Field 3 displays the current time.
• The Outer Circumference graphically displays the atmospheric pressure over 100 millibars or 1 inHg where
one complete circle is equivalent to 100 mbar/1 inHg, depending on the unit of measure chosen.
Note: The absolute pressure is the actual pressure in any location at any given time. Where as, sea level
pressure is the corresponding pressure at sea level.
31
4.1. PRESSURE DIFFERENCE MEASUREMENT SUB MODE
The pressure difference is not referring to the sea level pressure, but to the current barometric pressure
measured by the watch.
In the Barometer mode, PRESS the [Select] button once to enter this sub mode.
In the Pressure Difference Measurement submode (Fig. 23):
• Field 1 displays the change in temperature.
• Field 2 displays the change in atmospheric pressure.
• Field 3 displays the current time; to the left of the time is the text “differ”.
• The Outer Circumference graphically displays the change in pressure where one full circle equals 100 mbars
or 1 inHg.
This mode does continue in the background and allows the user to move to other modes and at the user’s
convenience can return to this sub mode to show the current reading.
4.1.1. How to Start the Pressure Difference Measurement
1. PRESS the [Select] button and hold in for 2 seconds. Located in Field 1 is the text “SET”; located in Field 2,
zero will begin to flash (Fig. 22).
2. PRESS the [Mode] button to accept the flashing zero and start the difference measurement.
If the user does not desire to begin the difference measurement, PRESS either the [+] or the [-] button to
toggle to the current barometric pressure reading, then PRESS the [Mode] button to exit the setup program.
Note: If the user does not press any button for 1 minute in the setup mode, the display will automatically exit setup.
4.2. 4-DAY MEMORY SUB MODE
In the Barometer mode, PRESS the [Select] button twice to enter this sub mode. This function allows the user
to follow changes in pressure that will assist forecasting changes in weather condition (i.e. storms).
In the 4-day memory sub mode (Fig. 24):
• Field 1 displays the day of the week the user is in;
32
• Field 2 displays the atmospheric pressure; and
• Field 3 displays the time and to the left the text “memory”.
• The Outer Circumference graphically displays the atmospheric pressure where one full circle equals
100 mbars or 1 inHg.
To view the information compiled in the 4-day memory:
PRESS the [-] button to scroll back down in increments of one hour for the first six hours, after that increments
are 6 hours.
PRESS the [+] button to scroll back up.
Note: Replacing the battery will not erase this information.
4.3. SEA LEVEL PRESSURE SUB MODE
Sea level pressure is pressure relative to sea level where as the pressure read in the main barometric display
is absolute pressure in the current location.
In the Barometer mode, PRESS the [Select] button three times to enter this sub mode.
In the sea level pressure sub mode (Fig. 25):
• Field 1 displays the text “SEA”;
• Field 2 displays the current sea level pressure; and
• Field 3 displays the current time.
4.3.1. Setting the Sea Level Pressure
Setting the sea level pressure can be used in setting the altitude measurement on the Wristop Computer if
the altitude is not known.
To set the sea level pressure:
1. PRESS the [Select] button and hold in for 2 seconds. Located in Field 2, the current sea level pressure
will begin to flash.
2. PRESS the [+] button to scroll the pressure upward or
PRESS the [-] button to scroll the pressure downward.
33
3. At the desired pressure, PRESS the [Mode] button to accept the changes and return to the main mode.
Once the user completes this process, the altitude measurement on the Wristop Computer is correct within
a range of some ten meters or few hundred feet.
Note: Information on the current sea level pressure can be obtained through newspapers, local news and radio
weather reports, the local airport facility or through the Internet under local weather.
If the user does not press any button for 1 minute in the setup mode, the display will automatically exit setup.
4.4. BAROMETRIC TREND INDICATOR
Located on the top left corner of the LCD display resides the Barometric Trend Indicator. This feature is
always displayed in all main modes providing the user a continual quick reference to analyze upcoming
weather conditions.
The Barometric trend is comprised of two lines forming an arrow. Each line represents a 3-hour period. The right
line represents the last 3 hours. The left line represents 3 hours prior to the last 3 hours. The line can indicate
9 different patterns in the barometric trend.
Situation 6-3 hours ago Situation last 3 hours
Dropped heavy (>2 mbars/3hours) Dropping heavy (>2 mbars/3hours)
Dropped heavy (>2 mbars/3hours) Remaining stable
Dropped heavy (>2 mbars/3hours) Rising heavy (>2 mbars/3hours)
Remained stable Dropping heavy (>2 mbars/3hours)
Remained stable Remaining stable
Remained stable Rising heavy (>2 mbars/3hours)
Risen heavy (>2 mbars/3hours) Rising heavy (>2 mbars/3hours)
Risen heavy (>2 mbars/3hours) Remaining stable
Risen heavy (>2 mbars/3hours) Dropping heavy (>2 mbars/3hours)
Note: If the user remains at the same elevation, the barometric trend indicator can work as a weather forecasting tool.
34
5. FREQUENTLY ASKED QUESTIONS
5.1. GENERAL
5.1.1. Is the Wristop Computer water resistant?
Yes, it is water resistant to a depth of 30 meters (100 ft). Rain and other normal exposure to water will not effect its
operation. You can swim wearing your Wristop Computer. However, the Wristop Computer is NOT a diving device.
5.1.2. How long will the battery last?
All users employ the product in different ways. Battery life depends mainly on how much the backlight,
the compass and the logbook are used. The low-battery warning symbol appears on the display when 5 to
15 percent of battery capacity remains. This should give the user plenty of time to safely change the battery.
The battery life expectancy is approximately 12-18 months.
5.1.3. What do the segments on the circumference mean?
In the Altimeter mode, one full circle equals 1,000 meters or 1,000 feet, therefore the segments on
the circumference graphically show the user the altitude over a full thousand. When using the difference
measurement function of the altimeter, the segments indicate the vertical difference in the elevation over a full
thousand either to the right if you’re ascending or to the left if you’re descending.
In the Barometer mode, one full circle equals 100 mbar or 1 inHg, and the segments indicate the pressure over
a full hundred mbar or over a full inHg. When using the difference measurement function of the barometer,
the segments indicate the change in atmospheric pressure either to the right if the pressure has risen or to the
left if the pressure has dropped.
5.1.4. Why do the segments on the circumference go to the left
(counterclockwise)?
Normally, they always go to the right (clockwise) from the 12-noon position.
You are in the difference measurement mode and your unit is showing a decreasing value. In normal mode,
the segment display increases clockwise, but if you are in a mode that shows you differences (such as vertical
35
ascent/descent), all decreasing values go counterclockwise from the center position, and all increasing values
go clockwise. So, it is “minus” to the left (counterclockwise), and “plus” to the right (clockwise).
5.1.5. Why are there two symbols above the Mode Indicator Bar
and what do they mean?
The left-hand symbol indicates that the altitude alarm is activated and the right-hand symbol indicates that one,
two, or three daily alarms are activated.
5.2. TIME
5.2.1. Why do the segments on the circumference increase and
decrease when I am in the Time mode?
In the Time mode, the segments show the advancement of seconds. Because the number of seconds differs
from the number of degrees, it is impossible for the segments to be consecutively lit up; they now light up or
extinguish, thereby marking the passing of every second.
5.2.2. What is the longest time I can set in the timer?
The maximum range of the countdown timer is 23 hours 59 minutes and 59 seconds.
5.3. ALTIMETER
5.3.1. How do you clear the logbook?
The logbook is self-erasing and cannot be cleared by the user.
5.3.2. How does the logbook self-erase?
The logbook is circular and will start erasing itself when all the memory places are filled. There are approx. 3,800
memory places, each of which contain the altitude as well as the ascent/descent rate at that time (according
to the chosen interval, 20 seconds, 1 minute, 10 or 60 minutes).
When all the memory places are filled, the logbook starts recording new logs on top of the oldest recordings.
This is what is meant when we say the logbook is “self-erasing”.
36
You can clear the history of the logbook; i.e. where you get the cumulative ascent and descent information
based on the logs recorded into the logbook.
5.3.3. How many logbooks can you record?
The number of logs you can record into the logbook depends on the chosen interval and the length of each
log. For example, if your interval is 1 minute, you can get a total of 3,800 minutes of logs into the logbook. This
equals 2.64 days if the recording is continuous (24 hours = 1,440 minutes; 3,800/1,440 = 2.64).
To avoid excessive battery drain, the recording is not continuous. The recording functions have certain timeouts
(i.e. the recording will be turned off automatically after a certain time). The timeouts are shorter for the faster
interval and longer for the slower interval.
5.3.4. What is the duration readout?
The duration readout tells you how many hours and/or minutes the event recorded into the logbook lasted.
For example, if you’re hiking from 1 p.m. to 6 p.m. and the logbook is on during this time, the readout would
show a duration of 05:00 hours.
5.3.5. What is the maximum capacity of total vertical ascent or
descent feet/meters in the logbook history?
The maximum figure that can be shown on the display is 29,999.999 representing feet or meters depending on
the unit of measurement set. This should be enough for most users: 29,999.999 meters is roughly threequarters
around the globe.
5.3.6. If hiking from a level of 5,000 ft down hill to 3,000 ft and
then back up to 8,000 feet, how is the Vector going to read
this or average it out?
There are several answers to this question related to different situations.
First, if you mean will Wristop Computer show accurate altitude information when ascending back to 8,000 ft
after having descended to 3,000 ft from 5,000 ft, the answer is yes if the barometric pressure hasn’t been
37
affected by weather changes. Since the altitude is shown based on the atmospheric pressure reading it will
be affected by pressure changes. But if the conditions are the same, and the reference altitude is set, the unit
will show quite accurate readings.
Second, if what you mean is how the Wristop Computer calculates the information shown in the logbook, this
is what it does: for the total ascent during the log (the logbook recording has been activated by the user when
starting out) it calculates the ascent from 3,000 ft to 8,000 ft, i.e. total ascent has been 5,000 ft. For the descent
it calculates the descent from 5,000 ft to 3,000 ft, i.e. total descent 2,000 ft.
Third, if thinking about the difference measurement function and how this is affected by the example situation,
the Wristop Computer will show you the absolute difference between 5,000 ft and 8,000 ft (beginning and end).
The fact that you’ve been down to 3,000 ft in-between does not have an impact on the absolute vertical altitude
difference between starting point and finish.
Last, the automatic 24-hour memory will show this information in the following way: Say you are starting out at
5,000 ft at noon, and then it takes you 2 hours to descend to 3,000 ft, and another five hours to reach 8,000 ft.
The scrollable displays in the 24-hour memory shows you the altitude 5,000 ft at 12:00 am, e.g. 4,000 ft at
1 p.m., 3,000 ft at 2 p.m., e.g. 4,000 ft 3 p.m., 5,000 ft at 4 p.m., 6,000 ft at 5 p.m., 7,000 ft at 6 p.m. and then
8,000 ft at 7 p.m.
These are the different cases in which the example situation will affect the readings of the Wristop Computer.
Most important to remember is to ALWAYS set the known reference altitude into the Wristop Computer. This is
the only way to get accurate altitude readings.
5.3.7. Why does the vertical ascent/descent measurement show
different readings even though I am inside and staying in
the same room?
The resolution of the vertical ascent/descent rate is 1 m/1 ft whereas the resolution of the altitude display is
5 m/10 ft, which means that the ascent/descent rate can show movement even though you remain at the same
altitude. This is caused by changes in pressure or even vertical movement within the 5 m/10 ft resolution range.
Indoors, even small, unnoticeable air currents cause changes in air pressure. For example, if you have a window
open at the other end of your house, the air current may affect a room at the other end of the building so little
38
that you do not notice it, but the sensors of the Wristop Computer do. Because the Wristop Computer measures
ascent and descent based on changes in air pressure, it interprets these changes as vertical movement.
5.4. BAROMETER
5.4.1. What is the little box on the top left of the display?
It is the barometric trend indicator that shows the general direction of weather changes. The display is based
on barometer measurements for the last 6 hours.
5.4.2. Does the Wristop Computer show future trends in weather
conditions?
No, the Wristop Computer continually accumulates data on barometric pressure existent within a 3 to 6 hour
window and displays general barometric trends in weather based on the accumulated data.
5.4.3. What does “absolute pressure” and “relative pressure”
mean?
Absolute pressure is the actual pressure in any location at any given time. Relative pressure on the other hand
equals the corresponding pressure at sea level for a certain altitude that you are at. For example, if you are
at an altitude of 1,000 m/3,300 ft the absolute pressure normally is around 900 mbar/26.60 inHg. The relative
pressure at sea level would then be around 1,013 mbar/29.90 inHg.
5.4.4. What is temperature compensation?
When the unit is temperature compensated, the altitude measurement of the unit is not affected by the temperature
of the unit itself. The unit can be worn on your wrist or placed on a table – it will in either case give you the
proper altitude reading providing the weather conditions have not changed. All Suunto Wristop Computers are
temperature compensated within the range - 5 to 140 °F / - 20 to +60 °C.
39
5.5. EFFECT OF AIR TEMPERATURE ON ALTITUDE
MEASUREMENT
The atmospheric pressure means the weight of air mass above the observer: at a higher altitude there is
less air than at a lower altitude. The principle of an altimeter is to measure the different air pressure between
different altitudes.
The air weight is affected by the outside temperature. Consequently the air pressure difference between two
altitudes is also dependant on temperature.
The altitude calculation of Wristop Computer is based on the air pressure at certain normal temperatures. Each
altitude has a definitive normal temperature. The normal temperatures at each altitude are presented in table 1.
Altitude (m)
Altitude (ft)
above sea level
above sea level
40
Temperature (ºC)
Temperature (ºF)
0
0
15.0
59.0
200
656
13.7
56.7
400
1312
12.4
54.3
600
1969
11.1
52.0
800
2625
9.8
49.6
1000
3281
8.5
47.3
1200
3937
7.2
45.0
1400
4593
5.9
42.6
1600
5250
4.6
40.3
1800
5906
3.3
37.9
Altitude (m)
Altitude (ft)
above sea level
above sea level
Temperature (ºC)
Temperature (ºF)
2000
6562
2.0
35.6
2400
7874
-0.6
30.9
2800
9187
-3.2
26.2
3000
9843
-4.5
23.9
3400
11155
-7.1
19.2
3800
12468
-9.7
14.5
4000
13124
-11.0
12.2
4500
14765
-14.3
6.4
5000
16405
-17.5
0.5
5500
18046
-20.8
-5.4
6000
19686
-24.0
-11.2
Table 1. Normal temperatures corresponding to different altitudes
Now the altitude measurement error caused by an abnormal temperature gradient can be approximated as
follows. If the sum of the temperature offsets from the normal temperatures determined at two different
altitudes is 1 ºC, the altitude difference calculated by Wristop Computer is 0.2% off the real altitude
difference (When using imperial units the offset factor is 0.11% / 1 ºF). This is because the real temperatures
are not always the same as the normal temperatures. A higher than normal temperature causes the calculated
altitude difference to be smaller than the real altitude difference (your mountain ascent was actually higher).
Consequently, a lower than normal temperature causes the calculated altitude difference to be larger than the
real altitude difference (you did not ascend quite as high as displayed).
41
Table 2 shows an example in which the temperature offsets are positive. In this example, the reference altitude
is set at 1000 m. At 3000 m the altitude difference is 2000 m and Wristop Computer shows 80 m too little
(20 ºC * 2000 m * 0.002/ºC = 80 m). Your actual altitude is thus 3080 m.
Lower point
Set reference altitude (real altitude)
Higher point
1000 m
Displayed altitude
3000 m
Real outside temperature
+17.5 ºC
+6.5 ºC
Normal (table) temperature
+8.5 ºC
-4.5 ºC
Temperature offset (= real - normal)
+9 ºC
+11 ºC
Sum of temperature offsets
+9 ºC + +11 ºC = 20 ºC
Table 2. Example using meters and Celsius.
Table 3 shows an example in which the temperature offsets are negative This time imperial units are used.
The reference altitude is set at 3280 feet. At 9840 feet the altitude difference is 6560 feet and Wristop Computer
shows 100 feet too much (-14 ºF * 6560 ft * 0.0011/ºF = -100 ft). Your actual altitude is thus 9740 ft.
Lower point
Set reference altitude (real altitude)
Higher point
3280 ft
Displayed altitude
9840 ft
Real outside temperature
+36.3 ºF
+18.9 ºF
Normal (table) temperature
+47.3 ºF
+23.9 ºF
Temperature difference (= real - normal)
-9 ºF
-5 ºF
Sum of temperature offsets
-9 ºF + -5 ºF = -14 ºF
Table 3. Example using feet and Fahrenheit.
42
6. ABBREVIATIONS
dEF - default factory setting of pressure sensor,
corresponds to standard (1013 mbar or
29,90 inHg) airpressure at sea level
SNR - sensor (used in sensor calibration)
dSC - descent
RE - reference altitude
dUA - dual time
CLR - clear
dUR - duration
bEG - begin
HIS - history
ASC - ascent
7. Technical specifications
Operating temperature: -20° C ... +60° C / -4° F ... +140° F
Storage temperature: -30° C ... +60° C / -22° F ... +140° F
Dimensions: 49 x 49 x 17 mm / 1.9” x 1.9” x 0.7”
Weight: 65 g / 2.3 oz
Water resistance (device): 30 m / 100 ft (ISO 22810)
User replaceable battery: 3V DL2430
Battery life: ~ 1 year in normal use
NOTE: Water resistance is not equivalent to functional operating depth.
FCC
This device complies with Part 15 of the FCC Rules. Operation is subject to the following two conditions: (1) this
device may not cause harmful interference, and (2) this device must accept any interference received, including
interference that may cause undesired operation. This product has been tested to comply with FCC standards
and is intended for home or office use. FCC WARNING: Changes or modifications not expressly approved by
Suunto could void your authority to operate this device under FCC regulations.
43
CE
The CE mark is used to mark conformity with the European Union EMC directive 2004/108/EC.
8. Suunto limited warranty
Suunto warrants that during the Warranty Period Suunto or a Suunto Authorized Service Center (hereinafter
Service Center) will, at its sole discretion, remedy defects in materials or workmanship free of charge either by
a) repairing, or b) replacing, or c) refunding, subject to the terms and conditions of this Limited Warranty. This
Limited Warranty is only valid and enforceable in the country of purchase, unless local law stipulates otherwise.
Warranty Period
The Limited Warranty Period starts at the date of original retail purchase. The Warranty Period is two (2) years
for display devices. The Warranty Period is one (1) year for accessories including but not limited to PODs and
heart rate transmitters, as well as for all consumable parts.
Exclusions and Limitations
This Limited Warranty does not cover:
1. a) normal wear and tear, b) defects caused by rough handling, or c) defects or damage caused by misuse
contrary to intended or recommended use;
2. user manuals or any third-party items;
3. defects or alleged defects caused by the use with any product, accessory, software and/or service not
manufactured or supplied by Suunto.
4. replaceable batteries.
This Limited Warranty is not enforceable if item:
5. has been opened beyond intended use;
6. has been repaired using unauthorized spare parts; modified or repaired by unauthorized Service Center;
7. serial number has been removed, altered or made illegible in any way, as determined at the sole discretion
of Suunto;
8. has been exposed to chemicals including but not limited to mosquito repellents.Suunto does not warrant
44
that the operation of the Product will be uninterrupted or error free, or that the Product will work with any
hardware or software provided by a third party.
Access to Suunto warranty service
You must have proof of purchase to access Suunto warranty service. For instructions how to obtain warranty
service, visit www.suunto.com/warranty, contact your local authorized Suunto retailer, or call Suunto
Contact Center.
Limitation of Liability
To the maximum extent permitted by applicable mandatory laws, this Limited Warranty is your sole and exclusive
remedy and is in lieu of all other warranties, expressed or implied. Suunto shall not be liable for special,
incidental, punitive or consequential damages, including but not limited to loss of anticipated benefits, loss of
data, loss of use, cost of capital, cost of any substitute equipment or facilities, claims of third parties, damage
to property resulting from the purchase or use of the item or arising from breach of the warranty, breach of
contract, negligence, strict tort, or any legal or equitable theory, even if Suunto knew of the likelihood of such
damages. Suunto shall not be liable for delay in rendering warranty service.
© Suunto Oy 12/2012. All Rights reserved. Subject to change without notice. Suunto is a registered trademark
of Suunto Oy.
9. DISPOSAL OF THE DEVICE
Please dispose of the device in an appropriate way, treating it as electronic waste. Do not throw it in the garbage.
If you wish, you may return the device to your nearest Suunto representative.
45
SUUNTO CUSTOMER SUPPORT
www.suunto.com/support
www.suunto.com/mysuunto
INTERNATIONAL
AUSTRALIA
AUSTRIA
CANADA
FINLAND
FRANCE
GERMANY
ITALY
JAPAN
NETHERLANDS
RUSSIA
SPAIN
SWEDEN
SWITZERLAND
UNITED KINGDOM
USA
+358 2 284 1160
1-800-240498 (toll free)
0720883104
1-800-267-7506 (toll free)
02 284 1160
0481680926
08938038778
0294751965
03 6831 2715
0107137269
4999187148
911143175
0850685486
0445809988
02036080534
1-855-258-0900 (toll free)
www.suunto.com
© Suunto Oy 12 /2 012
Suunto is a registered trademark of Suunto Oy.
All Rights reserved.