1
INSTALLATION INSTRUCTIONS
Before Using Your Appliance
•
•
•
Remove the exterior and interior packing materials.
Before connecting the appliance to the power source, let it stand upright for a minimum of 24 hours.
This will reduce the possibility of a malfunction in the cooling system from improper handling during
transportation.
Clean the interior surface with lukewarm water using a soft cloth.
Free-Standing Installation
•
•
•
•
•
This appliance is designed to be installed built-in or free standing.
Locate the appliance away from direct sunlight and sources of heat (stove, heater, radiator, etc.).
Direct sunlight may affect the acrylic coating and heat sources may increase electrical consumption.
Ambient temperature below 68°F (20°C) or above 90°F (32°C) will hinder the performance of this
appliance. This unit is not designed for use in a garage or any other outside installation.
Avoid locating the appliance in moist areas.
Plug the appliance into dedicated, properly installed-grounded wall outlet. Do not under any
circumstances cut or remove the third (ground) prong from the power cord. Any questions concerning
power and/or grounding should be directed toward a certified electrician or an authorized service
center. This unit is not designed to be installed in an RV or used with an inverter.
After plugging the appliance into a wall outlet, allow the unit to cool down for 3 ~ 4 hours before
placing beer cans in the appliance.
Built-In Installation
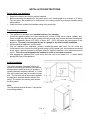
The cutout dimension illustrated in figure (A)
allows for door swing and access to the pull-out
shelves when installed as a built-in appliance. If
installing between frameless cabinets, a ½” wide
filler strip or side panel may be needed on hinge
side. The filler strip will act as a spacer between
the appliance case and adjacent cabinet door
swing. The width of the opening must include
the filter panels.
15-3/5”Min
Note:
The door should protrude at least 1” beyond the
surrounding cabinets.
Fig. A
6