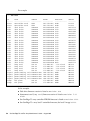
1
Sun StorEdge™ T3 and T3+ Array
Administrator’s Guide
Sun Microsystems, Inc.
901 San Antonio Road
Palo Alto, CA 94303-4900 U.S.A.
650-960-1300
Part No. 816-0776-10
August 2001, Revision A
Send comments about this document to: [email protected]
Copyright 2001 Sun Microsystems, Inc., 901 San Antonio Road, Palo Alto, CA 94303-4900 U.S.A. All rights reserved.
This product or document is distributed under licenses restricting its use, copying, distribution, and decompilation. No part of this product or
document may be reproduced in any form by any means without prior written authorization of Sun and its licensors, if any. Third-party
software, including font technology, is copyrighted and licensed from Sun suppliers.
Parts of the product may be derived from Berkeley BSD systems, licensed from the University of California. UNIX is a registered trademark in
the U.S. and other countries, exclusively licensed through X/Open Company, Ltd.
Sun, Sun Microsystems, the Sun logo, AnswerBook2, docs.sun.com, Sun StorEdge, SunSolve, SunService, StorTools, and Solaris are trademarks,
registered trademarks, or service marks of Sun Microsystems, Inc. in the U.S. and other countries. All SPARC trademarks are used under license
and are trademarks or registered trademarks of SPARC International, Inc. in the U.S. and other countries. Products bearing SPARC trademarks
are based upon an architecture developed by Sun Microsystems, Inc.
The OPEN LOOK and Sun™ Graphical User Interface was developed by Sun Microsystems, Inc. for its users and licensees. Sun acknowledges
the pioneering efforts of Xerox in researching and developing the concept of visual or graphical user interfaces for the computer industry. Sun
holds a non-exclusive license from Xerox to the Xerox Graphical User Interface, which license also covers Sun’s licensees who implement OPEN
LOOK GUIs and otherwise comply with Sun’s written license agreements.
Federal Acquisitions: Commercial Software—Government Users Subject to Standard License Terms and Conditions.
DOCUMENTATION IS PROVIDED “AS IS” AND ALL EXPRESS OR IMPLIED CONDITIONS, REPRESENTATIONS AND WARRANTIES,
INCLUDING ANY IMPLIED WARRANTY OF MERCHANTABILITY, FITNESS FOR A PARTICULAR PURPOSE OR NON-INFRINGEMENT,
ARE DISCLAIMED, EXCEPT TO THE EXTENT THAT SUCH DISCLAIMERS ARE HELD TO BE LEGALLY INVALID.
Copyright 2001 Sun Microsystems, Inc., 901 San Antonio Road, Palo Alto, CA 94303-4900 Etats-Unis. Tous droits réservés.
Ce produit ou document est distribué avec des licences qui en restreignent l’utilisation, la copie, la distribution, et la décompilation. Aucune
partie de ce produit ou document ne peut être reproduite sous aucune forme, par quelque moyen que ce soit, sans l’autorisation préalable et
écrite de Sun et de ses bailleurs de licence, s’il y en a. Le logiciel détenu par des tiers, et qui comprend la technologie relative aux polices de
caractères, est protégé par un copyright et licencié par des fournisseurs de Sun.
Des parties de ce produit pourront être dérivées des systèmes Berkeley BSD licenciés par l’Université de Californie. UNIX est une marque
déposée aux Etats-Unis et dans d’autres pays et licenciée exclusivement par X/Open Company, Ltd.
Sun, Sun Microsystems, le logo Sun, AnswerBook2, docs.sun.com, Sun StorEdge, SunSolve, SunService, StorTools, et Solaris sont des marques
de fabrique ou des marques déposées, ou marques de service, de Sun Microsystems, Inc. aux Etats-Unis et dans d’autres pays. Toutes les
marques SPARC sont utilisées sous licence et sont des marques de fabrique ou des marques déposées de SPARC International, Inc. aux EtatsUnis et dans d’autres pays. Les produits portant les marques SPARC sont basés sur une architecture développée par Sun Microsystems, Inc.
L’interface d’utilisation graphique OPEN LOOK et Sun™ a été développée par Sun Microsystems, Inc. pour ses utilisateurs et licenciés. Sun
reconnaît les efforts de pionniers de Xerox pour la recherche et le développement du concept des interfaces d’utilisation visuelle ou graphique
pour l’industrie de l’informatique. Sun détient une licence non exclusive de Xerox sur l’interface d’utilisation graphique Xerox, cette licence
couvrant également les licenciés de Sun qui mettent en place l’interface d’utilisation graphique OPEN LOOK et qui en outre se conforment aux
licences écrites de Sun.
LA DOCUMENTATION EST FOURNIE “EN L’ETAT” ET TOUTES AUTRES CONDITIONS, DECLARATIONS ET GARANTIES EXPRESSES
OU TACITES SONT FORMELLEMENT EXCLUES, DANS LA MESURE AUTORISEE PAR LA LOI APPLICABLE, Y COMPRIS NOTAMMENT
TOUTE GARANTIE IMPLICITE RELATIVE A LA QUALITE MARCHANDE, A L’APTITUDE A UNE UTILISATION PARTICULIERE OU A
L’ABSENCE DE CONTREFAÇON.
Please
Recycle
Contents
Preface
1.
2.
3.
ix
Array Administration Overview
1-1
1.1
Displaying Commands
1-2
1.2
Displaying Command Syntax
1.3
FRU Identifiers
1-2
1-3
Changing Global Parameters
2-1
2.1
Setting Cache Block Size
2.2
Enabling Partner Group Multipathing
2.3
Setting the Cache Mode
2.4
Enabling Mirrored Cache
2.5
Setting the LUN Reconstruction Rate
2.6
Performing Volume Verification
2.7
Setting Cache Read-Ahead Threshold
2.8
Setting the IP Address
Reconfiguring a Volume
2-2
2-4
2-4
2-5
2-6
2-7
2-8
2-9
3-1
3.1
Reconfiguration Limitations
3-1
3.2
Deleting a Logical Volume
3-2
3.3
Creating a Logical Volume
3-3
Contents
iii
3.4
4.
4-1
4.1
4-1
4.3
iv
3-6
Monitoring the Array
4.2
5.
Volume Labeling
Checking Status
4.1.1
Determining Failover
4-2
4.1.2
Checking Drive Status
4.1.3
Checking the Hot Spare
4.1.4
Checking Data Parity
4-4
4.1.5
Checking the Battery
4-5
4.1.6
Displaying FRU Information
4.1.7
Checking FRU Status
4-3
4-3
4-6
4-7
Configuring the Array for Remote System Logging
4-10
4.2.1
Transferring the Array Files to the Management Host
4.2.2
Editing the Array /etc/syslog.conf File
4.2.3
Editing the Array /etc/hosts File
4.2.4
Transferring the Files Back to the Array
4.2.5
Editing the Management Host /etc/syslog.conf File
4-13
4-14
Configuring the Array for SNMP Notification
4-15
Transferring the Array Files to the Management Host
4.3.2
Editing the Array /etc/syslog.conf File
4.3.3
Editing the Array /etc/hosts File
4.3.4
Transferring the Files Back to the Array
4-20
4-22
4-23
5-1
5.1
Identifying FRU Failures
5.2
Replacing FRUs
5-1
5-6
5.2.1
Verifying the FRU Firmware Level
5.2.2
Installing the Replacement FRU
5-6
5-9
5.2.2.1
Rebuilding a Replaced Drive FRU
5.2.2.2
Controller Card
5.2.2.3
Power and Cooling Unit
5-11
Sun StorEdge T3 and T3+ Array Administrator’s Guide • August 2001
4-16
4-18
4.3.1
Troubleshooting the Array
4-11
5-11
5-9
4-18
5.2.3
5.2.2.4
Interconnect Card
5-11
5.2.2.5
Chassis and Centerplane
Verifying the FRU Replacement
5.3
Identifying Miscabled Partner Groups
5.4
Identifying Data Channel Failures
A. Command Descriptions
Commands List
A-1
A.2
FRU Identifiers
A-3
A.3
Command Summaries
boot
A.3.2
disable
A.3.3
disk
A.3.4
enable
A.3.5
ep
A.3.6
fru
A.3.7
help
A.3.8
id
A.3.9
logger
5-14
5-18
A-3
A-4
A-5
A-5
A-6
A-6
A-7
A-8
A-8
A.3.10 lpc
A-9
A-10
A.3.11 ofdg
A-11
A.3.12 port
A-12
A.3.13 proc
A-13
A.3.14 refresh
A.3.15 reset
A.3.16 set
5-12
A-1
A.1
A.3.1
5-12
A-14
A-15
A-15
A.3.17 shutdown
A.3.18 sys
A-18
A.3.19 ver
A-19
A.3.20 vol
A-19
A-17
Contents
v
B. syslog Error Messages
B.1
Error Message Syntax
B-1
B.1.1
Message Types
B-2
B.1.2
FRU Identifiers
B-2
B.1.3
Error Message Listing
B.1.4
Warning Message Listing
B.2
Reset Log Types
B.3
Command-Line Error Messages
B.4
B-3
B-6
B-16
B-17
B.3.1
RAID Errors and Other Common Errors
B.3.2
Port Errors
B.3.3
Interconnect Card and Other FRU Errors
B.3.4
Other Errors
Examples
Error
B.4.2
Warning
B.4.3
Notice
B-18
B-22
B-25
B-26
B.4.1
Glossary
vi
B-1
B-26
B-27
B-30
Glossary-1
Sun StorEdge T3 and T3+ Array Administrator’s Guide • August 2001
B-23
Tables
TABLE 1-1
FRU Identifiers 1-3
TABLE 3-1
Volume Configuration Examples
TABLE 4-1
Drive Status Messages
TABLE 4-2
Possible FRU States and Definitions 4-8
TABLE 4-3
Message Categories
4-13
TABLE 4-4
Message Categories
4-21
TABLE A-1
Commands Listed in Alphabetical Order
TABLE A-2
FRU Identifiers A-3
TABLE A-3
boot Command Summary A-4
TABLE A-4
disable Command Summary A-5
TABLE A-5
disk Command Summary A-5
TABLE A-6
enable Command Summary A-6
TABLE A-7
ep Command Summary A-6
TABLE A-8
fru Command Summary A-7
TABLE A-9
help Command Summary A-8
TABLE A-10
id Command Summary A-8
TABLE A-11
logger Command Summary A-9
TABLE A-12
lpc Command Summary A-10
TABLE A-13
ofdg (Offline Diagnostics) Command Summary A-11
TABLE A-14
port Command Summary A-12
3-3
4-3
A-2
vii
TABLE A-15
proc Command Summary A-13
TABLE A-16
refresh Command Summary A-14
TABLE A-17
reset Command Summary A-15
TABLE A-18
set Command Summary A-15
TABLE A-19
shutdown Command Summary A-17
TABLE A-20
sys Command Summary A-18
TABLE A-21
ver Command Summary A-19
TABLE A-22
vol Command Summary
TABLE B-1
Message Types B-2
TABLE B-2
FRU Identifiers B-2
TABLE B-3
Error Messages B-3
TABLE B-4
Warning Messages B-6
TABLE B-5
Reset Log Types B-16
TABLE B-6
Error Message Types B-17
TABLE B-7
Volume-Related (VN) Errors
TABLE B-8
Port Errors
TABLE B-9
Unit-Related Errors (Interconnect Card and Other FRUs) B-23
TABLE B-10
Embedded Operating System and Driver Errors B-25
viii Book Title • Month 2000
A-19
B-18
B-22
Preface
The Sun StorEdge T3 and T3+ Array Administrator’s Guide describes configuring,
monitoring, and troubleshooting Sun StorEdge™ T3 and T3+ arrays using the
command-line interface (CLI). It provides information on commands that are specific
to the array, but it is not intended as a reference for general operating system
commands.
This guide is designed for use with the Sun StorEdge T3 and T3+ Array Installation,
Operation, and Service Manual and is written for an experienced system administrator
of the Solaris™ operating environment and related disk storage systems.
Before You Read This Book
Read the Sun StorEdge T3 and T3+ Array Installation, Operation, and Service Manual to
install the array.
How This Book Is Organized
Chapter 1 provides an overview of this book.
Chapter 2 describes how to modify array parameters using the CLI.
Chapter 3 provides information for reconfiguring a volume using the CLI.
Chapter 4 describes the commands you can use to check the health and status of the
array, and provides procedures for configuring remote monitoring.
ix
Chapter 5 describes how to use the CLI to troubleshoot array problems.
Appendix A lists supported Sun StorEdge T3 and T3+ array CLI commands with
descriptions of command options.
Appendix B contains information on error messages that can be viewed using the
CLI.
Glossary contains definitions of terms used in this document.
Using UNIX Commands
This document contains some information on basic UNIX® commands and
procedures such as booting the devices. For further information, see one or more of
the following:
■
AnswerBook2™ online documentation for the Solaris™ software environment
■
Other software documentation that you received with your system
Typographic Conventions
x
Typeface
Meaning
Examples
AaBbCc123
The names of commands, files,
and directories; on-screen
computer output
Edit your.login file.
Use ls -a to list all files.
% You have mail.
AaBbCc123
What you type, when
contrasted with on-screen
computer output
% su
Password:
AaBbCc123
Book titles, new words or terms,
words to be emphasized
Read Chapter 6 in the User’s Guide.
These are called class options.
You must be superuser to do this.
Command-line variable; replace
with a real name or value
To delete a file, type rm filename.
Sun StorEdge T3 Array Administrator’s Guide • August 2001
Shell Prompts
Shell
Prompt
C shell
machine_name%
C shell superuser
machine_name#
Bourne shell and Korn shell
$
Bourne shell and Korn shell superuser
#
Sun StorEdge T3 and T3+ array
:/:
Related Documentation
Application
Title
Part Number
Installation overview
Sun StorEdge T3 and T3+ Array Start Here
816-0772
Safety procedures
Sun StorEdge T3 and T3+ Array Regulatory
and Safety Compliance Manual
816-0774
Site preparation
Sun StorEdge T3 and T3+ Array Site
Preparation Guide
816-0778
Configuration
Sun StorEdge T3 and T3+ Array
Configuration Guide
816-0777
Installation and Service
Sun StorEdge T3 and T3+ Array Installation,
Operation, and Service Manual
816-0773
Cabinet installation
Sun StorEdge T3 Array Cabinet Installation
Guide
806-7979
Latest array updates
Sun StorEdge T3 and T3+ Array Release
Notes
816-1983
Disk drive specifications
18 Gbyte 10K rpm Disk Drive Specifications
806-1493
36 Gbyte, 10K rpm Disk Drive Specifications
806-6383
73 Gbyte, 10K rpm Disk Drive Specifications
806-4800
Sun StorEdge Component Manager
Installation Guide - Solaris
806-6645
Sun StorEdge Component
Manager installation
Preface
xi
Application
Title
Part Number
Sun StorEdge Component Manager
Installation Guide - NT
806-6646
Using Sun StorEdge
Component Manager
Sun StorEdge Component Manager User’s
Guide
806-6647
Latest Sun StorEdge
Component Manager
updates
Sun StorEdge Component Manager Release
Notes
806-6648
Accessing Sun Documentation Online
You can find the Sun StorEdge T3 and T3+ array documentation and other select
product documentation for Network Storage Solutions at:
http://www.sun.com/products-n-solutions/hardware/docs/
Network_Storage_Solutions
Sun Welcomes Your Comments
Sun is interested in improving its documentation and welcomes your comments and
suggestions. You can email your comments to Sun at:
[email protected]
Please include the part number (816-0776-10) of your document in the subject line of
your email.
xii
Sun StorEdge T3 Array Administrator’s Guide • August 2001
CHAPTER
1
Array Administration Overview
This book provides information on using the command-line interface (CLI) of the
Sun StorEdge T3 and T3+ array for administrative tasks. Each chapter contains a list
of the CLI commands as they pertain to performing various tasks related to
configuring, monitoring or troubleshooting an array.
Note – Throughout this book, the terms logical volume, LUNs (logical units), and
disks are used interchangeably.
This chapter is organized as follows:
■
■
■
“Displaying Commands” on page 1-2
“Displaying Command Syntax” on page 1-2
“FRU Identifiers” on page 1-3
1-1
1.1
Displaying Commands
● To view the available commands on the array, type help at the prompt.
:/: help
arp
cat
help
ls
tail
touch
boot
disable
more
passwd
sync
sys
ofdg
cd
mkdir
cmp
mv
cp
ping
date
pwd
echo
rm
head
rmdir
disk
port
tzset
enable
proc
ver
fru
reset
vol
id
set
ep
logger lpc
shutdown
refresh route
Note – Because this book is not a reference manual for the operating system, not all
of the commands displayed are discussed in this book, such as common UNIX
commands. See Appendix A for detail on commands specific to the array.
1.2
Displaying Command Syntax
You can type command-name help on the array to display the syntax of a command.
For example:
● To view the syntax of the sys command, type sys help.
:/: sys help
usage: sys list
sys stat
sys blocksize <16k | 32k | 64k>
sys cache <auto | writebehind | writethrough | off>
sys mirror <auto | off>
sys mp_support <none | rw>
sys rd_ahead <on | off>
sys recon_rate <high | med | low>
1-2
Sun StorEdge T3 and T3+ Array Administrator’s Guide • August 2001
1.3
FRU Identifiers
Many commands use a field-replaceable unit (FRU) identifier to refer to a particular
FRU in an array. This identifier contains a unit constant (u), sometimes referred to
as the enclosure; the unit number (n); the FRU constant (ctr for controller card, pcu
for power and cooling unit, l for interconnect card, d for disk drive); and the FRU
number (n).
TABLE 1-1
FRU Identifiers
FRU
Identifier
Unit number
Controller card
unctr
n = unit number (1, 2, ...)
Power and cooling unit
unpcun
n = unit number (1, 2, ...)
n = pcu number (1, 2)
Interconnect card
unln
n = unit number (1, 2, ...)
n = interconnect card number (1, 2)
Disk drive
undn
n = unit number (1, 2, ...)
n = disk drive number (1, 2, ... 9)
Chapter 1
Array Administration Overview
1-3
1-4
Sun StorEdge T3 and T3+ Array Administrator’s Guide • August 2001
CHAPTER
2
Changing Global Parameters
This chapter contains information on modifying array settings within an
administrative domain. An administrative domain can be either a single array
controller unit (workgroup configuration) or a partner group (enterprise
configuration) that shares common administration through a master controller.
Changing these settings will enable you to configure your array to suit your
application and recovery needs.
Note – Cache segment size must be set before volumes are created. Thereafter,
volumes must be removed before the cache segment block size can be changed.
This chapter contains the following sections:
■
■
■
■
■
■
■
“Setting Cache Block Size” on page 2-2
“Enabling Partner Group Multipathing” on page 2-4
“Setting the Cache Mode” on page 2-4
“Enabling Mirrored Cache” on page 2-5
“Setting the LUN Reconstruction Rate” on page 2-6
“Performing Volume Verification” on page 2-7
“Setting Cache Read-Ahead Threshold” on page 2-8
2-1
2.1
Setting Cache Block Size
Caution – Changing the cache segment block size requires that you delete the
existing volume; deleting a volume will destroy your data. Back up all data before
beginning this procedure.
The data block size is the amount of data written to each drive when striping data
across drives. (The block size is also known as the stripe unit size.) The block size
can be changed only when there are no volumes defined. The block size can be
configured as 16 Kbytes, 32 Kbytes, or 64 Kbytes. The default block size is 64 Kbytes.
A cache segment is the amount of data being read into cache. A cache segment is
1/8 of a data block. Therefore, cache segments can be 2 Kbytes, 4 Kbytes, or
8 Kbytes. Because the default block size is 64 Kbytes, the default cache segment size
is 8 Kbytes.
Cache block size is universal throughout an administrative domain. Therefore, you
cannot change it after you have created a volume. The only way to change it is to
delete a volume, change the block size, and then create a new volume as follows:
1. From the array, delete the existing volume as follows:
:/: vol list
volume
capacity
raid
v0
143.2 GB
5
:/: vol unmount volume-name
data
u1d1-9
:/: vol remove volume-name
2-2
Sun StorEdge T3 and T3+ Array Administrator’s Guide • August 2001
standby
none
2. Type sys list to determine the current cache segment size in blocks.
Cache segment size is shown as blocksize.
:/: sys list
blocksize
cache
mirror
mp_support
naca
rd_ahead
recon_rate
sys memsize
cache memsize
:
:
:
:
:
:
:
:
:
64k
auto
auto
none
off
on
med
128 MBytes
1024 MBytes
3. Specify and confirm the blocksize using the sys command.
a. Type sys blocksize n to change the blocksize, where n = 16k, 32k, or 64k.
b. Type sys list to display the revised blocksize.
For example:
:/: sys blocksize 16k
:/: sys list
blocksize
: 16k
cache
: auto
mirror
: auto
mp_support
: rw
naca
: off
rd_ahead
: on
recon_rate
: med
sys memsize
: 128 MBytes
cache memsize
: 1024 MBytes
Chapter 2
Changing Global Parameters
2-3
2.2
Enabling Partner Group Multipathing
This task applies only when two controller units are configured as a partner group.
For Alternate Pathing software to function properly, you must enable multipathing
support on the array for enterprise configurations.
● On the array, enable multipathing support by typing:
:/: sys mp_support rw
Note – If you are using Sun StorEdge Traffic Manager software for your
multipathing software, type sys mp_support mpxio to select the correct array
setting to support this software.
Refer to the Sun StorEdge T3 and T3+ Array Installation, Operation, and Service Manual
for more information on Alternate Pathing.
2.3
Setting the Cache Mode
Write caching improves performance for applications because the data is being
written to fast memory as opposed to slower disk storage devices. The cache is
protected with redundant battery systems that ensure data will be written to disk in
the event of an AC power loss.
There are four possible cache mode options:
■
■
■
■
Auto
Write-behind
Write-through
Off
The default cache setting on the Sun StorEdge T3 and T3+ array is auto, which
enables write-behind caching as long as there are no FRU failures. For more
information about these settings, refer to Chapter 3 in the Sun StorEdge T3 and T3+
Array Installation, Operation, and Service Manual.
2-4
Sun StorEdge T3 and T3+ Array Administrator’s Guide • August 2001
● To change the cache mode, type sys cache cache-mode.
For example, if you are setting the cache mode to write-behind, type:
:/: sys cache writebehind
Caution – Data loss can occur in the write-behind cache mode if the units are not a
fully redundant enterprise configuration and an array system failure occurs. Use the
auto cache mode for the highest degree of data protection.
Tip – You can view the cache status by typing vol mode.
2.4
Enabling Mirrored Cache
Mirrored cache can safeguard cached data when a controller fails in an enterprise
configuration. When enabled, cache data is copied to a cache mirror segment on the
alternate controller before the write is acknowledged to the host.
Note – There will be a performance impact when cache mirroring is enabled. This
overhead is caused by the data being written to two separate controller caches.
● To enable mirrored caching, type:
:/: sys mirror auto
Note – The auto setting enables cache mirroring only when array health and
conditions are optimal.
Chapter 2
Changing Global Parameters
2-5
2.5
Setting the LUN Reconstruction Rate
You can configure the LUN reconstruction rate to meet your requirements so as not
to impact application performance. Reconstruction rate options are high, medium,
and low.
Note – You cannot change the reconstruction rate while disk drive reconstruction is
in progress.
1. Use the sys list command to check the current reconstruction rate
(recon_rate).
:/: sys list
blocksize
cache
mirror
mp_support
naca
rd_ahead
recon_rate
sys memsize
cache memsize
:
:
:
:
:
:
:
:
:
16k
auto
auto
rw
off
on
med
128 MBytes
1024 MBytes
2. Use the sys command to specify and confirm the reconstruction rate.
a. Type sys recon_rate [high|med|low] to change the reconstruction rate.
b. Type sys list to display the revised rate.
For example:
:/: sys recon_rate
:/: sys list
blocksize
cache
mirror
mp_support
naca
rd_ahead
recon_rate
sys memsize
cache memsize
2-6
low
:
:
:
:
:
:
:
:
:
16k
auto
auto
rw
off
on
low
128 MBytes
1024 MBytes
Sun StorEdge T3 and T3+ Array Administrator’s Guide • August 2001
2.6
Performing Volume Verification
The vol verify command enables array administrators to execute manual parity
checks on existing volumes. Parity checking applies only to RAID 1 and RAID 5
volumes. Check data parity using the vol verify command before performing
tape-backup overwrite cycles, approximately once every 30 days.
Caution – Ensure that system health is in optimal condition before running the vol
verify command. For example, ensure that no LUNs are under reconstruction; the
status of all disks is zero, which can be checked using the vol stat command; and
other similar conditions are resolved before performing this procedure.
Caution – It can take up to several hours for the vol verify operation to run,
depending on system activity and the verification rate selected. Execution of this
command will affect system performance depending on these factors.
● Use the vol verify command to set parity check rate.
:/: vol verify volume-name [fix] rate n
where:
■
volume-name is the name of the volume to verify.
Note – The volume name is a name internal to the array and is not seen by the host.
■
The [fix] option corrects parity errors on RAID 5 volumes and corrects mirrored
data errors on RAID 1 volumes. If fix is not specified, then vol verify will
report errors, but not correct them. If the fix option is specified and an error is
detected, the vol verify command will regenerate parity from the existing data
on the volume.
■
The verification rate is n, where n equals any number from 1 to 8. The default rate
is 1, which has the minimum performance impact on the data host.
Note – Within an enterprise configuration, the vol verify command can only be
run on one volume at a time.
Chapter 2
Changing Global Parameters
2-7
2.7
Setting Cache Read-Ahead Threshold
Setting read caching can reduce disk I/O by reading data for future retrieval. This
refers to the number of sequential reads in a chunk of data. The two cache readahead threshold options are on and off. The default setting for the array is on.
1. Use the sys list command to check the current cache read-ahead threshold
(rd_ahead).
:/: sys list
blocksize
cache
mirror
mp_support
naca
rd_ahead
recon_rate
sys memsize
cache memsize
:
:
:
:
:
:
:
:
:
16k
auto
auto
rw
off
on
low
128 MBytes
1024 MBytes
2. Use the sys rd_ahead command to set the default threshold to off and confirm
the setting using the sys list command.
For example:
:/: sys rd_ahead off
:/: sys list
blocksize
: 16k
cache
: auto
mirror
: auto
mp_support
: rw
naca
: off
rd_ahead
: off
recon_rate
: low
sys memsize
: 128 MBytes
cache memsize
: 1024 MBytes
2-8
Sun StorEdge T3 and T3+ Array Administrator’s Guide • August 2001
2.8
Setting the IP Address
There are two ways to set the IP address on an array:
■
Editing the host files on a reverse address resolution protocol (RARP) server with
IP address information.
This option enables the IP address to be downloaded automatically when the
array is first installed and powered on, and receives a RARP request from the
host. If you move the array to another network, it receives its IP information from
the RARP server on that network; thus, the host files of the new RARP server
must be updated to include the new array. To set the array IP address by editing
the host files, refer to the instructions in the Installation section of the Sun
StorEdge T3 and T3+ Array Installation, Operation, and Service Manual.
■
Using the array set ip command.
This option can be used only if the array is online and is already connected to an
Ethernet network, which would be possible only if the array IP address had been
assigned using the RARP server previously. You can use this option if you are
moving the array to a network without a RARP server.
● Type set ip IP-address to assign the array IP network address:
:/: set ip IP-address
Caution – Be aware of the following if you are moving the array to a network with
a RARP server and use this command to assign a new IP address: if the array
reboots, it can pick up another IP address from the RARP server that overrides the
IP address you assigned with the set ip command. To avoid this, always assign
the IP address by editing the host files on a RARP server.
Chapter 2
Changing Global Parameters
2-9
2-10
Sun StorEdge T3 and T3+ Array Administrator’s Guide • August 2001
CHAPTER
3
Reconfiguring a Volume
This chapter contains information on configuring volume size, RAID level, and a hot
spare.
This chapter is organized as follows:
■
■
■
■
“Reconfiguration Limitations” on page 3-1
“Deleting a Logical Volume” on page 3-2
“Creating a Logical Volume” on page 3-3
“Volume Labeling” on page 3-6
Note – Cache block size must be configured before volumes are configured. See
Chapter 2 for more information.
3.1
Reconfiguration Limitations
Volumes can only be created or deleted. Once a volume has been configured, you
cannot reconfigure it to change its size, RAID level, or hot spare configuration. You
can only delete a volume and create a new one with the configuration you want.
Caution – Before you begin deleting and creating new volume(s), back up all data
on the array. Data that resides in the volume to be deleted will be destroyed.
3-1
3.2
Deleting a Logical Volume
Caution – Deleting a volume will destroy your data. Back up all data before
beginning this procedure.
1. Use the vol list command to display the configuration of the current volumes.
:/: vol list
volume
v0
capacity
143.2 GB
raid
5
data
u1d1-9
2. Unmount the volume.
:/: vol unmount volume-name
3. Delete the volume.
:/: vol remove volume-name
3-2
Sun StorEdge T3 and T3+ Array Administrator’s Guide • August 2001
standby
none
3.3
Creating a Logical Volume
When configuring a logical volume, you must define the volume, RAID level, and
hot spare at the same time.
Note – Configuring a hot spare drive in the volume is optional. If you are
configuring a hot spare in the volume, you can use only disk drive 9 (d9) in the
array as a hot spare. You can have only one hot spare per array, which can be shared
between two volumes.
TABLE 3-1 shows examples of valid volume configurations.
TABLE 3-1
Volume Configuration Examples
Volume 1
Volume 2
9 disk RAID 5
None
8 disk RAID 5
None
9 disk RAID 1
None
8 disk RAID 1
None
2 disk RAID 1
7 disk RAID 5
2 disk RAID 1
6 disk RAID 5
2 disk RAID 1
7 disk RAID 1
2 disk RAID 1
6 disk RAID 1
4 disk RAID 0
5 disk RAID 1
2 disk RAID 0
6 disk RAID 5
Hot spare
X
X
X
X
X
1. On the array, use the vol add command to create the volume as follows:
a. Define the volume name (vol add volume-name).
b. Define the drives (data undn-n) on which the volume will reside, where:
■
un is the array unit number
■
dn-n are the disk drives, n = 1 to 9
c. Define the RAID level (raid n), where n = 0, 1, or 5.
Chapter 3
Reconfiguring a Volume
3-3
d. Optional: define the hot spare drive (standby und9) where:
■
un is the array unit number
■
d9 is the number of the hot spare disk drive
:/: vol add volume-name data undn-n raid n standby und9
For example:
:/: vol add v1 data u2d1-8 raid 5 standby u2d9
■
■
■
■
v1 is the volume name
u2d1-8 indicates the location of the volume: unit 2, disk drives 1 through 8
raid 5 is RAID level 5
standby u2d9 is the location of the hot spare: unit 2, drive 9
2. Check the status of the volumes.
The vol stat command shows the drive status. The status of all drives must be 0.
For example:
:/: vol stat
v1
unmounted
u2d1
0
u2d2
0
u2d3
0
u2d4
0
u2d5
0
u2d6
0
u2d7
0
u2d8
0
u2d9
0
3. Use the vol init command to initialize the volume.
Depending on system activity at the time of initialization, it can take up to an hour
to initialize a volume. Only one volume can be initialized at a time.
:/: vol init volume-name data
4. Use the vol mount command to mount the volume.
:/: vol mount volume-name
3-4
Sun StorEdge T3 and T3+ Array Administrator’s Guide • August 2001
5. Use the vol list command to confirm that you created the volume correctly.
For example:
:/: vol list
volume
v1
capacity
125.2 GB
raid
5
data
u2d1-8
standby
u2d9
Note – If you are running on the Solaris 7, 11/99 operating environment or a later
release of the Solaris operating environment, skip Step 6. Later versions of the
Solaris operating environment automatically recognize added storage devices
without additional command operations.
6. On the data host, use the luxadm(1M) command to recognize the new volume.
In the Solaris environment, the luxadm(1M) command probes for new devices.
Refer to the luxadm(1M) man page for more information on this command.
a. Make sure there is a /dev/es directory on the host system. If not, type:
# mkdir /dev/es
The /dev/es directory is necessary for running the luxadm command.
b. On the host system, type luxadm insert:
# luxadm insert
Note – If the luxadm utility is not available, you will have to do a reconfiguration
reboot (boot -r) to ensure that the host recognizes the new volumes. It is
preferable, however, to use the luxadm command for this procedure instead of the
boot -r command.
Chapter 3
Reconfiguring a Volume
3-5
3.4
Volume Labeling
For the Solaris operating environment to recognize a volume, it must be labeled with
the format command. Whenever you create a volume, label it using the following
procedure. For more information on the format command, see the format(1M)
man page.
To change the label of a volume:
1. On the array, type vol stat to verify that the volume is mounted.
2. On the data host, type format at the root prompt.
Specify the disk number when prompted. In this example, the array is shown as disk
number 2. It can be identified by the SUN-T300-0113 label.
# format
Searching for disks...done
AVAILABLE DISK SELECTIONS:
0. c0t2d0 <drive type unknown>
/sbus@1f,0/SUNW,fas@e,8800000/sd@2,0
1. c0t3d0 <SUN2.1G cyl 2733 alt 2 hd 19 sec 80>
/sbus@1f,0/SUNW,fas@e,8800000/sd@3,0
2. c1t1d0 <SUN-T300-0113 cyl 34145 alt 2 hd 32 sec 128>
/sbus@1f,0/SUNW,socal@1,0/sf@0,0/ssd@w50020f2300000172,0
Specify disk (enter its number): 2
selecting c1t1d0
[disk formatted]
3-6
■
If the volume had been labeled previously using the format command, the next
display is the FORMAT MENU. If the FORMAT MENU is displayed, continue to the
next step.
■
If the volume had not been labeled previously using the format command, you
will be prompted with the question: Disk not labeled. Label it now? If
so, answer y at the prompt and press Return. The FORMAT MENU is displayed.
Sun StorEdge T3 and T3+ Array Administrator’s Guide • August 2001
3. Type type to select a drive type.
FORMAT MENU:
disk
type
partition
current
format
repair
label
analyze
defect
backup
verify
save
inquiry
volname
!<cmd>
quit
format> type
-
select a disk
select (define) a disk type
select (define) a partition table
describe the current disk
format and analyze the disk
repair a defective sector
write label to the disk
surface analysis
defect list management
search for backup labels
read and display labels
save new disk/partition definitions
show vendor, product and revision
set 8-character volume name
execute <cmd>, then return0
Chapter 3
Reconfiguring a Volume
3-7
4. Type 0 to choose the Auto configure option.
Select the Auto configure option regardless of which drive types are displayed by
the type option. For further information on partitioning, see the Solaris
format(1M) man page.
AVAILABLE DRIVE TYPES:
0. Auto configure
1. Quantum ProDrive 80S
2. Quantum ProDrive 105S
3. CDC Wren IV 94171-344
4. SUN0104
5. SUN0207
6. SUN0327
7. SUN0340
8. SUN0424
9. SUN0535
10. SUN0669
11. SUN1.0G
12. SUN1.05
13. SUN1.3G
14. SUN2.1G
15. SUN2.9G
16. SUN-T300-0100
17. other
Specify disk type (enter its number)[16]: 0
c1t1d0: configured with capacity of 33.34GB
<SUN-T300-0100 cyl 34145 alt 2 hd 16 sec 128>
selecting c1t1d0
[disk formatted]
5. Type label and answer y when prompted to continue.
format> label
Ready to label disk, continue? y
3-8
Sun StorEdge T3 and T3+ Array Administrator’s Guide • August 2001
CHAPTER
4
Monitoring the Array
This chapter describes how to use the CLI to monitor the Sun StorEdge T3 and T3+
array, and how to set up the array files for message logging and remote notification.
This chapter contains the following sections:
■
■
■
4.1
“Checking Status” on page 4-1
“Configuring the Array for Remote System Logging” on page 4-10
“Configuring the Array for SNMP Notification” on page 4-18
Checking Status
You can check array status by using a variety of CLI commands. This section
discusses how to monitor the following:
■
■
■
■
■
■
■
“Determining Failover” on page 4-2
“Checking Drive Status” on page 4-3
“Checking the Hot Spare” on page 4-3
“Checking Data Parity” on page 4-4
“Checking the Battery” on page 4-5
“Displaying FRU Information” on page 4-6
“Checking FRU Status” on page 4-7
4-1
4.1.1
Determining Failover
1. To determine which unit is the master or alternate master unit, type sys stat.
The following example shows a partner group in a normal state:
:/: sys stat
Unit
State
----- --------1
ONLINE
2
ONLINE
Role
-----Master
AlterM
Partner
------2
1
In a failover state, unit 2 assumes the role of master unit and unit 1 is disabled, as
shown in the following example:
:/: sys stat
Unit
State
----- --------1
DISABLED
2
ONLINE
Role
-----Slave
Master
Partner
-------
2. To display how paths are mapped from the host ports to the volume, type port
listmap.
:/: port listmap
port
u1p1
u1p1
u2p1
u2p1
4-2
targetid
1
1
2
2
addr_type
hard
hard
hard
hard
lun
0
1
0
1
volume
v0
v1
v0
v1
Sun StorEdge T3 and T3+ Array Administrator’s Guide • August 2001
owner
u1
u2
u1
u2
access
primary
failover
failover
primary
4.1.2
Checking Drive Status
● Use the vol stat command to check drive status codes.
All drives should show a status of 0 under normal conditions.
:/: vol stat
v0
mounted
v1
mounted
u1d1
0
u2d1
0
u1d2
0
u2d2
0
u1d3
0
u2d3
0
u1d4
0
u2d4
0
u1d5
0
u2d5
0
u1d6
0
u2d6
0
u1d7
0
u2d7
0
u1d8
0
u2d8
0
u1d9
0
u2d9
0
The numeric drive status codes are listed in the following table.
TABLE 4-1
4.1.3
Drive Status Messages
Value
Description
0
Drive mounted
2
Drive present
3
Drive is spun up
4
Drive is disabled
5
Drive has been replaced
7
Invalid system area on drive
9
Drive not present
D
Drive is disabled and is being reconstructed
S
Drive substituted
Checking the Hot Spare
1. Use the vol list command to check the location of the hot spare (standby)
drive.
:/: vol list
volume
v0
v1
capacity
125.2 GB
125.2 GB
raid
5
5
data
u1d1-8
u2d1-8
standby
u1d9
u2d9
Chapter 4
Monitoring the Array
4-3
2. Use the vol stat command to check the status of the hot spare drive.
:/: vol stat
v0
mounted
u1d1
0
u1d2
0
u1d3
0
u1d4
0
u1d5
0
u1d6
0
u1d7
0
u1d8
0
u1d9
0
All drives should show a status of 0. See TABLE 4-1 for definitions of drive status
codes.
4.1.4
Checking Data Parity
Note – Check data parity before performing tape-backup overwrite cycles,
approximately once every 30 days.
● Use the vol verify command to perform a parity check of the drives.
:/: vol verify [fix] volume-name
where:
■
volume-name is the name of the volume to verify.
Note – The volume name is a name internal to the array and is not seen by the host.
■
The [fix] option corrects parity errors on RAID 5 volumes and corrects mirrored
data errors on RAID 1 volumes. If fix is not specified, then vol verify will
report errors, but not correct them. If the fix option is specified and an error is
detected, the vol verify command will regenerate parity from the existing data
on the volume.
Note – The vol command is not re-entrant. Therefore, you cannot run other vol
commands on the array until the vol verify operation has completed.
See Section 2.6, “Performing Volume Verification” on page 2-7 for more information
on checking parity.
4-4
Sun StorEdge T3 and T3+ Array Administrator’s Guide • August 2001
4.1.5
Checking the Battery
1. Use the id read command to display information about battery life. (Unit
number n = 1 or 2; power cooling unit number n = 1 or 2.)
:/: id read unpcun
Revision
:
Manufacture Week
:
Battery Install Week:
Battery Life Used
:
Battery Life Span
:
Serial Number
:
Vendor ID
:
Model ID
:
0000
00221999
00221999
0 days, 0 hours
730 days, 12 hours
01204
TECTROL
300-1454-01
2. Use the refresh -s command to check the status of a battery refresh cycle.
The following example shows a normal battery status (no refresh cycle):
:/: refresh -s
No battery refreshing Task is currently running.
PCU1
PCU2
----------------------------------------------------------------U1
Normal
Normal
U2
Normal
Normal
Current Time
Last Refresh
Next Refresh
Fri Jun 09 16:54:53 2000
Thu Jun 01 12:54:19 2000
Fri Jun 29 12:54:19 2000
Chapter 4
Monitoring the Array
4-5
4.1.6
Displaying FRU Information
● Use the fru list command to display FRU vendor information, serial number,
and firmware levels.
In the event of a FRU failure, fru list output is helpful in verifying correct FRU
replacement because it contains the serial numbers. The following example shows
fru list output for a Sun StorEdge T3+ array.
:/: fru list
ID
-----u1ctr
u2ctr
u1d1
u1d2
u1d3
u1d4
u1d5
u1d6
u1d7
u1d8
u1d9
u2d1
u2d2
u2d3
u2d4
u2d5
u2d6
u2d7
u2d8
u2d9
u1l1
u1l2
u2l1
u2l2
u1pcu1
u1pcu2
u2pcu1
u2pcu2
u1mpn
u2mpn
4-6
TYPE
----------------controller card
controller card
disk drive
disk drive
disk drive
disk drive
disk drive
disk drive
disk drive
disk drive
disk drive
disk drive
disk drive
disk drive
disk drive
disk drive
disk drive
disk drive
disk drive
disk drive
loop card
loop card
loop card
loop card
power/cooling unit
power/cooling unit
power/cooling unit
power/cooling unit
mid plane
mid plane
VENDOR
----------0034
0034
SEAGATE
SEAGATE
SEAGATE
SEAGATE
SEAGATE
SEAGATE
SEAGATE
SEAGATE
SEAGATE
SEAGATE
SEAGATE
SEAGATE
SEAGATE
SEAGATE
SEAGATE
SEAGATE
SEAGATE
SEAGATE
SCI-SJ
SCI-SJ
SCI-SJ
SCI-SJ
TECTROL-CAN
TECTROL-CAN
TECTROL-CAN
TECTROL-CAN
SCI-SJ
SCI-SJ
MODEL
----------501-5710-02(
501-5710-02(
ST118202FSUN
ST118202FSUN
ST118202FSUN
ST118202FSUN
ST118202FSUN
ST118202FSUN
ST118202FSUN
ST118202FSUN
ST118202FSUN
ST118202FSUN
ST118202FSUN
ST118202FSUN
ST118202FSUN
ST118202FSUN
ST118202FSUN
ST118202FSUN
ST118202FSUN
ST118202FSUN
375-0085-01375-0085-01375-0085-01375-0085-01300-1454-01(
300-1454-01(
300-1454-01(
300-1454-01(
375-0084-01375-0084-01-
Sun StorEdge T3 and T3+ Array Administrator’s Guide • August 2001
REVISION
------------0200
0200
9329
9329
9329
9329
9329
9329
9329
9329
9329
9329
9329
9329
9329
9329
9329
9329
9329
EA29
5.03 Flash
5.02 Flash
5.02 Flash
5.02 Flash
0000
0000
0000
0000
0000
0000
SERIAL
-------123456
123455
LK478728
LK493799
LK493800
LK494457
NK040486
LK339351
LK150715
NK040157
LKG79907
LKG90019
LKH18597
LKH15606
LKH16563
LKG88883
LKH61907
LKG90719
LKG95442
LKG61774
007924
007382
003343
003344
001455
001408
001686
001445
000650
000649
4.1.7
Checking FRU Status
● Use the fru stat command to provide a status of each FRU.
Possible FRU states and definitions are listed in TABLE 4-2.
:/: fru stat
CTLR
-----u1ctr
u2ctr
STATUS
------ready
ready
STATE
---------enabled
enabled
ROLE
---------master
alt master
PARTNER
------u2ctr
u1ctr
TEMP
---32.0
29.0
DISK
-----u1d1
u1d2
u1d3
u1d4
u1d5
u1d6
u1d7
u1d8
u1d9
u2d1
u2d2
u2d3
u2d4
u2d5
u2d6
u2d7
u2d8
u2d9
STATUS
------ready
ready
ready
ready
ready
ready
ready
ready
ready
ready
ready
ready
ready
ready
ready
ready
ready
ready
STATE
---------enabled
enabled
enabled
enabled
enabled
enabled
enabled
enabled
enabled
enabled
enabled
enabled
enabled
enabled
enabled
enabled
enabled
enabled
ROLE
---------data disk
data disk
data disk
data disk
data disk
data disk
data disk
data disk
data disk
data disk
data disk
data disk
data disk
data disk
data disk
data disk
data disk
data disk
PORT1
--------ready
ready
ready
ready
ready
ready
ready
ready
ready
ready
ready
ready
ready
ready
ready
ready
ready
ready
PORT2
--------ready
ready
ready
ready
ready
ready
ready
ready
ready
ready
ready
ready
ready
ready
ready
ready
ready
ready
TEMP
---34
34
31
34
32
38
33
34
36
30
31
34
34
32
37
38
42
34
LOOP
-----u2l1
u2l2
u1l1
u1l2
STATUS
------ready
ready
ready
ready
STATE
---------enabled
enabled
enabled
enabled
MODE
------master
slave
master
slave
CABLE1
--------installed
installed
-
CABLE2
--------installed
installed
TEMP
---30.0
30.5
27.0
29.5
POWER
-----u1pcu1
u1pcu2
u2pcu1
u2pcu2
STATUS
------ready
ready
ready
ready
STATE
--------enabled
enabled
enabled
enabled
SOURCE
-----line
line
line
line
OUTPUT
-----normal
normal
normal
normal
BATTERY
------normal
normal
normal
normal
TEMP
-----normal
normal
normal
normal
Chapter 4
FAN1
-----normal
normal
normal
normal
VOLUME
-----v0
v0
v0
v0
v0
v0
v0
v0
v0
v1
v1
v1
v1
v1
v1
v1
v1
v1
FAN2
-----normal
normal
normal
normal
Monitoring the Array
4-7
TABLE 4-2
FRU
Column
Column
Definition
Controller Card
Status
State
Status and State Conditions
absent
disabled
Controller not in enclosure
ready
disabled
Disabled or disabling
offline
disabled
Reset or resetting
booting
enabled
Booting
ready
enabled
Online
Status
State
Status and State Conditions
ready
enabled
Online
fault
enabled
Problem with the drive; check LED
missing
enabled
Drive is missing
Disk Drive
4-8
Possible FRU States and Definitions
Role
Disk Drive Assignment
data disk
Part of volume
unassigned
Not in volume
standby
Standby disk for volume. (Must be
drive number 9)
Port
Drive Port Condition1
ready
Corresponding drive port online
notReady
Drive port not ready. Expect ready
soon.
bypass
This drive port is being bypassed; use
another. (Could be that the
interconnect card with corresponding
loop to drive is down.)
unknown
Drive port state is not known. (Occurs
only in partner groups when drive’s
corresponding interconnect card is
down and interconnect card on
partner unit is up.)
Sun StorEdge T3 and T3+ Array Administrator’s Guide • August 2001
TABLE 4-2
Possible FRU States and Definitions (Continued)
FRU
Column
Column
Definition
Interconnect
(Loop) Card
Status
State
Status and State Conditions
ready
enabled
Online
Power and
Cooling Unit
missing
Interconnect card not installed
offline
Interconnect card offline
fault
Interconnect card has fault condition
Status
State
Status and State Conditions
ready
enabled
Online
ready
substituted
Battery refresh in progress
missing
Power and cooling unit not installed
fault
enabled
Problem in power and cooling unit.
For example: fan fault, output fault,
over temperature.
fault
disabled
Power and cooling unit offline
Source
Power Source
line
Powered from power cord
battery
Powered from battery
--
Power and cooling unit not installed
Output
Power and Cooling Unit Condition
normal
Online
fault
Fault condition
--
Power and cooling unit not installed
Battery
Battery Condition
normal
Online
fault
Battery refresh in progress
--
Power and cooling unit not installed
Temp
Temperature Condition
normal
Normal operating temperature
fault
Power and cooling unit over
temperature
--
Power and cooling unit not installed
Chapter 4
Monitoring the Array
4-9
TABLE 4-2
Possible FRU States and Definitions (Continued)
FRU
Column
Column
Definition
Power and
Cooling Unit
Fan
Fan Condition
normal
Online
fault
Fault condition
--
Power and cooling unit not installed
1. There are two ports on each drive, and each port corresponds to an interconnect card. If one interconnect card
fails, then all drives on that loop will bypass that particular port, and the interconnect card that is still online
will start controlling all drives using the other port.
4.2
Configuring the Array for Remote
System Logging
This procedure consists of editing the /etc/syslog.conf and the /etc/hosts file
that exist on the array. Editing these files enables system messages to be logged and
directed to a management host. Because you cannot edit files on the array, you must
use FTP to transfer them to a host to make the edits and then transfer them back to
the array. This procedure consists of the following tasks:
■
■
■
■
■
“Transferring the Array Files to the Management Host” on page 4-11
“Editing the Array /etc/syslog.conf File” on page 4-13
“Editing the Array /etc/hosts File” on page 4-14
“Transferring the Files Back to the Array” on page 4-15
“Editing the Management Host /etc/syslog.conf File” on page 4-16
Note – For information on interpreting system messages, see Appendix B.
4-10
Sun StorEdge T3 and T3+ Array Administrator’s Guide • August 2001
4.2.1
Transferring the Array Files to the Management
Host
1. Start an ftp session from the management host to the array.
For example:
mngt_host:/:<15>ftp 129.146.81.201
Connected to 129.146.81.201.
220 chon-ji FTP server (SunOS 5.7) ready.
Name (129.146.81.201:root):
2. Log in to the array by typing root and your password at the prompts.
Name (129.146.81.201:root): root
331 Password required for root.
Password: password
230 User root logged in.
ftp>
3. Move to your working directory on the management host.
For example:
ftp> lcd /tmp
Local directory now /tmp
ftp>
4. Move to the /etc directory on the array.
ftp> cd /etc
250 CWD command successful.
ftp>
5. Type binary to set the transfer mode.
Chapter 4
Monitoring the Array
4-11
6. Copy the syslog.conf file from the /etc directory on the array to your working
directory.
ftp> get syslog.conf
200 PORT command successful.
150 Binary data connection for syslog.conf (129.150.47.101,1031) (162 bytes).
226 Binary Transfer complete.
162 bytes received in 1 seconds (0 Kbytes/s)
ftp>
7. Copy the hosts file from the /etc directory on the array to your working
directory.
ftp> get hosts
200 PORT command successful.
150 Binary data connection for hosts (129.150.47.101,1034) (47 bytes).
226 Binary Transfer complete.
47 bytes received in 1 seconds (0 Kbytes/s)
ftp>
8. Exit the ftp session.
ftp>
quit
221 Goodbye.
mngt_host:/:
4-12
Sun StorEdge T3 and T3+ Array Administrator’s Guide • August 2001
4.2.2
Editing the Array /etc/syslog.conf File
You must edit the /etc/syslog.conf file to include the category of messages that
you want to have logged with the IP address and host name of the management host
that will be logging these messages.
1. Determine the IP address and host name of the management host that will be
logging messages.
Consult with your system administrator if you do not have this information.
2. Determine which category of messages you would like to receive from the array.
Messages generated by the array are grouped into four categories in the order of
severity, as described in the following table.
TABLE 4-3
Message Categories
Category
Description
Error
Indicates a critical system event requiring immediate user
intervention or attention. For example, inability to flush the
write-behind cache.
Warning
Indicates a serious system event requiring eventual user
intervention. For example, a disk drive being disabled.
Notice
Indicates a system event that may lead to a more serious condition
in the future. For example, the occurrence of hard
errors corrected via parity replacement.
Information
Indicates a system event that has no consequence on the running
health of the system. For example, user login notifications.
Note – The message categories are cumulative. For example, if you specify that you
want to be notified about notice messages, you will also receive notification of
error and warning messages. If you specify that you want to be notified about
information messages, you will receive messages from all categories.
Caution – Use tab spaces to separate field entries when editing the
/etc/syslog.conf file. If tab spacing is not used, edits will not be recognized by
the array.
Chapter 4
Monitoring the Array
4-13
3. On the management host, use a text editor to edit the syslog.conf file in the
working directory.
Separate entries with tab spaces. Edits are highlighted in the following example:
# syslog.conf
# facility.level action
# messages to local syslog file
*.notice /syslog
# messages to syslogd on another host Remote system logging
*.warn @remote-host
*.warn @129.234.56.73
# messages sent as SNMP traps
*.warn | snmp_trap 129.146.81.201
Note – Use the IP address in the syslog.conf file. If you want to add a host name,
a corresponding entry must be present on the array’s /etc/hosts file as described
in the following section. The entry in the array’s /etc/hosts file is used only for
syslog control features on the array. Local utilities such as ping do not reference
the array’s /etc/hosts file. Therefore, IP addresses must be used with these
utilities.
4.2.3
Editing the Array /etc/hosts File
You must edit the /etc/hosts file with the name of the management host and its
IP address.
● On the management host, use a text editor to edit the /etc/hosts file in the
working directory.
Separate the IP address from the name with a tab. Edits are highlighted in the
following example:
#hosts
#ip-address name
129.146.81.201 host-name
4-14
Sun StorEdge T3 and T3+ Array Administrator’s Guide • August 2001
IP address
4.2.4
Transferring the Files Back to the Array
After editing the /etc/syslog.conf and /etc/hosts files, transfer the files from
the management host back to the array.
1. Start an ftp session from the management host to the array.
For example:
mngt_host:/:<15>ftp 129.146.81.201
Connected to 129.146.81.201.
220 chon-ji FTP server (SunOS 5.7) ready.
Name (129.146.81.201:root):
2. Log in to the array by typing root and your password at the prompts.
Name (129.146.81.201:root): root
331 Password required for root.
Password: password
230 User root logged in.
ftp>
3. Move to the /etc directory on the array.
ftp> cd /etc
250 CWD command successful.
ftp>
4. Type binary to set the transfer mode.
5. Copy the edited syslog.conf file from your working directory to the /etc
directory on the array.
ftp> put syslog.conf
200 PORT command successful.
150 Binary data connection for syslog.conf (129.150.47.101,1031) (162 bytes).
226 Binary Transfer complete.
162 bytes received in 1 seconds (0 Kbytes/s)
ftp>
Chapter 4
Monitoring the Array
4-15
6. Copy the edited hosts file from your working directory to the /etc directory on
the array.
ftp> put hosts
200 PORT command successful.
150 Binary data connection for hosts (129.150.47.101,1034) (47 bytes).
226 Binary Transfer complete.
47 bytes received in 1 seconds (0 Kbytes/s)
ftp>
7. Exit the ftp session.
ftp>
quit
221 Goodbye.
mngt_host:/:
8. On the array, start message traffic to the host.
The syslogd must be redirected at the array.
:/:<23>set logto *
4.2.5
Editing the Management Host
/etc/syslog.conf File
You must edit the /etc/syslog.conf file on the management host (the host used
for monitoring and administering one or more arrays through the Ethernet
connection) to include a log file for capturing error messages.
4-16
Sun StorEdge T3 and T3+ Array Administrator’s Guide • August 2001
● On the management host, add a line with the name of the log file to the host’s
/etc/syslog.conf file, as shown in bold type in the following example:
Note – You must use a tab space between log-filename and /var/adm/messages.
#ident"@(#)syslog.conf1.496/10/11 SMI"/* SunOS 5.0 */
#
# Copyright (c) 1991-2001, by Sun Microsystems, Inc.
#
# syslog configuration file.
#
# This file is processed by m4 so be careful to quote (‘’) names
# that match m4 reserved words. Also, within ifdef’s, arguments
# containing commas must be quoted.
#
*.err;kern.notice;auth.notice/dev/console
*.err;kern.debug;daemon.notice;mail.crit/var/adm/messages
*.alert;kern.err;daemon.erroperator
*.alert
root
*.emerg
*
# if a non-loghost machine chooses to have authentication messages
# sent to the loghost machine, un-comment out the following line:
#auth.noticeifdef(‘LOGHOST’, /var/log/authlog, @loghost)
mail.debugifdef(‘LOGHOST’, /var/log/syslog, @loghost)
#
# non-loghost machines will use the following lines to cause "user"
# log messages to be logged locally.
#
ifdef(‘LOGHOST’, ,
user.err
/dev/console
user.err
/var/adm/messages
user.alert ‘root, operator’
user.emerg *
)
local7.notice /var/adm/messages.t300
In this example, all arrays that use this host for logging will have their messages
dumped to /var/adm/messages.t300. The file name of the log file might be
different depending on the type of array management software you are using.
Chapter 4
Monitoring the Array
4-17
Note – If you are using the StorTools™ product in the Solaris software environment
to monitor the array, verify that you are using the correct /var/adm/messages file
name. Refer to the StorTools documentation for the name of this message file.
4.3
Configuring the Array for SNMP
Notification
Sun StorEdge T3 and T3+ arrays can provide remote notification of array events to
designated hosts using Simple Network Management Protocol (SNMP) traps. To
enable SNMP notification, you must edit files on the array to configure system
message logging. Because you cannot edit files on the array, you must ftp them to a
host to make the edits and then ftp them back to the array.
This procedure consists of the following tasks:
■
■
■
■
“Transferring the Array Files to the Management Host” on page 4-18
“Editing the Array /etc/syslog.conf File” on page 4-20
“Editing the Array /etc/hosts File” on page 4-22
“Transferring the Files Back to the Array” on page 4-23
Note – For information on interpreting system messages, see Appendix B.
4.3.1
Transferring the Array Files to the Management
Host
1. Start an ftp session from the management host to the array.
For example:
mngt_host:/:<15>ftp 129.146.81.201
Connected to 129.146.81.201.
220 chon-ji FTP server (SunOS 5.7) ready.
Name (129.146.81.201:root):
4-18
Sun StorEdge T3 and T3+ Array Administrator’s Guide • August 2001
2. Log in to the array by typing root and your password at the prompts.
Name (129.146.81.201:root): root
331 Password required for root.
Password: password
230 User root logged in.
ftp>
3. Move to your working directory on the management host.
For example:
ftp> lcd /tmp
Local directory now /tmp
ftp>
4. Move to the /etc directory on the array.
ftp> cd /etc
250 CWD command successful.
ftp>
5. Type binary to set the transfer mode.
6. Copy the syslog.conf file from the /etc directory on the array to your working
directory.
ftp> get syslog.conf
200 PORT command successful.
150 Binary data connection for syslog.conf (129.150.47.101,1031) (162 bytes).
226 Binary Transfer complete.
162 bytes received in 1 seconds (0 Kbytes/s)
ftp>
Chapter 4
Monitoring the Array
4-19
7. Copy the hosts file from the /etc directory on the array to your working
directory.
ftp> get hosts
200 PORT command successful.
150 Binary data connection for hosts (129.150.47.101,1034) (47 bytes).
226 Binary Transfer complete.
47 bytes received in 1 seconds (0 Kbytes/s)
ftp>
8. Exit the ftp session.
ftp>
quit
221 Goodbye.
mngt_host:/:
4.3.2
Editing the Array /etc/syslog.conf File
You must edit the /etc/syslog.conf file to include the category of messages that
you want to have logged with the IP address of the management host that will be
receiving these messages.
1. Determine the IP address and host name of the management host that will be
logging messages.
Consult with your system administrator if you do not have this information.
4-20
Sun StorEdge T3 and T3+ Array Administrator’s Guide • August 2001
2. Determine which category of messages you would like to receive from the array.
Messages generated by the array are grouped into four categories in the order of
severity, as described in TABLE 4-4.
TABLE 4-4
Message Categories
Category
Description
Error
Indicates a critical system event requiring immediate user
intervention or attention. For example, inability to flush the
write-behind cache.
Warning
Indicates a serious system event requiring eventual user
intervention. For example, a disk drive being disabled.
Notice
Indicates a system event that may lead to a more serious condition
in the future. For example, the occurrence of hard
errors corrected via parity replacement.
Information
Indicates a system event that has no consequence on the running
health of the system. For example, user login notifications.
Note – The message categories are cumulative. For example, if you specify that you
want to be notified about notice messages, you will also receive notification of
error and warning messages. If you specify that you want to be notified about
information messages, you will receive messages from all categories.
Caution – Use tab spaces to separate field entries when editing the
/etc/syslog.conf file. If tab spacing is not used, edits will not be recognized by
the array.
Chapter 4
Monitoring the Array
4-21
3. On the management host, use a text editor to edit the syslog.conf file in the
working directory.
Separate entries with tab spaces. Edits are highlighted in the following example:
# syslog.conf
# facility.level action
# messages to local syslog file
*.notice /syslog
# messages to syslogd on another host
*.warn @remote-host
*.warn @129.234.56.73
# messages sent as SNMP traps
*.warn | snmp_trap 129.146.81.201
SNMP notification
Note – You can use either the IP address or a host name in the syslog.conf file. If
you use a host name, a corresponding entry must be present on the array’s
/etc/hosts file, as described in the next section.
4.3.3
Editing the Array /etc/hosts File
You must edit the /etc/hosts file with the name of the management host and its
IP address.
● On the management host, use a text editor to edit the /etc/hosts file in the
working directory.
Separate the IP address from the name with a tab space.
#hosts
#ip-address name
129.146.81.201 host-name
4-22
Sun StorEdge T3 and T3+ Array Administrator’s Guide • August 2001
IP address
4.3.4
Transferring the Files Back to the Array
After editing the /etc/syslog.conf and /etc/hosts files, transfer the files from
the management host back to the array.
1. Start an ftp session from the management host to the array.
For example:
mngt_host:/:<15>ftp 129.146.81.201
Connected to 129.146.81.201.
220 chon-ji FTP server (SunOS 5.7) ready.
Name (129.146.81.201:root):
2. Log in to the array by typing root and your password at the prompts.
Name (129.146.81.201:root): root
331 Password required for root.
Password: password
230 User root logged in.
ftp>
3. Move to the /etc directory on the array.
ftp> cd /etc
250 CWD command successful.
ftp>
4. Copy the edited syslog.conf file from your working directory to the /etc
directory on the array.
ftp> put syslog.conf
200 PORT command successful.
150 Binary data connection for syslog.conf (129.150.47.101,1031) (162 bytes).
226 Binary Transfer complete.
162 bytes received in 1 seconds (0 Kbytes/s)
ftp>
Chapter 4
Monitoring the Array
4-23
5. Copy the edited hosts file from your working directory to the /etc directory on
the array.
ftp> put hosts
200 PORT command successful.
150 Binary data connection for hosts (129.150.47.101,1034) (47 bytes).
226 Binary Transfer complete.
47 bytes received in 1 seconds (0 Kbytes/s)
ftp>
6. Exit the ftp session.
ftp>
quit
221 Goodbye.
mngt_host:/:
7. On the array, start message traffic to the host.
The syslogd must be redirected at the array.
:/:<23>set logto *
4-24
Sun StorEdge T3 and T3+ Array Administrator’s Guide • August 2001
CHAPTER
5
Troubleshooting the Array
This chapter describes using the CLI to troubleshoot the array and its components.
This chapter contains the following sections:
■
■
■
■
5.1
“Identifying FRU Failures” on page 5-1
“Replacing FRUs” on page 5-6
“Identifying Miscabled Partner Groups” on page 5-14
“Identifying Data Channel Failures” on page 5-18
Identifying FRU Failures
The first step in remedying a FRU failure is to determine which FRU has failed. You
can do this by examining the output of the fru stat command and the messages
in the syslog file. After evaluating the data, you can confirm the failing FRU and
replace it.
5-1
1. Display a list of all installed FRUs and check their current status.
:/: fru stat
CTLR
-----u1ctr
u2ctr
STATUS
------ready
ready
STATE
---------enabled
enabled
ROLE
---------master
alt master
PARTNER
------u2ctr
u1ctr
TEMP
---32.0
29.0
DISK
-----u1d1
u1d2
u1d3
u1d4
u1d5
u1d6
u1d7
u1d8
u1d9
u2d1
u2d2
u2d3
u2d4
u2d5
u2d6
u2d7
u2d8
u2d9
STATUS
------ready
ready
ready
ready
ready
ready
ready
ready
ready
ready
ready
ready
ready
ready
ready
ready
ready
ready
STATE
---------enabled
enabled
enabled
enabled
enabled
enabled
enabled
enabled
enabled
enabled
enabled
enabled
enabled
enabled
enabled
enabled
enabled
enabled
ROLE
---------data disk
data disk
data disk
data disk
data disk
data disk
data disk
data disk
data disk
data disk
data disk
data disk
data disk
data disk
data disk
data disk
data disk
data disk
PORT1
--------ready
ready
ready
ready
ready
ready
ready
ready
ready
ready
ready
ready
ready
ready
ready
ready
ready
ready
PORT2
--------ready
ready
ready
ready
ready
ready
ready
ready
ready
ready
ready
ready
ready
ready
ready
ready
ready
ready
TEMP
---34
34
31
34
32
38
33
34
36
30
31
34
34
32
37
38
42
34
LOOP
-----u2l1
u2l2
u1l1
u1l2
STATUS
------ready
ready
ready
ready
STATE
---------enabled
enabled
enabled
enabled
MODE
------master
slave
master
slave
CABLE1
--------installed
installed
-
CABLE2
--------installed
installed
TEMP
---30.0
30.5
27.0
29.5
POWER
-----u1pcu1
u1pcu2
u2pcu1
u2pcu2
STATUS
------ready
ready
ready
ready
STATE
--------enabled
enabled
enabled
enabled
SOURCE
-----line
line
line
line
OUTPUT
-----normal
normal
normal
normal
BATTERY
------normal
normal
normal
normal
TEMP
-----normal
normal
normal
normal
FAN1
-----normal
normal
normal
normal
VOLUME
-----v0
v0
v0
v0
v0
v0
v0
v0
v0
v1
v1
v1
v1
v1
v1
v1
v1
v1
FAN2
-----normal
normal
normal
normal
2. Review the output of the fru stat list for any fault or abnormal status messages.
See TABLE 4-2 for a list of possible FRU status messages.
5-2
Sun StorEdge T3 and T3+ Array Administrator’s Guide • August 2001
3. Display the syslog file.
Use the tail command to display the last 10 lines of the file, which contain the
most recent log entries. (See Appendix B for a description of the syslog format.)
:/: tail syslog
Oct 26 16:24:15 ROOT[2]: W: u2ctr Hardware Reset (1000) occurred
Oct 26 16:24:16 ROOT[2]: N: u2ctr Waiting for configuration data from master...
Oct 26 16:24:31 MNXT[2]: N: u2ctr Initializing host port u2p1 ISP2100 ...
firmware status = 3
Oct 26 16:24:31 MNXT[2]: N: u2ctr Host port u2p1 TARGET_ID = 0x2 (ALPA = 0xe4)
Oct 26 16:24:58 ROOT[2]: N: u2ctr Starting psh...
Oct 26 16:24:58 ISR1[2]: N: u2ctr ISP2100[2] Received LIP(f7,e4) async event
Oct 26 16:24:58 FCC0[2]: N: u2ctr Port event received on port 3, abort 0
Oct 26 16:25:08 FCC2[2]: N: u2ctr (ITL 0 1 0 TT 20 TID 7910 OP 0) Target in Unit
Attention
For more extensive investigation, display the complete syslog file. You can do this in
two ways:
■
Using the cat command (that is, cat syslog), which could overwrite the
terminal window
■
Moving the syslog file to the host using an FTP connection. See “Transferring
the Array Files to the Management Host” on page 4-11 for instructions.
4. Use a text editor to examine the syslog file.
Look for Error and Warning messages—these indicate a serious problem with the
unit. Error message abbreviations are: E - errors, W - warnings, N - notices,
I - informational. The following is a partial output of a syslog file:
Oct 26 17:01:30 LPCT[1]: W: u2pcu1: Switch off
Oct 26 17:01:31 LPCT[1]: W: u2pcu1: Off
Oct 26 17:01:33 LPCT[1]: W: u2pcu1: DC not OK
Oct 26 17:01:36 LPCT[1]: E: u2pcu1: Battery not present
Oct 26 17:01:39 LPCT[1]: E: u2pcu1: Not present
Oct 26 17:01:39 TMRT[1]: E: u2pcu1: Missing; system shutting down in 30 minutes
Oct 26 17:01:40 TMRT[1]: E: u2ctr: Multiple Fan Faults; system shutting down in
30 minutes
Oct 26 17:01:42 LPCT[2]: E: u2pcu1: Not present
Oct 26 17:01:45 LPCT[1]: E: u2pcu1: Over temperature
Oct 26 17:01:45 LPCT[1]: W: u2pcu1: Switch off
Oct 26 17:01:46 LPCT[1]: W: u2pcu1: Off
Oct 26 17:01:46 LPCT[1]: E: u2pcu1: Battery not present
Oct 26 17:01:48 LPCT[1]: N: u2pcu1: Battery not OK
Oct 26 17:04:16 LPCT[1]: E: u2d4: Not present
Oct 26 17:04:16 TMRT[1]: E: u2d4: Missing; system shutting down in 30 minutes
Chapter 5
Troubleshooting the Array
5-3
Note – There is limited space on the array for syslog files. When the syslog file
exceeds the file-size threshold (1 Mbyte), this file is moved to a file called
syslog.OLD, overwriting any previous syslog.old image.
If you are monitoring an error condition, transfer the syslog file to a host to save
the output and prevent any pertinent data from being deleted.
5. Compare syslog entries with the output of the fru stat command to see which
FRU has failed.
In the following example, a warning (W:) message is shown in array unit 2 for drive
7 (u2d7). The fru stat output indicates a problem with u2d7. Based on this
information, you would determine whether drive 7 in unit 2 needs to be repaired or
replaced.
Oct 26 17:13:38 FCC0[1]: N:
Unit Attention
Oct 26 17:13:37 FCC0[2]: N:
Unit Attention
Oct 26 17:14:12 ISR1[2]: W:
Oct 26 17:14:12 ISR1[2]: W:
Oct 26 17:14:12 ISR1[2]: W:
Initializing CMD Required
Oct 26 17:14:13 ISR1[1]: N:
Oct 26 17:14:12 ISR1[2]: N:
Oct 26 17:14:12 ISR1[2]: N:
Oct 26 17:14:12 ISR1[2]: W:
Oct 26 17:14:15 SVDT[1]: N:
Oct 26 17:14:16 LPCT[1]: N:
Oct 26 17:14:12 ISR1[2]: W:
Oct 26 17:14:12 ISR1[2]: W:
Initializing CMD Required
Oct 26 17:14:12 ISR1[2]: N:
Oct 26 17:14:17 LPCT[1]: N:
Oct 26 17:14:12 ISR1[2]: N:
Oct 26 17:14:12 ISR1[2]: W:
Oct 26 17:14:12 ISR1[2]: W:
Oct 26 17:14:12 ISR1[2]: W:
Initializing CMD Required
Oct 26 17:14:12 ISR1[2]: N:
Oct 26 17:14:12 ISR1[2]: N:
Oct 26 17:14:12 WXFT[2]: W:
Oct 26 17:14:12 WXFT[2]: W:
5-4
u1ctr (ITL 7D 1 0 TT 20 TID 77A8 OP 0) Target in
u2ctr (ITL 7D 2 1 TT 20 TID 77A8 OP 0) Target in
u2d7 SCSI Disk Error Occurred (path = 0x0)
Sense Key = 0x2, Asc = 0x4, Ascq = 0x2
Sense Data Description = Logical Unit Not Ready,
u1ctr ISP2100[1] Received LIP(f8,e8) async event
u2d7 SVD_DONE: Command Error = 0x3
u2d7 sid 0 stype 815 disk error 3
u2d7 SCSI Disk Error Occurred (path = 0x0)
19 fcal ports were detected on l2
u2d7: Bypassed on loop 1
Sense Key = 0x2, Asc = 0x4, Ascq = 0x2
Sense Data Description = Logical Unit Not Ready,
u2d7 SVD_DONE: Command Error = 0x3
u2d7: Bypassed on loop 2
u2d7 sid 0 stype 405 disk error 3
u2d7 SCSI Disk Error Occurred (path = 0x0)
Sense Key = 0x2, Asc = 0x4, Ascq = 0x2
Sense Data Description = Logical Unit Not Ready,
u2d7 SVD_DONE: Command Error = 0x3
u2d7 sid 0 stype 405 disk error 3
u2d7: Failed
u2d7 hard err in vol (v1) starting auto disable
Sun StorEdge T3 and T3+ Array Administrator’s Guide • August 2001
:/: fru
CTLR
-----u1ctr
u2ctr
stat
STATUS
------ready
ready
STATE
---------enabled
enabled
ROLE
---------master
alt master
PARTNER
------u2ctr
u1ctr
TEMP
---34.5
33.5
DISK
-----u1d1
u1d2
u1d3
u1d4
u1d5
u1d6
u1d7
u1d8
u1d9
u2d1
u2d2
u2d3
u2d4
u2d5
u2d6
u2d7
u2d8
u2d9
STATUS
------ready
ready
ready
ready
ready
ready
ready
ready
ready
ready
ready
ready
ready
ready
ready
fault
ready
ready
STATE
---------enabled
enabled
enabled
enabled
enabled
enabled
enabled
enabled
enabled
enabled
enabled
enabled
enabled
enabled
enabled
disabled
enabled
enabled
ROLE
---------data disk
data disk
data disk
data disk
data disk
data disk
data disk
data disk
data disk
data disk
data disk
data disk
data disk
data disk
data disk
data disk
data disk
data disk
PORT1
--------ready
ready
ready
ready
ready
ready
ready
ready
ready
ready
ready
ready
ready
ready
ready
bypass
ready
ready
PORT2
--------ready
ready
ready
ready
ready
ready
ready
ready
ready
ready
ready
ready
ready
ready
ready
bypass
ready
ready
TEMP
---33
30
29
27
24
26
25
31
34
30
31
30
26
34
26
32
26
LOOP
-----u2l1
u2l2
u1l1
u1l2
STATUS
------ready
ready
ready
ready
STATE
---------enabled
enabled
enabled
enabled
MODE
------master
slave
master
slave
CABLE1
--------installed
installed
-
CABLE2
--------installed
installed
TEMP
---31.0
34.5
31.0
35.0
POWER
-----u1pcu1
u1pcu2
u2pcu1
u2pcu2
STATUS
------ready
ready
ready
ready
STATE
--------enabled
enabled
enabled
enabled
SOURCE
-----line
line
line
line
OUTPUT
-----normal
normal
normal
normal
BATTERY
------normal
normal
normal
normal
TEMP
-----normal
normal
normal
normal
Chapter 5
FAN1
-----normal
normal
normal
normal
VOLUME
-----v0
v0
v0
v0
v0
v0
v0
v0
v0
v1
v1
v1
v1
v1
v1
v1
v1
v1
FAN2
-----normal
normal
normal
normal
Troubleshooting the Array
5-5
5.2
Replacing FRUs
This section describes how to verify and confirm installation of a replacement FRU.
It includes the following sections:
■
■
■
5.2.1
“Verifying the FRU Firmware Level” on page 5-6
“Installing the Replacement FRU” on page 5-9
“Verifying the FRU Replacement” on page 5-12
Verifying the FRU Firmware Level
The array contains various types of FRU firmware that are particular to the array
model.
The Sun StorEdge T3 array contains four types of firmware:
■
■
■
■
Controller firmware
Controller erasable programmable read-only memory (EPROM) firmware
Disk drive firmware
Interconnect card firmware
The Sun StorEdge T3+ array contains the following firmware:
■
Controller firmware:
■
■
■
Level 1
Level 2
Level 3
■
Disk drive firmware
■
Interconnect card firmware
When you install the new FRU, you will check its firmware level to determine if you
need to upgrade the existing firmware. Use this procedure to check the firmware
versions on your particular array model.
5-6
Sun StorEdge T3 and T3+ Array Administrator’s Guide • August 2001
1. Type ver to display the header information:
■
An example of header information for a Sun StorEdge T3 array:
:/:<5>ver
T3 Release 1.17b 2001/08/02 15:21:29 (192.168.209.243)
Copyright (C) 1997-2001 Sun Microsystems, Inc.
All Rights Reserved.
In this example Sun StorEdge T3 array controller firmware is listed as
Release 1.17b.
■
An example of header information for a Sun StorEdge T3+ array:
:/:<5>ver
T3B Release 2.00 2001/08/02 15:21:29 (192.168.209.243)
Copyright (C) 1997-2001 Sun Microsystems, Inc.
All Rights Reserved.
In this example, the Sun StorEdge T3+ array is shown running version 2.00
level 3 controller firmware.
2. Type fru list to display the firmware versions for the disk drives and
interconnect card on both array models.
Chapter 5
Troubleshooting the Array
5-7
For example:
:/: fru list
ID
-----u1ctr
u2ctr
u1d1
u1d2
u1d3
u1d4
u1d5
u1d6
u1d7
u1d8
u1d9
u2d1
u2d2
u2d3
u2d4
u2d5
u2d6
u2d7
u2d8
u2d9
u1l1
u1l2
u2l1
u2l2
u1pcu1
u1pcu2
u2pcu1
u2pcu2
u1mpn
u2mpn
TYPE
----------------controller card
controller card
disk drive
disk drive
disk drive
disk drive
disk drive
disk drive
disk drive
disk drive
disk drive
disk drive
disk drive
disk drive
disk drive
disk drive
disk drive
disk drive
disk drive
disk drive
loop card
loop card
loop card
loop card
power/cooling unit
power/cooling unit
power/cooling unit
power/cooling unit
mid plane
mid plane
VENDOR
----------0034
0034
SEAGATE
SEAGATE
SEAGATE
SEAGATE
SEAGATE
SEAGATE
SEAGATE
SEAGATE
SEAGATE
SEAGATE
SEAGATE
SEAGATE
SEAGATE
SEAGATE
SEAGATE
SEAGATE
SEAGATE
SEAGATE
SCI-SJ
SCI-SJ
SCI-SJ
SCI-SJ
TECTROL-CAN
TECTROL-CAN
TECTROL-CAN
TECTROL-CAN
SCI-SJ
SCI-SJ
MODEL
----------501-5710-02(
501-5710-02(
ST118202FSUN
ST118202FSUN
ST118202FSUN
ST118202FSUN
ST118202FSUN
ST118202FSUN
ST118202FSUN
ST118202FSUN
ST118202FSUN
ST118202FSUN
ST118202FSUN
ST118202FSUN
ST118202FSUN
ST118202FSUN
ST118202FSUN
ST118202FSUN
ST118202FSUN
ST118202FSUN
375-0085-01375-0085-01375-0085-01375-0085-01300-1454-01(
300-1454-01(
300-1454-01(
300-1454-01(
375-0084-01375-0084-01-
REVISION
------------0200
0200
9329
9329
9329
9329
9329
9329
9329
9329
9329
9329
9329
9329
9329
9329
9329
9329
9329
EA29
5.03 Flash
5.02 Flash
5.02 Flash
5.02 Flash
0000
0000
0000
0000
0000
0000
SERIAL
-------123456
123455
LK478728
LK493799
LK493800
LK494457
NK040486
LK339351
LK150715
NK040157
LKG79907
LKG90019
LKH18597
LKH15606
LKH16563
LKG88883
LKH61907
LKG90719
LKG95442
LKG61774
007924
007382
003343
003344
001455
001408
001686
001445
000650
000649
In this example:
5-8
■
Disk drive firmware version is listed as Revision 9329
■
Interconnect card (loop card) firmware version is listed as Revision 5.03
Flash
■
Sun StorEdge T3 array controller EPROM firmware is listed as Revision 0200.
■
Sun StorEdge T3+ array level 2 controller firmware, the level 2 image is 0200.
Sun StorEdge T3 and T3+ Array Administrator’s Guide • August 2001
5.2.2
Installing the Replacement FRU
Caution – Make sure you have the replacement FRU available before removing the
failed FRU. If you remove a FRU, it must be immediately replaced. There is a timer
in the unit that will cause the array and all connected arrays to power off in 30
minutes if a FRU is removed and not replaced.
● Refer to the Sun StorEdge T3 and T3+ Array Installation, Operation, and Service Manual
for instructions on replacing FRUs.
5.2.2.1
Rebuilding a Replaced Drive FRU
A replaced drive FRU is automatically reconstructed by the array. If you should
need to rebuild the replaced drive FRU manually, do so as follows:
1. On the array, type:
:/: vol recon undn
where undn is the unit (u) number (n) and the drive (d) number (n) of the drive you
are rebuilding.
2. Start a second telnet session with the array to check rebuild progress.
3. Check rebuild progress using the proc list command.
The information in the PERCENT column and the TIME column, which shows the
elapsed time, enables you to estimate when the volume will complete reconstruction.
:/: proc list
VOLUME
v1
CMD_REF PERCENT
20241
23
TIME COMMAND
0:09 vol recon
Chapter 5
Troubleshooting the Array
5-9
4. Check the drive status to ensure reconstruction of the replaced drive FRU has
completed.
:/: fru stat
CTLR
-----u1ctr
u2ctr
STATUS
------ready
ready
STATE
---------enabled
enabled
ROLE
---------master
alt master
PARTNER
------u2ctr
u1ctr
TEMP
---32.0
29.0
DISK
-----u1d1
u1d2
u1d3
u1d4
u1d5
u1d6
u1d7
u1d8
u1d9
u2d1
u2d2
u2d3
u2d4
u2d5
u2d6
u2d7
u2d8
u2d9
STATUS
------ready
ready
ready
ready
ready
ready
ready
ready
ready
ready
ready
ready
ready
ready
ready
ready
ready
ready
STATE
---------enabled
enabled
enabled
enabled
enabled
enabled
enabled
enabled
enabled
enabled
enabled
enabled
enabled
enabled
enabled
enabled
enabled
enabled
ROLE
---------data disk
data disk
data disk
data disk
data disk
data disk
data disk
data disk
data disk
data disk
data disk
data disk
data disk
data disk
data disk
data disk
data disk
data disk
PORT1
--------ready
ready
ready
ready
ready
ready
ready
ready
ready
ready
ready
ready
ready
ready
ready
ready
ready
ready
PORT2
--------ready
ready
ready
ready
ready
ready
ready
ready
ready
ready
ready
ready
ready
ready
ready
ready
ready
ready
TEMP
---34
34
31
34
32
38
33
34
36
30
31
34
34
32
37
38
42
34
LOOP
-----u2l1
u2l2
u1l1
u1l2
STATUS
------ready
ready
ready
ready
STATE
---------enabled
enabled
enabled
enabled
MODE
------master
slave
master
slave
CABLE1
--------installed
installed
-
CABLE2
--------installed
installed
TEMP
---30.0
30.5
27.0
29.5
POWER
-----u1pcu1
u1pcu2
u2pcu1
u2pcu2
STATUS
------ready
ready
ready
ready
STATE
--------enabled
enabled
enabled
enabled
SOURCE
-----line
line
line
line
5-10
OUTPUT
-----normal
normal
normal
normal
BATTERY
------normal
normal
normal
normal
Sun StorEdge T3 and T3+ Array Administrator’s Guide • August 2001
TEMP
-----normal
normal
normal
normal
FAN1
-----normal
normal
normal
normal
VOLUME
-----v0
v0
v0
v0
v0
v0
v0
v0
v0
v1
v1
v1
v1
v1
v1
v1
v1
v1
FAN2
-----normal
normal
normal
normal
Note – There can be a delay between the time when drive reconstruction is started
and when the fru stat output displays an optimal status. If the drive is under
reconstruction when you run the fru stat command, the command output will
show the drive as missing. Once the drive finishes rebuilding, the fru stat output
will show the drive as ready.
5.2.2.2
Controller Card
Replacing a controller card does not require any special command line
administration, other than verifying its state using the fru stat command. For
information on the controller card and how to replace it, refer to Section 5.2.5,
“Controller Card,” in the Sun StorEdge T3 and T3+ Array Installation, Operation, and
Service Manual.
5.2.2.3
Power and Cooling Unit
The replacement of the power cooling unit FRU should be done as quickly as
possible to maintain full redundancy. For additional information including
replacement instructions, refer to Section 5.2.2, “Power and Cooling Units” in the
Sun StorEdge T3 and T3+ Array Installation, Operation, and Service Manual.
Note – The UPS battery, which is built into the power and cooling unit, will show a
fault when the unit is first installed before it recharges.
5.2.2.4
Interconnect Card
Replacing an interconnect card does not require any special command line
administration, other than verifying its state using the fru stat command. For
information on the interconnect card and how to replace it, refer to Section 5.2.4,
“Interconnect Cards,” in the Sun StorEdge T3 and T3+ Array Installation, Operation,
and Service Manual.
Note – In fru stat output, information on the interconnect card is listed under
the LOOP category.
Chapter 5
Troubleshooting the Array
5-11
5.2.2.5
Chassis and Centerplane
It is unlikely that the array chassis and centerplane, which is one FRU, will ever
need to be replaced. If it does need to be replaced, contact your Sun service
representative. Only trained, qualified service providers should replace an array
chassis and centerplane.
5.2.3
Verifying the FRU Replacement
1. After replacing the FRU, check the firmware level of the new FRU using the fru
list command to determine if it has the same firmware level as the FRU you
replaced.
See Section 5.2.1, “Verifying the FRU Firmware Level” on page 5-6. If the firmware
level of the new FRU is a later release, you will need to upgrade all firmware. For
instructions on how to upgrade firmware, refer to the Service chapter in the Sun
StorEdge T3 and T3+ Array Installation, Operation, and Service Manual.
Note – If you replace a controller card FRU, the controller firmware automatically
checks the firmware information on the system disk and upgrades or downgrades
itself to the previous firmware version recorded. A manual controller firmware
upgrade is not required.
5-12
Sun StorEdge T3 and T3+ Array Administrator’s Guide • August 2001
2. Check the FRU status to verify that the failure has been corrected using the fru
stat command.
:/: fru stat
CTLR
-----u1ctr
u2ctr
STATUS
------ready
ready
STATE
---------enabled
enabled
ROLE
---------master
alt master
PARTNER
------u2ctr
u1ctr
TEMP
---32.0
29.0
DISK
-----u1d1
u1d2
u1d3
u1d4
u1d5
u1d6
u1d7
u1d8
u1d9
u2d1
u2d2
u2d3
u2d4
u2d5
u2d6
u2d7
u2d8
u2d9
STATUS
------ready
ready
ready
ready
ready
ready
ready
ready
ready
ready
ready
ready
ready
ready
ready
ready
ready
ready
STATE
---------enabled
enabled
enabled
enabled
enabled
enabled
enabled
enabled
enabled
enabled
enabled
enabled
enabled
enabled
enabled
enabled
enabled
enabled
ROLE
---------data disk
data disk
data disk
data disk
data disk
data disk
data disk
data disk
data disk
data disk
data disk
data disk
data disk
data disk
data disk
data disk
data disk
data disk
PORT1
--------ready
ready
ready
ready
ready
ready
ready
ready
ready
ready
ready
ready
ready
ready
ready
ready
ready
ready
PORT2
--------ready
ready
ready
ready
ready
ready
ready
ready
ready
ready
ready
ready
ready
ready
ready
ready
ready
ready
TEMP
---34
34
31
34
32
38
33
34
36
30
31
34
34
32
37
38
42
34
LOOP
-----u2l1
u2l2
u1l1
u1l2
STATUS
------ready
ready
ready
ready
STATE
---------enabled
enabled
enabled
enabled
MODE
------master
slave
master
slave
CABLE1
--------installed
installed
-
CABLE2
--------installed
installed
TEMP
---30.0
30.5
27.0
29.5
POWER
-----u1pcu1
u1pcu2
u2pcu1
u2pcu2
STATUS
------ready
ready
ready
ready
STATE
--------enabled
enabled
enabled
enabled
SOURCE
-----line
line
line
line
OUTPUT
-----normal
normal
normal
normal
BATTERY
------normal
normal
normal
normal
TEMP
-----normal
normal
normal
normal
Chapter 5
FAN1
-----normal
normal
normal
normal
VOLUME
-----v0
v0
v0
v0
v0
v0
v0
v0
v0
v1
v1
v1
v1
v1
v1
v1
v1
v1
FAN2
-----normal
normal
normal
normal
Troubleshooting the Array
5-13
Note – When checking disk drive status, there can be a delay between the time
when drive reconstruction is started and when the fru stat output displays an
optimal status. If the drive is under reconstruction when you run the fru stat
command, the command output will show the drive as missing. Once the drive
finishes rebuilding, the fru stat output will show the drive as ready.
5.3
Identifying Miscabled Partner Groups
If you configure a partner group that has booted successfully, but you are unable to
establish a telnet connection, a possible cause is that the partner group has been
cabled together incorrectly.
The interconnect cable connections between dual controller units are critical for
determining which unit is the master controller unit and which is the alternate
master controller unit. If the interconnect cables are not properly installed on the
interconnect cards, it is possible for the top unit to boot as the master controller, and
the bottom unit would assume alternate master status. This becomes a problem
because the host has been configured to use the MAC address of the bottom unit.
If the bottom unit is incorrectly cabled making the bottom unit the alternate master,
the bottom unit’s Ethernet port will be inactive unless a failover situation occurs. In
that event, the IP and MAC address of the bottom unit will take over the values of
the master (top) unit.
If you suspect the partner group has been cabled together incorrectly, the following
procedure can help you determine if the top unit is acting as the master controller.
1. Determine the MAC address of the top unit.
The MAC address is located on a pull-out tab at the front of the unit, to the left of
the first disk drive. (FIGURE 5-1).
5-14
Sun StorEdge T3 and T3+ Array Administrator’s Guide • August 2001
Pull-out tab
FIGURE 5-1
MAC Address on Pull-out Tab
2. Edit the files on the RARP server to include the MAC address of the top unit.
a. Edit the /etc/ethers file by adding the MAC address and array name.
For example:
8:0:20:7d:93:7e array-name
In this example:
■
■
8:0:20:7d:93:7e is the MAC address
array-name is the name of the master controller unit.
b. Edit the /etc/hosts file with the IP address and array name.
For example:
192.129.122.111 array-name
In this example, 192.129.122.111 is the assigned IP address.
Chapter 5
Troubleshooting the Array
5-15
c. Edit the /etc/nsswitch.conf file to reference the local system files.
To ensure the Solaris software environment uses the changes made to
/etc/ethers and /etc/hosts files, edit the host and ethers entries in the
/etc/nsswitch.conf file so that the files parameter appears before the
[NOTFOUND=return] statements as shown:
hosts:
ethers:
nis files [NOTFOUND=return]
nis files [NOTFOUND=return]
d. Determine if the RARP daemon is running by typing:
# ps -eaf | grep rarpd
■
If the RARP daemon is running, you must kill the process and restart it for the
host to recognize the changes you just made. To kill the process, type:
# kill process ID
The process ID was provided in the ps -eaf | grep rarpd command output.
■
If the RARP daemon is not running, continue to the next step.
e. Start the RARP daemon in the Solaris environment by typing:
# /usr/sbin/in.rarpd -a &
3. Make sure you have an Ethernet connection to the Ethernet port of the top unit.
See the cabling section in the Sun StorEdge T3 and T3+ Array Installation, Operation,
and Service Manual for more information. If you do not have an Ethernet connection
to the top unit but do have one to the bottom unit, remove the cable from the bottom
unit and connect it to the top unit.
4. Press the power switch on the power and cooling units on both arrays to remove
AC power (FIGURE 5-2).
After pressing the switches, it may take some time for the units to power off while
shutdown procedures are performed. Wait until the units have powered off
completely.
5-16
Sun StorEdge T3 and T3+ Array Administrator’s Guide • August 2001
Power switches
FIGURE 5-2
Power Switch Locations
5. After both units have powered off, press the power switch on the power and
cooling units again to restore power to and reset the arrays.
It may take up to several minutes for the arrays to power on and come back online.
All LEDs will be green when the unit is fully powered on.
6. After the units are fully powered on, start a telnet session.
The telnet session will connect to the top unit.
If you still cannot start a telnet session, investigate the following other possible
causes:
■
RARP server not responding. To determine if this is the problem:
■
Verify that the RARP daemon is running on the host system.
■
Verify that the /etc/nsswitch.conf file is properly configured on the RARP
server.
■
In the Solaris environment, use the snoop(1M) command to verify that the
array is attempting to establish RARP communication with the Solaris server.
■
MAC address is incorrect. In the Solaris environment, use the snoop(1M)
command to specify the MAC address of the array and see if any RARP packets
are transmitted. If nothing is observed during a reboot of the array, verify that the
MAC address on the array label matches the MAC address configured on the
RARP server.
■
Netmask is incorrect. The default netmask address used on the array is
255.255.255.0. If your local subnet uses a different netmask, the RARP operation
may not work.
■
Inoperable network connections. If you are using hubs to connect to the
network, try eliminating or replacing the hub.
Chapter 5
Troubleshooting the Array
5-17
5.4
Identifying Data Channel Failures
The data channel encompasses the host data path that extends from the host bus
adapter to the array. Errors in the host data channel are outside of the scope of the
Sun StorEdge T3 and T3+ array. To determine failures in the data path, you must use
host-based application diagnostics, such as the StorTools product for the Solaris
operating environment.
Refer to the documentation of the selected diagnostics tool for information on
identifying data channel failures.
5-18
Sun StorEdge T3 and T3+ Array Administrator’s Guide • August 2001
APPENDIX
A
Command Descriptions
This appendix contains descriptions of the commands supported by the Sun
StorEdge T3 and T3+ array and is divided into the following sections:
■
■
■
A.1
“Commands List” on page A-1
“FRU Identifiers” on page A-3
“Command Summaries” on page A-3
Commands List
TABLE A-1 contains an alphabetical listing of the commands supported by the array.
To generate the command descriptions, use the command-name help command.
For example, for information on the reset command, type:
:/: reset help
usage: reset [ -y ]
A-1
TABLE A-1
Commands Listed in Alphabetical Order
Description
Re-entrant1
Page
boot
Boot system
No
A-4
disable
Disable certain FRUs
No
A-5
disk
Disk administration
No
A-5
enable
Enable certain FRUs
No
A-6
ep
Program the flash EPROM
No
A-6
fru
Display the FRU information
No
A-7
help
Display reference manual pages
Yes
A-8
id
Display FRU identification summary
No
A-8
lpc
Get interconnect card property
No
A-10
ofdg
Perform back-end offline loop diagnostics
No
A-11
port
Configure the interface port
No
A-12
proc
Display status of outstanding vol processes
No
A-13
refresh
Start/stop battery refreshing or display its
status
No
A-13
reset
Reset system
Yes
A-15
set
Display or modify the set information
No
A-15
shutdown
Shutdown array or partner group
No
A-17
sys
Display or modify the system information
No
A-18
ver
Display software version
No
A-19
vol
Display or modify the volume information
No
A-19
Command
1. A re-entrant command is one that can be run in multiple telnet sessions to the same array.
A-2
Sun StorEdge T3 and T3+ Array Administrator’s Guide • August 2001
A.2
FRU Identifiers
Many commands use a FRU identifier to refer to a particular FRU in an array. This
identifier contains a unit constant (u), the unit number (encid), the FRU constant
(ctr for controller card, pcu for power and cooling unit, l for interconnect card, d
for disk drive) and the FRU number (n). TABLE A-2 lists the possible FRU variables as
they appear in this appendix.
TABLE A-2
A.3
FRU Identifiers
FRU
Identifier
Unit number
Controller card
uencidctr
encid = unit number (1, 2, ...)
Power and cooling unit
uencidpcu[1|2]
encid = unit number (1, 2, ...)
n = pcu number (1, 2)
Interconnect card
uencidl[1|2]
encid = unit number (1, 2, ...)
n = interconnect card number (1, 2)
Disk drive
uenciddn
encid = unit number (1, 2, ...)
n = disk drive number (1 to 9)
Command Summaries
The following sections provide summaries of Sun StorEdge T3 and T3+ array
commands. Command summaries are listed in alphabetical order of the command.
Appendix A
Command Descriptions
A-3
A.3.1
boot
TABLE A-3
boot Command Summary
Name
boot
Synopsis
boot
boot
boot
boot
Description
Boots the RAID software according to the boot mode, configured with
the set command.
-f disk_no
-i filename.bin
-s
-w
Options
-f
Verifies the disk boot image in the specified disk; updates the disk with
its current disk position if the boot partition is OK; if the boot partition
is not OK, the command exits, displaying “Failed to set new boot disk
position” on the console.
-i
• Sun StorEdge T3 arrays:
Installs new autoboot firmware onto the drives from filename.bin.
filename can be a maximum of 11 characters. This new firmware will be
executed after the next system restart (if boot mode is set to auto). The
new firmware must be downloaded using the ftp command. Firmware
is copied to disk and boots from disk.
• Sun StorEdge T3+ arrays:
Copies the level 3 controller firmware image to the controller card flash,
which is different from the location used for a Sun StorEdge T3 array.
A-4
-s
Used when disks in an array are detected as being in the wrong disk
position. If this occurs, a special prompt ADMIN> is displayed. At this
point, use the boot -s command to correct this state and reboot the
array.
-w
Sets the default values to system area and configuration setting only.
The boot image and local file system will be retained. Use to quickly
clear all the system and configuration settings.
Sun StorEdge T3 and T3+ Array Administrator’s Guide • August 2001
A.3.2
disable
TABLE A-4
A.3.3
disable Command Summary
Name
disable
Synopsis
disable uencid
disable uencidl [1|2]
Description
Disables specified FRUs.
Arguments
See Section A.2, “FRU Identifiers” on page A-3 for definitions.
disk
TABLE A-5
disk Command Summary
Name
disk
Synopsis
disk version drives
disk download drives filename
Description
Controls, displays and configures disks.
Options
version
Displays the firmware version of the selected drive(s).
download
Updates the selected drive(s) with new firmware specified by the
filename.
Arguments
drives
filename
The disk drive numbers.
The file to use for drive firmware updates.
Appendix A
Command Descriptions
A-5
A.3.4
enable
TABLE A-6
A.3.5
enable Command Summary
Name
enable
Synopsis
enable uencid
enable uencidl [1|2]
Description
Enables specific FRUs.
Arguments
See Section A.2, “FRU Identifiers” on page A-3 for definitions.
ep
TABLE A-7
ep Command Summary
Name
ep
Synopsis
ep download filename
Description
Updates the FLASH with new firmware specified by filename.
Arguments
filename
A-6
The new firmware to be loaded into the controller EPROM. The file
must reside in the local file system.
Sun StorEdge T3 and T3+ Array Administrator’s Guide • August 2001
A.3.6
fru
TABLE A-8
fru Command Summary
Name
fru
Synopsis
fru
fru
fru
fru
fru
fru
fru
fru
fru
fru
fru
fru
fru
fru
fru
fru
fru
fru
fru
fru
fru
fru
Description
Displays the field-replaceable unit (FRU) information.
l[ist]
list sys
list [u<1-8>]
list [u<1-8>]c[1]
list [u<1-8>]d[<1-9>]
list [u<1-8>]l[<1-2>]
list [u<1-8>]pcu[<1-2>]
list [u<1-8>]mpn[1]
s[tat]
stat sys
stat [u<1-8>]
stat [u<1-8>]c[1]
stat [u<1-8>]d[<1-9>]
stat [u<1-8>]l[<1-2>]
stat [u<1-8>]pcu[<1-2>]
st[atistic]
statistic sys
statistic [u<1-8>]
statistic [u<1-8>]d[<1-9>]
statistic [u<1-8>]p[1]
[clear]
statistic [u<1-8>]v[<1-2>] [clear]
myuid
Options
list
list sys
Displays all FRU IDs types, vendor, model, version, and serial number.
stat sys
Displays the status and role of each tray.
statistic
sys
Displays I/O statistics.
myuid
Displays the current controller.
Arguments
See Section A.2, “FRU Identifiers” on page A-3 for definitions.
Appendix A
Command Descriptions
A-7
A.3.7
help
TABLE A-9
A.3.8
help Command Summary
Name
help
Synopsis
help
Description
Displays commands.
id
TABLE A-10
id Command Summary
Name
id
Synopsis
id
id
id
id
Description
Displays FRU identification summary.
read
read
read
read
uencid
uencidpcu[1|2]
uencidl[1|2]
uencidc1
Option
id read
uencid
Displays FRU information for the array midplane.
id read
uencidpcu
[1|2]
Displays FRU information for the array power and cooling unit.
id read
uencidl[1|2]
Displays FRU information for the array interconnect (loop) cards.
id read
uencidc1
Displays FRU information for the array controller.
id read
uncidc1
Displays information from center FRUID for the array only.
[fruid]
Arguments
A-8
See Section A.2, “FRU Identifiers” on page A-3 for definitions.
Sun StorEdge T3 and T3+ Array Administrator’s Guide • August 2001
A.3.9
logger
TABLE A-11
logger Command Summary
Name
logger
Synopsis
logger [-dmprstlog] [-f <file | -> ] [-p facility.priority]
[message]
Description
Generates messages to the syslog in the unit.
Options
-dmprstlog
Dumps the reset log, and displays the system crash information. This
log information can be useful in troubleshooting controller crashes.
-f
Specifies a particular file or content to be logged. -f <file> specifies a
particular file; if used, only the first 20 lines will be logged.
-f <-> specifies a request to log standard input; if used, the next line
up to Control-c or Control-d followed by a Return will be logged.
-p
Specifies the message’s facility and priority level. The default facility is
user and the default priority is notice.
Arguments
message
Text of message to be logged.
Example
This example shows text being written to the syslog facility as a
warning:
:/: logger -p syslog.warning this is a test
will write the following into the syslog:
Oct 26 14:44:56 sh01[1]: W: this is a test
Appendix A
Command Descriptions
A-9
A.3.10
lpc
TABLE A-12
lpc Command Summary
Name
lpc
Synopsis
lpc
lpc
lpc
lpc
lpc
lpc
Description
A utility to display and upgrade interconnect cards.
version
download uencid1{1|2} filename
reboot uencid1{1|2}
rsn uencid1{1|2}
rid uencid1{1|2}
ledtest uencid1{1|2} delay
Options
version
Displays each interconnect card firmware version.
download
Downloads new interconnect card firmware.
reboot
Executes soft reset to selected interconnect card.
rsn
Displays serial number.
rid
Displays interconnect card vendor id and product id.
ledtest
Tests LEDs controlled through the interconnect card. This option does
not test the AC LED on the PCU or the drive activity LED on disk
drives; these LEDs are not controlled through the interconnect card.
Arguments
A-10
uencid
Unit ID. See Section A.2, “FRU Identifiers” on page A-3 for definitions.
filename
File name of new firmware to download.
Sun StorEdge T3 and T3+ Array Administrator’s Guide • August 2001
A.3.11
ofdg
TABLE A-13
ofdg (Offline Diagnostics) Command Summary
Name
ofdg
Synopsis
ofdg
ofdg
ofdg
ofdg
Description
A utility to perform back-end loop diagnostics. All non-u1 disks must
be assigned to a volume to perform this diagnostic. Test output is
displayed in the syslog file. This test does not detect missing
interconnect cables.
[-y]
[-y]
[-y]
[-y]
health_check
fast_test uencidl[1|2]
fast_find uencidl[1|2]
find uencidl[1|2]
Options
health_
check
Performs a fast test on all detected loops in a partner group.
fast_test
Performs a nondisruptive, fast loop test on the specified loop. Disk
path failovers are not performed with this test.
fast_find
Performs a loop test on partner groups, providing limited detection of
bad FRUs. Use the fast_find option before using the find option to
eliminate interconnect cards, interconnect cables, and controller cards
as possible bad FRUs. This test reconfigures loops and performs disk
path failovers.
find
Performs a loop test on all loops in a partner group and provides loop
fault diagnostics, which has the capability to isolate a FRU problem to
a single disk port. Use the find option only after using the
fast_find option. This test reconfigures loops and by-passes disk
ports.
Arguments
-y
Provides an affirmative answer to the command prompt:
WARNING - Volume data will be offline while OFDG is
running. Continue? [N]:
uencid
Unit ID. See Section A.2, “FRU Identifiers” on page A-3 for definitions.
Appendix A
Command Descriptions
A-11
A.3.12
port
TABLE A-14
port Command Summary
Name
port
Synopsis
port
port
port
port
Description
A utility used to manage ports.
list
set port targetid target-id-value | s[oft]
host port sun | other
listmap [port]
Options
list
Displays the configuration of the ports.
set
Modify port parameters and change the port target ID value. Any
changes to the target ID require a reset for the changes to take effect.
host
Whenever attaching to a Solaris 2.6 host, add the option ‘sun’ to the
end of the port host command. For example: port host u1p1.
listmap
Shows the current mappings between host interface ports and LUNS
and volumes.
Arguments
port
Specifies the port. The format is: uarraypportindex. Examples: u1p1,
u2p1
target-id-value
Examples
Specifies the target ID (FC-AL ALPA). Valid values are from 0 to 125;
the optional argument s means soft-addressing.
:/: port list
port targetid addr_type status host wwn
u1p1 1
hard
online other 50020f230000036a
:/: port listmap
port targetid addr_type lun
u1p1 1
hard
1
volume
u1vol1
:/: port set u1p1 targetid 6
A-12
Sun StorEdge T3 and T3+ Array Administrator’s Guide • August 2001
owner access
u1 primary
A.3.13
proc
TABLE A-15
proc Command Summary
Name
proc
Synopsis
proc list [cmd-ref | vol-name]
proc kill cmd-ref | vol-name
Description
Displays status of outstanding vol processes.
Options
list
Displays the command reference number of an active vol init, vol
verify or vol recon command currently in progress.
kill
Terminates the active vol init, vol verify or vol recon
command by specifying its command reference number.
Arguments
cmd-ref |
vol-name
Specifies the command reference number or volume name.
Appendix A
Command Descriptions
A-13
A.3.14
refresh
TABLE A-16
refresh Command Summary
Name
refresh
Synopsis
refresh
refresh
refresh
refresh
Description
Starts the battery refresh operation on all power and cooling unit 1
batteries, followed by all power and cooling unit 2 batteries. This
operation consists of discharging and recharging each power and
cooling unit battery. Battery refresh takes up to 10 hours for each
power and cooling unit.
-c
-s
-i
-k
An automatic battery refresh cycle is performed once every 28 days;
the cycle frequency is specified in the /etc/sched.conf file on the
array. A manual battery refresh cycle is not required. During this cycle,
one battery is always fully charged. A battery refresh cycle will not
begin unless both batteries are in optimal condition.
Options
A-14
-c
Starts the refresh cycle.
-s
Reports the refresh cycle status.
-i
Directs the scheduler to reload the battery configuration file; for field
service use only.
-k
Kills the current refreshing task.
Sun StorEdge T3 and T3+ Array Administrator’s Guide • August 2001
A.3.15
reset
TABLE A-17
reset Command Summary
Name
reset
Synopsis
reset [-y]
Description
Resets the controller. Use the sync command before a reset
command.
Argument
-y
A.3.16
Answers “yes” when prompted to perform reset.
set
TABLE A-18
set Command Summary
Name
set
Synopsis
set
set
set
set
set
set
set
set
set
set
set
Description
Sets and displays the boot parameters. Without any parameters, the
set command shows the values of the parameters.
bootmode auto | tftp | none
bootdelay seconds <use value from 1 to 20 seconds>
ip value
netmask value
gateway value
tftphost value
tftpfile value
hostname value
logto 1 | * | /filename
loglevel 0 | 1 | 2 | 3 | 4
rarp on |off
Appendix A
Command Descriptions
A-15
TABLE A-18
set Command Summary (Continued)
Options
bootmode
Defines how the array is booted:
• Use auto boot for loading the RAID software from the local drives.
This is the default mode.
• If bootmode is using tftp, use tftphost and tftpfile. (Field
service procedure only.)
• If bootmode is set to none, use system EPROM command line. (Field
service procedure only.)
A-16
bootdelay
The delay time, in seconds, to cancel a system boot.
ip
The network IP address. The value is expressed in dotted decimal
notation (for example, 192.9.200.100).
netmask
The subnet mask for the network. The value is expressed in dotted
decimal notation (for example, 255.255.255.0).
gateway
The default gateway on the network. The value is expressed in dotted
decimal notation (for example, 192.9.200.1).
tftphost
The IP address of the server from which a tftp boot should be
performed. (Field service procedure only.)
tftpfile
The file name on the tftpboot server that contains the RAID software.
The value is a string of up to 39 characters. (Field service procedure
only.)
hostname
The user assigned name of the array.
Sun StorEdge T3 and T3+ Array Administrator’s Guide • August 2001
TABLE A-18
set Command Summary (Continued)
The file where messages are to be logged:
• If logto is set to 1, logging occurs only through the serial port; log
messages are not sent to the /syslog file.
logto
• If logto is set to *, and an /etc/syslog.conf entry specifies an
output file name that already exists, the arrayappends new log
information to the end of that output file. If the output file specified in
/etc/syslog.conf doesn’t exist, the arraycreates a new file with that
name. If the output file does not exist and cannot be created, the entry
will be ignored.
Note: If there are changes to the /etc/syslog.conf file, you must
type set logto * for those changes to take effect.
• If logto is set to /filename, and the specified file name does not exist,
the arraycreates a new file with that name. If the file name already
exists, the array appends new log information to the end of the existing
file. If the file name does not exist and cannot be created, the array will
attempt to open or create the default syslog file
/syslog. If both /filename and /syslog cannot be opened, logging
occurs through the serial port only.
loglevel
If enabled and connected to a rarp server, sets the IP address.
rarp
A.3.17
The level of messages to be logged (0=none, 1=errors, 2=
warnings/errors, 3=notices/warnings/errors, 4=
informational/notices/warnings/errors).
shutdown
TABLE A-19
shutdown Command Summary
Name
shutdown
Synopsis
shutdown [-y]
Description
The shutdown command performs a controlled shutdown of the array
and any array connected to it.
Argument
-y
Answers “yes” when prompted to perform a shutdown.
Appendix A
Command Descriptions
A-17
A.3.18
sys
TABLE A-20
sys Command Summary
Name
sys
Synopsis
sys
sys
sys
sys
sys
sys
sys
sys
sys
Description
A utility used to manage system information.
list
stat
blocksize 16k|32k|64k
cache auto|writebehind|writethrough|off
mirror auto|off
mp_support none|rw|mpxio|std
rd_ahead on|off
recon_rate high|med|low
naca
Options
list
Displays the current controller configuration.
stat
Displays the current controller status.
blocksize
Sets the system block size, which equals the stripe unit size: the
amount of data written to each drive when striping data across
drives. The block size can be changed only when there are no
volumes defined.
cache
Sets the system caching policy.
mirror
Turns the cache mirror feature on or off when using dual
controllers.
mp_support
• If mp_support is set to none, multipathing support is disabled.
Use this mode for workgroup configurations only.
• If mp_support is set to rw, multipathing support is enabled.
Use this mode for enterprise configurations to ensure redundancy.
• If mp_support is set to mpxio, this setting supports Sun StorEdge
Traffic Manager software’s multipathing utility. This setting is
required for all enterprise configurations in Sun Cluster
environments.
• The std option is reserved. Before using this option, contact your
SunService provider.
rd_ahead
A-18
Sets the number of sequential read commands before automatically
switching to datablock read ahead. Set to off to always perform
datablock read ahead.
Sun StorEdge T3 and T3+ Array Administrator’s Guide • August 2001
TABLE A-20
A.3.19
recon_rate
The disk drive reconstruction rate options: high, medium, or low.
naca
Enables IBM/AIX support.
ver
TABLE A-21
A.3.20
sys Command Summary (Continued)
ver Command Summary
Name
ver
Synopsis
ver
Description
Displays the current version of controller firmware on a Sun StorEdge
T3 array or the current version of level 3 controller firmware on a Sun
StorEdge T3+ array.
vol
TABLE A-22
vol Command Summary
Name
vol
Synopsis
vol
vol
vol
vol
vol
vol
vol
vol
vol
vol
vol
vol
Description
Used to manage volumes.
add name data drive raid 0|1|5> [standby drive]
disable drive [to–standby]
init name data|sysarea|fast [rate <1–16>]
list name
mode name
mount name
recon drive to–standby|from–standby
remove name
stat name
unmount name
verify name [fix] [rate <1–8>]
-y remove name
Options
add
Configures a new volume by assigning it data and hot spare (standby)
drives. The data drives cannot already be assigned to any other
volume. The hot spare (standby) drive can be shared by multiple
volumes.
Appendix A
Command Descriptions
A-19
TABLE A-22
vol Command Summary (Continued)
disable
Marks the specified drive unusable. If the to_standby argument is
included, data is first reconstructed onto the hot spare (standby) drive
(if available), and then it is disabled. The volume must be mounted for
this command.
init
Initializes the volume parity or system area label. This argument
specifies the initialize option to be performed on the selected volume:
• data - Initialize the entire data area with correct parity data. This
operation will destroy all user data on volume. It will take several
minutes to complete.
• sysarea - Initialize the system area with correct private label
information. This option is only for qualified service providers.
• fast - Initialize and bypass data area. The initialization rate can be
set to any value from 1 (slowest) to 16 (fastest). The default rate for the
array is 16. This option is to be used for RAID 0 volumes only.
A-20
list
Displays the configuration of the currently assigned volumes.
mode
Displays cache and mirror settings, and whether the volume is
mounted.
mount
Mounts the volume so the host can access it.
recon
Rebuilds (reconstruct) the data of the specified drive. If the
to_standby argument is included, data is written to the hot spare
(standby) drive. If the from_standby argument is included, data is
written back from the hot spare (standby). The volume must be
mounted for this command. If necessary, the drive is spun up before
reconstruction occurs. Following successful reconstruction, the
disabled drive is re-enabled.
remove
Deletes a volume by de-assigning the data and hot spare (standby)
drives assigned to it. The drives can then be assigned to a different
volume. The volume must be unmounted before it can be removed.
stat
Displays the operational status of a volume.
unmount
Unmounts the volume to disable access from the host.
verify
Enables an array administrator to execute manual parity checks on
existing volumes. The default verification rate is 1 (minimum impact
on data host). The verification rate can be set to a value from 1 to 8.
Run the vol verify command before performing tape-backup
overwrite cycles, approximately once every 30 days.
If the fix option is specified and an error is detected, the vol verify
command will regenerate parity from the existing data on the volume.
-y remove
Deletes a volume without prompting for verification to remove.
Sun StorEdge T3 and T3+ Array Administrator’s Guide • August 2001
TABLE A-22
vol Command Summary (Continued)
Arguments
name
Specifies the volume name.
drives
Specifies the set of drives to be assigned to the volume.
Example
:/: vol list
volume capacity
v0
125.2 GB
v1
125.2 GB
raid
5
5
data
standby
u2d1-8 u2d9
u2d1-8 u2d9
:/: vol add vol-name data u5d1-8 raid 5 standby
u5d9
Appendix A
Command Descriptions
A-21
A-22
Sun StorEdge T3 and T3+ Array Administrator’s Guide • August 2001
APPENDIX
B
syslog Error Messages
This appendix contains a list of errors that can be reported by the array, along with
error definitions.
This appendix is divided into the following sections:
■
■
■
■
B.1
“Error Message Syntax” on page B-1
“Reset Log Types” on page B-16
“Command-Line Error Messages” on page B-17
“Examples” on page B-26
Error Message Syntax
Error message syntax consists of the following three components:
■
■
■
“Message Types” on page B-2
“FRU Identifiers” on page B-2
“Error Message Listing” on page B-3
These components are described in the following subsections, including a listing of
syslog error and warning messages.
B-1
B.1.1
Message Types
A syslog daemon exists in the hardware RAID controller that records system
messages and provides for remote monitoring. There are four possible levels of
messages, listed in TABLE B-1 in order of severity.
TABLE B-1
B.1.2
Message Types
Message Type
Definition
Error
Indicates a critical system event requiring immediate user
intervention or attention. For example, an over temperature
condition or a detected FRU being removed.
Warning
Indicates a possible event requiring eventual user intervention. For
example, a FRU being disabled and recovery procedure executed.
Notice
Indicates a system event that may be a side effect of other events or
may be a normal condition. For example, the power switch is
turned off.
Information
Indicates a system event that has no consequence on the running
health of the system. For example, a good state of a FRU.
FRU Identifiers
The syntax of the error message uses a FRU identifier to refer to a particular FRU in an
array. This identifier contains a unit constant (u), the unit number (n), the FRU
constant (ctr for controller card, pcu for power and cooling unit, l for interconnect
card, d for disk drive), and the FRU number (n).
TABLE B-2
B-2
FRU Identifiers
FRU
Identifier
Unit number
Controller card
unctr
n = unit number (1, 2, ...)
Power and cooling unit
unpcun
n = unit number (1, 2, ...)
n = pcu number (1, 2)
Interconnect card
unln
n = unit number (1, 2, ...)
n = interconnect number (1, 2)
Disk drive
undn
n = unit number (1, 2, ...)
n = disk drive number (1 to 9)
Sun StorEdge T3 and T3+ Array Administrator’s Guide • August 2001
B.1.3
Error Message Listing
TABLE B-3 lists possible error messages.
TABLE B-3
Error Messages
Error Message
Description
Solution
System
E: No boot image on disk,
writing EPROM to boot image
area...
No master copy of image on
disk. Writing to disk from flash.
E: EPROM update failed...
Failed to write image from disk
to flash.
E: Power On Self Test
failed...
This is a fatal error which
means that the firmware may be
unable to communicate with the
drives. Problem may be caused
by interconnect cables, loop
cards, controller, disks/
firmware, centerplane.
Troubleshoot the unit. Check
status.
E: u<n>ctr: Not present
The array detects that the
controller is missing; controller
has been removed.
Reseat or replace the controller
card.
E: u<n>ctr: Missing; system
shutting down in <n> minutes
A controller is missing and a
countdown has started. If the
controller is not replaced in <n>
minutes, the system will shut
down.
Replace the controller.
E: u<n>ctr: Missing; system
shutting down now
A controller card was not
replaced within the stated time;
system shutting down now.
Replace the controller card and
power on the system.
E: ISP2200 test failed
ISP2200 POST test failed.
Please contact your contract
service provider for further
analysis.
E: Data cache memory test
failed
Cache Memory POST test failed.
Contact your contract service
provider for further analysis.
E: XOR functions and
datapaths test failed
XOR Memory POST test failed.
Controller will be reset.
Controller board replacement
may be necessary. Please take
appropriate action.
Controller Card
Appendix B
syslog Error Messages
B-3
TABLE B-3
Error Messages (Continued)
Error Message
Description
Solution
E: u<n>l<n>: Missing; system
shutting down in <n> minutes
A loopcard is missing, and a
countdown has started. If the
loop card is not replaced in the
time frame, then the system will
shut down.
Replace the loop card.
E: u<n>l<n>: Missing; system
shutting down now
A loopcard was not replaced
within stated time; system
shutting down now.
Replace the loop card and
power on the system.
E: u<n>l<n>: Not present
System detects that the
interconnect card is missing.
Reseat or replace the
interconnect card.
E: u<n>l<n>: UP cable not
present
or:
E: u<n>l<n>: DOWN cable not
present
System detects missing
interconnect cable for
interconnect card.
Check cables.
E: u<n>d<n>: Missing; system
shutting down in <n> minutes
A disk drive is missing and a
countdown has started. If the
drive is not replaced in the
stated time, the system will shut
down.
Replace the missing disk drive.
E: u<n>d<n>: Missing; system
shutting down now
A disk drive was not replaced
within the stated time; system
shutting down now.
Replace the disk drive and
power on the system.
E: Multi-disk failure, access
disallowed
System detects multiple disk
failure in the LUN, and
automatically unmounts this
volume.
Check the syslog for any other
related messages. Replace the
failed disks.
E: u<n>d<n>: Not present
System detects a drive was
removed.
Reseat or replace the disk drive.
E: u<n>pcu<n>: Missing;
system shutting down in <n>
minutes
A power and cooling unit is
missing and a countdown has
started. If the unit is not
replaced in the stated time, the
system will shut down.
Replace the power and cooling
unit.
E: u<n>pcu<n>: Missing;
system shutting down now
A power and cooling unit was
not replaced within in the stated
time; system shutting down
now.
Replace the power and cooling
unit; power on the system.
Interconnect (loop) Card and Cable
Drive
Power and Cooling Unit
B-4
Sun StorEdge T3 and T3+ Array Administrator’s Guide • August 2001
TABLE B-3
Error Messages (Continued)
Error Message
Description
Solution
E: u<n>pcu<n> Not present
System detects the power and
cooling unit is missing.
Reseat or replace the power and
cooling unit.
E: u<n>pcu<n>: Over
temperature, serial no = x
System detects that a power and
cooling unit has reached an
over temperature state.
Replace the power and cooling
unit.
E: u<n>pcu<n>: Battery not
present
System detects that the battery
is missing.
Replace the power and cooling
unit.
E: u<n>ctr1: Multiple Fan
Faults; system shutting down
in N minutes
The controller has detected a
fault on fans in both power and
cooling units.
Determine which fans in which
power and cooling unit failed;
replace the power and cooling
unit.
E: u<n>ctr1: Multiple Fan
Faults; system shutting down
now
The controller has detected a
fault on fans in both power and
cooling units.
Determine which fans in which
power and cooling unit failed;
replace the power and cooling
unit.
Appendix B
syslog Error Messages
B-5
B.1.4
Warning Message Listing
TABLE B-4 lists possible warning messages, which are divided into FRU categories
and System.
TABLE B-4
Warning Messages
Warning Message
Description
Solution
W: u<n>ctr recon failed in
vol volume_name
Reconstruct operation failed for
this volume.
Verify that the volume is still
mounted and that there is only
one drive disabled. Restart the
reconstruct operation manually,
or reconstruct the data to
another drive. Previous
messages in syslog should
indicate which disk(s) had a
problem.
W: u<n>ctr initialization
failed in vol volume_name
Volume data initialization to
zero failed.
Check the disk drive status
using the vol stat command.
If any disk has a non-zero
status, either initialize the
volume using the vol init
command, or replace the disk.
System
B-6
Sun StorEdge T3 and T3+ Array Administrator’s Guide • August 2001
TABLE B-4
Warning Messages (Continued)
Warning Message
W: u<n>ctr Reset (xxxx)
occurred
or
W: u<n>ctr Hardware Reset
(xxxx) occurred
or
W: u<n>ctr Exception Reset
(xxxx) occurred
or
W: u<n>ctr Assertion Reset
(xxxx) occurred
or
W: u<n>ctr RaidFail Reset
(xxxx) occurred
or
W: u<n>ctr Takeover Reset
(xxxx) occurred
or
W: u<n>ctr PsosFail Reset
(xxxx) occurred
or
W: u<n>ctr SysFail Reset
(xxxx) occurred
or
W: u<n>ctr MmuFail Reset
(xxxx) occurred
Description
Solution
A hard reset occurred. Message
indicates a controller has been
reset manually.
Check adjacent messages to see
if this event indicates an error.
Appendix B
syslog Error Messages
B-7
TABLE B-4
Warning Messages (Continued)
Warning Message
Description
Solution
W: u<n>ctr Reset (xxxx) was
initiated at <date> <time>
<message>
or
W: u<n>ctr Hardware Reset
(xxxx) was initiated at
<date> <time> <message>
or
W: u<n>ctr Exception Reset
(xxxx) was initiated at
<date> <time> <message>
or
W: u<n>ctr Assertion Reset
(xxxx) was initiated at
<date> <time> <message>
or
W: u<n>ctr RaidFail Reset
(xxxx) was initiated at
<date> <time> <message>
or
W: u<n>ctr Takeover Reset
(xxxx) was initiated at
<date> <time> <message>
or
W: u<n>ctr PsosFail Reset
(xxxx) was initiated at
<date> <time> <message>
or
W: u<n>ctr SysFail Reset
(xxxx) was initiated at
<date> <time> <message>
or
W: u<n>ctr MmuFail Reset
(xxxx) was initiated at
<date> <time> <message>
A soft reset occurred, for one of
several reasons. The specific
error is indicated by the Type.
Check Table B-5 for information
about the type of reset that
occurred. The field here should
match one of those listed in
Table B-5.
W: u<n>ctr Illegal mp_support
mode for explicit LUN fail
over request (opcode 0xD0
received) on LUN
The mp_support option is set
to an invalid value.
Use the sys list command
(or Component Manager) to set
the mp_support flag to mpxio
or std.
W: u<n>d<n>:
SVD_PATH_FAILOVER: path_id =
x
or
W: u<n>d<n>:
SVD_PATH_FAILOVER: path_id =
x, lid = x
A failover has occurred,
indicating that one of the
system's replaceable units is
faulty.
Troubleshoot and replace the
failed component. You can find
more information in related
syslog messages and by using
the fru stat command.
B-8
Sun StorEdge T3 and T3+ Array Administrator’s Guide • August 2001
TABLE B-4
Warning Messages (Continued)
Warning Message
Description
Solution
The Fibre Channel loop is
exhibiting an unexpected
number of LIPs. This problem
can be generated from any of
the FRUs.
In certain cases, running the
ofdg diagnostic may find the
problem. In general, notify your
Sun authorized service
provider.
W: u<n>ctr: Offline
A controller has stopped
communicating with the rest of
the system. Possibly, the
connection between the
controller and the rest of the
system has been disrupted.
Check that the controller card is
connected securely. If its state
becomes disabled, replace the
controller card.
W: u<n>ctr: Inactive
A controller is not
communicating with the rest of
the system. The controller will
be disabled if it does not start
communicating with the rest of
the system within a certain time
period.
W: u<n>ctr: Rebooting
A controller has been rebooted
because it was removed,
disabled, or offline and is now
re-enabled. Alternatively, the
system was shut down and
restarted.
Check previous messages to
determine if the reboot is an
unexpected event.
W: u<n>ctr: Failed to boot
The system was not able to
reboot a controller successfully,
even after repeated attempts.
Replace the controller.
W:
System disabled a controller.
Check previous message queue
to determine why the controller
is disabled. Then enable or
replace the controller.
A LUN failover has occurred.
Use the sys stat command to
see if the controller is disabled.
Then check the syslog for
possible interconnect, host
adapter, or cable problems.
W: u<n>l<n> LMON predictive
failure threshold exceeded LIP
Controller
u<n>ctr: Disabled
W: u<n>ctr starting lun
<lun_#> failover
W: ECC mechanism verification
failed
Contact your contract service
provider for further analysis.
Appendix B
syslog Error Messages
B-9
TABLE B-4
Warning Messages (Continued)
Warning Message
W: u<n>ctr: ISP2x00[N]
qlcf_i_read_response: Debug
Code - Immediate Notify CCBs
Exhausted
or
W: u<n>ctr: ISP2x00[N] DMA
Error Detected
or
W: u<n>ctr: ISP2x00[N]
Received LOOP DOWN async
event
or
W: u<n>ctr: ISP2x00[N] Bad
request pkt
or
W: u<n>ctr: ISP2x00[N] Bad
request pkt header
B-10
Description
Solution
Indicates an error in one of the
ISP 2x00 chips in the controller.
Notify your Sun authorized
service provider.
Sun StorEdge T3 and T3+ Array Administrator’s Guide • August 2001
TABLE B-4
Warning Messages (Continued)
Warning Message
Description
Solution
W: XOR T<n> ERROR: ACC should
not be zero
or
W: XOR T<n> ERROR: ACC should
be zero
or
W: XOR T<n> ERROR: BUF data
not equal to previously
written
or
W: XOR T<n> ERROR: BUF data
should be all zeros
or
W: XOR T<n> ERROR: ORed data
should be all zeros
or
W: XOR T<n> ERROR: Compare
error of BUS and orig data
or
W: XOR T<n> ERROR: buf data
should be all zeros
or
W: XOR T<n> ERROR: Buf check
finds all zeros
or
W: XOR T<n> ERROR: Write to
data cache mem failed
or
W: XOR T<n> ERROR: Read from
data cache mem failed
or
W: XOR T<n> ERROR: Diag Fail
A XOR Memory POST test
failed. Controller will be reset.
Replace the controller board.
Appendix B
syslog Error Messages
B-11
TABLE B-4
Warning Messages (Continued)
Warning Message
Description
Solution
W: u<n>l<n>: Offline
System is not able to poll the
interconnect card for
information. It is possible that
an interconnect card is disabled,
which may cause other
interconnect cards to go offline.
• If no interconnect card is
disabled, check cable
connections to the interconnect
card and make sure it is firmly
seated.
• If the interconnect card does
not come back online, replace
the interconnect card.
W: u<n>l<n>: Disabled
System detects the interconnect
card is disabled.
Check previous message queue
to determine why the
interconnect card is disabled.
Replace the interconnect card if
necessary.
W: Loop 1 may be bad - Please
run ofdg
or
W: Loop 2 may be bad - Please
run ofdg
System detects the possibility of
an internal error in the loop
interconnection.
Use the ofdg command to run
the system's built-in loop
diagnostic.
W: u<n>l<n> LMN2 predictive
failure threshold exceeded IO TIMEOUT
A timeout has occurred during
the ondg test.
W: u<n>l<n> Loop 1 may be bad
- check interconnect cable or
loopcard
or
W: u<n>l<n> Loop 2 may be bad
- check interconnect cable or
loopcard.
System detects a potential loop
failure.
Interconnect (loop) card and Cable
B-12
Sun StorEdge T3 and T3+ Array Administrator’s Guide • August 2001
Check the syslog for any other
related messages and use the
fru stat command to
determine the problem cause.
Remove and replace the bad
part.
TABLE B-4
Warning Messages (Continued)
Warning Message
Description
Solution
W: u<n>d<n> could not open
plugged disk
An attempt to open the newly
plugged disk failed.
Unseat the drive and wait a few
seconds before reseating it so
that the system can retry this
operation.
W: u<n>d<n> could not create
system area
An attempt to create system
area on this disk failed.
1. Unseat the drive and wait a
few seconds before reseating
it so that the system can
retry this operation.
2. If step 1 fails, replace this
drive with a new drive.
W: u<n>d<n> system area is
bad
The system area of the drive has
been corrupted.
1. Unseat the drive and wait a
few seconds before reseating
it so that the system can
retry this operation.
2. If step 1 fails, replace this
drive with a new drive.
W: u<n>d<n> could not open
disk, try unplug then plug
An attempt to bring newly
installed drive online failed.
Unseat the drive and wait a few
seconds before reseating it.
W: u<n>d<n> could not open
disk to be checked
An attempt to open this drive
failed.
1. Unseat the drive, wait a few
seconds, reseat it and retry
the volume add procedure.
2. If step 1 fails, replace the
drive with a new one.
W: u<n>d<n> system area
verify failed
An attempt to verify the data in
the system area failed.
Replace the drive.
• If the volume exists, initialize
the system area to fix the
problem.
• If the volume does not exist,
retry the volume add
procedure.
W: u<n>d<n> write disk
failed, err=<errno>
An attempt to write this disk
failed. System will
automatically disable this disk.
Check the syslog for any other
related messages. Replace the
failed disk.
W: u<n>d<n> Recon attempt
failed
Disk Reconstruct failed for disk
u<n>d<n>.
Check the syslog for other
related failures. If the disk
under reconstruction failed,
replace the disk.
Drive
Appendix B
syslog Error Messages
B-13
TABLE B-4
Warning Messages (Continued)
Warning Message
Description
Solution
W: u<n>d<n> Disable attempt
failed
Disk Disable failed for disk
u<n>d<n>.
Check if the disk is already
disabled by using the vol
stat command. If not disabled,
disable it by typing the vol
disable u<n>d<n> command.
W: u<n>d<n> Installing
u<n>d<n> failed, Try
unplugging and then plugging
Disk drive hot plug installation
failed.
Unseat the drive and reseat it.
W: u<n>d<n> Disk Bypassed
A drive is faulty and being
bypassed from the data loop.
W: u<n>ctr read failed during
recon stripe scb=<n>
During reconstruction, another
drive failed in the volume.
Check syslog for a multiple
drive failure. Replace all failed
disk drives.
W: u<n>d<n> hard err in vol
starting auto disable
There was a hard error on this
disk that prompted a disable
operation on this disk. System
will auto disable and
reconstruct to the hot spare
(standby), if there is one
configured.
If disabled, replace the failed
disk as soon as possible.
W: u<n>ctr disk error during
recon, terminating recon
Possible multiple drive failure
in the volume.
Check the syslog file. Replace
all failed disk drives.
W: u<n>d<n> SCSI Disk Error
Occurred (path = 0x<n>, port
= 0x<n>, lun =
0x<n>)
SCSI disk drive returned an
error status with the
appropriate SCSI Sense Data.
Notify your Sun authorized
service provider.
W: u<n>d<n> SCSI Disk Error
Occurred (path = 0x<n>)
W: Sense Key = 0x%x, Asc =
0x%x, Ascq = 0xN
If port has a value from 0 to 7,
then the message indicates a
transient controller condition,
not an error affecting a disk.
SCSI disk drive returned an
error status with the
appropriate SCSI Sense Data.
Notify your Sun authorized
service provider.
This indicates a drive is in the
wrong position in the unit.
Try to determine correct
position for disk from the
syslog. Power off the system.
Reorder the affected disks and
reboot the system.
W: Sense Data Description =
xxxxx
W: Valid Information = 0xN
W: u<n>d<n> is in wrong disk
position
W: u<n>d<n> is in wrong disk
position, previously in
u<n>d<n>
B-14
Sun StorEdge T3 and T3+ Array Administrator’s Guide • August 2001
TABLE B-4
Warning Messages (Continued)
Warning Message
Description
Solution
W: Disk <n> may be bad - too
slow
If the ondg mode is passive,
drive n is bad.
Replace the drive.
W: Can't Disable Disk
u<n>d<n> - xxx
When ondg detects a slowly
degrading drive, if the ondg
mode is active, the array will try
to disable that drive. If the array
can't disable the drive, it will
print out this warning message
with the error string.
W: Disable Disk u<n>d<n>
Disk d is disabled.
W: u<n>d<n> TMON over
temperature threshold
exceeded
A disk drive temperature has
been exceeded. The drive is
spinning down.
Check drives and possible
airflow obstruction.
W: u<n>d<n> TMON warning
temperature threshold
exceeded
A disk drive temperature
threshold has been exceeded;
the drive is still online.
Check disk drive and possible
airflow obstruction.
W: u<n>d<n>: Failed
System detects disk failure and
automatically disables the disk
drive.
Check the syslog for any other
related messages. Replace the
failed disk.
System detects fan fault on a
power and cooling unit.
1. Verify that the batteries have
had ample time to charge.
2. Ensure a refresh operation is
not in progress.
3. Replace the power and
cooling unit.
W: u<n>pcu<n>: DC not OK,
serial no=x
System detects that the DC
power source in the power and
cooling unit is not OK.
Replace the power and cooling
unit.
W: u<n>pcu<n>: Disabled,
serial no=x
A power and cooling unit has
been disabled.
Check previous messages to see
why the power and cooling unit
has been disabled, and replace
the power and cooling unit if
necessary.
W: u<n>pcu<n>: Off, serial
no=x
A power and cooling unit is off.
Check syslog for a fan fault or
power and cooling unit
overtemp. Replace the power
and cooling unit if necessary.
Power and Cooling Unit
W: u<n>pcu<n>: Fan 1 failed,
serial no=x
W: u<n>pcu<n>: Fan 2 failed,
serial no=x
Appendix B
syslog Error Messages
B-15
TABLE B-4
Warning Messages (Continued)
Warning Message
Description
Solution
W: u<n>pcu<n>: On battery,
serial no=x
System detects that a power and
cooling unit has switched to
battery.
1. Make sure that the AC
power cord is attached.
2. If the unit is receiving AC
power, then replace the
power and cooling unit.
W: u<n>pcu<n>: Switch off
System detects a power and
cooling unit has been powered
off.
Power on the unit by pressing
the power switch.
W: u<n>pcu<n>: Replace
battery, hold time low,
serial no=x
System detects that a battery is
nearing its end of life.
Replace the power and cooling
unit.
W: u<n>pcu<n>: Battery life
expired, replace battery
System detects an expired
battery.
Replace the power and cooling
unit.
W: u<n>pcu<n>: Replace
battery, battery has been on
the shelf for more than two
years
The battery’s shelf life has
exceeded its warranty period.
Replace the power and cooling
unit.
W: u<n>pcu<n>: n days battery
life left, replace battery
System detects that battery is
approaching expiration date.
Replace the power and cooling
unit.
B.2
Reset Log Types
If the error level is set to Notice (2) or higher (Warning or Error), you can trace the
reason for the reset through the syslog file.
TABLE B-5
B-16
Reset Log Types
Index
Type
Type Value
Description
0
Hardware
0x1000
User reset
1
Exception
0x2000
Exception
2
Assertion
0x3000
Software assertion
3
RaidFail
0x4000
RAID fatal error
Sun StorEdge T3 and T3+ Array Administrator’s Guide • August 2001
TABLE B-5
B.3
Reset Log Types (Continued)
Index
Type
Type Value
Description
4
Takeover
0x5000
Takeover
5
PsosFail
0x6000
pSOS fatal error
6
SysFail
0x7000
System error
Command-Line Error Messages
Sun StorEdge T3 and T3+ arrays issue a variety of error messages to the command
line, indicating an incorrectly entered command or invalid operation. When you
enter a command by itself, or the error is syntactic (for example, missing an
argument or using the wrong format), the array displays the command synopsis.
Otherwise, the array displays an error message consisting of a name in capital
letters, a numerical code in hexidecimal digits, and a text message.
The following tables list the errors that the array displays. TABLE B-6 lists the types of
errors and the numerical range associated with each.
TABLE B-6
Error Message Types
Type of Error
Numerical Range
Description
Logical volume manager
(LVM) driver error codes
0x10001–0x1000A
Disk drive-related errors
Virtual Node ("VN") error
codes
0x200000–0x200025
Errors related to vol and other command-line
operations
Port error codes
0x300000–0x300006
Errors related to the port command
Sys error codes
0x400000
Only one error, indicating a bad value
FRU error codes
0x500001–0x500076
Errors related to field replaceable units (FRUs)
pSOS operating system
errors
00000001–C000FFFF
pSOS errors (embedded operating system)
Appendix B
syslog Error Messages
B-17
B.3.1
RAID Errors and Other Common Errors
Volume related errors (VN_ERRORs) are the most common error messages
displayed. TABLE B-7 lists the names and values of these errors.
TABLE B-7
B-18
Volume-Related (VN) Errors
Error Name
Numerical
Value
Message
VN_BADUNIT
0x200000
Bad unit number
VN_BADDRIVE
0x200001
Bad drive number
VN_BADPART
0x200002
Bad partition ID
VN_VOLEXISTS
0x200003
Volume already in use
VN_VOLNOTFOUND
0x200004
Volume name not found
VN_PARTHASFS
0x200005
Partition already has file system
VN_FACLOCKED
0x200006
Facility locked by other command
VN_BADATTR
0x200007
Unable to read attributes
VN_MOUNTED
0x200008
Volume already mounted
VN_UNMOUNTED
0x200009
Volume not mounted
VN_MNTINUSE
0x20000A
Mount point in use
VN_NOMEMORY
0x20000B
Could not allocate memory for operation
VN_ALREADYDSBL
0x20000C
Is already a disabled drive
VN_NODSBL
0x20000D
No drives are disabled
VN_ABORTED
0x20000E
Operation aborted
VN_NOTSUP
0x20000F
Operation not supported
VN_UNKVOL
0x200010
Unknown volume
VN_RAIDERR
0x200015
RAID error
VN_NOPART
0x200016
Partition has size 0
VN_PARTSMALL
0x200017
Partition too small
VN_UNKVIF
0x200019
Unknown interface
VN_UNKVIFTYP
0x20001A
Unknown interface type
VN_BADVOLNAME
0x20001B
Bad volume name
VN_BADVOLNAMELEN
0x20001C
Bad volume name too long
Sun StorEdge T3 and T3+ Array Administrator’s Guide • August 2001
TABLE B-7
Volume-Related (VN) Errors (Continued)
Error Name
Numerical
Value
Message
VN_CFGNOTSUPPORTED
0x20001D
Unsupported volume configuration
VN_BADSTANDBYUNIT
0x20001E
Standby unit number is wrong
VN_DEVINVALID
0x20001F
Invalid drive specified
VN_LOCVOLBAD
0x200020
Local volume bad
VN_PORTMAPRM
0x200021
Volume still mapped to a port
VN_UNINITIALIZED
0x200022
Volume is uninitialized
VN_PENDING
0x200023
Operation is pending
VN_BADMODE
0x200024
Cache mode must be set to auto for
mirroring
VN_MIRRORON
0x200025
Cannot change cache mode when
mirroring is on
Some of these errors are generated more often than others, such as VN_MOUNTED,
VN_UNMOUNTED, VN_MNTINUSE, VN_CFGNOTSUPPORTED, VN_DEVINVALID,
VN_LOCVOLBAD, VN_UNITIALIZED, VN_BADMODE, and VN_MIRRORON. In particular,
VN_RAIDERR, code 0x200015, can result from a variety of scenarios and these
warrant attention. The array uses a specific protocol for carrying out commands, and
this protocol uses the RAID error as a general error message to be sent to the user.
As such, the RAIDERR may result from any of a number of software or hardware
conditions. Some cases involve problems related to the user configuration, which can
be remedied easily. Other cases are more subtle and are related to the function of the
array’s internal software. Detailed information for specific instances of the RAID
error can be found in the syslog; an overview of the scenarios are provided here.
B.3.1.1
Categories of RAID Errors
The following is a list of the categories that the array’s embedded protocol uses for
RAID errors and a few of the cases within each category. Each category code, which
can be useful in reference to the syslog, is included. Though not exhaustive, this
list provides a general breakdown of common RAID error generators:
1. Command Incomplete (0x1A): The command was not executed correctly
internally. The software responded to the command with too much or too little
information. In certain cases, the command may simply be paused and will
resume.
2. Partial (conditional) Success (0x19): This category includes the following cases:
Appendix B
syslog Error Messages
B-19
a. Aborting a non-existent command: A user has issued a command, then tried to
abort it after the command is executed.
b. Retry error: The command was retried one or more times.
c. Target error: A volume is offline or disabled.
3. Invalid Response (part of the category above; 0x19): The software did not provide
a valid response to the user command. These cases are more specific than the
Command Incomplete category.
a. Invalid information type (parameter): The software responded with the wrong
type of information.
b. Error in information returned: The information returned in response to the
command is erroneous. This case implies an embedded software error.
c. Function failed: The command failed to retrieve the appropriate information.
d. Zero size: The command accessed a volume with zero size.
4. Command Aborted(0x18): The command is aborted, often because of a time-out.
A command aborts when a component in the system freezes or if a connection is
defective.
5. Command Exception (0x17): This category includes cases where the command
cannot be executed. This error type is generated when a disabled, unavailable, or
invalid drive or volume is specified. For example, after using a hot spare
(standby) to reconstruct the data on a drive, you cannot refer to it again as a hot
spare.
a. Invalid name / address: Either the user or the internal software used a volume
or disk drive name that is invalid or does not match the current configuration.
b. Invalid command fields: The command is no longer supported or the internal
software used a command opcode that is unsupported.
c. Missing fields: The user or the internal software issued a command with
missing information.
d. Drive (module) errors: The disk drive referenced may be unattached, disabled,
substituted, or in the process of being reconstructed.
6. Machine Exception (0x16): This category includes cases where there is a hardware
error, or where other commands are being executed, thereby giving a busy
response.
a. Drive fatal error: There is an error internal to a referenced drive.
b. Autoreconstruct or disable attempted: A drive that is being reconstructed or
disabled is specified.
B-20
Sun StorEdge T3 and T3+ Array Administrator’s Guide • August 2001
c. Queue full or busy response: The command cannot be executed because the
system is busy processing other commands.
d. Unknown host: The specified host address is invalid or unreachable.
e. Single Drive errors: A drive referenced by the command was not detected, the
connection could not be opened, or the sysarea on the drive could not be
created. This case implies that the drive or the connection to it, is faulty.
Alternatively, a retry of a command accessing a disk could fail to execute.
f. Multiple disk failure: An error occurred involving more than one drive.
g. Standby already in use: (This error resembles the one in the Command
Exception category). In this case, the drive is busy processing a previous
command. This case applies when the command is complete and if the drive
configuration has changed as a result.
h. Volume (LUN) errors: A volume may be inaccessible, or its configuration may
be corrupted and represented as nonvalid.
7. Intervention Required (0x14): Here, an error results when a volume is mounted or
unmounted, in contrast to what is expected. Alternatively, a physical connection
may be broken and should be reinstated (by replacing the appropriate FRUs).
RAID errors can result from invalid command arguments or from a system
problem. The error may refer to the configuration of a volume or an individual
drive. For example, you can encounter the error while reconfiguring the array with
volumes that have been added but not mounted, or the problem may be related to
the hardware or an embedded component.
In general, RAID errors can be diagnosed by checking the status of the volumes
mounted on the array. Often, an existing but unmounted volume can trigger the
error. Other times, a conflict occurs when a new version of the binary is downloaded
while previous volumes are still being used.
B.3.1.2
Investigating RAID Errors
Some guidelines for investigating RAID errors include:
1. Check the state of the current volumes with the vol stat command.
■
If the volumes are unmounted, try re-mounting them and then resetting the
system using the T3 reset command.
■
If you are unable to re-mount the volumes, try removing all the volumes,
resetting the system, then adding them back before re-mounting them.
Appendix B
syslog Error Messages
B-21
2. Check the host connection to the array.
On hosts running the Solaris software environment, the format command should
match the number of volumes present on the array. If the number of volumes listed
do not match, see Chapter 5 for troubleshooting instructions. Specifically, the T300
entries listed by the format command should be recognized and labeled, and the
number of these entries should equal the number of volumes mounted on the array.
3. If you suspect that a hardware problem may be causing the RAID error, use the
fru list and fru stat commands to check the status of the components.
It may also be worthwhile to check the cables and connections between partnergroup units and between the host and the array units.
More detail regarding the error may be available in the syslog, in which case note
the date and time of the error for lookup. However, most common cases can be
handled as described above.
B.3.2
Port Errors
TABLE B-8 lists the port error messages that can be displayed.
TABLE B-8
B-22
Port Errors
Error Name
Numerical Value
Message
PRT_UNKNOWPORT
0x300000
Bad port number
PRT_ALREADYMAPPED
0x300001
Port is already mapped unmap first
PRT_INVALIDNAME
0x300002
Volume name is not correct
PRT_VOLNOTFOUND
0x300003
Volume name not found
PRT_INVALID
0x300004
Port number is incorrect
PRT_LUNNOTMAPPED
0x300005
This lun is not mapped
PRT_ACCESSINVALID
0x300006
Need to specify the access mode
Sun StorEdge T3 and T3+ Array Administrator’s Guide • August 2001
B.3.3
Interconnect Card and Other FRU Errors
TABLE B-9 lists the various FRU-related errors that you can encounter. These include
various power and cooling unit fault conditions, missing disks, and interconnect
card errors.
TABLE B-9
Unit-Related Errors (Interconnect Card and Other FRUs)
Error Name
Numerical Value
Message
PS1_ONBATT
0x500021
Power Supply 1 On Battery
PS2_ONBATT
0x500022
Power Supply 2 On Battery
PS1_FANHIGH
0x500023
Power Supply 1 Fan High
PS2_FANHIGH
0x500024
Power Supply 2 Fan High
PS1_REFBATT
0x500025
Power Supply 1 Refresh Battery
PS2_REFBATT
0x500026
Power Supply 2 Refresh Battery
DK1_NOTEXIST
0x500031
Disk 1 Not Present
DK2_NOTEXIST
0x500032
Disk 2 Not Present
DK3_NOTEXIST
0x500033
Disk 3 Not Present
DK4_NOTEXIST
0x500034
Disk 4 Not Present
DK5_NOTEXIST
0x500035
Disk 5 Not Present
DK6_NOTEXIST
0x500036
Disk 6 Not Present
DK7_NOTEXIST
0x500037
Disk 7 Not Present
DK8_NOTEXIST
0x500038
Disk 8 Not Present
DK9_NOTEXIST
0x500039
Disk 9 Not Present
DK_NONE
0x50003A
No Disk Present
DK1_BYPASSED
0x500041
Disk 1 Bypassed
DK2_BYPASSED
0x500042
Disk 2 Bypassed
DK3_BYPASSED
0x500043
Disk 3 Bypassed
DK4_BYPASSED
0x500044
Disk 4 Bypassed
DK5_BYPASSED
0x500045
Disk 5 Bypassed
DK6_BYPASSED
0x500046
Disk 6 Bypassed
DK7_BYPASSED
0x500047
Disk 7 Bypassed
DK8_BYPASSED
0x500048
Disk 8 Bypassed
DK9_BYPASSED
0x500049
Disk 9 Bypassed
Appendix B
syslog Error Messages
B-23
TABLE B-9
B-24
Unit-Related Errors (Interconnect Card and Other FRUs) (Continued)
Error Name
Numerical Value
Message
DK1_NOTREADY
0x500051
Disk 1 Not Ready
DK2_NOTREADY
0x500052
Disk 2 Not Ready
DK3_NOTREADY
0x500053
Disk 3 Not Ready
DK4_NOTREADY
0x500054
Disk 4 Not Ready
DK5_NOTREADY
0x500055
Disk 5 Not Ready
DK6_NOTREADY
0x500056
Disk 6 Not Ready
DK7_NOTREADY
0x500057
Disk 7 Not Ready
DK8_NOTREADY
0x500058
Disk 8 Not Ready
DK9_NOTREADY
0x500059
Disk 9 Not Ready
CT_NOTEXIST
0x500061
Controller Not Present
CT_QLOGNRDY
0x500062
Qlogic Chip Not Ready
CT_SEL_ID
0x500063
Select ID Changed
LP_VSC_ERR
0x500064
VSC7120 Loop Failed
LC1_OFFLINE
0x500065
Loop Card 1 Offline
LC2_OFFLINE
0x500066
Loop Card 2 Offline
LP_CABLE1
0x500067
Cable 1 Not Present
LP_CABLE2
0x500068
Cable 2 Not Present
LC1_NSTART
0x500069
Loop Card 1 Failed to Start
LC2_NSTART
0x50006A
Loop Card 2 Failed to Start
CT_NOALTLP
0x50006B
No Alternate Loop
LP_SWITCH1
0x500071
Switch to Loop 1
LP_SWITCH2
0x500072
Switch to Loop 2
LP_MUX_ISO
0x500073
Loop Mux Changed to Isolated
LP_MUX_TOP
0x500074
Loop Mux Changed to Top
LP_MUX_MID
0x500075
Loop Mux Changed to Middle
LP_MUX_BOT
0x500076
Loop Mux Changed to Bottom
Sun StorEdge T3 and T3+ Array Administrator’s Guide • August 2001
B.3.4
Other Errors
You will rarely see other types of errors, such as logical volume manager (LVM)
errors (range 0x10001-0x1000A) and operating system errors (range 00000001–
C000FFFF). The tftp error (numerical values 10060001-10060005) is an exception
that you can see when you try to download a new binary. The tftp errors are
usually generated due to one of the following reasons:
■
The permissions for the file to be downloaded are too restrictive. In general,
binaries should be world readable and executable.
■
The checksum for the binary file to be downloaded is erroneous.
■
The array units have not been recognized by the network. In this case, a system
administrator should make sure that the IP addresses of the arrays are entered in
the network database.
TABLE B-10 lists pSOS errors:
TABLE B-10
Embedded Operating System and Driver Errors
Error Type
Numerical Value
pSOS+
0000’0001 0000’0FFF
(reserved)
0000’1000 0000’1FFF
embedded file system
0000’2000 0000’2FFF
pREPC+
0000’3000 0000’3FFF
(reserved)
0000’4000 0000’4FFF
pNA+, pRPC+, pX11+
0000’5000 0000’5FFF
(reserved)
0000’6000 0000’FFFF
device driver errors
0001’0000 0FFF’FFFF
(reserved)
1000’0000 1000’FFFF
serial driver
1001’0000 1001’FFFF
tick timer driver
1002’0000 1002’FFFF
(reserved)
1003’0000 1003’FFFF
RAM disk driver
1004’0000 1004’FFFF
(reserved)
1005’0000 1005’FFFF
TFTP driver
1006’0000 1006’FFFF
SLIP driver
1007’0000 1007’FFFF
MMUlib
1008’0000 1008’FFFF
(reserved)
1009’0000 104F’FFFF
Appendix B
syslog Error Messages
B-25
TABLE B-10
B.4
Embedded Operating System and Driver Errors (Continued)
Error Type
Numerical Value
SCSI driver
1050’0000 105F’FFFF
(reserved)
1060’0000 BFFF’FFFF
Shared memory
C000’0000 C000’FFFF
(reserved)
C001’0000 FFFF’FFFF
Examples
This section contains examples for different types of messages.
■
■
■
B.4.1
Error
Warning
Notice
Error
This section provides examples of the types of errors that may be encountered and
the corresponding error message.
B.4.1.1
FRU Level Errors
■
Example 1
When a FRU is removed, it must be replaced in less than 30 minutes or the unit will
automatically shut down. In this example, the PCU in unit 1 is missing.
Jan
Jan
Jan
Jan
Jan
Jan
B-26
28
28
28
28
28
28
22:16:16
22:21:16
22:26:16
22:31:16
22:36:16
22:41:16
TMRT[1]:
TMRT[1]:
TMRT[1]:
TMRT[1]:
TMRT[1]:
TMRT[1]:
E:
E:
E:
E:
E:
E:
u1pcu1: Missing; system shutting down in 25
u1pcu1: Missing; system shutting down in 20
u1pcu1: Missing; system shutting down in 15
u1pcu1: Missing; system shutting down in 10
u1pcu1: Missing; system shutting down in 5
u1pcu1: Missing; system shutting down now
Sun StorEdge T3 and T3+ Array Administrator’s Guide • August 2001
minutes
minutes
minutes
minutes
minutes
■
Example 2
A power and cooling unit (PCU) over temperature condition.
E: u<n>pcu<n>: Over temperature
■
Example 3
The power and cooling unit (PCU) is flagged as not being present.
E: u<n>pcu<n>: Not present
B.4.2
Warning
This section provides examples of the types of errors that may occur and the
corresponding warning message.
B.4.2.1
Unrecoverable Drive Error
Data drive u1d4 error occurred while using interconnect path 0.
Jan 25 00:09:20 ISR1[1]: W: u1d4 SCSI Disk Error Occurred (path = 0x0)
Jan 25 00:09:20 ISR1[1]: W: Sense Key = 0x4, Asc = 0x15, Ascq = 0x1
Jan 25 00:09:20 ISR1[1]: W: Sense Data Description = Mechanical Positioning Error
This example shows the decode of the prior SCSI sense key information (from the
data drive) regarding the drive error. In this case, the drive error was a “Mechanical
Position Error.”
Jan 25 00:09:21 WXFT[1]: W: u1d4 hard err in vol (n1) starting auto disable
This message indicates that drive u1d4 was disabled as a result of the previous
error. The unit will continue to operate with a disabled drive, with possible
performance degradation. A repair action must be planned. However, since the drive
automatically disabled, the repair can be deferred.
Appendix B
syslog Error Messages
B-27
B.4.2.2
Cache Parity Error
The Fibre Channel chip, model ISP2200 interconnect 1, on the controller card
detected a parity error.
Dec 22 14:09:50 ROOT[1]: W: (ctr) SysFail Reset (7010) was initiated at 19981222
130800 ISP2100[1] detected parity error
In this example:
■
■
W: (ctr) indicates that the controller card needs to be replaced.
SysFail Reset (7010) indicates a reset log type.
This message points to a parity error occurring on the local bus of the controller. The
error is examined to determine if it is a single-bit error. If it is a single-bit error, an
attempt is made to rewrite the location. If the rewrite is successful, the error is
viewed as temporary and a notice, containing the address, is written to the syslog
with a unique identifier. If the rewrite is not successful, the error is considered
permanent and a warning, containing the address, is sent upstream to the
monitoring applications.
If another error occurs while operating with a permanent single-bit error, the
controller will fail over to the other controller.
B.4.2.3
Software Assertion or Panic
Reset type.
Jan 30 03:01:48 ROOT[1]: W: u1ctr Assertion Reset (3000) was initiated at
20000130 030050 g78/src/noblep/sdl/scsi/svd.c line 829, Assert(lid >=
SVD_START_LID) => 0 BOOT
Jan 30 03:01:48 ROOT[1]: N:
Jan 30 03:01:48 ROOT[1]: N:
ffffffff 01554634 00efe334
Jan 30 03:01:48 ROOT[1]: N:
00252418 2fff0000 00000001
Jan 30 03:01:48 ROOT[1]: N:
00000008 00000009 00000000
Jan 30 03:01:48 ROOT[1]: N:
00efe324 00efe318 0023b940
CPU state...
R0 = 00000000 01554588 00250ea4 015545cc 00000000
R8 = ffffffff 00002051 000d7438 00440000 00438f74
R16= 00000000 00000000 0023b828 00e40308 00e40308
R24= 00000000 2ffe0000 0023abe8 00060894 00000000
This message points to a software assertion or panic on the controller. This error
causes a controller panic. The controller is reset and a warning message is logged.
B-28
Sun StorEdge T3 and T3+ Array Administrator’s Guide • August 2001
B.4.2.4
Unrecoverable Drive Error
Dec 22 16:57:55 ISR1[1] : W: (dr) SCSI Disk Error Occurred (path = 0x0,u1d8)
■
W: (dr) indicates that the disk drive requires repair.
■
path = 0x0 indicates that the error was detected while using the interconnect
served by interconnect card 1 (path 0x1 is interconnect served by interconnect
card 2).
■
u1d8 is the address of the failing drive.
Dec 22 16:57:55 ISR1[1] : W: (dr) Sense key = 0xb, Asc 0x47, Ascq = 0x0
Dec 22 16:57:55 ISR1[1] : W: (dr) Sense Data Description = SCSI Parity Error
■
Sense key 0xb = ABORTED COMMAND. Indicates that the TARGET aborted
the command. The INITIATOR may be able to recover by re-trying the command.
■
The meaning of Asc and Ascq is decoded in the second line.
■
SCSI Parity Error is the decode of the most important information contained
in the Sense key message of the previous line.
These messages point to a parity error being detected and reported by the associated
disk drive.
B.4.2.5
Recoverable Drive Error
Feb 04 22:39:11 ISR1[1] : W: u1d1 SCSI Disk Error Occurred (path = 0x1)
■
W: u1d1 indicates the failing drive.
■
path = 0x1 indicates that the error was detected while using the interconnect
served by interconnect card 2 (path 0x0 is interconnect served by interconnect
card 1).
Feb 04 22:39:11 ISR1[1] : W: Sense key = 0x1, Asc 0x47, Ascq = 0x1
Feb 04 22:39:11 ISR1[1] : W: Sense Data Description = Recovered Data With Retries
■
Sense key (N (hex)) = RECOVERED ERROR. Indicates that the last command
completed successfully after some recovery action was performed.
■
The meaning of Asc and Ascq is decoded in the second line.
Appendix B
syslog Error Messages
B-29
■
B.4.3
Recovered Data With Retries is the decode of the most important
information contained in the Sense key message of the previous line.
Notice
Feb 25 21:47:03 LPCT[1]: N: u1pcu2: Switch off
■
■
■
B-30
N: is the Notice level message.
u1pcu2 is unit 1, power and cooling unit 2.
Switch off indicates that the power switch is off.
Sun StorEdge T3 and T3+ Array Administrator’s Guide • August 2001
Glossary
A
administrative
domain
alternate master
controller unit
Alternate Pathing
(AP)
Partner groups (interconnected controller units) that share common
administration through a master controller.
Also called “alternate master unit,” the secondary array unit in a partner group
that provides failover capability from the master controller unit.
A mechanism that reroutes data to the other array controller in a partner group
upon failure in the host data path. Alternate Pathing requires special software
to perform this function.
auto cache mode
The default cache mode for the Sun StorEdge T3 and T3+ array. In a fully
redundant configuration, cache is set to write-behind mode. In a nonredundant
configuration, cache is set to write-through mode. Read caching is always
performed.
auto disable
The Sun StorEdge T3 and T3+ array default that automatically disables a disk
drive that has failed.
B
buffering
Data that is being transferred between the host and the drives.
Glossary-1
C
command-line interface
(CLI)
controller unit
The interface between the Sun StorEdge T3 and T3+ array’s pSOS operating
system and the user in which the user types commands to administer the
array.
A Sun StorEdge T3 and T3+ array that includes a controller card. It can be use
as a standalone unit or configured with other Sun StorEdge T3 and T3+ arrays.
G
Dynamic Multi-Pathing
(DMP)
A VERITAS Volume Manager feature that provides an Alternate Pathing
mechanism for rerouting data in the event of a controller failover.
E
enterprise
configuration
erasable programmable
read-only memory
(EPROM)
expansion unit
Glossary-2
One or more partner groups (pair of interconnected controller units) in a
system configuration.
Memory stored on the controller card; useful for stable storage for long periods
without electricity while still allowing reprogramming.
A Sun StorEdge T3 and T3+ array without a controller card. It must be
connected to a controller unit to be operational.
Sun StorEdge T3 Array Administrator’s Guide • April 2001
F
Fibre Channel
Arbitrated Loop
(FC-AL)
field-replaceable unit
(FRU)
FLASH memory device
(FMD)
A 100 Mbyte/s serial channel that enables connection of multiple devices (disk
drives and controllers).
A component that is easily removed and replaced by a field service engineer or
a system administrator.
A device on the controller card that stores EPROM firmware.
G
Gigabit Interface
Converter (GBIC)
gigabyte (GB or
Gbyte)
graphical user interface
(GUI)
An adapter used on an SBus card to convert fiber-optic signal to copper.
One gigabyte is equal to one billion bytes (1Χ109).
A software interface that enables configuration and administration of the Sun
StorEdge T3 and T3+ array using a graphic application.
H
host bus adapter
(HBA)
An adapter that resides on the host.
hot spare
A drive in a RAID 1 or RAID 5 configuration that contains no data and acts as
a standby in case another drive fails.
hot-swappable
The characteristic of a field-replaceable unit (FRU) to be removed and replaced
while the system remains powered on and operational.
Glossary-3
I
input/output operations
per second (IOPS)
interconnect cable
interconnect card
A performance measurement of the transaction rate.
An FC-AL cable with a unique switched-loop architecture that is used to
interconnect multiple Sun StorEdge T3 and T3+ arrays.
An array component that contains the interface circuitry and two connectors
for interconnecting multiple Sun StorEdge T3 and T3+ arrays.
L
LC
light-emitting diode
(LED)
logical unit number
(LUN)
An industry standard name used to describe a connector standard. The Sun
StorEdge T3+ array uses an LC-SFF connector for the host FC-AL connection.
A device that converts electrical energy into light that is used to display
activity.
One or more drives that can be grouped into a unit; also called a volume.
M
master controller unit
media access control
(MAC) address
media interface adapter
(MIA)
megabyte (MB or
Mbyte)
megabytes per second
(MB/s)
Glossary-4
Also called a “master unit,” the main controller unit in a partner-group
configuration.
A unique address that identifies a storage location or a device.
An adapter that converts fiber-optic light signals to copper.
One megabyte is equal to one million bytes (1Χ106).
A performance measurement of the sustained data transfer rate.
Sun StorEdge T3 Array Administrator’s Guide • April 2001
multi-initiator
configuration
A supported array configuration that connects two hosts to one or more array
administrative domains through hub or switch connections.
P
parity
Additional information stored with data on a disk that enables the controller to
rebuild data after a drive failure.
partner group
A pair of interconnected controller units. Expansion units interconnected to the
pair of controller units can also be part of the partner group.
power and cooling unit
(PCU)
pSOS
A FRU component in the Sun StorEdge T3 and T3+ array. It contains a power
supply, cooling fans, and an integrated UPS battery. There are two power and
cooling units in a Sun StorEdge T3 and T3+ array.
An operating system built into the Sun StorEdge T3 and T3+ array RAID
Controller firmware, which provides interfaces between the mounted RAID
volumes and the database environment.
Q
quiesce
To halt all drive activity.
R
read caching
redundant array of
independent disks
(RAID)
reliability, availability,
serviceability (RAS)
Data for future retrieval, to reduce disk I/O as much as possible.
A configuration in which multiple drives are combined into a single virtual
drive to improve performance and reliability.
A term to describe product features that include high availability, easily
serviced components, and very dependable.
Glossary-5
reverse address
resolution protocol
(RARP)
A utility in the Solaris operating environment that enables automatic
assignment of the array IP address from the host.
S
SC
Simple Network
Management Protocol
(SNMP)
small form factor
(SFF)
synchronous dynamic
random access memory
(SDRAM)
system area
An industry standard name used to describe a connector standard.
A network management protocol designed to give a user the capability to
remotely manage a computer network.
An industry standard describing a type of connector. An LC-SFF connector is
used for the host FC-AL connection to the Sun StorEdge T3+ array.
A form of dynamic random access memory (DRAM) that can run at higher
clock speeds than conventional DRAM.
Located on the disk drive label, the space that contains configuration data, boot
firmware, and file-system information.
U
uninterruptable power
source (UPS)
A component within the power and cooling unit. It supplies power from a
battery in the case of an AC power failure.
V
volume
Glossary-6
Also called a logical unit or LUN, a volume is one or more drives that can be
grouped into a unit for data storage.
Sun StorEdge T3 Array Administrator’s Guide • April 2001
W
workgroup
configuration
world wide name
(WWN)
write caching
A standalone array connected to a host system.
A number used to identify array volumes in both the array system and Solaris
environment.
Data used to build up stripes of data, eliminating the read-modify-write
overhead. Write caching improves performance for applications that are
writing to disk.
Glossary-7
Glossary-8
Sun StorEdge T3 Array Administrator’s Guide • April 2001
Index
B
E
battery, checking, 4-5
boot command, A-4
enable command, A-6, A-8
ep command, A-6
error message
listing, B-3
syntax, B-1
types, B-2
C
cache read-ahead threshold, setting, 2-8
cache segment, 2-2
cache segment size
displaying, 2-3
setting, 2-2
command, descriptions, A-1
commands
displaying all, 1-2
See individual commands
syntax, displaying, 1-2
controller card, replacement, 5-11
F
fail over, determining, 4-2
format utility, 3-6
FRU
failure, identifying, 5-1
identifiers, 1-3
fru command, A-7, A-9, A-13
H
D
data, 3-4
data block size
definition, 2-2
data parity, checking, 4-4
disable command, A-5
disk command, A-5
disk drive
status messages, 4-3
status, checking, 4-3
help command, A-8
hot spare, checking, 4-3
hot spare, configuration limitations, 3-1
I
installation
verifying the firmware level, 5-7
Index-1
L
lpc command, A-10, A-11
LUN reconstruction rates, See reconstruction rates
M
MAC address location, 5-15
messages
error, B-3
example, B-26
notice
example, B-27
syntax, B-1
types, B-2
warning, B-6
example, B-27
mirrored cache, enabling, 2-5
blocksize subcommand, 2-3
determing fail over, 4-2
enabling multipathing, 2-4
mirrored cache, 2-5
read-ahead threshold, 2-8
reconstruction rates, 2-6
system logging, configuring, 4-10, 4-18
V
partner group, reconfiguring, 3-1
port command, A-12
power and cooling unit, replacement, 5-11
ver command, A-19
verification frequency, setting, 2-7
vol command, A-19
adding a volume, 3-4
checking data parity, 4-4
initializing volumes, 3-4
list subcommand, 2-2
mounting volume, 3-4
rebuilding a replaced fru, 5-9
remove subcommand, 2-2
unmount subcommand, 2-2
verification frequency, 2-7
verify subcommand, 4-4
volume
creating, 3-3
deleting, 3-2
initializing, 3-4
labeling, 3-6
mounting, 3-4
reconfiguration limitations, 3-1
verification frequency, See verification frequency
R
W
RAID level, configuration limitations, 3-1
reconstruction rates, 2-6
refresh command, A-14
reset command, A-15, A-17
reset log types, B-16
warning message
listing, B-6
N
notice message
example, B-30
syntax, B-1
P
S
serial number location, 5-15
set command, A-17
stripe unit size
See data block size
sys command, A-18
Index-2
Sun StorEdge T3 and T3+ Array Administrator’s Guide • August 2001