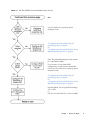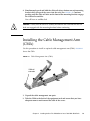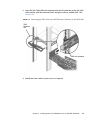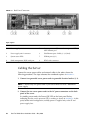
1
Sun Fire™ X4250 Server
Installation Guide
Sun Microsystems, Inc.
www.sun.com
Part No. 820-4217-11
May 2009, Revision A
Submit comments about this document at: http://www.sun.com/hwdocs/feedback
Copyright © 2009 Sun Microsystems, Inc., 4150 Network Circle, Santa Clara, California 95054, U.S.A. All rights reserved.
THIS PRODUCT CONTAINS CONFIDENTIAL INFORMATION AND TRADE SECRETS OF SUN MICROSYSTEMS, INC. USE,
DISCLOSURE OR REPRODUCTION IS PROHIBITED WITHOUT THE PRIOR EXPRESS WRITTEN PERMISSION OF SUN MICROSYSTEMS,
INC.
This distribution may include materials developed by third parties.Sun, Sun Microsystems, the Sun logo, Java, Solaris, and Sun Fire are
trademarks or registered trademarks of Sun Microsystems, Inc. in the U.S. and other countries. Intel is a trademark or registered trademark of
Intel Corporation or its subsidiaries in the United States and other countries. Intel Inside is a trademark or registered trademark of Intel
Corporation or its subsidiaries in the United States and other countries.
This product is covered and controlled by U.S. Export Control laws and may be subject to the export or import laws in other countries. Nuclear,
missile, chemical biological weapons or nuclear maritime end uses or end users, whether direct or indirect, are strictly prohibited. Export or
reexport to countries subject to U.S. embargo or to entities identified on U.S. export exclusion lists, including, but not limited to, the denied
persons and specially designated nationals lists is strictly prohibited.
Use of any spare or replacement CPUs is limited to repair or one-for-one replacement of CPUs in products exported in compliance with U.S.
export laws. Use of CPUs as product upgrades unless authorized by the U.S. Government is strictly prohibited.
Copyright © 2009 Sun Microsystems, Inc., 4150 Network Circle, Santa Clara, California 95054, Etats-Unis. Tous droits réservés.
CE PRODUIT CONTIENT DES INFORMATIONS CONFIDENTIELLES ET DES SECRETS COMMERCIAUX DE SUN MICROSYSTEMS, INC.
SON UTILISATION, SA DIVULGATION ET SA REPRODUCTION SONT INTERDITES SANS L’AUTORISATION EXPRESSE, ECRITE ET
PREALABLE DE SUN MICROSYSTEMS, INC.
Cette distribution peut des éléments développés par des tiers. Sun, Sun Microsystems, le logo Sun, Java, Solaris, et Sun Fire sont des marques
de fabrique ou des marques déposées de Sun Microsystems, Inc. aux Etats-Unis et dans d’autres pays. Intel est une marque de fabrique ou une
marque déposée de Intel Corporation ou de sa filiale aux Etats-Unis et dans d’autres pays. Intel Inside est une marque de fabrique ou une
marque déposée de Intel Corporation ou de sa filiale aux Etats-Unis et dans d’autres pays.
Ce produit est soumis à la législation américaine sur le contrôle des exportations et peut être soumis à la règlementation en vigueur dans
d’autres pays dans le domaine des exportations et importations. Les utilisations finales, ou utilisateurs finaux, pour des armes nucléaires, des
missiles, des armes biologiques et chimiques ou du nucléaire maritime, directement ou indirectement, sont strictement interdites. Les
exportations ou reexportations vers les pays sous embargo américain, ou vers des entités figurant sur les listes d’exclusion d’exportation
américaines, y compris, mais de maniere non exhaustive, la liste de personnes qui font objet d’un ordre de ne pas participer, d’une façon directe
ou indirecte, aux exportations des produits ou des services qui sont régis par la législation américaine sur le contrôle des exportations et la liste
de ressortissants spécifiquement désignés, sont rigoureusement interdites.
L’utilisation de pièces détachées ou d’unités centrales de remplacement est limitée aux réparations ou à l’échange standard d’unités centrales
pour les produits exportés, conformément à la législation américaine en matière d’exportation. Sauf autorisation par les autorités des EtatsUnis, l’utilisation d’unités centrales pour procéder à des mises à jour de produits est rigoureusement interdite.
Contents
Preface
1.
vii
Before You Begin
1
Tools and Equipment Needed
1
Installation Process Flowchart
1
Unpacking the Boxes
4
Package Contents Inventory
Options
4
Antistatic Precautions
5
Sun Fire X4250 Server Description
Front Panel Features
Back Panel
2.
4
6
6
7
Installing the Sun Fire X4250 Server Into a Rack With Slide Rails
Before You Install the Server
9
Server Installation Process Overview
10
Preparing the Slide Rails and Server for Installation
Disassembling Slide Rails
9
11
11
Installing the Mounting Brackets Onto the Server
Attaching the Slide-Rail Assemblies to the Rack
12
14
iii
Installing the Server Into the Slide-Rail Assemblies
Installing the Cable Management Arm (CMA)
19
Verifying Operation of the Slide Rails and CMA
3.
Setting Up the Sun Fire X4250 Server
Connecting the Cables
25
27
27
Connector Locations
Cabling the Server
17
27
28
Connecting to the ILOM Service Processor for the First Time
ILOM Service Processor Software Overview
31
Determining the ILOM Service Processor IP Address
Modifying the Service Processor IP Address
Applying Power for the First Time
33
35
38
Installing the Intel PROSET Teaming Utility
4.
40
Configuring the Preinstalled Solaris 10 Operating System
Solaris Preinstallation Overview
Delivery Methods
41
41
41
About the GRUB Menu
Before You Begin
30
42
42
Installation Worksheet
43
Configuring the Solaris OS
45
Redirecting the Console Output to the Video Port (Optional)
Using the GRUB Menu
46
46
Configuring RAID Drives
47
RAID Drive Overview
47
Mirroring the Preinstalled Solaris OS With LSI RAID
49
Creating a RAID Set to Incorporate a Preinstalled OS Using the Sun
StorageTek Card 50
Solaris 10 OS User Information
iv
Sun Fire X4250 Server Installation Guide • May 2009
51
Accessing Solaris 10 User Documentation
Downloading Solaris 10 OS Software
Solaris 10 OS Training
5.
51
52
52
Configuring the Preinstalled Windows Server 2003 R2
Operating System 53
Windows Server 2003 R2 Preinstallation Overview
Delivery Methods
53
54
How to Start an RKVM Session
54
Configuring the Windows Server 2003 R2 OS
Configuring RAID Drives
56
RAID Drive Overview
56
54
Mirroring the Preinstalled Windows Server 2003 R2 OS With LSI RAID
57
Creating a RAID Set to Incorporate a Preinstalled OS Using the Sun
StorageTek Card 58
6.
Troubleshooting
61
Powering On and Off the Server
Power On the Main Power
61
61
Power Off From Main Power Mode
Setup Troubleshooting
Contacting Support
Index
62
63
65
67
Contents
v
vi
Sun Fire X4250 Server Installation Guide • May 2009
Preface
The Sun Fire X4250 Server Installation Guide provides detailed information about how
to install the Sun Fire™ X4250 server hardware and software. The audience for this
book is primarily system administrators, network administrators, and service
technicians who have an understanding of server systems.
How This Book Is Organized
This guide contains the following chapters.
TABLE P-1
Installation Guide Chapters
Chapter
Describes:
Chapter 1
How to set up the Sun Fire X4250 server hardware.
Chapter 2
How to place the Sun Fire X4250 server into a rack using the rail assembly.
Chapter 3
How to connect cables and power up the Sun Fire X4250 server for the first
time.
Chapter 4
How to configure the Solaris™ 10 Operating System (OS) that might be
preinstalled on your Sun Fire X4250 server.
Chapter 5
How to configure the Windows Operating System (OS) that might be
preinstalled on your Sun Fire X4250 server.
Chapter 6
Troubleshooting information and how to apply and remove AC power to the
Sun Fire X4250 server. Support contacts are also included.
vii
Typographic Conventions
Typeface*
Meaning
Examples
AaBbCc123
The names of commands, files,
and directories; onscreen
computer output
Edit your.login file.
Use ls -a to list all files.
% You have mail.
AaBbCc123
What you type, when contrasted
with onscreen computer output
% su
Password:
AaBbCc123
Book titles, new words or terms,
words to be emphasized.
Replace command-line variables
with real names or values.
Read Chapter 6 in the User’s Guide.
These are called class options.
You must be a superuser to do this.
To delete a file, type rm filename.
* The settings on your browser might differ from these settings.
Sun Online
The following table shows where to find Sun documents online.
Sun Function
URL
Description
Sun
Documentation
http://docs.sun.com
You can navigate to the Sun Fire X4250
server document page and then
download PDF and view HTML
documents.
Support
http://www.sun.com/support/
Obtain technical support, and download
patches.
Training
http://www.sun.com/training/
Learn about Sun courses.
Warranty
http://www.sun.com/service/support/w Obtain specific details regarding your
arranty/index.html
warranty.
Feedback
http://www.sun.com/hwdocs/feedback/
viii
Sun Fire X4250 Server Installation Guide • May 2009
Submit your comments.
Sun Fire X4250 Server Documentation
To view the latest Sun Fire X4250 server documentation online, go to
http://docs.sun.com, and then navigate to Sun Fire X4250 server documentation.
Related Documentation
A Where to Find Documentation sheet lists available documents for the Sun Fire X4250
server and describes the Sun Fire X4250 server document set. The Where to Find
Documentation sheet is packed with your system and is also posted at the product's
documentation site.
Translated versions of some documents are available at the web site described earlier
in French, Simplified Chinese, Traditional Chinese, Korean, and Japanese. English
documentation is revised more frequently and might be more up-to-date than the
translated documentation.
Third-Party Web Sites
Sun is not responsible for the availability of third-party web sites mentioned in this
document. Sun does not endorse and is not responsible or liable for any content,
advertising, products, or other materials that are available on or through such sites
or resources. Sun will not be responsible or liable for any actual or alleged damage
or loss caused by or in connection with the use of or reliance on any such content,
goods, or services that are available on or through such sites or resources.
Safety and Compliance Information
Refer to the following documents for safety information regarding the Sun Fire
X4250 server:
■
Important Safety Information for Sun Hardware Systems, 816-7190: hard copy
document included in the ship kit.
■
Sun Fire X4250 and Sun Fire X4450 Servers Safety and Compliance Guide, 820-2704:
available online by navigating to the Sun Fire X4250 server document page from
the following URL:
http://docs.sun.com
Preface
ix
Sun Welcomes Your Comments
Sun is interested in improving its documentation and welcomes your comments and
suggestions. You can submit your comments by going to:
http://www.sun.com/hwdocs/feedback/
Please include the title and part number of your document with your feedback. For
example, the part number of this Sun Fire X4250 Server Installation Guide is 820-421711.
x
Sun Fire X4250 Server Installation Guide • May 2009
CHAPTER
1
Before You Begin
This chapter describes how to set up the Sun Fire X4250 server hardware. It includes
the following topics:
■
“Tools and Equipment Needed” on page 1
■
“Installation Process Flowchart” on page 1
■
“Unpacking the Boxes” on page 4
■
“Sun Fire X4250 Server Description” on page 6
Tools and Equipment Needed
To install the system, you need the following tools:
■
#2 Phillips screwdriver
■
Antistatic mat and grounding strap
■
Pencil, stylus, or other pointed device, for pushing front panel buttons
You also need a system console device, such as one of the following:
■
Sun workstation
■
ASCII terminal
■
Terminal server
Installation Process Flowchart
To install a typical server, follow the flowchart in FIGURE 1-1 and FIGURE 1-2.
1
FIGURE 1-1
Sun Fire X4250 Server Installation Process (Part 1)
See:
“Unpacking the Boxes” on page 4
Sun Fire X4250 Server Service Manual
“Preparing the Slide Rails and Server for
Installation” on page 11
“Installing the Server Into the Slide-Rail
Assemblies” on page 17
“Installing the Cable Management Arm
(CMA)” on page 19
“Verifying Operation of the Slide Rails and
CMA” on page 25
“Connecting the Cables” on page 27
“Connecting to the ILOM Service Processor
for the First Time” on page 30
“Applying Power for the First Time” on
page 38
“Installing the Intel PROSET Teaming
Utility” on page 40
2
Sun Fire X4250 Server Installation Guide • May 2009
FIGURE 1-2
Sun Fire X4250 Server Installation Process (Part 2)
See:
Sun Fire X4250 Server Operating System
Installation Guide
“Configuring the Preinstalled Solaris 10
Operating System” on page 41
or
“Configuring the Preinstalled Windows Server
2003 R2 Operating System” on page 53
Note: The preinstalled image can only convert
to a 2-disk mirror RAID.
If you want to use any other RAID
configuration, you will need to reinstall the
OS. See Sun Fire X4250 Server Operating System
Installation Guide.
“Configuring the Preinstalled Solaris 10
Operating System” on page 41
or
“Configuring the Preinstalled Windows Server
2003 R2 Operating System” on page 53
Sun StorageTek: Sun StorageTek RAID Manager
User's Guide
or
LSI: Sun LSI 106x RAID User’s Guide for MSM
Chapter 1
Before You Begin
3
Unpacking the Boxes
Unpack all server components from the packing cartons.
Package Contents Inventory
The following items are packaged with the Sun Fire X4250 server:
■
Sun Fire X4250 server
■
Sun Fire X4250 server accessory kit, including the following documentation:
■
Sun Fire X4150, X4250, and X4450 Servers Getting Started Guide
■
Important Safety Information for Sun Hardware Systems
■
Additional license, safety, and registration documentation
■
DB9-RJ45 adapter (for serial system management port)
■
Windows preinstall kit (only if Windows Server 2003 is preinstalled on the
server).
■
Optional rackmount kit
■
Optional cable management kit
Power cables, keyboard, and mouse are packaged separately from the other items.
Options
The documentation and CD kit is a separate orderable option. This kit currently
includes the following items:
■
Sun Fire X4250 Server Installation Guide (this document)
■
SunVTS Diagnostics CD
■
Sun Fire X4250 Server Tools and Drivers DVD (includes drivers and additional)
■
Sun Installation Assistant CD
Standard server components are installed at the factory. However, ordered options
such as additional memory or PCI-e cards are shipped separately. If possible, install
optional components before installing the server in a rack.
4
Sun Fire X4250 Server Installation Guide • May 2009
Antistatic Precautions
Electronic equipment is susceptible to damage by static electricity. Use a grounded
antistatic wrist strap, foot strap, or equivalent safety equipment to prevent
electrostatic damage (ESD) when you install or service the server.
Caution – To protect electronic components from electrostatic damage, which can
permanently disable the system or require repair by Sun service technicians, place
components on an antistatic surface, such as an antistatic discharge mat, an antistatic
bag, or a disposable antistatic mat. Wear an antistatic grounding strap connected to
a metal surface on the chassis when you work on system components.
Chapter 1
Before You Begin
5
Sun Fire X4250 Server Description
This section shows the Sun Fire X4250 server front and back panel features.
Front Panel Features
FIGURE 1-3 shows the front panel features.The hard drive numbering is shown on the
hard drive map label.
FIGURE 1-3
Front Panel
Hard drive map label
Figure Legend
Label
Item
Label
Item
1
Locator LED/Locator button: white
5
DVD drive (optional)
2
Service Required LED: amber
6
USB 2.0 connectors
3
Power/OK LED: green
7
4
Power button
Fault LEDs: amber
• Power supply (PS)
• Over temperature warning
• Top open (Check fan status)
6
Sun Fire X4250 Server Installation Guide • May 2009
Back Panel
FIGURE 1-4 shows the back panel features.
FIGURE 1-4
Back Panel
Figure Legend
Label
Item
Label
Item
1
Power supply unit 1 connector
2
Power supply unit 1 status indicator LEDs
• Power Supply OK: green
• Power Supply Fail: amber
• AC OK: green
6
7
8
9
10
11
PCI-express
PCI-express
PCI-express
PCI-express
PCI-express
PCI-express
3
Power supply unit 0 connector
12
Serial management/RJ-45 serial port
4
Power supply unit 0 status indicator LEDs:
• Power Supply OK: green
• Power Supply Fail: amber
• AC OK: green
13
Service processor (SP) network management
NET MGT port
5
System status LEDs:
• Power: green
• Attention: amber
• Locate: white
14
Gbit Ethernet ports NET 0, 1, 2, 3 (Intel)
15
USB 2.0 ports (0, 1)
16
HD15 video connector (analog VGA)
slot
slot
slot
slot
slot
slot
(3)
(0)
(4)
(1)
(5)
(2)
Chapter 1
Before You Begin
7
8
Sun Fire X4250 Server Installation Guide • May 2009
CHAPTER
2
Installing the Sun Fire X4250 Server
Into a Rack With Slide Rails
This chapter describes how to place the Sun Fire X4250 server into a rack using the
rail assembly in the rackmount kit. Perform this procedure if the rail assembly is
purchased.
This chapter includes the following topics:
■
“Before You Install the Server” on page 9
■
“Preparing the Slide Rails and Server for Installation” on page 11
■
“Installing the Server Into the Slide-Rail Assemblies” on page 17
■
“Installing the Cable Management Arm (CMA)” on page 19
■
“Verifying Operation of the Slide Rails and CMA” on page 25
Note – In this guide, the term rack means either an open rack or a closed cabinet.
Before You Install the Server
Read the following process overview before you begin to install the Sun Fire X4250
server.
9
Server Installation Process Overview
To install your server into a four-post rack using the slide-rail and cable
management arm options, perform the following tasks in the order shown:
1. “Checking Compatibility” on page 10
2. “Preparing the Slide Rails and Server for Installation” on page 11
3. “Installing the Server Into the Slide-Rail Assemblies” on page 17
4. “Installing the Cable Management Arm (CMA)” on page 19
5. “Verifying Operation of the Slide Rails and CMA” on page 25
Rail Assemblies Types
The server might include either tool-less or bolt-on rail assemblies in rackmount kits.
Instructions for both types are included in this chapter.
Checking Compatibility
Check that your rack is compatible with the slide-rail and cable management arm
(CMA) options. The optional slide rails are compatible with a wide range of
equipment racks that meet the following standards.
TABLE 2-1
10
Rack Compatibility
Item
Requirement
Structure
Four-post rack (mounting at both front and rear).
Two-post racks are not compatible.
Rack horizontal opening and unit
vertical pitch
Conforms to ANSI/EIA 310-D-1992 or IEC 60927
standards.
Distance between front and rear
mounting planes
Minimum 610 mm and Maximum 915 mm (24
inches to 36 inches).
Clearance depth in front of front
mounting plane
Distance to front cabinet door is at least 25.4 mm (1
inch).
Clearance depth behind front
mounting plane
Distance to rear cabinet door is at least 800 mm (31.5
inches) with the cable management arm, or 700 mm
(27.5 inches), without the cable management arm.
Clearance width between front and
rear mounting planes
Distance between structural supports and cable
troughs is at least 456 mm (18 inches).
Sun Fire X4250 Server Installation Guide • May 2009
Caution – Always load equipment into a rack from the bottom up so that it will not
become top-heavy and tip over. Deploy your rack’s anti-tip bar to prevent the rack
from tipping during equipment installation.
Caution – Ensure that the temperature in the rack does not exceed the server’s
maximum ambient rated temperatures. Consider the total airflow requirements of all
equipment installed in the rack to ensure that the equipment is operated within its
specified temperature range.
Preparing the Slide Rails and Server for
Installation
The following procedures describe how to prepare the slide rails and server for
installation:
■
“Disassembling Slide Rails” on page 11
■
“Installing the Mounting Brackets Onto the Server” on page 12
■
“Attaching the Slide-Rail Assemblies to the Rack” on page 14
Disassembling Slide Rails
Do one of the following procedures before installation:
■
“Disassembling Bolt-On Slide Rails” on page 11
■
“Disassembling Tool-less Slide Rails” on page 12
Disassembling Bolt-On Slide Rails
To remove the mounting brackets from the bolt-on slide-rail assemblies:
1. Unpack the slide rails.
2. Locate the slide-rail lock at the front of one of the slide-rail assemblies, as
shown in FIGURE 2-1.
Chapter 2
Installing the Sun Fire X4250 Server Into a Rack With Slide Rails
11
3. Squeeze and hold the tabs at the top and bottom of the lock while you pull the
mounting bracket out of the slide-rail assembly until it reaches the stop. (See
FIGURE 2-1).
4. Push the mounting-bracket release button toward the front of the mounting
bracket, as shown in FIGURE 2-1, and simultaneously withdraw the mounting
bracket from the slide-rail assembly.
5. Repeat for the remaining slide-rail assembly.
FIGURE 2-1
Disassembling the Bolt-On Slide Rail Before Installation
Mounting bracket
release button
Slide-rail lock
Disassembling Tool-less Slide Rails
To remove the mounting brackets from the tool-less slide-rail assemblies, refer to the
card included with the kit.
Installing the Mounting Brackets Onto the Server
To install the mounting brackets onto the sides of the server:
12
Sun Fire X4250 Server Installation Guide • May 2009
1. Position a mounting bracket against the chassis so that the slide-rail lock is at
the server front, and the three keyed openings on the mounting bracket are
aligned with the four locating pins on the side of the chassis.
FIGURE 2-2
Aligning the Mounting Bracket With the Server Chassis
Mountingbracket clip
Chassis front
Mounting bracket
Slide-rail lock
2. With the heads of the four chassis locating pins protruding though the three
keyed openings in the mounting-bracket, pull the mounting bracket toward
the front of the chassis until the mounting-bracket clip locks into place with an
audible click. (See FIGURE 2-2.)
3. Verify that the rear locating pin has engaged the mounting-bracket clip. (See
FIGURE 2-2.)
4. Repeat to install the remaining mounting bracket on the other side of the
server.
Chapter 2
Installing the Sun Fire X4250 Server Into a Rack With Slide Rails
13
Attaching the Slide-Rail Assemblies to the Rack
Do one of the following procedures to attach the slide-rail assemblies to the rack:
■
“Attaching Bolt-On Slide-Rail Assemblies” on page 14
■
“Attaching Tool-less Slide-Rail Assemblies” on page 17
Attaching Bolt-On Slide-Rail Assemblies
To attach bolt-on slide-rail assemblies to the rack:
1. Position a slide-rail assembly in your rack so that the brackets at each end of
the slide-rail assembly are on the outside of the front and rear rack posts. (See
FIGURE 2-3.)
2. Attach the slide-rail assembly to the rack posts, but do not tighten the screws
completely.
Choose one of the following methods to attach the slide-rails. The method you
use varies, depending on the type of rack:
14
■
If your rack has threaded mounting holes in the rack posts, first determine
whether the threads are metric or standard, and then insert the correct
mounting screws through the slide-rail brackets and into the threaded holes.
■
If your rack does not have threaded mounting holes, insert the mounting
screws through both the slide-rail brackets and rack posts, and then secure
them with the caged nuts.
Sun Fire X4250 Server Installation Guide • May 2009
FIGURE 2-3
Slide-Rail Assembly Mounting to Rack Post
Slide-rail
assembly
Rack post
Slide-rail assembly
bracket on outside
of rack post
3. Repeat Step 1 and Step 2 for the remaining slide-rail assembly.
Chapter 2
Installing the Sun Fire X4250 Server Into a Rack With Slide Rails
15
4. From the front of the rack, set the proper width of the rails with the spacer.
(See FIGURE 2-4.)
FIGURE 2-4
Setting the Rail Width
Rail-width spacer
5. Tighten the screws on the brackets.
6. Remove the spacer and confirm that the rails are attached tightly to the rack.
7. Repeat Step 4 through Step 6 for rear of the rack.
16
Sun Fire X4250 Server Installation Guide • May 2009
8. If available, extend the anti-tip foot at the bottom of the rack. (See FIGURE 2-5.)
FIGURE 2-5
Extending the Anti-tip Foot
Caution – If your rack does not have an anti-tip foot, the rack could tip over.
Attaching Tool-less Slide-Rail Assemblies
To attach tool-less slide-rail assemblies to the rack, refer to the installation card
included with the kit.
Installing the Server Into the Slide-Rail
Assemblies
Use this procedure to install the server chassis, with mounting brackets, into the
slide-rail assemblies that are mounted to the rack.
Caution – This procedure requires a minimum of two
people because of the weight of the server. Attempting this
procedure alone could result in equipment damage or
personal injury.
Chapter 2
Installing the Sun Fire X4250 Server Into a Rack With Slide Rails
17
Caution – Always load equipment into a rack from the bottom up so that it will not
become top-heavy and tip over. Extend your rack’s anti-tip foot to prevent the rack
from tipping during equipment installation.
1. Push the slide rails into the slide-rail assemblies in the rack as far as possible.
2. Raise the server so that the rear ends of the mounting brackets are aligned
with the slide-rail assemblies that are mounted in the equipment rack. (See
FIGURE 2-6.)
3. Insert the mounting brackets into the slide rails, and then push the server into
the rack until the mounting-brackets encounter the slide-rail stops
(approximately 12 inches, or 30 cm).
FIGURE 2-6
Inserting the Server With Mounting Brackets Into the Slide Rails
Mounting bracket
inserted into
slide rail
Slide-rail
release button
Slide-rail
lock
Slide-rail
assembly
mounted on
rack post
18
Sun Fire X4250 Server Installation Guide • May 2009
4. Simultaneously push and hold the slide-rail release buttons on each mounting
bracket while you push the server into the rack. (See FIGURE 2-6.) Continue
pushing until the slide-rail locks on the front of the mounting-brackets engage
the slide-rail assemblies.
You will hear an audible click.
Caution – Verify that the server is securely mounted in the rack and that the rail
locks are engaged with the mounting brackets before continuing.
Installing the Cable Management Arm
(CMA)
Use this procedure to install an optional cable management arm (CMA). FIGURE 2-7
shows the CMA.
FIGURE 2-7
Cable Management Arm (CMA)
CMA rail
extension
1. Unpack the cable management arm parts.
2. Take the CMA to the back of the equipment rack and ensure that you have
adequate room to work around the back of the server.
Chapter 2
Installing the Sun Fire X4250 Server Into a Rack With Slide Rails
19
Note – References to “left” or “right” in this procedure assume that you are facing
the back of the equipment rack.
3. Remove tape to separate parts.
The CMA rail extension might be taped to the CMA arm.
4. Attach the CMA rail extension into the left slide rail until the extension locks
into place with an audible click. (See FIGURE 2-8.)
FIGURE 2-8
Inserting the CMA Rail Extension Into the Back of the Left Slide Rail
CMA rail
extension
Left slide rail
5. Verify that the CMA rail extension engages the slide rail.
Support the CMA in the remaining installation steps. Do not allow the arm to
hang by its own weight until it is secured by all three attachment points.
20
Sun Fire X4250 Server Installation Guide • May 2009
6. Insert the CMA’s mounting-bracket connector into the right slide rail until the
connector locks into place with an audible click. (See FIGURE 2-9.)
FIGURE 2-9
Inserting the CMA Mounting Bracket Into the Back of the Right Slide Rail
Right slide rail
CMA mounting
bracket
Chapter 2
Installing the Sun Fire X4250 Server Into a Rack With Slide Rails
21
7. Insert the right CMA slide-rail connector into the right slide-rail assembly
until the connector locks into place with an audible click. (See FIGURE 2-10.)
FIGURE 2-10
Inserting CMA Slide-Rail Connector Into the Back of the Right Slide-Rail
Assembly
Right sliderail assembly
CMA slide-rail
connector
22
Sun Fire X4250 Server Installation Guide • May 2009
8. Insert the left CMA slide-rail connector into the rail extension on the left sliderail assembly until the connector locks into place with an audible click. (See
FIGURE 2-11.)
FIGURE 2-11
Connecting the CMA Arm to the Rail Extension Connector on Left Slide Rail
CMA
extension
arm
CMA arm connector
9. Install and route cables to your server, as required.
Chapter 2
Installing the Sun Fire X4250 Server Into a Rack With Slide Rails
23
10. Attach the hook-and-loop straps to the CMA, and press them into place to
secure the cables. (See FIGURE 2-12.)
For best results, place three hangers, evenly spaced, on the rear-facing side of the
CMA and three on the side facing the server.
FIGURE 2-12
Installing CMA Cable Straps
CMA arm
CMA cable hanger
11. Attach the right outer latch.
12. Attach the support latch to the left CMA extension.
24
Sun Fire X4250 Server Installation Guide • May 2009
Verifying Operation of the Slide Rails
and CMA
Use this procedure to ensure that the slide rails and CMA are operating correctly.
Note – Two people are recommended for this procedure: one to move the server in
and out of the rack, and one to observe the cables and CMA.
1. Slowly pull the server out of the rack until the slide rails reach their stops.
2. Inspect the attached cables for any binding or kinks.
3. Verify that the CMA extends fully from the slide rails.
4. Push the server back into the rack, as described in the following sub-steps.
When the server is fully extended, you must release two sets of slide-rail stops to
return the server to the rack:
a. The first set of stops are levers, located on the inside of each slide rail, just
behind the back panel of the server. These levers are labeled “PUSH.” Push
in both levers simultaneously and slide the server toward the rack.
The server will slide in approximately 18 inches (46 cm) and stop.
Verify that the cables and the CMA retract without binding before you
continue.
b. The second set of stops are the slide-rail release buttons, located near the
front of each mounting bracket. See FIGURE 2-6. Simultaneously push or pull
both of the slide-rail release buttons, and push the server completely into
the rack until both slide-rail locks engage.
5. Adjust the cable straps and CMA as required.
Chapter 2
Installing the Sun Fire X4250 Server Into a Rack With Slide Rails
25
26
Sun Fire X4250 Server Installation Guide • May 2009
CHAPTER
3
Setting Up the Sun Fire X4250 Server
This chapter describes how to connect cables and power up the Sun Fire X4250
server for the first time. It includes the following topics:
■
“Connecting the Cables” on page 27
■
“Connecting to the ILOM Service Processor for the First Time” on page 30
■
“Applying Power for the First Time” on page 38
■
“Installing the Intel PROSET Teaming Utility” on page 40
Connecting the Cables
Connect the power and data cables from the server back panel to your system.
Connector Locations
See FIGURE 3-1 for the locations of the back panel connectors.
27
FIGURE 3-1
Back Panel Connectors
Figure Legend
Label
Item
Label
Item
1
Power supply unit 0 connector
5
Service processor (SP) network management NET
MGT Ethernet port
2
Power supply unit 1 connector
6
Gbit Ethernet ports LAN-0, 1, 2, 3 (Intel)
3
System status LEDs
7
USB 2.0 ports (0, 1)
4
Serial management/RJ-45 serial port
8
HD15 video connector
Cabling the Server
Connect the server power cables and external cables in the order shown the
following procedure. The steps reference the numbered captions in FIGURE 3-1.
1. Connect two grounded server power cords to grounded electrical outlets (1, 2).
Note – Connect only one power cord if your server does not have a redundant
power supply.
2. Connect the two server power cords to the AC power connectors on the back
panel of the server.
In standby power mode, the Power/OK LED on the front panel flashes,
indicating that the service processor (SP) is working as shown in FIGURE 3-2. At this
point, before initial configuration, standby power is supplied only to the SP and
power supply fans.
28
Sun Fire X4250 Server Installation Guide • May 2009
FIGURE 3-2
Front Panel Power/OK LED
Note – Do not push the Power button at this time. Do not apply main power to the rest
of the server until you are ready to install a platform operating system.
3. Connect a serial null modem cable to the RJ-45 serial port (4).
See “Connecting to the ILOM Service Processor for the First Time” on page 30 for
more information about viewing system output from a serial console.
4. Connect Ethernet cables to the ILOM SP network management Ethernet port
(5).
5. Connect Ethernet cables to the RJ-45 LAN Gigabit Ethernet (LAN) connectors
as needed (6) for OS support.
6. Connect any additional external devices, as required, to the server’s USB (7) or
Video (8) connectors (optional).
7. Go to the next section and connect to the ILOM SP.
Caution – Do not operate the server without all fans, component heatsinks, air baffles,
and the cover installed. Severe damage to server components can occur if the server
is operated without adequate cooling mechanisms.
Chapter 3
Setting Up the Sun Fire X4250 Server
29
Connecting to the ILOM Service
Processor for the First Time
This section describes how to connect to the ILOM service processor (SP) for initial
setup and configuration. It also includes an overview of SP interfaces and
connections.
This section covers the following topics:
30
■
“ILOM Service Processor Software Overview” on page 31
■
“Determining the ILOM Service Processor IP Address” on page 33
■
“Modifying the Service Processor IP Address” on page 35
Sun Fire X4250 Server Installation Guide • May 2009
ILOM Service Processor Software Overview
The ILOM service processor (SP) consists of the components listed in TABLE 3-1.
TABLE 3-1
ILOM Service Processor Components
Item
Port
Function
1
ILOM hardware
ILOM includes the following hardware components:
• An embedded service processor (SP) chipset. The service processor monitors
the status and configuration of field-replaceable components inside your
server, such as fans, disk drives, and power supplies.
• Two back panel external connections: NET MGT PORT Ethernet connection,
and RJ-45 serial management port.
2
ILOM firmware
Several system management firmware applications are preinstalled on the SP
chipset. These operating system-independent firmware applications provide the
following system management interfaces into your server:
• Web-based graphical interface
• Secure Shell (SSH) command-line interface
• IPMI v2.0 command-line interface (CLI)
• Simple Network Management Protocol (SNMP) v3 interface
These interfaces call the same underlying system management functions on your
SP. You can work with one or more of these interfaces to integrate with other
management interfaces running in your data center.
3
Remote Console
application
The Remote Console application allows remote clients to view the graphical
console of your host server as though they were directly attached to its video
connector. The Remote Console mirrors the video display from the server VGA
device (up to 1280 x 1024 resolution) locally on the remote management system.
The remote keyboard, mouse, CD drive, or diskette drive appear as standard
USB devices.
The Remote Console depends on the following requirements to run correctly.
Client systems require a web browser (at least IE 6, Mozilla, or Firefox) with Sun
Java™ runtime environment (at least version 1.6 plug-ins) correctly installed.
Java runtime environment is available for free download at
http://java.sun.com.
4
Client-Side Secure You must install a Secure Shell communications application on the remote client
system (server, workstation, or laptop) to access the ILOM through a remote
Shell application
Secure Shell (SSH).
Many Secure Shell communications applications are available from commercial
or open-source distribution. Refer to http://www.openssh.org for
information about open-source client-side SSH applications.
5
Serial redirection
You can set the serial redirection to display system output or ILOM output. A
console can also be started to display system output. By default, the ILOM
output appears. The BIOS contains these serial redirection options. See the Sun
Fire X4250 Server Product Notes and the Integrated Lights Out Manager User’s Guide
for more information.
Chapter 3
Setting Up the Sun Fire X4250 Server
31
Note – The factory has configured the service processor hardware and firmware on
your server with the most common settings used in the field. You may not need to
change these defaults.
About Service Processor Interfaces
After you configure the IP address to comply with your network IP scheme, you can
access the ILOM service processor (SP) web browser interface using a Sun
Microsystems supported Internet web browser. You can also connect to the ILOM
service processor through secure shell (SSH).
Choose from one of several ILOM SP interfaces to support system management on
your server. After you have determined the IP address of the SP, you can access SP
firmware applications through the following ILOM SP interfaces:
■
Serial Port CLI
■
Secure (command) shell (SSH) CLI
■
Ethernet-based web browser
About ILOM IP Addresses
The ILOM service processor (SP) is assigned a DHCP IP address by default. There
are two requirements for DHCP IP address assignment to occur:
■
Connection to your network must be through a NET MGT PORT.
■
DHCP services must be present on your network infrastructure.
If a DHCP server cannot be reached after 3 DHCP requests, the ILOM SP is assigned
a static IP address based on the network management port MAC address. This IP
address is always in the format 192.168.xxx.xxx.
ILOM 3.0 Documentation
ILOM 3.0 is now available for the Sun Fire X4250 server. ILOM 3.0 documentation is
available in the ILOM 3.0 documentation collection:
http://docs.sun.com/app/docs/coll/ilom3.0
ILOM 2.0 documentation is also available at:
http://docs.sun.com/app/docs/coll/ilom2.0
32
Sun Fire X4250 Server Installation Guide • May 2009
In addition, product-specific supplements are available for the Sun Fire X4250 server
in the ILOM Supplements section of the Sun Fire X4250 server documentation set.
Determining the ILOM Service Processor IP
Address
Before connecting to the ILOM service processor (SP), you need to determine the IP
address of the SP.
There are two methods to determine the IP address of the ILOM SP. Choose one of
the following methods:
■
“Method 1: Access the BIOS” on page 33.
■
“Method 2: Connect to the Service Processor Using a Serial Connection” on
page 33.
Method 1: Access the BIOS
To access the BIOS and view the service processor (SP) IP address:
1. Power on the server (or restart the server if it is running).
2. When the Sun Microsystems splash screen appears during the Power On Self
Test (POST) operation, press F2 to access the BIOS settings.
3. Navigate to the Server tab, using the left and right keyboard arrows.
4. Access the Server tab and AST2000 (LAN) CONFIGURATION. Press Enter.
5. Access the IP ADDRESS tab.
6. View the SP IP address.
Tip – If the IP address is in the form of 192.168.xxx.xxx, the DHCP server might not
have assigned an address and the SP might use a static address.
Method 2: Connect to the Service Processor Using a Serial
Connection
To establish a connection to the service processor (SP) using a serial connection
(system management port):
Chapter 3
Setting Up the Sun Fire X4250 Server
33
1. Connect a terminal (or PC running terminal emulation software) to the server
serial port.
2. Ensure that the server hardware is installed and cables are inserted.
Ensure that the power is in standby mode and the green LED blinks. See
“Connecting the Cables” on page 27.
3. Verify that your terminal, laptop, PC, or terminal server is operational.
4. Configure the terminal device or the terminal emulation software running on a
laptop or PC to the following settings:
■
8N1: eight data bits, no parity, one stop bit
■
9600 baud
■
Disable hardware flow control (CTS/RTS)
■
Disable software flow control (XON/XOFF)
5. Connect a null serial modem cable from the RJ-45 serial port on the server
back panel to a terminal device (if not connected already).
See FIGURE 1-4 for the position of the serial port on the back panel.
6. Press Enter on the terminal device to establish a connection between the
terminal device and the ILOM service processor (SP).
Note – If you connect to the serial port on the ILOM before it has been powered on
or during its power-on sequence, SP boot messages might be displayed.
The ILOM displays a login prompt, after a short wait.
login:
7. Type the default user name root, and then type the default password
changeme to log in to the ILOM SP.
The ILOM displays a default command prompt, indicating that you have
successfully logged in:
->
34
Sun Fire X4250 Server Installation Guide • May 2009
8. Type the command show /SP/network to display the current SP IP address.
The IP information appears, as shown in the following sample:
/SP/network
Targets:
Properties:
commitpending = (Cannot show property)
ipaddress = 129.148.53.128
ipdiscovery = static
ipgateway = 129.148.53.248
ipnetmask = 255.255.255.0
macaddress = 00:1E:68:0F:4A:84
pendingipaddress = 129.148.53.128
pendingipdiscovery = static
pendingipgateway = 129.148.53.248
pendingipnetmask = 255.255.255.0
9. Be sure to record the IP address assigned to the ILOM.
Modifying the Service Processor IP Address
Choose one of the following methods to change the current IP address of the ILOM
service processor (S):
■
“Method 1: Using the Serial Connection” on page 35
■
“Method 2: Using the Service Processor (SP) ILOM Web Browser Interface” on
page 37
Method 1: Using the Serial Connection
The following examples show how to change the current IP address of the ILOM
service processor using a serial connection.
Example 1: Set to Static IP Address
To change the SP DHCP IP address to a static IP address using the serial connection
(system management port):
1. Connect a terminal (or a PC running terminal emulation software) to the server
serial port.
2. Ensure that the server hardware is installed and cables are inserted.
3. Verify that your terminal, laptop, PC, or terminal server is operational.
Chapter 3
Setting Up the Sun Fire X4250 Server
35
4. Configure the terminal device or the terminal emulation software running on a
laptop or PC to the following settings:
■
8N1: eight data bits, no parity, one stop bit
■
9600 baud
■
Disable hardware flow control (CTS/RTS)
■
Disable software flow control (XON/XOFF)
5. Connect a null serial modem cable from the server’s back panel RJ-45 serial
port to a terminal device (if not connected already).
See FIGURE 1-4 for the serial port position.
6. Press Enter on the terminal device to establish a connection between the
terminal device and the ILOM service processor (SP). The following prompt
appears.
->
7. Type the default user name root, and then type the default password:
changeme to log in to the ILOM SP.
The ILOM displays a default command prompt, indicating that you have
successfully logged in:
->
8. Type the following command to determine the SP IP address:
show /SP/network
9. To assign a static IP ADDRESS, type the following commands in exact order:
set /SP/network pendingipdiscovery=static
set /SP/network pendingipaddress=xxx.xxx.xxx.xxx
set /SP/network pendingipnetmask=xxx.xxx.xxx.xxx
set /SP/network pendingipgateway=xxx.xxx.xxx.xxx
set /SP/network commitpending=true
Where xxx = IP address numbers
Example 2: Set to DHCP IP Address
To change the service processor (SP) static IP address to a DHCP IP address using
the serial connection (system management port):
1. Connect a terminal (or a PC running terminal emulation software) to the server
serial port.
2. Ensure that the server hardware is installed and cables are inserted.
36
Sun Fire X4250 Server Installation Guide • May 2009
3. Verify that your terminal, laptop, PC, or terminal server is operational.
4. Configure the terminal device or the terminal emulation software running on a
laptop or PC to the following settings:
■
8N1: eight data bits, no parity, one stop bit
■
9600 baud
■
Disable hardware flow control (CTS/RTS)
■
Disable software flow control (XON/XOFF)
5. Connect a null serial modem cable from the server’s back panel RJ-45 serial
port to a terminal device (if not connected already).
See FIGURE 1-4 for the serial port position.
6. Press Enter on the terminal device to establish a connection between the
terminal device and the ILOM SP. The prompt appears.
->
7. Type the following command to change a static address to a DHCP address:
set /SP/network pendingipdiscovery=dhcp
set /SP/network commitpending=true
8. Type show /SP/network to view the newly assigned DHCP address.
DHCP enabled is shown as ipdiscovery=DHCP
Method 2: Using the Service Processor (SP) ILOM Web
Browser Interface
Note – The SP Web Browser Interface can be accessed only if you know the service
processor IP address. See “Determining the ILOM Service Processor IP Address” on
page 33.
To change a static IP address using the service processor (SP) ILOM Web Browser
Interface:
1. Open a Sun Microsystems supported web browser, such as Internet Explorer,
Mozilla, or Firefox.
2. Type the IP address of the SP in the browser address bar.
For example: http://xxx.xxx.xxx.xxx
Where xxx = IP address numbers
3. Accept the certificate when prompted.
Chapter 3
Setting Up the Sun Fire X4250 Server
37
4. Enter your username (root) and password (changme).
5. Select the Configuration tab and then the Network tab.
6. Set configurations, such as IP configuration and DNS, as required.
7. Do one of the following:
■
If DHCP is required, select the Enable DHCP check box.
■
If STATIC is required, clear the Enable DHCP check box, and manually set all
IP information.
8. If you manually change the IP address, you must manually change the subnet
mask, because the subnet mask changes according to the IP address class.
9. Note your settings and log out.
10. If the IP address changes, you must reconnect using the newly assigned IP
address, because the current session will become unresponsive.
See the Integrated Lights Out Manager 2.0 User’s Guide for detailed information.
Applying Power for the First Time
To turn on the server for the first time:
1. Verify that the top cover is on.
If the cover is removed, the system will power off.
2. Verify that the power cord has been connected and that standby power is on.
In standby power mode, the Power/OK LED on the front panel flashes. See
FIGURE 3-2.
3. To verify that you are connected to the server through the serial management
port, perform the following sub-steps:
a. Connect a terminal (or a PC running terminal emulation software) to the
server serial port.
b. Ensure that the server hardware is installed and cables are inserted.
c. Verify that your terminal, laptop, PC, or terminal server is operational.
38
Sun Fire X4250 Server Installation Guide • May 2009
d. Configure the terminal device or the terminal emulation software running
on a laptop or PC to the following settings:
8N1: eight data bits, no parity, one stop bit
9600 baud
Disable hardware flow control (CTS/RTS)
Disable software flow control (XON/XOFF)
e. Connect a null serial modem cable from the server’s back panel RJ45 serial
port to a terminal device (if not connected already).
See FIGURE 1-4 for the serial port position.
f. Press Enter on the terminal device to establish a connection between the
terminal device and the ILOM service processor (SP).
The following prompt appears.
->
4. Use a pencil, or other pointed object, to press and release the recessed Power
button on the server front panel.
When main power is applied to the server, the Power/OK LED next to the Power
button lights and remains lit.
5. To display a screen for configuring the preinstalled Solaris OS from the system
management port, type:
start /SP/console
6. Install and configure the software, as required.
Note – To switch back to the ILOM command-line interface from the serial console,
press Esc ( .
Chapter 3
Setting Up the Sun Fire X4250 Server
39
Installing the Intel PROSET Teaming
Utility
The Intel PROSET teaming utility is optional for Windows systems.
To install the Intel PROSET Teaming Utility.
1. Install the Ethernet drivers from the Tools & Drivers CD Version 1.1 or later,
using your preferred method.
■
Autorun - Insert the Tool & Drivers CD. From the Autorun menu, choose
Install/Update drivers and optional packages.
■
Manually - Access the Ethernet properties and update the driver manually
through Device Manager.
2. When the Ethernet cards have been installed and IP addresses assigned, run
the PROSET installer.
Locate the installer on the Tools & Drivers CD Version 1.1 or later, in the
following location: drivers\windows\IntelNic\2003\PROSET\2003_xx
where xx is 32 or 64 bit. Use PROSETDX.msi installer.
3. Follow the instructions on your screen and choose the Advanced Network
Features from the displayed list of options.
4. To access the PROSET Teaming options, access the Ethernet Card through
Device Manager and choose Properties.
5. The new tabs installed are Teaming and VLAN.
40
Sun Fire X4250 Server Installation Guide • May 2009
CHAPTER
4
Configuring the Preinstalled
Solaris 10 Operating System
This chapter describes how to configure the Solaris™ 10 Operating System (OS) that
might be preinstalled on your Sun Fire X4250 server. This chapter assumes that your
server has a hard drive installed, with the Solaris operating system preinstalled.
Your system might be different, depending on your hard drive configuration.
This chapter includes the following topics:
■
“Solaris Preinstallation Overview” on page 41
■
“Configuring the Solaris OS” on page 45
■
“Configuring RAID Drives” on page 47
■
“Solaris 10 OS User Information” on page 51
Solaris Preinstallation Overview
Read this section before you set up the Solaris OS.
Delivery Methods
To configure the preinstalled Solaris OS, you can select a delivery option in the
GRUB menu that allows you to choose a delivery method:
■
Configure the preinstalled Solaris OS through the serial management port
(default method)
■
Configure the preinstalled Solaris 10 image using a directly connected monitor
and keyboard
41
About the GRUB Menu
Solaris uses a GRUB boot loader with a GRUB menu. When you start the Solaris OS,
a GRUB-level menu appears. The GRUB menu allows you to select to direct output
to either the serial port or video port.
If you do not select an output within 10 seconds at the GRUB menu, the system
boots using the default output (serial management port-ttya). Serial redirection
requires a connection to the serial management port. See “Determining the ILOM
Service Processor IP Address” on page 33 and “Method 1: Using the Serial
Connection” on page 35.
Before You Begin
Before you configure the preinstalled Solaris OS, you must do the following:
1. Perform initial configuration of the service processor, and determine the server’s
network settings. See “Setting Up the Sun Fire X4250 Server” on page 27.
2. Gather the information that you will need to configure the server. See
“Installation Worksheet” on page 43.
3. After these steps are complete, you can configure the preinstalled Solaris OS. See
“Configuring the Solaris OS” on page 45.
4. Configure RAID, if necessary. See “Configuring RAID Drives” on page 47.
42
Sun Fire X4250 Server Installation Guide • May 2009
Installation Worksheet
Fill in TABLE 4-1 with information you need to configure the preinstalled Solaris 10
OS for the server. Collect only the information that applies to your system.
TABLE 4-1
Installation Worksheet
Enter System Configuration:
Asterisk (*) indicates default.
Installation Information
Description
Language
Choose from the list of available languages for the
Solaris 10 software.
English*
Locale
Choose your geographic region from the list of
available locales.
English
(C - 7-bit ASCII)*
Terminal
Choose the type of terminal that you are using
from the list of available terminal types.
Network connection
Is the system connected to a network?
Networked
Non-networked*
DHCP
Can the system use Dynamic Host Configuration
Protocol (DHCP) to configure its network
interfaces?
Yes
No*
If you are not
IP
using DHCP,
address
note the network
address.
If you are not using DHCP, supply the IP address
for the system.
Example: 129.200.9.1
Subnet
If you are not using DHCP, is the system part of a
subnet?
If yes, what is the netmask of the subnet?
Example: 255.255.255.0
255.255.255.0 *
IPv6
Do you want to enable IPv6 on this machine?
Yes
No*
Host name
A host name that you choose for the system.
Kerberos
Do you want to configure Kerberos security on this Yes
machine?
No*
If yes, gather the following information:
Default Realm:
Administration Server:
First KDC:
(Optional) Additional KDCs:
Chapter 4
Configuring the Preinstalled Solaris 10 Operating System
43
Installation Information
Description
Enter System Configuration:
Asterisk (*) indicates default.
Name service: if
the system uses
a name service,
provide the
following
information.
Name
service
Which name service should this system use?
NIS+
NIS
DNS
LDAP
None*
Domain
name
Provide the name of the domain in which the
system resides.
NIS+ and
NIS
Do you want to specify a name server or let the
installation program find one?
Specify One
Find One*
DNS
Provide IP addresses for the DNS server. You must
enter at least one IP address, but you can enter up
to three addresses.
IP addresses (1–3):
You can also enter a list of domains to search when Search Domains (1–3):
a DNS query is made.
LDAP
44
Provide the following information about your
LDAP profile:
If you specify a proxy credential level in your
LDAP profile, gather the following information:
Proxy-Bind Distinguished Name:
Proxy-Bind Password:
Sun Fire X4250 Server Installation Guide • May 2009
Profile name:
Profile server:
Installation Information
Description
Enter System Configuration:
Asterisk (*) indicates default.
Default route
Do you want to specify a default route IP address Specify IP address
or let the Solaris installation program find one?
Detect IP address
The default route provides a bridge that forwards None*
traffic between two physical networks. An IP
address is a unique number that identifies each
host on a network.
Select one of the following routes:
• Specify IP address. An /etc/defaultrouter
file is created with the specified IP address.
When the system is rebooted, the specified IP
address becomes the default route.
• Detect IP address. Let the Solaris installation
program detect an IP address. However, the
system must be on a subnet that has a router
that advertises itself by using the ICMP router
discovery protocol. If you are using the
command-line interface, the software detects an
IP address when the system is booted.
• None. Select None if you do not have a router or
do not want the software to detect an IP address
at this time. The software automatically tries to
detect an IP address on reboot.
Time zone
How do you want to specify your default time
zone?
Root password
Choose a root password for the system.
Geographic region*
Offset from GM
Time zone file
Configuring the Solaris OS
To configure the preinstalled Solaris OS:
1. Log in to the service processor as an administrator. For example:
Login: root
Password: changeme
2. To start the ILOM console, type
start /SP/AgentInfo Console
3. Follow the Solaris 10 preinstallation onscreen instructions.
Chapter 4
Configuring the Preinstalled Solaris 10 Operating System
45
4. Type the system and network information when prompted. See TABLE 4-1 for
collected information.
The displayed screens can vary, depending on how you chose to assign network
information to the server (DHCP or static IP address).
5. After the system configuration information has been entered, the OS
installation continues. On completion, the system reboots and displays the
Solaris OS login.
Redirecting the Console Output to the Video Port
(Optional)
You must complete the procedure “Configuring the Solaris OS” on page 45 and be
logged in to the service processor (SP) before you can redirect the console output to
the video port. This procedure is optional.
Note – The Solaris GRUB menu allows you to manually select graphics adapter
redirection during the boot process. If not chosen within 30 seconds after the GRUB
menu is displayed, the system defaults to serial redirection (ttya).
1. Reboot the system.
2. To enable video output, choose Solaris Build - Graphics Adapter from
the GRUB menu Changing Default Console Output.
Using the GRUB Menu
The preinstalled Solaris 10 OS image directs console output to the serial port by
default. After the initial configuration of the preinstalled Solaris OS is complete, you
can modify the Solaris 10 GRUB menu to direct output to the video port by default.
Caution – This procedure is intended only for advanced users of the Solaris OS.
You can seriously disrupt server operation or make the server unbootable if you
introduce a problem in the menu.lst file.
To set the video port as the default output:
1. Open the /boot/grub/menu.lst file in a text editor.
46
Sun Fire X4250 Server Installation Guide • May 2009
2. Modify the following line in the file to change the default so that the console
output goes to the video port:
default 1
3. Run the following command to add the Xserver startup scripts:
/usr/dt/bin/dtconfig -e
4. Reboot the server. After the system reboots, the console output goes to the
video port by default.
5. Configure RAID drives, if necessary.
Configuring RAID Drives
After you configure the Solaris OS, you might need to configure the RAID drives.
This section contains the following topics:
■
“RAID Drive Overview” on page 47
■
“Mirroring the Preinstalled Solaris OS With LSI RAID” on page 49
■
“Creating a RAID Set to Incorporate a Preinstalled OS Using the Sun StorageTek
Card” on page 50
RAID Drive Overview
The Sun Fire X4250 server has two optional RAID Host Bus Adapter (HBA) cards.
You can access RAID configuration through the HBA card BIOS. To access the LSI
card BIOS, press Ctrl-C. To access the Sun StorageTek card BIOS, press Ctrl-A:
TABLE 4-2
RAID HBA Cards
RAID HBA Cards
Press for BIOS
Sun StorageTek
Ctrl-A
LSI 3081E
Ctrl-C
The system has the preinstalled OS on HD0. When the Solaris OS installation is
completed, the option to upgrade your single-disk OS to a mirrored RAID solution is
available.
Chapter 4
Configuring the Preinstalled Solaris 10 Operating System
47
The configuration procedure is different for each supported controller card. For
example, a Sun StorageTek HBA card has many more options for RAID
configuration than an LSI HBA card. Configure the RAID depending on your needs
as shown in TABLE 4-3.
Note – Configuring the Sun Fire X4250 server RAID is optional. By default the
preinstalled Solaris image is configured in a non-RAID configuration. If anything
other than a basic Mirror RAID is required, it is recommended to perform a fresh
installation of the Solaris Operating System (or other OS) in the desired RAID
configuration.
TABLE 4-3 shows the RAID drive options.
TABLE 4-3
RAID Drive Options
SAS Card
Drives Supported
RAID Configuration Supported
Sun StorageTek
Seagate 73GB SAS
Volume – 1 disk
Fujitsu 73GB SAS
RAID 0 – stripe – 2 disk minimum
No redundancy
Seagate 146GB SAS
RAID 1 – mirror – 2 disk minimum
50%
RAID 1E – 3 drive minimum
50%
RAID 10 – 4 drive minimum
50%
RAID 5 – 3 drive minimum
67–94%
RAID 5EE – 4 drive minimum
50–88%
RAID 50 – 6 drive minimum
67–94%
RAID 6 – 4 drive minimum
50–88%
RAID 60 – 8 drive minimum
50–88%
Spanned Volume – 2 drive minimum
100%
RAID Volume – 4 drive minimum
50-100%
Seagate 73GB SAS
IM – Integrated Mirror array. 2 disk
minimum, plus up to 2 hot spare disks.
Data on Primary disk
might be merged.
Fujitsu 73GB SAS
IME – Integrated Mirror Enhanced array. 3 All data will be deleted
to 8 disks including up to 2 hot spares.
during creation.
Seagate 146GB SAS
IS – Integrated Striping array. 2 to 8 disks.
LSI 3081E
48
Sun Fire X4250 Server Installation Guide • May 2009
Drive Usage
All data will be deleted
during creation.
Mirroring the Preinstalled Solaris OS With LSI
RAID
The Solaris OS supports hardware RAID and cannot be installed on an existing array
if one has been created. Refer to the Sun Fire X4250 Server Operating System
Installation Guide or an HBA card product guide.
If you choose the preinstalled Solaris OS and want to make the OS part of a RAID
set, and if you are using LSI RAID only, perform the following procedure to update
the preinstalled Solaris OS to a mirrored RAID set. As stated in TABLE 4-3, only IM
(Integrated Mirror) allows data on the primary hard disk drive (HDD) to be
preserved or merged into an array of disks.
This example allows the creation of a mirror before or after the Solaris installation.
The server has 2 disks: HDD0 (with the OS) and HDD1 (which is blank).
To create a mirror image of the Solaris OS on HDD1:
1. Power on your server system for the first time.
2. Press Ctrl-C to access the LSI RAID configuration utility.
3. Select the SAS card - SAS1068E. Press Enter.
4. Choose RAID Properties.
5. Create an IM (Integrated Mirror) for the required disk configuration.
6. Select the hard disks to be used. Use the right arrow to move the cursor to the
RAID column, and press the Space bar to include into RAID.
7. Because HDD0 contains data, select merge or delete:
■
Choose M to merge data and start a sync operation.
■
Choose D to erase the preinstalled Solaris OS.
8. Press C to create the RAID and start the sync operation.
9. Click Exit to save the configuration and close the menu.
10. Press Esc to exit the configuration utility and reboot.
Chapter 4
Configuring the Preinstalled Solaris 10 Operating System
49
Creating a RAID Set to Incorporate a Preinstalled
OS Using the Sun StorageTek Card
The Sun StorageTek card allows you to choose from many RAID configurations.
How you configure your system depends on your system requirements and the
available hard disk drives in the system. The following example shows how to
mirror the preinstalled Solaris OS. This is the recommended option, and all
remaining disks (should there be more than 2) are incorporated into a DATA RAID
set using the available options as shown in TABLE 4-3.
You will need the Sun Fire X4250 Server Tools and Drivers CD.
Follow these steps to mirror your configured Solaris OS:
1. Using your Solaris Server, log in and start Xserver.
This graphical user interface is required for StorageTek Software Management.
2. From the supplied Tools and Drivers CD, copy the StorMan.ds application,
located in the /mount-point/RAIDmgmt/StorageTEK/Solaris directory, to
a new directory you choose on your Solaris server, for example,
mkdir /StorMan.
3. Change the permissions of the new directory and StorMan application:
chmod 777 StorMan.ds
4. Run the following command to install the application:
pkgadd -d StorMan.ds
5. Choose to install all components when prompted.
6. To run the application, type the following:
sh /usr/StorMan/StorMan.sh
A split screen appears.
7. Click the screen to activate the Managed Systems List.
8. Double-click the local machine (it is displayed by IP Address of the Primary
ENET connection).
A prompt appears.
9. At the prompt, log in as root, using the OS password that was assigned during
installation.
10. Click the SUN STK RAID Controller.
All attached hard disk drives on Enclosure 0 and 1 appear.
50
Sun Fire X4250 Server Installation Guide • May 2009
Tip – HDD0 (OS) should be Enclosure 0 Logical Volume 1.
11. To mirror the OS, right-click Logical Device 1 and choose Expand or Change
Logical Device.
12. Choose the appropriate RAID option (in this example, RAID 1 for Mirror).
13. Choose a disk to mirror the OS with, from the physical disk list.
Select the hard disk drive that best fits your needs.
14. After you select the HDD, click Next, and then view the configuration
summary.
15. Click Apply to start the mirroring process.
You can also click Schedule to perform the mirroring process at a later time.
16. One more confirmation screen is displayed, and when confirmed, the OS will
begin to mirror.
Mirroring may take several hours, depending on the amount of data and the
HDD size.
Solaris 10 OS User Information
This section provides pointers to information about the Solaris 10 OS.
Accessing Solaris 10 User Documentation
You can access the various collections of the Solaris 10 OS user documentation at:
http://docs.sun.com/app/docs/prod/solaris.10
Specifically, you can access the Solaris 10 OS Release and Installation collection at:
http://docs.sun.com/app/docs/coll/1236.1
Chapter 4
Configuring the Preinstalled Solaris 10 Operating System
51
Downloading Solaris 10 OS Software
If you need to install the Solaris 10 OS or reinstall the OS after removing it, you can
download the CD or DVD image from the following URL:
http://www.sun.com/software/solaris/get.jsp
Solaris 10 8/07 is the minimum supported version for the Sun Fire X4250 server.
See the Sun Fire X4250 Server Operating System Installation Guide for specific
instructions on Solaris 10 installation.
Solaris 10 OS Training
Sun provides flexible training options that accommodate your personal schedule
and learning style. The training options include instructor-led, web-based online,
CD-ROM, and Live Virtual Classes. For Solaris 10 Training and Certification options
at a glance, go to: http://www.sun.com/training/catalog/solaris10.html
52
Sun Fire X4250 Server Installation Guide • May 2009
CHAPTER
5
Configuring the Preinstalled
Windows Server 2003 R2
Operating System
This chapter describes how to configure the Preinstalled Windows Server 2003 R2
Operating System (OS) that might be preinstalled on your Sun Fire X4250 server.
This chapter assumes that your server has a hard drive installed, with the
Preinstalled Windows Server 2003 R2 operating system preinstalled. Your system
might be different, depending on your hard drive configuration and ordering
options.
This chapter includes the following topics:
■
“Windows Server 2003 R2 Preinstallation Overview” on page 53
■
“Configuring the Windows Server 2003 R2 OS” on page 54
■
“Configuring RAID Drives” on page 56
Windows Server 2003 R2 Preinstallation
Overview
Read this section before you set up the Windows Server 2003 R2 OS.
Servers shipped with the factory-installed Windows Server 2003 R2 operating
system include a Getting Started Guide. Read this guide before performing the initial
setup of the Windows Server 2003 R2 operating system. For initial setup procedures
and other information, also refer to the Sun x64 Servers Windows 2003 R2 Operating
System Preinstall Release Notes.
53
Delivery Methods
By default, video output for the Windows preinstall is directed to the VGA monitor.
If no VGA monitor is attached, use an RKVM session to configure the OS.
How to Start an RKVM Session
For more detailed information on starting an RKVM session (Remote Console
session), refer to the section "Starting the Remote Console Application" in the Integrated
Lights Out Manager 2.0 User’s Guide.
Note – If a VGA monitor is attached, skip this section.
1. Determine the Service Processor IP address.
Refer “Determining the ILOM Service Processor IP Address” on page 33.
2. Open a browser window.
3. Type the IP address of the Service Processor into a browser window, and then
log in to the WebGUI.
4. Click on the Remote Control tab, and then select Redirection.
5. Click Launch.
The console is displayed.
Configuring the Windows Server 2003
R2 OS
To configure the preinstalled Windows Server 2003 R2 Operating System:
1. Boot the pre-installation image for the first time.
The EMS Connection Detected dialog box appears.
2. Click OK to continue using this local connection.
An EMS (emergency management console) connection might be detected if Serial
Console Redirection is enabled in the BIOS, and an EMS Connection Detected
popup message might appear, as shown here.
54
Sun Fire X4250 Server Installation Guide • May 2009
Note – In Sun servers, Serial Console Redirection is enabled by default.
The Welcome to Windows Setup Wizard screen appears.
3. Click Next.
The License Agreement screen appears.
4. Read the terms and conditions of the license agreement, and if you agree,
accept the terms and conditions. Click Next.
The Regional and Language Options screen appears.
5. Select your preferred region and language. Click Next.
The Personalize Your Software screen appears.
6. Type your name and organization. Click Next.
The Licensing Modes screen appears.
7. Select the desired licensing mode. Click Next.
The Computer Name and Administrator Password screen appears.
8. Enter an administrator password and confirm the password. Keep or change
the suggested Computer name, and click Next.
The Date and Time Settings screen appears.
9. Set the Date, Time, and Time Zone settings for your locale. Click Next.
The network software installs and configures the operating system.
The Network Settings page appears.
The Workgroup or Computer Domain page appears.
10. Configure the computer to be part of a Domain or Workgroup, and then click
Next.
The Performing Final Tasks page appears and the server restarts automatically
when completed.
Chapter 5
Configuring the Preinstalled Windows Server 2003 R2 Operating System
55
Configuring RAID Drives
After you configure the Windows Server 2003 R2 OS, you might need to configure
the RAID drives.
RAID Drive Overview
The Sun Fire X4250 server has two optional RAID Host Bus Adapter (HBA) cards.
You can access RAID configuration through the HBA card BIOS. To access the LSI
card BIOS, press Ctrl-C. To access the Sun StorageTek card BIOS, press Ctrl-A.
TABLE 5-1
Sun Fire X4250 Server RAID HBA Cards
RAID HBA cards
Press for BIOS
Sun StorageTek
Ctrl-A
LSI 3081E
Ctrl-C
The system has the preinstalled OS on HD0. When the Windows Server 2003 R2 OS
installation is completed, the option to upgrade your single-disk OS to a mirrored
RAID solution is available.
The configuration procedure is different for each supported controller card. For
example, a Sun StorageTek HBA card has many more options for RAID
configuration than an LSI HBA card. Configure the RAID depending on your needs
as shown in TABLE 5-2.
Note – Configuring the Sun Fire X4250 server RAID is optional. By default, the
Windows Server 2003 R2 preinstallation image is configured in a non-RAID
configuration. If anything other than a basic Mirror RAID is required, it is
recommended to perform a fresh installation of the Windows Server 2003 R2
Operating System (or other OS) in the desired RAID configuration.
TABLE 5-2 shows the RAID drive options.
56
Sun Fire X4250 Server Installation Guide • May 2009
TABLE 5-2
RAID Drive Options
SAS Card
Drives Supported
RAID Configuration Supported
Sun StorageTek
Seagate 73GB SAS
Volume – 1 disk
Fujitsu 73GB SAS
RAID 0 – stripe – 2 disk minimum
No redundancy
Seagate 146GB SAS
RAID 1 – mirror – 2 disk minimum
50%
RAID 1E – 3 drive minimum
50%
RAID – 4 drive minimum
50%
RAID 5 – 3 drive minimum
67–94%
RAID 5EE – 4 drive minimum
50–88%
RAID 50 – 6 drive minimum
67–94%
RAID 6 – 4 drive minimum
50–88%
RAID 60 – 8 drive minimum
50–88%
Spanned Volume – 2 drive minimum
100%
RAID Volume – 4 drive minimum
50-100%
Seagate 73GB SAS
IM – Integrated Mirror array. 2 disk
minimum, plus up to 2 hot spare disks.
Data on Primary disk
might be merged.
Fujitsu 73GB SAS
IME – Integrated Mirror Enhanced array. 3 All data will be deleted
to 8 disks including up to 2 hot spares.
during creation.
Seagate 146GB SAS
IS – Integrated Striping array. 2 to 8 disks. All data will be deleted
during creation.
LSI 3081E
Drive Usage
Mirroring the Preinstalled Windows Server 2003
R2 OS With LSI RAID
The Windows Server 2003 R2 OS supports hardware RAID and cannot be installed
on an existing array if one has been created. Refer to the Sun Fire X4250 Server
Operating System Installation Guide or an HBA card product guide.
If you choose the preinstalled Windows Server 2003 R2 OS and want to make the OS
part of a RAID set, and if you are using LSI RAID only, perform the following
procedure to update the preinstalled Windows Server 2003 R2 OS to a mirrored
RAID set. As stated in TABLE 5-2, only IM (Integrated Mirror) allows data on the
primary hard disk drive (HDD) to be preserved or merged into an array of disks.
This example allows the creation of a mirror before or after the Windows Server 2003
R2 installation. The server has 2 disks: HDD0 (with the OS) and HDD1 (which is
blank).
Chapter 5
Configuring the Preinstalled Windows Server 2003 R2 Operating System
57
To create a mirror image of the Windows Server 2003 R2 OS on HDD1:
1. Power on your server system for the first time.
2. Press Ctrl-C to access the LSI RAID configuration utility.
3. Select the SAS card - SAS1068E. Press Enter.
4. Choose RAID Properties.
5. Create an IM (Integrated Mirror) for the required disk configuration.
6. Select the hard disks to be used. Use the right arrow to move the cursor to the
RAID column, and press the Space bar to include into RAID.
7. Because HDD0 contains data, select merge or delete:
■
Choose M to merge data and start a sync operation.
■
Choose D to erase the preinstalled Windows Server 2003 R2.
8. Press C to create the RAID and start the sync operation.
9. Click Exit to save the configuration and close the menu.
10. Press Esc to exit the configuration utility and reboot.
Creating a RAID Set to Incorporate a Preinstalled
OS Using the Sun StorageTek Card
The Sun StorageTek card allows you to choose from many RAID configurations.
How you configure your system depends on your system requirements and the
available hard disk drives in the system. The following example shows how to
mirror the preinstalled Windows Server 2003 R2 OS. This is the better option, and all
remaining disks (should there be more than 2) are incorporated into a DATA RAID
set using the available options as shown in TABLE 5-2.
You will need the Sun Fire X4250 Server Tools and Drivers CD.
Follow these steps to mirror your configured Windows Server 2003 R2 OS:
1. Select Start and then Sun Link - Online Information.
2. Select Install Supplemental Software.
3. Check Sun StorageTEK Manager.
4. Click Next to install the Sun StorageTEK Manager program.
5. Select Start and then Sun StorageTEK Raid Manager.
58
Sun Fire X4250 Server Installation Guide • May 2009
6. Double-click the local machine that is displayed by the IP Address of the
Primary ENET connection. A prompt appears.
7. At the prompt, log in as root, using the OS password that was assigned during
installation.
8. Click the SUN STK RAID Controller.
All attached hard disk drives on Enclosure 0 and 1 appear.
9. To mirror the OS, right-click Logical Device 1 and then choose Expand or
Change Logical Device.
10. Choose the appropriate RAID option.
In this example, select RAID 1 for Mirror.
11. Choose a disk to mirror the OS with, from the physical disk list.
Select the hard disk drive that best fits your needs.
12. After you select the hard disk drive, click Next, and then view the
configuration summary.
13. Click Apply to start the mirroring process.
You can also click Schedule to perform the mirroring process at a later time.
14. One more confirmation screen appears. Confirm the mirroring.
The OS begins to mirror. Mirroring may take several hours, depending on the
amount of data and the hard disk drive size.
Chapter 5
Configuring the Preinstalled Windows Server 2003 R2 Operating System
59
60
Sun Fire X4250 Server Installation Guide • May 2009
CHAPTER
6
Troubleshooting
This chapter describes troubleshooting information and how to apply and remove
AC power to the Sun Fire X4250 server. Support contacts are also included.
This chapter includes the following topics:
■
“Powering On and Off the Server” on page 61
■
“Setup Troubleshooting” on page 63
■
“Contacting Support” on page 65
Powering On and Off the Server
Use the following procedures to power on and power off the Sun Fire X4250 server.
Power On the Main Power
To apply main power for all server components:
1. Verify that the top cover is on.
If the cover is removed, the system powers off.
2. Verify that the power cord has been connected and that standby power is on.
In standby power mode, the Power/OK LED on the front panel flashes.
3. Use a pen, or other pointed object, to press and release the recessed Power
button on the server front panel.
When the main power is applied to the server, the Power/OK LED next to the
Power button lights and remains lit, as shown in FIGURE 6-1.
61
FIGURE 6-1
Front Panel Power/OK LED
Note – The first time the server powers on, the power on self-test (POST) can take
up to a minute.
Power Off From Main Power Mode
To remove main power from the server, use one of the following two methods:
TABLE 6-1
Shutdown Methods
Shutdown
Method
Graceful shutdown
Use a pen, or other pointed object, to press and release the Power
button on the front panel. This causes Advanced Configuration
and Power Interface (ACPI)–enabled operating systems to perform
an orderly shutdown of the operating system. Servers not running
ACPI-enabled operating systems shut down to standby power
mode immediately.
Emergency shutdown
Press and hold the Power button for at least four seconds to force
the main power off and cause the server to enter standby power
mode. When the main power is off, the Power/OK LED on the
front panel begins flashing, indicating that the server is in standby
power mode.
Caution – To completely power off the server, you must disconnect the AC power cords
from the back panel of the server.
62
Sun Fire X4250 Server Installation Guide • May 2009
Setup Troubleshooting
This section contains information to help you troubleshoot minor server problems.
If you experience problems while setting up your server, refer to the troubleshooting
information in TABLE 6-2.
TABLE 6-2
Troubleshooting Procedures
Problem
Possible Solution
Server powers on,
but the monitor does
not.
•
•
•
•
CD or DVD does not
eject from the media
tray when you press
the Eject button.
• Move the mouse or press any key on the keyboard. The drive
might be in low power mode.
• Use the utility software installed on your server to eject the CD.
• Make sure that the media in the device is not in use and is not
mounted by the operating system.
No video is
displayed on the
monitor screen.
• Is the monitor cable attached to the video connector?
• Does the monitor work when connected to another system?
• If you have another monitor, does it work when connected to the
original system?
• If, after POST and BIOS are complete, you no longer see video
output on your monitor and see only a flashing cursor, check the
configuration of the operating system to determine if it is
configured to redirect its output exclusively over the serial line.
Server does not
power on when the
front panel Power
button is pressed.
Keep notes on the following situations in case you need to call
service:
• Is the Power LED illuminated on the front of the system? (Ensure
that the power cord is connected to the system and to a grounded
power receptacle.)
• Does the wall outlet have power? Test by plugging in another
device.
• Does the monitor sync within five minutes after power on? (The
green LED on the monitor stops flashing and remains
illuminated.)
Keyboard or mouse
does not respond to
actions.
• Verify that the mouse and keyboard cables are connected to the
on-board USB 2.0 connectors on the server.
• Verify that the server is powered on and the front Power LED is
illuminated.
Is the Power button for the monitor turned on?
Is the monitor power cord connected to a wall outlet?
Is the monitor power cord connected to the monitor?
Does the wall outlet have power? Test by plugging in another
device.
Chapter 6
Troubleshooting
63
TABLE 6-2
Troubleshooting Procedures (Continued)
Problem
Possible Solution
Server appears to be
in low power mode,
but the Power LED
does not blink.
The Power LED only blinks when all server components are in low
power mode. A tape drive might be connected to your server.
Because tape drives do not enter low power mode, the Power LED
does not blink.
Hung or frozen
server: No response
from mouse or
keyboard or any
application.
Try to access your system from a different server on the network:
1. On another system, type ping IP_address_of_server.
2. If a response is returned, then try logging in to the Sun Fire X4250
server using either telnet, ssh, or rlogin.
3. If you successfully log in, list the running processes using the ps
command.
4. Kill any processes that appear unresponsive or should not be
running, by using the kill process_ID command.
5. Check the responsiveness of the Sun Fire X4250 server after each
process is killed.
If the this procedure does not work, power cycle the server:
1. Press the Power button to power off the server and wait 20 to 30
seconds.
2. Press the Power button again to power system back on.
Note – For additional troubleshooting information, see the Sun Fire X4250 Server
Service Manual.
64
Sun Fire X4250 Server Installation Guide • May 2009
Contacting Support
If the troubleshooting procedures in this chapter fail to solve your problem, use
TABLE 6-3 to collect information that you might need to communicate to the support
personnel. TABLE 6-4 lists the Sun web sites and telephone numbers for additional
technical support.
TABLE 6-3
System Information Needed for Support
System Configuration Information Needed
Your Information
Sun service contract number
System model
Operating environment
System serial number
Peripherals attached to the system
Email address and phone number for you and a
secondary contact
Street address where the system is located
Superuser password
Summary of the problem and the work being done
when the problem occurred
Other Useful Information
IP address
Server name (system host name)
Network or internet domain name
Proxy server configuration
Chapter 6
Troubleshooting
65
TABLE 6-4
Sun Technical Support Contacts
Server Documents and Support Resources
URL or Telephone Number
PDF files for all current Sun Fire X4250
server documents.
http://www.sun.com/documentation/
Solaris™ 10 and other software
http://docs.sun.com/documentation/
documents. This web site has full search
capabilities.
Discussion and troubleshooting forums. http://supportforum.sun.com/
Support, diagnostic tools, and alerts for
all Sun products.
http://www.sun.com/bigadmin/
SunSolveSM web site. Contains links to
software patches. Lists some system
specifications, troubleshooting and
maintenance information, and other
tools.
http://www.sunsolve.sun.com/handbook_pub/
SunServiceSM support phone numbers.
1-800-872-4786 (1-800-USA-4Sun), select Option 1
Lists international telephone numbers
for SunService support.
http://www.sun.com/service/contacting/solution.html
Warranty and contract support contacts. http://www.sun.com/service/warrantiescontracts/
Links to other service tools.
Warranties for every Sun product.
66
http://www.sun.com/service/support/warranty
Sun Fire X4250 Server Installation Guide • May 2009
Index
A
front panel, 6, 29, 62
accessory kit, 4
applying power, 38
G
B
graceful shutdown, 62
GRUB boot loader, 42
GRUB menu, 42, 46
back panel connectors, 27
bolt-on slide-rail assemblies, 14
C
cable management arm (CMA), 10, 19
configuring preinstalled Solaris OS, 45
configuring preinstalled Windows OS, 54
configuring the service processor (SP), 30
connecting the cables, 27
connector locations, 27
console, 1
H
hardware RAID, 49, 57
HD15 video connector, 7
host bus adapter (HBA), 47, 56
I
DB9-RJ45 adapter, 4
description of system, 6
DHCP IP address, 32, 35, 36
downloading Solaris 10 OS software, 52
information about Solaris 10, 51
initial setup, 30
installation flowchart, 2, 3
installation worksheet, 43
installing the mounting brackets, 12
installing to a rack, 9, 10
Integrated Lights Out Manager (ILOM), 31
IPMI, 31
IPv6, 43
E
K
emergency shutdown, 62
ESD, 5
external cables, 28
Kerberos, 43
D
F
four-post rack, 10
L
languages, 43
locator LED, 6
LSI, 47, 56
67
NET MGT port, 7, 32
Solaris 10 OS user documentation, 51
Solaris 10 training, 52
static IP address, 35, 36, 37
subnet, 43
Sun StorageTek card, 47, 50, 56, 58
system management port, 33, 36
O
T
optional components, 4
temperatures, 11
terminal, 43
time zone, 45
tool-less slide-rail assemblies, 17
tools needed, 1
troubleshooting, 63
turning on the server, 38
M
MAC address, 32
mirrored RAID, 47, 56
N
P
password, 45
POST, 63
power cables, 28
powering off the server, 62
powering on the server, 61
powering up the server, 27
unpacking the system, 4
R
rack compatibility, 10
rack installation, 9, 10
rackmount kit, 9
RAID, 47, 56
rail assembly, 9
rear panel connectors, 28
rear panel LEDs, 28
redirecting console output, 46
region, 43
remote console, 31
removing the mounting brackets, 11
S
secure shell (SSH), 31, 32
serial connection, 33, 36
serial management port-ttyb, 42
serial port CLI, 32
serial redirection, 31
service processor (SP) configuration, 30
service processor (SP) interfaces, 32
service required LED, 6
slide rail installation, 11, 12, 14
SNMP, 31
Solaris 10 operating system, 41
Solaris 10 operating system preinstallation, 41
68
U
Sun Fire X4250 Server Installation Guide • May 2009
V
video port, 46
W
web browser interface, 37
web-based graphical interface, 31
Windows Server 2003 operating system, 53