1
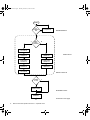
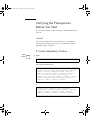
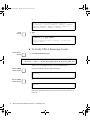
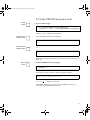
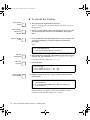
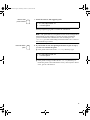
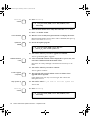
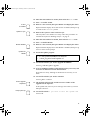
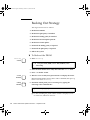
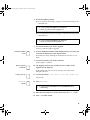
RelNotes.book Page 1 Thursday, October 14, 1999 8:14 AM
Netra ft™ 1800
Interim Update Instructions
Important – Read Before Installation
Sun Microsystems, Inc.
901 San Antonio Road
Palo Alto, CA 94303-4900 USA
650 960-1300
Fax 650 969-9131
Part No. 806-3437-10
September 1999, Revision B
Send comments about this document to: [email protected]
RelNotes.book Page ii Thursday, October 14, 1999 8:14 AM
Copyright 1999 Sun Microsystems, Inc., 901 San Antonio Road • Palo Alto, CA 94303 USA. All rights reserved.
This product or document is protected by copyright and distributed under licenses restricting its use, copying, distribution, and
decompilation. No part of this product or document may be reproduced in any form by any means without prior written authorization
of Sun and its licensors, if any. Third-party software, including font technology, is copyrighted and licensed from Sun suppliers.
Parts of the product may be derived from Berkeley BSD systems, licensed from the University of California. UNIX is a registered trademark in
the U.S. and other countries, exclusively licensed through X/Open Company, Ltd.
Sun, Sun Microsystems, the Sun logo, AnswerBook, Java, the Java Coffee Cup, Netra, Netra ft, and Solaris are trademarks, registered
trademarks, or service marks of Sun Microsystems, Inc. in the U.S. and other countries. All SPARC trademarks are used under license and are
trademarks or registered trademarks of SPARC International, Inc. in the U.S. and other countries. Products bearing SPARC trademarks are
based upon an architecture developed by Sun Microsystems, Inc.
The OPEN LOOK and Sun™ Graphical User Interface was developed by Sun Microsystems, Inc. for its users and licensees. Sun acknowledges
the pioneering efforts of Xerox in researching and developing the concept of visual or graphical user interfaces for the computer industry. Sun
holds a non-exclusive license from Xerox to the Xerox Graphical User Interface, which license also covers Sun’s licensees who implement OPEN
LOOK GUIs and otherwise comply with Sun’s written license agreements.
RESTRICTED RIGHTS: Use, duplication, or disclosure by the U.S. Government is subject to restrictions of FAR 52.227-14(g)(2)(6/87) and
FAR 52.227-19(6/87), or DFAR 252.227-7015(b)(6/95) and DFAR 227.7202-3(a).
DOCUMENTATION IS PROVIDED “AS IS” AND ALL EXPRESS OR IMPLIED CONDITIONS, REPRESENTATIONS AND WARRANTIES,
INCLUDING ANY IMPLIED WARRANTY OF MERCHANTABILITY, FITNESS FOR A PARTICULAR PURPOSE OR NONINFRINGEMENT, ARE DISCLAIMED, EXCEPT TO THE EXTENT THAT SUCH DISCLAIMERS ARE HELD TO BE LEGALLY INVALID.
Copyright 1999 Sun Microsystems, Inc., 901 San Antonio Road • Palo Alto, CA 94303 Etats-Unis. Tous droits réservés.
Ce produit ou document est protégé par un copyright et distribué avec des licences qui en restreignent l’utilisation, la copie, la distribution, et la
décompilation. Aucune partie de ce produit ou document ne peut être reproduite sous aucune forme, par quelque moyen que ce soit, sans
l’autorisation préalable et écrite de Sun et de ses bailleurs de licence, s’il y en a. Le logiciel détenu par des tiers, et qui comprend la technologie
relative aux polices de caractères, est protégé par un copyright et licencié par des fournisseurs de Sun.
Des parties de ce produit pourront être dérivées des systèmes Berkeley BSD licenciés par l’Université de Californie. UNIX est une marque
déposée aux Etats-Unis et dans d’autres pays et licenciée exclusivement par X/Open Company, Ltd.
Sun, Sun Microsystems, le logo Sun, AnswerBook, Java, le logo Jave Coffee Cup, Netra, Netra ft, et Solaris sont des marques de fabrique ou des
marques déposées, ou marques de service, de Sun Microsystems, Inc. aux Etats-Unis et dans d’autres pays. Toutes les marques SPARC sont
utilisées sous licence et sont des marques de fabrique ou des marques déposées de SPARC International, Inc. aux Etats-Unis et dans d’autres
pays. Les produits portant les marques SPARC sont basés sur une architecture développée par Sun Microsystems, Inc.
L’interface d’utilisation graphique OPEN LOOK et Sun™ a été développée par Sun Microsystems, Inc. pour ses utilisateurs et licenciés. Sun
reconnaît les efforts de pionniers de Xerox pour la recherche et le développement du concept des interfaces d’utilisation visuelle ou graphique
pour l’industrie de l’informatique. Sun détient une licence non exclusive de Xerox sur l’interface d’utilisation graphique Xerox, cette licence
couvrant également les licenciés de Sun qui mettent en place l’interface d’utilisation graphique OPEN LOOK et qui en outre se conforment aux
licences écrites de Sun.
CETTE PUBLICATION EST FOURNIE "EN L’ETAT" ET AUCUNE GARANTIE, EXPRESSE OU IMPLICITE, N’EST ACCORDEE, Y
COMPRIS DES GARANTIES CONCERNANT LA VALEUR MARCHANDE, L’APTITUDE DE LA PUBLICATION A REPONDRE A UNE
UTILISATION PARTICULIERE, OU LE FAIT QU’ELLE NE SOIT PAS CONTREFAISANTE DE PRODUIT DE TIERS. CE DENI DE
GARANTIE NE S’APPLIQUERAIT PAS, DANS LA MESURE OU IL SERAIT TENU JURIDIQUEMENT NUL ET NON AVENU.
Please
Recycle
RelNotes.book Page 3 Thursday, October 14, 1999 8:14 AM
Netra ft 1800
Interim Update Instructions
This document contains important release information for the software for the
Netra ft 1800.
Caution – Read this document before attempting to install the system.
This document contains the following information:
■
“Prerequisites” on page 6
■
“Verifying the Prerequisites Before You Start” on page 7
■
“Patch Installation” on page 11
■
“Programmable Hardware Upgrade” on page 14
■
“To Enable or Disable the OSdog” on page 19
■
“To Reset the System with the Upgrades” on page 20
■
“Verifying the Upgrade” on page 21
■
“Backing Out Strategy” on page 24
■
“Functionality Addendum” on page 31
■
“Documentation Changes” on page 31
■
“Solaris Y2K Patch Compatibility” on page 32
■
“CMS Control of the ICN Subsystem” on page 33
The flow chart on page 4 and continued on page 5 shows the procedure for installing
the upgrade.
3
RelNotes.book Page 4 Thursday, October 14, 1999 8:14 AM
START
Prerequisites
met
N
Set system
to req’d level
PREREQUISITES
Y
Y
QFE
patch
installed
N
Backout patch
107778-04
Install patch
108181-01
Install patch
108181-01
Install patch
105181-14
Install patch
105181-14
Install patch
108145-10
Install patch
108145-10
Re-install patch
107778-04
Install Patch D
INSTALL PATCH D
FPGA
at -08
Y
N
Install FPGAs
UPGRADE FPGAs
REBOOT
Continued on next page
4
Netra ft 1800 Interim Update Instructions • September 1999
RelNotes.book Page 5 Thursday, October 14, 1999 8:14 AM
from previous page
Update PROMs
Y
OSdog
required
UPGRADE PROMs
N
OSDOG
Enable OSdog
Disable OSdog
Power OFF
Cycle
POWER RECYCLE
Verify patch D
installation
Verify FPGA
installation
Verify PROM
installation
VERIFICATION
END
Netra ft 1800 Interim Update Instructions
5
RelNotes.book Page 6 Thursday, October 14, 1999 8:14 AM
Prerequisites
Caution – Read all the instructions before attempting the installation procedure to
ensure that you understand them and have everything required to hand.
The Netra ft 1800 upgrade software is supplied as a patch (108145-10, or whichever
is the latest version). In addition to this patch, you will require the Kernel Update
patch (105181-14) which is delivered as part of patch 108181-01. You can download
both of these patches from SunSolve at http://sunsolve.sun.com.
In order to upgrade the system successfully you must already have installed:
■
The base system from the Netra ft 1800 Installation CD (part no. 704-6491-11).
■
The mandatory patches from the Netra ft 1800 Patch CD (part no.
704-6823-12). These patches are:
■
■
107369-16 or -17 (Netra ft 1800 software patch)
106929-01 (SunOs 5.6 /usr/uadmin patch)
and are also available from SunSolve.
Caution – The mandatory patches listed above must be installed before you
proceed with the upgrade.
In addition you may have also installed:
■
■
108065-03 (Netra ft 1800 Bridge patch)
107926-04 (Netra ft 1800 OSdog patch)
If you installed the Sun QFE/P patch 107778 as part of the existing installation, it
will be necessary to back out the patch (see Step 3 on page 12) and then re-install it
(see Step 8 on page 13) following the instructions in this document.
Instructions for installing the base system and mandatory patches are contained in
the Netra ft 1800 Software Release Notes (part no. 805-4527-13).
Caution – You must follow precisely the installation instructions in this document.
The installation procedure for the patches involves special instructions. Installing the
patches incorrectly can leave your system unusable, requiring a complete reinstallation of all software which can take up to four hours.
All operations must be performed at the OBP ok prompt or as root.
Netra ft 1800 release software occupies approximately 540 Mbytes of disk space.
6
Netra ft 1800 Interim Update Instructions • September 1999
RelNotes.book Page 7 Thursday, October 14, 1999 8:14 AM
Verifying the Prerequisites
Before You Start
If any of the following verifications fails, consult Sun Enterprise
Services.
General
The system should be free from faults (that is, no red LEDs
showing) and running in sync (see “To Confirm the System is
Running in Sync” on page 11.
To Verify Mandatory Patches
Patch
verified
1. Type:
# showrev -p | grep 107369
The output should include:
Patch: 107369-17 Obsoletes: 106616-01 Requires:
Incompatibles: Packages: SUNWcsu, SUNWftcar, SUNWcmscu,
SUNWcmsr, SUNWcmsu, SUNWcmsdf, SUNWftm, SUNWftmuu,
SUNWftutr, SUNWftutu, SUNWpnet, SUNWspltr, SUNWspltu
Patch: 107369-16 Obsoletes: 106616-01 Requires:
Incompatibles: Packages: SUNWftcar, SUNWcmscu, SUNWcmsr,
SUNWcmsu, SUNWcmsdf, SUNWftm, SUNWftmuu, SUNWftutr,
SUNWftutu, SUNWpnet, SUNWspltr, SUNWspltu
or:
Patch: 107369-17 Obsoletes: 106616-01 Requires:
Incompatibles: Packages: SUNWcsu, SUNWftcar, SUNWcmscu,
SUNWcmsr, SUNWcmsu, SUNWcmsdf, SUNWftm, SUNWftmuu,
SUNWftutr, SUNWftutu, SUNWpnet, SUNWspltr, SUNWspltu
7
RelNotes.book Page 8 Thursday, October 14, 1999 8:14 AM
or:
Patch: 107369-16 Obsoletes: 106616-01 Requires:
Incompatibles: Packages: SUNWftcar, SUNWcmscu, SUNWcmsr,
SUNWcmsu, SUNWcmsdf, SUNWftm, SUNWftmuu, SUNWftutr,
SUNWftutu, SUNWpnet, SUNWspltr, SUNWspltu
Patch
verified
2. Type:
# showrev -p | grep 106929
Patch: 106929-01 Obsoletes:
Packages: SUNWcsr
▼
FPGA revision
verified
Requires:
Incompatibles:
To Verify FPGA Firmware Levels
1. For each motherboard type:
# cd /usr/platform/SUNW,Ultra-4FT/SUNWcms/sbin
# ./cmsfruinfo -l x-MBD -i -s EE_MBD_BRIDGE_FWARE_PARTNO EE_MBD_BRIDGE_FWARE_DASH
where x is A for motherboard A or B for motherboard B.
Record A-MBD
FPGA revision
For both motherboards the output should be:
2587134
07
Record B-MBD
FPGA revision
or
2587134
08
Both sides should be at the same revision level, that is, both -07 or
both -08.
8
Netra ft 1800 Interim Update Instructions • September 1999
RelNotes.book Page 9 Thursday, October 14, 1999 8:14 AM
To Verify PROM Firmware Levels
PROM
verified
1. For each CPUset type:
# cd /usr/platform/SUNW,Ultra-4FT/SUNWcms/sbin
# ./cmsfruinfo -l x-CPU -i -s EE_CPU_PROM_PARTNO EE_CPU_PROM_DASH
where x is A for A-CPU or B for B-CPU.
Record A-CPU
PROM revision
For both CPUsets the output should be:
2587354
07
Record B-CPU
PROM revision
or
2587354
09
Both sides should be at the same revision level, that is, both -07 or
both -09.
Record
version
2. Check the PROM version by typing:
# prtconf -V
Record the version in the box. In the following example:
OBP 3.7.23.0 1999/06/24 14:24
OBP 3.7.23.0 indicates version 23.
The PROM should be version 21 for CPU PROM revision 07, or
version 23 for CPU PROM revision 09.
9
RelNotes.book Page 10 Thursday, October 14, 1999 8:14 AM
This page is intentionally blank.
10
Netra ft 1800 Interim Update Instructions • September 1999
RelNotes.book Page 11 Thursday, October 14, 1999 8:14 AM
Patch Installation
This installation procedure, including the two required reboots, will
take approximately ninety minutes.
Note – There are special instructions for backing out this patch.
Refer to “Backing Out Strategy” on page 24.
Caution – Do not reboot at any stage of the installation process
unless specifically requested to do so in this document. In particular,
rebooting after step 6 and before step 7 has completed will render
the system unusable.
▼ To Confirm the System is Running in Sync
Steps 10, 29 and 43 require you to verify that the system is running
in sync, or wait for the system to come back into sync. To determine
if the CPUsets are running in sync, perform either of the following:
■
Examine the amber LEDs, labeled Diag, on the front panel of
each CPUset. If they are running in sync, the LEDs will flash
exactly at the same time.
■
Enter the following command:
# cd /usr/platform/SUNW,Ultra-4FT/SUNWcms/lib
# ./u4ftvmctl -c
If the CPUsets are running in sync, the following message is
displayed:
CPUsets running combined
11
RelNotes.book Page 12 Thursday, October 14, 1999 8:14 AM
▼
Prerequisites
verified
To Install the Patches
1. Verify that all prerequisites have been met.
Refer to “Verifying the Prerequisites Before You Start” on page 6
through page 9.
Base software
and patches
installed
2. If step 1 is not satisfied, contact Sun Enterprise Services to assist
you in achieving the correct level of installation, then repeat
step 1.
Back out QFE/P
patch
3. If you installed the Sun QFE/P patch 107778 as part of Step 2 or in
a previous installation, you must backout the patch before
proceeding.
Type:
# cd /var/sadm/patch
# ./107778-04/backoutpatch 107778-04
Patches
downloaded
4. Download patches 108181-01 and 108145-10 (or the latest versions)
from the web site at SunSolve (http://sunsolve.sun.com).
Copy them into the subdirectory /var/tmp.
Patch files
extracted
5. Extract the files:
# cd /var/tmp
# zcat 108181-01.tar.Z | tar -xvf # zcat 108145-10.tar.Z | tar -xvf -
Kernel Update
patch installed
6. Read the caution at the top of page 11, then install the Kernel
Update patch:
#
#
#
#
cd 108181-01
./installpatch .
cd /usr/platform/SUNW,Ultra-4FT/lib/105181-14
./installpatch .
When prompted, type yes to confirm the installation. When
installation of the patch is complete do not reboot.
12
Netra ft 1800 Interim Update Instructions • September 1999
RelNotes.book Page 13 Thursday, October 14, 1999 8:14 AM
Netra ft 1800
patch installed
7. Install the Netra ft 1800 upgrade patch:
# cd /var/tmp/108145-10
# ./installpatch .
When prompted, type yes to confirm the installation.
Note – The patch delivers an updated version of the Configuration
Management System (CMS). To do this, the patch installation
process terminates the CMS daemon. Do not attempt to use
cmsconfig (or other CMS utility) until instructed to do so later in
this installation procedure.
Reinstall QFE/P
patch
8. If you backed out the Sun QFE/P patch 107778 as part of Step 3,
you can now reinstall the patch.
■
If the patch still resides in the /var/tmp directory, type:
# cd /var/tmp/107778-04
# ./installpatch .
■
If the patch no longer resides in the /var/tmp directory, reinstall the patch as described in the Netra ft 1800 Software Release
Notes, part no. 805-4527-13.
13
RelNotes.book Page 14 Thursday, October 14, 1999 8:14 AM
Programmable Hardware
Upgrade
Note – The upgrade utilities cannot be run if the system was
booted from a read-only device, such as a CD-ROM or a network:
the system must be running from a writable device such as a disk
before this procedure can be performed. In particular, if the system
has just been fully installed from CD-ROM, it should be rebooted
from disk before performing this procedure.
Note – If the FPGAs were upgraded using version 08 of the
upgrade utility during the base software patch installation in Step 2
it is not necessary to repeat the procedure. If you are not sure of the
firmware version, proceed to the next step (Step 9), otherwise you
can proceed directly to the PROM upgrade at Step 13.
▼
To Upgrade the FPGAs
The following procedure upgrades both motherboard A and
motherboard B.
System in sync
14
9. Ensure the system is running in sync by following the procedure
“To Confirm the System is Running in Sync” on page 11.
Netra ft 1800 Interim Update Instructions • September 1999
RelNotes.book Page 15 Thursday, October 14, 1999 8:14 AM
FPGAs upgraded
on one side
10. Type:
# cd /usr/platform/SUNW,Ultra-4FT/lib
# ./fwupdate.fpga.258-7134-08
You will be prompted:
WARNING: This firmware update can only be performed on:
1) The side which is executing this update utility.
2) The other side if its cpuset is powered off.
3) Either side if running in-sync.
Please enter the side of the system that you want to update A or B?
Type A to upgrade motherboard A or B to upgrade motherboard B,
then type yes to confirm.
Keep system up
11. When asked if you want to halt the system, answer no. The
power cycle for the FPGA upgrades is performed later at Step 50
on page 20.
FPGAs upgraded
on other side
12. Repeat Step 10 and Step 11 for the other motherboard.
System rebooted
13. Reboot the machine:
# init 6
▼
To Upgrade the PROMs
You must disable each CPUset in turn in order to upgrade the
remaining CPUset PROM.
System in sync
14. Wait for the system to come back into sync following Step 13.
This may take a few minutes. To verify, follow the procedure “To
Confirm the System is Running in Sync” on page 11.
15
RelNotes.book Page 16 Thursday, October 14, 1999 8:14 AM
cmsconfig
started
15. Start cmsconfig:
# cd /usr/platform/SUNW,Ultra-4FT/SUNWcms/sbin
# ./cmsconfig
16. Enter the item number for A-CPU, then select the Action item.
17. Press 0 to disable A-CPU.
A-CPU disabled
18. Wait for a few seconds, then press Return to redisplay the menu.
Repeat until the display shows that A-CPU is disabled, then press q
twice to exit from cmsconfig.
Update the
PROM
19. Invoke the update program:
# cd /usr/platform/SUNW,Ultra-4FT/lib
# ./netra_ft_1800.flash.update-10
20. You will be asked if you wish to upgrade the PROMs.
Answer y and then yes to upgrade.
NVRAM variables
noted
21. A list of NVRAM variables will be displayed for you to note, and
reset later if different from the default values.
Note these for safety, although it should not be necessary to use
them.
22. You will be asked if you wish to continue.
Answer yes to continue.
B-CPU upgrade
completed
23. The upgrade will proceed, and the success or failure of the
upgrade will be reported.
If the update fails, note any error messages and contact Sun
Enterprise Services.
Keep system up
24. You will be asked Do you wish to halt the system now.
Answer no.
cmsconfig
started
25. Start cmsconfig:
# cd /usr/platform/SUNW,Ultra-4FT/SUNWcms/sbin
# ./cmsconfig
16
Netra ft 1800 Interim Update Instructions • September 1999
RelNotes.book Page 17 Thursday, October 14, 1999 8:14 AM
26. Enter the item number for A-CPU, then select the Action item.
27. Press 1 to enable A-CPU.
A-CPU
re-enabled
System in sync
28. Wait for a few seconds, then press Return to redisplay the menu.
Repeat until the display shows that A-CPU is enabled, then press q
to return to the cmsconfig menu.
29. Wait for the system to come back into sync.
This may take a few minutes. To verify, follow the procedure “To
Confirm the System is Running in Sync” on page 11.
30. Enter the item number for B-CPU, then select the Action item.
31. Press 0 to disable B-CPU.
B-CPU disabled
32. Wait for a few seconds, then press Return to redisplay the menu.
Repeat until the display shows that B-CPU is disabled, then press q
twice to return to the prompt.
Update the
PROM
33. Invoke the update program:
# cd /usr/platform/SUNW,Ultra-4FT/lib
# ./netra_ft_1800.flash.update-10
34. You will be asked if you wish to upgrade the PROMs.
Answer y and then yes to upgrade.
35. A list of NVRAM variables will be displayed for you to note, and
reset later if different from the default values.
Note these for safety, although it should not be necessary to use
them.
36. You will be asked if you wish to continue.
Answer yes to continue.
A-CPU upgrade
completed
37. The upgrade will proceed, and the success or failure of the
upgrade will be reported.
If the update fails, note any error messages and contact your Sun
Enterprise Services.
Keep system up
38. You will be asked Do you wish to halt the system now.
Answer no.
17
RelNotes.book Page 18 Thursday, October 14, 1999 8:14 AM
cmsconfig
started
39. Start cmsconfig:
# cd /usr/platform/SUNW,Ultra-4FT/SUNWcms/sbin
# ./cmsconfig
40. Enter the item number for B-CPU, then select the Action item.
41. Press 1 to enable B-CPU.
B-CPU
re-enabled
System in sync
42. Wait for a few seconds, then press Return to redisplay the menu.
Repeat until the display shows that B-CPU is enabled, then press q
twice to return to the main menu.
43. Wait for the system to come back into sync.
This may take a few minutes. To verify, follow the procedure “To
Confirm the System is Running in Sync” on page 11.
44. Type:
# eeprom auto-boot? true
18
Netra ft 1800 Interim Update Instructions • September 1999
RelNotes.book Page 19 Thursday, October 14, 1999 8:14 AM
▼
To Enable or Disable the OSdog
The OSdog functionality is enabled or disabled at boot time based
on values stored in the motherboard EEPROM. These can only be
modified by an OBP command.
If you require the OSdog to be enabled, proceed to Step 45.
If you do not require the OSdog, proceed to Step 48
▼ To Enable the OSdog
Go to OBP
prompt
45. Type:
# init 0
Enable the
OSdog
46. At the ok prompt type:
ok
ok
ok
ok
setenv auto-boot? false
reset-all
4f set-conf-osdog
setenv auto-boot? true
The OSdog is now permanently enabled.
47. Proceed to Step 50.
▼
Go to OBP
prompt
To Disable the OSdog
48. Type:
# init 0
Enable the
OSdog
49. At the ok prompt type:
ok
ok
ok
ok
setenv auto-boot? false
reset-all
0 set-conf-osdog
setenv auto-boot? true
The OSdog is now permanently disabled.
19
RelNotes.book Page 20 Thursday, October 14, 1999 8:14 AM
▼
To Reset the System with the Upgrades
50. A full power cycle of the system is required in order for the
upgrades to take effect.
■
If you are at the unix prompt, type:
# init 5
■
System
power-cycled
If you are at the OBP prompt, ignore this step and proceed with
Step 51.
51. Reset motherboard and side B using either of the following two
methods:
■
From the Remote Control Processor (RCP), enter the command:
# BBoff
Wait 10 seconds, then enter the command:
# BBon
■
Press the black standby power button on the side B (bottom)
Control Alarms and Fans (CAF) module to power off.
Wait ten seconds, then press the green button to power on.
52. Reset motherboard and side A using either of the following two
methods:
■
From the Remote Control Processor (RCP), enter the command:
# AAoff
Wait 10 seconds, then enter the command:
# AAon
■
Press the black standby power button on the side A (top) Control
Alarms and Fans (CAF) module to power off.
Wait ten seconds, then press the green button to power on.
The system will boot up and come into sync.
20
Netra ft 1800 Interim Update Instructions • September 1999
RelNotes.book Page 21 Thursday, October 14, 1999 8:14 AM
Verifying the Upgrade
You can use the following instructions to verify that the patch
installation procedure has been correctly applied.
If any of these verifications fail, you should review the related steps
in the procedure or consult Sun Enterprise Services.
▼ To Verify the Patch Installation
53. Type:
# showrev -p | grep 105181-14
The output should be:
Patch: 105181-14 Obsoletes: 105214-01, 105636-01, 105776-01, 106031-02,
106308-01 Requires: Incompatibles: Packages: SUNWkvm, SUNWcsr, SUNWcar,
SUNWhea
Patch: 108145-10 Obsoletes: 108065-03, 107926-03, 107369-16 Requires:
105181-14 Incompatibles: Packages: SUNWcsu, SUNWftcar, SUNWftcau,
SUNWcmscu, SUNWcmsr, SUNWcmsu, SUNWcmsdf, SUNWcrash, SUNWftm, SUNWftmur,
SUNWftmuu, SUNWftutr, SUNWftutu, SUNWlogr, SUNWlogu, SUNWpnet, SUNWspltr,
SUNWspltu, SUNWttymx
Patch installation
verified
54. Type:
# showrev -p | grep 108145
The output should be:
Patch: 108145-10 Obsoletes: 108065-03, 107926-03, 107369-16 Requires:
105181-14 Incompatibles: Packages: SUNWcsu,
SUNWftcar, SUNWftcau, SUNWcmscu, SUNWcmsr, SUNWcmsu, SUNWcmsdf, SUNWcrash,
SUNWftm, SUNWftmur, SUNWftmuu, SUNWftutr,
SUNWftutu, SUNWlogr, SUNWlogu, SUNWpnet, SUNWspltr, SUNWspltu, SUNWtty
21
RelNotes.book Page 22 Thursday, October 14, 1999 8:14 AM
▼ To Verify FPGA Firmware Levels
FPGA upgrade
verified
55. For each motherboard type:
# cd /usr/platform/SUNW,Ultra-4FT/SUNWcms/sbin
# ./cmsfruinfo -l x-MBD -i -s EE_MBD_BRIDGE_FWARE_PARTNO EE_MBD_BRIDGE_FWARE_DASH
where x is A for motherboard A or B for motherboard B.
For both motherboards the output should be:
2587134
08
Both sides should be at the same revision level, that is, both -08.
22
Netra ft 1800 Interim Update Instructions • September 1999
RelNotes.book Page 23 Thursday, October 14, 1999 8:14 AM
▼ To Verify PROM Firmware Levels
PROM upgrade
verified
56. For each CPUset type:
# cd /usr/platform/SUNW,Ultra-4FT/SUNWcms/sbin
# ./cmsfruinfo -l x-CPU -i -s EE_CPU_PROM_PARTNO EE_CPU_PROM_DASH
where x is A for A-CPU or B for B-CPU.
For both CPUsets the output should be:
2587354
10
Both sides should be at the same revision level, that is, both -10.
57. Type:
# prtconf -V
The output should be:
OBP 3.7.24.0 1999/06/24 14:24
The 24 indicates that the PROM level is 24.
23
RelNotes.book Page 24 Thursday, October 14, 1999 8:14 AM
Backing Out Strategy
The stages involved are as follows:
1. Backout the PROM.
2. Backout the QFE patch, if installed.
3. Backout the OSdog patch, if installed.
4. Backout the interim update patch D.
5. Backout the kernel update.
6. Re-install the OSdog patch, if required.
7. Re-install the QFE patch, if required.
8. Reboot the system.
▼ To Backout the PROM
cmsconfig
started
1. Start cmsconfig:
# cd /usr/platform/SUNW,Ultra-4FT/SUNWcms/sbin
# ./cmsconfig
2. Enter the item number for A-CPU, then select the Action item.
3. Press 0 to disable A-CPU.
A-CPU
disabled
4. Wait for a few seconds, then press Return to redisplay the menu.
OSdog
installed Y / N
5. Determine which patch you are reverting to by typing the
following at the command line:
Repeat until the display shows that A-CPU is disabled, then press q
twice to exit from cmsconfig.
# patchadd -p | grep “atch: 107926”
■
24
If a line including the patch number 107926 is displayed, circle
‘Y’ in the box, otherwise circle ‘N’.
Netra ft 1800 Interim Update Instructions • September 1999
RelNotes.book Page 25 Thursday, October 14, 1999 8:14 AM
6. Invoke the update program.
■
If you entered ‘23 in Step 2 on page 9, enter the following at the
command line:
# cd /usr/platform/SUNW,Ultra-4FT/lib
# ./netra_ft_1800.flash.update-09
■
If you entered ‘21’ in Step 2 on page 9, enter the following at the
command line:
# cd /usr/platform/SUNW,Ultra-4FT/lib
# ./netra_ft_1800.flash.update-07
7. You will be asked if you wish to upgrade.
Answer y and then yes to upgrade.
NVRAM variables
noted
8. A list of NVRAM variables will be displayed for you to note, and
reset later if different from the default values.
Note these for safety, although it should not be necessary to use
them.
9. You will be asked if you wish to continue.
Answer yes to continue.
B-CPU upgrade
completed
10. The upgrade will proceed, and the success or failure of the
upgrade will be reported.
If the update fails, note any error messages and contact Sun
Enterprise Services.
Keep system up
11. You will be asked Do you wish to halt the system now.
Answer no.
cmsconfig
started
12. Start cmsconfig:
# cd /usr/platform/SUNW,Ultra-4FT/SUNWcms/sbin
# ./cmsconfig
13. Enter the item number for A-CPU, then select the Action item.
14. Press 1 to enable A-CPU.
25
RelNotes.book Page 26 Thursday, October 14, 1999 8:14 AM
A-CPU
re-enabled
System in sync
15. Wait for a few seconds, then press Return to redisplay the menu.
Repeat until the display shows that A-CPU is enabled, then press q
to return to the cmsconfig menu.
16. Wait for the system to come back into sync.
This may take a few minutes. To verify, follow the procedure “To
Confirm the System is Running in Sync” on page 11.
17. Enter the item number for B-CPU, then select the Action item.
18. Press 0 to disable B-CPU.
B-CPU disabled
19. Wait for a few seconds, then press Return to redisplay the menu.
Repeat until the display shows that B-CPU is disabled, then press q
twice to return to the prompt.
Update the
PROM
20. Invoke the update program.
■
If you entered ‘23’ in Step 2 on page 9, enter the following at the
command line:
# cd /usr/platform/SUNW,Ultra-4FT/lib
# ./netra_ft_1800.flash.update-09
■
If you entered ‘21’ in Step 2 on page 9, enter the following at the
command line:
# cd /usr/platform/SUNW,Ultra-4FT/lib
# ./netra_ft_1800.flash.update-07
21. You will be asked if you wish to upgrade.
Answer y and then yes to upgrade.
22. A list of NVRAM variables will be displayed for you to note, and
reset later if different from the default values.
Note these for safety, although it should not be necessary to use
them.
23. You will be asked if you wish to continue.
Answer yes to continue.
A-CPU upgrade
completed
24. The upgrade will proceed, and the success or failure of the
upgrade will be reported.
If the update fails, note any error messages and contact Sun
Enterprise Services.
26
Netra ft 1800 Interim Update Instructions • September 1999
RelNotes.book Page 27 Thursday, October 14, 1999 8:14 AM
Keep system up
25. You will be asked Do you wish to halt the system now.
Answer no.
cmsconfig
started
26. Start cmsconfig:
# cd /usr/platform/SUNW,Ultra-4FT/SUNWcms/sbin
# ./cmsconfig
27. Enter the item number for B-CPU, then select the Action item.
28. Press 1 to enable B-CPU.
B-CPU
re-enabled
System in sync
29. Wait for a few seconds, then press Return to redisplay the menu.
Repeat until the display shows that B-CPU is enabled, then press q
to return to the cmsconfig menu.
30. Wait for the system to come back into sync.
This may take a few minutes. To verify, follow the procedure “To
Confirm the System is Running in Sync” on page 11.
▼ To Backout the QFE Patch
The following step applies only if the QFE patch (number 107778)
was previously installed. If the patch was not installed, ignore this
step and proceed to Step 32.
QFE patch
backed out
31. Backout the QFE patch by entering the following at the command
line:
# cd /var/sadm/patch
# ./107778-04/backoutpatch 107778-04
▼ To Backout the OSdog Patch
The following step applies only if the OSdog patch (number 107926
was previously installed, in which case you will have circled ‘Y’
following Step 5 on page 24. If you circled ‘N’, ignore this step and
proceed to Step 33.
27
RelNotes.book Page 28 Thursday, October 14, 1999 8:14 AM
OSdog patch
backed out
32. Backout the OSdog patch by entering the following at the
command line:
# cd /var/sadm/patch
# ./107926-04/backoutpatch 107926-04
▼ To Backout the Interim Update Patch
Netra ft 1800
Interim Update
patch backed out
33. Backout the Netra ft 1800 Interim Update patch by entering the
following at the command line:
# cd /var/sadm/patch
# ./108145-10/backoutpatch 108145-10
▼ To Back Out the Kernel Update
Kernel Update
patch backed
out twice
34. Backout the Kernel Update patch by entering the following at the
command line:
# cd /var/sadm/patch
# ./105181-14/backoutpatch 105181-14
The following warning will be displayed:
WARNING: /usr/sbin/patchrm is being used to backout
this patch.
Backoutpatch will be removed from Solaris patches in
the next release of Solaris.
Checking installed packages and patches...
Backing out patch 105181-14...
ERROR: Patch number 105181-14 is not installed
The backout script must therefore be executed a second time, after
which the patch will install correctly; that is, type:
# ./105181-14/backoutpatch 105181-14
28
Netra ft 1800 Interim Update Instructions • September 1999
RelNotes.book Page 29 Thursday, October 14, 1999 8:14 AM
▼ To Re-install the OSdog Patch
Perform this step only if the OSdog patch was backed out in
step 31, otherwise proceed to Step 36.
Osdog patch
re-installed
35. Re-install the OSdog patch.
■
If patch 107926-04 still resides in the /var/tmp directory, type:
# cd /var/tmp/107926-04
# ./installpatch .
■
If patch 107926-04 no longer resides in the /var/tmp directory,
download it from SunSolve at http://sunsolve.sun.com and
install it according to the instructions provided with the patch.
▼ To Re-install the QFE Patch
Perform this step only if the QFE patch was backed out in Step 31
on page 27, otherwise proceed to Step 37.
QFE patch
re-installed
36. Re-install the QFE patch.
■
If the patch still resides in the /var/tmp directory, enter:
# cd /var/tmp/107778-04
# ./installpatch .
■
If the patch no longer resides in the /var/tmp directory, reinstall the patch as described in the Netra ft 1800 Software Release
Notes, part no. 805-4527-13.
37. Finally, reboot the system:
# init 6
29
RelNotes.book Page 30 Thursday, October 14, 1999 8:14 AM
This page is intentionally blank.
30
Netra ft 1800 Interim Update Instructions • September 1999
RelNotes.book Page 31 Thursday, October 14, 1999 8:14 AM
Functionality Addendum
This Addendum contains details of documentation changes and functional additions
since the last update.
Documentation Changes
User’s Guide
The following changes should be made to the Netra ft 1800 User’s Guide:
■
Section 9.2.1 “Console Subsystem” on page 9-5: All references to sm should be
replaced with ft_serial.
■
Table 9-2 “Console Subsystem Fields” on page 9-5:
Field
Values
*description
Serial multiplexer
port0
NULL|A-CAF_console
port1
NULL|A-CAF_modem
port2
NULL|B-CAF_console
port3
NULL|B-CAF_modem
*redundancy
The redundancy level of the system
*mode_of_use
The file system device used to access the subsystem
*ports_in_use
List of ports in use
31
RelNotes.book Page 32 Thursday, October 14, 1999 8:14 AM
■
Table 9-3 “Console Subsystem States” on page 9-6: Add an extra state as follows:
State
Means
not_known
The subsystem cannot determine its level of redundancy (this is an
error state).
■
Delete the paragraph following Table 9-3 on page 9-6.
Reference Manual / Manpages
The following changes should be made:
■
ttymuxadm(1M):
■
AVAILABILITY should be SUNWttymx
■
On line 166 change B CAF to B-CAF.
■
ttymux(7d):
■
AVAILABILITY should be SUNWttymx.
Solaris Y2K Patch Compatibility
The following Y2K patches currently available on SunSolve have been tested with
this patch, but are not included as part of the patch1:
Patch
Software
Description
105210-22
SunOS 5.6
libc and watchmalloc
105800-05
SunOS 5.6
/usr/bin/admintool
106193-03
SunOS 5.6
sysid unzip
106828-01
SunOS 5.6
/usr/bin/date
107492-01
SunOS 5.6
runacct cannot update /var/adm/acct/sum/log
105621-17
SunOS 5.6
libbsm and cron
105464-02
OpenWindows 3.6
Multiple xterm fixes
105566-07
CDE 1.2
Calendar manager
1. All patches tested at time of document delivery.
32
Netra ft 1800 Interim Update Instructions • September 1999
RelNotes.book Page 33 Thursday, October 14, 1999 8:14 AM
CMS Control of the ICN Subsystem
CMS control of the ICN subsystem is implemented via four new cmsdefs. Two are
simple device cmsdefs (u4ftmbox and icnio) that are visible in cmsconfig but
have no user changeable attributes. However, they can provide information that may
be useful in diagnosing problems. The other two (icn and icn_system) constitute
the user interface; they are described in detail below. There are two u4ftmbox
objects, four icnio objects, four icn objects and one icn_system object.
icn_system
This is the master CMS object for the icn subsystem. Its only visible user operations
are enable and disable. Its task is to provide overall control of the subsystem.
icn_system 0 can only be enabled if the system is split – when the system is
combined it remains in the disabled state unless an explicit enable is requested,
in which case it will go to the enable_failed state, setting the info field to
’System is not split’.
Under normal operation the act of enabling and disabling icn_system 0 is
automatically undertaken by u4ftsplitd and thus no user intervention should be
required.
Enabling icn_system 0 automatically brings the u4ftmbox objects online and
then enables the individual icn objects (in that order). Disabling icn_system 0
disables the icn objects and takes the u4ftmbox objects offline (again in that order).
If the u4ftmbox objects fail to come online, icn_system goes enable_failed and
does not proceed to perform any actions on the icn objects. They will then normally
appear to be in state not_present.
icn_system 0 effectively encompasses the functionality of the existing icn control
scripts (icn.init and icn.terminate) and can be used interchangeably with
them.
A complete reset of the icn system can be accomplished by executing a disable
followed by an enable on icn_system 0.
Functionality Addendum
33
RelNotes.book Page 34 Thursday, October 14, 1999 8:14 AM
icn
Each icn object controls a single icn network connection. It can be enabled and
disabled, and also supports attributes that set the hostname of the network interface;
control whether the interface is ’up’ or ’down’, and determine how much memory is
reserved for communication.
icn objects can only be enabled if icn_system 0 is also enabled.
The initial value for the hostname attribute is read from the corresponding icn
configuration file in /etc; furthermore if the hostname is changed in the CMS the
modified value is written back to the appropriate configuration file. Note that the
reverse is not true: that is, if the configuration file in /etc/ is modified, this will not
be noticed by the icn CMS object; in fact, the change to the configuration file will be
lost when the object is disabled, since at that time the hostname from the CMS object
is copied back to the configuration file.
When initially enabled (automatically via an enable on icn_system 0) the initial
state of each icn object depends upon the existing system state. If the matching icn
configuration file (CMS object icn 0 reads /etc/config.icn0 and so on for the
other instances) contains a hostname, then the icn object is automatically enabled
and the interface plumbed and brought online. If the configuration file does not
contain a hostname then the icn instance automatically goes to the disabled state.
Once enabled, a disable action unplumbs the network interface; takes the
necessary devices offline, and goes to the disabled state. A subsequent enable will
bring the interface back online.
The hostname attached to an interface cannot be changed while the interface is
marked as ’up’.
Memory size cannot be changed if the interface is ’up’ or ’down’.
Individual icn interfaces can be reset by disabling and then enabling the
appropriate icn object.
34
Netra ft 1800 Interim Update Instructions • September 1999