1
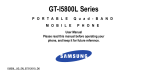
Model: ID707WTA
Cyberus – Tablet PC
User Manual
Contents
Safety Precautions
---------------------------------3
Product Overview
---------------------------------4
Functions of Button and Port
Battery Charge and Replacement
Getting Started
----------------------------------6
Application Introduction
Status Icon Briefing
Touch Screen Operation
Home Screen Management
Keyboard Use Guide
Connectivity
-----------------------------------9
Insert Micro SD Card
Connect to PC
Setting
-----------------------------------11
Wi-Fi Setting
Language Setting
Screen Rotation
Clear Data History
Web
-----------------------------------12
Browser
Facebook
YouTube
Market
Email
Tools
------------------------------------15
Camera, Sound Recorder and Camcorder
Troubleshooting
-----------------------------------16
Warranty
------------------------------------17
2
Safety Precautions
Please read the safety precautions and user manual carefully before using your device to
ensure proper use.
Images and screenshots used in this user manual may differ in appearance from the
actual product.
Content in this user manual may differ from the product, or from software provided by
service providers or carriers, and is subject to change without prior notice.
Keep your device dry.
Do not use or store your device in dusty, dirty areas.
Do not place your device on slopes. If your device falls, it can be damaged.
Do not place your device in too hot or too cold areas.
Do not place your device with metal objects such as keys and necklaces.
Do not place your device near magnetic fields.
Do not place your device near or in heaters, microwaves, hot cooking equipment, or high
pressure containers.
Simply put, do not drop, throw, or sit on your device, for obvious reasons.
Do not use your device near other electronic devices.
Please do not use your device in thundery days.
Keep your device away from liquid substance.
For advanced operations such as Dev tools, it is suggested to be operated by professional
engineers.
3
Product Overview
This section is to tell you functions of each button and port, battery charge and
replacement.
Functions of Button and Port
4
1.
2.
3.
4.
5.
6.
7.
8.
9.
10.
11.
12.
Indicator Light
Volume Down
Volume Up
Go to Home Screen
Unlock the screen or go to Menu Options when running an application
Quick Search to search on the internet
Back to the last interface
Micro SD Slot
USB Port
Earphone Port
DC Port
Power button. Press and hold on for more than 3 seconds to turn on or turn off the unit.
One quick press to lock the screen when the unit has been turned on.
13. Use an ultra thin stick to reach the hole’s bottom to restart your device.
14. Camera
Battery Charge and Replacement
Use the power adapter to charge the battery of your Cyberus. The indicator light will show
flickering red light when charging and still red light when charging finished.
Rechargeable batteries have a limited life cycle so it may need to be replaced. Press and
slide open the battery cover at the back of the device with “Sungale” printed, then pull out
the battery cable and Install the new battery.
Accessories are listed as following:
5
Getting Started
This section is to introduce general application of main menu, touch screen, keyboard,etc.
Press and hold the power button for more than 3 seconds to boot up.
Touch M at the right bottom to unlock and go to home screen.
Touch
for more applications.
6
Application Introduction
Photo:
Music:
E-book:
Browser:
Google Maps:
YouTube:
Facebook:
Market:
VideoPlayer:
Notepad:
Wifi Setting:
Library:
Internet:
Game and Kids:
Application:
Multimedia:
Document:
Tools:
Disply your favorite pictures.
Meditate in your beloved songs.
Read ebooks in various formats.
Browse websites on the internet, search content you want to know.
Search for maps.
Watch YouTube videos updated everyday, register or log in to YouTube.
Share your photos and other information with your friends
Android market for you to download thousands of applications.
Play your favorite videos.
Arrange your schedule and events.
Configur the wifi network and connect to Wifi.
A collection of popular reading tools like FBReader, IReader, RepliGo
Reader, Kobo, Borders, Amazon Kindle, Wattpad, Ebook,etc.
A gallery of internet applications like Skype, Email, Weather, etc.
Enjoy yourself.
Sound Recorder, Camera, Camcorder.
Play pictures, music and video.
View and edit WORD, EXCEL, SLIDESHOW and PDF files.
Calendar, Alarm Clock to help you organise your time, Settings for
your personal preferences
Status Icon Briefing
Airplane Mode, under this mode, you can not access the internet, but non-wireless
features are available.
Shows that the EDGE network is active, and you can connect to the internet through
Wi-Fi.
Means that the router is available and shows the signal intensity.
Means that your battery is being charged.
Shows that you are downloading some applications or files.
Means that your device is connecting with computers.
Means no Micro SD card.
Vibration Mode
Silent Mode
Means application update available.
7
Touch Screen Operation
For better performance of the touch screen, please remove the protective film first.
Select:
Tap an icon to select and run an application.
Slide:
Use your finger or stylus to gently slide on the screen to up or down, right or left
horizontally to move items on the screen. If you enter an item by mistake while
Drag:
Lock:
sliding on the screen, just tap the
to go back to last interface.
Touch and hold the icon for about 2 seconds and move your finger or stylus to
the destination.
Press power button once to lock the screen.
Home Screen Management
1. Touch and hold any application icon to create shortcut icon on home screen
2. Touch and hold the shortcut icon until the
icon at the right edge of your screen
turns to a trash can, drag the application shortcut icon to the trash can and it will be
deleted from your home screen.
Note: You can only create shortcut icon of an application but not a folder contains more
than one application.
3. You can create 3 home screens at most. If you want to go to another home screen,
just tap the blank area of the screen and slide left or right.
Keyboard Use Guide
Tap
Tap
to switch between lowercase letters and capital letters.
to switch to numbers and symbols. Tap “ALT” (which is fomer
symbols.Tap
to delete data.
8
) for more
Connectivity
This section is to tell you about connecting with external device such as Micro SD card
and computer.
Insert Micro SD Card
Insert a Micro SD Card into the card slot with the label side face up, push the card until it
locks into place, and “preparing SD card” will appear on the upper left corner of the
screen.
When you want to remove the Micro SD card, press the card in the slot and it will pop up,
take it out gently.
Note: This device supports Micro SD Card up to 32GB.
Connect to PC
After booting up, connect the device to computer with the USB cable, tap the white blank
status area at the top of the screen and slide it downwards as following:
9
Tap “Select to copy files to/from your computer [Internal storage].” and then “Mount’’ to
manage files between your computer and internal memory.
If you have inserted a Micro SD card, you can tap “Select to copy files to/from your
computer” and then “Mount” to manage files between your computer and Micro SD card.
Note: For the first time you connect this device to your computer, you might be asked to
install driver of your device so that it can be recognized by your computer. Please follow
the installation guide or contact your computer service provider for help.
Please safely remove your device from computer after file management to prevent data
lose.
10
Setting
This section is to tell you settings like Wi-Fi, language, screen rotation, and how to clear
data history.
Wi-Fi Setting
In the home screen with main menu, tap “Tools”→ tap “Settings”→ tap “Wireless
controls” tap “Wi-Fi settings” and it will search available routers nearby and then show
routers list after that.
Tap a router’s name and input the password if needed. It will automatically link to your
appear on the upper right corner of
router and Wi-Fi. And there will be a Wi-Fi icon
to return or
to
the screen. Now you have successfully linked to internet. Tap
home screen directly.
Language setting
In the home screen, tap “Tools” → tap “Settings” → slide and tap “Locale & text” in the
eighth row→tap “Select locale”→slide downwards or upwards to find the language that
you want and tap the language.
Tap
to return after setting.
Screen Rotation
This device has built-in motion sensor to automatically adjust screen display between
portrait and landscape.
If you want to defaut this function, please set as following:
In the home screen, tap “Tools”→ tap “Settings”→ tap “Sound and display” → tap
“Orientation” to turn the green tick to grey.
You may also find “Screen timeout” in the “Sound and display” to set screen backlight
time.
11
Clear Data history
If you want to clear data that have been made on your Cyberus Tablet, go to “Tools” →
“Settings” → “Applications” → “Manage applications” → tap the application whose data
that you want to clear → tap “Clear data” and “OK” and the related data will be deleted
from your device.
If you want to clear all operation data, go to “Tools” → “Settings” → “SD card & device
storage”→ “Factory data reset”→ “Reset device”→ “Erase everything” and your device
will be reset。
Web
This section is to tell you some operation about Browser, Facebook, YouTube, Market and
App store, etc. Please note that all these applications need Wi-Fi connection, for how to
link to Wi-Fi, please refer to “Setting→Wi-Fi Setting” section.
Browser
When you have opened a web page, tap “M” touch key to find menus like “Bookmarks,
New Window, Refresh, Forward and More”.
Tap “More” to find more functions like “Find on page , Select text, etc”.
Facebook
Tap “Facebook” and login or sign up if you don’t have an account.
Tap “M” touch key to find some information about your facebook.
If you want to clear your facebook data, please refer to content in “Setting→Clear Data
History” section.
YouTube
Tap “YouTube” to view videos, and tap “M” touch key to find more operations like “Upload,
12
My account, Categories, etc”.
Market
In the home screen, tap “Market” → tap “Next” to set up your google account.
Sign in your google account or creat a google account and then sign in.
After a few minutes, it will enter into interface of “Android Market Terms of Service”. Tap
“Accept” after reading and your accept the terms to enter Market. There will be three
options listed: Apps, Games and Downloads.
Tap “Apps” to download and install apps from the Market.
Tap “Games” to download and install games from the Market
Tap “Downloads” to find the apps that have been downloaded to your device.
Email
Set up your email accounts. You will need to contact your email server supplier for your
email’s POP3 and SMTP server related information, some of which can be found on the
internet. Take gmail as a sample, search content “gmail pop3 smtp server” on internet,
you will find gmail’s pop3 server is “pop.gmail.com”, related port is 995. Need “SSL”
security.
SMTP server is “smtp.gmail.com”, related port is 465 if use SSL security. If choose TLS
security, related port will be 587.
In the main menu, tap “Mail”→tap “Next”→Input your Gmail account and pass word→Tap
“Manual setup”→tap “POP3 account” and you will enter into an interface similar with the
following picture.
Check your username to see if it has been filled completely with “@gmail.com”. If not,
please add “@gmail.com” after your gmail account.
Tap “gmail.com” under POP3 server item to change it to “pop.gmail.com”. And then
change port to “995”, tap item “Security type” to choose “SSL if available” and tap “Next” to
set up SMTP server. The interface is similar with the following picture.
13
Change “SMTP server” to “smtp.gmail.com” and “port” to “465” or “587”, choose security
type to “SSL(if available)” or “TLS(if available)” respectively.
Then tap “Next” to finish setting. It will enter into your email account after a few minutes.
Then you will need to give this account a name and input the name which will appear on
the email that have been sent out by you.
Tap “M” touch key to find more operations like composing a message.
When writing a message, tap “M” touch key to get more operations like “Add Cc/Bcc”,etc.
If you want to clear your email account and related data, please refer to “Clear data
history” in “Setting” section.
14
Tools
This section is to tell you how to operate Camera, Sound Recorder and Camcorder.
Camera : All the 3 functions need Micro SD card. Please insert a Micro SD card into your
device first. For how to insert Micro SD card, please refer to content of “Insert Micro SD
Card” in “Connectivity” section.
In the home screen, tap “Application” and find “Camera”. Tap “Camera” to enter the
interface as following:
Tap
to take pictures, then tap “M” touch key to get 3 submenus: “Switch to video,
Gallery, Settings”.
Tap “Switch to Video” to turn to Camcorders.
Tap “Gallery” and the folder without name (not the folder named “Pictures” to view pictures
that have been taken. Tap the picture, you will find more operations like “Set as wallpaper”,
“Share the picture through Facebook, Gmail, Picasa and Twidroid” and “Delete the
picture”, etc.
Tap “M” touch key to find more operations like slideshow, rotate and more.
You can also find the pictures in “Multimedia”→ “Pictures”
Sound Recorder: In the home screen, tap “ Applications” and find “Sound Recorder”
to start recording. Tap
to stop
→ tap “Sound Recorder” to enter, and tap
recording. Tap “Use this recording” and the record will automatically be stored. Go to
Multimedia in the home screen, tap “Music player” to find the records.
Camcorder: In the home screen, tap “ Applications” and find “Camcorder”. Tap
to begin taking video. Tap
to stop.
“Camcorder” to enter camcorder and tap
Tap “M” touch key to find 3 submenus: Switch to camera, Gallery, Settings.
Tap “Gallery” and then the folder without name (not “Pictures” ) to view the videos.
15
When playing the videos, tap “M” touch key to find more operations like share the video
through Gmail, Twidroid, YouTube, etc. You can also delete the videos.
Go to “Settings” to set up video record time, video quality, etc.
Trouble shooting
FAQs:
Q 1 : Why can’t I link to Wi-Fi?
A: Please check if you have turned on Wi-Fi. Go to “Tools”→ “Setting”→ “Wireless
controls” → tap “Wi-Fi” to turn it on.
Please check if you have input the right password.
For more Wi-Fi related questions, please go to www.sungale.com and find Support→
Wi-Fi related FAQ.
Q2 : Why can’t I install applications downloaded from the Market?
A: Please check your settings. Go to “Tools”→ “Setting”→ “Applications”. Check if there’s
a green tick after Unknown sources. If there’s not, tap “Unknown sources” to turn the tick
green.
Q3: How to find more operations when running an application?
A: Tap “M” touch key.
Support:
1. Visit the support site.
For manual download and FAQs: www.sungale.com
More supports about WIFI: www.sungalewifi.com
2. Contact Sungale Support team
Toll Free Call in the USA: 800-473-5156
Service email: [email protected]
16
LIMITED WARRANTY
The limited warranty set forth below is given by the manufacturer with respect to Sungale brand DPF
players and other consumer electronics products purchased and used in the United States of America.
The manufacturer warrants this product against defects in material or workmanship as follows:
LABOR: For a period of ninety (90) days from the date of purchase, if this product is, defective, the
manufacturer will repair or replace the product, at its option, at no charge. After this ninety (90) days
period up to one year, a labor charge of US$30.00 will be charged for each service.
PARTS: For a period of one year from the date of purchase, the manufacturer will supply, at no charge,
new or rebuilt replacement parts in exchange for defective parts. After this one year period, the
manufacturer will charge the new or replacement parts.
This warranty does not cover: (1) customer instruction, installation or set up; (2) cosmetic damage or
damage due to accident, misuse, abuse, or negligence; (3) commercial use of the product; (4)
modification of any part of the product; (5) damage due to improper operation, improper maintenance, or
connection to an improper voltage supply; (6) damage due to an attempted repair of the product by
anyone other than a facility authorized by the manufacturer to service the product; (7) consumables
(such as fuses and batteries).
This warranty is valid only in the United States.
This product must be accompanied by a copy of the original retail purchase receipt. If no proof of
purchase is attached, the warranty will not be honored and repair cost will be charged.
This warranty is valid with attach written documentation detailing the complaint to the outside or inside of
the carton.
This warranty is invalid if the factory applied serial number has been altered or removed from the product.
The manufacturer reserves the right to modify any design of this product without prior notice.
To obtain warranty service, you must deliver the product freight prepaid, in either its original packaging or
packaging affording an equal degree of protection, plus proof of purchase, to
Service Center
13941 Central Ave, Chino, CA91710
Tel: 800-473-5156
REPAIR OR REPLACEMENT AS PROVIDED UNDER THIS WARRANTY IS THE EXCLUSIVE
REMEDY OF THE CONSUMER. THE SERVICE CENTER SHALL NOT BE LIABLE FOR ANY
INCIDENTAL OR CONSEQUENTIAL DAMAGES FOR BREACH OF ANY EXPRESS OR IMPLIED
WARRANTY ON THIS PRODUCT. EXCEPT TO THE EXTENT PROHIBITED BY APPLICABLE LAW,
ANY IMPLIED WARRANTY OF MERCHANTABILITY OR FITNESS FOR A PARTICULAR PURPOSE
ON THIS PRODUCT IS LIMITED IN DURATION TO THE DURATION OF THIS WARRANTY.
Some states do not allow the exclusion or limitation of incidental or consequential damages, or allow
limitations on how long an implied warranty lasts, so the above limitations or exclusions may not apply to
you. This warranty gives you specific legal rights, and you may have other rights which vary from state to
state.
17