1
Site Preparation
10
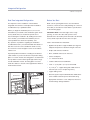
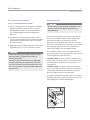
Anti-Tip Bracket Installation
WOOD FLOOR APPLICATIONS
To prevent the unit from tipping forward and provide
a stable installation, the unit must be secured in place
with the anti-tip bracket provided with the unit.
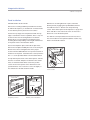
An anti-tip bracket and hardware is provided with the integrated unit. Placement of the anti-tip bracket is critical to
a stable installation. The anti-tip bracket must be installed
on a solid base.
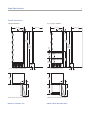
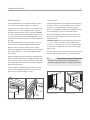
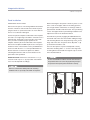
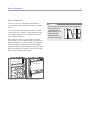
If you are installing the unit in a space deeper than 24"
(610), be sure to locate the anti-tip bracket so that it
engages the unit properly. It is important that the anti-tip
bracket is placed 24" (610) from the front of the unit
(without panels) to the back of the anti-tip bracket.
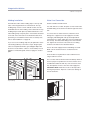
IMPORTANT NOTE: In some installations the subflooring
or finished floor may require angling the wood screws
used to fasten the anti-tip bracket to the back wall.
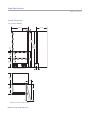
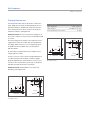
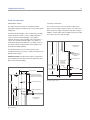
Use the six #12 x 2 1/2" wood screws and the six 1/4" flat
washers provided. Drill pilot holes 3/16" (5) diameter
maximum, and make sure the screws penetrate through
the flooring material and into the wall plate a minimum of
3/4" (19). Make sure the screws hold tight. Refer to the
illustration below.
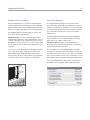
CONCRETE FLOOR APPLICATIONS
Use the two 3/8" x 3 3/4" concrete wedge anchors, two
#12 x 2 1/2" wood screws and two 1/4" flat washers
provided. Make sure the anchors and screws hold tight.
Refer to the illustration below.
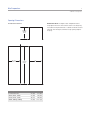
Anti-Tip Bracket Placement
A
27" (686) Models
13 1/2" (343)
36" (914) Models
18" (457)
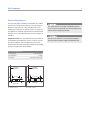
Make sure there are no electrical wires or plumbing
in the area which the screws could penetrate.
A
A
A
FINISHED
FLOORING
WALL PLATE
SUBFLOORING
WOOD FLOOR
Wood floors.
A
FINISHED
FLOORING
WALL PLATE
SUBFLOORING
CONCRETE
FLOOR
Concrete floors.
11/2"(38)
min