1
{
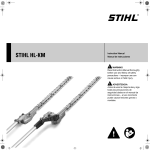
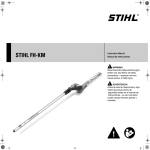
STIHL FSB-KM
Instruction Manual
Manual de instrucciones
WARNING
Read Instruction Manual thoroughly
before use and follow all safety
precautions – improper use can
cause serious or fatal injury.
ADVERTENCIA
Antes de usar la máquina lea y siga
todas las precauciones de
seguridad dadas en el manual de
instrucciones – el uso incorrecto
puede causar lesiones graves o
mortales.
Instruction Manual
1 - 22
Manual de instrucciones
23 - 46
English
© ANDREAS STIHL AG & Co. KG, 2015
0458-541-8621-A. VA4.A15.
0000000913_010_GB
Printed on chlorine-free paper
Printing inks contain vegetable oils, paper can be recycled.
Original Instruction Manual
Contents
KombiSystem
Guide to Using this Manual
Safety Precautions and Working
Techniques
Approved KombiEngines
Approved Combinations of Cutting
Attachment, Deflector, Handle and
Harness
Mounting the KombiTool
Mounting the Deflector
Mounting the Cutting Attachment
Fitting the Harness
Starting / Stopping the Engine
Storing the Machine
Maintaining the Mowing Head
Maintenance and Care
Main Parts
Specifications
Maintenance and Repairs
Disposal
Trademarks
2
2
3
10
11
12
12
13
15
16
17
17
20
20
20
21
21
21
Allow only persons who fully understand
the manuals of the KombiEngine and
trimmer KombiTool to operate this
power tool combination.
To receive maximum performance and
satisfaction from your STIHL
KombiTool, it is important that you read,
understand and follow the safety
precautions and the operating and
maintenance instructions in chapter
"Safety Precautions and Working
Techniques" before using your
KombiTool. For further information you
can go to www.stihlusa.com.
Contact your STIHL dealer or the STIHL
distributor for your area if you do not
understand any of the instructions in the
two manuals.
WARNING
Because a KombiEngine equipped with
a trimmer KombiTool has a high-speed
cutting attachment some special safety
precautions must be observed to reduce
the risk of personal injury. Careless or
improper use may cause serious or even
fatal injury.
Make sure your unit is equipped with the
proper deflector, handle and harness for
the type of cutting attachment being
used. Always wear proper eye
protection.
{
FSB-KM
This instruction manual is protected by copyright. All rights reserved, especially the rights to reproduce, translate and process
with electronic systems.
1
English
KombiSystem
Guide to Using this Manual
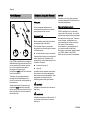
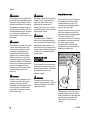
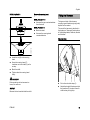
Pictograms
All the pictograms attached to or
embossed on the machine are shown
and explained in this manual.
+
Symbols in Text
Many operating and safety instructions
are supported by illustrations.
..
..
002BA530 KN
+
The individual steps or procedures
described in the manual may be marked
in different ways:
In the STIHL KombiSystem a number of
different KombiEngines and KombiTools
can be combined to produce a power
tool. In this instruction manual the
functional unit formed by the
KombiEngine and KombiTool is referred
to as the power tool.
Therefore, the separate instruction
manuals for the KombiEngine and
KombiTool should be used together for
the power tool.
Always read and and make sure you
understand both instruction manuals
before using your power tool for the first
time and keep them in a safe place for
future reference.
N
A bullet marks a step or procedure.
A description of a step or procedure that
refers directly to an illustration may
contain item numbers that appear in the
illustration. Example:
N
Loosen the screw (1).
N
Lever (2) ...
NOTICE
Indicates a risk of property damage,
including damage to the machine or its
individual components.
Engineering Improvements
STIHL’s philosophy is to continually
improve all of its products. As a result,
engineering changes and improvements
are made from time to time. Therefore,
some changes, modifications and
improvements may not be covered in
this manual. If the operating
characteristics or the appearance of
your machine differs from those
described in this manual, please contact
your STIHL dealer or the STIHL
distributor for your area for assistance.
In addition to the operating instructions,
this manual may contain paragraphs
that require your special attention. Such
paragraphs are marked with the
following symbols and signal words:
DANGER
Indicates an imminent risk of severe or
fatal injury.
WARNING
Indicates a hazardous situation which, if
not avoided, could result in severe or
fatal injury.
2
FSB-KM
English
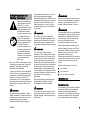
Safety Precautions and
Working Techniques
Because a KombiEngine
equipped with a trimmer
KombiTool is a highspeed power tool, special
safety precautions must
be observed to reduce
the risk of personal injury.
It is important that you
read, fully understand
and observe the following
safety precautions and
warnings. Read the
instruction manuals and
the safety precautions of
your KombiEngine and
KombiTool periodically.
Careless or improper use
may cause serious or
fatal injury.
Have your STIHL dealer show you how
to operate your power tool. Observe all
applicable local safety regulations,
standards and ordinances.
The term "trimmer" is used to designate
an FS unit that is equipped with a nylon
line head or a head with flexible plastic
blades (i.e., the Polycut head). FS
models with an "R" on the nameplate
were originally configured (at the time of
distribution) as a trimmer with a loop
handle.
WARNING
As more fully explained later in these
Safety Precautions, to reduce the risk of
personal injury, make sure your unit is
equipped with the proper handle,
harness and deflector for the type of
FSB-KM
cutting attachment you are using. Use
only cutting attachments that are
specifically authorized by STIHL for use
on your KombiEngine model. To reduce
the risk of severe or fatal injury from
blade contact and / or loss of control,
never attempt to use a metal blade on
this trimmer.
WARNING
Do not lend or rent your power tool
without the instruction manuals of your
KombiEngine and KombiTool. Be sure
that anyone using it understands the
information contained in these manuals.
WARNING
The use of this machine may be
hazardous. If the rotating line or blade
comes in contact with your body, it will
cut you. When it comes in contact with
solid foreign objects such as rocks or
bits of metal, it may fling them directly or
by ricochet in the direction of bystanders
or the operator. Striking such objects
could damage the cutting attachment.
Thrown objects, including broken heads
or polymer blades, may result in serious
or fatal injury to the operator or
bystanders.
Use your KombiEngine equipped with
the appropriate KombiTool only for
cutting grass and similar material.
WARNING
Do not use it for other purposes, since
misuse may result in personal injury or
property damage, including damage to
the machine.
WARNING
Minors should never be allowed to use
this power tool. Bystanders, especially
children, and animals should not be
allowed in the area where it is in use.
WARNING
To reduce the risk of injury to bystanders
and damage to property, never let your
power tool run unattended. When it is
not in use (e.g. during a work break),
shut it off and make sure that
unauthorized persons do not use it.
Most of these safety precautions and
warnings apply to the use of all STIHL
power tools. Different models may have
different parts and controls. See the
appropriate section of your
KombiEngine and KombiTool instruction
manuals for a description of the controls
and the function of the parts of your
model.
Safe use of a power tool involves
1.
the operator
2.
the power tool
3.
the use of the power tool.
THE OPERATOR
Physical Condition
You must be in good physical condition
and mental health and not under the
influence of any substance (drugs,
alcohol, etc.) which might impair vision,
dexterity or judgment. Do not operate
this machine when you are fatigued.
3
English
WARNING
Be alert – if you get tired, take a break.
Tiredness may result in loss of control.
Working with any power tool can be
strenuous. If you have any condition that
might be aggravated by strenuous work,
check with your doctor before operating
this machine.
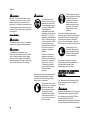
Proper Clothing
WARNING
To reduce the risk of injury, the operator
should wear proper protective apparel.
WARNING
The deflector provided with your
KombiTool will not protect the operator
from all foreign objects (gravel, glass,
wire, etc.) thrown back by the rotating
cutting attachment. Thrown objects may
also ricochet and strike the operator.
WARNING
To reduce the risk of
injury to your eyes never
operate your power tool
unless wearing goggles
or properly fitted protective glasses with
adequate top and side
protection complying with
ANSI Z87 "+" (or your
applicable national standard). To reduce the risk of
injury to your face STIHL
recommends that you
also wear a face shield or
face screen over your
goggles or protective
glasses.
Power tool noise may
damage your hearing.
Wear sound barriers (ear
plugs or ear mufflers) to
protect your hearing.
Continual and regular
users should have their
hearing checked
regularly.
Be particularly alert and cautious when
wearing hearing protection because
your ability to hear warnings (shouts,
alarms, etc.) is restricted.
Always wear heavy duty
work gloves (e.g. made of
leather or other wear
resistant material) when
handling the cutting
attachment.Heavy-duty,
nonslip gloves improve
your grip and help to protect your hands.
4
Clothing must be sturdy
and snug-fitting, but allow
complete freedom of
movement. Wear long
pants made of heavy
material to help protect
your legs. Do not wear
shorts, sandals or go
barefoot.
Avoid loose-fitting jackets, scarfs,
neckties, jewelry, flared or cuffed pants,
unconfined long hair or anything that
could become caught on branches,
brush or the moving parts of the unit.
Secure hair so it is above shoulder level.
Good footing is very
important. Wear sturdy
boots with nonslip soles.
Steel-toed safety boots
are recommended.
For further instructions on proper
clothing see the safety precautions in
the instruction manual of the
KombiEngine you are using.
THE POWER TOOL (KOMBIENGINE
EQUIPPED WITH TRIMMER
KOMBITOOL)
For illustrations and definitions of the
power tool parts see the chapter on
"Main Parts".
WARNING
Never modify this power tool in any way.
Only attachments supplied by STIHL
and expressly approved by STIHL for
use with the specific STIHL
KombiEngine are authorized. Although
certain unauthorized attachments are
FSB-KM
English
parts may cause the head to fly off and
seriously injure the operator or
bystanders.
useable with STIHL power tools, their
use may, in fact, be extremely
dangerous.
If this tool is subjected to unusually high
loads for which it was not designed (e.g.
heavy impact or a fall), always check
that it is in good condition before
continuing work. Check in particular that
the fuel system is tight (no leaks) and
that the controls and safety devices are
working properly. Do not continue
operating this machine if it is damaged.
In case of doubt, have it checked by your
STIHL servicing dealer.
THE USE OF THE POWER TOOL
(KOMBIENGINE EQUIPPED WITH
TRIMMER KOMBITOOL)
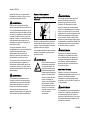
Transporting the Power Tool
WARNING
To reduce the risk of injury from loss of
control and blade or line contact, never
carry or transport your power tool with
the cutting attachment moving.
WARNING
002BA254 KN
For the cutting attachments authorized
by STIHL for your unit, see the chapter
"Approved Combinations of Cutting
Attachment, Deflector, Handle and
Harness" in the instruction manual or the
STIHL "Power Tools and Accessories"
catalog.
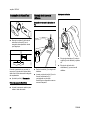
It may be carried only in a horizontal
position. Grip the shaft in a manner that
the machine is balanced horizontally.
Keep the hot muffler away from your
body and the cutting attachment behind
you.
WARNING
Always switch off the engine and make
sure the working tool has stopped before
putting a power tool down.
WARNING
When transporting it in a vehicle,
properly secure it to prevent turnover,
fuel spillage and damage to the unit.
Before Starting
WARNING
Always check your power tool for proper
condition and operation before starting.
Never attempt to modify the controls or
safety devices.
Never use a power tool that is damaged
or not properly maintained.
WARNING
The cutting attachment must be properly
tightened and in safe operating
condition. Inspect for loose parts (nuts,
screws, etc.). Replace damaged heads
before using the power tool.
Keep the handles clean and dry at all
times; it is particularly important to keep
them free of moisture, pitch, oil, fuel mix,
grease or resin in order for you to
maintain a firm grip and properly control
your power tool.
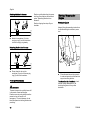
WARNING
To reduce the risk
of personal injury
to the operator
from blade or line
contact and
thrown objects,
make sure your
unit is equipped
with the proper
deflector, handle
and harness for
the type of cutting
attachment being
used (see chart in
the chapter on
"Approved Combinations of Cutting
Attachment,
Deflector, Handle
and Harness.")
Do not attach any cutting attachment to
a unit without proper installation of all
required parts. Failure to use the proper
FSB-KM
5
English
Keep the deflector adjusted properly at
all times (see chapters on "Mounting the
Deflector" and "Mounting the Cutting
Attachment" of your instruction manual).
Arrows on the deflector (as seen from
the underside) show the correct
direction of rotation of the cutting
attachment. When viewed from above,
however, the cutting attachment rotates
counterclockwise.
Adjust harness (if you are wearing one)
and hand grip to suit your size before
starting work. The machine should be
properly balanced as specified in your
instruction manual for proper control and
less fatigue in operation. To be better
prepared in case of an emergency,
practise releasing the unit from the
harness as quickly as possible.
Starting
Start the engine at least 10 feet (3 m)
from the fueling spot, outdoors only.
For specific starting instructions, see the
appropriate section of your
KombiEngine and KombiTool manuals.
Place the power tool on firm ground or
6
other solid surface in an open area.
Maintain good balance and secure
footing.
During Operation
Holding and Controlling the Power Tool
WARNING
To reduce the risk of injury from blade or
line contact, be absolutely sure that the
cutting attachment is clear of you and all
other obstructions and objects, including
the ground, because when the engine
starts at starting-throttle, engine speed
will be fast enough for the clutch to
engage and move the cutting
attachment.
Once the engine has started,
immediately blip the throttle trigger,
which should release the starting throttle
and allow the engine to slow down to
idle.
With the engine running only at idle,
attach the power tool to the spring hook
of your harness if you are using one (see
appropriate chapter of the instruction
manual).
WARNING
Your power tool is a one-person
machine. Do not allow other persons in
the general work area, even when
starting.
See also the safety precautions on
Starting in the instruction manual of the
KombiEngine.
002BA080 KN
As can be seen in that chart, some
cutting attachments may require you to
change your deflector, handle and / or
harness.
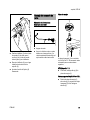
Always hold the unit firmly with both
hands on the handles while you are
working. Wrap your fingers and thumbs
around the handles.
Your right hand should grip the rear
handle. This also applies to left-handers.
WARNING
Never attempt to operate
your power tool with one
hand. Loss of control of
the power tool resulting in
serious or fatal injury may
result. To reduce the risk
of cut injuries, keep
hands and feet away
from the cutting attachment. Never touch a
moving cutting attachment with your hand or
any other part of your
body.
WARNING
Do not overreach. Keep proper footing
and balance at all times. Special care
must be taken in slippery conditions (wet
ground, snow) and in difficult, overgrown
terrain. Watch for hidden obstacles such
FSB-KM
English
as tree stumps, roots and ditches to
avoid stumbling. For better footing, clear
away scrub and cuttings. Be extremely
cautious when working on slopes or
uneven ground.
WARNING
To reduce the risk of injury from loss of
control, never work on a ladder or on any
other insecure support. Never hold the
cutting attachment above waist height.
Working Conditions
Operate and start your power tool only
outdoors in a well-ventilated area.
Operate it under good visibility and
daylight conditions only. Work carefully.
WARNING
If the vegetation being cut or the
surrounding ground is coated with a
chemical substance (such as an active
pesticide or herbicide), read and follow
the instructions and warnings that
accompany the substance at issue.
WARNING
Inhalation of certain dusts, especially
organic dusts such as mold or pollen,
can cause susceptible persons to have
an allergic or asthmatic reaction.
Substantial or repeated inhalation of
dust and other airborne contaminants, in
particular those with a smaller particle
size, may cause respiratory or other
illnesses. Control dust at the source
where possible. Use good work
practices, such as operating the unit so
that the wind or operating process
directs any dust raised by the power tool
away from the operator. Follow the
FSB-KM
recommendations of EPA / OSHA /
NIOSH and occupational and trade
associations with respect to dust
("particulate matter"). When the
inhalation of dust cannot be
substantially controlled, i.e., kept at or
near the ambient (background) level, the
operator and any bystanders should
wear a respirator approved by NIOSH /
MSHA for the type of dust encountered.
distance from such objects as vehicles
or windows. Even maintaining a
minimum distance of 15 meters cannot
exclude the potential danger. Any
coworkers who must be in the restricted
area should also wear goggles or
protective glasses. Stop the engine
immediately if you are approached.
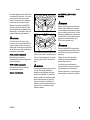
Never use metal
blades on this
KombiTool. Only
mowing heads are
authorized.
Operating Instructions
WARNING
Do not operate your power tool using the
starting throttle lock, as you do not have
control of the engine speed.
In the event of an emergency, shut off
the engine immediately – move the slide
control / stop switch / momentary stop
switch to 0 or STOP.
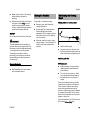
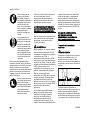
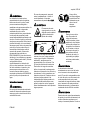
WARNING
The cutting attachment
continues to rotate for a
short period after the
throttle trigger is released
(flywheel effect.)
15m (50ft)
To reduce the risk of eye and other injury
always wear proper eye protection (see
the chapter on "Proper Clothing") and
ensure that bystanders are at least
50 feet (15 m) away. To reduce the risk
of damage to property, also maintain this
WARNING
Inspect the work area: To
reduce the risk of injury,
remove stones, pieces of
metal and other solid
objects which could be
thrown 15 meters or more
by the cutting attachment
or damage the cutting
attachment and property
(e.g. parked vehicles,
windows).
WARNING
This power tool is normally to be used at
ground level with the cutting attachment
parallel to the ground. Use of a trimmer
above ground level or with the cutting
attachment perpendicular to the ground
may increase the risk of injury, since the
cutting attachment is more fully exposed
and the power tool may be more difficult
to control.
7
English
During cutting, check the tightness and
the condition of the cutting attachment at
regular short intervals with the engine
and attachment stopped. If the behavior
of the attachment changes during use,
stop the engine immediately, wait until
the cutting attachment stops, and check
the nut securing the attachment for
tightness and the head for cracks, wear
and damage.
WARNING
A loose head may vibrate, crack, break
or come off the trimmer, which may
result in serious or fatal injury. Make
sure that the cutting attachment is
properly tightened. Use the wrench
supplied or one of sufficient length to
obtain the proper torque. If the head
loosens after being properly tightened,
stop work immediately. The retaining nut
may be worn or damaged and should be
replaced. If the head continues to
loosen, see your STIHL dealer. Never
use a KombiEngine with a loose
KombiTool.
WARNING
Replace a cracked, damaged or wornout head or a cracked, bent, warped,
damaged, dull or worn out blade
immediately, even if damage is limited to
superficial cracks. Such attachments
may shatter at high speed and cause
serious or fatal injury.
8
WARNING
If the head, blade or deflector becomes
clogged or stuck, always shut off the
engine and make sure the cutting
attachment has stopped before
cleaning. Grass, weeds, etc. should be
cleaned off the blade or from around the
head at regular intervals.
WARNING
To reduce the risk of unintentional
rotation of the cutting attachment and
injury, always shut off the engine before
replacing the cutting attachment. To
reduce the risk of injury, always shut off
the engine before adjusting the length of
the nylon line on manually adjustable
mowing heads.
Using the Mowing Heads
Do not use with mowing line longer than
the intended length. With a properly
mounted deflector, the built-in linelimiting blade will automatically adjust
the line to its proper length.
Using the unit with an overly long nylon
cutting line increases the load on the
engine and reduces its operating speed.
This causes the clutch to slip
continuously and results in overheating
and damage to important components
(e.g. clutch, polymer housing
components). Such damage could,
among other things, cause the cutting
attachment to rotate at idle.
USING THE CUTTING
ATTACHMENTS
For an illustration of the various cutting
attachments and instructions on proper
mounting see the chapter on "Mounting
the Cutting Attachment" in your
instruction manual.
WARNING
To reduce the risk of severe or fatal
injury from blade contact and / or loss of
control, never attempt to use a metal
blade on this trimmer.
000BA019 KN
WARNING
Mowing heads are to be used only on
trimmers equipped with a line-limiting
blade in the deflector in order to keep the
line at the proper length (see "Main
Parts" chapter in your instruction
manual).
FSB-KM
English
MAINTENANCE, REPAIR AND
STORING
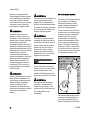
However, the polymer-bladed STIHL
PolyCut produces a better cut if there
are no plants along the edge of the lawn.
Sharpening is not necessary, and worn
polymer blades are easily replaced.
1
002BA073 KN
If the lawn edges are planted with trees
or bordered by a fence etc., it is best to
use a nylon line head. It achieves a
"softer" cut with less risk of damaging
tree bark etc. than polymer blades.
To reduce the risk of serious injury,
never use wire or metal-reinforced line
or other material in place of the nylon
cutting lines. Pieces of wire could break
off and be thrown at high speed toward
the operator or bystanders.
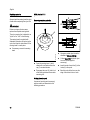
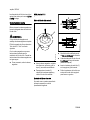
STIHL AutoCut mowing head
Nylon cutting line advances
automatically when tapped against the
ground (TapAction).
STIHL PolyCut mowing head
Uses either nylon lines or nonrigid,
pivoting polymer blades.
Observe wear indicators.
FSB-KM
2
002BA074 KN
WARNING
Do not continue using the PolyCut if one
of the circular holes (1; arrow) becomes
visible or if the projecting rim (2; arrow)
has worn away. Install a new mowing
head.
WARNING
If the wear limit marks are ignored, there
is a risk of the cutting attachment
shattering and flying parts injuring the
operator or bystanders. To reduce the
risk of accidents from shattered blades,
avoid contact with stones, metal and
similar solid objects. Check PolyCut
blades for cracks at regular intervals. If a
crack is found on one blade, always
replace all blades.
WARNING
Always stop the engine and make sure
that the cutting attachment is stopped
before doing any maintenance or repair
work or cleaning the power tool. Do not
attempt any maintenance or repair work
not described in your instruction manual.
Have such work performed by your
STIHL servicing dealer only.
WARNING
Use only identical STIHL replacement
parts for maintenance and repair. Use of
non-STIHL parts may cause serious or
fatal injury.
Tighten all nuts, bolts and screws,
except the carburetor adjustment
screws, after each use.
Do not clean your machine with a
pressure washer. The solid jet of water
may damage parts of the machine.
Store the power tool in a dry and high or
locked location out of reach of children.
9
English
Approved KombiEngines
KombiEngines
Only use KombiEngines supplied by
STIHL or explicitly approved by STIHL
for use with the KombiTool.
Depending on the cutting attachment
used, always refer to and observe the
chapter on "Approved Combinations of
Cutting Attachment, Deflector, Handle
and Harness".
This KombiTool may be operated only in
combination with the following
KombiEngines:
STIHL KM 55 R, KM 56 R, KM 85 R,
KM 90 R, KM 94 R, KM 110 R
10
FSB-KM
English
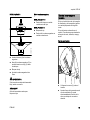
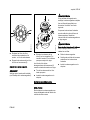
Approved Combinations of Cutting Attachment, Deflector, Handle and Harness
Cutting Attachment
Deflector
Handle
3
4
7
2
5
Approved Combinations
The complete combination includes:
–
Cutting attachment
–
Deflector
–
Handle
–
Harness/shoulder strap (special
accessory)
Select correct combination from the
table according to the cutting
attachment you intend to use.
WARNING
For safety reasons no other
combinations are permitted – risk of
accidents.
Cutting Attachments
2
STIHL PolyCut 5-3
Deflector
3
Deflector with blade, for mowing
heads
Handle
4
5
6
Loop handle
Loop handle with
barrier bar
Shoulder strap
7
6
541BA004 KN
1
Shoulder Strap
Choose the proper deflector in order to
reduce the risk of injury from thrown
objects and contact with the cutting
attachment.
Make sure your unit is equipped with the
proper handle and harness in order to
reduce the risk of injury from loss of
control and contact with the cutting
attachment.
Do not use rigid polymer blades, metal
cutting attachments or circular saw
blades on this unit.
Only mowing heads may be used on
loop-handled trimmers with a curved
drive tube.
Shoulder strap may be used
WARNING
Based on the cutting attachment being
used:
Mowing heads
1
STIHL AutoCut 11-2
FSB-KM
11
English
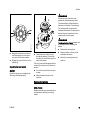
Mounting the KombiTool
Mounting the deflector
Mounting the Deflector
Fitting the line limiter blade
2
1
002BA326 KN
2
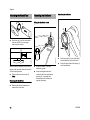
N
1
Push the lug (1) on the drive tube
into the slot (2) in the coupling
sleeve as far as stop.
1
3
When correctly installed, the red line (3)
(arrow point) must be flush with the end
of the coupling sleeve.
N
Tighten down the star knob (4)
firmly.
Removing the KombiTool
N
12
002BA250 KN
002BA327 KN
4
002BA251 KN
3
2
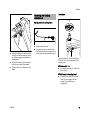
N
Slide the blade (1) into the
deflector's guide.
N
Insert and tighten down the
screw (2) with the combination
wrench (3) – supplied with
KombiEngine or available as
special accessory.
N
Push the clamp (1) over the lug (2)
on the deflector and hold it there.
N
Push the other side of the clamp (1)
over the deflector.
Reverse the above sequence to
remove the drive tube.
FSB-KM
English
Thrust plate
Mounting the Cutting
Attachment
5
1
Placing power tool on the ground
3
b
3
4
2
6
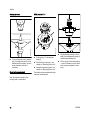
N
Slide the deflector (3) onto the drive
tube (4) so that the bead (a) on the
drive tube engages the guide (b) in
the deflector.
N
Push the deflector (3) into position
until the set screw (5) engages.
N
Tighten down the clamp screw (6)
firmly.
N
Switch off the engine.
N
Lay your trimmer on its back with
the loop handle and shroud pointing
down and the output shaft facing up.
541BA001 KN
002BA252 KN
546BA016 KN
4
The thrust plate (1) is shipped with the
PolyCut 5-3. It is only required for this
mowing head.
STIHL AutoCut 11-2
N
Pull the thrust plate (1), if fitted, off
the shaft (2).
STIHL PolyCut 5-3 mowing head
N
FSB-KM
Slip the thrust plate (1) over the
shaft (2) and engage the hex
recess (3) on the external
hexagon (4).
13
English
STIHL AutoCut 11-2
Blocking the shaft
6
2
2
2
4
1
1
N
To block the shaft, insert a suitable
tool (1) through the holes (2) in the
deflector and thrust plate – turn the
thrust plate back and forth if
necessary.
Mounting the mowing head
N
Fit the spring (1) in the mowing
head (2).
N
Wind fresh line onto spool – see
chapter on "Replacing Nylon Line".
N
Assemble the mowing head – see
chapter on "Replacing Nylon Line".
5
681BA015 KN
681BA014 KN
342BA021 KN
2
3
N
Slip the mowing head (2) over the
shaft (3) and engage hex recess (4)
on the external hexagon (5).
N
Fit the cap (6) on the mowing head
– screw it clockwise on to the shaft
as far as stop and tighten it down
firmly.
The individual steps are described in the
instruction sheet supplied.
Keep the instruction sheet for the
mowing head in a safe place.
14
FSB-KM
English
STIHL PolyCut 5-3
Remove the mowing head.
STIHL AutoCut 11-2
N
8
Unscrew the cap counterclockwise
from the shaft.
STIHL PolyCut 5-3
7
N
Block the shaft.
N
Unscrew the mowing head
counterclockwise.
Fitting the Harness
The type and style of the harness,
carrying ring and carabiner (spring hook)
depend on the market.
The use of the harness is described in
the chapter on "Approved Combinations
of Cutting Attachment, Deflector, Handle
and Harness".
Shoulder strap
681BA017 KN
3
Insert the nut (8) in the mowing
head.
N
Screw the mowing head (7)
clockwise on to the shaft (3) as far
as stop.
N
Block the shaft.
N
Tighten down the mowing head
firmly.
2
002BA374 KN
N
1
WARNING
If the mounting nut has become too
loose, fit a new one.
NOTICE
Remove the tool used to block the shaft.
FSB-KM
N
Put on the shoulder strap (1).
N
Adjust the length of the strap so that
the carabiner (2) is about a hand’s
width below your right hip.
15
English
Practice quickly detaching the power
tool from the carabiner as described
under "Detaching Machine from
Harness".
Attaching Machine to Harness
1
2
1
002BA308 KN
2
N
Practice slipping the strap off your
shoulder.
Starting / Stopping the
Engine
Starting the Engine
Always follow the operating instructions
for the KombiEngine and basic power
tool.
Attach the carabiner (1) to the
carrying ring (2) on the drive tube –
hold the carrying ring steady.
Detaching Machine from Harness
1
N
Press down the bar on the
carabiner (1) and pull the carrying
ring (2) out of the carabiner.
Throwing Off the Machine
WARNING
355BA007 KN
2
002BA310 KN
2
1
N
Place the machine on the ground –
it must rest securely on the machine
support and the gearbox.
To reduce the risk of accidents, check
that the cutting attachment is not
touching the ground of any other
obstacles.
The machine must be quickly thrown off
in the event of imminent danger.
Practice removing and putting down the
power tool as you would in an
emergency. To avoid damage, do not
throw the power tool to the ground when
practicing.
16
FSB-KM
English
Make sure you have a firm footing,
either standing, stooping or
kneeling.
N
Hold the machine with you left hand
and press it down firmly – do not
touch the controls on the control
handle – see KombiEngine or basic
power tool instruction manual.
Storing the Machine
For periods of 3 months or longer
N
Remove, clean and inspect the
cutting attachment.
N
If the KombiTool is removed from
the KombiEngine and stored
separately: Fit the protective cap on
the drive tube to avoid dirt getting
into the coupling.
N
Store the machine in a dry, high or
locked location – out of the reach of
children and other unauthorized
persons.
NOTICE
Do not stand or kneel on the drive tube.
WARNING
The cutting attachment may begin to
move as soon as the engine starts. For
this reason, blip the throttle after starting
– the engine returns to idling speed.
The starting procedure is now as
described in the instruction manual of
the KombiEngine or basic power tool
you are using.
Stopping the Engine
N
Maintaining the Mowing
Head
Placing power tool on the ground
546BA016 KN
N
N
Switch off the engine.
N
Lay your trimmer on its back with
the loop handle and shroud pointing
down and the output shaft facing up.
Adjusting nylon line
STIHL AutoCut
N
With the engine running, hold the
rotating mowing head above the
grass surface.
N
Tap it on the ground once – fresh
line is advanced and the blade on
the deflector trims it to the right
length.
See KombiEngine or basic power
tool instruction manual.
Fresh line is advanced every time the
mowing head is tapped on the ground.
For this reason observe the mowing
head's cutting performance during
operation. If the mowing head is tapped
on the ground too often, the line limiter
blade will unnecessarily cut off unused
lengths of nylon line.
Line feed operates only if both lines are
still at least 2.5 cm (1 in) long.
FSB-KM
17
English
Replacing nylon line
STIHL AutoCut 11-2
Always check the mowing head for signs
of wear before replacing the nylon line.
Removing remaining nylon line
3
4
WARNING
3
If there are signs of serious wear,
replace the complete mowing head.
The nylon mowing line is referred to as
"nylon line" or "line" in the following.
1
2
The mowing head is supplied with
illustrated instructions for replacing the
nylon line. Keep the instructions for the
mowing head in a safe place.
681BA052 KN
R
If necessary, remove the mowing
head.
681BA008 KN
N
R
N
N
Open the mowing head – hold it
steady with one hand and turn the
cap (1) counterclockwise.
Disengage the spool (2), take it out
of the mowing head and remove the
remaining line.
N
Use green-coded nylon line with a
diameter of 2,0 mm (0.08 in).
N
Cut two 3 m (10ft) lengths of nylon
line from the reel (special
accessory).
N
Insert the ends of each line (3) in the
holes (4) in the spool.
N
Bend the ends of the lines over the
edge of the holes to form a hook.
Winding line onto spool
A prewound spool (special accessory)
may be used as an alternative to the
following procedure.
18
FSB-KM
English
WARNING
If there are signs of serious wear,
replace the complete mowing head.
2
The thermoplastic cutting blades are
referred to as "blades" in the following.
5
The mowing head is supplied with
illustrated instructions for replacing the
blades. Keep the instructions for the
mowing head in a safe place.
6
5
7
N
N
Straighten out the nylon lines and
wind them tightly on to the spool –
one nylon line in each chamber.
Engage the ends of the lines in the
notches (5).
6
N
681BA011 KN
681BA053 KN
WARNING
Thread the ends of the lines (6)
through the sleeves (7) and push
the spool (2) into the head so that it
snaps into position.
Assembling the mowing head
The nylon lines must disengage from the
notches (5) as the spool is pushed into
position.
NOTICE
N
Check that the spring is installed (see
"Mounting the Mowing Head").
Pull out the ends of the lines as far
as stop.
N
Mount the mowing head on the
machine.
To reduce the risk of injury, always shut
off the engine before installing the
blades.
N
Remove the mowing head.
N
Replace blades as shown in the
illustrated instructions.
N
Mount the mowing head on the
machine.
Replacing Cutting Blades
STIHL PolyCut
Always check the mowing head for signs
of wear before installing new cutting
blades.
FSB-KM
19
English
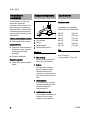
Main Parts
The following intervals apply to normal
operating conditions only. If your daily
working time is longer or operating
conditions are difficult (very dusty work
area, etc.), shorten the specified
intervals accordingly.
2
N
Check condition, check tightness
before starting work and after every
fueling stop
N
Replace if damaged
Safety labels
N
20
Replace illegible safety labels
Max. output shaft speed at cutting
attachment with KombiEngine:
3
4
Retighten if necessary
Cutting attachments
Engine speed
1
All accessible screws and nuts
N
Specifications
1
2
3
4
681BA054 KN
Maintenance and Care
Drive Tube
Deflector
Mowing Head
Line Limiting Blade
Definitions
1
Drive Tube
Encloses and protects the drive
shaft between the engine and
gearbox.
2
Deflector
Designed to reduce the risk of injury
from foreign objects flung
backwards toward the operator by
the cutting attachment and from
contact with the cutting attachment.
3
Mowing Head
The cutting attachment, i.e. mowing
head, for different purposes (special
accessory).
4
Line Limiting Blade
Metal blade on the deflector which
keeps the line of the mowing head
at the proper length.
KM 55 R:
KM 56 R:
KM 85 R:
KM 90 R:
KM 94 R:
KM 110 R:
10,400 rpm
10,600 rpm
11000 rpm
11000 rpm
10,200 rpm
11000 rpm
Weight
dry, without cutting
attachment and
deflector
0.7 kg (1.5 lbs)
FSB-KM
English
Users of this unit should carry out only
the maintenance operations described
in this manual. STIHL recommends that
other repair work be performed only by
authorized STIHL servicing dealers.
Warranty claims following repairs can be
accepted only if the repair has been
performed by an authorized STIHL
servicing dealer using genuine STIHL
replacement parts.
Genuine STIHL parts can be identified
by the STIHL part number, the
{ logo and, in some cases, by
the STIHL parts symbol K. The
symbol may appear alone on small
parts.
Disposal
Trademarks
Observe all country-specific waste
disposal rules and regulations.
STIHL Registered Trademarks
STIHL®
{
K
000BA073 KN
Maintenance and Repairs
The color combination orange-grey
(U.S. Registrations #2,821,860;
#3,010,057, #3,010,058, #3,400,477;
and #3,400,476)
STIHL products must not be thrown in
the garbage can. Take the product,
accessories and packaging to an
approved disposal site for environmentfriendly recycling.
Contact your STIHL servicing dealer for
the latest information on waste disposal.
AutoCut®
EASYSTART®
FARM BOSS®
iCademy®
MAGNUM®
MasterWrench Service®
MotoMix®
FSB-KM
21
English
OILOMATIC®
Rock Boss
STIHL
Quad Power ™
®
Quiet Line ™
Cutquik®
STIHL Arctic ™
®
STIHL DUROMATIC
®
STIHL HomeScaper Series ™
STIHL Quickstop
STIHL
STIHL Compact ™
ROLLOMATIC®
®
STIHL WOOD BOSS
TIMBERSPORTS®
STIHL Interchangeable Attachment
Series ™
STIHL M-Tronic ™
STIHL MiniBoss ™
WOOD BOSS®
YARD BOSS®
STIHL MotoPlus 4 ™
Some of STIHL’s Common Law
Trademarks
STIHL OUTFITTERS ™
STIHL Multi-Cut HomeScaper Series ™
STIHL PICCO ™
STIHL PolyCut ™
STIHL
Injection
STIHL PowerSweep ™
TM
STIHL Precision Series ™
STIHL Protech ™
STIHL RAPID ™
STIHL SuperCut ™
4-MIX ™
STIHL Territory ™
BioPlus ™
TapAction ™
Easy2Start ™
TrimCut ™
EasySpool ™
This listing of trademarks is subject to
change.
ElastoStart ™
Ematic ™
FixCut ™
HT Plus ™
IntelliCarb ™
Any unauthorized use of these
trademarks without the express written
consent of
ANDREAS STIHL AG & Co. KG,
Waiblingen is strictly prohibited.
Master Control Lever ™
Micro ™
Pro Mark ™
22
FSB-KM
español / EE.UU
© ANDREAS STIHL AG & Co. KG, 2015
0458-541-8621-A. VA4.A15.
0000000913_010_EA
Impreso en papel libre de cloro.
Las tintas contienen aceites vegetales, el papel es reciclable.
Manual de instrucciones original
Contenido
Sistema KombiSystem
Acerca de este manual de
instrucciones
Medidas de seguridad y técnicas
de manejo
Motores KombiEngine aprobados
Combinaciones aprobadas de
accesorio de corte, deflector,
mango y arnés
Instalación del KombiTool
Montaje de la barra de defensa
Montaje del accesorio de corte
Uso de la correa para hombro
Arranque / parada del motor
Almacenamiento de la máquina
Mantenimiento de la cabeza
segadora
Información para mantenimiento
Componentes importantes
Especificaciones
Información de reparación
Desecho
Marcas comerciales
25
25
26
34
35
36
36
37
39
40
41
41
44
44
44
45
45
45
Permita que solamente las personas
que comprenden completamente la
materia tratada en los manuales del
motor KombiEngine y de la
motoguadaña KombiTool manejen esta
herramienta motorizada combinada.
Para obtener el rendimiento y
satisfacción máximos de la herramienta
KombiTool de STIHL, es importante que
lea, obedezca y comprenda las
precauciones de seguridad y las
instrucciones de uso y mantenimiento
dadas en el capítulo "Precauciones de
seguridad y técnicas de uso", antes de
usar la KombiTool. Para obtener más
información, puede visitar el sitio
www.stihlusa.com.
Comuníquese con el concesionario o
distribuidor de STIHL si no se entiende
alguna de las instrucciones dadas en los
dos manuales.
ADVERTENCIA
Dado que este motor KombiEngine
equipado con la motoguadaña
KombiTool tiene un accesorio de corte
de gran velocidad, es necesario tomar
medidas especiales de seguridad para
reducir el riesgo de lesiones. El uso
descuidado o inapropiado puede causar
lesiones graves e incluso la muerte.
Asegúrese que su máquina esté
equipada con el deflector, mango y
arnés adecuados para el tipo de
{
FSB-KM
Este manual de instrucciones está protegido por derechos de propiedad intelectual. Todos los derechos reservados, especialmente los derechos de reproducción, traducción y procesamiento con sistemas electrónicos.
23
español / EE.UU
accesorio de corte que se está
utilizando. Siempre protéjase
adecuadamente los ojos.
24
FSB-KM
español / EE.UU
Sistema KombiSystem
Acerca de este manual de
instrucciones
Pictogramas
+
+
002BA530 KN
..
..
Con el sistema KombiSystem de STIHL,
varios motores KombiEngine y
accesorios KombiTool pueden
combinarse para formar una
herramienta motorizada. En este
manual de instrucciones la unidad
formada por el motor KombiEngine y la
herramienta KombiTool se identifica
como la herramienta motorizada.
Por lo tanto, para esta herramienta
motorizada es necesario usar juntos los
manuales de instrucciones para el motor
KombiEngine y la herramienta
KombiTool.
Siempre lea y entienda los dos
manuales de instrucciones antes de
usar la herramienta motorizada por
primera vez y guarde los mismos en un
lugar seguro para referencia futura.
FSB-KM
ADVERTENCIA
Identifica una situación de peligro que,
al no evitarse, puede resultar en
lesiones graves o mortales.
Todos los pictogramas que se
encuentran fijados o grabados en la
máquina se muestran y explican en este
manual.
INDICACIÓN
Símbolos en el texto
Mejoramientos técnicos
Muchas de las instrucciones de uso y
seguridad vienen acompañadas de
ilustraciones.
La filosofía de STIHL es mejorar
continuamente todos sus productos.
Como resultado de ello, periódicamente
se introducen cambios de diseño y
mejoras. Por lo tanto, es posible que
algunos cambios, modificaciones y
mejoras no se describen en este
manual. Si las características de
funcionamiento o la apariencia de su
máquina difieren de las descritas en
este manual, comuníquese con el
concesionario STIHL para obtener la
ayuda que requiera.
Los pasos individuales o
procedimientos descritos en el manual
pueden estar señalados en diferentes
maneras:
N
Se usa un punto para denotar un
paso o procedimiento.
Una descripción de un paso o
procedimiento que se refiere
directamente a una ilustración puede
contener números de referencia que
aparecen en la ilustración. Ejemplo:
N
Suelte el tornillo (1).
N
Palanca (2) ...
Indica el riesgo de daños a la propiedad,
incluyendo a la máquina o sus
componentes.
Además de las instrucciones de uso, en
este manual pueden encontrarse
párrafos a los que usted debe prestar
atención especial. Tales párrafos están
marcados con los símbolos y las
palabras identificadoras:
PELIGRO
Indica un riesgo inminente de lesiones
graves o mortales.
25
español / EE.UU
Medidas de seguridad y
técnicas de manejo
Dado que este motor
KombiEngine equipado
con motoguadaña
KombiTool tiene un accesorio de corte de gran
velocidad, es necesario
tomar medidas especiales de seguridad para
reducir el riesgo de
lesiones.
Es importante que usted
lea, comprenda bien y
respete las siguientes
advertencias y medidas
de seguridad. Lea periodicamente los manuales
de instrucciones y las instrucciones de seguridad
de su motor
KombiEngine y accesorio KombiTool. El uso
descuidado o inadecuado
puede causar lesiones
graves o incluso la
muerte.
Pida a su concesionario STIHL que le
enseñe el manejo de la herramienta
motorizada. Respete todas las
disposiciones, reglamentos y normas de
seguridad locales del caso.
La palabra "orilladora" se usa para
identificar una unidad FS equipada con
un cabezal de hilo de nilón o un cabezal
con cuchillas de plástico flexibles (tal
como el cabezal Polycut). Los modelos
FS con una "R" en la chapa de
identificación se configuraron
26
originalmente (en el momento de
distribución) como una orilladora con un
mango tórico.
ADVERTENCIA
Tal como se explicará a continuación en
estas Medidas de seguridad, para
reducir el riesgo de lesiones personales,
asegúrese que su máquina esté
equipada con el mango, arnés y
deflector adecuados para el tipo de
accesorio de corte que se está
utilizando. Utilice exclusivamente los
accesorios de corte autorizados
específicamente por STIHL para usar en
su modelo de KombiEngine. Para
reducir el riesgo de lesiones personales
o la muerte debido al contacto con las
cuchillas y / o a la pérdida de control,
nunca intente usar una cuchilla metálica
en esta motoguadaña.
ADVERTENCIA
No preste ni alquile nunca su
herramienta motorizada sin entregar los
manuales de instrucciones de su motor
KombiEngine y el accesorio KombiTool.
Asegúrese que todas las personas que
utilicen la máquina lean y comprendan
la información contenida en estos
manuales.
ADVERTENCIA
El uso de esta máquina puede ser
peligroso. Si el hilo o la cuchilla giratoria
llega a entrar en contacto con su cuerpo,
le ocasionará una cortadura. Cuando
choca con algún objeto extraño sólido
tal como rocas o pedazos de metal,
puede arrojarlo directamente o por
rebote en dirección de personas que se
encuentren en la cercanía o del
operador. El chocar contra este tipo de
objetos puede dañar el accesorio de
corte. Los objetos lanzados, incluso los
cabezales o las cuchillas de polímero
rotos, pueden provocar lesiones graves
o mortales al operador o a personas que
se encuentren en su proximidad.
Use el motor KombiEngine equipado
con el accesorio KombiTool apropiado
únicamente para cortar pasto,
matorrales, madera y materiales
similares.
ADVERTENCIA
No debe usarse para ningún otro
propósito ya que el uso indebido puede
resultar en lesiones personales o daños
a la propiedad, incluso daños de la
máquina.
ADVERTENCIA
Nunca se debe permitir a los niños que
usen esta herramienta motorizada. No
se debe permitir la proximidad de otras
personas, especialmente de niños, ni de
animales en los lugares donde se esté
utilizando la máquina.
ADVERTENCIA
Para reducir el riesgo de ocasionar
lesiones a las personas en la cercanía y
daños a la propiedad, nunca deje la
herramienta motorizada en marcha
desatendida. Cuando no está en uso
(por ejemplo durante el descanso),
apáguela y asegúrese que las personas
no autorizadas no puedan usarla.
Las medidas de seguridad y avisos
contenidos en este manual se refieren al
uso de todas las herramientas
motorizadas STIHL. Los distintos
FSB-KM
español / EE.UU
modelos pueden contar con piezas y
controles diferentes. Vea la sección
correspondiente de sus manuales de
instrucciones del motor KombiEngine y
accesorio KombiTool para tener una
descripción de los controles y la función
de los componentes de su modelo.
El uso seguro de una herramienta
motorizada atañe a
1.
el operador
2.
la herramienta motorizada
3.
el uso de la herramienta
motorizada.
EL OPERADOR
Condición física
Usted debe estar en buenas
condiciones físicas y psíquicas y no
encontrarse bajo la influencia de
ninguna sustancia (drogas, alcohol,
etc.) que le pueda restar visibilidad,
destreza o juicio. No maneje esta
máquina cuando está fatigado.
ADVERTENCIA
Esté alerta. Si se cansa, tómese un
descanso. El cansancio puede provocar
una pérdida del control. El uso de
cualquier herramienta motorizada es
fatigoso. Si usted padece de alguna
dolencia que pueda ser agravada por la
fatiga, consulte a su médico antes de
utilizar esta máquina.
FSB-KM
Vestimenta adecuada
ADVERTENCIA
Para reducir el riesgo de lesiones el
operador debe usar el equipo protector
adecuado.
ADVERTENCIA
El deflector provisto con su accesorio
KombiTool no siempre protege al
operador contra todos los objetos
extraños (gravilla, vidrio, alambre, etc.)
arrojados por el accesorio de corte
giratorio. Los objetos arrojados o
lanzados por el accesorio también
pueden rebotar y golpear al operador.
ADVERTENCIA
Para reducir el riesgo de
lesionarse los ojos,
nunca maneje la herramienta motorizada si no
tiene puestas gafas o
anteojos de seguridad
bien ajustados con una
protección adecuada en
las partes superior y lateral que satisfagan la
norma ANSI Z87 "+" (o la
norma nacional correspondiente). Para reducir
el riesgo de lesionarse la
cara, STIHL recomienda
usar también una careta
o protector facial adecuado sobre las gafas o
anteojos de seguridad.
El ruido de la herramienta
motorizada puede dañar
los oídos. Siempre use
amortiguadores del ruido
(tapones u orejeras) para
protegerse los oídos. Los
usuarios constantes y
regulares deben someterse con frecuencia a un
examen o control
auditivo.
Esté especialmente alerta y tenga
cuidado cuando se usa protectores de
oídos, ya que los mismos reducen la
posibilidad de oír señales de
advertencia (gritos, alarmas, etc.).
27
español / EE.UU
La ropa debe ser de
confección fuerte y ajustada, pero no tanto que
impida la completa libertad de movimiento. Use
pantalones largos hechos
de un material grueso
para protegerse las piernas. No use pantalones
cortos, sandalias o pies
descalzos.
Evite el uso de chaquetas sueltas,
bufandas, corbatas, joyas, pantalones
acampanados o con vueltas, pelo largo
suelto o cualquier cosa que pueda
engancharse en las ramas, matorrales o
piezas en movimiento de la máquina.
Sujétese el pelo de modo que quede
sobre los hombros.
Es muy importante tener
una buena superficie de
apoyo para los pies.
Póngase botas gruesas
con suela antideslizante.
Recomendamos las
botas de seguridad con
puntera de acero.
28
Para instrucciones adicionales acerca
de la ropa adecuada, vea las
precauciones de seguridad, en el
manual de instrucciones del motor
KombiEngine que está usando.
LA HERRAMIENTA MOTORIZADA
(MOTOR KOMBIENGINE PROVISTO
CON BORDEADORA KOMBITOOL)
Para las ilustraciones y definiciones de
los componentes de la herramienta
motorizada, vea el capítulo sobre
"Piezas principales".
ADVERTENCIA
Nunca modifique, de ninguna manera,
esta herramienta motorizada. Utilice
únicamente los accesorios y repuestos
suministrados por STIHL y
expresamente autorizados por STIHL
para usarse con el motor KombiEngine
específico de STIHL. Si bien es posible
conectar a la herramienta motorizada de
STIHL ciertos accesorios no
autorizados, su uso puede ser, en la
práctica, extremadamente peligroso.
Para los accesorios de corte
autorizados por STIHL para su unidad,
consulte el capítulo "Combinaciones
aprobadas de accesorio de corte,
deflector, mango y arnés", en el manual
de instrucciones o en el catálogo STIHL
"Herramientas motorizadas y
accesorios".
Si la máquina experimenta cargas
excesivas para las cuales no fue
diseñada (por ejemplo, impactos
severos o una caída), siempre
asegúrese que esté en buenas
condiciones antes de seguir con el
trabajo. Inspeccione específicamente la
integridad del sistema de combustible
(ausencia de fugas), y asegúrese de
que los controles y dispositivos de
seguridad funcionen como corresponde.
No siga manejando esta máquina si está
dañada. En caso de dudas, pida que el
concesionario de servicio de STIHL la
revise.
EL USO DE LA HERRAMIENTA
MOTORIZADA (MOTOR
KOMBIENGINE EQUIPADO CON
ORILLADORA KOMBITOOL)
Transporte de la herramienta
motorizada
ADVERTENCIA
Para reducir el riesgo de sufrir lesiones
debido a la pérdida de control y al
contacto con las cuchillas o el hilo,
nunca lleve ni transporte la herramienta
motorizada con el accesorio de corte en
marcha.
002BA254 KN
Siempre use guantes
gruesos (por ejemplo,
fabricados de cuero u
otro material resistente al
desgaste) cuando manipule el accesorio de
corte. Los guantes para
servicio severo y antideslizantes mejoran la
sujeción y protege sus
manos.
Puede acarrearse solamente en
posición horizontal. Agarre el eje de una
manera que mantenga la máquina
equilibrada horizontalmente. Mantenga
el silenciador caliente lejos de su cuerpo
y el accesorio de corte detrás de usted.
FSB-KM
español / EE.UU
ADVERTENCIA
Antes de apoyar la herramienta
motorizada en el suelo, siempre apague
el motor y asegúrese de que el
accesorio ha dejado de girar.
ADVERTENCIA
Cuando transporte la máquina en un
vehículo, sujétela firmemente para
impedir su vuelco, el derrame de
combustible y el daño a la máquina.
Antes de arrancar
ADVERTENCIA
Siempre revise que la herramienta
motorizada esté en buenas condiciones
y funcione correctamente antes de
arrancarla. Nunca intente modificar los
controles o los dispositivos de
seguridad.
Nunca use una herramienta motorizada
que esté dañada o mal cuidada.
ADVERTENCIA
No instale ningún accesorio de corte en
una máquina sin que todas las piezas
requeridas estén correctamente
instaladas. Si no se utilizan las piezas
debidas se puede causar el
desprendimiento del cabezal y lesionar
gravemente al operador o a las
personas que encuentren en su
proximidad.
ADVERTENCIA
El accesorio de corte debe estar
correctamente apretado y en buenas
condiciones de trabajo. Inspeccione en
FSB-KM
busca de piezas flojas (tuercas, tornillos,
etc.). Sustituya las cabezas dañadas
antes de usar la herramienta
motorizada.
Mantenga los mangos limpios y secos
en todo momento; es particularmente
importante mantenerlos libres de
humedad, aceite, combustible, grasa o
resinas para garantizar que la máquina
pueda empuñarse firmemente para
mantenerla bajo control seguro.
Mantenga siempre el deflector bien
ajustado (vea en su manual de
instrucciones los capítulos de "Montaje
del deflector" y "Montaje de los
accesorios de corte").
ADVERTENCIA
Para reducir el
riesgo de sufrir
lesiones corporales debido a la
pérdida de control
y/o al contacto con
la cuchilla o el hilo
y los objetos arrojados, asegúrese
que su máquina
está equipada con
el deflector,
mango y arnés
correctos para el
tipo de accesorio
de corte que está
usando (vea la
tabla en el capítulo
"Combinaciones
aprobadas de
accesorio de
corte, deflector,
mango y arnés").
Tal como se puede ver en la tabla, para
usar algunos de los accesorios de corte
puede ser necesario cambiar el
deflector, el mango y/o el arnés.
Las flechas en el deflector (vista de
abajo) muestran el sentido correcto de
rotación del accesorio de corte. Sin
embargo, al verlo de arriba, el accesorio
de corte gira en sentido contrahorario.
Ajuste y el arnés (si lo tiene) y la
empuñadura de modo correspondiente
a su estatura antes de empezar a
trabajar. La máquina debe estar
correctamente equilibrada de la forma
especificada en el manual de
instrucciones para un control correcto y
menos fatiga de trabajo. Para
prepararse para emergencias, practique
la liberación rápida de la unidad del
arnés.
Arranque
Arranque el motor solamente al aire
libre, por lo menos 3 m (10 pies) del
lugar en que lo haya llenado.
Para las instrucciones específicas de
arranque, vea la sección
correspondiente de los manuales del
motor KombiEngine y accesorio
KombiTool. Coloque la herramienta
motorizada sobre suelo firme u otra
29
español / EE.UU
superficie sólida en un lugar abierto.
Mantenga el equilibrio y elija un buen
punto de apoyo para los pies.
Durante el funcionamiento
ADVERTENCIA
Sujeción y control de la herramienta
motorizada
Para reducir el riesgo de lesiones
debido al contacto con las cuchillas o el
hilo, esté absolutamente seguro que el
accesorio de corte se encuentra lejos de
su cuerpo y de todas las obstrucciones
y objetos, incluido el suelo, porque al
arrancar el motor, su velocidad será lo
suficientemente rápida para que el
embrague se engrane y haga girar el
accesorio de corte.
Tan pronto arranque, accione
inmediatamente por un breve momento
el gatillo de aceleración para
desconectarlo de la posición de
arranque y permitir que el motor se
desacelere a la marcha en vacío.
Con el motor funcionando a velocidad
de ralentí solamente, enganche la
herramienta motorizada al gancho de
resorte de su arnés, si lo tiene (vea el
capítulo correspondiente del manual de
instrucciones).
ADVERTENCIA
Su herramienta motorizada es una
máquina que debe ser manejada por
solamente una persona. No deje que
otras personas estén en el lugar de
trabajo, aun durante el arranque.
Vea también las precauciones de
seguridad de arranque en el manual de
instrucciones del motor KombiEngine.
30
002BA080 KN
ADVERTENCIA
Al trabajar, siempre sujete la máquina
firmemente con ambas manos en los
mangos. Cierre firmemente los dedos y
pulgares sobre los mangos.
La mano derecha debe sujetar el mango
trasero. Esto también corresponde a
personas zurdas.
ADVERTENCIA
Nunca intente manejar la
herramienta motorizada
con una sola mano. La
pérdida de control de la
herramienta motorizada
puede ocasionar lesiones
graves o mortales. Para
reducir el riesgo de lesionarse, mantenga las
manos y los pies alejados
del accesorio de corte.
No toque nunca con las
manos ni con cualquier
parte del cuerpo un accesorio de corte en
movimiento.
No trate de alcanzar más lejos de lo
debido. Mantenga los pies bien
apoyados y equilibrados en todo
momento. Se debe tener cuidado
especial cuando las condiciones del
suelo son resbaladizas (suelo húmedo,
nieve) y en terreno difícil y con mucha
vegetación. Para evitar tropezarse, esté
atento a los obstáculos ocultos tales
como tocones, raíces y zanjas. Para
obtener un punto de apoyo seguro, quite
los matorrales y el material cortado. Sea
sumamente precavido cuando trabaje
en declives o terreno irregular.
ADVERTENCIA
Para reducir el riesgo de lesiones
causadas por la pérdida del control,
nunca trabaje sobre una escalera o
cualquier otra superficie de soporte
poco seguro. Nunca mantenga el
accesorio de corte a una altura más
arriba de la cintura.
Condiciones de trabajo
Maneje y arranque su herramienta
motorizada solamente al aire libre en un
lugar bien ventilado. Manéjela
solamente en condiciones de buena
visibilidad y a la luz del día. Trabaje con
mucho cuidado.
ADVERTENCIA
Si la vegetación que se está cortando o
la tierra en el lugar está recubierta de
una sustancia química (tal como un
pesticida o herbicida activo), lea y siga
las instrucciones suministradas con la
sustancia en cuestión.
FSB-KM
español / EE.UU
ADVERTENCIA
La inhalación de ciertos polvos,
especialmente los polvos orgánicos,
tales como el moho o polen, puede
provocar reacciones alérgicas o
asmáticas en las personas sensibles. La
inhalación repetida o de grandes
cantidades de polvo u otros
contaminantes del aire, especialmente
los de partículas pequeñas puede
causar enfermedades respiratorias o de
otro tipo. Controle el polvo en su fuente,
siempre que sea posible. Utilice buenas
prácticas de trabajo, tal como trabajar
de manera que el viento o el proceso de
corte dirija el polvo producido por la
herramienta motorizada en sentido
opuesto del operador. Observe las
recomendaciones emitidas por
EPA/OSHA/NIOSH y las asociaciones
de trabajo y los sindicatos con respecto
al polvo ("materia particulada"). Cuando
sea imposible eliminar
significativamente la inhalación del
polvo, es decir mantener el nivel cerca
del valor ambiente, el operador y las
personas que se encuentren en la
cercanía siempre deberán usar un
respirador aprobado por NIOSH/MSHA
para el tipo de polvo presente en el
lugar.
Instrucciones de manejo
ADVERTENCIA
No maneje la herramienta motorizada
usando el bloqueo de acelerador para
arranque, pues no tendrá control de la
velocidad del motor.
FSB-KM
En caso de emergencia, apague el
motor inmediatamente – mueva el
control deslizante / interruptor
momentáneo de parada a 0 o STOP
ADVERTENCIA
El accesorio de corte
sigue girando por un rato
después que se suelta el
gatillo de aceleración
(efecto de volante).
15m (50ft)
Para reducir el riesgo de ocasionar
lesiones a los ojos u otras partes del
cuerpo (vea el capítulo "Vestimenta
adecuada"), asegúrese que las
personas estén a por lo menos 15 m
(50 pies) de distancia de la máquina.
Para reducir el riesgo de ocasionar
daños a la propiedad, mantenga esta
distancia con respecto a los vehículos y
las ventanas. Aun si se mantiene una
distancia mínima de 15 metros, esto no
elimina el peligro potencial. Los
trabajadores que deben quedar en la
zona prohibida también deben usar
gafas o protección ocular. Apague el
motor inmediatamente si se le aproxima
alguna persona.
Nunca utilice
cuchillas metálicas
en esta KombiTool.
Solamente se permite el uso de
cabezas
segadoras.
ADVERTENCIA
Revise la zona de trabajo: Para reducir el
riesgo de lesionarse,
retire las piedras, piezas
metálicas y otros objetos
sólidos que pudieran ser
lanzados a una distancia
de 15 metros o más por
el accesorio de corte, o
que pudieran dañar el
accesorio de corte y la
propiedad (por ejemplo:
vehículos estacionados,
ventanas)
ADVERTENCIA
La herramienta motorizada
normalmente se usa a nivel del suelo
con el accesorio de corte paralelo al
suelo. El uso de la motoguadaña sobre
el nivel del suelo o con el accesorio de
corte perpendicular al suelo puede
incrementar el riesgo de lesiones, dado
que el accesorio de corte queda casi
totalmente expuesto y la herramienta
motorizada es más difícil de controlar.
ADVERTENCIA
Durante el corte, revise frecuentemente
el apriete y la condición del accesorio de
corte en intervalos regulares con el
motor y el accesorio parados. Si nota un
31
español / EE.UU
ADVERTENCIA
Una cabeza suelta puede vibrar,
agrietarse, romperse o salirse de la
motoguadaña, lo que puede provocar
lesiones graves o mortales. Asegúrese
que el accesorio de corte esté
correctamente apretado. Utilice la llave
suministrada o cualquier otra que tenga
el largo adecuado para obtener el par de
apriete adecuado. Si la cabeza se suelta
después de haberla apretado
correctamente, deje de manejar la
máquina inmediatamente. La tuerca de
retención puede estar desgastada o
dañada y debe ser sustituida. Si la
cabeza continúa suelta, consulte al
concesionario STIHL. Nunca use un
motor KombiEngine con un accesorio
KombiTool suelto.
ADVERTENCIA
Sustituya inmediatamente una cabeza
trizada, dañada o desgastada o una
cuchilla trizada, combada, deformada,
dañada, desafilada o desgastada,
incluso si solamente hay rayas
superficiales. Los accesorios en esa
condición pueden romperse a velocidad
alta y causar lesiones graves o
mortales.
ADVERTENCIA
Si la cabeza, la cuchilla o el deflector se
atasca o queda pegado, siempre
apague el motor y asegúrese que el
accesorio de corte está detenido antes
de limpiarlo. Quite el pasto, las malezas,
etc. de la cuchilla o de alrededor de la
cabeza en intervalos regulares.
ADVERTENCIA
Para reducir el riesgo de la rotación
inesperada del accesorio de corte y la
posibilidad de sufrir lesiones, siempre
apague el motor antes de sustituir el
accesorio de corte. Para reducir el
riesgo de sufrir lesiones, siempre
apague el motor antes de ajustar el
largo del hilo de nilón en las cabezas
segadoras de ajuste manual.
Uso de las cabezas segadoras
No use con un hilo de segado más largo
que el deseado. Con un deflector
debidamente instalado, la cuchilla
limitadora integral automáticamente
ajusta el hilo al largo adecuado.
Al usar la máquina con un hilo de nilón
de largo excesivo se aumenta la carga
del motor y se reduce la velocidad de
funcionamiento. Esto hace que el
embrague patine continuamente y
resulta en sobrecalentamiento y daño
de los componentes importantes (por
ejemplo, el embrague y las piezas de
polímero de la caja). Un efecto de este
tipo de daño puede ser la rotación del
accesorio de corte cuando el motor está
a la velocidad de marcha en vacío.
USO DE LOS ACCESORIOS DE
CORTE
Para una ilustración de los diversos
accesorios de corte y las instrucciones
sobre el montaje correcto, vea el
capítulo sobre "Montaje del accesorio
de corte" en su manual de instrucciones.
ADVERTENCIA
Para reducir el riesgo de lesiones
personales o la muerte debido al
contacto con las cuchillas y / o a la
pérdida de control, nunca intente usar
una cuchilla metálica en esta
motoguadaña.
000BA019 KN
cambio en el comportamiento del
accesorio durante el trabajo, apague el
motor inmediatamente, espere hasta
que se pare el accesorio de corte y
revise el apriete de la tuerca que sujeta
el accesorio y revise el cabezal en
busca de grietas, desgaste y daños.
Las cabezas segadoras deben usarse
solamente en las motoguadañas con
una cuchilla limitadora del hilo en el
deflector para mantener el hilo al largo
32
FSB-KM
español / EE.UU
MANTENIMIENTO, REPARACIÓN Y
ALMACENAMIENTO
Sin embargo, la cabeza PolyCut de
STIHL con cuchilla de polímero produce
un mejor corte si no hay plantas a lo
largo de la orilla del césped. No es
necesario afilar y las cuchillas de
polímero desgastadas se pueden
cambiar fácilmente.
ADVERTENCIA
Para reducir el riesgo de lesiones
graves, nunca use un hilo de alambre o
reforzado con metal ni ningún otro
material en lugar de los hilos de corte de
nilón. Es posible que unos pedazos de
alambre sean desprendidos y arrojados
a gran velocidad contra el operador o
terceros.
Cabeza segadora AutoCut de STIHL
El hilo de corte de nilón avanza
automáticamente cuando se le golpea
contra el suelo (característica
TapAction).
Cabeza segadora PolyCut de STIHL
Utiliza ya sea hilos de nilón o cuchillas
de polímero pivotantes no rígidas.
1
2
002BA074 KN
Si las orillas del césped tienen árboles o
están bordeadas por un cerco, etc., es
mejor usar la cabeza de hilo de nilón.
Deja un corte más "suave" con menos
riesgo de dañar la corteza de los
árboles, etc., que si se usan cuchillas de
polímero.
002BA073 KN
correcto (vea el capítulo "Piezas
principales" en el manual de
instrucciones).
No siga usando la PolyCut si uno de los
agujeros circulares (1; flecha) está
visible o si el borde saliente (2; flecha)
está desgastado. Instale una cabeza
segadora nueva.
ADVERTENCIA
Si se pasan por alto las marcas de límite
de desgaste, el accesorio de corte
puede astillarse y lanzar objetos que
puedan lesionar al operador o a
terceros. Para reducir el riesgo de
lesiones causadas por la rotura de la
cuchilla, evite el contacto con las
piedras, el metal u otros objetos sólidos.
Revise la condición de las cuchillas
PolyCut en intervalos regulares.
Siempre sustituya todas las cuchillas si
se encuentra una fisura en una cuchilla.
ADVERTENCIA
Siempre apague el motor y verifique que
el accesorio de corte está parado antes
de llevar a cabo cualquier trabajo de
mantenimiento, reparación o limpieza
de la herramienta motorizada. No
intente hacer ningún trabajo de
mantenimiento o reparación que no esté
descrito en su manual de instrucciones.
Este tipo de trabajo debe ser realizado
únicamente por el concesionario de
servicio de STIHL.
ADVERTENCIA
Utilice solamente las piezas de repuesto
idénticas de STIHL para el
mantenimiento y la reparación. El uso
de piezas no fabricadas por STIHL
puede causar lesiones graves o
mortales.
Apriete todas las tuercas, pernos y
tornillos, excepto los tornillos de ajuste
del carburador, después de cada uso.
No limpie la máquina con una lavadora
a presión. El chorro fuerte de agua
puede dañar las piezas de la máquina.
Guarde la herramienta motorizada en un
lugar seco y elevado o con llave lejos del
alcance de los niños.
Observe los indicadores de desgaste.
FSB-KM
33
español / EE.UU
Motores KombiEngine
aprobados
Motores KombiEngine
Utilice únicamente los motores
KombiEngine provistos por STIHL o
expresamente aprobados por STIHL
para uso con el accesorio KombiTool.
Dependiendo del accesorio de corte en
uso, consulte y aténgase a las
recomendaciones dadas en el capítulo
"Combinaciones aprobadas de
accesorio de corte, deflector, mango y
arnés".
Este accesorio KombiTool puede
usarse únicamente con los motores
KombiEngine siguientes:
STIHL KM 55 R, KM 56 R, KM 85 R,
KM 90 R, KM 94 R, KM 110 R
34
FSB-KM
español / EE.UU
Combinaciones aprobadas de accesorio de corte, deflector, mango y arnés
Accesorio de corte
Deflector
Mango
3
4
7
2
5
Combinaciones aprobadas
Accesorios de corte
La combinación completa consta de:
Cabezas segadoras
–
Accesorio de corte
–
Deflector
–
Mango
–
Arnés/correa para el hombro
(accesorio especial)
Seleccione la combinación correcta de
la tabla según el accesorio de corte que
se desee utilizar.
ADVERTENCIA
Por razones de seguridad, no está
permitida ninguna otra combinación –
debido al riesgo de que ocurran
accidentes.
1
2
Deflector
3
Deflector con cuchilla para cabezas
segadoras
Mango
4
5
6
Mango tórico
Mango tórico con
barra de defensa
Correa para hombro
7
FSB-KM
STIHL AutoCut 11-2
STIHL PolyCut 5-3
6
541BA004 KN
1
Correa para hombro
ADVERTENCIA
Basado en el accesorio de corte en uso:
Seleccione un deflector adecuado para
reducir el riesgo de lesiones causadas
por los objetos lanzados y por el
contacto con el accesorio de corte.
Para reducir el riesgo de sufrir lesiones
debido a la pérdida de control y al
contacto con el accesorio de corte,
asegúrese que su máquina está
equipada con el mango y arnés
correctos.
No utilice cuchillas de polímero rígido,
accesorios de corte metálicos ni discos
de sierra con esta máquina.
Solamente las cabezas segadoras
pueden usarse en las motoguadañas
con mango tórico equipadas con un tubo
de mando curvo.
Se puede usar la correa para el
hombro
35
español / EE.UU
Instalación del KombiTool
2
Montaje del deflector
Montaje de la barra de
defensa
Instalación de la cuchilla limitadora de
hilo
1
002BA326 KN
2
1
Empuje la orejeta (1) del tubo de
mando en la ranura (2) en el
manguito de acoplamiento hasta
que haga tope.
1
3
Cuando la instalación es correcta, la
raya roja (3) (punta de la flecha) debe
estar a ras con el extremo del manguito
de acoplamiento.
N
Apriete la perilla (4) firmemente.
Retiro del accesorio KombiTool
N
36
002BA250 KN
4
002BA327 KN
3
2
002BA251 KN
N
N
Deslice la cuchilla (1) en la guía del
deflector.
N
Inserte y ajuste el tornillo (2) con la
llave de combinación (3) –
suministrada con el motor
KombiEngine o disponible como un
accesorio especial.
N
Empuje la abrazadera (1) sobre la
orejeta (2) en el deflector y sujétela
allí.
N
Empuje el otro lado de la
abrazadera (1) por encima del
deflector.
Invierta la secuencia anterior para
retirar el tubo de mando.
FSB-KM
español / EE.UU
Placa de empuje
Montaje del accesorio de
corte
5
1
Colocación de la herramienta
motorizada en el suelo
3
b
3
4
2
Deslice el deflector (3) sobre el tubo
de mando (4) de modo que el
cordón (a) en el tubo de mando
trabe la guía (b) en el deflector.
N
Empuje el deflector (3) en su lugar
hasta que trabe el tornillo de
sujeción (5).
N
Apriete el tornillo de fijación (6)
firmemente.
N
Apague el motor.
N
Apoye la orilladora sobre su parte
trasera con el mango tórico y la
cubierta orientados hacia abajo y el
eje de salida vuelto hacia arriba.
541BA001 KN
N
4
546BA016 KN
002BA252 KN
6
La placa de empuje (1) se suministra
con la PolyCut 5-3. Es necesario usarla
solamente para con esta cabeza
segadora.
STIHL AutoCut 11-2
N
SI la tiene, extraiga del eje (2) la
placa de empuje (1).
Cabeza segadora PolyCut 5-3 de STIHL
N
FSB-KM
Deslice la placa de empuje (1)
sobre el eje (2) y engrane el rebajo
hexagonal (3) en el hexágono
externo (4).
37
español / EE.UU
STIHL AutoCut 11-2
Bloqueo del eje
6
2
2
2
4
1
1
N
Para bloquear el eje, empuje una
herramienta adecuada (1) a través
de los agujeros (2) en el deflector y
la placa de empuje – si es
necesario, gire la placa hacia uno y
otro lado.
Montaje de la cabeza segadora
Guarde la hoja de instrucciones de la
cabeza segadora en un lugar seguro.
38
N
Coloque el resorte (1) en la cabeza
segadora (2).
N
Enrolle el hilo de nilón nuevo en el
carrete – vea el capítulo sobre
"Sustitución del hilo de nilón".
N
Arme la cabeza segadora – vea el
capítulo sobre "Sustitución del hilo
de nilón"
5
681BA015 KN
681BA014 KN
342BA021 KN
2
3
N
Deslice la cabeza segadora (2) por
encima del tubo (3) y engrane el
rebajo hexagonal (4) en el
hexágono externo (5).
N
Coloque la tapa (6) en la cabeza
segadora y atorníllela en sentido
horario en el eje hasta donde tope.
Los pasos individuales se describen en
la hoja de instrucciones suministrada.
FSB-KM
español / EE.UU
STIHL PolyCut 5-3
Retire la cabeza segadora.
STIHL AutoCut 11-2
N
8
Destornille la tapa en sentido
contrahorario del eje.
STIHL PolyCut 5-3
7
3
N
Bloquee el eje.
N
Destornille la cabeza segadora en
sentido contrahorario.
Uso de la correa para
hombro
El tipo y el estilo del arnés, de la argolla
de transporte y del mosquetón (gancho
con resorte) dependen del lugar de
venta.
El uso del arnés se describe en el
capítulo "Combinaciones aprobadas de
accesorio de corte, deflector, mango y
arnés".
681BA017 KN
Correa para hombro
Inserte la tuerca (8) en la cabeza
segadora.
N
Atornille la cabeza segadora (7) en
sentido horario en el eje (3) hasta
donde tope.
N
Bloquee el eje.
N
Apriete la cabeza segadora bien
firme.
2
002BA374 KN
N
1
ADVERTENCIA
Si la tuerca de montaje está demasiado
floja, instale una nueva.
N
Colóquese la correa (1) sobre el
hombro.
N
Ajuste el largo de la correa de modo
que el mosquetón (2) quede
aproximadamente el ancho de la
mano por debajo de su cadera
derecha.
INDICACIÓN
Quite la herramienta usada para
bloquear el eje.
FSB-KM
39
español / EE.UU
en caso de emergencia. Para evitar
dañar la herramienta motorizada, no la
lance al suelo cuando esté practicando.
Conexión de la máquina al arnés
1
1
002BA308 KN
2
N
Practique la desconexión de la
herramienta motorizada del mosquetón
de la manera descrita en "Desconexión
de la máquina del arnés".
2
Practique el deslizamiento de la correa
fuera de su hombro.
Arranque / parada del motor
Arranque del motor
Siga siempre las instrucciones de
funcionamiento del motor KombiEngine
y la herramienta motorizada básica.
Enganche el mosquetón (1) en la
argolla para transporte (2) ubicada
en el tubo de mando – mantenga fija
la argolla para transporte.
Desconexión de la máquina del arnés
1
N
355BA007 KN
2
002BA310 KN
2
1
Empuje la barra en el
mosquetón (1) y extraiga la argolla
de transporte (2) del mosquetón.
Eliminación de la máquina
ADVERTENCIA
N
Coloque la máquina en el suelo:
Debe quedar firmemente apoyada
sobre el apoyo de la máquina y la
caja de engranajes.
Para reducir el riesgo de sufrir
accidentes, verifique que el accesorio
de corte no esté tocando el suelo ni
ningún otro obstáculo.
Es necesario quitarse la máquina
rápidamente en caso de un peligro
inminente. Practique quitarse la
herramienta motorizada y colocarla en
el suelo de la manera en la cual lo haría
40
FSB-KM
español / EE.UU
Asegúrese de tener los pies bien
apoyados – ya sea de estar a pie,
agacharse o arrodillarse.
N
Sujete la máquina con la mano
izquierda y presionarla contra el
suelo firmemente – no toque los
mandos del mango de control al
presionarla – consulte el manual de
instrucciones del motor
KombiEngine o de la herramienta
motorizada básica.
Almacenamiento de la
máquina
Para intervalos de 3 meses o más
N
Retire, limpie e inspeccione el
accesorio de corte.
N
Si se retira el accesorio KombiTool
del motor KombiEngine y se
almacena por separado: Coloque
la tapa protectora en el tubo de
mando para evitar la entrada de
tierra al acoplamiento.
N
Guarde la máquina en un lugar seco
y elevado, o bajo llave – fuera del
alcance de los niños y de otras
personas no autorizadas.
INDICACIÓN
No se pare ni se arrodille sobre el tubo
de mando.
ADVERTENCIA
El accesorio de corte puede empezar a
girar tan pronto arranque el motor. Por
esta razón, accione momentáneamente
el gatillo de aceleración – el motor
reduce su aceleración al régimen de
marcha en vacío.
El procedimiento de arranque siguiente
corresponde al descrito en el manual de
instrucciones del motor KombiEngine o
la herramienta motorizada básica que
se está usando.
Parada del motor
N
Consulte el manual de
instrucciones del motor
KombiEngine o de la herramienta
motorizada básica.
FSB-KM
Mantenimiento de la cabeza
segadora
Colocación de la herramienta
motorizada en el suelo
546BA016 KN
N
N
Apague el motor.
N
Apoye la orilladora sobre su parte
trasera con el mango tórico y la
cubierta orientados hacia abajo y el
eje de salida vuelto hacia arriba.
Ajuste del hilo de nilón
STIHL AutoCut
N
Con el motor en marcha, mantenga
la cabeza segadora sobre la
superficie del césped.
N
Golpéela suavemente contra el
suelo una vez – el hilo avanza y la
cuchilla en el deflector lo corta al
largo correcto.
El hilo nuevo avanza cada vez que se
golpea el suelo con la cabeza segadora.
Por este motivo, observe el rendimiento
de corte de la cabeza segadora al
usarla. Si la cabeza segadora se golpea
contra el suelo con frecuencia excesiva,
la cuchilla limitadora recortará tramos
del hilo innecesariamente.
41
español / EE.UU
La alimentación del hilo funciona sólo si
ambos hilos miden por lo menos 2,5 cm
(1 pulg) de largo.
STIHL AutoCut 11-2
3
Retiro del hilo de nilón restante
Sustitución del hilo de nilón
4
Revise siempre la cabeza segadora en
busca de desgaste antes de sustituir el
hilo de nilón.
3
1
ADVERTENCIA
2
Si hay señales de desgaste serio,
sustituya la cabeza segadora completa.
R
681BA052 KN
El hilo de segado de nilón se denomina
"hilo de nilón" o "hilo" en el texto
siguiente.
De ser necesario, retire la cabeza
segadora.
681BA008 KN
Con la cabeza segadora se proveen
instrucciones ilustradas para la
sustitución del hilo de nilón. Guarde las
instrucciones de la cabeza segadora en
un lugar seguro.
N
R
N
N
Abra la cabeza segadora - sujétela
bien firme con una mano y gire la
tapa (1) en sentido contrahorario.
Desenganche el carrete (2),
sáquelo de la cabeza segadora y
retire el hilo de nilón restante.
N
Use hilo de nilón codificado verde
de 2,0 mm (0,08 pulg) de diámetro.
N
Corte dos trozos de hilo de nilón de
3 m (10 pies) de largo del carrete
(accesorio especial).
N
Inserte el extremo de cada hilo (3)
en los agujeros (4) del carrete.
N
Doble los extremos de los hilos por
encima del borde de los agujeros
para formar un gancho.
Enrollado del hilo en el carrete
Se puede usar un carrete preenrollado
(accesorio especial) en vez del
procedimiento siguiente.
42
FSB-KM
español / EE.UU
ADVERTENCIA
Si hay señales de desgaste serio,
sustituya la cabeza segadora completa.
2
Las cuchillas de termoplástico se
denominan "cuchillas" en el texto
siguiente.
5
5
N
Enderece los hilos de nilón y
enróllelos bien apretados en el
carrete - un hilo en cada cámara.
Enganche los extremos de los hilos
de nilón en las muescas (5).
6
N
681BA011 KN
7
681BA053 KN
N
Se proveen instrucciones ilustradas
para la sustitución de cuchillas en la
cabeza segadora. Guarde las
instrucciones de la cabeza segadora en
un lugar seguro.
6
Enhebre los extremos de los
hilos (6) en los manguitos (7) e
inserte el carrete (2) en la cabeza
para que encaje en su lugar.
Armado de la cabeza segadora
Los hilos de nilón deben
desengancharse de las muescas (5)
cuando se inserta el carrete en su lugar.
INDICACIÓN
N
Verifique que el resorte esté instalado
(vea "Montaje de la cabeza segadora").
Tire de los extremos de los hilos
hasta que paren.
N
Instale la cabeza segadora en la
máquina.
ADVERTENCIA
Para reducir el riesgo de sufrir lesiones,
siempre apague el motor antes de
instalar las cuchillas.
N
Retire la cabeza segadora.
N
Sustituya las cuchillas de la manera
mostrada en las instrucciones
ilustradas.
N
Instale la cabeza segadora en la
máquina.
Sustitución de cuchillas de corte
STIHL PolyCut
Revise siempre la cabeza segadora en
busca de desgaste antes de instalar las
cuchillas de corte nuevas.
FSB-KM
43
español / EE.UU
Componentes importantes
Los intervalos dados a continuación
corresponden únicamente a
condiciones normales de trabajo. Si el
tiempo de trabajo por jornada es más
largo que lo normal, o si las condiciones
son extremas (zonas polvorientas, etc.),
acorte los intervalos indicados de modo
correspondiente.
Todos los tornillos y tuercas accesibles
N
Vuelva a ajustar de ser necesario
Accesorios de corte
N
N
Inspeccione, revise el apriete antes
de comenzar el trabajo y después
de cada parada para cargar
combustible.
Sustituya si está dañado.
Etiquetas de seguridad
N
44
Cambie las etiquetas de seguridad
ilegibles
Especificaciones
Velocidad del motor
1
2
Velocidad máx. de eje de salida al
accesorio de corte con KombiEngine:
3
4
1
2
3
4
681BA054 KN
Información para
mantenimiento
Tubo de mando
Deflector
Cabeza segadora
Cuchilla limitadora del hilo
Definiciones
1
Tubo de mando
Encierra y protege el eje impulsor
entre el motor y el mecanismo.
2
Deflector
Sirve para reducir el riesgo de
lesiones causadas por objetos
extraños arrojados contra el
operador por el accesorio de corte y
por el contacto con el accesorio de
corte.
3
Cabeza segadora
El accesorio de corte, por ejemplo
una cabeza segadora, que se usa
para diferentes propósitos
(accesorio especial).
4
Cuchilla limitadora del hilo
Cuchilla metálica en el deflector que
mantiene el hilo de la cabeza
segadora a un largo adecuado.
KM 55 R:
KM 56 R:
KM 85 R:
KM 90 R:
KM 94 R:
KM 110 R:
10400 r/min
10600 r/min
11000 r/min
11000 r/min
10200 r/min
11000 r/min
Peso
seco, sin accesorio
de corte y deflector 0,7 kg (1,5 lb)
FSB-KM
español / EE.UU
Los usuarios de esta máquina deben
efectuar únicamente los trabajos de
mantenimiento descritos en este
manual. STIHL recomienda que un
concesionario de servicio STIHL efectúe
los demás trabajos de reparación.
Los reclamos de garantía presentados
después de realizadas las reparaciones
serán aceptados únicamente si las
mismas fueron ejecutadas por un
concesionario de servicio autorizado
STIHL utilizando piezas de repuesto
genuinas de STIHL.
Los repuestos genuinos STIHL se
identifican por medio del número de
pieza STIHL, el logotipo { y el
símbolo de piezas STIHL K. El
símbolo aparece solo en algunas piezas
pequeñas.
Desecho
Marcas comerciales
Respete todas las leyes y los
reglamentos sobre eliminación de
desechos que correspondan a su país.
Marcas registradas de STIHL
STIHL®
{
K
000BA073 KN
Información de reparación
La combinación de colores anaranjadogris (Números de registro EE.UU.
2,821,860; 3,010,057, 3,010,058,
3,400,477; y 3,400,476)
No se debe botar los aparatos STIHL en
el basurero. Lleve el producto, los
accesorios y el embalaje a un vertedero
autorizado para reciclarlos y contribuir al
cuidado del medio ambiente.
Comuníquese con un concesionario de
servicio de STIHL para obtener la
información más actualizada sobre la
eliminación de desechos.
AutoCut®
EASYSTART®
FARM BOSS®
iCademy®
MAGNUM®
MasterWrench Service®
MotoMix®
FSB-KM
45
español / EE.UU
OILOMATIC®
Rock Boss
STIHL
Quad Power ™
®
Quiet Line ™
Cutquik®
STIHL Arctic ™
®
STIHL DUROMATIC
®
STIHL HomeScaper Series ™
STIHL Quickstop
STIHL
STIHL Compact ™
ROLLOMATIC®
®
STIHL WOOD BOSS
TIMBERSPORTS®
STIHL Interchangeable Attachment
Series ™
STIHL M-Tronic ™
STIHL MiniBoss ™
WOOD BOSS®
YARD BOSS®
STIHL MotoPlus 4 ™
Algunos de las marcas comerciales de
STIHL por ley común
Stihl Outfitters ™
STIHL Multi-Cut HomeScaper Series ™
STIHL PICCO ™
STIHL PolyCut ™
STIHL
Injection
STIHL PowerSweep ™
TM
STIHL Precision Series ™
STIHL Protech ™
STIHL RAPID ™
STIHL SuperCut ™
4-MIX ™
STIHL Territory ™
BioPlus ™
TapAction ™
Easy2Start ™
TrimCut ™
EasySpool ™
Esta lista de marcas comerciales está
sujeta a cambios.
ElastoStart ™
Ematic ™
FixCut ™
HT Plus ™
IntelliCarb ™
Queda terminantemente prohibido todo
uso de estas marcas comerciales sin el
consentimiento expreso por escrito de
ANDREAS STIHL AG & Co. KG,
Waiblingen.
Master Control Lever ™
Micro ™
Pro Mark ™
46
FSB-KM
español / EE.UU
FSB-KM
47
español / EE.UU
48
FSB-KM
0458-541-8621-A
englisch
englisch // spanisch
spanisch USA
USA
G U
U
www.stihl.com
*04585418621A*
0458-541-8621-A