1
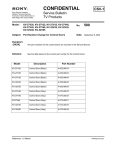
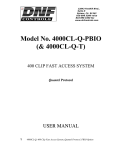
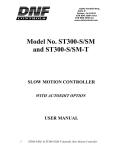
KV-32XBR400/36XBR400/38DRC1/38DRC1C
Other Information
Other Information
Using the Remote Control
Button
Description
Turns on/off Twin Mode. For details, see “Using Twin
View” on page 21.
The following table describes the buttons on the remote control that
are for more advanced functions.
✍ Main Power button must be turned ON to activate the Remote Control.
Button Descriptions
MUTING
POWER
VCR/DVD SAT/CABLE
Outside Panel
Button
PICTURE
MODE
SLEEP
DISPLAY
ANT
GUIDE
1
2
3
4
5
6
7
8
JUMP
Press to mute the sound. Press again or press VOL + to
restore the sound.
VCR/DVD
(POWER)
Turns the DVD player, MDP player, or VTR (VCR) on
and off.
SAT/CABLE
(POWER)
Turns the satellite receiver or cable box on and off.
TV (POWER)
Turns the TV on and off.
PICTURE MODE
Press repeatedly to step through the available video
picture modes: Vivid, Standard, Pro, Movie. Also available
in the Video menu. For details, see “Selecting Video
Options” on page 26.
9
ENTER
0
TV/VIDEO
FUNCTION
VCR/DVD SAT/CABLE
SLEEP
FAVORITES
CH
DISPLAY
MENU
RESET
AV 1 2 3 DVD
RM -Y174
Changes the VHF/UHF input to the AUX input.
GUIDE
Displays the program guide of your satellite antenna.
0 – 9 and ENTER
Press 0 – 9 to select a channel, the channel changes after
2 seconds. Press ENTER for immediate selection.
MUTING
POWER
VCR/DVD SAT/CABLE
TV
TV/VCR
REC
DVD MENU
2
1
4
TV
JUMP
Press to jump back and forth between two channels. The
TV alternates between the current channel and the last
channel that was selected.
TV/VIDEO
Cycles through available video inputs: TV, VIDEO 1, VIDEO 2,
VIDEO 3, VIDEO 4, VIDEO 5, VIDEO 6.
VCR/DVD
(FUNCTION)
Activates the remote control for use with a DVD player,
MDP, or VTR (VCR).
SAT/CABLE
(FUNCTION)
Activates the remote control for use with a satellite
receiver or cable box.
TV (FUNCTION)
Activates the remote control for use with the TV.
Adjusts the volume.
FAVORITES
Displays the Favorite Channels list. For details, see
“Using Favorite Channels” on page 20.
CH +/-
Scan through channels.
MENU
Press to display the TV menu. Press again to exit from
the menus.
RESET
Resets the TV to the factory default settings for the
Video and Audio menus. (Clears setting on Channel
and Timer)
AV 1 2 3 DVD
Press once to display the current time and channel label
(if set) and channel number. Press again to turn Display
off. See page 34 for details on setting the time.
ANT
Freezes the window picture. Press again to restore the
picture.
VOL +/-
Joystick allows for movement of the on-screen cursor.
Pressing down on the center of the joystick selects the
item.
Press repeatedly until the TV displays the time in
minutes (15, 30, 45, 60, or 90) that you want the TV to
remain on before shutting off automatically. Cancel by
pressing until SLEEP OFF appears. While Sleep feature is
set, press once to view remaining time
TV
FREEZE
VOL
Description
MUTING
TV
z To scan rapidly through the
channels, press and hold down the
CH+ or CH- button.
FREEZE
3
5
7
Inside Panel
TV/VCR
Changes the VHF/UHF output of the VCR.
m
Rewind
N
Play
M
Fast-forward
DVD MENU
Displays the DVD menu.
REC
Record
x
Displays the DVD menu.
X
M or m during playback
(release to resume normal playback)
0 – 9 and ENTER
Press 0 – 9 to select a VCR channel, the channel changes
after 2 seconds. Press ENTER for immediate selection.
CODE SET
Used for programming the remote control to operate
non-Sony video equipment. For details, see
“Programming the Remote Control” on page 42.
6
8
9
CODE SET
ENTER
0
FUNCTION
TV/VIDEO
VCR/DVD SAT/CABLE
TV/DBS
Use to switch control for connected video equipment.
You can program one video source for each switch
position (see page 42).
TV
GUIDE
MTS
40
41
Other Information
Programming the
Remote Control
The remote control is preset to operate Sony brand video equipment.
Sony
Equipment
Switch Position
on Remote Control
Programmable
Code Number
Beta, ED Beta VCRs
VTR1
303
8 mm VCR
VTR2
302
VHS VCR
VTR3
301
DVD Player
DVD/MDP
751
If you have video equipment other than Sony brand that you want to
control with the TV’s remote control, use the following procedures to
program the remote control.
✍ The equipment must have infrared (IR) remote capability in order to be used with the
remote control.
309, 335
Wards
Manufacturer Code
Minolta
305, 304
327, 328, 335,
331, 332
Yamaha
314, 330, 336,
337
Zenith
331
Sony
301
Admiral
(M. Ward)
327
Aiwa
338, 344
Audio
Dynamic
314, 337
Broksonic
319, 317
Canon
309, 308
Citizen
332
Craig
302, 332
Criterion
315
Curtis Mathes
304, 338, 309
Daewoo
341, 312, 309
DBX
314, 336, 337
Dimensia
304
Emerson
Mitsubishi/
MGA
323, 324, 325,
326
Multitech
325, 338, 321
NEC
314, 336, 337
Olympic
309, 308
Optimus
327
Panasonic
308, 309, 306,
307
Pentax
305, 304
Philco
308, 309
Philips
308, 309, 310
308
308, 309, 306
RCA/
PROSCAN
304, 305, 308,
309, 311, 312,
313, 310, 329
319, 320, 316,
317, 318, 341
Realistic
309, 330, 328,
335, 324, 338
Fisher
330, 335
Sansui
314
Funai
338
Samsung
322, 313, 321
329, 304, 309
Move the slide switch to the desired input.
General
Electric
Sanyo
330, 335
Go Video
322, 339, 340
Scott
Enter the three-digit code number.
312, 313, 321,
335, 323, 324,
325, 326
Sharp
327, 328
Shintom
315
✍ You must perform step 3 within 10 seconds of step 2, or you must start again from
step 2.
Press CODE SET.
Press ENTER.
Tips
❑ If more than one code number is listed, try entering them one by
❑
If you enter a new code number, the code number you previously
entered at that setting is erased.
❑
In some rare cases, you may not be able to operate your
equipment with the supplied remote control. In this case, use the
equipment’s own remote control unit.
Goldstar
332
Hitachi
306, 304,
305,338
Instant Replay 309, 308
one until you come to the correct code for your equipment.
❑
Manufacturer Code
Memorex
Quasar
digit code number for your equipment. If more than one code
number is listed, use the number listed first to complete the
following procedure.
2
3
4
5
Manufacturer Code
VCRs
Pioneer
1 Turn to “Programmable Codes” on page 43, and find the three-
z To check if the code number
works, after step 5 aim the TV’s
remote control at the component
and press the POWER button that
corresponds with that component. If
it responds, you’re done. If not, try
using the other codes listed for your
component.
Programmable Codes
Whenever you remove the batteries to replace them, the code
numbers may revert to the factory setting and must be reset.
42
JC Penney
309, 305, 304,
330, 314, 336,
337
JVC
314, 336, 337,
345, 346, 347
Kenwood
314, 336, 332,
337
LXI (Sears)
332, 305, 330,
335, 338
Magnavox
308, 309, 310
Marantz
314, 336, 337
Marta
332
Signature 2000 338, 327
(M. Ward)
SV2000
338
Sylvania
308, 309, 338,
310
Symphonic
338
Tashiro
332
Tatung
314, 336, 337
Teac
314. 336, 338,
337
Technics
309, 308
Toshiba
312, 311
Laserdisc Players
Manufacturer Code
Panasonic
704, 710
Pioneer
702
DVD Players
Manufacturer
Sony
Panasonic
Pioneer
RCA
Toshiba
Code
751
753
752
755
754
Cable Boxes
Manufacturer Code
Hamlin/Regal 222, 223, 224,
225, 226
Jerrold/G. I.
201, 202, 203,
204, 205, 206,
207, 208, 218
Oak
227, 228, 229
Panasonic
219, 220, 221
Pioneer
214, 215
Scientific
209, 210, 211
Atlanta
Tocom
216, 217
Zenith
212, 213
Satellite Receivers
Manufacturer Code
Sony
801
General
802
Electric
Hitachi
805
Hughes
804
Panasonic
803
RCA/
802, 808
PROSCAN
Toshiba
806, 807
43
— 11 —
KV-32XBR400/36XBR400/38DRC1/38DRC1C
Operating a VCR
To Do This ...
Operating an MDP
(Laserdisc Player)
Operating a Satellite
Receiver
Press
To Do This ...
VTR/DVD (POWER)
Turn on/off
SAT/CABLE (POWER)
Change channels
CH +/-
Select a channel
0-9 buttons, ENTER
Record
N and REC simultaneously.
Change channels
CH +/-
Play
N
Back to previous channel
JUMP
Stop
x
Display channel number
DISPLAY
Fast forward
M
Display DBS guide
GUIDE
Rewind the tape
m
Display DBS menu
MENU
Pause
X (press again to resume normal playback)
Move highlight (cursor)
Joystick or arrows
Search the picture forward
or backward
M or m during playback
(release to resume normal playback)
Select item
Change input mode
TV/VCR
To Do This ...
Operating a DVD
Player
To Do This ...
Press
Turn on/off
VCR/DVD (POWER)
Play
N
Stop
x
Pause
X (press again to resume normal playback)
Search the picture forward
or backward
M or m during playback
(release to resume normal playback)
Search a chapter forward or
backward
CH +/-
VTR/DVD (POWER)
Play
N
Stop
x
Pause
X (press again to resume normal playback)
Step through different
chapters of a video disc
CH+ to step forward or CH- to step backward
Display the DVD menu
DVD MENU
Select tracks directly
0-9 buttons
Display the menu
(Setup)
MENU
To Do This ...
Problem
Possible Remedies
❏
❏
If your TV does not turn on, and a red light keeps flashing, your TV may
need service. Call your local Sony Service Center.
Make sure the power cord is plugged in.
Push the power button on the front of the TV.
Check to see if the TV/VIDEO setting is correct: when watching TV, set to
TV, and when watching connected equipment, set to VIDEO 1, 2, 3, 4, 5 or 6.
Try another channel. It could be station trouble.
Remote control
does not operate
❏
❏
❏
❏
❏
Batteries could be weak. Replace the batteries.
Press TV (FUNCTION) when operating your TV.
Make sure the TV’s power cord is connected securely to the wall outlet.
Locate the TV at least 3-4 feet away from fluorescent lights.
Check the orientation of the batteries.
Dark, poor or no
picture (screen lit),
good sound
❏
❏
❏
Adjust the Picture setting in the Video menu (see page 26).
Adjust the Brightness setting in the Video menu (see page 26).
Check antenna/cable connections.
Good picture,
no sound
❏
❏
❏
❏
❏
Cannot receive upper
❏
channels (UHF) when using ❏
an antenna
❏
Only snow and noise appear ❏
on the screen
❏
❏
Dotted lines
or stripes
TV is fixed to one channel
Press
Turn on/off
SAT/CABLE (POWER)
Select a channel
0-9 buttons, ENTER
Change channels
CH +/-
Back to previous channel
JUMP
45
Troubleshooting
No color
Press
Turn on/off
44
No picture
(screen not lit), no sound
button
Step through different tracks M to step forward or m to step backward
of an audio disc
Operating a Cable
Box
Problem
Press
Turn on/off
Cannot receive channels
❏
Use Auto Program in the Channel menu to add receivable TV channels that
are not presently in TV memory (see page 30).
Unable to select a channel
❏
Use Auto Program in the Channel menu to add receivable TV channels that
are not presently in TV memory (see page 30).
Lost password
❏
In the password screen (see page 31), enter the following master password:
4357. The master password clears your previous password; it cannot be
used to temporarily unblock channels.
If, after reading these operating instructions, you have additional questions related to the use of your Sony
television, please call our Customer Information Services Center at 1-800-222-SONY (7669) (U.S. residents
only) or (416) 499-SONY (7669) (Canadian residents only).
Press MUTING so that “MUTING” disappears from the screen (see page 40).
Make sure Speaker is set to ON in the Audio menu (see page 28).
Adjust the Color settings in the Video menu (see page 26).
Check the antenna/cable connections.
Make sure the channel is broadcasting programs.
Press ANT to change the input mode (see page 40).
Adjust the antenna.
Move the TV away from noise sources such as cars, neon signs, or hairdryers.
❏
Use Auto Program in the Channel menu to add receivable channels that are
not presently in TV memory (see page 30).
Check your Channel Fix settings (see page 30).
Double images or ghosts
❏
Use a highly directional outdoor antenna or a cable (when the problem is
caused by reflections from nearby mountains or tall buildings).
Cannot operate menu
❏
If the item you want to choose appears in gray, you cannot select it.
Cannot receive any channels ❏
when using cable TV
❏
❏
Increase the volume of the cable box using the cable box’s remote control.
Then press TV (FUNCTION) and adjust the TV’s volume.
Change Cable to OFF (see page 30).
Use Auto Program in the Channel menu to add receivable channels that are
not presently in TV memory (see page 30).
❏
❏
❏
Possible Remedies
Cannot gain enough volume ❏
when using a cable box
Use Auto Program in the Channel menu to add receivable channels that are
not presently in TV memory (see page 30).
Check your cable settings.
Make sure Cable is set to ON in the Channel menu (see page 30).
47
46
— 12 —
KV-32XBR400/36XBR400/38DRC1/38DRC1C
SECTION 2
DISASSEMBLY
2-1. REAR COVER REMOVAL
Remove +BVTP 4x16 screws from
areas indicated with a circle.
2-2. CHASSIS ASSEMBLY REMOVAL
2-3. SERVICE POSITION
Lift lever up on right and left sides of chassis bracket
and pull chassis assembly gently away from bezel.
— 13 —
Pull up and rotate A and D Boards
to service the set.
KV-32XBR400/36XBR400/38DRC1/38DRC1C
11
2-4. PICTURE TUBE REMOVAL
1
WARNING:
BEFORE REMOVING
THE ANODE CAP
High voltage remains in the CRT
even after the power is disconnected. To avoid electric shock,
discharge CRT before attempting
to remove the anode cap. Short
between anode and CRT coated
earth ground strap.
10
2
3
9
4
8
Coated
Earth
Ground
Strap
7
6
1. Discharge the anode of the CRT and remove the anode cap.
2. Unplug all interconnecting leads from the deflection yoke, neck
assembly, degaussing coils and CRT grounding strap.
3. Remove speaker assemblies.
4. Remove the C Board from the CRT.
5. Remove the chassis assembly.
6. Loosen the neck assembly fixing screw and remove.
5
7. Loosen the deflection yoke fixing screw and remove.
8. Place the set with the CRT face down on a cushion and remove the
degaussing coil holders.
9. Remove the degaussing coils.
10. Remove the CRT grounding strap and spring tension devices.
11. Unscrew the four CRT fixing screws [located on each CRT corner] and
remove the CRT [Take care not to handle the CRT by the neck].
ANODE CAP REMOVAL
WARNING: High voltage remains in the CRT even after the power is disconnected. To avoid electrical shock, discharge the CRT before
attempting to remove the anode cap. Short between anode and coated earth ground strap of CRT.
NOTE:
After removing the anode, short circuit the anode of the picture tube and the anode cap to either the metal chassis, CRT shield,
or carbon painted on the CRT.
REMOVAL PROCEDURES
c
b
a
Anode Button
1
Turn up one side of the rubber cap in
the direction indicated by arrow a .
2
Use your thumb to pull the rubber
cap firmly in the direction indicated
by arrow b .
HOW TO HANDLE AN ANODE CAP
1
Do not use sharp objects which may cause damage to the
surface of the anode cap.
2
To avoid damaging the anode cap, do not squeeze the rubber
covering too hard. A material fitting called a shatter-hook terminal
is built into the rubber.
3
Do not force turn the foot of the rubber cover. This may cause
the shatter-hook terminal to protrude and damage the rubber.
— 14 —
3
When one side of the rubber cap
separates from the anode button,
the anode cap can be removed by
turning the rubber cap and pulling
it in the direction of arrow c .