1
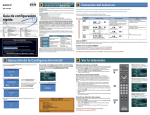
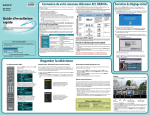
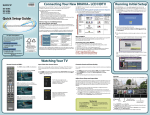
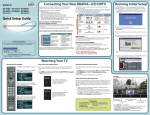
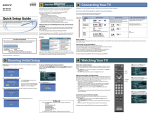
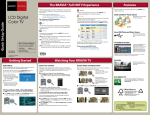
Connecting Your New BRAVIA® LCD HDTV Congratulations! Your new BRAVIA® TV opens the door to a “Full HD Experience”. This guide will explain how to get the most from your new High-Definition TV. KDL-40WL140 KDL-46WL140 KDL-52WL140 Please take these steps before you power up your BRAVIA: ■ Register online at: http://www.sony.com/registration (from U.S.A.) http://www.sonystyle.ca/registration (from Canada) ■ Make sure you’ve removed all accessory contents from packaging. ■ Install 2 AA batteries (supplied separately) in your remote control. ■ Determine whether you will mount your TV on a wall or place it on a floor stand. Sony wall-mounting brackets are designed to provide the best fit. ■ Give your TV 2 3/8 inches (6 cm) of space behind it to properly ventilate. Quick Setup Guide The Four Steps to a Full HD Experience: Set, Sound, Source, and Setup Along with your BRAVIA TV set, a complete HD system requires an HD sound system, a source of HD content, and proper setup connection with components such as your HD cable or satellite box. You must get HD programming to experience the stunning detail of HDTV. For further information, see the Operating Instructions Manual supplied with the TV. Please retain this guide for your future reference. Assembly may be required on some models. Best Signal Performance For Your Convenience Please contact Sony Customer Support directly if you have questions on the use of your television after reading your Quick Setup Guide and Operating Instructions Manual. For United States http://www.sony.com/tvsupport or to speak with a support representative: 1-800-222-SONY (7669) Input Connector http://www.sony.ca/support High Definition Content Best Picture Quality 16:9 Aspect Ratio HD Over-The-Air Antenna HD Cable Subscription/ Programming HD Satellite Subscription Digital Content Good Picture Quality Aspect Ratio based on Program Over-The-Air Antenna Digital Cable Subscription Digital Satellite Subscription Analog Content Original TV format 4:3 Aspect Ratio Over-The-Air Antenna Cable Subscription or to speak with a support representative: 1-877-899-SONY (7669) Please Do Not Return the Product to the Store ©2008 Sony Corporation Video Connection HDMI 1 HDMI 2 HDMI 3 HDMI 4 Audio Connection 1080/24p, 1080p, 1080i, 720p, 480p, 480i, PC (Compatible with HD or SD content) Component connection Audio L/R 1080p, 1080i, 720p, 480p, 480i (Compatible with HD or SD content) S VIDEO connection Audio L/R Component 1 Component 2 first time. Select the language for the OSD (on screen display) from the screen shown below. High or Standard Definition Quality HDMI cable carries both video and audio signals. (*When HDMI is connected to DVI with an adapter, a separate audio L/R is necessary.) HDMI connection* 1 The Initial Setup screen will appear when your BRAVIA is powered on for the Step 1 of 6 Initial Setup Please select a language. Language settings will apply to on screen display as well as default audio for digital channels. Highlight a choice and press to continue. English Español Français Video 1 (Use this connector in place of composite video connector) Video 1 Video 2 Video 3 Composite video connection 2 Follow the instruction provided on the screen. Note: If you are using a cable or satellite box, select the Skip option to skip the Auto Program. 480i (SD content) 3 When all receivable channels are found, press , to continue to set the current Audio L/R time. Sources Contact your cable or satellite provider to upgrade your service to HD. Receive over-the-air HD broadcasts with an HD-quality antenna (www.antennaweb.org) and discover the wealth of entertainment now available on super-high-resolution Blu-ray Disc™. For Canada Run the Initial Setup to scan for the available analog and digital channels after connecting your signal source to the CABLE/ANTENNA input on the rear of the TV. See reverse side of this guide for sample connection diagrams. ■ Turn off and unplug all components before making connections. ■ Do not turn on the TV until connection setup is completed. The quality of the image you see on your BRAVIA can only be as high as the quality of the signal it is displaying. This chart shows the different signal types and how to access them. Comments Running Initial Setup Your BRAVIA TV must be properly connected to components such as sound system and cable or satellite box. Audio/Video Performance 4-113-060-11(1) 4 Continue on to set up the TV Guide On Screen™ if you are not using a cable or What is HDMI™? satellite box. Follow the on-screen instruction to set up your system. HDMI (High-Definition Multimedia Interface) cables are the standard for connecting HDTV. They are built to properly handle high bandwidth, uncompressed video and multi-channel audio—all in one cable. Connecting a PC to Your BRAVIA ■ May require DVI-to-HDMI adapter and separate audio connector. ■ Connect PC’s audio output when using a Digital Video Interface (DVI) or HD15 connection. ■ Press PC’s FUNCTION Key + Select Output to transmit to TV. ■ When using an HD15 connection, adjust TV’s Pitch and Phase to correct sharpness. ■ Refer to your BRAVIA Operating Instructions Manual for more information. To learn more about HDTV, visit: U.S.A.: http://www.sony.com/HDTV Canada:http://www.sonystyle.ca/hd Note: Your TV will need to be left powered off (overnight) to receive TV Guide data. When your program information is obtained, your TV will display the program listing. (See Operating Instructions Manual for more details.) Printed in U.S.A. Watching Your TV Remote Control and XMB™ Press HOME to display the XMB™ (XrossMediaBar). Sync XMB™ (XrossMediaBar) with focus on Settings. Select Settings to customize your TV. Product Support Clock/Timers Input: Select Your Content Source Customize Sound and Picture Quality Whether you are watching cable, satellite or broadcast TV; playing a VCR, DVD or Blu-ray Disc; or connecting to your PC, you need to choose the correct input using your remote control: You can choose optimum sound and picture settings to match the content you are displaying on your TV: ■ ■ Press HOME on your remote control to display the TV or External Inputs selection list; OR Press INPUT to display the input selection menu as shown below. You can use both INPUT or / to toggle through the list. Sound Screen Channel TV XMB™ (XrossMediaBar) with focus on TV icon. Select the channels from here or use the 0-9 number buttons on your remote control. The TV will automatically detect the connected equipment. Shown here with equipment connected to Video 1, Component 1 and HDMI 1. 7 8.1 ■ ■ Press HOME on your remote control to display the XMB™ and select Picture or Sound from the Settings menu. Choose the appropriate setting for your content. Use the OPTIONS button to quickly access Picture Adjustments and Sound Adjustments. Refer to your Operating Instructions Manual for more information. Favorites Adjust Screen Shape and Aspect Ratio ■ KFMB-DT 9 10 10.1 TV 11 XMB™ (XrossMediaBar) with focus on External Inputs. Select connected device from here or use the INPUT button on your remote control. ■ Adjust your TV so boxy 4:3 images are automatically re-configured (zoomed or stretched) to fit the wide TV screen; OR Watch SD content in its original, boxy format with wide black bars surrounding the image to fill in unused space (for example, you may prefer to watch an old classic movie in its original 4:3 format, not reconfigured for a wide screen). Press WIDE on your remote control. Your TV will display available wide modes for the current signal. Select the Wide Mode setting of your preference. To Do List Video 2 Video 3 When the Initial Setup is completed, consider carrying out these items: Set Closed Captions (CC) Manage Inputs (Label/Enable Inputs) Set Parental Lock Set Speakers Show/Hide Channels Component 2 HDMI 1 HDMI 2 Inputs can be managed by labeling them with the name of the connected equipment as shown here. See the Operating Instructions Manual for details. TV Use the Favorites feature to manage your favorite channels and inputs for easy access. High-Definition and Standard-Definition signals are transmitted with different aspect ratios (the width-to-height shape of the image). Most HD signals use a widescreen aspect ratio of 16:9. Most SD signals use a boxy 4:3 aspect ratio. The 16:9 aspect ratio looks perfect on your BRAVIA, but a 4:3 image may need to be adjusted to better fill the wide screen of your BRAVIA. ■ 8 Cable ■ For details, refer to your BRAVIA Operating Instructions Manual. Saved channel Recently viewed channels or external input and inputs Background TV ■ ■ ■ ■ Saved channel or external input Press FAVORITES to access Favorites. In Favorites, you will see a list of your most recently viewed channels and external inputs. Highlight a channel or external input and press to tune to it. To add a channel or external input to your Favorites list, tune to it and press OPTIONS, then select Add to Favorites. See the Operating Instructions Manual for more details on this feature. HD Basic Connection with A/V Receiver HD BRAVIA Sync Basic Connection Rear of TV HD Basic Connection with Home Theater System Rear of TV *Rear of TV *A/V Receiver Blu-ray Disc/DVD A/V Receiver Blu-ray Disc/DVD *Blu-ray Disc SAT (dish) or Cable/SAT (dish) HD Cable Box or HD Satellite Receiver Splitter SAT (dish) HD Antenna SD Cable Box or SD Satellite Receiver HD Cable Box or HD Satellite Receiver Cable/Antenna Home Theater System Splitter Cable/Antenna * Signifies a BRAVIA Sync capable device. Required Cable Types for Connection Coaxial Notes on Connection: ■ Mini-Pin Audio DVI-to-HDMI DVI - to - HDMI adapter Composite HDMI Audio (L/R) with Mini-Pin HD15 Component Audio (L/R) ■ Your TV is equipped with four HDMI inputs. Connect your incoming signal source (HD Cable Box, HD Satellite Receiver, or DVD) with HDMI or component video for the best possible picture quality. If your connecting equipment has DVI output instead of the HDMI output, you must use a DVI-to-HDMI cable for the video and also connect an audio cable for the sound. If this is the case, connect the cable to HDMI IN 4 (input) of your TV. ■ ■ ■ P&P/PIP functions require Cable/Antenna connection. When receiving a high-definition signal by an over-the-air antenna, it is best to use an HD antenna. When using a DVI-to-HDMI cable, make sure to connect the DVI side first. Digital Optical Audio Notebook PC Connection Basic Connection with SD VCR/DVD Rear of TV Desktop PC Connection Rear of TV Rear of TV SAT (dish) SAT (dish) PC Notebook PC HD Cable Box or HD Satellite Receiver VCR VCR/DVD Combo DVD Splitter Cable/Antenna HD Cable Box or HD Satellite Receiver Splitter Cable/Antenna Splitter Cable/Antenna