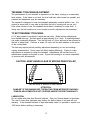
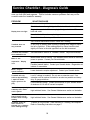
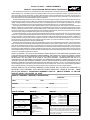
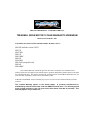
1
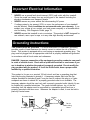
SMOOTH 9.6H
OWNER’S MANUAL
treadmillbynet.com
advancedfitness.com
The Fitness Superstore
SALES: (888) 9TREADS
(888) 987-3237
SERVICE: (888) 800-1167 ext. 103
SMOOTH is a registered trademark of
Internetfitness.com
Mt. Laurel, NJ
Important Safety Instructions
WARNING!
Read all instructions before using this appliance.
DANGER - To reduce the risk of electric shock disconnect your treadmill from the
electrical outlet prior to cleaning and/or service work.
WARNING - To reduce the risk of burns, fire, electric shock, or injury to persons,
install the treadmill on a flat level surface with access to a 120-volt, 20-amp
grounded outlet. DO NOT USE AN EXTENSION CORD: DO NOT ATTEMPT TO
DISABLE THE GROUNDED PLUG BY USING IMPROPER ADAPTERS, OR IN ANY
WAY MODIFY THE CORD SET. A serious shock or fire hazard may result along
with computer malfunctions. See Grounding Instructions, page 2.
• Do not operate treadmill on deeply padded, plush or shag carpet. Damage to both
carpet and treadmill may result.
• Do not block the rear of the treadmill. Provide a minimum of 3 1/2 feet clearance
between the rear of the treadmill and any fixed object.
• Keep children away from the treadmill. There are obvious pinch points and other
caution areas that can cause harm.
• Keep hands away from all moving parts.
• Never operate the treadmill if it has a damaged cord or plug. If it is not working
properly, call your dealer.
• Keep the cord away from heated surfaces.
• Do not operate where aerosol spray products are being used or where oxygen is
being administered.
• Never operate the treadmill with the air openings blocked. Keep the air openings
free of lint, hair, and the like.
• Never drop or insert any object into any openings.
• Do not use outdoors.
• To disconnect, turn all controls to the off position, remove tether cord, then remove
plug from outlet.
• Do not attempt to use your treadmill for any purpose other than for the purpose it is
intended.
• Use handrails provided; they are for your safety.
• Wear proper shoes. High heels, dress shoes, sandals or bare feet are not suitable
to be used on your treadmill. Quality athletic shoes are recommended to avoid leg
fatigue.
Remove tether cord after use to prevent unauthorized treadmill operation.
SAVE THESE INSTRUCTIONS - THINK SAFETY!
1
Important Electrical Information
WARNING!
• NEVER use a ground fault circuit interrupt (GFCI) wall outlet with this treadmill.
• Route the power cord away from any moving part of the treadmill including the
elevation mechanism and transport wheels.
• NEVER remove any cover without first disconnecting AC power.
• If voltage varies by ten percent (10%) or more, the performance of your treadmill
may be affected. Such conditions are not covered under your warranty. If you
suspect your voltage is low, contact your local power company or a licensed electrician for testing. See Diagnosis Guide, page 13.
• NEVER expose this treadmill to rain or moisture. This product is NOT designed for
use outdoors, near a pool or spa, or in any other high humidity environment.
Grounding Instructions
This product must be grounded. If it should malfunction or breakdown, grounding
provides a path of least resistance for electric current to reduce the risk of electric
shock. This product is equipped with a cord having an equipment-grounding plug. The
plug must be plugged into an appropriate outlet that is properly installed and grounded
in accordance with all local codes and ordinances.
DANGER - Improper connection of the equipment-grounding conductor can result
in a risk of electric shock. Check with a qualified electrician or serviceman if you
are in doubt as to whether the product is properly grounded. Do not modify the
plug provided with the product - if it will not fit the outlet, have a proper outlet
installed by a qualified electrician.
This product is for use on a nominal 120-volt circuit, and has a grounding plug that
looks like the plug illustrated in sketch A. A temporary adapter that looks like the
adapter illustrated in sketches B and C may be used to connect this plug to a 2-pole
receptacle as shown in sketch B if a properly grounded outlet is not available. The
temporary adapter should be used only until a properly grounded outlet (sketch A) can
be installed by a qualified electrician. The green colored rigid ear, lug, or the like
extending from the adapter must be connected to a permanent ground such as a
properly grounded outlet box cover. Whenever the adapter is used, it must be held in
place by a metal screw.
Grounded Outlet
Adapter
Metal Screw
Grounding Pin
Tab for
Grounding
Screw
Grounded Outlet Box
A
B
2
C
Treadmill Assembly
Attention!
The following instructions are included only as information so that you, the consumer, understand basically how the treadmill is assembled.
STEP 1: Remove treadmill from carton. You may pick the rear of the treadmill up and
roll it off the packaging. Remove foam padding, wrap, etc. Observe for possible
freight damage.
Note: You will need a phillips screw driver and 1/2” wrench to complete assembly.
STEP 2: This owners manual packet contains (2) Allen wrenches and (4) black plugs.
When practical, assembly hardware is mounted in appropriate locations that require
removal and replacement. The computer head is loose. Set aside for step 6.
STEP 3: An unpainted steel channel connects the console uprights to the base. With
phillips screwdriver and Allen wrench (provided) unbolt the console uprights from base.
Discard plastic washers (4) and steel channels. The 5/16” x 1” Allen bolts and “gold”
special nut/washers will be used in step 5. The black phillips head screws will be used
in step 8.
STEP 4: Raise the console upright assembly and place upright console assembly into
front grill area. Be careful of the two cables. A bottom and rear 3/8” pin will help locate
into proper position to allow hardware installation. Locate the (4) 5/16” x 1” black Allen
bolts and “gold” special 5/16” washer/nuts removed in step 4. Place one bolt on the end of
the Allen wrench (provided) and insert thru any one of (4) round frame holes. Bolt
should go thru console hole to allow “gold” 5/16” hex nut/washer to be started. Hand
“run” the nut against the console so that it will not turn during tightening with Allen
wrench. Do not tighten with Allen wrench until all (4) nut/bolt assemblies are inserted
and started. Tighten all bolts. Nuts should “hold” without a wrench. If they do not hold
use an open end wrench from the bottom. Insert the (4) black plugs into the access
holes.
Note: For heavy use units it is advisable to use a wrench on the nuts and add additional torque to nut / bolt.
STEP 5: Handles will install thru access holes in console upright. Remove both
5/16” Allen bolts in each handle with included wrench that is located in parts bag. Slide
handle (flair to outside) thru access holes in console upright. Use caution to avoid
data cables in left hand side console upright. You may observe data cable clearance from top of open console upright. Start both bolts into hand rail thru console
upright. Repeat procedure for opposite hand rail. Tighten all bolts.
3
Smooth 9.1 / 9.6
2/06/01
STEP 6: Place the treadmill in operating position. Make certain cables from upper
computer do not come in contact with motor fan. Apply AC power. Start the unit and
observe belt tracking. Unit must be reasonably level for proper tracking. Test treadmill
basic operation. This includes noise, motor performance, etc.
STEP 7: Install motor hood and secure with (2) black phillips head screws removed in
step 4. Front of motor hood is not secured.
The dealer must provide the following (minimum):
n
Follow the belt tracking instructions closely in order to ensure proper belt tension
and path.
n
Walk on the belt at slow speeds under 2.5 mph for a few minutes in order to break
in
the belt/deck lubricant.
n
Make certain treadmill is electrically grounded.
Contact Smooth
Service 1-888-800-1167, ext. 103
Sales
1-800-TREADMILL
4
Smooth 9.1 / 9.6
2/06/01
Important Operation Instructions
NEVER operate this treadmill without reading and completely understanding the
results of any operational change you request from the computer.
l
Understand that changes in speed and incline do not occur immediately. Set your
desired speed on the computer console and release the adjustment key. The computer
will obey the command gradually.
l
NEVER use your treadmill during an electrical storm. Surges may occur in your
household power supply that could damage treadmill components. Removing safety
cord will protect the unit.
l
Use caution while participating in other activities while walking on your treadmill;
such as watching television, reading, etc. These distractions may cause you to lose
balance or stray from walking in the center of the belt; which may result in serious
injury.
l
NEVER mount or dismount the treadmill while the belt is moving. Smooth treadmills
start with zero speed and it is unnecessary to straddle the belt during start up. Simply
standing on the belt during slow acceleration is proper after you have learned to operate the unit.
l
Always hold on to a handrail or grab bar while making control changes (incline, speed,
etc.). Do not use excessive pressure on console control overlays. They are precision
set to function properly with little finger pressure. Pushing harder is not going to make
the unit go faster or slower. If you feel the buttons are not functioning properly with
normal pressure contact your Smooth dealer; adjustments can be made. All buttons
should operate and control treadmill functions without excessive finger effort. Damage
to overlay will result if excessive control pressure continues.
l
Safety Tether Cord
A safety tether cord is provided with this unit. It is a simple
magnetic design that should be used at all times. It is for your
safety should you fall or move too far back on the treadbelt.
Pulling this safety tether cord will stop treadbelt movement.
To Use:
1. Place magnet into position on the console control head.
Your treadmill will not start and operate without this. Removing the magnet also secures the treadmill from unauthorized use.
2. Fasten the black plastic clip onto your clothing securely to assure good holding
power. Note: The magnet has strong enough power to minimize accidental, unexpected stopping and the clip should be attached securely to make certain it does not
come off. Be familiar with its function and limitations. Use the adjustment system to
assure proper length of cord.
The treadmill will stop, depending on speed, with a two to three step coast anytime the
magnet is pulled off the console. Use the red STOP/PAUSE switch in normal operation.
5
Operation of Your New Treadmill
DO NOT STAND ON THE WALKING BELT WHILE
LEARNING TO OPERATE YOUR NEW TREADMILL!!!
Basic Treadmill Operation:
Step 1: Press and release DISPLAY ON/FAST key. Display will light.
Step 2: For calorie computation if desired;
(A) Calorie window will display LBS.
(B) Use blue INCLINE keys to enter users weight.
Note: If no weight is entered calories do not calculate and calorie window will not light.
Step 3: For an elapsed (countdown) time press ENTER key. The Time/Pace window
will indicate 20:00 (minutes). Adjust to desired time with blue INCLINE keys.
Note: The above steps 2 & 3 are not required for operation of the treadmill.
Step 4: Adjust to desired speed with FASTs/SLOWt keys.
Step 5: Incline may be adjusted anytime with blue Up + / Down - incline keys.
Step 6: Press START BELT key to begin belt movement. Clock will begin.
Speed / Incline Repeat Feature:
The computer will retain the speed/incline value you’ve just selected as a repeater
feature. This means the next time the unit “wakes”/lights up, your desired start speed/
incline will repeat itself. Anytime, before belt movement is begun, the speed or incline
start value can be changed and held in memory.
Pause Feature:
Step 1: When operating the treadbelt, the pause feature may be utilized by pressing
the red STOP/PAUSE switch. This will slowly decelerate the treadbelt to zero.
TIME and DISTANCE will hold while unit is in the pause mode.
Step 2: To resume previously set speed, press START BELT key. Unit will slowly
return to the speed displayed.
Pace Feature:
o
Pace is the amount of time that it will take to walk or jog a mile. Press SELECT key
after treadbelt movement for pace function. Press SELECT key again to exit pace
mode. Pace will scan with Time/Calorie and adjust up or down as speed is
changed.
Smooth 9.6
2/06/01
6
Track Feature: Refer to page 9 (Programmable Operation)
o Before going into P1 (preset) program is the 1/4 mile Track display. Select this
feature as you would any other program. Once displayed press START BELT key
to begin exercise. A dot will travel around the track indicating your position. The
Segment Time window will indicate the number of laps.
Panel Dim Feature:
s
After belt movement you may press and release the DIM
key. This will blank out
the display. Any key (Speed/Incline for example) will light the display back up for a
few seconds. Press and release the DIM key to exit this mode. The computer
display is still running, but simply not displaying the information.
s
o
To Turn Treadmill Off:
o
Two methods accomplish this:
(1) Press and release red STOP/PAUSE switch while in pause mode. Display will
blank out. Use this method when possible.
(2) Pull tether cord. Should be used only in panic situation.
Hour Meter Feature:
When the tether cord is initially placed in operational position the Distance window will
display total hours.
The Speed window indicates upper computer software version. This is a service issue
to refer to computer software design.
Dot Matrix Display
o This display illustrates in programmable modes the workout effort. Twenty rows of
“dots” (7 high) indicate each segment of a workout. When all the “dots” of a row
are lit, this indicates 100% of the program level. For example: if a program
maximum speed is 3.5 mph, all dots lit mean 3.5 mph. The dots are only to show
an approximate level (speed/incline) of effort. They do not necessarily indicate a
specific value - only an approximate percent to compare levels of intensity.
Smooth 9.6
2/06/01
7
Program Descriptions
NOTE: Refer to the section entitled “Operating Your New Treadmill” for program operation instructions.
Speed and Incline Programs
All Smooth Programmable treadmills are equipped with eight different programs to add
variety to your workout. Each program is evenly divided into 10 equal segments. The
workout computer will automatically divide any selected workout time by 10 to give you
equal segment lengths. We provide you with four different program examples, from
which you can develop and program your own workouts in the computer’s memory. All
Factory Defined programs come pre-packaged with warm up and cool down periods at
the beginning and end of each program to help you exercise properly.
Factory Defined Exercise Programs
Programs P1 through P4 are generalized programs that are provided as simple examples of workouts and the results that may occur as a result of these workouts. Consult your physician before beginning any exercise program and do not exceed their
guidelines.
WARNING! Factory Defined selections are characterized by programs that are predetermined by our team of exercise experts. If you make any changes
before you begin exercising or during exercise, the changes will be erased once the
machine has been turned off at the end of your program and will return to the original
factory program.
Definition of the Factory Defined Programs
P1- Interval Trainer - This program is designed to increase your endurance and build
your lung power through periods of work load and rest. This is an extremely popular
form of training for athletes that experience periods of work load and rest during performance.
P2- Thigh Burner - This program is designed to gradually increase the work load using
incline while maintaining a somewhat constant speed. This hill profile is designed to
burn away fat in the thigh area by concentrating the intense workout on the thighs.
P3- Cardio Conditioner - For the majority of people, work loads indicated in this program are similar to those experienced while using Heart Rate Control. Through this
process, the cardiovascular system is strengthened.
P4- Weight Manager - By using varying work loads, this program creates interest and
helps you stick with your workout. Through this process, it gives you the opportunity to
improve your fitness while gradually replacing fat with muscle.
8
Programmable Operation of Your Treadmill
Note: Refer to instructions on countdown elapsed time feature. All programs have the
workout pre-set at 20 minutes. You may change to another (10 minutes is minimum) if
desired by following instructions pertaining to countdown time. This must be done
before DISPLAY ON/FASTs key is pressed.
To Select a Program:
Step 1:
Step 2:
Press and release the DISPLAY ON/FASTs key. Display will light.
Press and release the SELECT key. Time/Calorie/Pace window will display
elapsed time. Segment Time window will display a particular program.
Speed window will display the maximum speed that this program will
achieve. Incline window will display the maximum incline of this program.
Step 3: When a preset program (P1-P4) is selected the Distance window will show
L-3 (which means Level 3). You may choose 5 different effort levels of any
preset program. Use the FASTsSLOWt keys to make a selection. The
Incline and Speed windows will change accordingly indicating the maximum
amount that speed/incline will achieve.
Note: See below To Review/Change a Program.
Step 4: After selecting a program press and release START BELT key.
Treadmill will begin to move and workout has begun.
Note: The segment time will always be 1/20th of the session time. Within 5 seconds of
the end of a segment run, Incline and Speed displays will flash with a chime to alert a
change. This statement applies to both pre-set and user programs.
To Review/Change a Program:
Step 1:
Step 2:
s
s
Refer to above. Repeat Step 1 & 2 (To Select a Program).
Press and release the ENTER key when the desired program is displayed.
Incline window will display the incline of that segment. Make desired
incline adjustments with the blue Up + / Down - keys. Shown in the Speed
window is the speed that segment will achieve. You may adjust displayed
speed with the FASTsSLOWt keys. All pre-set programs will return to
their original format once the treadmill is shut down.
Step 3: Press and release the SHIFT
key to advance the display to the next
segment. Use SHIFT
key to go back to a previous segment.
STEP 4: After reviewing/changing the program, press and release the START BELT
key to begin belt movement.
Note: You may adjust speed or incline anytime during a workout. These values will not
be held in memory.
Smooth 9.6
2/06/01
9
To Custom Program User (U1 thru U4):
Step 1:
s
Refer to Select a Program. Repeat Step 1 & 2. Press and release the
SELECT key past P4 to user U1. There are 4 available.
Step 2: Use the FASTsSLOWt speed keys to make a speed entry. Display will
show desired speed and U1-1. Use the blue incline Up + / Down - keys to
make an incline entry.
Step 3: Press and release the Shift key to advance to segment 2. Display will
show U1-2. Use FASTsSLOWt keys to adjust to desired speed for that
segment. Use the blue incline Up + / Down - keys to make an incline entry.
Step 4: Repeat above procedures until all 10 segments are programmed.
Step 5: Press and release the START BELT key to begin exercise. Exercise
is now held in memory unless changed or erased.
Note: You may adjust speed and or incline anytime during a workout. These values
will not be held in memory.
To Review / Change a User Program:
Follow instructions on page 9 To Review/Change a Program. Any speed and or incline
change before belt movement is held in memory.
To Erase a User Defined Program:
s
s
STEP 1: Choose the user program to be erased. U1 for example.
STEP 2: Press both Shift
keys at the same time for 3 seconds. Speed and incline values will be cleared and cannot be recovered.
Smooth 9.6
2/06/01
10
T
Target
Heart Rate
The old motto, “no pain, no gain”, is a myth that has been overpowered by the
benefits of exercising comfortably. A great deal of this success has been promoted by
the use of heart rate monitors. With the proper use of a heart rate monitor, many
people find that their choice of exercise intensity is either too high or too low and exercise is much more enjoyable by maintaining their heart rate in the desired benefit
range.
l
TARGET HEART RATE
200
To determine the
TRAINING CHART
benefit range in which
190
you wish to train, you
Max
imu
180
must first determine
mH
ear
your Maximum Heart
t Ra
170
te
Rate. This can be
accomplished by using
160
the following formula:
150
220 - User’s Age =
Maximum Heart Rate.
140
After calculating your
130
Maximum Heart Rate,
you can decide upon
120
which goal you would
110
like to pursue. The two
most popular reasons
100
for, or goals of exercise,
20 25 30 35 40 45 50 55 60 65
are cardiovascular
Age of User
fitness (training for the
Weight Loss
Cardiovascular
heart and lungs) and
weight control. The black columns on the chart above represent the Maximum Heart
Rate for a person whose age is listed at the bottom of each column. The training heart
rate for either cardiovascular fitness or weight loss is represented by two different lines
that cut diagonally through the chart. A definition of the lines’ goal is in the bottom lefthand corner of the chart. If your goal is cardiovascular fitness or if it is weight loss, it
can be achieved by training at 75% or 65%, respectively, of your Maximum Heart Rate
on a schedule approved by your physician. Consult your physician before participating
in any exercise program.
Heart Rate (Beats per Minute)
l
With all Heart Rate Control treadmills, you may use the heart rate monitor feature
without using the Heart Rate Control program. This function can be used during
manual mode or during any of the eight different programs. The Heart Rate Control
program automatically controls incline and overrides manual adjustment of incline
grade.
l
Note: Refer to Heart Rate Control Operation for computer calculated target heart
rate.
11
Using a PolarTM Heart Rate Transmitter
PolarTM is the recognized, worldwide leader in wireless heart rate monitors, with a 99%
accuracy rate. PolarTM was the first company that provided a high level of consistency
both in design, accuracy, and manufacturing.
Your PolarTM heart rate transmitter is composed of two parts:
1. The PolarTM Transmitter
2. The Elastic Strap
How to wear your PolarTM Transmitter:
1. Attach the transmitter to the elastic strap using the locking parts.
2. Adjust the strap as tightly as possible as long as the strap is not too tight to remain
comfortable.
3. Position the transmitter with the PolarTM logo centered in the middle of your body
facing away from your chest (some people must position the transmitter slightly left
of center). Attach the final end of the elastic strap by inserting the round end and,
using the locking parts, secure the transmitter and strap around your chest.
4. Position the transmitter immediately below the pectoral muscles.
5. Sweat is the best conductor to measure very minute heart beat electrical signals.
However, plain water can also be used to pre-wet the electrodes (2 black rectangular areas on the reverse side of the belt and either side of transmitter). It’s also
recommended that you wear the transmitter strap a few minutes before your work
out. Some users, because of body chemistry, have a more difficult time in achieving
a strong, steady signal at the beginning. After “warming up”, this problem lessens.
As noted, wearing clothing over the transmitter/strap doesn’t effect performance.
6. Your workout must be within range - distance between transmitter/receiver - to
achieve a strong steady signal (as noted by flashing light). The length of range may
vary somewhat but generally stay close enough to the console to maintain good,
strong, reliable “flashes” (pulses). Usually an improper distance will indicate - (error) until you move closer.
Wearing the transmitter immediately against bare skin assures you of proper
operation. If you wish, you may wear the transmitter over a shirt. To do so, moisten
the areas of the shirt that the electrodes will rest upon.
Note: The transmitter is automatically activated when it detects activity from the user’s heart. Additionally,
it automatically deactivates when it does not receive any activity. Although the transmitter is water resistant,
moisture can have the effect of creating false signals, so you should take precautions to completely dry the
transmitter after use to prolong battery life (estimated transmitter battery life is 2500 hours).
Should your PolarTM Transmitter require service, carefully pack the PolarTM Transmitter
in a shipping carton with proof of purchase (photocopy of your dealer invoice will suffice
if unit is less than one year old). Your package should be returned to PolarTM with a
note detailing your name, daytime telephone number, a statement that describes why
the unit is being returned for repair, and $7.50 for return shipping/handling. Mail the
package postage prepaid to:
PolarTM CIC, Inc.
99 Seaview Boulevard
Port Washington, NY 11050 USA
Unauthorized service will void any warranty provided by PolarTM. After the one year
warranty provided by PolarTM, contact PolarTM at the above address for repair charges.
12
Heart Rate Control
WARNING!
DO NOT USE THE HEART RATE CONTROL PROGRAM IF YOUR HEART RATE IS
NOT REGISTERING PROPERLY ON THE TREADMILL’S DISPLAY!
Special Operations of Heart Rate Functions:
All treadmills that are factory equipped with a Heart Rate Control system have many
distinct features both in the Heart Rate Control program and during heart rate monitoring. This section will give you a more detailed background to use your treadmill in the
most effective manner.
How the Heart Rate Control Program Works:
Heart Rate Control uses your treadmill’s incline system to adjust your heart rate. Increases and decreases in elevation affect heart rate much more efficiently than
changes in speed. Additionally, changes in incline keep you in control of the machine’s
speed instead of the machine controlling you.
Note: Once you begin the Heart Rate Control mode by pressing the “START BELT”
key, you cannot make incline adjustments by pressing the incline “UP” and “DOWN”
keys. The computer makes all incline adjustments for you.
Setting the Maximum Incline in Heart Rate Control:
During the setup of Heart Rate Control, you may choose, if desired, a maximum incline
that the workout will achieve. You should set the maximum incline no higher than a
level that is comfortable and approved by your physician. Obviously a low maximum
incline may result in more speed adjustments. See Heart Rate Control Operation.
Selecting a Heart Rate Control Program:
You have the option, during the setup mode, to choose either the Weight Control program or the Cardiovascular program. Weight Control attempts to maintain your heart
rate at 65% of your Maximum Heart Rate. Cardiovascular attempts to maintain your
heart rate at 75% of your Maximum Heart Rate. Your Maximum Heart Rate is based
upon a formula that subtracts your age from 220. Your age input is performed during
the setup mode. See Heart Rate Control Operation.
Note: If you change your Target Heart Rate during your workout, the new percentage
of your Maximum Heart Rate will appear in the Incline window on the display.
Heart Rate Control Countdown:
To use the Heart Rate Control countdown feature, you must enter time during the initial
start up phase. See page 6: To Set Countdown Elapsed Time. If time is not entered,
the clock will count from 0:00 up once the “START BELT” key is pressed. If time is
entered, the clock will begin once you have reached your Target Heart Rate. By delaying the beginning of the clock operation until you are in your Target Heart Rate range,
you will know exactly how much time you have spent in the range. Therefore, you will
be able to accurately measure your heart rate workout. Consult with your physician
concerning the amount of time that you should exercise using Heart Rate Control.
13
Technical Specifications of Heart Rate Control:
If the treadmill is not able to read the signals of the transmitter or if your heart rate is
not at least forty beats per minute, the computer will register an error and will display “- ” in the Actual Heart Rate window. If the computer is receiving a signal from the transmitter, a small LED will flash in the lower right hand corner of the Actual Heart Rate
window. The protocol for the Heart Rate Control program is:
Range of Actual Heart Rate
11 to 20 Beats Below Target
6 to 10 Beats Below Target
3 to 5 Beats Below Target
2 Beats + Target Heart Rate
3+ Beats Above Target
Change in Incline
Increase by 1%
Increase by 1%
Increase by .5%
No Change
Decrease by 1%
Time Between Changes
15 Seconds
30 Seconds
30 Seconds
Not Applicable
15 Seconds
Note: Your Actual Heart Rate must be within 20 beats of the Target Heart Rate
before the machine will begin to control the incline.
If the machine reaches the maximum incline setting and your heart rate has not
reached the Target Heart Rate, the treadmill will prompt you to increase your speed
using a flashing light bar on the display. If the machine declines to 0% and your heart
rate continues to exceed the Target Heart Rate, the treadmill will prompt you to decrease your speed using a flashing light bar on the display.
If the treadmill is unable to receive a signal from the transmitter or if it detects an error,
the Actual Heart Rate window will display “--” and the treadmill’s incline will reset to 0%.
Note: Do not increase your speed if you do not feel comfortable. Use the
DOWN - key to decrease your Target Heart Rate.
Erratic Operation:
Caution! Do not use this treadmill for Heart Rate Control unless a steady, solid
Actual Heart Rate value is being displayed. High, wild, random numbers being
displayed indicate a problem.
o Receiver indicator lights are in two areas: (1) Flashing heart on dot matrix display.
(2) A computer light on display of Time/Calorie/Pace window in right hand corner.
Note: Both these lights should flash in exact rhythm of your heart beat (pulse). A
steady or erratic light indicates interference from an outside source.
Areas to look for on interference:
(1) Treadmill not properly grounded - A must!
(2) Microwave ovens, T.V.’s, small appliances, etc.
(3) Fluorescent lights.
(4) Some household security systems.
(5) Perimeter fence for a pet.
14
Heart Rate Control Operation
Note: Enter a countdown elapsed time if desired.
STEP 1: Press and release the DISPLAY ON/FASTs key.
STEP 2: Press and release the SELECT key. The first program to be displayed is
Heart Rate Control. HC will be displayed in the Segment Time window.
15 will be displayed in the Incline window.
STEP 3: With the incline Up + Down - keys adjust to desired maximum incline. Few
people would choose 15%. A more common maximum would be 10%.
STEP 4: Press the ENTER key. The word AGE will be displayed in the Segment Time
window. 45 (age) will be displayed in the Time/Calorie/Pace window. Use
the incline Up + Down - adjust keys to enter your age. Use the
Fasts Slowt keys to select cardiovascular or weight control. The
recommended target will be displayed in the Speed/Target dot matrix window.
The percent of target from maximum heart rate is displayed in the Incline
window. It will change as target is adjusted.
Note: The above is a calculation only. You may adjust your target to your personal
level. You may skip Step 4 by pressing the ENTER key before above adjustments are
made.
STEP 5: Press the ENTER key and adjust speed with the Fasts Slowt key to
desired level.
STEP 6: Press and release the START BELT key to begin belt movement.
Note: Remember you have no control of incline. The incline Up + Down - keys
adjust target - not incline. You may adjust target anytime during the workout.
Heart Rate Monitor (Only)
o You may use your treadmill computer as a monitor only by pressing the ENTER key
after belt movement. While wearing the PolarTM transmitter strap, as you would with
Heart Rate Control, you can observe your heart rate without the computer
controlling the incline. This applies to manual or programmable operation.
Press the ENTER key to exit this mode. Actual Heart Rate is shown in the
Distance/HR window.
15
General Maintenance
Belt and Bed - Your treadmill uses a very high-efficient low-friction bed. Performance
is maximized when the bed is kept as clean as possible. Use a soft, damp cloth or
paper towel to wipe the edge of the belt and the area between the belt edge and frame.
Also reach as far as practical directly under the belt edge. This should be done once a
month to extend belt and bed life. Use water only - no cleaners or abrasives. A mild
soap and water solution along with a nylon scrub brush will clean the top of the textured
belt. Allow to dry before using.
Belt Dust - This occurs during normal break-in or until the belt stabilizes. Wiping
excess off with a damp cloth will minimize buildup.
General Cleaning - Dirt, dust, and pet hair can block air inlets and accumulate on the
running belt. On a monthly basis, vacuum underneath your treadmill to prevent
buildup. Once a year, you should remove the black motor hood and vacuum out dirt
that may accumulate. UNPLUG POWER CORD BEFORE THIS TASK.
BELT ADJUSTMENTS:
Treadbelt Tension Adjustment - Belt tension is not critical for most users. It is very
important for joggers and runners in order to provide a smooth, steady running surface.
Adjustment must be made from the right side of the rear roller in order to adjust tension
with the 1/4” allen wrench provided in the parts package. The adjustment bolt is located at the end of the right side rail as noted in diagram below.
Belt Tension
Adjustment
Side Only
Tracking
Adjustment
Side Only
Tighten the rear roller only enough to prevent slippage at the front roller. Turn the
treadbelt tension adjusting bolt in increments of 1/4 turn and inspect for proper tension.
When an adjustment is made to the belt tension, you must also make a tracking
adjustment to compensate for the change in belt tension. This is accomplished by
turning both the tension and tracking allen bolts an equal amount. This adjustment
should be made by turning both bolts clockwise by no more than a 1/4 turn at a time.
DO NOT OVERTIGHTEN - Overtightening will cause belt damage and premature
bearing failure.
16
TREADBELT TRACKING ADJUSTMENT:
The performance of your treadmill is dependent on the frame running on a reasonably
level surface. If the frame is not level, the front and back roller cannot run parallel, and
constant belt adjustment may be necessary.
The treadmill is designed to keep the treadbelt reasonably centered while in use. It is
normal for some belts to vary near a side while the belt is running with no one on it.
After a few minutes of use, the treadbelt should have a tendency to center itself. If,
during use, the belt continues to move toward one side, adjustments are necessary.
TO SET TREADBELT TRACKING:
A 1/4” allen wrench is provided to adjust the rear roller. Make tracking adjustments
from the left side only. Set belt speed at approximately 2 to 3 mph. A small adjustment
can make a dramatic difference. Turn the bolt only a 1/4 turn and wait a few minutes for
the belt to adjust itself. Continue to make 1/4 turns until the belt stabilizes in the center
of the running deck.
The belt may require periodic tracking adjustment depending on use and walking/
running characteristics. Some users will affect tracking differently. Expect to make
adjustments as required to center the treadbelt. Adjustments will become less of a
maintenance concern as the belt is used. Proper belt tracking is an owner responsibility common with all treadmills.
CAUTION - KEEP HANDS CLEAR OF MOVING REAR PULLEY!
Belt will move in direction of allen wrench.
ATTENTION:
DAMAGE TO THE RUNNING BELT RESULTING FROM IMPROPER TRACKING /
TENSION ADJUSTMENTS IS NOT COVERED UNDER THE SPIRIT WARRANTY.
LUBRICATION:
Do not relube with other than Smooth lubricant. See your Smooth dealer for purchase.
The use of some other lubricants may destroy the deck surface or belt and will void
warranty. If the treadmill belt/deck is kept reasonably clean it is possible to expect over
1000 hours before relubing is necessary.
17
Service Checklist - Diagnosis Guide
Before contacting your dealer for aid, please review the following information. It may
save you both time and expense. This list includes common problems that may not be
covered under the treadmill’s warranty.
PROBLEM
SOLUTION/CAUSE
Tether cord not in position.
Circuit breaker on front grill tripped. Push circuit breaker in until it locks.
Display does not light
Plug is disconnected. Make sure plug is firmly pushed into AC household wall outlet.
Household circuit breaker may be tripped.
Treadmill defect. Contact your Smooth dealer.
See General Maintenance section under Belt Tracking.
Treadbelt does not
stay centered
A user may be walking while favoring or putting more weight on either
the left or right foot. If this walking pattern is natural, track the belt
slightly off-center to the side opposite from the belt movement.
Treadmill belt hesitates
when walked/run on
See Maintenance section on Treadbelt Tension. Adjust as necessary.
Motor is not
responsive / Display
is lit
Motor “surges”,
speed fluctuates
Treadmill will only
achieve approximately
7 mph but shows
higher speed on display
Treadbelt stops quickly/
suddenly when tether
cord is pulled
Treadmill trips on
board 10 amp circuit
breaker when running/
walking
Computer shuts off
when console is
touched (on a cold day)
while walking/running
Make certain clock is running. This indicates motor should be receiving
power to operate. Contact your Smooth dealer.
Possible treadmill defect. Contact your Smooth dealer. Diagnostics will
indicate if warrantable.
Lower electronics require adjustment. Contact your Smooth dealer.
Low AC voltage to treadmill. Do not use an extension cord. If an
extension cord is required it should be as short as possible and heavy
duty 16 gauge minimum.
Low household voltage. Contact an electrician or your Smooth dealer.
A minimum of 110 volt AC current is required.
High belt/deck friction. See General Maintenance section on lubrication.
High belt/deck friction. See General Maintenance section on lubrication.
Treadmill is not grounded. Static electricity is “crashing” the computer.
Refer to Grounding Instructions on page 2.
18
Smooth Treadmills - LIMITED WARRANTY
CONSULT YOUR PHYSICIAN BEFORE USING THIS PRODUCT.
This Limited Warranty applies in the United States to products manufactured or distributed by Smooth Fitness (“Smooth”) under the
SMOOTH brand name. The warranty period to the original purchaser for home use only is (lifetime) on the frame, (10) years on motor, (10)
years on hush deck, (5) years on slick deck, (5) years on belt, and rollers (3) years on all other parts, and (1) year labor. The warranty for a
light commercial setting (under 4 hours use daily) is (lifetime) on the frame, (2) years all parts, and (1) year on labor. This warranty does not
cover wear and tear, only manufacturer defects for the periods specified.
Smooth warrants that the Product you have purchased for non-commercial, personal, family or household use from Smooth or from an
authorized Smooth reseller is free from defects in materials or workmanship under normal use during the warranty period. Your sales
receipt, showing the date of purchase of the Product is your proof of the date of purchase. This warranty only extends to you, the original
purchaser. It is not transferable to anyone who subsequently purchases the Product from you. It excludes expendable parts.
During the warranty period Smooth will at no additional charge, repair or replace (at Smooth’s option) the part or product if it becomes
defective, malfunctions, or otherwise fails to conform with this Limited Warranty under normal non-commercial, personal, family or household use. In repairing the Product, Smooth may replace defective parts, or at the option of Smooth, serviceable used parts that are equivalent
to new parts in performance. All exchanged parts and Products replaced under this warranty will become the property of Smooth. Smooth
reserves the right to change manufacturers of any part to cover any existing warranty.
To obtain warranty service, you must contact a Smooth authorized service technician or Smooth Fitness at our phone numbers located in
this manual. Any parts determined to be defective must be returned to Smooth to obtain warranty service. You must prepay any shipping
charges, export taxes, custom duties and taxes, or any other charges associated with transportation of the parts or Product. In addition, you
are responsible for insuring any parts or Product shipped or returned. You assume the risk of loss during shipment. You must present
Smooth with proof-of-purchase documents (including the date of purchase). Any evidence of alteration, erasing or forgery of proof-ofpurchase documents will be cause to void this Limited Warranty.
This warranty does not extend to any product not purchased from Smooth or from an authorized Smooth reseller. This Limited Warranty
does not extend to any Product that has been damaged or rendered defective: (a) as a result of accident, misuse, or abuse; (b) by the use of
parts not manufactured or sold by Smooth; (c) by modification of the Product or normal wear and tear; (d) operation on incorrect power
supplies; or (e) as a result of service by anyone other than Smooth, or an authorized Smooth warranty service provider. Product on which the
serial number has been defaced or removed is not eligible for warranty service. Should any Product be submitted for warranty service be
found ineligible therefore, an estimate of repair cost will be furnished and the repair will be made if requested by you upon Smooth’s receipt
of payment or acceptable arrangements for payment.
EXCEPT AS EXPRESSLY SET FORTH IN THIS WARRANTY, SMOOTH MAKES NO OTHER WARRANTIES, EXPRESSED OR IMPLIED, INCLUDING ANY IMPLIED WARRANTIES OF MERCHANTABILITY AND FITNESS FOR A PARTICULAR PURPOSE. SMOOTH
EXPRESSLY DISCLAIMS ALL WARRANTIES NOT STATED IN THIS LIMITED WARRANTY. ANY IMPLIED WARRANTIES THAT MAY
BE IMPOSED BY LAW ARE LIMITED TO THE TERMS OF THIS LIMITED WARRANTY. NEITHER SMOOTH NOR ANY OF ITS
AFFILIATES SHALL BE RESPONSIBLE FOR INCIDENTAL OR CONSEQUENTIAL DAMAGES. SOME STATES DO NOT ALLOW
LIMITATIONS ON HOW LONG AN IMPLIED WARRANTY LASTS OR THE EXCLUSION OR LIMITATION OF INCIDENTAL OR CONSEQUENTIAL DAMAGES, SO THE ABOVE LIMITATION OR EXCLUSION MAY NOT APPLY TO YOU. This Limited Warranty gives you
specific legal rights and you may also have other rights that may vary from state to state. This is the only express warranty applicable to
Smooth-branded products. Smooth neither assumes nor authorizes anyone to assume for it any other express warranty.
PLEASE SEND IN THE ATTACHED WARRANTY CARD WITHIN TEN (10) DAYS OF PURCHASE TO
REGISTER YOUR TREADMILL WITH SMOOTH FITNESS PRODUCTS. MADE IN THE USA. Thank
you for your business! PLEASE MAIL WARRANTY CARD TO: SMOOTH FITNESS, 717 FELLOWSHIP RD., SUITE C, MT. LAUREL, NJ 08054
SMOOTH TREADMILL WARRANTY REGISTRATION
____________________________________
TELEPHONE
________________________________________________________________________________________
FIRST
M.I.
LAST
________________________________________________________________________________________
ADDRESS
APT. NO.
________________________________________________________________________________________
CITY
STATE
ZIP
_____ / _____ / _____
DATE OF PURCHASE
________________
MODEL NO.
Name of store or company where
purchased:
How do you plan to use the treadmill?
Walk____ Run____ Both____
Who will use the treadmill?
Male____ Female____ Both____
How many family members?_____
AGE:
15-24_____
35-44_____
55-64_____
25-34_____
45-54_____
65 + _____
Where did you learn about
treadmills?
TV____ Radio____ Friend____
In Store Display____
Salesperson____
Print ad/flyer____ Internet____
Why did you purchase a treadmill?
Dr.’s Orders____
Lose Weight____
In-home convenience____
Improve Cardiovascular
Fitnesss____
Safety from outdoors____
Other_________________________
________________________________________________
SERIAL NO.
How import are each feature?
Least
Most
Unique Features o o o o o
Horsepower
o o o o o
Warranty
o o o o o
Price
o o o o o
Look/Design
o o o o o
Folding Feature o o o o o
Other Comments:
______________________________________
_____________________
______________________
_______________________
Smooth Fitness respects the rights of your privacy. Our company will not sell or distribute to others the information above.
This information is used to track our product quality and to contact you in the event of a product safety concern. It may be used
to offer you future product offerings only from Smooth. Please
check here if you wish not to receive any additional information
on Smooth products o
SMOOTH TREADMILLS – LIMITED WARRANTY
TREADMILL DRIVE MOTOR 10 YEAR WARRANTY ADDENDUM
EFFECTIVE MARCH 1, 2001
FOR THE FOLLOWING SMOOTH TREADMILL MODELS ONLY:
SM5.0P (includes version 2 PV2)
SM5.3P
SM5.1HR
SM9.1P
SM9.1HRC
SM9.2P
SM9.2HR
SM9.2AB (aeropedic belt)
SM9.6P
SM9.6HRC
This Limited Warranty amends the previous drive motor warranty in the treadmill owner’s
manuals listed above and applies in the United States to products distributed by Internet Fitness.com under
the Smooth brand name. The warranty period to the original purchaser for the DRIVE MOTOR is ten (10)
years from date of purchase, effective on or after March 1, 2001.
FOR THE CONSUMER: Please retain this page as proof of your new Drive Motor Warranty for future
reference.
This Limited Warranty applies in the United States to products manufactured or
distributed by Internet Fitness.com under the SMOOTH brand name. The warranty period
to the original purchaser is ten (10) years on the drive motor from date of purchase. This
Warranty applies only to home use.