1
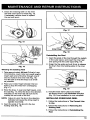
4. Check the indexingteeth on the inner
reel and outer spOOl for wear (Fig. 15).
If necessary, remove burrs or replace
the reel and spool
Inner Reel
Fig, 17
Fig,15
Fig. 18
Reinstalling the Reel
Inner
Reel
Fig. 16
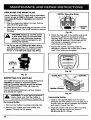
1. Insert the ends of the line through the eyelets
inthe outer spool, and insert the innerreel
and spring into the outer spool (Fig, 19),
2. Grasp the line ends and pull firmly to release
the them from the holding slots in the inner
reel.
W_nding the ExisUng Reel
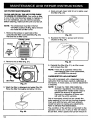
1. Take approxtmateJy 25 feet (7.6 m) of new
trimming line, loop it into two equaJ lengths.
insert each end of the line through one of
the two holes in the inner reel (Fig. 16).
Pull the line so that the loop is as small
as possible,
2. PlaCe your index finger betwee_ the two
lines to stop the lines from overlapping
(Fig. 17).
3. Wind the lines, in even end tight layers, onto
the reel (Fig. 17). Wind the line in the direction
indicated on the inner reel. Be surenot to
overlap the two ends of the fine.
NOTE: Failure to wind the tine in the dtrast_on
indicated will cause the string head to
operate Incorrectly.
3. Insert the ends of the line into the two
holding slots (Fig. 18).
Fig. 19
3, Hold the inner reel in place and install
the Bump Knob in the clockwise direction
(Fig. 12), Line installationis now complete.
|NSTALUNG PREWOUND REEL
1, Follow the instructions in The Correct Une
to Use,
2, Follow the instructions in Removing the
Existing Reel.
3. Follow the instructionsinReinstalling the
Reel.
13