1
MAINTENANCE AND REPAIR INSTRUCTIONS
CARBURETOR ADJUSTMENT
This unit is equipped with a diaphragm-type, fixed
jet carburetor that has been carefully calibrated at
the factory. In most cases, no further adjustment
is required.
Old fuel is usually the main reason for the
unit not running properly. Drain and refill the
tank with clean, fresh unleaded fuel prior to
doing any adjustments.
The condition of the air filter is important to the
operation of the unit. A dirty air filter will restrict
the air flow, which upsets the fuel-air mixture in
the carburetor. The resulting symptoms are often
mistaken for an out-of-adjustment carburetor.
Therefore, check the condition of the air filter
before adjusting the carburetor. Refer to Air Filter
Maintenance.
If the following conditions are experienced, it may
be necessary to adjust the carburetor:
• The engine will not idle
• The engine hesitates or stalls on acceleration
• A loss of engine power that is not corrected
by new fuel or cleaning the air filter
NOTE: Warm up the engine for 30-60
seconds before adjusting the
carburetor.
1. Clean the air filter if it is dirty. Refer to Air
Filter Maintenance.
2. Fill the tank with clean, unleaded fuel.
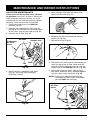
3. If the engine stops frequently when idling,
turn the idle speed screw clockwise 1/2 turn
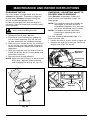
until the engine stabilizes (Fig. 40).
4. If the cutting head keeps rotating after the
trigger is released, turn the idle speed screw
counterclockwise 1/2 turn until the head
stops rotating (Fig. 40).
If the unit will still not run properly, take it to an
authorized service dealer.
CHECKING THE OIL LEVEL
CAUTION: To prevent extensive
engine wear and damage to the unit,
always maintain the proper oil level
in the crankcase. Never operate the
unit with the oil level below the
bottom of the dipstick.
The importance of checking and maintaining
the proper oil level in the crankcase cannot be
overemphasized. Check oil before each use
as follows:
1. Make sure the engine is stopped and is cool
so the oil has had time to drain into the
crankcase.
2. Place the unit on a flat, level surface to get a
proper oil level reading.
3. To keep dirt, grass clippings, etc., out of the
engine, clean the area around the oil fill
plug / dipstick before removing it.
4. Remove the oil fill plug / dipstick and wipe
the oil off. Reinsert it all the way back in.
5. Remove the oil fill plug / dipstick and check
the oil level. The level should be up to the
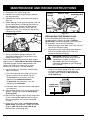
top of the dipstick (Fig. 41).
6. If the level is low, add a small amount of oil
to the crankcase and recheck. Continue to
do this until the oil level reaches the top of
the dipstick (Fig. 42).
NOTE: Be careful not to overfill the unit.
Oil Fill
Plug /
Dipstick
Idle Adjustment
Screw
Fig. 41
O-Ring
Top of
Dipstick
Oil Fill
Plug /
Dipstick
Fig. 40
Fig. 42
21