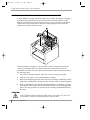
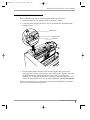
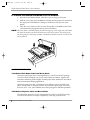
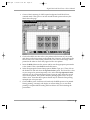
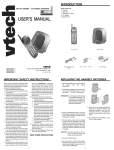
1
DLDP2_cover.qxd
3/26/99 11:38 AM
Page 1
DLDP2.qxd
3/29/99 9:56 AM
Page iii
Digital Label and Decal Press 2 UserÕs Manual
Notices
The information in this document is subject to change without notice.
NO WARRANTY OF ANY KIND IS MADE WITH REGARD TO THIS MATERIAL,
INCLUDING, BUT NOT LIMITED TO, THE IMPLIED WARRANTIES OF
MERCHANTABILITY AND FITNESS FOR A PARTICULAR PURPOSE.
No liability is assumed for errors contained herein or for incidental damages in connection
with the furnishing, performance, or use of this material.
This document contains proprietary information which is protected by copyright. All rights
are reserved. No part of this document may be photocopied, reproduced, or translated into
another language without the prior written consent.
Patent Pending
Trademark Acknowledgements
IBM is a registered trademark of International Business Machines Corporation. Windows is
a registered trademark of Microsoft Corporation. Apple and Macintosh are registered
trademarks of Apple Computer, Inc. ColorSync, QuickDraw, System 7, LocalTalk, and
TrueType are trademarks of Apple Computer, Inc. Adobe, Adobe Illustrator, and Type
Manager are trademarks and Postscript is a registered trademark of Adobe Systems,
Incorporated. All other trademarks are the property of their respective owners.
Printing History
Edition 2.2, #990322
© Copyright 1998
All rights reserved.
iii
DLDP2.qxd
3/29/99 9:56 AM
Page iv
Digital Label and Decal Press 2 UserÕs Manual
FCC Compliance Statement:
This device complies with part 15 of the FCC rules. Operation is subject to the following
two conditions: (1) this device may not cause harmful interference, and (2) this device must
accept any interference received, including interference that may cause undesired operation.
For Users in the United States:
This equipment has been tested and found to comply with the limits for a Class A digital
device, pursuant to Part 15 of the FCC Rules. These limits are designed to provide
reasonable protection against harmful interference in a residential installation. This
equipment generates, uses, and can radiate radio frequency energy and, if not installed and
used in accordance with the instructions, may cause harmful interference to radio
communications. However, there is no guarantee that interference will not occur in a
particular installation. If this equipment does cause harmful interference to radio or
television reception, which can be determined by turning the equipment off and on, the user
is encouraged to try to correct the interference by one or more of the following measures:
■
Re-orient or relocate the receiving antenna.
■
Increase the separation between the equipment and receiver.
■
Connect the equipment into an outlet on a circuit different from that to which the
receiver is connected.
■
Consult the dealer or an experienced radio/TV technician for help.
■
Use of a shielded cable is required to comply with the Class A limits of Part 15 of the
FCC Rules.
You are cautioned that any changes or modifications not expressly approved in this manual
could void your authority to operate and/or obtain warranty service for this equipment.
For Users in Canada:
This digital apparatus does not exceed the Class A limits for radio noise for digital
apparatus set out on the Radio Interference Regulations of the Canadian Department of
Communications.
Le present appareil numerique nÕemet pas de bruits radioelectriques depassant les limites
applicables aux appareils numeriques de la class A prescrites dans le Reglement sur le
brouillage radioelectrique edicte par le ministere des Communications du Canada.
iv
DLDP2.qxd
3/29/99 9:56 AM
Page v
Table of Contents
Section 1: Introduction
A. How Your Digital Press Works .......................................................1
B. Special Features .................................................................................2
Section 2: Safety Precautions.............................................................5
Section 3: Getting Started
A.
B.
C.
D.
E.
F.
Choosing a Good Location ............................................................11
About Moisture Condensation......................................................11
Unpacking and Inspection.............................................................12
Identifying the Parts .......................................................................12
Removing the Ribbon Cartridge and Blade Holder ..................16
Installing the Blade Holder ...........................................................17
Section 4: Ribbons and Print Media
A.
B.
C.
D.
E.
F.
G.
H.
I.
Introduction .....................................................................................19
About Ribbons.................................................................................19
Loading Ribbon into the Ribbon Cartridge ................................21
Placing the Ribbon Cartridge into the Printer............................22
About Print Media ..........................................................................22
Specialty Supplies and Applications............................................24
Loading Print Media into the Supply Tray.................................25
Adjusting the Supply TrayÕs In-Feed Clutch ..............................27
Inserting the Media Tray Assembly into the Printer .................28
Section 5: Connecting the Unit
A. Applying Power ..............................................................................31
B. Running the Self Test......................................................................32
C. Connecting to an IBM-PC or Compatible ...................................34
Section 6: Installing and Setting Up the Printer Driver for Windows 95/98
A.
B.
C.
D.
Installing the Windows 95/98 Printer Driver ...........................37
Installing the 32-Bit Print Spooler for Windows 95/98.............39
Configuring Your ComputerÕs Parallel Port...............................41
Setting Up the Windows 95/98 Printer Driver ..........................44
v
DLDP2.qxd
3/29/99 9:56 AM
Page vi
Digital Label and Decal Press 2 UserÕs Manual
Section 7: Installing and Using the PressPrint Software for Windows 95/98
A.
B.
C.
D.
E.
F.
About PressPrint .............................................................................49
Installing PressPrint........................................................................49
Configuring the Cutter Settings....................................................51
Using PressPrint..............................................................................52
Printing to the Digital Label and Decal Press ............................56
Helpful PressPrint Hints................................................................58
Importing Files ...........................................................................58
Importing Macintosh Files........................................................58
Importing Vector vs. Bitmap Files ...........................................59
Show Bitmaps Outlines/Show Reduced Bitmaps ................59
Purge Undo .................................................................................60
Aligning Objects .........................................................................60
Creating a Die Cut .....................................................................60
Selecting Objects.........................................................................60
Rotating Images to Maximize Space .......................................61
Anti-Aliasing...............................................................................61
Print Multiple Pages of the Same Label .................................62
G. Creating Serialized Labels .............................................................62
H. Printing Multiple Spot Color Labels ............................................66
Section 8: Maintenance
A.
B.
C.
D.
E.
F.
G.
H.
I.
J.
K.
Supplies Required...........................................................................69
Cleaning the Printhead ..................................................................70
Cleaning the UnitÕs Case................................................................71
Cleaning the Inside of the Unit.....................................................71
Cleaning the Platen Roller.............................................................72
Cleaning the In-Feed Rollers.........................................................73
Clearing a Ribbon Jam ...................................................................74
Clearing a Minor Print Media Jam...............................................74
Clearing a Major Print Media Jam ...............................................75
Cleaning the Pinch Rollers ............................................................79
Replacing the Cutter Blade............................................................81
Section 9: Troubleshooting...............................................................85
Section 10: Technical Specifications...............................................93
Appendix A: Interfacing Information
A. Introduction .....................................................................................95
B. Centronics-Type Parallel Interface ...............................................95
Index ......................................................................................................97
vi
DLDP2.qxd
3/29/99 9:56 AM
Page 1
Introduction
1
Thank You...
...for choosing the Digital Label and Decal Press 2. It has been designed to provide
you with stunning, high-quality color output on durable adhesive-backed paper,
vinyl, polyester, and even heat transfer material. It offers many features which
allow you to simultaneously print and cut professional-quality labels, decals, signs,
photos, and much more Ñ quickly and easily!
A. HOW YOUR DIGITAL PRESS WORKS
The digital press utilizes two different, yet closely related printing technologies to
achieve its remarkable output Ñ thermal transfer and dye-sublimation.
Thermal Transfer
Thermal transfer is a process which uses a resin- or wax/resin-based ribbon roll as
a carrier for transferring color to either ribbonsÕ appropriate type of print media
(see Section 4 for more information on these ribbons and the appropriate print
media for each). Such ribbons are available in single spot colors and/or in a
paneled form which includes each of the yellow, magenta, and cyan process colors
on the same ribbon roll. By providing each of the process colors, paneled ribbons
allow you to conveniently produce full-color images automatically, from a single
ribbon.
Section 1: Introduction 1
DLDP2.qxd
3/29/99 9:56 AM
Page 2
Digital Label and Decal Press 2 UserÕs Manual
As the ribbon and print media pass simultaneously beneath the Printhead,
thousands of thermal elements within the Printhead melt the colored inks, thus
transferring thousands of tiny colored dots from the ribbon onto the print media. If
using a paneled ribbon, the print media automatically makes a separate pass for
each colored panel on the ribbon. By combining different colored dots from each
ribbon panel in different combinations (this process is called ÒditheringÓ), your
digital press is able to print up to 16.7 million colors.
Dye-Sublimation
Dye-sublimation is similar to thermal transfer in that it still involves a paneled,
multi-pass process beneath the same thermal Printhead. The difference, however,
lies within the special dye-sublimation ribbon and print media and in the transfer
process itself.
Unlike a thermal transfer ribbon, each colored panel on a dye-sublimation ribbon is
composed of a colored dye rather than a colored ink. When the dyes on the ribbon
are heated beneath the thermal Printhead, they vaporize and diffuse into the
surface of the special dye-receptive print media. By varying the heat intensity of
each thermal element within the Printhead, the digital press is able to change the
value and hue of each transferred dot of color. This results in the blending of one
colored dot into the next, producing continuous-tone, photo-realistic, color-accurate
images with no dithering.
B. SPECIAL FEATURES
With its dual function thermal transfer/dye-sublimation color printing capability,
the digital press offers you incredible printing versatility. Its wax/resin thermal
transfer mode delivers fast, inexpensive color output on paper stock, while its resin
thermal transfer mode prints outdoor-durable labels, signs, and decals on longlasting vinyl or polyester media. And with its dye-sublimation mode, you get
continuous-tone, photo-quality output no other color printing technology can
match.
Switching back and forth between these printing methods is easy. All you do is
load either the thermal transfer ribbon with the appropriate print media or the dyesublimation ribbon and print media, and select the appropriate printing choice
from within the software driver. The entire change-over process only takes about 15
to 20 seconds.
And, best of all, operation is simple and straight forward. The digital press will
print from any IBM-PC¨ or compatible running Windowsª 95/98. This means that
you can use virtually any software application running under Windows to create
your custom labels or decals. Then, just import your design into the PressPrint
printing software to duplicate, print, and cut as many labels as needed.
2 Section 1: Introduction
DLDP2.qxd
3/29/99 9:56 AM
Page 3
Digital Label and Decal Press 2 UserÕs Manual
To begin using your digital press, please refer to the remainder of this manual. This
UserÕs Manual is your complete step-by-step guide to setting up and printing with
your powerful, new Digital Label and Decal Press.
Section 1: Introduction 3
DLDP2.qxd
3/29/99 9:56 AM
Page 4
Digital Label and Decal Press 2 UserÕs Manual
4 Section 1: Introduction
DLDP2.qxd
3/29/99 9:56 AM
Page 5
Safety Precautions
2
Before operating the unit, please read the following safety precautions carefully.
WARNINGS
CAUTION!
TO PREVENT FIRE OR SHOCK HAZARD, DO NOT EXPOSE THE UNIT
TO RAIN OR MOISTURE. TO REDUCE THE RISK OF ELECTRIC SHOCK,
DO NOT REMOVE FRONT, TOP, SIDE, OR REAR PANELS. NO USERSERVICEABLE PARTS INSIDE. REFER SERVICING TO QUALIFIED
SERVICE PERSONNEL.
■
■
■
Operate the unit only on 110-120 VAC, 50/60 Hz, if operating within the
United States or Canada. For printers that have been shipped outside of the
United States and Canada, operate the unit only on 220-240 VAC. If you have
any doubt as to whether you have a unit with the correct voltage rating for
your countryÕs power supply, DO NOT ATTEMPT TO USE THE UNIT. Contact
your dealer or the factory.
Stop operation immediately if any liquid or solid object should fall into the
cabinet. Unplug the unit and have it checked by qualified service personnel.
Do not disassemble the cabinet. Refer servicing only to qualified personnel.
Section 2: Safety Precautions 5
DLDP2.qxd
3/29/99 9:56 AM
Page 6
Digital Label and Decal Press 2 UserÕs Manual
Sicherheitsmaßnahmen
Vor Inbetriebnahme bitte die folgenden Sicherheitsma§nahmen beachten.
SICHERHEITSHINWEISE
VORSICHT!
ZUR VERH†TUNG VON FEUERGEFAHR ODER STROMSCHL€GEN DAS GER€T VOR REGEN
ODER FEUCHTIGKEIT SCH†TZEN. UM DIE GEFAHR VON STROMSCHL€GEN ZU
VERHINDERN, KEINE GER€ATEABDECKUNGEN ABNEHMEN. DAS GER€T ENTH€LT KEINE
TEILE, DIE VOM BENUTZER GEWARTET WERDEN K…NNEN. WARTUNGSARBEITEN D†RFEN
NUR VON QUALIFIZIERTEM FACHPERSONAL DURCHGEF†HRT WERDEN.
■
■
■
Innerhalb der USA und Kanada das GerŠt nur mit 120 V Wechselstrom und 60
Hz betreiben. Drucker, die au§erhalb der USA oder Kanada verwendet werden,
dŸrfen nur mit 230/250 V Wechselstrom betrieben werden. Wenn Sie nicht
sicher sind, ob Ihr GerŠt fŸr die in Ihrem Land verwendete Nennspannung
ausgelegt ist, DAS GER€T NICHT IN BETRIEB NEHMEN. Wenden Sie sich
in diesem Fall an Ihren HŠndler oder den Hersteller des GerŠtes.
Den Betrieb sofort unterbrechen, wenn ein Gegenstand in das GehŠuse gefallen
oder FlŸssigkeit eingedrungen ist. Den Netzstecker ziehen und das GerŠt von
qualifiziertem Wartungspersonal ŸberprŸfen lassen.
Keine GehŠuseteile abnehmen. Wartungsarbeiten nur von qualifiziertem
Fachpersonal durchfŸhren lassen.
Consignes de sécurité
Avant dÕutiliser lÕappareil, pri•re de lire attentivement les consignes de sŽcuritŽ
suivantes.
AVERTISSEMENTS
ATTENTION !
POUR EVITER TOUT RISQUE DÕINCENDIE OU DÕELECTROCUTION, NE PAS EXPOSER
LÕAPPAREIL A LA PLUIE OU A LÕHUMIDITE. POUR EVITER TOUTE DECHARGE ELECTRIQUE,
NE PAS RETIRER LES PANNEAUX AVANT, SUPERIEUR, LATERAUX OU ARRIERE. NE PAS
TENTER DE REPARER SOI-MEME LES PIECES A LÕINTERIEUR DE LÕAPPAREIL. CONFIER
LÕENTRETIEN DE LÕAPPAREIL A UN PERSONNEL QUALIFIE.
■
■
■
Faire fonctionner lÕappareil uniquement sur courant alternatif de 120 V, 60 Hz
aux Etats-Unis ou au Canada. Pour les imprimantes expŽdiŽes en-dehors des
Etats-Unis et du Canada, faire fonctionner lÕappareil uniquement sur courant
alternatif de 230/250 V. En cas de doute sur la tension nominale du bloc
dÕalimentation local, NE PAS TENTER DÕUTILISER LÕAPPAREIL. Contacter
le distributeur ou lÕusine.
Arr•ter immŽdiatement le fonctionnement si un liquide ou un solide venait ˆ
sÕinfiltrer ˆ lÕintŽrieur de lÕarmoire. DŽbrancher lÕappareil et le faire vŽrifier par
un personnel qualifiŽ.
Ne pas dŽmonter lÕarmoire. Confier lÕentretien de lÕappareil ˆ un personnel
qualifiŽ.
6 Section 2: Safety Precautions
DLDP2.qxd
3/29/99 9:56 AM
Page 7
Digital Label and Decal Press 2 UserÕs Manual
Precauciones de seguridad
Antes de operar la unidad, por favor, lea detenidamente las siguientes precauciones
de seguridad.
ADVERTENCIAS
ÁPRECAUCION!
PARA EVITAR PELIGROS DE INCENDIO O CHOQUE ELECTRICO, NO EXPONGA LA UNIDAD
A LA LLUVIA NI A LA HUMEDAD. PARA REDUCIR EL RIESGO DE CHOQUE ELECTRICO, NO
QUITE LOS PANELES DELANTERO, SUPERIOR, LATERALES NI TRASERO. EL INTERIOR NO
TIENE PIEZAS REPARABLES POR EL USUARIO. PARA SERVICIO DE REPARACION Y
MANTENIMIENTO, SOLICITE LA ATENCION DE UN TECNICO DE SERVICIO AUTORIZADO.
■
■
■
Opere la unidad s—lo a 120 VCA, 60 Hz, si la opera dentro de los Estados
Unidos o Canad‡. Para las impresoras que han sido enviadas fuera de los
Estados Unidos y Canad‡, opere la unidad s—lo a 230/250 VCA. Si no est‡
seguro de que su unidad est‡ especificada con el rŽgimen correcto de voltaje
para la corriente de su pa’s, NO INTENTE USAR LA UNIDAD. P—ngase en
contacto con su distribuidor o con la f‡brica.
Detenga la operaci—n inmediatamente si algœn l’quido u objeto s—lido cayera en
el armario. Desenchufe la unidad y h‡gala revisar por un tŽcnico de servicio
autorizado.
No desarme el armario. Para servicio de mantenimiento, solicite la atenci—n de
un tŽcnico autorizado.
Precauzioni per la Sicurezza
Prima di dare inizio al funzionamento dellÕunitˆ siete pregati di leggere
attentamente le seguenti precauzioni di sicurezza.
AVVERTENZE
ATTENZIONE!
ONDE EVITARE IL PERICOLO DI INCENDIO O SCOSSA ELETTRICA, NON ESPORRE LÕUNITË
ALLA PIOGGIA OD UMIDITË. EVITARE DI RIMUOVERE I PANNELLI ANTERIORE,
SUPERIORE, LATERALE O POSTERIORE PER RIDURRE IL RISCHIO DI SCOSSA ELETTRICA.
LA MANUTENZIONE DELLE PARTI INTERNE DELLÕUNITË NON é DI COMPETENZA
DELLÕUTENTE. AI FINI DELLA RIPARAZIONE RIVOLGERSI AL PERSONALE DI
COMPETENZA.
■
■
■
Negli Stati Uniti e Canada lÕunitˆ funziona solo con alimentazione a 120 VAC,
60 Hz. Le stampanti destinate ad altri paesi funzionano solo con alimentazione
di 230/250 VAC. Qualora non abbiate la certezza che il trasformatore e la spina
di cui disponete siano quelli adeguati allÕ alimentazione erogata nel vostro
paese, NON USARE LÕUNITË. Rivolgersi piuttosto al rivenditore o la fabbrica
del luogo.
Arrestare immediatamente il funzionamento dellÕunitˆ qualora si verifichi un
versamento di liquido o la caduta di un oggetto solido al suo interno. Staccare
la spina e rivolgersi al personale di assistenza qualificato.
Non smontare la struttura dellÕalloggiamento. Le riparazioni vanno effettuate
Section 2: Safety Precautions 7
DLDP2.qxd
3/29/99 9:56 AM
Page 8
Digital Label and Decal Press 2 UserÕs Manual
Precauções de Segurança
Antes de operar a unidade, por favor leia cuidadosamente as seguintes precau•›es
de seguran•a.
ADVERTÊNCIAS
CUIDADO!
PARA EVITAR O PERIGO DE INCæNDIO OU CHOQUE ELƒTRICO, NÌO EXPONHA A
UNIDADE Ë CHUVA OU UMIDADE. PARA REDUZIR O RISCO DE CHOQUE ELƒTRICO, NÌO
REMOVA OS PAINƒIS DIANTEIRO, SUPERIOR, LATERAIS OU TRASEIRO. NÌO Hç PE‚AS NO
INTERIOR QUE POSSAM SER CONSERTADAS PELO USUçRIO. PARA MANUTEN‚ÌO, PE‚A
ASSISTæNCIA A UM TƒCNICO QUALIFICADO.
■
■
■
Opere a unidade somente em 120 VAC, 60 Hz, se estiver operando nos Estados
Unidos ou Canad‡. Para impressoras enviadas para fora dos Estados Unidos e
Canad‡, opere a unidade somente em 230/250 VAC. Se voc• tiver dœvidas a
respeito da gradua•‹o correta de voltagem para a alimenta•‹o de energia do
seu pa’s, NÌO TENTE USAR ESTA UNIDADE. Entre em contato com seu
revendedor ou com a f‡brica.
Se qualquer l’quido ou objeto cair dentro do gabinete, p‡re a opera•‹o
imediatamente. Desligue a unidade da tomada e chame um tŽcnico qualificado.
N‹o desmonte o gabinete. Para manuten•‹o, pe•a assist•ncia somente a um
tŽcnico qualificado.
8 Section 2: Safety Precautions
DLDP2.qxd
3/29/99 9:56 AM
Page 9
Digital Label and Decal Press 2 UserÕs Manual
Section 2: Safety Precautions 9
DLDP2.qxd
3/29/99 9:56 AM
Page 10
Digital Label and Decal Press 2 UserÕs Manual
10 Section 2: Safety Precautions
DLDP2.qxd
3/29/99 9:56 AM
Page 11
Getting Started
3
A. CHOOSING A GOOD LOCATION
Place the unit in a location with adequate air circulation to prevent internal heat
build up.
■
Use the dimensions specified in Section 10 as a guideline for the minimum
clearances to the unit.
NOTE: Allow for adequate clearance above the unit to accommodate the height of the unit with its
cover open.
■
■
Do not place the unit in a location where the ventilation holes located on the
rear of the unit could become blocked.
Do not install unit near heat sources such as radiators or air ducts, or in a place
subject to direct sun-light, excessive dust, mechanical vibration or shock.
B. ABOUT MOISTURE CONDENSATION
If the unit is brought directly from a cold to a warm location, or is placed in a very
damp room, moisture may condense inside the unit. Should this occur, print quality
may not be optimum. Leave the unit turned off in a warm, dry room for several
hours before using. This will allow the moisture to evaporate.
Section 3: Getting Started 11
DLDP2.qxd
3/29/99 9:56 AM
Page 12
Digital Label and Decal Press 2 UserÕs Manual
C. UNPACKING AND INSPECTION
While unpacking your digital press, inspect the carton to ensure that no damage
has occurred during shipping. Make sure that all supplied accessories are included
with your unit. The following items should be included:
■
■
■
■
■
■
■
■
■
■
■
Power Cord
Interface Cable
Media Supply Tray
Media Tray Cover
Media Output Rack
Ribbon Cartridge (1)
Cutter Blade Holder with Blade (1)
Printer Driver Software
32-Bit Print Spooler Software
Warranty Statement and Registration Card
This manual and other printed information
Save the carton and packing materials. They will come in handy when transporting
the unit.
D. IDENTIFYING THE PARTS
This illustration shows the features found on the front of your Digital Label and
Decal Press.
Cover Release Button
Cancel Button
Cutter Door
Cancel LED Light
Pause Button
Pause LED
Light
Cancel Button
Cutting
Pressure Slide
Cancel LED Light
On-Line LED Light
On-Line Button
Media Tray Assembly
12 Section 3: Getting Started
DLDP2.qxd
3/29/99 9:56 AM
Page 13
Digital Label and Decal Press 2 UserÕs Manual
Notice that the control panel of your digital press is essentially divided in half. One
half provides controls for the Printer functions and the other half for the Cutter
functions. The reason for this, is that each of these functions works independently
of the other. This means that if the print job is canceled, for example, the cutter will
continue to cut and vice versa. The following describes the controls for each
function:
Printer Controls
Printer
Cancel
On-Line
The On-Line Button takes the printer on- and off-line. When the printer is on-line,
the On-Line LED light will turn ON. When the printer is off-line, the On-Line light
will turn OFF. The printer must have its On-Line light ON in order to print. When
flashing, the On-Line light also serves to indicate a print error condition. Such
conditions are discussed in Section 9 of this manual.
The Cancel button cancels the print job currently being printed. In order to cancel a
print job, the printer must first be taken off-line by pressing the On-Line button.
When the printer is off-line, the On-Line light will turn OFF. After a print job is
canceled, both LED lights will once again turn ON. Any print media remaining in
the printer will automatically eject up and out through the cutter. If the cutter is
busy cutting, the printer will wait to eject the media until after the cut job is
complete.
Cutter Controls
Cutter
Cancel
Pause
The Pause Button allows the cutter to either pause or resume cutting. When the
cutter is ready to cut, the Pause LED light will be OFF. When the cutter is paused,
the Pause light will turn ON. The cutter can be paused at anytime during a cut job.
When the Pause light is turned OFF, cutting will resume.
Section 3: Getting Started 13
DLDP2.qxd
3/29/99 9:56 AM
Page 14
Digital Label and Decal Press 2 UserÕs Manual
The Cancel Button cancels the job currently being cut. In order to cancel a cut job,
the cutter must first be paused by pressing the Pause button. When the printer is
paused, the Pause light will turn ON. After a cut job is canceled, the Pause light
will turn OFF and the Cancel light will once again turn ON. Any print media left
within the cutter after a cut job is canceled will automatically be ejected.
IMPORTANT! Pressing the Pause and Cancel buttons simultaneously will completely cancel and
reset both the printer and cutter functions. This should be done only if you wish to
clear out the unitÕs memory and reset it for the next print job. In most cases, any
print media remaining within the printer will automatically be ejected once the
unit is reset. In some cases, however, you may need to open the printerÕs Top Cover
and manually remove the print media (see Section 8-H for instructions on
manually ejecting print media).
The Cutting Pressure slide adjusts the amount of pressure used by the cutter. It is
very important that this cut pressure be adjusted properly. If cut pressure is too
high, the cutter may cut all the way through the print media. This will cause
premature wear on the cutting blade and may even cause the cutter to stall. If cut
pressure is too low, the cutter may not cut deeply enough. This makes it difficult to
remove the matrix or weed the excess print media from the finished labels. When
optimum cut pressure is set, the cutter will cut completely through the adhesivebacked portion of the print media and ever-so-slightly into the backing.
When switching between the wide variety of print media, it will most likely be
necessary to adjust the cut pressure in order to accommodate the unique
characteristics of each media type. In most cases, optimum cut pressure can be
determined after just one sheet of media has been cut. If cutter adjustment is
required, the cut pressure can be adjusted at any time, even while print media is
being cut.
The default position of the Cutting Pressure slide is in the exact center. To increase
pressure, move the slide toward the positive (+) end. To decrease pressure, move
the slide toward the negative (-) end. Do not make extreme adjustments to the
Cutting Pressure slide. Always increase or decrease the cut pressure one increment
at a time.
NOTE: An additional cut pressure adjustment option is provided within the PressPrint software.
This option should rarely need to be adjusted, however, since its optimum setting is preset
at the factory. See Section 7-C for more information on this option.
14 Section 3: Getting Started
DLDP2.qxd
3/29/99 9:56 AM
Page 15
Digital Label and Decal Press 2 UserÕs Manual
This illustration shows the input ports found on the rear panel of the unit. When connecting
the unit to your computer, you will use its Parallel Interface Port. For more information on
this port, please refer to Section 5-C or Appendix A.
Fuse
Power Switch
Power Input Port
Parallel Interface
Serial Interface
Off
On
NOTE: The Serial port and the small switches on the rear panel of the unit are for factory use only.
Leave all switches in the ÒOFFÓ (up) position when operating the unit unless otherwise
instructed by this manual or a factory technician.
Section 3: Getting Started 15
DLDP2.qxd
3/29/99 9:56 AM
Page 16
Digital Label and Decal Press 2 UserÕs Manual
E. REMOVING THE RIBBON CARTRIDGE AND BLADE HOLDER
A single Ribbon Cartridge and Blade Holder are included. The Ribbon Cartridge is
what holds print ribbons in place inside the printer. The Blade Holder is what
holds the cutter blade in place inside the cutter. For your convenience, the Blade
Holder ships with a blade already installed. During shipment, these items are
fastened to each other inside the unit.
Additional ribbon cartridges can be purchased to make switching between the
various print ribbons more convenient. Additional cutter blades can also be
purchased as needed. To remove these items from the inside of the printer, refer to
the following steps:
1.
Press the Cover Release Button. Allow the cover to swing up and open.
2.
With the cover open, you can see the Ribbon Cartridge.
3.
Remove the shipping tape from both sides of the cartridge. GRASPING EACH
SIDE of the cartridge, lift it straight up and carefully remove it from the printer.
4.
Remove the shipping tape fastening the Blade Holder to the Ribbon Cartridge
and separate the two items. Remove the Blade Holder from its packaging, and
refer to the next procedure for instructions on installing the Blade Holder into
the cutter.
CAUTION!
THE CUTTER BLADE IS RAZOR-SHARP AND CAN EASILY CUT YOU. BE
EXTREMELY CAREFUL WHEN HANDLING THIS BLADE!
16 Section 3: Getting Started
DLDP2.qxd
3/29/99 9:56 AM
Page 17
Digital Label and Decal Press 2 UserÕs Manual
F. INSTALLING THE BLADE HOLDER
Refer to the following steps to install the Blade Holder into the cutter.
1.
Open the Cutter Door by pulling down on the doorÕs handle.
2.
Locate the black, plastic Cutter Arm. This is what holds the aluminum Blade
Holder in place.
Blade Holder
Securing Knob
Cutter Arm
3.
Place the Blade Holder into the Cutter Arm and tighten the gold-colored
Securing Knob by turning it toward the front of the printer. Tighten only until
the Blade Holder fits securely within the Cutter Arm. To verify proper
tightness, try rotating the Blade Holder clockwise within the Cutter Arm. If it
rotates, the Securing Knob needs to be further tightened. Do not over-tighten!
You are now ready to go on to Section 4 to learn about print ribbons, print media,
and how each is loaded into the printer.
Section 3: Getting Started 17
DLDP2.qxd
3/29/99 9:56 AM
Page 18
Digital Label and Decal Press 2 UserÕs Manual
18 Section 3: Getting Started
DLDP2.qxd
3/29/99 9:56 AM
Page 19
Ribbons and
Print Media
4
A. INTRODUCTION
As you may already know from reading Section 1, your digital press is able to
produce a variety of output by using a variety of different print ribbons. Each of
these ribbons is unique, and each requires its own compatible print media. To make
it easy for you to remember which ribbons are to be used with which print media
and which type of output each set of print supplies will produce, the print supplies
are divided into three separate categories. These categories include #100-Series
supplies, #200-Series supplies, and #300-Series supplies.
This section describes the ribbon and print media in each of these categories and
explains how to install these print supplies into your digital press. This section also
explains the specialty supplies which can be used to create fabric transfers, photo
coffee mug transfers, prepress proofs, and full-color paper labels.
B. ABOUT RIBBONS
#100-Series Ribbons — Wax/Resin Thermal Transfer Print Method
#100-Series Ribbons utilize what is called a wax/resin thermal print method and
are distinguished by their GREEN cores. Wax/resin inks are designed to be printed
onto plain paper label stock and produce durable output that is highly scratch and
smudge-resistant under most indoor conditions. These ribbons are available in spot
colors only and, therefore, are intended for printing economical one or two-color
jobs. A variety of wax/resin ribbon colors are available.
Section 4: Ribbons and Print Media 19
DLDP2.qxd
3/29/99 9:56 AM
Page 20
Digital Label and Decal Press 2 UserÕs Manual
Each ribbon has a length of 105 meters, which allows you to print up to 200 sheets
worth of output. The maximum printable area for these ribbons is 11.71Ó x 17.3Ó
(297 x 439mm). All #100-Series ribbons must be used only in conjunction with the
#100-Series plain paper label stock which is distinguished by a GREEN-and-WHITE
package cover sheet (see Part E of this section for more print media information).
#200-Series Ribbon — Dye-Sublimation Print Method
The #200-Series Ribbon utilizes what is called a dye-sublimation print method and
is distinguished by its GRAY cores. This ribbon is designed to print onto special
dye-receptive polyester label stock and produces durable labels and decals that are
color-accurate when used with the optional color matching software.
This ribbon is in a convenient paneled format which includes the three process
colors of yellow, magenta, and cyan, along with a clear overlay panel which makes
printed images more durable. This means you can automatically print continuoustone process color images with no dithering. Due to its precise color matching
ability and its true photo-quality output, this ribbon is the most popular of the
print ribbons.
The #200-Series ribbon provides exactly 50 sheets worth of output and has a
maximum printable area of 11.71Ó x 17.3Ó (297 x 439mm). This ribbon can be used
only in conjunction with the special #200-Series dye-receptive polyester label stock
which is distinguished by a GRAY-and-WHITE package cover sheet (see Part E of
this section for more print media information).
NOTE: The #200-Series Dye-Sublimation Ribbon can also be used with the #300-Series Vinyls
which offer the benefit of greater conformability. Note, however, that dye-sublimation
printing on #300-Series Vinyl is slightly less durable than on the #200-Series White
Polyester. If maximum print quality and durability are required, use the #200-Series DyeSublimation Ribbon with the #200-Series White Polyester.
#300-Series Ribbons — Resin Thermal Transfer Print Method
#300-Series Ribbons utilize what is called a resin thermal print method and are
distinguished by their WHITE cores. These ribbons are designed to print onto vinyl
label stock and produce the digital pressÕ most durable, longest lasting form of
output.
Resin ribbons are available in both a convenient 3-color paneled format and in a
variety of spot colors. The paneled ribbon allows you to automatically print full
process color images. The spot color ribbons allow you to print fast, one-color jobs.
Please note that process color output from the paneled ribbon will dither. Due to
the nature of resin inks, resin ribbons produce very durable output that can be used
in more challenging environments.
The #300-Series paneled ribbon provides 50 sheets worth of output while the spot
color ribbons produce up to 200 sheets. All resin ribbons have a maximum
printable area of 11.71Ó x 17.3Ó (297 x 439mm). These ribbons can be used only in
conjunction with the #300-Series vinyl label stock which is distinguished by a
BLACK-and-WHITE package cover sheet (see Part E of this section for more print
media information).
For current selection and availability on all ribbons, please contact the
manufacturerÕs Supplies Department or your nearest reseller.
20 Section 4: Ribbons and Print Media
DLDP2.qxd
3/29/99 9:56 AM
Page 21
Digital Label and Decal Press 2 UserÕs Manual
C. LOADING RIBBON INTO THE RIBBON CARTRIDGE
Whether using the included Ribbon Cartridge or using other cartridges purchased
separately, all Ribbon Cartridges can be used with any of the different print
ribbons. Follow these steps to load a print ribbon into a Ribbon Cartridge:
1.
Remove the ribbon from its packaging. Do not touch the colored portion of the
ribbon. Oil or dirt from your hands can impair print quality. Handle the ribbon
only by the ends of its ribbon core.
2.
The supply end of the ribbon is the end with the fresh, unused ribbon on it.
The take-up end of the ribbon is the other end.
Supply
Take-up
3.
Place the supply end of the ribbon into the supply end of the Ribbon Cartridge
as indicated. Make certain that the ribbon is fed from underneath the supply
end of the ribbon roll, up and over the top of the take-up end of the ribbon roll.
Supply End
Take-up End
Once the ribbon is installed into the Ribbon Cartridge, it can then be placed into the
printer. See Part D of this section for instructions on inserting a loaded Ribbon
Cartridge into the printer.
Section 4: Ribbons and Print Media 21
DLDP2.qxd
3/29/99 9:56 AM
Page 22
Digital Label and Decal Press 2 UserÕs Manual
D. PLACING THE RIBBON CARTRIDGE INTO THE PRINTER
1.
Press the Cover Release Button. Allow the cover to swing up and open.
2.
With the cover open, place the Ribbon Cartridge into the printer. Be certain that
the supply end of the Ribbon Cartridge is oriented towards the rear of the
printer.
3.
Close the cover. When you start to print, the notches on the Ribbon Drive Hub
will automatically engage the take-up end of the ribbon.
NOTE: When the ribbon is installed properly, the black sensing plug in the supply end of the ribbon
roll should be located in the back, left-hand corner of the unitÕs interior. This sensing plug
tells the digital press which type of ribbon is installed and MUST be present in order for the
unit to function.
E. ABOUT PRINT MEDIA
#100-Series Plain Paper Label and Decal Stock
#100-Series plain paper stock is distinguished by a GREEN-and-WHITE package
cover sheet and is designed only for use with #100-Series ribbons. Together, the
#100-Series materials produce highly durable paper labels suitable for most indoor
retail and industrial labeling applications.
#100-Series paper stock has a permanent acrylic adhesive and is available with
either a white matte or white gloss finish. All #100-Series plain paper stock has a
sheet size of 12Ó x 20Ó (305 x 508mm) and comes packaged in 100 sheet quantities.
#200-Series Polyester Label and Decal Stock
The #200-Series polyester stock is distinguished by a GRAY-and-WHITE package
cover sheet and, due to its unique composition, is the only polyester stock
22 Section 4: Ribbons and Print Media
DLDP2.qxd
3/29/99 9:56 AM
Page 23
Digital Label and Decal Press 2 UserÕs Manual
compatible with the #200-Series dye-sublimation ribbon. The #200-Series stock is
available in white only, with a general purpose permanent adhesive ideal for
adhering to corrugated, glass, metals, and some plastics. The sheet size of this print
media is 12Ó x 20Ó (305 x 508mm), and it comes packaged in 100 sheet quantities.
#300-Series Vinyl Label and Decal Stock
#300-Series vinyl stock is distinguished by a BLACK-and-WHITE package cover
sheet and is designed only for use with #300-Series ribbons. Together, the #300Series materials produce the digital pressÕ most durable form of output suitable for
more challenging indoor/outdoor applications.
Vinyl stock is used in a wide variety of applications where an economical yet
durable label or decal is required. Typical uses for vinyl materials include window
and door decals, automotive decals, outdoor signs, and more. Vinyl stock is
available in both a cast (white or clear) and a calendered (white) form. Cast vinyl is
very thin and conforms easily to curves, over rivets, etc. Calendered vinyl is
slightly thicker and is used primarily on flat surfaces. Both types of vinyl provide a
permanent adhesive with a typical indoor/outdoor life of 3-5 years.
A low-tack adhesive clear vinyl is also available. This soft, removable vinyl is
similar to static-cling vinyl and is perfect for window decals and other transparent
applications. All #300-Series vinyl stock has a sheet size of 12Ó x 20Ó (305 x 508mm)
and comes packaged in 100 sheet quantities.
#300-Series UL-Recognized Polyester Labels and Decals
A special #300-Series black ribbon is available for printing UL-recognized labels
and decals onto special white gloss, silver matte, brushed silver, or brushed gold
polyester stock. When used together, these materials can be used to produce rating
plates and other labels and decals requiring UL listings. These materials can also be
used for more general applications such as producing nameplates, faceplates, and
more.
The UL ribbon provides 200 prints. The polyester stock has a sheet size of 12Ó x 20Ó
(305 x 508mm), is packaged in 100 sheet quantities, and has a general purpose
permanent adhesive. For best results, polyester stock should only be used with the
special black UL-recognized ribbon.
NOTE: Although the #300-Series Black UL-Recognized Ribbon provides maximum print quality
when printing onto #300-Series Polyesters, you may also achieve acceptable results by
using the variety of other #300-Series Resin Ribbons with the polyester materials. If doing
so, increase the Intensity setting within the printer driver setup window (see Section 6-D).
Note that print quality may vary when using the standard resin ribbons with the polyester
materials and, therefore, is not guaranteed.
IMPORTANT! Always seal print media in its original packaging and place on a smooth, flat
surface when not in use. Do not stack objects on top of the print media or place
more than 500 sheets in a single stack. Print media must not be exposed to excess
dust, heat, direct sunlight, or moisture and must not be allowed to curl or bend.
Section 4: Ribbons and Print Media 23
DLDP2.qxd
3/29/99 9:56 AM
Page 24
Digital Label and Decal Press 2 UserÕs Manual
F. SPECIALTY SUPPLIES AND APPLICATIONS
Fabric Transfers
To make fabric transfers such as T-shirts, aprons, banners, sweatshirts, mouse pads,
caps and more, unique fabric transfer ribbon and paper can be used. These
materials allow you to create permanent, machine washable fabric transfers in full
CMYK process color. For best results, a commercial-grade heat press is highly
recommended for transferring printed images.
NOTE: The fabric transfer paper for the digital press has RED LINES on the reverse side. This redlined fabric transfer paper is the only type of transfer paper compatible with the digital press
and is not compatible with any other printers. When printing with these supplies, keep in
mind that the maximum printable width is reduced to the center 9.2Ó (234mm) of the
media. This helps keep the unitÕs rollers clean and free of any waxy build-up.
Photo Coffee Mug Transfers
To make photo coffee mug transfers, simply print with the standard #200-Series
dye-sublimation ribbon and a special non-adhesive dye-sublimation receiver paper.
Photos, graphics, logos and much more can be easily transferred to speciallytreated mugs. Transferred images are permanent and dishwasher-safe. For best
results, the manufacturerÕs special FotoMUG! Transfer Kit or a commercial-grade
mug press is highly recommended for transferring printed images.
NOTE: When printing images that will be transferred to a mug, the overlay of the #200-Series dyesublimation ribbon must not be applied. See Section 6-D for information on the printer
driverÕs Disable Overlay option.
Prepress Proofs
To make photo-quality, full CMYK process color prepress proofs, a 4-color dyesublimation ribbon and non-adhesive backed paper are available. These materials
are perfect for printing economical customer proofs of label or decal designs Ñ
even if you intend to produce the labels on a flexo press or screen printing
equipment. Using the same dye-sublimation print method as the #200-Series
supplies, these materials print continuous-tone, photo-quality, color-accurate
images with absolutely no dithering. And since the print method is dyesublimation, they can also be used to make photo mug transfers. Please note that
since no clear overlay panel is provided, the overall print longevity of these
materials is substantially less than that of the #200-Series supplies.
Wax Thermal Process Color Paper Labels
To make fast, full CMYK process color labels and decals on plain paper stock, a 4color wax thermal ribbon is available. When used with the #100-Series plain paper
label stock, this ribbon produces the most economical full-color output possible.
24 Section 4: Ribbons and Print Media
DLDP2.qxd
3/29/99 9:56 AM
Page 25
Digital Label and Decal Press 2 UserÕs Manual
Use for applications where lower durability is acceptable. Please note that process
colors will dither.
For current selection and availability on all print media, please contact the
manufacturerÕs Supplies Department or your nearest reseller.
G. LOADING PRINT MEDIA INTO THE SUPPLY TRAY
The digital press has an adjustable Meda Tray Assembly which consists of three
separate parts: the Supply Tray, the Tray Cover, and the Output Rack.
Output Rack
Tray Cover
Supply Tray
The Supply Tray stores the blank media to be printed. The Tray Cover rests on top
of the Supply Tray and protects media within the Supply Tray from dust or other
contaminants. It also helps guide media during the printing process. The Output
Rack rests on top of the Tray Cover and catches finished output after it is printed
and cut.
Section 4: Ribbons and Print Media 25
DLDP2.qxd
3/29/99 9:56 AM
Page 26
Digital Label and Decal Press 2 UserÕs Manual
Refer to the following steps to load print media into the Supply Tray:
1.
Before loading any media, depress the spring loaded panel of the Supply Tray
until it is latched in its ÒdownÓ position. This panel will unlatch and return to
its ÒupÓ position when inserted into the printer.
2.
Remove a stack of print media from its packaging. Please note that no more
than about 50 sheets of print media should be loaded at a time. Do not attempt
to load more than this amount.
3.
Fan the stack of print media to assure that none of the sheets are sticking
together. Then, neatly stack the media and check to see that it is free of bent
edges. Handle the print media only along the edges and do not touch the
printable side. Oil or dirt from your hands can impair print quality.
4.
Place the print media Ñ PRINT SIDE FACING DOWN Ñ between the Media
Guides of the Supply Tray. When inserted properly, the backing side of the
print media will be facing up. Adjust the Media Guides snugly against the
media stack. Be sure the print media fits loosely beneath the three Media
Guide Tabs shown below. This will assure consistent feeding and printing.
Media Guide Tabs
NOTE: Do not attempt to load print media on which you have already printed or which is not
approved. Printing onto such media may damage the printer.
26 Section 4: Ribbons and Print Media
DLDP2.qxd
3/29/99 9:56 AM
Page 27
Digital Label and Decal Press 2 UserÕs Manual
H. ADJUSTING THE SUPPLY TRAY’S IN-FEED CLUTCH
Before the Media Tray can be assembled and inserted into the printer, you must
first adjust the Supply TrayÕs In-Feed Clutch according to the type of print media
you are installing. When properly adjusted, the In-Feed Clutch help print media
feed more consistently, one sheet at a time. Please refer to the following steps for
instructions on when and how you should adjust this clutch.
1.
The black, plastic In-Feed Clutch is located on the top left-hand corner of the
Supply Tray, on the same shaft as the trayÕs rubber In-Feed Roller.
2.
If you intend to print onto #200-Series dye-sublimation print media (either
adhesive-backed or non adhesive-backed), move the In-Feed Clutch to the left
so it is aligned with the tray labelÕs ÒDye-SubÓ setting. To move the clutch,
simply use your finger to slide it until it locks into position.
In-Feed Clutch
3.
If you intend to print onto #300-Series resin or #100-Series wax/resin print
media, move the In-Feed Clutch to the right so it is aligned with the tray labelÕs
ÒOtherÓ setting. To move the clutch, simply use your finger to slide it until it
locks into position.
Section 4: Ribbons and Print Media 27
DLDP2.qxd
3/29/99 9:56 AM
Page 28
Digital Label and Decal Press 2 UserÕs Manual
I. INSERTING THE MEDIA TRAY ASSEMBLY INTO THE PRINTER
Once media is loaded into the Supply Tray and the In-Feed Clutch is properly
adjusted, the complete Media Tray Assembly can then be inserted into the unit.
Refer to the following steps to assemble and insert the Media Tray Assembly.
1.
Place the assemblyÕs Tray Cover onto the Supply Tray so the extensions on the
front edges of the Tray Cover engage the securing notches on both sides of the
Supply Tray.
2.
Place the Output Rack onto the Tray Cover so it fits securely between the raised
plastic edges of the tray as shown.
28 Section 4: Ribbons and Print Media
DLDP2.qxd
3/29/99 9:56 AM
Page 29
Digital Label and Decal Press 2 UserÕs Manual
3.
Grasp the fully assembled Media Tray Assembly and slide it into the unit until
the mounting posts on both sides of the Supply Tray engage the securing
notches on both sides of the unitÕs front interior.
As the Media Tray Assembly is inserted into the unit, you should hear its spring
loaded panel automatically unlatch and spring back to its ÒupÓ position. This panel
forces the media stack against the In-Feed Rollers to assure consistent feeding.
IMPORTANT! In order for the digital press to function properly, the complete Media Tray
Assembly must always remain fully assembled within the unit during printing.
Section 4: Ribbons and Print Media 29
DLDP2.qxd
3/29/99 9:56 AM
Page 30
Digital Label and Decal Press 2 UserÕs Manual
30 Section 4: Ribbons and Print Media
DLDP2.qxd
3/29/99 9:56 AM
Page 31
Connecting
the Unit
5
A. APPLYING POWER
1.
Locate the power cord supplied with your digital press.
2.
With the power switch turned OFF, place one end of the power cord into the
power port on the rear panel of the unit.
Section 5: Connecting the Unit 31
DLDP2.qxd
3/29/99 9:56 AM
Page 32
Digital Label and Decal Press 2 UserÕs Manual
3.
Place the other end of the power cord into an available wall outlet.
4.
Once the power cord is connected, press the power switch located on the rear
panel of the unit to turn the power ON.
B. RUNNING THE SELF TEST
Now that print supplies are installed and power is applied, a self test should be
performed to check for proper operation of the unit. The digital press is capable of
doing a specific self test print for monochrome resin, 3-color resin, and dyesublimation. To tell the digital press which type of self test you would like it to
print, simply configure the small switches on the unitÕs rear panel accordingly.
If you have a #300-Series monochrome resin ribbon and print media installed, leave
all switches set to the default or ÒupÓ position.
If you have a #300-Series 3-color resin ribbon and print media installed, flip only
switch 1 down and turn the power OFF and ON to reset the unit.
If you have #200-Series dye-sublimation supplies installed, flip only switch 2 down
and turn the power OFF and ON to reset the unit.
Once you have selected the type of self test you would like to print, refer to the
following steps to initiate the self test print.
1.
Make sure the appropriate supplies are properly loaded, that power is ON, and
that the Top Cover and Cutter Door are shut.
2.
Using the ÒPrinterÓ buttons on the right-hand side of the control panel, press
and hold the On-Line button down. The On-Line light will turn OFF.
3.
While continuing to hold the On-Line button down, press and release the
Cancel button.
4.
Release the On-Line button when you hear the printerÕs engine begin to cycle.
32 Section 5: Connecting the Unit
DLDP2.qxd
3/29/99 9:56 AM
Page 33
Digital Label and Decal Press 2 UserÕs Manual
The digital press will both print and cut the self test image. Please note that the
print quality of the self test may not be optimum. DonÕt worry, this is perfectly
normal. The self test procedure is not intended to demonstrate print quality, but
rather to verify that the digital press is mechanically sound.
PROGRAM VERSION
G H 1.XX 04/12/97
Self Test Example
(Approximately 30% of actual size)
NOTE: The self test procedure in this section verifies that the unit is mechanically functioning
properly. If you would like to perform a self test print which verifies your computer is properly
communicating with the digital press, see the ÒCalibrateÓ description in Section 6-D.
Section 5: Connecting the Unit 33
DLDP2.qxd
3/29/99 9:56 AM
Page 34
Digital Label and Decal Press 2 UserÕs Manual
C. CONNECTING TO AN IBM-PC OR COMPATIBLE
The digital press is designed to be used with nearly any high-end IBM-PC or
compatible running Windows 95/98. For best performance, a minimum of a
Pentium 133 MHz computer with 32 megabytes of RAM or higher and a hard disk
with at least 200 megabytes of free space is recommended. Note that processing
speed will increase if additional RAM is added.
The digital press is equipped with a Centronics parallel interface port. This port is
the means through which it receives data from your computer. To connect the unit
to your computer, simply locate the shielded, bi-directional parallel cable included
with the unit, and refer to the following steps.
NOTE: It is very important to always use a high-quality interface cable suitable for the digital
pressÕ high-speed rate of data transmission. A suitable interface cable is a shielded, bidirectional parallel cable (preferably an I-EEE 1284 type cable) which is no longer than 6
feet in length. For best results, DO NOT connect the digital press through a switch box, as
this can interfere with the flow of print data.
1.
Connect the Centronics-type parallel side to the digital press. Snap the
fastening clips into place.
34 Section 5: Connecting the Unit
DLDP2.qxd
3/29/99 9:56 AM
Page 35
Digital Label and Decal Press 2 UserÕs Manual
2.
Connect the other side to the back of your PC at the LPT1, LPT2, or PARALLEL
connector. Tighten the cableÕs thumbscrews.
The printer must have its On-Line light and Cancel lights ON to receive data. The
cutterÕs Pause light, however, should remain OFF when the unit is ready to print.
IMPORTANT! In order to begin printing, you must first install its custom printer driver software
along with the PressPrint software for Windows 95/98. For instructions on
installing and using this software, please refer to Section 7 of this manual.
Section 5: Connecting the Unit 35
DLDP2.qxd
3/29/99 9:56 AM
Page 36
Digital Label and Decal Press 2 UserÕs Manual
36 Section 5: Connecting the Unit
DLDP2.qxd
3/29/99 9:56 AM
Page 37
Installing and
Setting Up the Printer
Driver Software for
Windows 95/98
6
A. INSTALLING THE WINDOWS 95/98 PRINTER DRIVER
Before you can print with the digital press you must first install in Windows what
is called a Òprinter driver.Ó The printer driver is simply software which gives the
digital press the proper commands it needs in order to print. Use the following
steps to install the printer driver into Windows 95/98. Once the driver is installed,
put it away in a safe place in case it ever needs to be reinstalled.
NOTE: This section of the OperatorÕs Manual assumes that you are already familiar with
Windows 95/98 and know how it operates. If you are not yet familiar with Windows,
consult the appropriate Microsoft¨ documentation to become familiar with the basics of
Windows before proceeding.
1.
Insert the printer driver diskette into your computerÕs disk drive.
Section 6: Installing and Setting Up the Printer Driver Software for Windows 95/98 37
DLDP2.qxd
3/29/99 9:56 AM
Page 38
Digital Label and Decal Press 2 UserÕs Manual
2.
Click the Start button, point to Settings, and select Printers.
3.
Double-click on the Add Printer icon.
4.
Follow the on-screen instructions to complete installation. When prompted, do
not have Windows print a test print, since you most likely performed a printer
self test in Section 5. Once installed, the Digital Label Press 2 icon, shown
below, will appear in the Printers folder.
Digital Label
Press 2
NOTE: Occasionally, new printer driver versions are released which have new or updated features.
Before installing an updated printer driver version, always delete the existing printer driver
version from your system. To do this, simply select the printer driver icon from within the
Printers folder, and press the Delete key. A message may appear saying, ÒSome files were
used only for this printer and are no longer needed. Would you like to delete these files
now?Ó If you have PrimaColor and/or the 32-Bit Print Spooler installed, select NO.
38 Section 6: Installing and Setting Up the Printer Driver Software for Windows 95/98
DLDP2.qxd
3/29/99 9:56 AM
Page 39
Digital Label and Decal Press 2 UserÕs Manual
B. INSTALLING THE 32-BIT PRINT SPOOLER FOR WINDOWS 95/98
The printer driver software supports a print utility program called the 32-Bit Print
Spooler. Once installed, the print spooler is able to process your print jobs and send
them to the printer at consistently faster speeds than if sending print jobs through
the system spooler of Windows. The 32-Bit Print Spooler also allows your computer
to display helpful prompts if an error occurs during operation.
In order for the 32-Bit Print Spooler to function properly, your computerÕs
parallel port must be set to ECP. This is a high-speed parallel port setting standard
on most newer computers. (To verify or change your parallel port setting, please
refer to Part C of this section.)
The 32-Bit Print Spooler installs just like any other standard Windows application
program. To install the 32-Bit Print Spooler, refer to the following steps:
1.
Insert the 32-Bit Print Spooler diskette into your computerÕs disk drive.
2.
Click the Start button, point to Settings, and select Control Panel.
3.
Double-click on the Add/Remove Programs icon.
Section 6: Installing and Setting Up the Printer Driver Software for Windows 95/98 39
DLDP2.qxd
3/29/99 9:56 AM
Page 40
Digital Label and Decal Press 2 UserÕs Manual
4.
Follow the on-screen instructions to complete installation. Once installed, the
32-Bit Print Spooler icon, shown below, will appear in the Programs group of
the Start menu. After installation, it is recommended that you restart your
computer.
NOTE: Before installing updated 32-Bit Print Spooler versions, always uninstall the existing print
spooler version from your system. To do this, simply select 32-Bit Print Spooler from the
list of programs in the Add/Remove Programs Properties window and click on the
Add/Remove button.
To print with the 32-Bit Print Spooler, you must select the Fast 32-bit Spooler
option from within the printer driver setup window (see Part D for further printer
driver setup information). When this option is selected, the 32-Bit Print Spooler will
automatically open and close with the start and finish of each print job.
NOTE: You can also manually open the 32-Bit Print Spooler simply by selecting its icon from the
Programs group of the Start menu.
When the 32-Bit Print Spooler is running, its icon will appear in the Windows Task
Bar. During a print job, it is often helpful to click on this icon to bring the 32-Bit
Print Spooler status window to the foreground of your application. This window
provides a number of details about the print jobs being sent to the digital press.
PressPrint - arctic.CDL
The Current Job tab tells you the name and size of the file printing, the progress of
the overall print job, as well as the total number of copies left to print. It also
provides buttons which allow you to pause or cancel the print job at any time
during the printing process.
40 Section 6: Installing and Setting Up the Printer Driver Software for Windows 95/98
DLDP2.qxd
3/29/99 9:56 AM
Page 41
Digital Label and Decal Press 2 UserÕs Manual
The Settings tab tells you the port and printer to which you are printing and allows
you to configure the timeout settings. In most instances, these settings will rarely
need to be changed. This tab also provides two other options called Save last job
for reprint and Direct to Port Mode.
When the Save last job for reprint option is selected, the 32-Bit Print Spooler will
automatically save the last print job you sent to the printer and allow you to
instantly reprint the job without the delay of having to reprocess it. The print job
will be saved in the spooler until another print job is sent and saved over it. If you
do not wish to save the last print job for reprint, deselect this option. To print a
saved job, simply select the Print button from the spoolerÕs Current Job tab.
The Direct to Port Mode option is selected by default. In most instances, this
option allows the spooler to send data to the printer at its optimum speed. If,
however, you experience problems when printing with this option selected, simply
deselect it and try your print job again.
The Job Queue tab appears only when a print job is being sent to the printer. This
tab tells you the name and status of each job in the queue and shows you the order
in which the jobs will print if you have sent multiple jobs to the printer. A control
button is also provided which allows you to delete every job listed in the queue. To
delete the job currently being printed, simply select the Cancel Print button under
the Current Job tab.
Because the 32-Bit Print Spooler offers so much control over each print, it is highly
recommended that you always use the 32-Bit Print Spooler when printing.
C. CONFIGURING YOUR COMPUTER’S PARALLEL PORT
As described in Part B of this section, the printer driver software includes a
software application program called the 32-Bit Print Spooler. In order for the 32-Bit
Print Spooler to function properly, you must be using Windows 95/98 and your
computerÕs parallel port mode must be set to ECP. Although this may sound
complicated, most computerÕs allow you to verify or change this setting quite
easily. The following steps will guide you through the general process of verifying
and/or changing your parallel port setting.
NOTE If your computerÕs parallel port is not ECP compatible, you will not be able to use the
32-Bit Print Spooler. Instead, print using the Write Direct To Port option within the
printer driver, or print directly through the system spooler of Windows. If printing through
the system spooler of Windows, see page 84 for important printing tips.
Section 6: Installing and Setting Up the Printer Driver Software for Windows 95/98 41
DLDP2.qxd
3/29/99 9:56 AM
Page 42
Digital Label and Decal Press 2 UserÕs Manual
1.
Click on the Start button, point to Settings, and select Control Panel.
2.
Double-click on the System icon, select the Device Manager tab, select View
devices by type, and double-click on the Ports listing.
3.
If your LPT port is set to ÒECP Printer Port,Ó your computerÕs parallel port is
set properly and you can skip to step 6.
4.
If your LPT port is set to ÒPrinter PortÓ instead of ÒECP Printer Port,Ó you must
change the parallel port mode through your system ÒBIOSÓ or setup screen.
The system BIOS is generally entered by holding down a specific keyboard
character while your computer is booting up. This keyboard character will
differ depending on which brand of computer you have, but is often specified
on screen during initial startup. For example, a line such as ÒPress <DEL> key
if you want to run SETUPÉÓ may appear. Once you have entered the BIOS,
use the on-screen directions to locate the parallel port option and change it to
ECP. When changed, save the BIOS settings and reboot (some computers
require you to reboot twice).
42 Section 6: Installing and Setting Up the Printer Driver Software for Windows 95/98
DLDP2.qxd
3/29/99 9:56 AM
Page 43
Digital Label and Decal Press 2 UserÕs Manual
5.
As described in steps 1-3 above, go back to Device Manager in Windows 95/98,
and verify that the LPT port registers as ECP. If your LPT port still registers as
ÒPrinter Port,Ó double-click on the Printer Port line, select the Driver tab, and
click on the Change Driver button. Then, select the Show all devices option
and choose the ECP Printer Port option from under Models as shown below.
This will force Windows to recognize your parallel port as ECP.
IMPORTANT! Since the process of verifying and/or changing your computerÕs parallel port to
ECP is largely dependent on your brand of computer, please refer to your
appropriate computer documentation or contact the computer manufacturer for
more information on this process.
6.
Once you are sure that your computerÕs parallel port mode is set to ECP, you
are ready to print with the 32-Bit Print Spooler. Before printing, select the Fast
32-Bit Spooler option from within the printer driver setup window along with
all other appropriate printer driver options (see Part D of this section for more
printer driver information).
If you are unable to set your computer as described in this setup procedure or if
you have problems printing through the 32-Bit Print Spooler, refer to the
troubleshooting tip, ÒMy prints have thin lines or a dark band across the width of
the printÓ on page 84 for additional information.
Section 6: Installing and Setting Up the Printer Driver Software for Windows 95/98 43
DLDP2.qxd
3/29/99 9:56 AM
Page 44
Digital Label and Decal Press 2 UserÕs Manual
D. SETTING UP THE WINDOWS 95/98 PRINTER DRIVER
Once the printer driver has been successfully installed, you will need to set the
driver up with the appropriate print options for your specific print job. Refer to the
following steps to change or verify your printer driver options.
1.
Click the Start button, point to Settings, and select Printers. Then, click on the
Digital Label Press 2 icon with the right mouse button and select Properties.
The Properties window will appear.
2.
Click on the Details tab of the Properties window and select the Setup button.
NOTE: The PressPrint printing software allows you to change these same printer driver options
through the Printer Setup button of the Print window. This means that you donÕt have to
go back to the main printer setup window each time you want to change a setting or option
in the printer driver.
3.
The Digital Label Press 2 Setup screen appears. Change the options as follows:
Digital Label Press 2 Setup
Paper Size
The digital press prints onto oversized Super B/A3-size print media. Super B/A3size media has a 12Ó x 20Ó (305 x 508mm) sheet size which provides a maximum
printable area of 11.71Ó x 17.3Ó (297 x 439mm). This means the digital press can
print nearly the entire width of a sheet, but that it requires a non-printable margin
of about 1.5Ó (38mm) on the top of the sheet and about 1.2Ó (30.5mm) on the
bottom.
When printing from PressPrint, note that the default Blank Size is already set to the
maximum printable area of 11.71Ó x 17.3Ó (297 x 439mm). For best results, leave the
Blank Size set to these dimensions.
44 Section 6: Installing and Setting Up the Printer Driver Software for Windows 95/98
DLDP2.qxd
3/29/99 9:56 AM
Page 45
Digital Label and Decal Press 2 UserÕs Manual
Ribbon Type
Click on the Ribbon Type down arrow. The following ribbon selections will appear:
Spot Color Resin (#300-Series), Spot Color Wax/Resin (#100-Series), Process 3
Color Resin (#300-Series), and Process 3 Color Dye-Sub (#200-Series), Process 4
Color Dye-Sub (specialty ribbon used for printing prepress proofs), Process 4
Color Wax (specialty ribbon used for printing T-shirt transfers and wax thermal
paper labels). Select the ribbon type option thatÕs appropriate for the type of ribbon
you are using. See Sections 4-B, 4-E, and 4-F for a complete description of all
available ribbon types.
Color Matching
Click on the Color Matching down arrow and select the appropriate color matching
option. Select None if you are more interested in print speed rather than print color,
if you have already color corrected your image for printing, or if you are using the
unitÕs optional Pantone Color Matching Software.
Select Algebraic if you would like the printer driver to make very simple, yet fast,
color balance adjustments. This option gives you more natural looking images
without actually utilizing any specific color matching software and without
slowing down the processing speed of the printer driver. In general, this option
works best when printing full-color graphics with the process 3 color resin ribbon.
The PrimaColor option is available only when the optional PrimaColor Color
Matching Upgrade is installed. Select this option to enable color matching profiles
written specifically for your printer. The PrimaColor option automatically adjusts
the color of your image according to preconfigured printer profiles and default
system profiles. This results in a very precise color match compliant with ICC
standards.
NOTE: The PrimaColor option is intended to match color hues as closely as possible. This means it
works best when printing photographic images. When printing simple spot colors, you may
notice that some colors may appear slightly muted.
Since the default system profiles provided are generic, the colors of some monitors
may still vary slightly from your output. As a solution, raw printer profiles are
included in case you would like to combine your custom monitor profiles with the
printer profiles. This can be done through third-party color matching utility
programs.
Dither Mode
This option only applies when printing with a resin or a wax/resin (#100 or #300Series) ribbon type. Click on the Dither Mode down arrow and select the
appropriate dither option. Selecting Fine Dither provides a print in which the dots
of color are very close together, giving you increased clarity if the image is to be
viewed up close. Selecting Coarse Dither provides a print where the dots are
Section 6: Installing and Setting Up the Printer Driver Software for Windows 95/98 45
DLDP2.qxd
3/29/99 9:56 AM
Page 46
Digital Label and Decal Press 2 UserÕs Manual
slightly larger and spaced further apart. This is a good option to select if you are
printing images which may be viewed from further away. The Coarse option is also
effective in hiding print imperfections if you are working in a particularly dusty
environment.
Intensity
This control sets the lightness or darkness of the printed image. Click and drag on
the sliderÕs box or click on the left and right arrows to change the amount of heat
used in the printing process.
Disable Overlay
This option only applies when printing with the 3-color dye-sublimation (#200Series) ribbon type. Select this option if you wish to print dye-sublimation output
without applying the ribbonÕs clear overlay panel. Please note that image durability
will be minimal if this overlay is not applied. In most cases, the only time the
overlay should not be applied is if you intend to heat transfer printed images to
coated ceramic coffee mugs mugs (see Section 4-F, Photo Coffee Mug Transfers).
Enhance Fine Text
This option only applies when printing with a dye-sublimation (#200-Series) ribbon
type. When selected, this option allows the digital press to apply the softwarebased spatial filter of RasterTextª technology. This filter brings out the fine detail
of smaller text and lines and allows them to print with much greater definition and
clarity. Image processing time will increase when using this option.
Fast 32-bit Spooler
Select this option for consistently faster print processing. This option is only
selectable if the printer driverÕs 32-Bit Print Spooler software has been installed.
When selected, this option allows the printer driver to send all print jobs to the
unitÕs 32-Bit Print Spooler rather than to the system print spooler of Windows. It is
highly recommended that you always use the 32-Bit Print Spooler when printing.
See Part B of this section for complete details on the 32-Bit Print Spooler.
Write Direct to Port
Select this option if you do not have an ECP compatible parallel port on your
computer and, therefore, cannot effectively use the 32-Bit Print Spooler. When
selected, this option allows the printer driver to bypass the system print spooler of
Windows and to send all print data directly to the printer. This option devotes all of
your system resources to the current print job, thereby increasing overall print
speed. When the print job is finished, your system resources will again be devoted
to the normal function of your on-screen applications.
46 Section 6: Installing and Setting Up the Printer Driver Software for Windows 95/98
DLDP2.qxd
3/29/99 9:56 AM
Page 47
Digital Label and Decal Press 2 UserÕs Manual
NOTE: When printing with the Fast 32-bit Spooler or the Write Direct to Port option selected, the
Print to File option found within many Windows application programs is not supported.
The Print to File option is supported only when printing through the system print spooler
of Windows 95/98.
Disable Target & Cut
Select this option if you wish to bypass the unitÕs cut function and use only its print
function. This can be helpful if, for example, you are printing a large-format sign or
photo that does not require precision cutting.
Cut Only (Disable Print)
Select this option if you wish to bypass the unitÕs print function and use only its cut
function. When the No Targets option is selected, the digital press operates similar
to a traditional cutter in that it is able to cut shapes and letters out of completely
blank label stock.
When the Use Pre-Existing Targets option is selected, the digital press allows you
to refeed a sheet which has already been printed but still needs to be cut. To do
this, simply load the sheet into the Media Supply Tray with the printed side facing
DOWN. Then, resend your original print job with this option selected. This option
can be helpful if, for example, you experienced some type of media jam after the
sheet was printed but before it could reach the cutter.
Orientation
Select either Portrait or Landscape. Selecting Portrait causes the page to print in a
vertical orientation. Selecting Landscape causes the page to print in a horizontal
orientation. An icon illustrating a printed page in the dialog box helps you
remember the difference between the two.
Section 6: Installing and Setting Up the Printer Driver Software for Windows 95/98 47
DLDP2.qxd
3/29/99 9:56 AM
Page 48
Digital Label and Decal Press 2 UserÕs Manual
Calibrate
This option allows you to recalibrate your printerÕs ribbon sensor if the need
should ever arise. For more information on the printerÕs ribbon sensor and on the
calibration process, please refer to the end of Section 9. In most instances, this
calibration procedure should not be necessary.
The Calibrate option also allows you to send a simple self test print to the printer
by clicking on the TEST button. The appropriate self test will automatically print
according to the Ribbon Type option you have selected in the printer driver setup.
Be sure the appropriate print supplies are installed for the selected Ribbon Type.
This self test procedure can be helpful in assuring that your computer is effectively
communicating with the digital press and that it is functioning properly. If you
would like to bypass your computer and print a self test directly from the digital
press, see the self test procedure described in Section 5-B.
To find out the firmware version currently installed in the unit, click on the
VERSION button. Periodically, new firmware versions are released which may
enhance the operation of the digital press. Use this option to determine whether or
not the unit is in need of an update.
After your selections have been made, select the OK button to return to the
Properties window. Select OK again to return to the Printers window. Exit this
window and youÕre ready to go on to Section 7. All printer driver options you
selected will stay the same until you change them.
48 Section 6: Installing and Setting Up the Printer Driver Software for Windows 95/98
DLDP2.qxd
3/29/99 9:56 AM
Page 49
Installing and Using the
PressPrint Software
for Windows 95/98
7
A. ABOUT PRESSPRINT
PressPrint for Windows 95/98 is a software application program specifically
designed for use with your digital press. This program is sold separately but is
required in order for the digital press to both print and cut images. PressPrint is
primarily intended to be used as a type of print utility program in which images
created through other software applications can be imported, contoured for cutting,
duplicated, and sent to the digital press for production. It does, however, include a
variety of extra tools and menu selections which allow you to create more simple
label and decal designs directly.
This section will guide you through the installation process and will also explain
how to efficiently use PressPrint in its primary role of mass producing pre-designed
images. For details on PressPrintÕs more general capabilities, tools, and menu
selections, please refer to its extensive on-line Help menu.
B. INSTALLING PRESSPRINT
PressPrint installs just like any other standard Windows 95/98 application
program. To install PressPrint, simply close down all other programs and insert the
PressPrint CD into your computerÕs CD drive. PressPrintÕs Installer Program will
automatically open. Follow the on-screen instructions to complete installation. Note
that when the installer program displays the Font Installer dialog box, select the
Section 7: Installing and Using the PressPrint Software for Windows 95/98 49
DLDP2.qxd
3/29/99 9:56 AM
Page 50
Digital Label and Decal Press 2 UserÕs Manual
Continue button to load all of your current system fonts into PressPrint. This is
necessary in order for PressPrint to recognize your system fonts.
Once installed, the PressPrint folder, shown below, will appear in the Programs
group of the Start menu. Select the PressPrint icon to open PressPrint.
PressPrint
PressPrint
PressPrint Help File
If PressPrintÕs Installer Program does not automatically open when the CD is
inserted into your computerÕs CD drive, refer to the following steps to install
PressPrint:
1.
Click the Start button, point to Settings, and select Control Panel.
2.
Double-click on the Add/Remove Programs icon.
50 Section 7: Installing and Using the PressPrint Software for Windows 95/98
DLDP2.qxd
3/29/99 9:56 AM
Page 51
Digital Label and Decal Press 2 UserÕs Manual
3.
Follow the on-screen instructions to complete installation. Once installed, the
PressPrint folder will appear in the Programs group of the Start menu. Select
the PressPrint icon to open PressPrint.
C. CONFIGURING THE CUTTER SETTINGS
Before you begin using PressPrint to produce output, you must first enter the
custom cutter settings for your digital press. These settings are determined at the
factory and are provided on a sheet labeled ÒCutter SettingsÓ which is included
with the unit. These settings are also indicated on a label attached to the rear of the
unit. The cutter settings are software selectable and assure that the cut line will
accurately be aligned with the printed image. Once entered, these settings will
seldom need to be changed.
To enter the custom settings for your digital press, open the PressPrint software.
Then, click on the Cut menu and select Cutter Settings. The Cutter window
appears.
Cutter
Enter the custom values noted on the sheet labeled ÒCutter SettingsÓ or on the
printerÕs rear panel label, and select OK.
The Pressure option controls the overall cut pressure applied by the cutter. Once
entered, this setting should not need to be changed. Instead, when adjusting for the
various types of print media, use only the Cutting Pressure slide on the front of the
unit. See Section 3-D for information on when and how to adjust the Cutting
Pressure slide.
The X Offset and Y Offset options fine-tune the position of the overall cut line. If
these values are slightly inaccurate, the cut line will not appear centered around the
printed image. The X Offset dictates the position of the cut line along a fixed
horizontal axis and is measured in thousandths of an inch from the left-hand side of
the page to the left-hand edge of the first cut line. Therefore, increasing the X Offset
moves the overall cut line further away from the left-hand side of the page and
decreasing it moves it closer (Hint: 100 thousandths of an inch equals .1Ó or
2.54mm).
Section 7: Installing and Using the PressPrint Software for Windows 95/98 51
DLDP2.qxd
3/29/99 9:56 AM
Page 52
Digital Label and Decal Press 2 UserÕs Manual
The Y Offset dictates the position of the cut line along a fixed vertical axis and is
measured in thousandths of an inch from the top of the page to the top edge of the
first cut line. Therefore, increasing the Y Offset moves the overall cut line down
from the top edge of the page and decreasing it moves it up (Hint: 100
thousandths of an inch equals .1Ó or 2.54mm).
The Blade Offset indicates the distance from the tip of the blade to the edge of the
blade shaft. Since the digital press will always use the same type of blade, this
value should always remain the same.
D. USING PRESSPRINT
This part of Section 7 explains how to use the PressPrint features most essential to
printing with the digital press. Refer to the following steps to learn how to import
an image, place a contour cut line around it, and duplicate the image down and
across the page.
PressPrint - fish2.CDL
52 Section 7: Installing and Using the PressPrint Software for Windows 95/98
DLDP2.qxd
3/29/99 9:56 AM
Page 53
Digital Label and Decal Press 2 UserÕs Manual
1.
After opening PressPrint, select Import from the File menu. The Import File
window appears.
2.
Select the file you would like to import. To do this, use the list of File Type
options to select the exact type of file you would like to import. Then, use the
Look in: box to navigate to the drive and directory in which your file is located.
Select the specific file you wish to import. (Select the Merge check box if you
intend to import two or more different images onto the same page.) Click on
OK to begin importing. (See Part F of this section for tips on importing
different file types.)
3.
When the file is finished importing, it will automatically be selected. Click and
drag on the surrounding nubs to resize the image. Click and drag on the center
nub to move the image. Note that for best print quality, imported bitmap images
should be kept at or close to their original size.
PressPrint - fish2.CDL
Section 7: Installing and Using the PressPrint Software for Windows 95/98 53
DLDP2.qxd
3/29/99 9:56 AM
Page 54
Digital Label and Decal Press 2 UserÕs Manual
4.
While the image is still selected, click on the Cut menu and select Contour Cut
(see Part F of this section for information on PressPrintÕs Die Cut feature). The
Contour Cut Settings window appears.
5.
Select
to trace a cut line along the exact contour of your imageÕs outside
edge. Select
to trace a cut line along the contour of both the outside and
inside edges of your image. In this case, the software will essentially attempt to
cut away anything it sees as white space. Then, enter the desired Offset value
to specify how far you would like the cut line to be from the edge of the
colored portion of your image. Entering a value greater than 0 will cause the
cut line to be placed away from the colored portion of your image. Entering a
value less than 0 will cause the cut line to be placed within the colored portion
of your image. Entering an exact value of 0 will cause the cut line to be placed
on the very edge of where the colored portion of your image meets white
space.
6.
Select OK to begin contouring your image. This process will take from just a
few seconds to a few minutes depending on the size and complexity of your
image. When the image is finished contouring, a dashed cut line will appear
around your image and both will be selected.
NOTE: If you imported a bitmap image, you may wish to select Show Bitmaps Outlines from the
View menu before proceeding. For more information on this option, see its explanation in
Part F of this section
54 Section 7: Installing and Using the PressPrint Software for Windows 95/98
DLDP2.qxd
3/29/99 9:56 AM
Page 55
Digital Label and Decal Press 2 UserÕs Manual
7.
With both the cut line and the image selected, click on the Layout menu and
select Array. The Array Setup window appears.
8.
Enter the total number of copies you would like to make of your image. Adjust
the margins and/or spacing between each image accordingly in order to fit the
maximum number of copies on each page. The Page Preview shows you how
your images will layout when duplicated. The Total Number of Pages box
shows you how many individual pages will be required to produce the
specified number of labels.
9.
Click on OK to begin duplicating your image. Note that if copying multiple
pages of output, only one page of images will actually appear on screen. This is
done to conserve system resources. PressPrint remembers the total number of
pages created, however, and automatically sends them to the digital press at
the time of printing.
When your image is finished duplicating, you may wish to save your file before
printing. To do this, select Save from the File menu and specify a file name and a
location of where you would like the file to be saved. Files will be saved with
PressPrintÕs native Ò.CDLÓ file extension.
Section 7: Installing and Using the PressPrint Software for Windows 95/98 55
DLDP2.qxd
3/29/99 9:56 AM
Page 56
Digital Label and Decal Press 2 UserÕs Manual
E. PRINTING TO THE DIGITAL LABEL AND DECAL PRESS
Once you have successfully completed Part D of this section, you can then send
your file to the digital press to be printed and cut. Refer to the following steps to
begin printing.
1.
Select Print from the File menu. The Print window appears.
Digital Label Press 2
Digital Label Press 2
2.
Be sure Digital Label Press 2 is selected under the Printer option. The rest of
the options can be left at their default settings for most print jobs. Notice that
the number in the Copies box will automatically match the total number of
pages specified when you originally arrayed your image.
NOTE If you intend to print with the #200-Series dye-sublimation print supplies, you may wish to
select one of the Anti-Aliasing options from the Preferences tab. Anti-Aliasing causes
printed images to appear more smoothly around the edges. In most cases, the Fine AntiAliasing option provides the best print quality. DO NOT select anti-aliasing if printing
with #100 or #300-Series supplies, as it can actually degrade print quality with these
materials.
3.
Click on the Printer Setup button. The Digital Label Press 2 Setup window
appears. Be sure that the appropriate printer driver settings are selected for
your upcoming print job. In particular, be sure that the proper Ribbon Type
option is selected and that the Fast 32-bit Spooler option is checked. Refer to
Section 6-D for more information on any of these printer driver options.
56 Section 7: Installing and Using the PressPrint Software for Windows 95/98
DLDP2.qxd
3/29/99 9:56 AM
Page 57
Digital Label and Decal Press 2 UserÕs Manual
Digital Label Press 2 Setup
4.
Once all appropriate printer settings have been chosen, select OK to close the
setup window. Select OK from the Printing window to send your print job.
Before the digital press actually starts printing, the print job must be processed or
rasterized. This will take anywhere from several seconds to several minutes
depending on the complexity of your image and the speed of your computer.
During this time, your computer will be tied up. Once the print job finished
rasterizing, your computer will be released and you will hear the unit begin to feed
the first sheet of print media.
The digital press will simultaneously print and cut as many sheets of output as you
originally specified. While printing, you may wish to bring the 32-Bit Spooler to the
foreground in order to monitor the status of the print job. If you experience an error
during operation, you can use the 32-Bit Print Spooler to pause the print job while
you clear any recoverable errors such as an initial print media or ribbon jam. Once
the error is cleared, select Resume in the spooler to resume printing. After a minute
or two, the digital press will once again begin printing your print job.
If you need to adjust the cut pressure during the print job, use the Cutting Pressure
slide on the front of the unit. See Section 3-D for information on when and how to
adjust the Cutting Pressure slide. For more information on dealing with possible
print errors, please refer to Section 9. For important hints on efficiently working
with the PressPrint software, please refer to Part F of this section.
Section 7: Installing and Using the PressPrint Software for Windows 95/98 57
DLDP2.qxd
3/29/99 9:56 AM
Page 58
Digital Label and Decal Press 2 UserÕs Manual
F. HELPFUL PRESSPRINT HINTS
Importing Files
■
PressPrint accepts a wide variety of file types. These file types are listed and can
be selected through PressPrintÕs Import window. When importing files created
through other programs, be sure the file you are importing is one of the file
types listed in the import window. Like all other graphics programs, PressPrint
will not be able to import an unsupported file type.
If you have problems importing a certain file type, simply resave or export your
file as one of PressPrintÕs other supported file types. In most cases, importing a
file which has been converted to a TIFF or JPEG will essentially guarantee that
PressPrint will accept it. Most graphics applications allow you to save or export
images in a variety of industry-standard file types. (If importing TIFF files, note
that only RGB TIFF images are supported. CMYK TIFF files will not import
properly.)
If your program does not allow you to save or export an image in an acceptable
format, a separate file conversion software package called Transverter Proª is
available. This package allows you to easily convert files into a variety of
accepted PressPrint formats. See the documentation included with this
conversion software for complete instructions.
■
When preparing a file to be imported, be sure to prepare and import a single
image only. In other words, use PressPrint to duplicate and mass produce the
image after it has been imported.
Importing Macintosh Files
In many cases, files which have been created on a Macintosh will need to be
imported into PressPrint. This is done in the exact same fashion as importing a
Windows file and all the tips given in the previous ÒImporting FilesÓ hint still apply.
In addition, however, Mac users should be aware of a few additional tips.
■
Since you will not always have all of the fonts supported by a Macintosh on
your PC, you should always convert Macintosh text to curves before exporting.
This will turn fonts into graphics, thereby eliminating the need to support that
font on the computer running PressPrint.
■
When exporting the image from your Macintosh program, be sure to export as
one of PressPrintÕs supported file types. If you have trouble importing any of the
standard Macintosh file types such as an EPS, try exporting the image in a
bitmap format such as TIFF or JPEG. These file types are standard to both Mac
and Windows. If your Mac program does not allow you to save or export an
image in anything other than an EPS format, a separate file conversion software
package called Transverter Pro is available. This package allows you to easily
convert an EPS file into a standard bitmap format such as a TIFF or JPEG. See the
documentation included with this conversion software for complete instructions.
58 Section 7: Installing and Using the PressPrint Software for Windows 95/98
DLDP2.qxd
3/29/99 9:56 AM
Page 59
Digital Label and Decal Press 2 UserÕs Manual
■
Be sure to name your file with the appropriate file extension to indicate the
type of file you are saving it as. For example, if exporting your image as an EPS
file it should named ÒFilename.epsÓ. For a TIFF file, name it ÒFilename.tifÓ. Or,
for a JPEG file, call it ÒFilename.jpgÓ.
Importing Vector vs. Bitmap Files
A vector-based file is a file such as an EPS which can be grouped, ungrouped, and
broken apart into a number of separate objects. These objects can be individually
sized, deleted, or repositioned. Vector files are generally created in programs such
as Adobe¨ Illustrator¨ or Corel Drawª and are beneficial in that they can be edited
and greatly enlarged or reduced within PressPrint without sacrificing any image
quality or resolution.
The draw back is that vector files include graphics only. So, if you have a
photographic image within your label design, the photo will not be considered a
vector object and may not import into PressPrint along with the rest of the vectorbased graphics. To overcome this issue, you can import the vector-based graphics
and the photographic image separately, then basically reassemble your label design
within PressPrint. An easier way, however, is to simply import such a label design
as a bitmap file format.
A bitmap file is a file such as a TIFF or JPEG which cannot be broken apart into
separate objects. Instead, when an image is saved or exported in a bitmap format, it
becomes a single, solid object. A bitmap file is beneficial in that it provides an easy
way to import nearly any type of label design from nearly any type of program,
without losing any of the labelÕs design elements. The only draw back to bitmap
images, however, is that they cannot be easily edited like a vector-based image, and
will slightly degrade in quality if significantly enlarged.
Show Bitmaps Outlines / Show Reduced Bitmaps
Since bitmap images are saved as one solid object, they tend to have a file size
slightly larger than that of a vector-based graphic. This means that more system
resources may be required by such files causing your computer to slow down. To
avoid this, PressPrint provides two options called ÒShow Bitmaps OutlinesÓ and
ÒShow Reduced BitmapsÓ under the View menu. The Show Bitmaps Outlines
option makes bitmaps appear as a simple box outline on screen. This conserves
system resources and greatly increases the speed of your system when working
with bitmaps. The Show Reduced Bitmaps option conserves slightly less system
resources, but allows bitmaps to remain on screen by displaying them at a reduced
resolution.
To utilize either of these options, simply import your bitmap label design and place
a cut line around it as usual. Then, before duplicating the image, click on the View
menu and select either Show Bitmaps Outlines or Show Reduced Bitmaps. All
bitmaps will be displayed accordingly as long as either option is selected. To return
to normal display mode, simply deselect the option.
Section 7: Installing and Using the PressPrint Software for Windows 95/98 59
DLDP2.qxd
3/29/99 9:56 AM
Page 60
Digital Label and Decal Press 2 UserÕs Manual
Purge Undo
Another option which will enhance the speed of PressPrint is the Purge Undo
option of the Edit menu. Selecting this option from time to time will clear the
memory of PressPrintÕs Undo feature, thereby freeing up more memory for
PressPrintÕs more immediate functions. Note that once the undo memory has been
purged, you will not be able to undo any actions done prior to the purge.
Aligning Objects
PressPrint provides an alignment option which automatically aligns two or more
selected objects. This feature is helpful if, for example, you would like to align a Die
Cut line with your label design or to align a selection of grouped label designs to
the page blank. To utilize this feature, select the objects you wish to align. Then,
select Alignment from the Layout menu, specify how you would like the selected
objects to align, and click on OK.
Creating A Die Cut
A die cut is different from a contour cut in that die cuts provide a preset cut line in
shapes such as rectangles, circles, stars, ovals, etc. PressPrint provides several die
cut shapes which can be individually customized. To create a die cut line, select the
object around which you would like to place the cut line. Then, select Die Cut from
the Cut menu. When the Die Cut Settings window appears, specify the style, size,
and other custom settings of the cut line, and click on OK. The die cut line will
automatically center in relation to the selected object.
Selecting Objects
To select an object, choose the Pointer tool and click on the edge of the object. To
select multiple objects, hold down the shift key while clicking on the edge of each
object. Another way to select one or more objects is to use the Pointer tool to click
and drag around the object or objects you would like to select. As you drag the
pointer tool, a blue outline will appear. Any object within this outline will be
selected.
60 Section 7: Installing and Using the PressPrint Software for Windows 95/98
DLDP2.qxd
3/29/99 9:56 AM
Page 61
Digital Label and Decal Press 2 UserÕs Manual
Rotating Images to Maximize Space
In order to fit as many labels on a page as possible, you may sometimes wish to
rotate images so they can be placed closer together. To rotate an image, select both
the image and its cut line. Then, select Rotate from the Layout menu. The Rotate
window appears.
Enter the number of degrees you wish to rotate the image and click on the Apply
button. This will rotate the image. To close the Rotate window, click on the
button.
Use the Rotate option along with the Duplicate option of the Edit menu to create a
single row of closely placed images. Use the Alignment option of the Layout menu
to help align the images. Once you get a complete row created and aligned (as
shown below), click and drag the pointer around the entire row to select it. You can
then use the Array option of the Layout menu to duplicate the row down the page
as you normally would a single image.
Anti-Aliasing
Anti-Aliasing is an option found in the Preferences tab of the Print window. When
selected, this option automatically smoothes the edges of images printed with the
#200-Series dye-sublimation materials. None, Coarse, Medium, and Fine antialiasing options are available. In general, the Fine option provides the best quality.
DO NOT select this option if printing with the #100-Series wax/resin or #300Series resin materials. Since these materials cannot produce continuous-tone images
like dye-sublimation materials, anti-aliasing can actually degrade the quality of
resin and wax/resin images.
Section 7: Installing and Using the PressPrint Software for Windows 95/98 61
DLDP2.qxd
3/29/99 9:56 AM
Page 62
Digital Label and Decal Press 2 UserÕs Manual
Printing Multiple Pages of the Same Label
Besides the standard method described in Part D (step 7) of this section, there is
another, sometimes more efficient, way of printing multiple pages of the same labels.
To use this alternate method, simply import an image and duplicate one page worth of
labels. Then, send that single page to the printer with the 32-Bit Print SpoolerÕs Save
last job for reprint option selected. After the first page is finished printing, open the
32-Bit Spooler and select the Print button. When the Number of Copies to Print
window appears, enter the number of pages you would like to print, and click on OK.
All specified pages will then be printed. The saved print job will remain in the 32-Bit
Print Spooler until another print job is sent to the spooler and saved over it.
G. CREATING SERIALIZED LABELS
PressPrint makes it easy to create serialized labels such as product serial tags, parking
stickers, and more. PressPrint even allows you to incorporate text (.txt) files, such as a
list of names, into serialized labels for even greater customization. To create a set of
serialized labels, please refer to the following procedure. As an example, this
procedure demonstrates how to create labels with both a serialized number and a
custom serialized name. If you have not yet read through Parts D, E, and F of this
section, please do so before attempting to complete this procedure.
62 Section 7: Installing and Using the PressPrint Software for Windows 95/98
DLDP2.qxd
3/29/99 9:56 AM
Page 63
Digital Label and Decal Press 2 UserÕs Manual
1.
Import or create a label design in which you would like to place your serialized
text.
PressPrint - IDNumber.CDL
2.
Use the text tool
to enter the line or lines of text exactly as you would
like it to appear in the first label. Enter a separate line of text for each text field
you would like to serialize.
PressPrint - IDNumber.CDL
3.
Once you have entered the text, place a cut line around the entire label and
select all.
Section 7: Installing and Using the PressPrint Software for Windows 95/98 63
DLDP2.qxd
3/29/99 9:56 AM
Page 64
Digital Label and Decal Press 2 UserÕs Manual
4.
With both the cut line and the label selected, choose Badges from the Layout
menu. The Badge Setup window appears.
5.
Enter the number of labels you wish to create into the Number of copies box,
and adjust the vertical and horizontal spacing between labels as needed.
6.
Highlight the text you wish to have serialized and, if applicable, click on the
Browse button to select the appropriate Replacement data file. The replacement
data file specifies the text (.txt) file you would like to use in your serialized
labels. Such a file can be created in any text editing program, such as the
Notepad program in the Windows Accessories folder, and must be saved in an
MS-DOS Text (.txt) format. When creating such a file, place each item in the list
on its own line, and be sure to close the file before attempting to merge it into
PressPrint. A sample of the list created for this example procedure is shown
below:
64 Section 7: Installing and Using the PressPrint Software for Windows 95/98
DLDP2.qxd
3/29/99 9:56 AM
Page 65
Digital Label and Decal Press 2 UserÕs Manual
7.
Once you have highlighted the text you wish to serialize and/or selected the
replacement data file, click on the OK button of the Badge Setup window. The
Text Substitution window appears.
8.
When the Text Substitution window appears, make sure the text from the
replacement data file is listed under the appropriate column. If not, use the
indicated ÒFÓ keys to cut and paste the data into the appropriate column.
9.
Click on the top gray cell of the numerical text as indicated to select all of the
cells. Then, enter the serialized text into the Edit Text box exactly as you would
like that text to appear on your first label, and click on the Serialization button.
The Serialize window appears.
10. Fill in the variable information as prompted by the instructions in the Serialize
window, and click on OK when finished. Select OK again in the Text
Substitution window to begin serializing and duplicating your labels. All
serialized text will appear in the font selected in your initial label design.
Section 7: Installing and Using the PressPrint Software for Windows 95/98 65
DLDP2.qxd
3/29/99 9:56 AM
Page 66
Digital Label and Decal Press 2 UserÕs Manual
PressPrint - IDNumber.CDL
Note that if copying multiple pages of output, only one page of images will
actually appear on screen. This is done to conserve system resources. If you would
like to view subsequent pages, PressPrint does provide a scrolling tool
in the bottom right-hand corner of its screen. This allows you to easily
move from page to page. When your labels are finished duplicating, you can then
print them according to the instructions in Part E of this section.
H. PRINTING MULTIPLE SPOT COLOR LABELS
Multiple spot color labels are labels created by using two or more of the digital
pressÕ separate spot color resin or wax/resin ribbons to print a label design with
two or more separate colors. This process is done by manually changing ribbon
colors during the print job and is beneficial if you would like to create a simple two
or three color label with no dithering. Since separate ribbons are used, keep in
mind that the alignment of the different colors may not be exact. For this reason,
your multiple spot color label designs should be relatively simple.
The following is an example of how to print a multiple spot color job. You may
want to actually complete this exercise as a self tutorial. If you do not have the
ribbon colors specified in this exercise, simply substitute any other spot color
combination. Note that both single and multiple pages of multiple spot color labels
can be printed in this fashion. If you have not yet read through Parts D, E, and F of
this section, please do so before attempting to complete this exercise.
66 Section 7: Installing and Using the PressPrint Software for Windows 95/98
DLDP2.qxd
3/29/99 9:56 AM
Page 67
Digital Label and Decal Press 2 UserÕs Manual
1.
Create a label consisting of a RED square background with BLACK text
centered inside. Then, place a cut line around the red square and array the
labels down the page.
PressPrint - UNTITLED.CDL
2.
Click on the RED color box in the color palette on the bottom of your screen,
and drag it to the first position in the palette (P1). Likewise, click and drag the
BLACK color box to the second position (P2). The Colors in the image will be
printed in the order in which they appear in the color palette.
3.
Insert the RED ribbon into the printer and be sure the appropriate print media
is also loaded. Then, select Print from the File menu.
4.
Select the appropriate Printer Setup options (Ribbon Type, etc.). Then, click on
the Preferences Tab and select the Separate Colors option. This forces the colors
in your image to be printed separately. Also, select the Clip Separated Colors
option if you do not want the digital press to print in areas where the second
color will be printed. This option is useful if printing lighter colors on top of
darker colors. Note that these options should only be selected when printing
multiple spot color print jobs.
5.
Click on OK to print. PressPrint will send only the RED squares to be printed.
During printing, a message will display on screen telling you to wait until
printing is complete before loading the next ribbon color and reloading the
print media.
Introduction 67
DLDP2.qxd
3/29/99 9:56 AM
Page 68
Digital Label and Decal Press 2 UserÕs Manual
6.
When the RED squares are finished printing, the printed sheet will be ejected.
At this time, remove the RED ribbon and load the BLACK ribbon. Then, reload
the printed sheet back into the Media Supply Tray. Be sure to load the printed
sheet with its Print Side Down and with its Top or Leading Edge nearest the
Media TrayÕs feed roller.
7.
When all supplies are once again in place, click on OK. PressPrint will send the
BLACK text to to be printed. The cutter targets and cut information will also be
sent to the digital press at this time since black is the final color (PressPrint
does this automatically when the Separate Colors option is selected, as long as
cutting is enabled in the driver). Printing and cutting of your two color labels
should now be complete.
68 Introduction
DLDP2.qxd
3/29/99 9:56 AM
Page 69
Maintenance
8
Your the digital press is built to require a minimum amount of maintenance.
Nevertheless, there are a few procedures you can perform on a regular basis or as
needed to ensure the best possible performance.
A. SUPPLIES REQUIRED
For the procedures listed in this section, you will need the following items:
■
■
■
Isopropyl alcohol
Soft, lint-free cloth
Small vacuum cleaner (if available)
Or, to make these maintenance procedures more convenient, a Printer Cleaning Kit
is available from your authorized reseller. This optional kit includes the following:
■
Printhead Cleaning Pens pre-moistened with 99.99% isopropyl alcohol for
cleaning your printerÕs Printhead.
■
Cleaning Pads pre-moistened with 99.99% isopropyl alcohol for cleaning your
printerÕs rollers and general inside area.
Section 8: Maintenance 69
DLDP2.qxd
3/29/99 9:56 AM
Page 70
Digital Label and Decal Press 2 UserÕs Manual
B. CLEANING THE PRINTHEAD
This procedure is performed if you notice a streak running the length of the page
where ink was not transferred. This procedure should also be performed
approximately every 100 prints in order to maintain consistent print quality.
Printhead
Ribbon Guard
Printhead
Printhead Cover
1.
Turn the printer power OFF.
2.
Open the printerÕs Top Cover by pressing the Cover Release Button.
3.
Remove the Ribbon Cartridge from the printer.
4.
Using a Printhead Cleaning Pen from the Printer Cleaning Kit or a soft, lint-free
cloth slightly moistened with isopropyl alcohol, firmly wipe back and forth
across the surface of the Printhead. If using a cloth, be extremely careful not to
use too much alcohol. It must not be allowed to drip into the printer!
5.
Allow the Printhead to thoroughly dry before re-installing the Ribbon
Cartridge.
6.
Re-install the Ribbon Cartridge, and shut the cover. If a streak persists, Contact
Technical Support for further assistance.
IMPORTANT! Never use a sharp tool or a metal object of any kind to clean the Printhead. You
will damage the Printhead!
70 Section 8: Maintenance
DLDP2.qxd
3/29/99 9:56 AM
Page 71
Digital Label and Decal Press 2 UserÕs Manual
C. CLEANING THE UNIT’S CASE
Your digital press has a durable casing that should retain its luster and appearance
for many years. Clean it only with a soft cloth slightly moistened with water or a
mild soap. Do not use excess water or cleaning solvents of any kind. Never spray
the cabinet with a cleaner. Rather, spray the cloth first and then wipe down the
unit.
D. CLEANING THE INSIDE OF THE UNIT
As you use your digital press dust and other particles will accumulate inside its
case. These particles are attracted to the underside of the ribbon by static produced
during printing and can cause voids or colored spots on the printed image. Use the
following procedure to clean the inside of the unit periodically or as needed.
1.
Open the printerÕs Top Cover by pressing the Cover Release Button.
2.
Remove the Ribbon Cartridge from the printer.
3.
Open the Cutter Door by pulling down on the doorÕs handle.
4.
If you have access to a very small vacuum cleaner (most computer stores sell
devices just for this purpose), use it to vacuum out all visible areas inside the
printer and cutter. Using such a vacuum works especially well when cleaning
paper dust from the cutter.
5.
If you do not have access to a small vacuum, use a Cleaning Pad from the
Printer Cleaning Kit or a soft, lint-free cloth slightly moistened with isopropyl
alcohol to wipe out all visible areas inside the printer and cutter. Also,
thoroughly wipe off any dust which may be on the Ribbon Cartridge. Be
extremely careful not to let any alcohol drip inside the printerÕs case!
Section 8: Maintenance 71
DLDP2.qxd
3/29/99 9:56 AM
Page 72
Digital Label and Decal Press 2 UserÕs Manual
6.
Re-install the Ribbon Cartridge, shut the Cutter Door, and shut the printerÕs
Top Cover.
E. CLEANING THE PLATEN ROLLER
The Platen Roller rests just underneath the Printhead when the printerÕs Top Cover
is closed. During printing, print media is wrapped tightly around this roller in
order to maintain consistent print registration.
Periodically clean the printerÕs Platen Roller if you notice excess dust or debris
accumulation on the roller or if the digital press is having feeding problems or print
media jams. Also perform this procedure if you notice any ink on the Platen Roller.
Use the following steps to clean this roller.
1.
Open the printerÕs Top Cover by pressing the Cover Release Button.
2.
Remove the Ribbon Cartridge from the printer.
3.
Locate the Platen Roller. It is the long, black rubber roller in the center of the
printerÕs interior.
Platen Roller
4.
Use a Cleaning Pad from the Printer Cleaning Kit or a soft, lint-free cloth
slightly moistened with isopropyl alcohol to thoroughly wipe the roller clean.
While wiping, use the Cancel button of the Printer controls to rotate the roller.
Be extremely careful not to let any alcohol drip inside the printerÕs case!
5.
After the roller is clean and completely dry, replace the Ribbon Cartridge and
close the printerÕs cover.
72 Section 8: Maintenance
DLDP2.qxd
3/29/99 9:56 AM
Page 73
Digital Label and Decal Press 2 UserÕs Manual
F. CLEANING THE IN-FEED ROLLERS
The In-Feed Rollers are visible when the Media Tray Assembly is removed. There
are a total of three In-Feed Rollers. Two rollers are located within the printer, one
directly in front of the other. The other roller is located on the Media Supply Tray.
Together, the In-Feed Rollers serve to pull print media out of the Supply Tray and
feed it up into the printer.
Periodically clean the printerÕs In-Feed Rollers if you notice voids or spots in
printed images down the center of the page, if you notice excess dust or debris
accumulation on the rollers, or if the printer is having difficulty pulling media out
of the Supply Tray. Use the following steps to clean these rollers.
1.
Remove the Media Tray Assembly from the printer.
2.
Locate the Media Supply TrayÕs rubber In-Feed Roller.
In-Feed Roller
3.
Locate the two rubber In-Feed Rollers within the printer.
In-Feed Rollers
4.
Use a Cleaning Pad from the Printer Cleaning Kit or a soft, lint-free cloth
slightly moistened with isopropyl alcohol to thoroughly wipe each of the
rollers clean. While wiping, manually rotate each roller with your fingertips.
Section 8: Maintenance 73
DLDP2.qxd
3/29/99 9:56 AM
Page 74
Digital Label and Decal Press 2 UserÕs Manual
5.
After all of the rollers are clean and completely dry, replace the Media Tray
Assembly.
G. CLEARING A RIBBON JAM
If the ribbon becomes jammed in the printerÕs Platen Roller (visible when you open
the printerÕs Top Cover), use the following procedure to correct the problem.
1.
With the printerÕs Top Cover open, remove the ribbon take-up core (the side
with the used ribbon on it) from the Ribbon Cartridge.
2.
Gently pull the ribbon up and out of the printer while pressing and holding
down the printerÕs On-Line button. This will rotate the Platen Roller backwards
and eject the ribbon while you are pulling upwards.
3.
If any ink is visible on the Platen Roller, clean it according to the steps in Part E
of this section.
H. CLEARING A MINOR PRINT MEDIA JAM
If a sheet of print media becomes jammed inside the unit, remove it through the
following steps:
1.
Open the printerÕs Top Cover by pressing the Cover Release Button.
2.
Remove the Ribbon Cartridge and, if necessary, the Media Tray Assembly from
the printer.
3.
From the Printer controls, press the Cancel button to advance the print media.
Press the On-Line button to reverse the print media. If the print media is
jammed within the cutter, press the cutterÕs Cancel button to advance the print
media or its Pause button to reverse the print media. Note that the Cutter Door
must be closed and the printerÕs Top Cover must be open in order for the cutter
buttons to function in this manner.
4.
While pressing either of the Printer buttons, it may also be necessary to gently
pull on the appropriate end of the print media to help clear out the media. If
pressing either of the buttons does not seem to move the print media and it
appears to be stuck, refer to the steps in Part I of this section.
5.
Once the jam has been cleared, replace the Print Cartridge and Media Tray
Assembly, and close the Top Cover. Select the Cancel Print button in the 32-Bit
Print Spooler to cancel the print job, and press the printerÕs Cancel button to
clear its memory. Resend the print job. Note that if the 32-Bit Print SpoolerÕs
Save last job for reprint option was selected, you simply have to select the
spoolerÕs Print button to resend the job.
74 Section 8: Maintenance
DLDP2.qxd
3/29/99 9:56 AM
Page 75
Digital Label and Decal Press 2 UserÕs Manual
I. CLEARING A MAJOR PRINT MEDIA JAM
Although rare, print media can sometimes begin to separate from its backing while
printing. When this happens, it can occasionally become stuck to the interior rollers
causing the media to jam and halt the print process. If this happens, do not attempt
to rip the media from the printer. This will cause the media to tear, leaving media
fragments within the printer. Instead, use the following procedure to clear the print
media from the printer.
1.
Open the printerÕs Top Cover by pressing the Cover Release Button.
2.
Remove the Ribbon Cartridge from the printer.
3.
Locate the Print Pressure Bracket indicated in the illustration below. This
bracket runs the entire width of the printerÕs interior and must be removed in
order to clear out the print media jam.
Securing Levers
Print Pressure Bracket
Sensor Connector
Section 8: Maintenance 75
DLDP2.qxd
3/29/99 9:56 AM
Page 76
Digital Label and Decal Press 2 UserÕs Manual
4.
The Print Pressure Bracket is held in place by two Securing Levers and is
connected to the printer electronically by its Sensor Connector. Each of these
items is marked with a yellow colored end. To remove the bracket, first turn
the printer power OFF, then disconnect the Sensor Connector by sliding it
toward the left-hand side of the printer until it stops.
Print Pressure
Bracket
Sensor Connector
Securing
Lever
5.
Next, firmly pull up on each Securing Lever until each is in its fully opened
position as shown above. Some force is required to unlatch these Securing
Levers. Note that lifting both the left and right Securing Levers simultaneously
may reduce the effort required to unlatch the levers.
76 Section 8: Maintenance
DLDP2.qxd
3/29/99 9:56 AM
Page 77
Digital Label and Decal Press 2 UserÕs Manual
6.
Once the bracket is disconnected and unlatched, gently lift it from the printer.
7.
Once the bracket is removed, clear all traces of the jammed media from the
printer. If necessary, turn the printer power back ON, and press the Cancel and
On-Line buttons to rotate and view all areas of the rollers.
Section 8: Maintenance 77
DLDP2.qxd
3/29/99 9:56 AM
Page 78
Digital Label and Decal Press 2 UserÕs Manual
8.
When all print media is cleared, turn the printer power OFF, then insert the
Print Pressure Bracket back into its original position within the printer. Be sure
the Print Pressure Bracket is seated properly on top of the Chassis Tab on each
side of the printerÕs interior as shown.
Print Pressure
Bracket
Chassis Tab
Sensor Connector
9.
Once the Print Pressure Bracket is in the proper position, firmly push each
Securing Lever all the way down until each is in its locked position. Some force
is required to latch these Securing Levers.
10. Reconnect the Sensor Connector by sliding it toward the right-hand side of the
printer until it stops.
11. Replace the Print Cartridge and close the Top Cover. Select the Cancel Print
button in the 32-Bit Print Spooler to cancel the print job, and press the printerÕs
Cancel button to clear its memory. Resend the print job. Note that if the 32-Bit
Print SpoolerÕs Save last job for reprint option was selected, you simply have
to select the spoolerÕs Print button to resend the job.
NOTE: After the Print Pressure Bracket has been placed back into the printer, you may need to
recalibrate the ribbon sensor according to the calibration procedure at the end of Section 9.
78 Section 8: Maintenance
DLDP2.qxd
3/29/99 9:56 AM
Page 79
Digital Label and Decal Press 2 UserÕs Manual
J. CLEANING THE PINCH ROLLERS
Two sets of Pinch Rollers can be found inside the unit. The first set is located within
the unitÕs cutter. The second set is located next to the printerÕs Platen Roller. These
Pinch Rollers serve to hold print media securely so it can be accurately printed and
cut.
If using the #200-Series (dye-sublimation) or #300-Series (resin) print supplies, you
should not need to clean these rollers. If using the #100-Series (wax/resin) print
supplies, you should clean these rollers only if you notice faint streaks of color
running along each outside edge of the printed page. These streaks are caused by
the gradual transfer of the wax/resin inks from the printed page to the Pinch
Rollers. Refer to the following steps to clean these rollers.
NOTE: If you are using the #100-Series supplies and wish to avoid having to clean the Pinch
Rollers, simply leave a 1.25Ó (31.8mm) margin along each outside edge of the sheet. This
will assure that the wax/resin inks will not come into contact with these rollers.
1.
Open the printerÕs Top Cover by pressing the Cover Release Button.
2.
Remove the Ribbon Cartridge from the printer.
3.
Open the Cutter Door by pulling down on the doorÕs handle.
4.
Locate the two, small gray Pinch Rollers just inside the cutter.
Pinch Rollers
5.
Use a Cleaning Pad from the Printer Cleaning Kit or a soft, lint-free cloth
slightly moistened with isopropyl alcohol to thoroughly wipe the rollers clean.
While wiping, manually rotate the rollers with your fingertips.
6.
After the rollers are clean and completely dry, close the Cutter Door.
Section 8: Maintenance 79
DLDP2.qxd
3/29/99 9:56 AM
Page 80
Digital Label and Decal Press 2 UserÕs Manual
7.
Next, clean the Pinch Rollers within the printer. To do this, you must first
remove the Print Pressure Bracket from the printer. Refer to the steps in Part I
of this section for instructions on removing this bracket.
Print Pressure Bracket
8.
Once the Print Pressure Bracket is removed, use a Cleaning Pad from the
Printer Cleaning Kit or a soft, lint-free cloth slightly moistened with isopropyl
alcohol to thoroughly wipe the Pinch Rollers clean. While wiping, use the
Cancel and On-Line buttons of the Printer controls to rotate the Pinch Rollers.
Pinch Rollers
9.
After the roller is clean and completely dry, re-install the Print Pressure Bracket
according to the steps in Part I of this section.
10. Replace the Ribbon Cartridge and close the printerÕs cover.
80 Section 8: Maintenance
DLDP2.qxd
3/29/99 9:56 AM
Page 81
Digital Label and Decal Press 2 UserÕs Manual
K. REPLACING THE CUTTER BLADE
The cutter uses a tiny razor-sharp blade to kiss-cut its output. Over time, this blade
will eventually begin to grow dull. When this happens, you may notice one or all of
the following symptoms:
■
The cut line is rough or jagged as if the media were being ripped instead of
sliced.
■
If the cut line has sharp, pointed corners, some of these corners start to lift up
as they are cut.
■
Excess cutting pressure is required for print media which originally required
far less pressure.
■
Print media which normally cuts fine, starts to stall the cutter as cut pressure is
increased.
If any of these symptoms begin to consistently occur, replace the Cutter Blade
according to the following steps.
1.
Open the Cutter Door by pulling down on the doorÕs handle.
2.
Locate the black, plastic Cutter Arm which holds the aluminum Blade Holder
in place.
Blade Holder
Securing Knob
Cutter Arm
3.
Loosen the gold-colored Securing Knob by turning it toward the rear of the
printer.
Section 8: Maintenance 81
DLDP2.qxd
3/29/99 9:56 AM
Page 82
Digital Label and Decal Press 2 UserÕs Manual
4.
Remove the aluminum Blade Holder.
CAUTION!
THE CUTTER BLADE IS RAZOR-SHARP AND CAN EASILY CUT YOU. BE
EXTREMELY CAREFUL WHEN REMOVING THIS BLADE!
5.
Unscrew and remove the top of the Blade Holder.
6.
Tip the base of the holder upside down and remove the blade.
82 Section 8: Maintenance
DLDP2.qxd
3/29/99 9:56 AM
Page 83
Digital Label and Decal Press 2 UserÕs Manual
7.
Insert the new blade into the base of the holder and replace the holderÕs screwon top.
8.
Place the Blade Holder back into the Cutter Arm and retighten the gold-colored
Securing Knob by turning it toward the front of the printer. Tighten only until
the Blade Holder fits securely within the Cutter Arm. To verify proper
tightness, try rotating the Blade Holder clockwise within the Cutter Arm. If it
rotates, the Securing Knob needs to be further tightened. Do not over-tighten!
Section 8: Maintenance 83
DLDP2.qxd
3/29/99 9:56 AM
Page 84
Digital Label and Decal Press 2 UserÕs Manual
84 Section 8: Maintenance
DLDP2.qxd
3/29/99 9:56 AM
Page 85
Troubleshooting
9
If you have difficulty operating your digital press, the troubleshooting suggestions
in this section should, in most cases, solve the problem. If you still have difficulty
after trying these suggestions, call the manufacturerÕs Technical Support Group or
your authorized reseller. Customer and technical support representatives are
available Monday through Friday, 7:30 AM to 6:00 PM Central Standard Time. You
may also leave a message 24-hours a day if youÕd like to have a representative call
you back the next business day. Technical support and printer driver upgrades can
also be obtained by connecting to http://www.fargo.com.
The printer does not even begin to print.
Symptoms: Nothing happens or an error message comes up in the Windows application
program.
■
Make sure that the power cord is plugged in securely on both ends and that the
printer is turned ON. Confirm power is applied. The Cancel and On-Line LED
lights of the Printer controls and the Cancel LED light of the Cutter controls
must be illuminated in order for the digital press to function.
■
Make certain that the printer cable is securely connected. An error message in
the software application telling you that the printer is not responding is usually
due to a missing or defective parallel interface cable. Always use a shielded, bidirectional parallel cable (preferably an I-EEE 1284 type cable) that is no longer
than 6 feet in length.
Section 9: Troubleshooting 85
DLDP2.qxd
3/29/99 9:56 AM
Page 86
Digital Label and Decal Press 2 UserÕs Manual
The print job rasterizes, but the unit doesn’t print.
Symptoms: Your computer seems to raster the image and send it to the printer but the
printer does not respond.
■
You may be in need of more hard drive space. As a rule, you should always
maintain at least 200 MB of free space on your hard disk.
My prints have thin lines or a dark band across the width of the print.
Symptoms: The printer seems to ÒstutterÓ or print unusually slow, and when the print is
finished, it has many thin lines across the entire width of the print. Or, it has a
dark band across the first inch of the print while the rest of the print is much
lighter.
■
This signifies that your computer is not sending data to the printer fast enough.
Be sure that your computerÕs parallel port mode is set to ECP and that you are
printing through the Fast 32-Bit Spooler. See Section 6-B and C for instructions
on checking your parallel port mode and on using this spooler.
■
If you are not able to use the 32-Bit Print Spooler, try printing with the Write
Direct to Port option selected from within the printer driver. This option
devotes all of your system resources to the current print job, thereby increasing
the rate of data transmission. Note that this option will tie-up your system until
the print job is complete.
■
If you are unable to print through either the 32-Bit Print Spooler or the Write
Direct To Port option, try printing through the system print spooler of
Windows 95/98. This spooler is provided with Windows and can be used with
nearly any type of printer. The following steps will help you optimize this
standard spooler for printing to the digital press:
1.
Click the Start button, point to Settings, and select Printers. When the
Printers window appears, click on the Digital Label Press 2 icon using the
right mouse button, and select the Properties option.
2.
Select the Details tab, then select the Spool Settings button. Select the
Print directly to the printer option and click on OK.
3.
Again from the Details tab, select the Port Settings button. Deselect both
the Check Port state before printing option and the Spool MS-DOS print
jobs option, and click on OK.
4.
Increase the Transmission retry value of the Details tab from 45 to 900.
Click on OK to close the Properties window.
86 Section 9: Troubleshooting
DLDP2.qxd
3/29/99 9:56 AM
Page 87
Digital Label and Decal Press 2 UserÕs Manual
The On-Line LED light under the Printer controls is flashing rapidly.
This indicates an error has occurred with the print media or with the print ribbon.
If such an error occurs before the digital press actually starts to print, the error is
recoverable. Correct the problem and press the On-Line button to resume printing.
If the error occurs after the digital press starts printing, select the Cancel Print
button in the 32-Bit Print Spooler to cancel the print job, and correct the problem.
Then, press the printerÕs Cancel button to clear its memory, and resend the print
job. If necessary, you can also reset the printer by simultaneously pressing the
CutterÕs Cancel and Pause buttons or by simply turning the unitÕs power OFF and
ON (see Section 3-D for more information on the button functions). Note that if the
32-Bit Print SpoolerÕs Save last job for reprint option was selected, you simply
have to select the spoolerÕs Print button to resend the job. Refer to the following list
for possible causes to this printer error condition.
■
Check that you have properly loaded print media and a print ribbon and that
you have not run out of either. Replace media as required (see Section 4).
■
Make sure the Ribbon Type option selected in the printer driver matches the
type of ribbon currently installed. (see Section 6-D for Ribbon Type
information).
■
Check that you have loaded compatible print supplies according to the
descriptions given in Section 4. Remember, only supplies within the same #100,
#200, or #300-Series can be used with one another.
■
Check to see if the print media is jammed or is not feeding effectively from the
Media Supply Tray. If jammed, clear according to Section 8-H. If not feeding,
separate the print media to assure it is not sticking together. Also, be sure the
Media Supply TrayÕs In-Feed Clutch is set properly according to Section 4-H.
You may also need to clean the In-Feed Rollers according to Section 8-F.
■
Check to see if the ribbon is jammed down into the Platen Roller. If so, clear the
jam according to Section 8-G.
■
If you have removed the Print Pressure Bracket according to the instructions in
Section 8-I, be sure it was re-installed properly according to these same
instructions.
Section 9: Troubleshooting 87
DLDP2.qxd
3/29/99 9:56 AM
Page 88
Digital Label and Decal Press 2 UserÕs Manual
The On-Line LED light under the Printer controls or the Cancel LED light
under the Cutter controls is flashing erratically.
This indicates a data transmission error. In other words, the digital press is not
properly receiving the print data. If such an error occurs, select the Cancel Print
button in the 32-Bit Print Spooler to cancel the print job, and correct the problem.
Then, press the printerÕs Cancel button to clear its memory, and resend the print
job. If necessary, you can also reset the printer by simultaneously pressing the
CutterÕs Cancel and Pause buttons or by simply turning the printer power OFF and
ON (see Section 3-D for more information on the button functions). Note that if the
32-Bit Print SpoolerÕs Save last job for reprint option was selected, you simply
have to select the spoolerÕs Print button to resend the job. Refer to the following list
for possible causes to this printer error condition.
■
If you have canceled the printer during a print job, is the computer still trying
to send the print job? If so, cancel the print job in the software and resend it.
■
This condition can sometimes be caused by using a substandard interface cable.
Always use a shielded, bi-directional parallel cable (preferably an I-EEE 1284
type cable) that is no longer than 6 feet in length.
■
Do you have the unit connected through a switch box? If so, connect it directly
to your computer. Do not connect the digital press through a switch box, as this
can interfere with the flow of print data.
■
If using the system print spooler of Windows and your printer starts printing
and stops, you may need to increase your Transmission Retry Value. To do this,
right-click on the Digital Label Press 2 icon within the Printers window. Then
select Properties and click on the Details tab. Under Timeout Settings, increase
the Transmission Retry Value from 45 to 900.
The Cancel LED light under the Cutter controls is flashing rapidly.
This indicates an error has occurred with the cutter. If such an error occurs, correct
the problem and press the CutterÕs Pause button to resume cutting (see Section 3-D
for more information on the Cutter button functions). Refer to the following list for
possible causes to this cutter error condition.
■
Make sure the cutter door is securely shut.
■
If the cutter stops cutting in the middle of a cut job, this is considered a cutter
Òstall.Ó Cutter stalls can be caused if the cut pressure is set too high or if the
cutter blade has become dull. Check and/or replace the cutter blade according
to Section 8-K.
■
The cutter may not be sensing the cutter target due to improper printing of the
target. Check that the print media is stacked and loaded evenly within the
Supply Tray and that the trayÕs Media Guides are pushed securely against the
media stack. Also, check that each cutter target is being completely printed.
88 Section 9: Troubleshooting
DLDP2.qxd
3/29/99 9:56 AM
Page 89
Digital Label and Decal Press 2 UserÕs Manual
The On-Line and Cancel LED lights under the Printer controls flash
together, then the On-Line light flashes alone several times.
■
This indicates either the printer driver or the printerÕs firmware version is not
compatible with the other and that one or the other is outdated. Contact
Technical Support for information on the most recent versions of each.
■
This can also indicate a more serious printer error has occurred. Contact
Technical Support for details.
The print media or ribbon is jammed.
Symptoms: The digital press stops printing and the Printer On-Line LED light is flashing.
■
Check that you have properly loaded print media and a print ribbon according
to the instructions in Section 4. Print media should always be loaded with the
print side facing down (backing side up).
■
Check that you have loaded compatible print supplies according to the
descriptions given in Section 4. Remember, only supplies within the same #100,
#200, or #300-Series can be used with one another.
■
If the print media is not feeding effectively from the Media Supply Tray,
separate the print media to assure it is not sticking together. Also, be sure the
Media Supply TrayÕs In-Feed Clutch is set properly according to Section 4-H.
You may also need to clean the In-Feed Rollers according to Section 8-F.
■
If you have removed the Print Pressure Bracket according to the instructions in
Section 8-I, be sure it was re-installed properly according to these same
instructions. In particular, check that the Sensor Connector was properly
reconnected.
■
Clear all jams according to Section 8-G, H, or I.
My prints have thin lines in them.
Symptoms: Random lines appear in output that travel the entire length of the print, from
top to bottom.
■
Most likely due to dust or other debris on the Printhead. Review the proper
procedures for Printhead cleaning in Section 8-B.
My #100-Series wax/resin prints have streaks in them.
Symptoms: Faint streaks appear in wax/resin output that always travel along each outside
edge of the printed sheet.
■
Most likely due to dirty Pinch Rollers. See Section 8-J for instructions on
cleaning these rollers and on what you can do to prevent such streaks in the
future.
Section 9: Troubleshooting 89
DLDP2.qxd
3/29/99 9:56 AM
Page 90
Digital Label and Decal Press 2 UserÕs Manual
My prints have blotches or spots in them.
Symptoms: Small spots appear randomly on the print with no ink or different colors of ink.
■
Most likely due to dust inside the printer. Review the procedures in Section 8-D
for cleaning the inside of the printer.
■
Can also be caused by dust accumulation on the ribbon or print media. Always
store print supplies in the original packaging or in some other suitable dustfree environment.
■
If the spots appear mainly down the center of the page, this may also indicate
that the printerÕs Feed Rollers need to be cleaned. Clean according to Section 8-F.
My prints have poor or faded print quality.
■ Check that you have properly loaded print media and a print ribbon according
to the instructions in Section 4. Print media should always be loaded with the
print side facing down (backing side up).
■
Check that you have loaded compatible print supplies according to the
descriptions given in Section 4. Remember, only supplies within the same #100,
#200, or #300-Series can be used with one another.
■
You are using too much heat or not enough heat to properly transfer ink.
Adjust the Intensity control in the printer driver up or down as needed.
My dye-sublimation prints look jaggy or pixelated.
Symptoms: Prints do not look smooth or continuous, but rather grainy and unclear.
■
For best photo-realistic output, you should always use high resolution 24 bit
images. If scanning an image, always scan the image at a 24 bit color setting, at
the same size at which you will be printing, and at 300 dpi. If you stretch or
Òblow upÓ a small or low resolution image, you will always get a pixelated or
grainy effect when printing.
■
Try selecting the Fine Anti-Aliasing option from the Preferences tab of
PressPrintÕs Print window. This option should be selected only for dyesublimation prints and causes printed images to appear more smoothly around
the edges.
The print media won’t feed and the Printer On-line LED is flashing rapidly.
Symptoms: The printer starts to make noise like everything is fine, but no print media feeds.
■
Check that you have properly loaded print media and a print ribbon according
to the instructions in Section 4 and that you have not over-loaded the tray. Do
not attempt to load more than 50 sheets of print media. Also, be sure the print
media stack fits loosely beneath the Media Supply TrayÕs three Media Guide
Tabs (see Section 4-G).
■
If the print media is not feeding effectively from the Media Supply Tray,
separate the print media to assure it is not sticking together. Also, be sure the
Media Supply TrayÕs In-Feed Clutch is set properly according to Section 4-H.
You may also need to clean the In-Feed Rollers according to Section 8-F.
90 Section 9: Troubleshooting
DLDP2.qxd
3/29/99 9:56 AM
Page 91
Digital Label and Decal Press 2 UserÕs Manual
The cutter is not functioning as it normally does, and/or the quality of the
cut line has degraded.
Symptoms:
Ñ The cut line is rough or jagged as if the media were being ripped instead
of sliced.
Ñ If the cut line has sharp, pointed corners, some of these corners start to
lift up as they are cut.
Ñ Excess cutting pressure is required for print media which originally
required far less pressure.
Ñ Print media which normally cuts fine, starts to stall the cutter as cut
pressure is increased.
■
Most likely due to a dull cutter blade. Check and/or replace the cutter blade
according to Section 8-K.
The cut line is not centered around the printed object.
■
Be sure the cutter settings are configured properly according to Section 7-C.
■
Be sure the blank size within PressPrint is set to the default size of
11.71Ó x 17.3Ó.
The cutter is cutting too deeply or is not cutting deeply enough.
■
The various print media will require unique cutter pressure settings. Use the
Cutting Pressure Slide to adjust the cut pressure accordingly. See Section 3-D
for instructions on properly adjusting the cutting pressure.
My image gets cut off at the top or bottom (or on the side in Landscape
mode).
■
Remember, there is an unprintable area at the top and bottom of all print
media. This is necessary so that the printer can grip the print media while
feeding it back and forth. See Paper Size explanation in Section 6-D for more
print area information. Be sure images fall within this print area and that the
Layout\Blank Size option in PressPrint is set to 11.710Ó x 17.3Ó.
Multiple sheets of print media feed at the same time.
■
Be sure to fan or separate the media before loading. Static and moisture tend to
attract two sheets together. This is especially true with the #300-Series clear or
white cast vinyl. Also, be sure the Media Supply TrayÕs In-Feed Clutch is set
properly according to Section 4-H.
Section 9: Troubleshooting 91
DLDP2.qxd
3/29/99 9:56 AM
Page 92
Digital Label and Decal Press 2 UserÕs Manual
Areas of my prints are “scrambled” or look like bar codes.
■
This signifies a data transmission error. This could be caused by a faulty or
substandard printer cable or parallel port. Try switching to a different, higher
quality parallel cable. For best results, use a shielded, bi-directional I-EEE 1284
parallel cable no longer than 6 feet in length.
The ribbon sensor needs adjustment.
Symptoms: My full-color output is printing completely off-color on all or part of the sheet,
and/or the error message ÒThe printer did not detect the proper ribbon
panelsÉÓ displays.
■
Check that the Ribbon Type option in the printer driver is set according to the
ribbon currently installed (see Section 4-B and Section 6-D). If it is, and the
error persists, your printerÕs ribbon sensor is most likely in need of adjustment.
Refer to the following steps to adjust the unitÕs ribbon sensor.
1.
Open the Top Cover.
2.
Manually wind the ribbon forward until the beginning of the ribbonÕs
YELLOW panel touches the ribbon take-up core (the core with the used
ribbon on it). This will properly position the yellow panel over the unitÕs
ribbon sensor.
3.
Close the Top Cover and verify that the printer is properly connected to
your computer.
4.
Go to the printer driver setup window (see Section 6-D) and click on the
Calibrate button. The Printer Ribbon Sensor Calibration window appears.
5.
Click on the Send button of the Ribbon Calibrate box to download the
ribbon sensor calibration sequence. While the ribbon sensor is recalibrating,
both the On-Line and Cancel LED lights of the Printer controls will flash
simultaneously. When calibration is complete, both lights will remain solid.
You can now resend your print job.
92 Section 9: Troubleshooting
DLDP2.qxd
3/29/99 9:56 AM
Page 93
Technical
Specifications
10
Printing Methods:
Dye-sublimation Ñ resin thermal transfer Ñ wax/resin thermal
transfer
Printing Resolution:
300 x 300 DPI
Colors:
Up to 16.7 million
Color Panel Order:
Color:
Monochrome:
Yellow, Magenta, Cyan, Overlay (if used)
Continuous single color
Printing Speed:
Dye-Sublimation (CMYO):
Resin Thermal Transfer (CMY):
Wax/Resin Thermal Transfer:
Approximately 6 minutes per page
Approximately 3 minutes per page
Approximately 1 minute per page
Paper Feed Method:
Friction feed
Paper Loading:
Supply Tray capacity:
Output Rack capacity:
Approximately 50 sheets
Approximately 50 sheets
Media Size:
B/A3-Super 12Ó x 20Ó (305 x 508mm)
Printing Area:
11.71Ó x 17.3Ó (297.4 x 439.4mm)
Ink Ribbon:
Dye-sublimation:
Resin thermal transfer:
Wax/resin thermal transfer:
3-Color with overlay: CMYO; 50 prints/roll
3-Color: CMY; 50 prints/roll
Spot Colors: 200 prints/roll
Spot Colors: 200 prints/roll
Printer Driver:
Windows 95
Interface:
Centronics-type parallel
Section 10: Technical Specifications 93
DLDP2.qxd
3/29/99 9:56 AM
Page 94
Digital Label and Decal Press 2 UserÕs Manual
Dimensions:
18ÓW x 13.5ÓH x 15.75ÓD (32.25ÓD with paper tray installed);
45.7cmW x 34.3cmH x 40cmD (82cmD with paper tray installed)
Weight:
71 lbs. (32 kg)
Temperature:
Operating:
Storage:
5¡C to 35¡C
-20¡C to 55¡C (5¡C to 35¡C guaranteed for Ink Ribbon;
-5¡C to 45¡C for up to one month is normally acceptable but
not guaranteed)
Humidity:
Operating:
Storage:
20% to 80% (RH non-condensation)
15% to 85% (RH non-condensation)
Supply Voltage:
110-120/220-240 VAC
Supply Frequency:
50/60 Hz
Safety:
UL1950, T†V-GS (IEC950)
EMC:
FCC Class A, CRC c1374 Class A, CISPR 22-B, T†V-EMC
CE:
Self certified based on IEC 801-2-3-4, CISPR 22-B and IEC 950
certification
94 Section 10: Technical Specifications
DLDP2.qxd
3/29/99 9:56 AM
Page 95
Appendix A:
Interfacing Information
A
A. INTRODUCTION
The digital press is equipped with a standard 8-bit Centronics-type parallel data
communications port. This is the means by which the printer receives data from
your computer. This chapter describes the pin assignments, protocol, and signal
specifications for the unitÕs parallel port.
B. CENTRONICS-TYPE PARALLEL INTERFACE
The Centronics-type parallel interface is the most widely used printer interface due
to its simplicity, speed, and standardization throughout the PC industry. The
printerÕs parallel interface connector is a standard 36-pin Amp type with two
metal-wire retaining clips and is ECP (Extended Capabilities Port) compatible. It
mates with a shielded, bi-directional PC to printer parallel cable. If using a parallel
cable other than the one supplied with your printer, always use an I-EEE 1284
parallel cable which is less than 6 feet in length.
Appendix A: Interfacing Information 95
DLDP2.qxd
3/29/99 9:56 AM
Page 96
Digital Label and Decal Press 2 UserÕs Manual
Pin assignments are as follows:
WIRE DIAGRAM
DB36P
DB25P
19
36
1
1
2
2
3
3
4
4
5
5
6
6
7
7
8
8
9
9
10
10
11
11
12
12
13
13
14
14
32
15
31
16
36
17
19 THROUGH 30
19 THROUGH 25
SHELL
SHELL
PIN 1
18
TABLE A-1: Parallel Interface Pin Assignments
96 Appendix A: Interfacing Information
25
14
13
PIN 1
DLDP2.qxd
3/29/99 9:56 AM
Page 97
Index
I
#100-Series plain paper..................................................................................................................................22
#100-Series ribbons .........................................................................................................................................19
#200-Series polyester......................................................................................................................................22
#200-Series ribbons .........................................................................................................................................20
#300-Series ribbons .........................................................................................................................................20
#300-Series UL-recognized polyester ..........................................................................................................23
#300-Series vinyl .............................................................................................................................................23
32-Bit print spooler ...................................................................................................................................39, 46
Aligning objects...............................................................................................................................................60
Anti-Aliasing ...................................................................................................................................................61
Bitmap files ......................................................................................................................................................59
Blade holder.........................................................................................................................................16, 17, 81
Calibrate ...........................................................................................................................................................48
Cancel button.............................................................................................................................................13, 14
Cancel LED light .......................................................................................................................................13, 88
Color matching................................................................................................................................................45
Contour cut ......................................................................................................................................................54
Cut only (disable print)..................................................................................................................................47
Cutter blade .....................................................................................................................................................81
Cutting pressure slide ....................................................................................................................................14
Cutter controls .................................................................................................................................................13
Cutter settings .................................................................................................................................................51
Die cut...............................................................................................................................................................60
Disable overlay................................................................................................................................................46
Disable target & cut ........................................................................................................................................47
Dither mode .....................................................................................................................................................45
Dye-sublimation..........................................................................................................................................2, 20
ECP..............................................................................................................................................................39, 41
Enhance fine text.............................................................................................................................................46
Fabric transfers ................................................................................................................................................24
Importing files ...........................................................................................................................................58, 59
In-Feed clutch ..................................................................................................................................................27
In-Feed rollers..................................................................................................................................................73
Index 97
DLDP2.qxd
3/29/99 9:56 AM
Page 98
Digital Label and Decal Press 2 UserÕs Manual
Intensity............................................................................................................................................................46
Media tray assembly ................................................................................................................................25, 28
No targets .........................................................................................................................................................47
On-Line button ................................................................................................................................................13
On-Line LED light ..............................................................................................................................13, 87, 88
Orientation .......................................................................................................................................................47
Output rack......................................................................................................................................................25
Paper size .........................................................................................................................................................44
Parallel port ...................................................................................................................................15, 34, 41, 95
Pause button ....................................................................................................................................................13
Pause LED light...............................................................................................................................................13
Photo coffee mug transfers............................................................................................................................24
Pinch rollers .....................................................................................................................................................79
Platen roller......................................................................................................................................................72
Polyester ...........................................................................................................................................................23
Power ................................................................................................................................................................31
Prepress proofs ................................................................................................................................................24
PressPrint .........................................................................................................................................................49
PrimaColor.......................................................................................................................................................45
Print media.......................................................................................................................................................22
Print pressure bracket ....................................................................................................................................75
Printer cleaning kit .........................................................................................................................................69
Printer controls ................................................................................................................................................13
Printer driver ...................................................................................................................................................37
Printhead ..........................................................................................................................................................70
Resin thermal transfer ....................................................................................................................................20
Ribbon cartridge .................................................................................................................................16, 21, 22
Ribbon sensor ............................................................................................................................................48, 92
Ribbon type......................................................................................................................................................45
Ribbons .............................................................................................................................................................19
Rotating images...............................................................................................................................................61
Save last job for reprint ..................................................................................................................................41
Securing levers ................................................................................................................................................75
Self test........................................................................................................................................................32, 48
Serialized labels...............................................................................................................................................62
Supply tray.......................................................................................................................................................25
Technical support............................................................................................................................................85
Thermal transfer................................................................................................................................................1
Tray cover.........................................................................................................................................................25
UL-recognized labels ......................................................................................................................................23
Use pre-existing targets..................................................................................................................................47
Vector ................................................................................................................................................................59
Vinyl ..................................................................................................................................................................23
Wax/Resin thermal transfer..........................................................................................................................19
Wax thermal process color paper labels ......................................................................................................24
Write direct to port .........................................................................................................................................46
98 Index
DLDP2_cover.qxd
3/26/99 11:38 AM
Page 2
Printed in the United States of America
P/N 510183