1
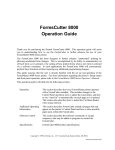
PrintMaster 860 Series Quick Setup Instructions
1
Unpack the Printer: Remove all packing materials, and place on table or print stand. –– Connect the power and host interface cables.
2
Load Paper – To access the rear paper feed tractors, lift the lid on the back
of the printer. If the tractors are nost set to the proper wideth for the form you
are loading, locate the reen lever on the side of the right-hand tractor and
move it toward the front of the printer to allow the tractor to slide left or right.
Note that the left-hand tractor position is not adustable. Open the doors on the
top of the tractors and place the holes in the edges of the form, face down,
over the pins in the tractor. Make sure the top edge of the form will not extend
beyond the tractor doors and close the doors. Slide the right-hand tractor so
that the form is taut between the tractors and lock the tractor in place by
moving the green lever down.
3
If your printer is a PrintMaster 862, open the access door for the lower tractors. Load
a form in the bottom tractors with the front of the form facing you by using the same
procedure used for loading the rear tractors. Make sure that top edge of the form
does not extend above the top of the tractors.
5
4
Turn the Printer On – Press the
Online/Power button to turn the
printer on.
Install the Ribbon – Follow the
instructions on the ribbon lid and the side
of the printer to load the ribbon cartridge.
Select the Form you wish to print on
using the UNLOAD/CHANGE button, and
then press the LOAD button to load the
form into position for printing.
CAUTION: DO NOT TIGHTEN RIBBON!
The printer will do this automatically when
the ribbon lid is closed.
6
Review the configuration settings described on the next page. When complete, press the “Online” button to allow the printer to receive data and begin printing.
Part Number 6818 Rev. A
PrintMaster 860 Series Setup Menu Reference
USING SETUP
This reference provides brief instructions for using the printer’s control panel to make
configuration changes. Once you have set up the Interface parameters, you may also use
the Remote Setup program supplied with your printer to make additional changes.
Note: Upon entering the Interface Menu, use the Value buttons to select either the
Serial or Parallel/LAN interface to access the appropriate menu items.
Please refer to the PrintMaster 860 Series Operator’s Manual for complete setup instructions.
The menu tables to the right show the functions available in each menu along with the
factory default value. To make changes, use the following steps:
1. Lift the ribbon lid.
2. Press the MENU button. The ONLINE indicator will begin to flash yellow and the
display will show the following:
Entering
Setup Menus
3.
4.
5.
6.
FORMS MENU
Form 0
Continue to use the MENU button to select any of the menus in the tables shown
to the right.
The SUBMENU button selects additional menus that are related to the selected
menu. For instance, if the FORMS MENU has been selected, the SUBMENU
button will select which form (Form 0 through Form 9) is to be set up. Note that
not all menus have submenus. If no submenu is available, the bottom line will be
blank and the SUBMENU button will not be used.
Once the correct menu and submenu (if available) is selected, pressing the
ALIGN/ITEM button will cause the various items and their current values to be
displayed. Note that the items and their values are right justified. To scroll
through the items available, repeatedly press the ALIGN/ITEM button. To change
the value of the displayed item, use the UP and DOWN arrow buttons to step
through the possible choices. Remember to leave the correct value displayed
before selecting a different item or menu, since “what you see is what you get”
when Setup Mode is exited.
To exit Setup, simply close the ribbon lid. The printer will display:
Exiting Menus
Saving Changes
Copyright © 2010 Printek, Inc.
1517 Townline Road
Benton Harbor, MI 49022
FORMS MENU
INTERFACE MENU
Form Name = Form 0
Tractor PathA = Rear
Lines/Inch = 6
Form Length = 66 Lines
Top Margin = 0 Lines
Bottom Margin = 0 Lines
Characters/Inch = 10
Left Margin = Column 0
Right Margin = 272
Font = Epson FX FD
Draft Speed = Normal
Impact Force = Normal
Language = USA
Zero = Normal
Unidirectional = No
Parallel/LAN
Emulation = Epson
LAN Setup = Off1
IP Address1 = Auto2
IP Address1,2 = 192.168.0.27
Subnet Mask1,2 = 255.255.255.0
1,2
IP Gateway = 192.168.0.0
Auto-CR = On
Auto-LF = Off
Host FF at TOF = No
Characters = Control
Minimum Buffer = No
OPTIONS MENU
Max Form Allowed = Form 2
Auto-Scroll = 1 Second Delay
Tear-Off = 0.00 Inches
Paper Out Fault = Finish Page
Char. To Ignore = 255
Top of Barcode = Off
Top of Oversized = Off
User Language = English
Page Size = 8192 Characters
Truncate Lines = No
A
Bottom Slew = Fast
Ribbon Check = On
Ribbon Life = 23 Million Chars
TEST MENU
Print the Menus = No
Test Mode = Off
A
Available in PrintMaster 862 only.
Serial
Emulation = Epson
Auto-CR = On
Auto-LF = Off
Host FF at TOF = No
Characters = Control
Minimum Buffer = No
Baud Rate = 9600
Data Bits = 8
Stop Bits = 1
Parity = None
Busy Polarity = Low
DTR = Power
XON/XOFF = Off
ETX/ACK = Off
RTS/CTS = Off
1
LAN Setup is only set to “On” when the
internal, wired Ethernet interface is
installed and being used. The external
loopback cable must be installed on the
rear of the printer and the noted items are
then available in the setup menu. The
Serial interface is not available.
LAN Setup is set to “Off” for all other
interfaces. If another optional interface is
installed, please refer to the additional
instructions provided for setup.
2
When IP Address is set to “Auto”, the
printer receives its address via DHCP and
the IP specification choices are not
available.
Phone: 800-368-4636
Fax: 269-925-8539
[email protected]
www.printek.com