1
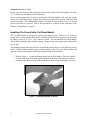
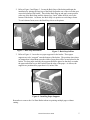
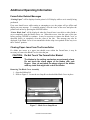
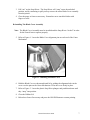
FormsCutter 8000 Operation Guide Thank you for purchasing the Printek FormsCutter 8000. This operation guide will assist you in understanding how to use the FormsCutter to further enhance the use of your FormsMaster 8000 Series printer. The FormsCutter 8000 has been designed to further enhance “unattended” printing by allowing unattended form changes. This is accomplished by its ability to automatically cut off each form as it is printed, or by cutting off any printed forms when a new form is selected via a software command. In most applications the FormsCutter 8000 will automatically perform these functions without requiring any additional programming changes. This guide assumes that the user is already familiar with the set up and operation of the FormsMaster 8000 Series printer. For more information regarding the printer’s Setup menus and front panel operation, please refer to the FormsMaster 8000 Series Operator’s Manual. This operation guide is divided into the following sections. Operation This section describes how your FormsMaster printer operates with a FormsCutter installed. This includes changes to the Control Panel operation, how to adjust the cut position, and how to use “AutoCut” to automatically cut each page as it is printed. This section also describes how to install the Cut Sheet Basket when using AutoCut. Additional Operating Information This section describes FormsCutter related messages that may appear on the printer’s Control Panel and how to clear possible paper jams within the FormsCutter. Software Control This section describes the software commands, or escape sequences, that may be added to programs to control the FormsCutter. Specifications FormsCutter 8000 product specifications. Copyright 1999 by Printek, Inc., 1517 Townline Road, Benton Harbor, MI 49022 Printek Part Number 4859 Operation This section describes differences in the way the FormsMaster printer operates when a FormsCutter is installed. This includes changes in how the printer’s Control Panel operates, form length considerations, and how to select, adjust and use the new features provided. Changes to the Operation of the Printer’s Control Panel While there are some changes to the operation of the printer’s front panel after a FormsCutter is installed, its operation is still very intuitive. The changes concern how the FORM FEED and the UNLOAD buttons operate as described below. FORM FEED Pressing the FORM FEED button will now cause the printer to check to see whether the “Automatic Cut” feature has been set to “No” or “Yes” for the current form (see “Automatically Cutting Each Form As It Is Printed” on page 3). If Automatic Cut is set to “No”, then the next form will advance to the Tear Bar, just as it would if there was no FormsCutter installed. When Automatic Cut is set to “Yes”, the FORM FEED button will cause the current form to be cut off and ejected from the printer, and the next form will be aligned for printing. UNLOAD Pressing the UNLOAD button will cause the printer to check to see if there is a “previously printed form” before unloading the form. A “previously printed form” refers to a form which has been either partially or completely printed, and not yet torn off or cut off. If no previously printed form exists, the UNLOAD button operates normally and will unload the current form and move the tractors to the load position. If a previously printed form does exist, pressing the UNLOAD button the first time will cause that form to be cut off and ejected. Pressing the UNLOAD button a second time will cause the current form to be unloaded and the tractors moved to the load position. How Different Form Lengths Affect the FormsCutter Forms are cut based upon the current top-of-form position and the current form length. The printer will automatically position the next form at the top-of-form whenever a form is loaded or a Form Feed character is received. The form length must be set to correspond with the perforations between forms. Additionally, the FormsCutter performs best when the form length is a multiple of ½ inches in length. The FormsCutter will operate with other form lengths, however the cut position 2 Printek FormsCutter 8000 will not be as accurate. For more information please refer to “Adjusting Where The Form Is Cut”, below. The FormsCutter will not cut forms that are less than 3½ inches in length. Forms less than 3½ inches in length may be printed, but the printer will operate just as though there is no FormsCutter installed and these forms will be positioned at the Tear Bar to be torn off manually. Adjusting Where The Form Is Cut In most cases the cut position requires no adjustment. However, some multiple part forms may cut differently depending upon how well they are constructed by the forms manufacturer. If you have a form which does not cut at the correct position, the position may be adjusted to be as much as 0.2986” above or below the nominal position. This adjustment is made with the "Cut Adjustment" which is now available for each of the ten forms in the Forms Setup Menu. A more positive value will move the cut farther down the page. Likewise, a more negative value will move the cut up on the page. When adjusting the cut position, you should cut at or below the perforation between forms. If it is not possible to cut exactly at the perforation on all parts of the form, it is best to cut slightly below the perforation to avoid leaving excess paper, or “flaps” above the perforation. Leaving excess paper above the perforation may contribute to a paper jam the next time the form is unloaded and then reloaded or reselected. Note: When using forms that are not a multiple of ½ inch in length, the vertical cut position is not as accurate or as repeatable. In this case, always adjust the cut to be below the perforation. Automatically Cutting Each Form As It Is Printed The FormsCutter may be used to automatically cut each form without requiring any software changes. This is accomplished by setting the "Automatic Cut" feature in the Forms Setup Menu to “Yes” for the forms where this feature is desired. When using the AutoCut feature, the Cut Sheet Basket may be installed to collect the cut forms (refer to “Installing The FormsCutter Cut Sheet Basket”). The following paragraphs describe how the printer will operate based upon the Automatic Cut setting for the current form. Automatic Cut set to “No” In this case, the printer will operate similarly to when there is no FormsCutter installed. Printed forms will be presented to the tear bar and may be torn off, or they may be cut off by taking the printer off line and pressing the UNLOAD button. If no previously printed form is present or it has already been cut or torn off, the form will be unloaded and the tractors will move to the load position. This is also described in “Changes to the Operation of the Printer’s Control Panel” on page 2. Printek FormsCutter 8000 3 Automatic Cut set to “Yes” In this case, the forms are not presented to the tear bar (unless the form length is less than 3.5” in which case automatic cut is not allowed). If a previously printed form is present, pressing the UNLOAD button will cause the current form to be cut off and ejected. If there is no previously printed form present, UNLOAD will operate normally. The FORM FEED button will cause the current form to be cut off and ejected each time it is pressed. This is also described in “Changes to the Operation of the Printer’s Control Panel” on page 2. Installing The FormsCutter Cut Sheet Basket The Cut Sheet Basket is designed to catch forms ranging from 5 inches to 12½ inches in length. The Cut Sheet Basket must only be installed when each form is going to be cut either by setting “AutoCut” to “Yes” or by software control. Do not install the Cut Sheet Basket when printing multiple pages without cutting. Doing so may cause paper jams and possible loss of data. The following instructions describe how to install the basket and use it for different sizes of forms. When printing multiple pages without cutting, remove the Cut Sheet Basket and allow the forms to accumulate in the basket supplied with the print stand. 1. Refer to Figure 1. Locate the bottom (larger) piece of the basket. Place the “hooks” near the front edge of the basket under the pins on the sides of the printer as shown, and then rotate the back edge of the basket down until it rests on the paper exit cover. Figure 1 - Installing Bottom of Basket 4 Printek FormsCutter 8000 2. Refer to Figure 2 and Figure 3. Locate the Back Stop of the basket and begin the installation by placing the long legs of the Back Stop under one of the wires that goes across the bottom of the basket. Then tilt the Back Stop up and apply some pressure at the top of the Back Stop until the shorter legs “hook” under the next wire in the bottom of the basket. As shown, the Back Stop is in position to catch longer forms. To catch shorter forms, move the Back Stop closer to the printer. Figure 2 - Back Stop Installation Figure 3 - Back Stop in Place 3. Refer to Figure 4. Locate the two paper supports for the basket. These paper supports are to be “snapped” onto the bottom of the basket. The position where these are snapped on is dependent upon the width of paper that will be cut and placed in the basket. For best paper stacking, the supports should be placed so that they are under the paper and about two to three inches from the edge of the paper. As shown, the supports are positioned for paper that is 8½ inches wide. Figure 4 - Installing Paper Supports Remember to remove the Cut Sheet Basket whenever printing multiple pages without cutting. Printek FormsCutter 8000 5 Additional Operating Information FormsCutter Related Messages “Cutting Paper” will be displayed on the printer’s LCD display while a cut is actually being performed. If an error should occur while cutting or attempting to cut, the printer will go offline and display an error message. To continue printing, clear the cause of the error and place the printer back on line by pressing the ONLINE button. “Cutter Blade Jam” will be displayed when the FormsCutter is not able to either finish a cut or completely open the blades after a cut. When this occurs, clear the cause of the jam before pressing ONLINE to continue. It may be necessary to remove the Blade Cover, as described below, to completely clear the cause of the jam. This message may also be displayed if the Blade Cover is not reinstalled with the snap rivets pushed all the way in to their “locked” position. Clearing Paper Jams From The FormsCutter If a blade jam occurs or a paper jam should occur within the FormsCutter, it may be necessary to remove the Blade Cover to clear the jam. CAUTION: Do Not Touch The FormsCutter Blades! The blades in the cutting mechanism are extremely sharp. Do not touch the sharp edges of the blades with your fingers. Also, do not touch the sharp edges of the blades with any tools that might nick or dull the blades. Removing The Blade Cover Assembly 1. Open the Ribbon Lid. 2. Refer to Figure 5. Locate the two Snap Rivets that hold the Blade Cover in place. Figure 5 – Blade Cover Snap Rivets 6 Printek FormsCutter 8000 3. Pull “out” on the Snap Rivets. The Snap Rivets will “snap” out to the unlocked position, and by continuing to pull you may remove the entire Blade Cover assembly from the printer. 4. Clear the paper or forms as necessary. Remember not to touch the blades with fingers or tools. Reinstalling The Blade Cover Assembly Note: The Blade Cover Assembly must be installed and the Snap Rivets “locked” in order for the FormsCutter to operate properly. 5. Refer to Figure 6. Locate the Blade Cover alignment pins on each end of the Cutter Mechanism. Figure 6 - Installing the Blade Cover 6. Hold the Blade Cover as shown and install it by guiding the alignment holes in the cover over the pins on the Cutter Mechanism. Press the cover firmly in place. 7. Refer to Figure 5. Locate the plastic Snap Rivet plungers and push them down until they “snap” into position. 8. Close the Ribbon Lid. 9. Reload new forms if necessary and press the ONLINE button to resume printing. Printek FormsCutter 8000 7 Software Control Software control of the FormsCutter is only offered when using the Printek or Epson emulation modes as described below. To access these commands when using other emulations, refer to the "Emulations" section in the appropriate chapter of the FormsMaster 8000 Series Programmer's Manual. Printek Emulation The "ESC L n" sequence used for loading forms will now automatically cut off any partially printed or completed form prior to unloading the current form and loading the new one specified by n, where n equals the form number (0-9). Example: The following escape sequence will load form 2. Escape Sequence: ESC L 2 Hexadecimal: 1B 4C 32 "ESC C" will cause a previously printed form to be cut off. This sequence should be used when you wish to cut off a report or form and do not wish to change forms. Escape Sequence: ESC C Hexadecimal: 1B 43 "ESC B n" may be used to set Automatic Cut to “Yes” (n=1) or “No” (n=0) for the currently selected form. Example: The following escape sequence will select Auto Cut = Yes. Escape Sequence: ESC B 1 Hexadecimal: 1B 42 31 Epson Emulation The "ESC EM n" sequence used for loading forms will now automatically cut off any partially printed or completed form prior to unloading the current form and loading the new one specified by n. n may be used to select Form 0 (n = zero or F), Form 1 (n = one), or Form 2 (n = two or B). Example: The following escape sequence will load form 2. Escape Sequence: ESC EM 2 Hexadecimal: 1B 19 32 "ESC EM R" will cause a previous form to be cut off. This sequence should be used when you wish to cut off a report or form and do not wish to change forms. Escape Sequence: ESC EM R Hexadecimal: 1B 19 52 8 Printek FormsCutter 8000 Specifications Features: "Automatic Cut" of each page (selected in form set up or by escape sequence). Adjustable paper catcher for catching Automatic Cut forms five to 12½ inches in length. Interlock to prevent operation of blades when the printer’s ribbon lid is open. Cut Specifications: Cut Time: 5 seconds typical Repeatability of cut: ± 0.02" (when using forms that are a multiple of ½” in length). Angularity of cut: ± 0.03". Blade Life: 200,000 cuts on six part carbonless forms. Paper Specifications: Form Length: 3.5 inches minimum (5 inches minimum when using Cut Sheet Basket). 12.5 inches maximum when using Cut Sheet Basket. Forms Types: 15 lb. minimum wt. single sheet. Recycled paper is not recommended. 2-6 part carbonless forms. 2-5 part forms with carbon. Maximum Form Thickness: Same as printer (.025 inch). Form Width: Same as printer (15 inches max). Cut Sheet Basket Capacity: 2.5 inches, approximately 100 six part forms. Physical: Dimensions (FormsCutter fits entirely inside of printer): Height: 6.57 inches Width: 20.61 inches Depth: 8.36 inches Additional clearance required behind printer for Cut Sheet Basket Basket: 11 inches. Weight: 12. 5 lbs. Shipping weight: 17.4 lbs. Environmental: Operating temperature: 50°F to 95°F. Relative humidity: 20% to 80% non condensing. Requirements: FormsMaster printer with firmware V013 or later. Power: None, supplied by printer. Operating modes: Automatic Cut = Yes/No Automatic Cut = Yes Automatic Cut = No is selected for each form in the form set up menu or by an escape sequence. Each page will automatically be cut as the bottom of the form is reached, or when a “Cut” escape sequence is received . Upon pressing the "Unload" button or upon receipt of a "Load Form" or “Cut” escape sequence, the printer will move the paper to Top of Form and cut the form off. Specifications subject to change without notice. Printek FormsCutter 8000 9