1
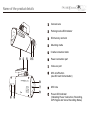
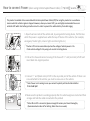
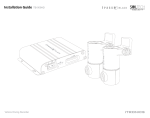
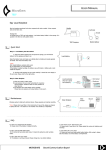
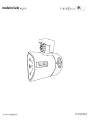
Installation Guide
Components
Main unit
Mounting cradle
Power cable
User manual
Adhesive tape
(Spare)
Cable holder
SD memory card
Uninterrupted-Power Cable
(Option)
SD card reader
Video out cable
(Option)
Name of the product details
Camera lens
Parking mode LED indicator
SD memory card slot
Mounting cradle
Cradle connection knob
Power connection port
Video out port
MIC on/off button
(also SD card format button)
MIC hole
Power LED indicator
(Indicating Power Connection, Recording,
GPS Signal and Voice Recording Status)
Installation Guide
1. Clean the windshield where to place the product.
2. As shown in the picture, click the mounting cradle at the top of the product
with Cradle Connecting Knob.
3. Remove the protection film of adhesive tape on the cradle and adhere it on the
windshield with aligning the camera lens to the front direction
* Tip: Please avoid adhering the product from any position where to block driver's view
angle as well as where the camera lens is blocked by any objects to record front view.
4. As shown in the picture, after confirming front and reverse side of SD Memory
Card, insert and push the SD Memory Card into the slot on the bottom of the
product
Installation Guide - Front Camera
5.
. Align the drection of camera lens to the front.
6. Connect the power cable and put into the cigarette lighter jack of the vehicle.
7. Arrange the cable with cable holders.
The installation is completed.
How to connect Power (when using Uninterrupted-Power Cable)
This product is available to be connected with Uninterrupted-Power Cable (UPC) for using the product as a surveillance
camera when the vehicle engine is stopped. However, when you connect UPC, you are highly recommended to use our
authentic UPC which has battery protection circuit in order to prevent the vehicle battery from discharging.
1. Open fuse box inside of the vehicle and, by using electric testing device, find the fuse
which the power is supplied even while the key-off status of the vehicle. (For example,
emergency flasher lights, interior lights and door lights etc.)
* Caution: UPC can be connected only when the voltage of vehicle power is 12v.
Check vehicle voltage first by using such as electric testing device.
2. Pull out the fuse and connect one leg of the fuse with "+" end (red color) of UPC and
insert back into original position.
3. Connect "-" end (black color) of UPC to the any metal part of the vehicle. If there is no
screw attached to the vehicle, you must to screw one on the vehicle.
* Note: Power is not coming in case you connect to plasitc part like dash board other
than metal part
4. Make sure the product is working properly after the vehicle engine is started and then
arrange and hide the cable connected to the product
* Note: When UPC is connected, please manage SD memory card more thoroughly.
(Recommended number of formatting: More than once a week)
Disassembling the product from the Mounting Cradle
It possible to assemble and disassemble the main unit with the cradle due to both are fixed by the fixing knob.
Accordingly, please disassemble the main unit from the cradle when you need a repair service and/or to prevent
the main unit from long-time exposure to direct sunlight.
1. Rotate the knob in a counterclockwise direction until it is completely loosen.
2. Remove the knob and detach the main unit from the cradle.
* Caution: Please make sure not to lost the knob.
ITRONICS
VIDEOS