1
Introduction
ADAM DU – Data Capture Utility for ADAM Balances & Scales
ADAM DU (Data Utility) is an application that allows you to quickly and easily
capture data from an ADAM Laboratory Balance or Weighing Scale and perform
various functions on the collected readings.
ADAM DU can perform tasks, such as graphing the data, mathematical statistical
analysis & export the readings to several common file formats. Also quickly
®
®
®
®
export data to other applications (e.g. Microsoft Excel , Microsoft Word or the
Windows® Clipboard). ADAM DU can provide basic remote control of the
balance/scale*.
Adam DU can collect data from up to 8 different balances/scales simultaneously,
each data collection session can be individually monitored, configured and
customised to your requirements.
Adam DU can also now speak the readings received. This is ideal if you want to
stay informed of a scale's progress whilst completing other tasks or maybe you
might be visually impaired.
ADAM DU can quickly provide you with data, that is easy to integrate into
any project!
*(Note: the various ADAM products have different remote facilities).
Microsoft, Windows, Excel & Word are registered trademarks of Microsoft Corporation in the United States
and other countries.
Version: 1.0.21 20/12/2010
AE Part Number: 9230
Features
Feature List:
•
•
•
•
•
•
•
•
•
•
•
•
•
•
•
•
•
•
•
•
•
Quick and easy to use interface, supports capturing data simultaneously over
a serial communication port(s) from up to 8 balances/scales
Main Commander Window to manage and overview all data capture sessions
Graph readings in real-time
Perform statistical analysis on readings (Min, Max, Median, Mean, Variance,
Standard Deviation, Total) in real-time
Use a Timer control to regularly poll balances/scales for readings
Export captured readings to several file formats (Text, CSV, HTML, XML)
Export captured readings automatically to other applications (MS Excel and
MS word)*
Export captured readings to the Windows® Clipboard for quick importing into
other Windows® applications
Capture custom data along with the scales data readings, supports up to 6
additional user defined data fields that can have data inputted by a user
User defined fields support drop down lists, to make it quick and easy to
select data from pre-defined options. The lists of options can be imported
from a CSV file - created from your computer systems or they can be
manually entered
Interact with the connected Balance/Scale - send remote commands to
control certain aspects of the balance/scale (certain commands are only
applicable to certain models). Ideal for situations where you may only have
remote access to a scale/balance
Log calibration reports to file for complete tracking of calibration records
Log form output (custom defined multiple line data from a balance) to a file
Continuously log readings to a file in real-time
Print datagrid readings and the graphed readings
Collect date and time with readings, where supported collect the
Scale/Balances serial number for unique identification of data
readings/balance
Quickly search for readings - a specific reading(s), max or min reading
Collect Density Determination readings when used with an appropriate
balance and Density Determination Kit
Collect unit weight, pieces count, unit price and total price from counting and
retail scales.
Capture Tare weight, Net weight and Total/Gross Weight from any scale for
production line applications.
Speak all readings received from a balance/scale using the Microsoft®
Speech Synthesizer engine (Windows XP and later)
*(You need a licenced copy of Microsoft® Word/Excel to use this facility)
Installation
Installation
You can download an evaluation copy of ADAM DU from www.adamdu.com or
you may have received an evaluation copy of the software on a CDROM that
came with your ADAM balance/scale.
To install from the Website:
1. Visit ADAM DU Download Page. Make sure you have read the hardware &
software requirements before downloading a copy of the evaluation software.
2. Once downloaded, run the "adamdu.msi" file.
3. Follow the on screen installation prompts to correctly install the software.
4. You now have a 14 day free evaluation of the ADAM DU software
5. To purchase the software before or after the evaluation period has expired,
please visit: ADAM DU Website and follow the instructions on how to pay for a
licence.
To install from a CDROM:
1. Insert the ADAM DU CDROM into the CDROM drive on your computer.
2. If "CDROM autorun" is enabled on your computer then shortly after inserting
the disc you should see a menu screen with instructions on how to install an
evaluation copy of ADAM DU on your computer.
3. If "CDROM autorun" is not enabled (or no menu appears) then open up
Windows Explorer (File Manager). Click on your CDROM drive. Then run the
program "adamdu.msi" and a installation menu with instructions will appear
shortly..
4. You now have a 14 day evaluation of the ADAM DU software
5. To purchase the software before or after the evaluation period has expired,
please visit: ADAM DU Website and follow the instructions on how to pay for a
licence.
Quick Start Guide
Quick Start Guide
After running ADAM DU, a licence expiry reminder will pop up if you are running
an evaluation copy of ADAM DU. If you are running ADAM DU for the first time
then you will also have to agree to the terms of use in the licence. After that the
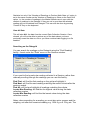
ADAM DU Commander Window will appear.
The Commander Window allows you to manage & obtain an overview of your
data collection sessions. You can create a new data collection session by
clicking on the green "Start New Data Collection Session" button.
A new window will pop up:
Select your balance/scale from the drop down list.
After selecting a model, more information will be displayed. Some notes may also
be displayed about the particular ADAM model, also the default factory serial port
communication settings will also be loaded.
Other than selecting the Com Port that your balance/scale is connected to, you
should not need to change any of the other settings unless you have changed
from the default factory settings in the balance/scale's software.
Press the "Confirm Comms. Settings and Start Collecting Data" button. The
Datagrid(see diagram below of the main areas of the Session window) is enabled
by default, depending upon the ADAM balance/scale model. You should be able
to press the Print key on a balance/scale (please refer to the model's user
manual for more details on how to print) and this should send the current reading
to ADAM DU software.
If ADAM DU does not display a reading, try again, if it still does not work then
check the serial port settings in the scale/balance (please refer to the user
manual that came with the scale/balance or download the latest copy from our
website). More troubleshooting help may be found at: Problems connecting to a
Balance Section of this manual.
System Requirements
Hardware Requirements
There are no specific hardware requirements but the computer must be good
enough to run one of the required operating systems below. Note: obviously the
more sessions and/or analysis functions you enable, the more processor &
memory resources are used. See the Frequently Asked Questions section on
customising ADAM DU to run on slower computers.
A RS-232 port is required on the computer to connect to the balance/scale and
also a RS-232 Null Modem Cable (please see the user manual of your
balance/scale for the exact wiring specification required). You can also use the
computer's USB port with the addition of a "RS-232 serial port to USB converter"
(available at most computer stores).
Operating System Requirements
ADAM DU will work on Windows XP SP2* and later, Windows Vista and
Windows 7 - all operating systems should have the latest service packs &
updates/security patches installed.
The Microsoft .NET v2 framework and v3 is also required as a minimum for the
software to run. Though we would recommend installing the .Net Framework
v3.5. Please note newer operating systems will have these Frameworks installed
by default. The .Net Framework v3.5 can be downloaded through Windows
Update or manually downloaded/installed from: Microsoft Web Site
* This operating system must also have a minimum of Windows Internet Explorer
v6 service pack 1 and Microsoft Installer V2. Again these can be downloaded
from Windows Update or manually downloaded/installed from the following links:
Windows Installer v3 for Windows XP
Microsoft, Windows, Excel & Word are registered trademarks of Microsoft Corporation in the United States
and other countries.
Licence
Single End-User PC Licence Agreement
1 INTRODUCTION
1.1 This Licence Agreement (“Agreement”) is an agreement between you and Adam Equipment
Co. Ltd. Please read these terms and conditions carefully before downloading/installing any
software and applicable documentation as they contain important information about your rights
and obligations. It governs your use of the software ("the Software") supplied to you by Adam
Equipment Co. Ltd. and related documentation. In particular, we draw your attention to clause 8
(limitation of liability).
By downloading, installing or otherwise using the Software you agree to be legally bound by this
Licence Agreement (it may be modified and released on our website www.adamdu.com without
notice).
1.2 If you do not wish to be bound by this Agreement, then you may not download or use the
Software (you must remove any installed copies from your computer(s)).
2 LICENCE
2.1 Specific conditions of use which apply to the type of licence you have acquired from Adam
Equipment Co. Ltd. are:
2.1.1 Evaluation Licence for chargeable Software: You may use the Software within your
organisation to assess whether it meets your needs for a period of up to 14 days from its
installation date. At the end of this period, if you do not purchase a licence from Adam Equipment
then you must destroy all copies of the Software supplied to you, including copies installed on any
computer and all related documentation.
2.1.2 End-User PC Licence:
With a Single End-User PC Licence you may install and use one copy of the Software on a single
computer. You may not share the licence between different computers, nor install it on a server
based computer, nor use the Software on more than one computer at the same time.
The Software is tied into a single computer by examining certain computer hardware components
and producing a key based on these. The license is based on this key.
3 RESTRICTIONS ON USE
3.1 You may make a reasonable number of copies of the Software solely for backup and recovery
purposes. Any such copies shall in all respects be subject to the terms and conditions of this
Agreement.
3.2 You shall not make copies of the Software additional to those expressly permitted in this
Licence Agreement.
3.3 You shall not copy any written documentation accompanying the Software.
3.4 You shall not remove or obscure any copyright and trademark notices or other proprietary
notices relating to the Software. All notices must be duplicated as it appears on the Software, on
all authorised copies.
3.5 You shall not reverse engineer, decompile or disassemble the Software except to the extent
expressly permitted by any applicable local laws which may over-rule this restriction.
3.6 You may not distribute the Software to any third party.
3.7 You may not rent, lease or transfer the Software to another individual or company.
3.8 You shall not use the Software in any way other than in a manner specifically licensed under
this Agreement.
3.9 You shall not display the Software on a public bulletin board, website, chat room or by any
other unauthorised means.
3.10 The software is not intended for use in the operation of nuclear facilities, aircraft navigation
or communication systems, or air traffic control machines, or any other safety-critical situations in
which case the failure of the software could lead to death, personal injury, severe physical or
environmental damage.
3.11 Transfer of a valid licence from one computer you own to another computer you own, may
be possible by contacting Adam Equipment Co. Ltd. It will be at Adam Equipment Co. Ltd's
discretion - depending upon the circumstances of the reason for transfer.
4 INTELLECTUAL PROPERTY RIGHTS
The copyright, patents, trade marks and all other intellectual property rights in the Software and
related documentation are owned by and remain the property of Adam Equipment Co. Ltd. and
are protected by national laws and international treaty provisions. You do not obtain any rights in
the Software other than those expressly granted in this Agreement.
5 TERMINATION
This Agreement is effective until terminated. This Agreement will terminate automatically if you
fail to comply with any provision of this Agreement. Upon notice of termination from Adam
Equipment Co. Ltd. you shall destroy the documentation and all copies of the Software promptly.
6 UPDATE POLICY
Adam Equipment Co Ltd. may create, from time to time, updates for certain versions of the
Software. Maybe to fix bugs or release new features at Adam Equipment's discretion. Adam
Equipment Co Ltd. may make any such updated versions available to licensees who have paid
the update fee. If you acquire an update for your version of the ADAM DU Software then all
copies of the previous version must be destroyed and not used, except for one copy which may
be retained solely for archival purposes.
7 WARRANTY
7.1 Subject to the limitations upon its liability set out in clause 8, Adam Equipment Co. Ltd.
warrants that:
7.1.1 for a period of 90 days from you purchasing the Software, it will materially conform to the
electronic documentation provided with it; and
7.1.2 with respect to any physical diskette(s), the same shall be free from defects in materials and
workmanship for a period of 90 days from purchase.
7.2 In the event of notification within the warranty period stated in clause 7.1, Adam Equipment
Co. Ltd. shall replace the defective Software and/or diskette(s). Your remedy for breach of the
warranties set out in clause 7.1 shall be limited to replacement of the defective materials and
shall not encompass any other damages.
7.3 Save as stated herein, Adam Equipment Co. Ltd. expressly disclaims all other conditions,
warranties, terms and undertakings, expressed or implied, statutory or otherwise, relating to the
Software and related documentation or technical support including but not limited to warranties of
quality, performance, satisfactory quality or fitness for a particular purpose.
8 LIMITATION OF LIABILITY
8.1 Nothing in this Agreement shall limit Adam Equipment Co. Ltd's liability for:
8.1.1 fraud or other criminal act;
8.1.2 personal injury or death caused by our negligence;
8.1.3 any other liability that cannot be excluded by law.
8.2 Subject to clause 8.1, Adam Equipment Co. Ltd. accepts no liability for any indirect or
consequential loss or damage, or for any loss of data, profit, revenue, anticipated savings or
business, however caused and even if foreseeable or made known to Adam Equipment Co. Ltd.
8.3 Except as provided in clause 8.1, Adam Equipment Co. Ltd's maximum liability to you for any
cause whatsoever will be limited to the amount paid for the Software.
9 SEVERABILITY
If a Court or other competent authority decides that any provision of this Agreement is void or
otherwise ineffective in whole or in part then any other part and the other terms and conditions of
this Agreement shall continue in full force and effect.
10 THIRD PARTY RIGHTS
The parties do not intend that any term of this Agreement shall be enforceable solely by virtue of
the Contracts (Rights of Third Parties) Act 1999 by any person who is not a party to this
Agreement.
11 ENTIRE AGREEMENT
This Agreement constitutes the entire agreement between the parties with respect to the subject
matter of this Agreement and supersedes all previous agreements, arrangements or undertakings
between the parties relating to the subject matter of this Agreement and any representations or
warranties previously given or made to it.
12 ASSIGNMENT
You may not assign this Agreement nor any of its rights or obligations hereunder nor sub-license
the use (in whole or in part) of the Software without Adam Equipment Co. Ltd's prior consent.
13 NOTICES
13.1 All notices shall be given:
13.1.1 to Adam Equipment Co. Ltd. via e-mail at [email protected]
13.1.2 to you at either the e-mail or postal address you provide during any ordering process.
13.2 Notice will be deemed received when an e-mail is received in full (or else on the next
business day if it is received on a weekend or a public holiday in the place of receipt) or 3 days
after the date of posting.
14 GOVERNING LAW
This Agreement is governed by and interpreted in accordance with English law. Any disputes or
claims relating to this Agreement shall be subject to the exclusive jurisdiction of the English
Courts.
15 U.S. GOVERNMENT RESTRICTED RIGHTS
If the software is to be used/installed in the U.S. then the Software and documentation are
provided with Restricted Rights. Use, duplication, or disclosure by the U.S. Government is subject
to restrictions as set forth in subparagraph (c)(1)(ii) of the Rights in Technical Data and Computer
Software clause at DFARS 252.227-7013 or subparagraphs(c)(1),(2), and (3) of the Commercial
Computer Software - Restricted Rights at 48 CFR 52.227-19, as applicable, and any
amendments thereto.
Version 1.1 21/7/2008
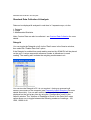
Standard Data Collection and Anaylsis
Standard Data Collection & Analysis
Data can be displayed & analysed in real-time in 3 separate ways, via the:
1. Datagrid
2. Graph
3. Mathematical Statistics
Note: Custom Data can also be collected - see Custom Data Collection for more
details.
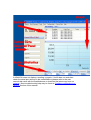
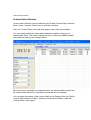
Datagrid
You can toggle the Datagrid on/off via the "Data" menu in the Session window,
then select the "Enable Data Grid" option.
If the Datagrid is enabled then each reading received by ADAM DU will be placed
on the grid. A unique sequential reference number is placed next to each
reading. The reading also includes the weighing measurement unit.
You can turn the Datagrid off if it is not required - freeing up processing &
memory resources on the computer (see Frequently Asked Questions for more
details about this). You can also restrict the amount of data readings that are
displayed on the grid at any time by using the "Configuration" menu in the
Session window. The "Number of Readings to Show on the Data Grid" menu
option allows you to toggle between the following numbers of readings - 100,
1000, 10000 or All.
You can also search the Datagrid see: Using the Data Collection Session
Window
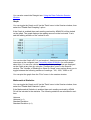
Graph
You can toggle the Graph on/off via the "Data" menu in the Session window, then
select the "Enable Data Graphing" option.
If the Graph is enabled then each reading received by ADAM DU will be plotted
on the graph. The graph displays the reading amount on the horizontal Y axis
and the reading number on the vertical X axis.
You can turn the Graph off if it is not required - freeing up processing & memory
resources on the computer (see Frequently Asked Questions for more details
about this). You can also restrict the amount of data readings that are displayed
on the Graph at any time by using the "Configuration" menu in the Session
window. The "Number of Readings to Show on Graph" menu option allows you to
toggle between the following numbers of readings - 100, 1000, 10000 or All.
You can print the graph from the "Print" menu in the session window.
Mathematical Statistics
You can toggle the Graph on/off via the "Data" menu in the Session window, then
select the "Enable Math Statistics" option.
If the Mathematical Statistics is enabled then each reading received by ADAM
DU will be included in the statistics. The following statistics are calculated in realtime:
Variance
Variance (n-1)
Standard Deviation
Standard Deviation (n-1)
Minimum reading
Maximum reading
Mean reading
Median reading
Total or Arithmetic Sum of all readings
You can turn the Mathematical Statistics off if it is not required - freeing up
processing & memory resources on the computer (see Frequently Asked
Questions for more details about this). You can also restrict the amount of data
readings that are displayed on the Mathematical Statistics bar at any time by
using the "Configuration" menu in the Session window. The "Number of
Readings to Perform Math Stats on" menu option allows you to toggle between
the following numbers of readings - 100, 1000, 10000 or All.
Note: you can copy and paste the results from any of the statistics fields into
another application.
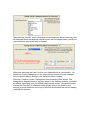
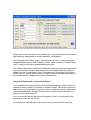
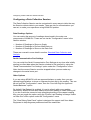
Custom Data Collection
Custom Data Collection
Custom data collection can be enabled by the "Enable Custom Data Collection
Panel" option, from the "Data" menu in a Session window.
Note: the "Custom Data" menu will also appear once it has been enabled.
You can collect additional custom data besides the reading, using up to 6
customisable fields. The custom fields allow you to collect any additional data
along with the reading, see example below:
When you print a reading from a balance/scale, any data currently entered into
the custom fields will also be collected and entered into the Datagrid.
You can setup the names of the custom fields on the Datagrid from the "Define
Custom Data Collection Fields", located on the Session Window, under the
"Custom Data" menu option.
Simply type in the new names of the fields (you do not need to use all the fields)
and make any adjustments to column widths for the Datagrid.
You can specify how many of the 6 custom fields you wish to use by using the
"Enable/Disable Custom Data Collection Fields" option under the "Custom Data"
menu. Simply tick/un-tick to enable/disable any fields.
The custom field column widths on the Datagrid will be automatically saved when
you exit the session window, alternatively you can manually save the column
widths from the "Configuration" menu, then select the "Save Data Grid Column
Widths" option. Simply use the cursor to "grab" a column separator and drag it to
the required width to display all your text in that column.
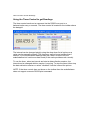
Using Drop Down Lists in the Custom Fields
You can specify the custom fields to work with drop down lists, the list could for
example contain a series of products or operator names. This helps to speed up
data entry as you only need to type in a couple of characters and an item is autoselected alphabetically. Simply tick the box next to each custom field that you
require to use a drop down list.
You can manually specify the options to appear in a list or you can import the
options into a list from a CSV file.
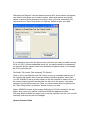
If you decide to manually type in the options for a custom field list, press the
"Manually Add Options" next the desired custom field. A new screen will appear
(see below), this allows you to add an option, select and remove an existing
option or remove all the options from the list. Once you have entered all your
options click the "Save Drop Down List Options" button to save your data.
If you decide to import the list options from a file then you need to make sure the
file is of a CSV (comma separated value) file, the options need to be separated
by commas and the options need to be enclosed in speech marks. For example
the CSV could look like:
"Mr Smith","Mr Jones","Mrs Andrews","Dr Davies"
Click on the "Load Options from File" button, a pop up message reminds you of
the required file format, then a new file selection window appears, select your
.csv file. ADAM DU will do a basic check on the file contents to make sure it is of
the correct format and will load the data into the list on the screen. Any blank
options in the file will be removed. Once you have entered all your options click
the "Save Drop Down List Options" button to save your data.
Notes: ADAM DU stores all the custom field lists in CSV files located in the sub
folder "drop_down_list_options" within the ADAM DU application folder.
The drop down list does not restrict you to only the options in the list, you can still
manually enter any text into the Datagrid.
Special Custom Fields
There are 2 extra special custom fields besides the 6 user configurable custom
fields. These are:
•
•
Date and Time
Balance/Scale Serial Number
"Date and Time" option will automatically collect & display the computers time in
a separate column on the grid.
The "Balance/Scale Serial Number" option is only available if an ADAM DU is
being used in conjunction with certain balances. The balances will transmit their
ADAM serial number (e.g. AE123456789) when connected to ADAM DU. This
allows you to get a unique identifier from the balance which may be useful for
auditing purposes or help to identify a balance/station in a multiple
balance/ADAM DU configuration environment.
Note: the PGW/PW & PGL balances must have up to date firmware installed to
transmit their AE serial number to ADAM DU.
Collection of Unit Weight, Piece Count, Unit Price or Total Price readings
Enabling of the collection of Unit Weight, Piece Count, Unit Price or Total Price
readings (via the Data Menu - available only for certain models) will automatically
use Custom Fields 1 & 2. The two Custom Fields will be automatically renamed
and disabled from user customisation until this facility is switched off again.
Net/Total Weight Collection Mode
This mode enables any scale to collect/calculate Tare weight, Net weight and
Total/Gross weight (even if the scale does not natively support sending this data
over the RS232/USB port).
To enable this mode, open a data collection session, select the Data menu, then
select "Net/Total Weight Collection Mode".
After selecting this mode & starting a data collection session, custom data
collection mode is auto enabled and first three custom fields are reserved.
To perform Net/Total weighing:
1. Place container on scale & press the scale's Print button - to send the
container weight (TW) to ADAM DU. Container weights are always stored in
the odd number readings on the data grid..
2. Tare the scale
3. Put contents into the container on the scale
4. Press Print on the scale to send the Net Weight (NW) to ADAM DU
5. ADAM DU will calculate the Total weight (NW + TW) and display this along
with the individual Tare & Net weights in the custom fields. This happens on
all even number readings/entries on the data grid.
If you make a mistake on a container weight or contents weight, simply stop the
data collection session & delete the last reading. Then re-start the session again
(with appending data option) & re-print the correct reading to ADAM DU.
Specify Custom Fields to Preserve Data Entered via Keyboard
To help speed up data entry you can specify whether the data in each of the 6
user defined custom fields is wiped or preserved after each reading is received
by ADAM DU. If a custom field's data does not change for each captured data
reading, for example maybe a Testers Name - "Mr Smith" who is using the
balance for a period of time - then you can specify it to preserve the typed in data
using the "Preserve Data in Custom Fields after Data Collection" option under
the "Custom Data" menu.
If a custom field is not specified to preserve data then, the field will be wiped after
each collected reading, to allow you to type in new data.
Specify Custom Field data types for Excel Export
When exporting data to Microsoft Excel, the imported data is examined by Excel
& each cell is assigned a format automatically based on the data in it. This can
cause problems sometimes for example with numbers that use Leading
Zeros/Zero Padded. E.g. Custom Field 1 might contain 00123456789 but when
exported to Excel, Excel determines it is an integer number and assigns a
number format to the cell and the leading zeros are removed e.g. 123456789.
This behaviour may not be desirable if you wish to preserve the leading zeros
(for example in product codes), so there is an option under the "Custom Data"
menu called "Specify Custom Field data types for Excel Export". This menu
option as a sub menu that allows you to specify any of the 6 custom fields to be
exported to Microsoft Excel as a string - thus preserving the string as it is seen in
ADAM DU.
Specify Custom Field Focus
ADAM DU can be set to automatically place input focus/highlight on a selected
custom field after a reading is received. This can be useful to allow quick data
entry into a single custom field or can be used in-conjunction with other
applications that can place data directly into an application i.e. place data from a
bar-code scanner into a specific custom field. This "Specify Custom Field Focus"
option is located under the "Custom Data" menu. There is a submenu where you
can select one of the six custom fields.
Only one custom field can be specified to have automatic focus - that custom
field must be enabled for the focus to work.
Timer Control to Poll for Readings
Using the Timer Control to get Readings
The timer control sends out a command via the RS232 com port to a
balance/scale every x seconds. The timer control is located on the toolbar above
the datagrid.
The interval can be changed quickly using the drop down list of options or a
value can be manually entered. The frequency cannot be set smaller than 1
second. If you require faster readings than this, then it is best to set the
scale/balance into continuous data mode (if the scale provides such a mode).
To use the timer, select an interval and start a data collection session, the
interval can be changed whilst a session is running. To stop the timer either stop
the data collection session or select "disabled" from the interval list options.
NOTE: If the timer control does not show on the toolbar then the scale/balance
does not support a remote RS232 print command.
Exporting/Saving data to a file
Exporting/Saving Data to a File
Once you have captured some data readings you can save the readings to file in
4 different formats:
1.
2.
3.
4.
CSV - Comma Separated Value format
TXT - Basic Text file
HTML - A web page
XML - Extensible Markup Language file (commonly used to import data into
other systems/applications)
To save your readings to file, under the "Data" menu, select the "Save Current
Data Readings to File" option. (Note: you must have stopped the current data
collection session before you save any data).
You will be presented with a file save dialog box (as commonly used in
Windows), here you can specify the file location and name.
To specify the file type, click on the drop down box next to "Save as type" in the
bottom of the example above. You can select one of the 4 file formats.
Note: a default file name is automatically entered for the file, based on the
session number, serial com port and the current date.
Depending upon how many readings you have collected, it may take some time
to save the readings to a file. A progress indicator is placed at the top of session
window showing its current progress.
Next to the progress indicator is a cancel button which can stop the process of
saving the readings to file.
A pop up message window will appear informing you once all the readings have
been saved to file.
If Custom Data fields have been used then these will be saved too. Though the
custom field names must start with an alphabetic character (eg dont use: 1_field
or #678) if you are exporting to XML - as these are not valid field names for XML.
Exporting Data to another Application
Exporting Data to another Application
®
You can quickly and easily transfer collected readings to Microsoft Word or
®
®
Microsoft Excel (You need Microsoft Excel/MS Word installed on your
computer to use this facility).
Under the "Data" menu, select the "Export Current Data to MS Excel" to transfer
data to Excel or "Export Current Data to MS Word" to transfer data to Word from
the Session window.
Depending upon how many readings you have collected, it may take some time
to transfer the readings. A progress indicator is placed at the top of session
window showing its current progress.
Next to the progress indicator is a cancel button which stop the process of saving
the readings to file.
®
®
Microsoft Excel or Microsoft Word will be automatically displayed on the
screen on completion of the process.
Notes: if you have collected a lot of readings, 65,000+, then Excel may have the
readings displayed in multiple worksheets within the workbook, as older versions
of Excel only support a limited amount of rows in a single worksheet.
If Custom Data fields have been used then these will be exported too.
Data exported to Excel is automatically assigned a data type format in each cell,
sometimes Excel assigns an incorrect cell format. This can be over-ridden to
preserve the original data in ADAM DU, see section "Custom Data Collection Specify Custom Field data types for Excel Export" for more information on this
topic.
Exporting Data to another Application using the Windows Clipboard
You can also transfer collected readings to the Windows® clipboard, which will
®
then allow you to transfer the readings into other Windows applications. Once
the operation is complete you can then user Control+V to paste into your desired
application.
Notes: the readings are placed into the clipboard using tab separators between
the fields. If Custom Data fields have been used then these will be exported too.
Continual Data Logging
Continual Data Logging
ADAM DU can be specified to continually save collected readings from a Session
to a file in real-time. You can enable this option from the "Data" menu, then
choose the "Continual Data Logging to File" option - move the mouse to side to
click the "Enable" option.
A file save dialog box will be presented, allowing you to specify the filename and
location. Also the file format can be specified, see Exporting/Saving data to a file
for more information of the different file formats.
Once this option has been enabled, you can check the location of the saved file
at any time, as an extra menu option will appear under "Continual Data Logging
to File" menu item, listing the currently used file and location.
Note: the Continual logging options can only be enabled/disabled if the Data
Collection Session is not currently collecting data.
Logging Calibration Reports
Logging Calibration Reports
If your PGW/PW balance has internal calibration that is enabled, then periodically
the Balance will calibrate itself & output a calibration report over the RS-232 port.
If you require this report (maybe for auditing purposes) then you can set ADAM
DU to save it to file (it has no effect on the data readings captured).
From the "Data" menu option in the Session window, select the option "Collect
Calibration Reports" & tick the "Enable" sub option. You will be presented with a
Windows Save file dialog window. You can specify the filename and location of
the log file.
The data is saved to a simple text file.
Selecting the same menu option will now display a sub menu item, showing the
current filename & location of the file - should you forget.
Note: you can also manually force the PGW/PW balances to do calibrations
(whether they have internal or no internal calibration).
This option can be remembered & set to auto start when the session starts, see
section: Configuring a Data Collection Session
Logging Form Data
Logging Form Data
PGW/PW balances have the option of outputting more detailed mult-line form
data to the RS-232 port. If you require this data then you can set ADAM DU to
save it to file (it has no effect on the data readings captured).
From the "Data" menu option in the Session window, select the option "Collect
Form Data" & tick the "Enable" sub option. You will be presented with a Windows
Save file dialog window. You can specify the filename and location of the log file.
The data is saved to a simple text file.
Selecting the same menu option will now display the current filename & location
of the file should you forget.
This option can be remembered & set to auto start when the session starts, see
section: Configuring a Data Collection Session
Configuring & Using the Commander Window
Configuring & Using the Commander Window
The Commander Window allows you manage & oversee one or more sessions.
The Commander Window will become more useful when using multiple sessions
simultaneously taking data from scales/balances.
The Commander Window shows the current status of each session, along with
the last reading received. This allows you minimse all the session windows to the
taskbar and keep the smaller Commander Window open to oversee what is
happening in each session.
You can also do several tasks quickly & easily via buttons on the Commander
Window:
•
•
•
•
Minimise & Restore all windows - including the Commander Window & all
open Session windows
Stop All Sessions - stop each Session that is currently collecting data
readings
Close All Sessions - close each open session, whether it is collecting data or
not.
Re-Organise Windows - it can get a bit cluttered on the desktop if you have
up to 8 Session windows open at the same time. This function re-organises
the all windows into a cascaded formation so you quickly access the window
you want.
Shortcuts
You can quickly bring to the foreground a particular session window by double
clicking on the session reading or status area on the Commander Window.
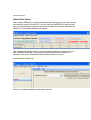
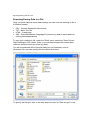
Starting Multiple Sessions Simultaneously
To save time in starting lots of individual Sessions, you can start them from a
single screen, from the Commander Window, select the "Session Commands"
menu, then select the "Start Multiple Data Collection Sessions" option.
A new window will appear showing the options for starting up to 8 sessions at the
same time:
For each session you want to start, select a Balance/Scale model & the serial
com port it is connected to. Once you have specified all session details (leave
session details blank if you do not need that particular Session), click on the
"Start Selected Data Collection Sessions" to start them.
Notes: After using a Session in ADAM DU for the first time, the Com Port number
will be remembered for the Session. So the above window will automatically load
in a previously used Com Port numbers to help speed up the process.
This facility is restricted to using the factory default com port settings, so if you
have manually changed the com port settings in the balance/scale for some
reason then this facility will not work for you.
Standard computers only have one or two com ports, so you will need to
purchase a device(s) to give you extra com ports if required.
Other Options
From the "Options" menu are the following options:
•
•
Remember Window Positions - Enable this option if you wish to place/size
any of the ADAM DU windows in specific positions on your desktop, then
when you load ADAM DU or open a Session the windows will place/size in
their last position/size.
Reset All Window Positions - if a window becomes "lost" or sized so it
•
•
•
becomes a problem, this option will reset the window positions & sizes.
Show Data readings from Sessions - enables or disables the Data Readings
bar in the Commander window
Show Session Statuses - enables or disables the Session Status bar in the
Commander window
Hide Session Windows when main window is minimised - if this option is
enabled then every time the Commander Window is minimsed all open
Session windows will also be mininised.
Taskbar Options
Whilst ADAM DU is running, a blue "laboratory flask" icon is placed on the
taskbar:
Right clicking on the "Laboratory Flask" icon will present a menu of options, all of
which have been explained earlier in this section of the user manual.
Using the Data Collection Session Window
Using the Data Collection Session Window
The Quick Start Guide covers the basics of connecting a Data Collection Session
to an ADAM Balance and the section Standard Data Collection and Analysis
covers what you can do with the data readings collected.
Sending Commands via the RS-232 Port to a Scale/Balance
You can remotely control some of the functions of the balance/scale from ADAM
DU. The amount of remote control options you have depends upon the model.
After selecting a model during the connection process, the "Send Command"
menu in the Session window will be populated with possible options.
Note: For some ADAM balances these options are further restricted depending
upon the firmware/software version of the balance.
Printing
If the Graph is enabled, you will be able to print this from the "Print" menu in the
Session window.
If the Datagrid is enabled then you will be able to print the data in it from the
"Print" menu in the Session window. Custom Data will also be printed if it has
been collected. The Printing of the data in the Datagrid is fairly basic. If you
require more advanced printing options/layouts then it is suggested you export
®
the data to another application like Microsoft Word or Excel where you can
format the data to your requirements & then print.
Note: ADAM DU will print to the windows default printer. If you require other
printers then you can export to another application for more flexible printing
options.
Delete Last Reading
This will delete the last recorded reading from the Datagrid and Maths statistics.
This can also be done by pressing the Delete key on the keyboard.
Delete Selected Reading
This will delete the selected/highlighted reading from the Datagrid and Maths
Statistics but only if the "Number of Readings to Perform Math Stats on" option is
set to the same number as the "Number of Readings to Show on the Data Grid"
option, i.e. the number of readings in the Maths Statistics are in sync with the
number of readings in the Datagrid. If they are not in sync then the selected
reading will just be deleted from Datagrid. This can also be done by pressing
"Control S" key on the keyboard.
Clear All Data
This will wipe ALL the data from the current Data Collection Session. Once
cleared, you will not be able to retrieve any of the data unless you have
previously saved the data to a file or you have continual data logging to a file
enabled.
Searching on the Datagrid
You can search for readings on the Datagrid using the "Find Reading"
facility - found under the "Data" menu on the Session window.
If you need to find a particular reading collected in a Session, rather than
manually scrolling through the readings you can use this facility.
Find First: will find the first reading on the grid and highlight it.
Find Next: will find the next reading matching the search criteria after the
previous match.
Find All: will find and highlight all readings matching the criteria.
Locate Max Reading: will find the the highest value during the data
collection session
Locate Min Reading: will find the the lowest value during the data
collection session
Notes: when searching for a reading you must also enter a space and the
weighing unit after the numerical reading e.g. 1234.9 g or 0.15 kg etc. The
length of time to find a match will vary depending upon the speed of the
computer and the number of readings captured in the session.
Configuring a Data Collection Session Window
Configuring a Data Collection Session
The Data Collection Session can be customised in many ways to tailor the way
the Session collects data to your needs. There are lots on customisations you
can set, to make your experience using ADAM DU quicker.
Data Readings Options
You can restrict the amount of readings shown/used in the main core
components of ADAM DU. These are set via the "Configuration" menu in the
Session window:
•
•
•
Number of Readings to Show on Graph
Number of Readings to Perform Math Stats on
Number of Readings to Show on the Data Grid
These are covered in more detail in section: Standard Data Collection and
Analysis
Serial Communication Port Settings
You can revisit the Serial Communication Port Settings at any time after initially
starting to collect data when the Session window is first opened, by using the
"Serial Communication Port Settings" option under the "Configuration" menu.
Note: that the current Session must be stopped before you can make any
changes to the serial coms port.
Other Options
If you are using ADAM DU with an approved balance or scale, then you can
optional toggle whether to show or suppress the last digit in the reading. This can
be set from the "Configuration" menu, then the "Use Last Digit for Approved
Scales/Balances" option.
By default if the Datagrid is enabled, it is set to refresh with every reading
received by ADAM DU and also make sure the last reading is visible on the grid.
If you do no wish the screen to keep refreshing/scrolling to the newest reading
then you can toggle the option using the "Ensure Last Reading is Always Visible
on Data Grid" menu option under the "Configuration" menu.
The "View Debug Data Panel" option is designed for support staff from Adam
Equipment to help diagnose problems should the need arise.
Similarly the "Save Debug Log to File for Support" option may be used upon
request of the ADAM DU support team.
Remember Settings for this Session
This menu option expands into another sub menu, allowing various options to be
set, so the next time you start the current session certain settings will be
remembered. These options are:
•
•
•
•
•
•
•
•
•
•
•
Remember the Serial Port Settings used for this Session: Next time you open
the current Session window, all the last com port settings will be shown
automatically. This will over ride the default settings that are first used by
ADAM DU for the selected balance/scale.
Collecting Form Data - Remember Filename and Auto Start: If the you are
using ADAM DU with a PGW/PW balance that outputs Form data reports on a
regular basis & tick this option to remember the filename/path & auto start the
logging the next time the Session starts (once the file details have been
specified for the first time).
Collecting Calibration Reports - Remember Filename and Auto Start: If the
you are using ADAM DU with a PGW/PW balance that is set to output
calibration data reports on a regular basis & tick this option to remember the
filename/path & auto start the logging the next time the Session starts (once
the file details have been specified for the first time).
Continual Logging to File - Remember Filename and Auto Start: If you are
using continual file logging, you can use this option to remember the
filename/path & auto start saving when the Session starts (once the file
details have been specified for the first time).
Continual Logging to File - Always Append to file when Starting New Session:
If you are using the option above you specify the action to be taken if the file
exists.
Continual Logging to File - Always Overwrite file when Starting New Session:
The alternative option to appending the to the log file is to overwrite the log
file.
Always Enable Maths Stats for this Session: Whenever the current session
starts Maths Stats will be visible.
Always Enable Graphing for this Session: Whenever the current session
starts the Graph will be visible.
Always Enable Data Collection Grid for this Session: Whenever the current
session starts the Datagrid will be visible.
Always Enable Custom Data Collection Panel for this Session: Whenever the
current session starts the Custom data collection panel will be visible.
Always use Last Digit for Approved Scales/Balances: Whenever the current
Session starts & the balance/scale is approved, then the the last digit can be
made visible or suppressed - the specified option will be remembered for the
next time the Session starts.
Note: each Session 1-8 has its own "Remembered" settings & also per model, so
this allows you to easily use a wide selection of different ADAM Balances/Scales
and cater for different setups.
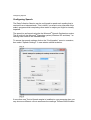
Configuring Speech
Configuring Speech
The Data Collection Session can be configured to speak each reading that is
received from a balance/scale. This is ideal if you want to stay informed of the
scale's progress whilst completing other tasks or maybe you might be visually
impaired.
The speech is performed using the the Microsoft® Speech Synthesizer engine.
This is built into the Microsoft® Operating system (Windows XP and later) - so
nothing extra needs to be installed/setup.
To access the speech settings click on the "Configuration" menu in a session,
then select "Speech Settings". A new window should as below:
If more than one Text-to-Speech engine is installed on your computer then you
may choose a different voice to announce the readings. Different MS Windows
operating systems come with different voice engines installed by default.
The volume and speed of speech can also be altered if desired. The "text-tospeech" test box can be used to test the voice with the current volume and speed
settings. Simply enter some text (like the default text above) and click the "start"
button to hear sample speech.
When you are happy with the settings click the "Save Settings" button.
Enabling Speech
To enable speech for a session, simply select the "Configuration" menu and then
select "Speech Enabled" option. Now every reading will be spoken.
Notes: If you enable speech in more than one session then obviously the speech
may conflict if the readings received co-inside with each other.
We do not recommend you using the Adam DU timer control with an interval
lower than about 3-4 seconds or you may find the computer struggles to get the
speech out in time before the next reading is spoken. If you have a slow
computer you may also find you need stay away from the smaller time intervals.
Also using a scale in continuous RS-232 output mode would not be a good idea
as they usually output up to 10 readings a second and the computer cannot
speak that quickly obviously...
Loading Test Data
Loading Test Data from a file created by a Moisture Balance
From the "Moisture Analysis" menu (available when using a Moisture Balance
like the PMB) you can select "Load Test Results". This will prompt you to select a
results file created by a Moisture Balance.
The results file can be saved from the PMB to a USB Memory stick device. The
Memory stick can then be connected to the computer, making the results files
available to ADAM DU.
The data readings will be extracted from the file and loaded into ADAM DU. Then
the readings will be processed (as if they had been directly received by ADAM
DU via RS-232/USB). If the graphing/maths stats are enabled these will also be
computed.
This enables you to analyse data when the Moisture Balance cannot be
connected directly to a computer due to its location or maybe you want to review
previously saved results.
Frequently Asked Questions
FAQ:
1. My computer operates slowly when running ADAM DU, is there anything
i can do?
Each session & each individual real-time process in that session (graphing,
datagrid, continual file logging & maths stats) takes up some processing power
and memory from your computer. So if you run ADAM DU on a slower computer
it will help if you disable any real-time features that are not needed (you turn
features on/off in each session under the "Data" menu option on the Session
window).
Also most of the real-time features display data on the screen & refresh it
regularly, keeping ADAM DU minimised on the taskbar stops the need for this
and thus frees up more of the CPU.
If you have problems with running out of memory, check that the real-time
processes: Datagrid, Graph and Maths stats (if enabled) are NOT set to work on
ALL the collected readings, this will especially help if you are collecting tens or
hundreds of thousands of readings. You can restrict the real-time processes to
only work on the last 100, 1000 or 10000 readings - thus restricting the amount of
memory used. This is done from each session window under the "Configuration"
menu.
2. I have a licenced copy of ADAM DU & it has suddenly stopped working its telling me my evaluation period has expired?
OR
I have just purchased/activated ADAM DU but it still says I am using an
evaluation version
OR
I get a warning message of "A Licence file has been found in the ADAM DU
program folder but it does not match the licence key displayed below"
You might see a message window similar to this, the purple area explains that
the licence file is not valid, as it does not match your licence key. This may have
occurred because of 2 reasons:
1. You have changed some main hardware components in your computer since
you licenced/activated ADAM DU.
2. You incorrectly entered your licence key into the ADAM DU website whilst
activating or purchasing ADAM DU.
The licence key is tied into the main hardware components of your computer (to
stop illegal software copying).
If the main hardware components of your computer change then the Licence key
will also change thus it does not match licence file we issued to you.
Please contact us via our website support page for assistance in obtaining a new
licence www.adamdu.com
3. My Balance/Scale is not mentioned in the List of Supported Models by
ADAM DU.
If you have recently purchased a new ADAM balance/scale that has an RS-232
port and it is not listed in the Supported Models then please visit ADAM DU
Website as a newer version of ADAM DU will be most likely available for
download that will contain support for current models. Just install the newer
version of ADAM DU over your old version to benefit from the latest software. If
you still cannot see the your Model listed on the website, then please use the
"Contact Us" form on the website for further information
4. Can I get software updates/bug patches for free?
Adam Equipment may provide free software updates for your version of ADAM
DU at our discretion, as per the Licence agreement. See the download page on
the ADAM DU Website for more information on the latest updates for ADAM DU
& the changes from previous updates. If there is a newer update available then
you can simply download it and install it on your computer. It will automatically
upgrade your current version.
5. Is it ok to unplug the USB lead/switch the HCB off whilst ADAM DU is
running?
Please do not unplug or switch off the HCB whilst ADAM DU is running as the
sudden disappearance of the virtual com port can cause ADAM DU to have
problems reconnecting back to the HCB. If you do disconnect the HCB you may
have to close ADAM DU down & restart it, if it has problems accessing the HCB's
virtual com port or it does not show it in the list of available com ports.
6. Can the CBK A (USA version) work with ADAM DU when using the lbs &
oz weiging unit?
No, due to mathematical calculations inside ADAM DU, the space separator
between the lbs and the ozs causes too many problems to make it feasible to
work. All the other weighing units are supported on the CBK eg Lbs, ozs, KG, g
etc..
Problems with Adam DU
Problems with ADAM DU
Problems Connecting to a Balance/Scale or not Receiving Readings
Correctly or not able to send a remote command to the scale.
Points to check:
1. Check the serial data cable is correctly wired as per the RS-232 specification
in the user manual for your ADAM scale/balance (not all serial cables are
wired the same!)
2. Check that the Serial port settings in the balance/scale match the serial port
settings in ADAM DU - baud rate (speed) & mode. Please see the relevant
section in the scale/balance's user manual or see this section: Supported
Balances and Scales. If you get some yellow pop up information balloons
from ADAM DU, warning you about "unusable data" whilst trying to receive
readings from your balance/scale, then this would indicate a mis-match in the
communications settings between ADAM DU & your balance/scale.
3. Determine that the RS-232 Serial Com port/USB port on the computer is
working by connecting another device to it if possible. You can always use
Windows HyperTerminal to connect to the balance/scale to see if you can
receive data readings in raw format from the scale/balance. The readings
should look something like what is displayed on the display of the
balance/scale (though there may be other text included with the reading).
Unexpected Crashes
Unexpected crashes in the software can be caused by a corrupted version of the
Microsoft .NET Framework version 2. Try uninstalling the Framework (from add &
remove programs) and then re-install it. Then visit the Microsoft Updates website
for your operating system and download the latest service pack for the
Framework.
Techincal Support
Technical Support
Please make sure you have looked at the relevant section in the ADAM DU
manual with regards your problem. Also look at the following sections for help:
Problems with ADAM DU & Frequently Asked Questions.
If you cannot find the answer to your problem, then please look at the support
section of our website as that may have more up to date support information than
in this user manual.
You may also see if there are any software updates for ADAM DU on the
website, there will will be a change release log on the download page. Consult
this to see if an update has fixed your current problem.
If the above options have not helped then please visit the website Support
section for instructions on how to contact Adam Equipment for Technical
Support.
How to Purchase
How to Purchase ADAM DU
You must install ADAM DU on the computer you intend to run ADAM DU on
when licenced/purchased - as part of the purchasing process you need to
provide a licence key. The licence key is unique to a single computer.
When ADAM DU is first run it activates a 14 Day Evaluation Period. During that
evaluation period, every time you start ADAM DU you will be presented with a
small pop up screen informing you that it is in Evaluation mode, how long you
have left before the evaluation runs out and the licence key - should you wish to
purchase the software.
You can also get the licence key from the "Help" menu on any ADAM DU
window, then select the "How to Purchase On-line" option & follow instructions
If you are unable to purchase online then please contact your local Dealer or
ADAM office, details of local ADAM offices can be found on the ADAM Website
Note: If the evaluation period expires before you purchase a licence then you will
still be presented with the pop up screen giving instructions on how to purchase
ADAM DU before ADAM DU automatically closes.
Miscellaneous
Miscellaneous
ADAM DU will collect the PGW,PW & PGL Balance's serial number & firmware version
automatically when a Session is started (if the firmware in the PGW/PW/PGL balance supports
this function, otherwise the information will not appear). This information is displayed on the top
right section of the Session window, see below:
The collection of the Serial number of the balance may be included in the captured data via the
custom data collection facility - to help uniquely identify a data collection session/balance.
Supported Balances and Scales
Supported ADAM Balances & Scales
•
•
•
•
•
•
•
•
•
•
•
•
•
•
•
•
•
•
•
•
•
•
•
•
•
PGW Precision Balances
PW Analytical Balances
ACBplus Compact Balances
CBD Counting Scales
CBC Bench Counting Scales
CPWplus Weighing Scales
ADK Precision Balances
CBK Bench Scales
CBK M Approved Bench Scales
AZextra Price Computing Retail Scales
AE 202 Indicators
BFW Platform Scales
CFW Check Weighing Floor Scales
HCB Compact Balances
CFC Floor Counting Scales
PGL Precision Balances
AE 401 Indicators
GK Indicators
GKM Indicators
GFK Weighing Scales
GFKM Weighing Scales
PMBMoisture Analyser
AE 402 Indicators
GC Counting Indicator
GFC Floor Counting Scale
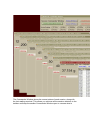
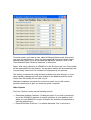
ADAM Factory Default Serial Communication Settings
PGW/PW Precision Balances
4800 Baud N,8,1 (No Parity, 8 Data bits, 1 Stop Bit)
Note: prior to v2.41 default baud rate was 9600
ACBplus Compact Balances
9600 Baud N,8,1 (No Parity, 8 Data bits, 1 Stop Bit)
Note: prior to v2.11 default baud rate was 4800
CBD Counting Scales
4800 Baud N,8,1 (No Parity, 8 Data bits, 1 Stop Bit)
CBC Bench Counting Scales
4800 Baud N,8,1 (No Parity, 8 Data bits, 1 Stop Bit)
CPWplus Weighing Scales
9600 Baud N,8,1 (No Parity, 8 Data bits, 1 Stop Bit)
ADK Precision Balances
2400 Baud N,8,1 (No Parity, 8 Data bits, 1 Stop Bit)
CBK Bench Scales
9600 Baud N,8,1 (No Parity, 8 Data bits, 1 Stop Bit)
CBK M Approved Bench Scales
9600 Baud N,8,1 (No Parity, 8 Data bits, 1 Stop Bit)
AZextra Price Computing Retail Scales
4800 Baud N,8,1 (No Parity, 8 Data bits, 1 Stop Bit)
AE 202 Indicators
4800 Baud N,8,1 (No Parity, 8 Data bits, 1 Stop Bit)
BFW Platform Scales
9600 Baud N,8,1 (No Parity, 8 Data bits, 1 Stop Bit)
Note: RS-232 Pin 2 is output & Pin 3 is input - which is the reverse of
most standard RS-232 cables. See BFW user manual for more details.
CFW Check Weighing Floor Scales
4800 Baud N,8,1 (No Parity, 8 Data bits, 1 Stop Bit)
HCB Compact Balances
9600 Baud N,8,1 (No Parity, 8 Data bits, 1 Stop Bit)
CFC Floor Counting Scales
4800 Baud N,8,1 (No Parity, 8 Data bits, 1 Stop Bit)
PGL Precision Balances
4800 Baud N,8,1 (No Parity, 8 Data bits, 1 Stop Bit)
AE 401 Indicators
4800 Baud N,8,1 (No Parity, 8 Data bits, 1 Stop Bit)
GK Indicators
9600 Baud N,8,1 (No Parity, 8 Data bits, 1 Stop Bit)
GKM Indicators
9600 Baud N,8,1 (No Parity, 8 Data bits, 1 Stop Bit)
GFK Weighing Scales
9600 Baud N,8,1 (No Parity, 8 Data bits, 1 Stop Bit)
GFKM Weighing Scales
9600 Baud N,8,1 (No Parity, 8 Data bits, 1 Stop Bit)
PMB Moisture Analyser
4800 Baud N,8,1 (No Parity, 8 Data bits, 1 Stop Bit)
AE 402 Indicators
9600 Baud N,8,1 (No Parity, 8 Data bits, 1 Stop Bit)
GC Counting Indicator
9600 Baud N,8,1 (No Parity, 8 Data bits, 1 Stop Bit)
GFC Floor Counting Scale
9600 Baud N,8,1 (No Parity, 8 Data bits, 1 Stop Bit)
GBC Bench Counting Scale
9600 Baud N,8,1 (No Parity, 8 Data bits, 1 Stop Bit)