1
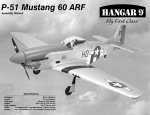
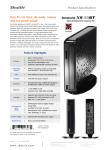
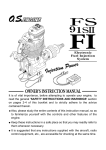
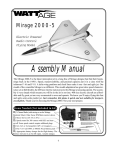
P-47 THUNDERBIRD 150 ARF
Getting Ready
for Combat
Converting the Hangar 9 Thunderbolt 150 ARF for Competition
By Dino Di Giorgio, Team JR
325th Fighter Group Markings–
Hangar 9’s P-47D Thunderbolt “Razorback” 150 ARF is based
bombs, display propeller, functioning flaps that improve landing
on a full-size warbird flown in World War II combat by Captain
317th Fighter Squadron, 15th Air Force. Scale detailing is spot
performance, and heavy-duty UltraTract™ metal retracts that are Notes by Colonel Robert Baseler of the 325th
Fighter group.
designed for easy setup, scale looks and trouble-free operation,
I thought the distinctive identification of the 325th Fighter
flight after flight.
on, right down to the iconic #11 on the “jug,” the combat-
This article will explain in detail how you can take
ready “Razorback” fuselage and a period-authentic UltraCote®
the Hangar 9® P-47D 150 and convert it for entry in
scheme. Other realistic scale details include the molded air
competition scale events.
Herschel “Herky” Green, the charismatic commander of the
scoops and vents, greenhouse canopy, wing fillets, belly tank,
Group would look good on the tail section, so I started adapting the color scheme. John Watkins worked with me. Our first
attempts included black and white checks and red and white
checks, which, at a distance, looked all red. We finally tried
Stripping
The P-47D ARF comes out of the box
factory-covered in authentic UltraCote. I took a deep breath while holding
the Xacto knife and, for a moment, I
felt like a surgeon. I knew it would
be just fine after the first cut.
You must remove the original
covering before you can re-cover it
in your own scheme. Lightly lift the
areas where the covering overlaps.
Once the covering is loose, most
of the removal is quite easy. It
becomes a little harder when
you come to some areas where
Hangar 9 has painted some plastic
to match the covering. Take a heat
gun and warm up the covering. After
the covering is warm enough, it will
start to curl. Then, it’s ready to be removed. There
will be some residue of glue and paint. This will be removed shortly.
Continue until you have all the covering removed from the airplane.
Upgrades
Prep Work
It was time to make some decisions
on what would be added to
the airframe before sanding
began. I contacted Bill Stevick
from Bob Dively Models (www.
bobdivelymodels.com) to see if he
had a cockpit that would fit our
Jug. We required an all-new cockpit.
Bill went to work and, within a
few days, completed a prototype.
The only necessary modification
would require you to cut a former
out of the hatch and fuse below,
which is very simple. The cockpit is
built around a balsa frame. After it
is cut, assembled and painted, it’s
ready to fit the balsa walls (which
are required but not included in the
cockpit kit).
Now, start preparing the plane for fiberglass cloth. Take 220-grit
sandpaper and lightly sand over the entire airframe. You might notice
some areas that require some wood filler. Open a can of Micro-Fill (NHP
201) or a similar product. The more you fill now, the less you have to
fill after the primer is sprayed on. I recommend lightly wet-sanding the
cowl with 400-grit paper to smooth it out. It doesn’t need to be stripped
down to the glass. I found that a little extra nose weight was needed
anyway. After you have filled and sanded those areas, final-sand with
dry 320-grit paper. When this step is complete, take a compressor and
blow off the remaining dust. If you don’t have a compressor, you might
be able to reverse your vacuum. Pick up any remaining loose dust with
a tack cloth.
You need to buy
enough glass to cover
the entire plane,
including the control
surfaces. Most fiberglass comes in 38”
width, depending
on your source, and
you’ll need 25 feet of
cloth. This particular
lightweight cloth came
from Aero Accessories
(www.aero-accessories.
com) in a 38” width. You’ll also need some inexpensive 2- to 3-inch
throwaway brushes, epoxy finishing resin, some mixing cups and 91%
isopropyl alcohol. My method of laying the resin on the plane may vary
depending on your resources.
First, I cut the cloth to match the outline of the part. Take one small
1-ounce mixing cup to mix Z-Poxy’s Finishing Resin (PAAPT40) two-part
epoxy in. Make sure you carefully pour ¼ ounce of resin in the cup,
followed by ¼ ounce of hardener. Mix those two parts very thoroughly.
Add the other ½ ounce of 91% alcohol to the cup, and mix that up
until you get a light brown color and all the mixing swirls blended in.
Pour that into a plastic container. Take your brush and apply the resin to
the cloth. You don’t need to make it heavy, since two coats are needed.
You will not need a rubber card or squeegee for this method. After the
coat is complete, let it dry. Move on to all the remaining parts until all
parts are complete, and they have dried overnight. Then, apply a second
coat of resin on all the parts.
Priming
for Paint
After the parts have
dried, take a piece of
220-grit and sand away
the loose pieces of
cloth. Sand the entire
plane with 220 to get
rid of any lumps that
have settled during the
drying phase.
I chose Pactra-Prep
primer to prime the entire Jug. Spray the parts one at a time using light
coats. Allow drying between coats, or you may have problems lifting the
colors at the end. Sand the parts using 220 until smooth. You want to
fill any holes you may have missed from the second coat of resin.
After you have put on a few coats, check to see where you might need
some lightweight “red” body putty to fill any small dents or holes that
you were not able to fill with the primer. Let the putty dry and sand
smooth. You are ready to lay a light coat of primer back on.
I then took a 3-view drawing and laid out the panel lines with some
1/16-chart tape. You may use various sizes, according to your liking.
The method I use to build up the panels is simple. Spray 4–5 light coats
over the panel lines only and let dry. Sand the surfaces with 320 paper
lightly, especially around the tape. Remove all the chart tape. I chose to
make the exhaust and vent area more detailed. Take some lightweight
aluminum and bend some vents to shape. Cut a slot for them to slide
into. Then take a piece of brass tubing cut on an angle and glue in
with some thick CA or silicone from the inside. Touch up the parts
with a shot of primer. Take the tack cloth and remove all the dust
that’s left over.
Next, take some Krylon dull aluminum spray paint and spray the
entire Jug. The panel lines should be slightly noticeable now. Since
we are adding some details, I thought it would be perfect to add
some raised access panels. You can easily achieve this by using Aero
Foil, which is a high-grade lightweight self-adhesive product exclusively sold through Aero-Accessories. Cut out the panels with a sharp
knife or by using scissors. Peel the back liner off and stick on. You
can use a spoon or the corner of a brush to burnish the panel on.
You will need to cover the entire tail where the Checkertail markings
will go with white primer. You’re using white, because the yellow
paint will not cover well over any other paint. It is extremely important that you mask off the tail before painting the white primer.
Checkertail
I used Bob Dively’s Liquid Masking Film (LMF), which you can buy
from most hobby shops or directly from Bob Dively Models. The first
step is to paint multiple coats of yellow over the white primer and
allow the paint to dry completely. At this time, apply the first layer
of LMF using a disposable foam brush. Allow the LMF to dry at least
one half-hour or until the film is almost clear. Apply two more coats
allowing each coat to dry. Let the LMF dry overnight before laying out the Checkertail lines. We estimated the size of the squares
based off documentation drawings. The approximate size came to
17∕8 inches.
Layout the squares
using a square and
starting 90 degrees
from the leading
edge. Mark the LMF
surface with a ballpoint pen. Measure
back from the leading edge another
17∕8 inches until
you complete the
surface. This method
is used for both
vertical and horizontal surfaces. Take a sharp Xacto knife and score
along the lines carefully. You do not need to cut into the surface.
Mark each black square, so you know what square will be removed
for painting. Make sure that the alternate black and yellow squares
cover the entire surface including the round edges. Now remove the
squares marked “X” for black paint. Once all squares are removed,
you may paint them using matte black paint. When the black has
set, carefully peel the remaining LMF from the surface. Now you
have completed the art of the Checkertail. Once again, you will have
to mask the entire tail from overspray when painting the fuse and
make sure that you leave the tail to dry for a few days.
Painting
3 ways to BUY 877-504-0233 hobby store locator horizonhobby.com 800-338-4639 to order by phone
t
Fiberglassing
| Summer 2006
degrees to the leading edges of the vertical and horizontal tail surfaces.
You could see that Checkerboard tail almost as far away as you could
see the entire aircraft.
Since we chose to paint the P-47D in the same color and markings
as the ARF covered version, I chose to use Tamiya spray paint and
Testors acrylic. Take some tack cloth and wipe down the aluminum
for any overspray. I generally paint the bottom first. This way, the
green will cover more easily over the gray.
Using Tamiya’s AS-7, spray both wings and the lower part of the fuse
with several light coats. You will use 3–4 cans for this process.
After the
parts dry,
paint the
Olive Drab
using approximately 3–4
cans of Tamiya
AS-6 paint.
You can paint
the fuse without the cowl
or canopy
at this time.
The canopy is
prepped just
like the tail. Using LMF, lay four coats over the outside of the canopy,
while drying between coats. When finished, take the Xacto and lightly
scribe lines around the raised window frames. Make sure you leave
the LMF attached to the window. Carefully lift the LMF off the frame,
because that’s where the paint will go. Watch your corners where you
cut. Sometimes it’s easy not to make contact with the other corner,
and then it will start to lift. If this occurs, push it back down with a
finger and cut the lifting part with the knife.
Once the LMF has been removed from the frame, you may paint the
canopy, but make sure only the film is left on the windows. I recommend that you place some paper or tape on the inside to avoid overspray. After priming and sanding the cowl, mask off where you need
to paint the white primer on the nose. There is a small yellow and
white band that needs to be masked using flexible 3M blue line tape
or similar. I painted using Tamiya TS-34 Camel Yellow, TS-27 Matte
White and TS-49 Bright Red. Mask off the nose when dry. Paint the
gray and then the rest of the OD green to match the fuse pattern.
ZENOAH ENGINES
Markings
Hangar 9 did all
the work for you on
the nose art. I felt
no need to change
it. Align the Varga
“blonde,” and stick
it where you think
looks best. When it
came to finding paint
masks, I went to
industry-leader Jerry
Caudle from Pro-Mark
Graphics (www.promark.com). Jerry sent perfect masks for the Stars and Bars, as well as
the #11 for the fuse and under the cowl.
Trim the excess vinyl around the template and leave about 1 inch of
border. If the mask does not fit around the curve, simply pull a little
(the material stretches). Using TS-27 Matte White, spray the entire
mask as a base coat. You may have numerous layers of paint to coat
over the green. Once the white has dried, align the top mask and
spray Testors Enamel Insignia Blue in light coats. You will have to get
out a small air gun for the blue; it’s not available in a spray that I am
aware of.
Paint the edges down first. You only need to paint over the exposed
areas. I chose Testors Enamel Insignia Blue over the acrylic simply
because it looked like a better shade. You can now lay out the #11
on the fuse and bottom of the cowl the same way. After you paint
the small #11 on the cowl, shoot a light coat of yellow for the final.
Detailing
Good job! You’re
almost done. Now,
take some 320-grit
wet sandpaper and
lightly sand down
the green until
some areas of the
silver show through.
Especially, sand
down the panel
lines again very
lightly. Don’t go further than the silver
paint. And remember to keep the sandpaper wet.
Once you are happy with the result, lightly wet-sand with 400-grit.
Make the leading edges of the wing and tail a little more damagedlooking than the rest. Wipe down the plane with water and paper
towels to remove the sanded paint. If you would like to add rivets,
you may do so using a soldering gun with a piece of sharpened
brass tubing. Keep the heat very low; it’s easy to puncture the skin if
it’s too hot. All you’re trying to do is score the paint. Add the canopy
to get ready for the last stage of painting.
Clear Coat
Now that the plane is in its final stages, we can proceed to the
clear-coat process. Wipe down the plane with water and towels and
go over it with the tack cloth. For clear, I chose a product called
Base Fix from Sikkens automotive. You can find this in most auto
body shops. It’s a one-part spray that doesn’t need to be reduced, so
it’s easy to use and apply. When you are spraying the plane, I recommend two light coats. The heavier you lay it down, the glossier the
shine. Since this is a warbird, we don’t want it shiny. Remember to
take the LMF off the canopy with an Xacto knife.
Weathering
I like to add some more dirt to the plane, so I used pastel chalk
from the local art supply store. You can purchase a combo kit that
has some black, gray and brown colors. Sand the chalk into powder
with 120-grit
paper. This will
be a messy job
because of the
fine powder, so be
sure you are in an
open area. Dip a
disposable brush
into the powder.
Lightly streak the
brush across the
exhaust area and/
or gun ports. You
can use the chalk
wherever you see it might add some realism. Using various pastels,
you can highlight the exhaust too. Even though you place the chalk
over the clear, it will stay attached to the surface for a long time.
Engine, Radio & Accessories
www.aero-accessories.com
The Evolution 35GT gas engine (EVOE35GT) is perfect for the Jug. It
fits into the cowl using the engine mounts included with the ARF kit.
The ignition mounts in the firewall box with a strap. Cut the ignition
monitor light lead, solder a connector in between, and mount the
light in the gunsight inside the cockpit.
The Jug comes with a very nice centerline static tank. The hard
mount is already inside the belly. I looked at it and thought I could
make the tank removable without much work. I used a small drop
tank release system from Aero Accessories. All you have to do is cut
a slot in the fuse for the release switch and add a 2/56 wire with
a clevis. Attach a sub-micro servo such as the JR S241 or JR SPORT
SM15. Mount the servo in the fuse and you are set. Adding a TruTurn Prop Hub (www.tru-turn.com) simply made the P-47D come to
life. You can’t fly without one!
About the Author
Dino Di Giorgio has been flying model aircraft since before his eighth
birthday. As a teenager, he discovered the excitement of giant-scale
competition and began collecting warbirds. Dino has been a member
of Team JR for twelve years and, in 1992, began competing at Top
Gun, where he has earned three Team Scale 1st-place trophies. You
can easily see Dino flying, competing and having a good time at
warbird, scale and jet RC events year round.
P-47D Thunderbolt 150 ARF
Realistic scale details include a combat-ready "Razorback" fuselage, molded air scoops and vents,
greenhouse canopy, molded fiberglass wing fillets, belly tank, bombs, display propeller and more.
Wingspan 81.25 in • Wing Area 1164 sq in
Length 71 in • Weight 15–17 lb
Radio 5 channels w/6 servos
Engine 1.20–2.10 2-stroke;
1.20–2.10 4-stroke; 26–35 cc gas
Motor (electric conversion);
E-flite Power 110 (EFLM40110A)
P-47 Thunderbolt
150 ARF w/Retracts
HAN2700
List Price 799.99
569.99
2
ricx/
P-40E Warhawk 60 ARF w/Retracts
HAN2850 List Price 329.99 259.99
1
Wingspan: 65.5 in
P-51D Mustang 60 ARF w/Retracts
HAN2375 List Price 329.99 254.99
1
Wingspan: 65.5 in
P-51D Miss America 60 ARF w/Retracts
HAN2775 List Price 319.99 254.99
1
F6F Hellcat 60 ARF
The F6F Hellcat was one of World War II’s
deadliest fighters. Hangar 9’s .60-size replica
looks like the real thing, right down to the painted
fiberglass cowling, accurate period decals and factory-installed
mechanical retracts that rotate 90 degrees. The servos even mount
inside the airplane to maintain the incredible scale looks. And as if its
cool appearance wasn’t enough, the Hellcat 60 ARF also performs like
a classic sport airplane, eagerly handling huge loops, smooth rolls and
other light aerobatics.
Wingspan 64.6 in • Wing Area 709.4 sq in
Length 52 in • Weight 8.25–9.5 lb
Radio 5 channels w/6 servos
Engine .60–.78 2-stroke; .91–1.00 4-stroke Power 110
ric/
F6F Hellcat 60
ARF w/Retracts
HAN4075
339.99
264.99
3 ways to BUY 877-504-0233 hobby store locator horizonhobby.com 800-338-4639 to order by phone
Wingspan: 64.6 in
Wingspan: 67.5 in
AT-6 Texan 60 ARF w/Retracts
HAN1925 List Price 319.99 254.99
1
Piper J-3 Cub 40 PNP & ARF
Marvel at the scale realism of Hangar 9’s J-3 Cub PNP. Factory-painted scale wing struts
are constructed from airfoil-shaped aluminum. Factory-assembled scale landing gear feature
simulated bungies and smooth shock absorption that stand up to everyday flying. Or, if you
prefer using your own engine and servos, the Piper J-3 Cub 40 is also available as an ARF that
offers the same scale realism.
Wingspan 80 in • Wing Area: 932 sq in
Length 51 in • Weight 7–7.5 lb
Radio 4 channels w/5 servos (servos installed on PNP)
Engine (PNP) Evolution .46NT (installed)
Engine (ARF) .46–.50 2-stroke; .56–.82 4-stroke
eic,
PNP
eic.
ARF
Piper J-3 Cub 40
PNP
HAN4025
List Price 599.99
409.99
2
Piper J-3 Cub 40
ARF
HAN4000
List Price 319.99
209.99
2
Wingspan: 65.25 in
F4U Corsair 60 ARF w/Retracts
HAN2575 List Price 339.99 264.99
2
| Summer 2006
SCALE
And For Sport
FoR
For a faithful wartime flying experience, try Hangar 9’s comprehensive series of classic
warbirds. Not only are they marked by their realistic scale detail, but each airplane can also
offer show-stopping sport performance for an exhilarating weekend at the flying field. Plus,
they all live up to Hangar 9’s high standards, including up-to-date construction techniques,
period-authentic UltraCote® trim schemes and lightweight all-wood parts. And if you’re into
electric flight, most Hangar 9® warbirds can be adapted to electric power optons.
Wingspan: 65.in
P-47 Thunderbolt 60 ARF w/Retracts
HAN2975 List price 329.99 259.99
2