1
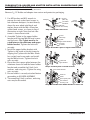
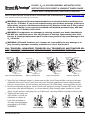
B10320F: O2 / IV HOLDER ASSEMBLY AND INSTALLATION
INSTRUCTIONS FOR EVEREST & JENNINGS® WHEELCHAIRS
PLEASE SAVE THESE INSTRUCTIONS FOR FUTURE USE
Info: The most current version of these instructions can be found online at www.grahamfield.com
Tools required are listed at the beginning of each section
WARNING:Important!ReadandunderstandtheseinstructionsbeforeinstallingorusingtheO2/IVHolder.Ifyoudonotunderstandanypartofthesewarnings,cautionsor
instructions,contactahealthcareprofessionalfordirectionintheuseofthisproduct.
IftheO2/IVHolderisnotproperlyassembledandinstalled,personalinjuryanddamagetotheO2/IVHoldercouldresult.
WARNING:Ifcomponentsaredamagedormissing,contactyourdealerimmediately.
DONOTusesubstituteparts.UseonlyEverest&Jenningsreplacementparts.NonEverest&Jenningsreplacementpartscouldcausepersonalinjuryanddamagetothe
O2/IVHolder.
WARNING:GFHealthProducts,Inc.assumesnoresponsibilityforanydamageorinjurycausedbyimproperassembly,installationoruseofthisproduct.
E&J®TRAVELER®,ADVANTAGE,TRAVELERL3/L4,TRAVELERSE,ANDTRAVELERHD:
HOLDERINSTALLATIONONWHEELCHAIR(SEEILLUSTRATIONSBELOW)
Remove O2 / IV Holder from carton and protective packaging.
upper bracket
O2/IV
holder
u-bolt
Steps 1-2: Traveler/Advantage
offset tube
u-bolt
u-bolt
u-bolt
backpost
backpost
backpost
lower rail
lower bracket
lock washer
wing nut
upper bracket
O2/IV
holder
upper bracket
O2/IV
holder
upper bracket
O2/IV
holder
lower rail
lower bracket
lock washer
wing nut
Steps 1-2: Traveler L3/L4
lower rail
lower bracket
lock washer
wing nut
Steps 1-2: Traveler SE
lower rail
lower bracket
lock washer
wing nut
Steps 1-2: Traveler HD
1. Note that left sideframe above is shown from inside. Install lower holder section on left-rear
sideframe lower rail: Insert U-bolt over rail, then through appropriate lower holder bracket
holes as shown above. Install washers and wing nuts on U-bolt ends, securing holder to rail.
2. Install on sideframe backpost: Insert U-bolt over backpost (except Traveler HD: insert U-bolt
over offset tube behind backpost, as shown above), then through upper bracket as shown
above. Install washers and wing nuts on U-bolt ends, securing holder to backpost/offset tube.
3. Tighten all four wing nuts
until holder is secure on
sideframe as shown at
right. Ensure holder is
securely attached before
proceeding to HOLDER
Step 3:
Step 3:
Step 3:
Step 3:
ASSEMBLY.
Traveler HD
Traveler/Advantage
Traveler L3/L4
Traveler SE
B10320F-INS-LAB-RevB11
1
PARAMOUNTXD:HOLDERANDADAPTERINSTALLATIONONWHEELCHAIR(SEE
ILLUSTRATIONSATRIGHT)
Tools required: Phillips screwdriver, M5 hex key, M13 wrench
Remove O2 / IV Holder and adapter from carton and protective packaging.
1. Use M5 hex key and M13 wrench to
remove the two socket head screws in
left sideframe backpost, located directly
above the rear wheel axle block, and
replace them with the M8 x 45mm hex
socket head screws, as shown in Step 1
illustration at right. Note that left sideframe is shown from inside.
2. Assemble T-plate to the upper holder
bracket with the two M8 flat head screws
and lock nuts. The T-plate must be located between the sideframe and upper
holder bracket. Tighten the lock nuts
securely.
3. Install the upper holder bracket with
T-plate to the inside of the left frame by
aligning the T-plate with the M8 x 45mm
hex socket head screw ends and installing the M8 lock nuts. Tighten the lock
nuts securely.
4. Place the short spacer plate between the
sideframe lower rail and the lower holder
bracket and assemble the U-bolt, lock
washers, and wing nuts. Tighten the wing
nuts securely.
5. Ensure holder is securely attached before
proceeding to HOLDER ASSEMBLY.
6. The remaining U-bolt, washers, and wing
nuts may be discarded.
2
backpost
screws
(M8 x 45)
screws
(M8 x 45)
rear wheel
axle block
left sideframe
(shown from inside)
Step 1: Install M8 x 45 screws
screws
(flat head)
T-plate
upper holder bracket
lock nuts
O2 holder
Step 2: Assemble T-plate to upper holder bracket
T-plate and
upper bracket
Step 3: Install T-plate on inside of frame
lower holder bracket
lower rail
U-bolt
short spacer plate
lock washers
and wing nuts
Step 4: Assemble lower holder bracket to lower rail
B10320F-INS-LAB-RevB11
HOLDERASSEMBLY
1. Install holder middle section: slide
middle tube down over lower tube until
button lock locks into hole as shown at
right.
WARNING:Ensurethatbuttonlock
islockedinplacebeforecontinuing.
2. Install holder upper section (IV hanger): Loosen height adjustment knob
as necessary. Slide upper tube down
into middle tube until desired height
is reached, then tighten height-adjustment knob until secure.
middle
section
lower
section
WARNING:EnsuretheO2/IVHolder
isinstalledasdescribed,andall
componentsaresecurelyfastened,
beforeuse.
hole
middle
section
button
lock
button
lock
lower
tube
lower
section
Step 1: Install middle section
Adjust IV hangerheight
3. Loosen knob until hanger slides freely
inside tube.
4. Slide hanger to desired height. Tighten
knob until hanger is secure in tube.
OPERATION
middle
tube
IV
hook
knob
upper
tube
middle
tube
IV hanger
height-adjustment
knob
O2 bottle
anti-rattle
knob
InstallO2cylinder
Loosen anti-rattle knob as necessary, install cylinder, and tighten knob enough to
prevent cylinder from rattling.
Step 2: Install IV hanger
ALLMODELS:LOCKMIDDLETUBEINPLACEWITHBOLT(OPTIONAL)
Tools required: Needlenose pliers, Phillips screwdriver, 7/16" wrench
You may wish to use the included optional bolt and nut
to more securely attach the middle tube to the lower
section.
pliers
button
lock
lower
tube
1. Depress button lock and remove middle tube from
lower tube.
2. Remove button lock from lower tube: Depress button
while holding button lock with needlenose pliers. Remove button lock from holder as shown at near right.
remove
button lock
nut
bolt
lower
tube
install
bolt & nut
3. Slide middle tube down over lower tube until holes match. Insert bolt through both tubes as
shown at far right.
4. Install nut on bolt. Use Phillips screwdriver and 7/16" wrench to tighten until both tubes are
secure.
B10320F-INS-LAB-RevB11
3
MAINTENANCE
WARNING:InspecttheO2/IVHolderfrequentlyandtightenitasneededtoensuresecureinstallation.
Check holder at least once a week to ensure all parts lock securely into place and will not accidentally unlock. Wipe holder with a soft cloth and dry immediately if exposed to moisture. If necessary, wash with a mild soap and water solution, rinse, and dry with a soft cloth.
s NOTICE:NeveruseabrasivecleanersorscouringpadsonanypartoftheO2/IVHolder.
WARRANTY
GF Health Products, Inc. warrants the Everest & Jennings B10320F O2 / IV Holder for three months
against manufacturer's defects. If a product is deemed to be under warranty, GF Health Products,
Inc. shall provide, at its option, (1) replacement of any defective part or product or (2) a credit
of the original selling price made to GF Health Products, Inc.'s initial customer. The warranty
does not include any labor charges incurred in replacement part(s) installation or any associated
freight or shipping charges to GF Health Products, Inc.
The warranties contained herein contain all the representations and warranties with respect to
the subject matter of this document, and supersede all prior negotiations, agreements and understandings with respect thereto. The recipient of this document hereby acknowledges and represents that it has not relied on any representation, assertion, guarantee, warranty, collateral contract or other assurance, except those set out in this document.
www.grahamfield.com
GF Health Products, Inc. is not responsible for typographical errors. Packaging, warranties, products and specifications are subject to change without notice.
Graham-Field, Everest & Jennings, E&J and Traveler are registered trademarks of GF Health Products, Inc.
© 2011 GF Health Products, Inc. • 2935 Northeast Parkway • Atlanta, GA 30360 • tel 770-368-4700
4
B10320F-INS-LAB-RevB11