1
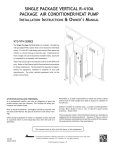
The Crossings at Beaverdam - Woodfin, NC VTC / VTH Vertical Terminal Air Conditioner and Heat Pump Cooling: 8,900 - 23,100 BTU/h Heat Pump: 8,500 - 22,400 BTU/h Electric Heat: 5,100 - 34,100 BTU/h Up to 3.0 COP Product Features • • • • • • • • • • • • • • Chlorine-free R-410A refrigerant Evaporator coil freeze protection Compressor restart delay Low-ambient lock-out Adjustable fresh air damper Wall-mount thermostat Electrical disconnect Random unit restart Front desk control Fan on/off delay Adjustable fresh air damper Completed insulated cabinet for quiet operation "Ductable" to multiple rooms Full-length wall panels available (eliminates closet door) ¾ Ton through 2 Tons * Complete warranty details available from your local dealer or at www.amana-ptac.com. SS-VPTAC www.amana-ptac.com Amana® is a trademark of Maytag Corporation or its related companies and used under license to Goodman Company, L.P., Houston, Texas. 2/10 Supersedes 5/08 Product Specifications Features • Front Desk Control Ensures that system pressure equalizes before the system restarts, so compressor life is extended. Enable or disable each unit from the front desk to save energy used to condition unoccupied rooms. • Low Ambient Lockout • Fan Delay Locks out compressor at 40ºF and below, thus extending compressor life. Allows the evaporator blower to continue running for up to 45 sec. after the thermostat is satisfied, maximizing cooling performance. • Electrical Disconnect Makes service and maintenance easier. (Factory-installed) • Random Restart • Filter Brackets Protects against damage to electrical circuits by preventing all units from starting at one time after power disruption. Random restart occurs in 3 to 4 min. Installed over evaporator coil and shipped with throw-away filter (20” x 24” x 1”; see Figure 5, pg. 9). (Field-installed) • Evaporator Coil Freeze Protection (Factory-installed) – Connects evaporator drain pan to a vertical pipe connection in the unit’s base pan via a drain line. Evaporator condensate is delivered from the unit to a catch tray in the wall sleeve and exits the sleeve through the ¾” male NPT fitting to allow complete piping of the drain to a condensate riser during the rough-in stage. This eliminates condensate connection problems when connecting the HVAC drain to the riser after the HVAC unit is installed in the closet. Unit can be removed for service without disconnecting the condensate piping. Additional closet space is not needed to connect the drain. • Unique “Sleeve Drain” Condensate System Prevents ice build-up on coils and compressor damage during the cooling mode. Attached to the coil, a temperature sensor will de-energize the compressor when freezing conditions are detected and re-energize the compressor when the coil warms up again. • Ductable Return Air Permits the connection of return air ductwork using the provided tabs (usually not required) on the inlet of the evaporator coil. (Figure 5, pg. 9) • Secondary Overflow Note: Duct systems and registered sizes must be properly designed for the CFM and external static pressure rating of the unit. Should the primary condensate riser become clogged, water will fill the catch tray and be diverted through the sleeve to the exterior of the building, ensuring no leakage into the interior area. Rain water entering the sleeve is automatically diverted to the building exterior. • Adjustable Outside Air (manual) Meets code requirements for outside air introduction. The air vent (Figure 6, pg. 9) allows up to 50 CFM of outside air to be introduced into the equipment closet. The air mixes with return air entering the closet through the return air grille. Note: Negative pressure can be introduced through an external source to raise the 50 CFM level. Consult with the factory. • Compressor Restart Delay – (3 min.) Nomenclature VT 1,2 C 3 07 4,5 3 6 E 7 08 8,9 A 10 A 11 Family VT Vertical PTAC Model Type C Cooler H Heat Pump Cooling Capacity 07 7000 BTU/h 09 9000 BTU/h 12 12000 BTU/h 18 18000 BTU/h 24 24000 BTU/h Rated Voltage 3 230/208 V, 60 Hz, 1 Ph Major Design Series A Original B New SEER Req. 2006 E R-410A, 2010 2 Engineering Major & Minor Revisions A H C Option Cole Standard Model Hot Water Model Seacoast Protection 00 02 03 04 05 06 08 10 Heater No Electric Heat 2.0 KW 3.0 kW 4.0 kW 5.0 kW 6.0 kW 8.0 kW 10 kW OA OB 2-Row Coils 3-Row Coils www.amana-ptac.comSS-VTAC Product Specifications VTC Model Specifications—Cooling/Electric Heat Electrical Data (208/240v-1 Ph-60hz) Blower Data Electric Heat Data Model kW Heating Amps BTU/h 240V 208V 240V 208V Condenser Data Evaporator Condenser Compressor Motor Motor 240V 208V Amps HP RLA LRA FLA HP Min. Circuit Amps Max. Ship Circuit Weight Protection (lbs.) 208V 230V 208V 230V VTC093E-0 0 0 0 0 0 0 7 7 15 15 VTC093E-2 2 1.5 6,800 5,100 9 7.9 10 12 15 15 VTC093E-3 3 2.3 10,200 7,700 13.2 11.5 15 17 15 20 VTC093E-4 4 3 13,600 10,200 17.4 15.1 19 22 20 25 VTC123E-0 0 0 0 0 0 0 9 9 15 15 VTC123E-2 2 1.5 6,800 5,100 9 7.9 10 12 15 15 0.7 0.7 ⅛ ⅛ 4.5 5.6 25.0 29.0 0.5 0.5 ¹/15 ¹/15 VTC123E-3 3 2.3 10,200 7,700 13.2 11.5 15 17 15 20 VTC123E-4 4 3 13,600 10,200 17.4 15.1 19 23 20 25 VTC123E-5 5 3.8 17,000 12,800 22 19 24 28 25 30 VTC183E-0 0 0 0 0 0 0 13 13 20 20 VTC183E-2 2 1.5 6,800 5,100 9.2 8.1 13 13 20 20 20 VTC183E-3 3 2.3 10,200 7,700 13.4 11.7 15 17 20 VTC183E-4 4 3 13,600 10,200 17.5 15.3 20 22 25 25 VTC183E-5 5 3.8 17,000 12,800 22 19 24 28 25 30 0.9 ⅛ 6.5 43.0 0.7 ¹/10 VTC183E-6 6 4.5 20,500 15,350 26 23 29 33 30 35 VTC183E-8 8 6 27,300 20,500 34 30 38 43 40 45 VTC183E-10 10 7.5 34,100 25,600 43 37 47 54 50 60 VTC243E-0 0 0 0 0 0 0 20 20 30 30 VTC243E-3 3 2.3 10,200 7,700 14 12.3 20 20 30 30 VTC243E-4 4 3 13,600 10,200 18.2 15.9 VTC243E-5 5 3.8 17,000 12,800 22 20 VTC243E-6 6 4.5 20,500 15,350 27 22 24 30 30 26 29 30 30 23 31 35 35 40 2.6 ¼ 11.5 54.0 2.3 ¼ VTC243E-8 8 6 27,300 20,500 35 30 40 45 40 50 VTC243E-10 10 7.5 34,100 25,600 43 38 49 55 50 60 245 245 255 255 Cooling Performance Data Model Standard Ratings¹ BTU/h EER VTC093E 8,900 9.0 VTC123E 11,500 9.0 VTC183E 17,600 9.0 VTC243E 23,100 9.0 ¹ Tested in accordance with ARI Standard 310/380-93 at 95°F DB/75°F WB outdoors and 80°F DB/67°F WB indoors. SS-VTACwww.amana-ptac.com 3 Product Specifications VTC Model Specifications—Cooling/Electric Heat (cont.) Blower Data Model VTC093E VTC123E VTC183E VTC243E Motor Speed¹ Connection 0.05 0.10 0.15 0.20 0.25 0.30 0.35 0.40 High 490 475 460 450 435 420 400 --- Med 375 360 350 340 330 315 300 --- Low 290 280 270 260 240 230 215 --- CFM vs. External Static Pressure High 490 475 460 450 435 420 400 --- Med 375 360 350 340 330 315 300 --- Low 290 280 270 260 240 230 215 --- High 660 655 650 645 640 635 625 610 Med 580 578 575 570 565 560 550 540 Low 485 480 475 470 465 460 455 450 High 1,030 1,000 980 950 920 890 860 820 Med 880 860 840 820 790 760 730 710 Low 770 760 750 740 720 700 680 660 Notes: (1) VTC12, 18- and 24-blower motors are factory-wired for medium (cooling) and low (heating) fan operation. VTC09 is low speed for both. (2) VTH12, 18- and 24-blower motors are factory-wired for medium (cooling/heat pump) and low (electric heat) speed operation. VTH09 is low speed in all modes. Dimensional Data VTC/VTH Unit *See Wall Sleeve Installation Instructions for complete details. "P" Trap Is shown for illustration purposes only. It may not be required by local codes. 4 www.amana-ptac.comSS-VTAC Product Specifications VTH Model Specifications—Cooling/Electric Heat Electrical Data (208/240v-1 Ph-60hz) Model Electric Heat Data kW ETU/h VTH243E VTH183E VTH123E VTH093E 240V 208V 240V Elower Data Condenser Data Evaporator Heating Amps Compressor Motor HP RLA LRA FLA HP Min. Circuit Amps Max. Circuit Protection 208V 230V 208V 230V 10 12 15 15 15 17 15 20 208V 240V 5,100 9 7.9 13.2 11.5 13,600 10,200 17.4 15.1 19 22 20 25 6800 208V Amps Motor 2 1.5 3 2.3 4 3 2 1.5 3 2.3 4 3 5 3.8 17,000 12,800 22 2 1.5 6,800 5,100 9.2 10,200 7,700 13.4 11.7 15 17 20 20 13,600 10,200 17.5 15.3 20 22 25 25 24 28 25 30 10,200 7,700 6800 5,100 0.7 ⅛ 4.5 25 0.5 ¹/15 9 7.9 10 12 15 15 13.2 11.5 15 17 15 20 13,600 10,200 17.4 15.1 19 23 20 25 19 24 28 25 30 8.1 13 13 20 20 10,200 7,700 3 2.3 4 3 5 3.8 17,000 12,800 22 19 0.7 0.9 ⅛ ⅛ 5.6 6.5 29 43 0.5 0.7 ¹/15 ¹/10 6 4.5 20,500 15,350 26 23 29 33 30 35 8 6 27,300 20,500 34 30 38 43 40 45 10 7.5 34,100 25,600 43 37 47 54 50 60 3 2.3 10,200 7,700 14 12.3 20 20 30 30 4 3 15.9 22 24 30 30 13,600 10,200 18.2 5 3.8 17,000 12,800 22 20 6 4.5 20,500 15,350 27 23 26 29 30 30 31 35 35 40 8 6 27,300 20,500 35 10 7.5 34,100 25,600 43 30 40 45 40 50 38 49 55 50 60 2.6 ¼ 11.5 54 2.3 ¼ Ship Wgt (lEs) 245 245 255 255 Important: • Heat pump does not operate simultaneously with electric heat. • Electrical data in the aEove taEle only applies to units manufactured after 8/1/2000 (data code G08). Contact factory for electrical data for units manufactured prior to 8/1/2000. • Compressors in these models (after 8/1/2000) do not operate simultaneously with heater elements. • Models manufactured Eefore 8/1/2000 (excluding the VTH24-HP) did feature simultaneous operation and therefore had higher circuit ampacities. Performance Data Model Cooling Data Heating Data² BTU/h EER BTU/h WATTS COP VTH093E 8,900 9.0 8,500 795 3.0 VTH123E 11,400 9.0 11,500 1,001 3.0 VTH183E 17,400 9.0 16,700 1,582 3.0 VTH243E 22,600 9.0 22,400 1,967 3.0 ¹ Tested in accordance with ARI Standard 310/380-93 at 95°F DB/75°F WB outdoors and 80°F DB/67°F WB indoors. ² 47°F DB, 43°F WB Outdoor/70°F DB, 60°F WB Indoor SS-VTACwww.amana-ptac.com 5 Product Specifications Dimensional Data DUCT OPENING (C) 1 A ELEMENT 10 B 6-1/8 FILTER RETURN AIR BLOWER MOTOR DISCONNECT 66 ELECTRICAL KNOCKOUT CONDENSER OUTLET LOW VOLTAGE 41-1/4 CONDENSER INLET 20 20 A B VTC/VTH 09, 12, 18 6½ 6½ VTC/VTH 24 10 3 6 20 www.amana-ptac.comSS-VTAC Product Specifications Accessories • Wall-mounted Low-voltage Thermostat Easily controls the unit. Low-voltage wires exit the left side of the cabinet. (See Pg. 8.) • "Flush Style" Architectural Louver Unit with Installed Rear Sleeve and FlushStyle Louver Attaches to the outside of the wall sleeve for a flush appearance. Louvers recess into the wall sleeve; stock and custom colors available. • Wall Sleeves Standard 22" width x 44" Height. Six sleeves (three rear installation, three side installation) available for varying wall widths, from 5" to 20". (See chart below and Figure 7, page 9.) Shipped separately to allow installation during construction, each sleeve includes a factory installed "weather guard" to cover the sleeve opening during construction phase. Note: Due to better access to unit, wall sleeves installed in the rear application are recommended over side-installed wall sleeves whenever possible. Note: Sleeve, louver, filter, and thermostat required for each general installation. Side Wall Sleeves Model Wall Depth Sleeve Depth SWS958A 5" - 8" Walls 26" SWS9812A 8" - 12" Walls 30" SWS91214A 12" - 15" Walls 33" 20" Walls Note: Side-installed wall sleeves require different closet sizes and configurations. (See Page 10.) Rear Wall Sleeves Model Wall Depth Sleeve Depth VWS95BA 5" - 8" Walls 26" VWS9812A 8" - 12" Walls 30" VWS91214A 12" - 15" Walls 33" 20" Walls Separate wall mounting bracket is shipped with "side install" wall sleeves. Architectural Grilles (Available in various colors) Model Wall Depth AGKV01CB Anodized Cluminum (Clear) AGKV01DB Dark Broze AGKV01TB Stonewood AGKV01WB White AGKV015B Custom Color Side Install Sleeve SS-VTACwww.amana-ptac.com 7 Product Specifications PRODUCT SPECIFICATIONS Accessories ACCESSORIES (CONT(cont.) .) • Wall-mounted Low-voltage Thermostat* • Wall-mounted Low-voltage Thermostat* Easily controls the unit. Low-voltage wires exit the left side of Easily controls the unit. Low-voltage wires exit the left side of the cabinet. the cabinet. * Available for straight cool/hydronic chassis and heat pump chassis. * Available for straight cool/hydronic chassis and heat pump chassis. • Unit Mounted Freeze Sensor (UMF01A) • Unit Mounted Freeze Sensor (UMF01A) De-energizes the unit when reduced air ow or ice build-up De-energizes theRe-energizes unit when reduced air when flow ornormal ice build-up are are detected. the unit operat ing detected. conditionsRe-energizes resume. the unit when normal operating conditions resume. • Hydronic Flow Control Module (HFC01A)* • Hydronic Flow Control Module (HFC01A)* Regulates the amount of hot water heat to the unit. *Applies to Regulates amount hydronic the models only.of hot water heat to the unit. *Applies to hydronic models only. • Optional Access/Return Air Panel Panels are available in louvered or non-louvered and are Straight Cool/ Digital cool - off In1246001 sulated for sound reduction with tamper-proof screws. Louvered Hydronic Chassis heat, auto - on panel includes a 18” x 24” x 1” lter. Non-louvered panels require Heat Pump Digital cool - off external 1246003return air grilles and unit mount lters. Chassis Straight Cool/ Digital cool - off - • 1246001 Optimal Access/Return Air Panel heat, auto - on Hydronic Chassis Panels are available as louvered or non-louvered and are insulatHeat Pump Digital cool - off 1246003 ed to for sound reduction with tamper-proof screws. Louvered Chassis heat, auto - on panel includes an 18" x 24" x 1" filter. Non-louvered panels required external return air grilles and unit mount flters. FloatSwitch Switch (FSE306A)* (FSE306A)* •• Float Opensthe the condensate condensate pan rises in the Opens pan automatically automaticallywhen whenwater water rises in pan and shuts off the system by breaking low or line volt age the pan and shuts off the system by breaking low or line voltage currenttotothe thecompressor. compressor.Switch Switchisisnormally normallyclosed. closed.By Byclipping clipping current the oat switch to the side of the auxiliary drain pan, ceiling wathe float switch to the side of the auxiliary drain pan, ceiling water damage is prevented. In some areas, this switch can replace ter damage is prevented. In some areas, this switch can replace auxiliarydrain drainpan. pan.Local Localbuilding buildingcodes codesshould shouldbebechecked checked ananauxiliary for application. for application. Note: Note:The Thefloat oatswitch switchmust mustbe beinstalled installedbefore beforeunit unitisisset setininthe thesleeve. sleeve. *Applies *Appliestotohydronic hydronicmodels modelsonly. only. heat, auto - on Access / Return Air Panel ³ 4 Access/Return Air Panel Access/Return Air Panel Description Dimensions (H x W) Part # Frame Opening Louvered 1 87 X 31 84 X 28 LWP0187 Non-Louvered 2 87 X 31 84 X 28 N/LWP0187 Louvered 1 82 X 31 Access/Return Air Panel³ ⁴ Part # Description Non-Louvered 2 82 X 31 Ship Wt. 40 79 X 28 LWP0182 Dimensions (H x W) Ship40 Weight 79 X 28 N/LWP0182 Frame Opening Notes: 931-11 Louvered¹ 87 x 31 84 x 28 55 1 Includes 18 x 24 x 1 filter Non-Louvered² 87 unit x 31mount 84fixlter 28 55 2 931-12 Requires external return air grille and 3 931-13 Both panels are insulated for sound82reduction Louvered¹ x 31 and 79 have x 28 tamper-proof 55 screws 931-14 Non-Louvered² 82 x 31 79 x 28 55 4 Panels are shipped ten per carton Note: A solid door or panel with a side wall return air grille will result in lower sound levels Note: A solid door or panel with a side wall return air grille will result in lower sound levels. Part # N/LWP0187 “A” 87.00 Part #84.00 N/LWPO187 8 8 “B” A B 87 84 www.goodmanmfg.com SS-VTAC www.amana-ptac.comSS-VTAC Product Specifications Accessories (cont.) Filter Clip Ducted Return Air Flanges Electrical Disconnect Filter Bracket Thermostat Connection Fresh Air Vent Figure 5—Filter Bracket Detail Outdoor Air Ventilation One end of a 4” aluminum vent pipe is connected to the condenser venturi and the other end is connected to the side of the VTC/VTH cabinet. A mesh screen is installed inside the vent pipe, and a metal plate on the side of the cabinet covers the opening of the vent pipe. Up to 50 CFM of outside air is introduced into the equipment closet by removing the metal cover plate. The outside air then mixes with the return air and is pulled through the evaporator coil and into the supply duct. The cover plate can be re-installed to partially close the outside air opening if less than 50 CFM is desired. An external source of negative pressure (i.e., a bathroom fan) could be used to introduce more than 50 CFM of outside air. Consult with factory for further details. Note: It is suggested that a minimum 24” door be used for access. Closet interior may be smaller than listed here as long as the door opening allows for removing the unit. Door opening must line up with unit to allow removal. Figure 6 Note: Sleeve protrudes ¼" (min.) Outside Wall wall surface through outside Footprint Closet Wall Footprint Outside Wall Surface Closet Inside Width (min.) (VWS958A) (VWS9812A) Note: Bottom surface of sleeve pan to be located 6" (min.) above floor to facilitate drain installation. Please see Wall Sleeve Installation instruction book for complete instructions. (VWS91215A) Figure 7 SS-VTACwww.amana-ptac.com 9 Product Specifications General Assembly Rough-In Dimensions 44”H x 21 5/8”W Approximate Fastener Locations Architectural Grille Electrical Disconnect Filter Sleeve Seal Rear Access Panel Wall Sleeve Drain 3/4” MPT Electrical Service Knock-out 10 Outside www.amana-ptac.comSS-VTAC Product Specifications Installation Rear Installation Notes: Grille width: 22" 1. Sleeve rough-in opening is 44” (H) x 21-5/8” (W) Unit must line up with door opening to facilitate removal when necessary. Min. 2" Req'd 2. Bottom of opening should be approximately 6” above floor level. 3. Minimum 3” clearance is required on all sides of the unit. Rear Installation—Closet Dimensions Instructions: C A To find the minimum closet depth (dimension “C”), use the following method: Determine dimension “A” which is the total finished wall thickness. 27" (minimum) * For 5”-8” outside wall thickness, subtract “A: from 29” (C” = 29 - “A”) * For 8”-12” outside wall thickness, subtract “A: from 33” (C” = 33 - “A”) * For 12”-15” outside wall thickness, subtract “A” from 36” (C” = 36 - “A”) Side Installation—Closet Dimensions Instructions: WallSleeve Sleeve Wall VT UNIT 12" min. 12" min. A To find the minimum closet depth (dimension “C”), use the following method: Determine dimension “A”, which is the total finished wall thickness. C 30" min. 27" min. min. Outside Wall 30" min. * For 5”-8” outside wall thickness, subtract “A: from 39” (C” = 39 - “A”) * For 8”-12” outside wall thickness, subtract “A: from 43” (C” = 43 - “A”) * For 12”-15” outside wall thickness, subtract “A” from 46” (C” = 46 - “A”) SS-VTACwww.amana-ptac.com 11 Product Specifications Labor is not covered. This is the responsibility of the installing contractor. Guide Specifications Ratings – Each unit must meet the following specifications: ARI rating of _________BTU/h cooling (and ________ BTU/h reverse cycle heating with a COP of ________at 47 °F O.D.) Electric resistance heat of _________ BTU/h. Total Amp draw must be of _________ and _________ Watts at _________ volts. The EER must be a minimum of _________ EER. Unit Chassis — Each unit must be slide-out design, ready for installation into closet space. Unit must fit into closet space not to exceed 24” x 24” with overhead duct connections designed to .25 ESP. Unit must be tested for conformance to ASTME water infiltration specification ASTME 331-86, which ensures no water infiltration when tested at 8" rain per hour at 63 mph wind for 15 min. Filter — Filter provided with the unit. Installer must provide for easy accessibility. Heat Pumps — Each unit must include a changeover thermostat that senses an outside coil switch-over temperature of 25°F, lock-open refrigerant-reversing valve during heat pump operation, temperature-activated defrost drain and automatic emergency heat operation to over-ride the heat pump’s change-over thermostat and bring on electric resistance heaters in the event of a sealed-system failure. Compressor — The compressor must be hermetically sealed, internally isolated, rotary-type and permanently mounted on rubber isolators. No removal or adjustment of compressor hold-down bolts is to be required during installation. Unit Controls — The unit must be controlled by a thermostat. Other unit controls must include a concealed ventilation control to allow the introduction of filtered air into the room, a concealed fan mode switch to allow the owner to preset for either continuous fan or thermostatically cycled fan operation. Additionally, the following controls are to be included as standard on all units: • Compressor restart delay • Random restart circuit • Front desk control • Evaporator coil freeze protection • Fan delay • Low ambient lock-out Evaporator/Condenser Fans — Direct drive with a permanent split capacitor, two-speed motor. Must have a condenser fan and separate indoor evaporator motor. Condenser fan must be propeller type and evaporator fan must be blower type. Coils — Unit’s coils must have copper tubing expanded into rippled-edge louvered aluminum fins. Discharge and Return Air — A unit must be able to discharge air through an overhead duct system with an external static pressure capability of 0.35" for 9,000 and 12,000 unit sizes and 0.40" for 18,000 and 24,000 unit sizes. The return air must be capable of a free return at the unit or a ducted return. Warranty — Limited One-Year Warranty; Second- through Fifth-Year Limited Replacement Compressor Warranty. Full warranty details are available at www.amana-hac.com. Wall Sleeve — The wall sleeve must be of industry-accepted dimensions: from 21” [d] to 28” [d] (dependent upon wall width, from 5” to 15”) x 22” [w] x 44” [h] and constructed of insulated galvanized steel for corrosion resistance. Sleeve must be shipped with weather-resistant rear closure panel installed. Condensate Drain — The unit must have a condensate draining system. A vertical pipe connection in the base pan is connected to the evaporator drain pan via a drain line. Condensate passes from the unit to a catch tray, located in the wall sleeve, and exits the sleeve through a ¾” male NPT fitting. (This allows piping to be done during construction stage). The unit must also have a secondary condensate draining system for overflow. If the primary condensate draining system becomes clogged, water will be directed from the catch tray, through the sleeve, to the outside of the building. Any external water source (rain, sleet, etc.) entering the sleeve will also be diverted to the building’s exterior. Outdoor Grilles — Must be architecturally extruded and made of anodized aluminum (AGKV***A). All other grilles must be submitted to our company for feasibility, airflow characteristics and compliance with U.L. regulations, where necessary. Hydronic Heat Units — Required for heating functions instead of electric resistance heaters. Unit must retain complete service access with the kit installed. Proper water or steam valves must be used; however, they are not included with the Hydronic Heat Unit. Thermostats — A manual, auto-changeover or programmable thermostat must be installed to provide full remote operation of the chassis. Amana® is a trademark of Maytag Corporation or its related companies and used under license to Goodman Company, L.P. All rights reserved. Our continuing commitment to quality products may mean a change in specifications without notice. © 2010 • Goodman Company, L.P. • Houston, Texas • Printed in the USA. 12 www.amana-ptac.comSS-VTAC 2-STAGE HEAT/1-STAGE COOL HEAT PUMP Thermostat 2246003 Non-Programmable Featuring: Amana Brand Quality Americans have been relying on long-lasting Amana brand products since 1934, when Amana, Iowa, native George Foerstner accepted the • Premium Amana® brand Quality challenge of building a dependable beverage cooler. Since then, the Amana brand has enjoyed many firsts, including developing the first New! cold storage locker, being the first manufacturer to nationally market an upright freezer for home use, and introducing the first portable countertop microwave oven. Hardwired • 2-stage heat/1-Stage Cool Heat Pump • 1-stage heat/1-Stage Cool Electric Heat • Patented Thermal Intrusion Barrier • Large Display with Backlight • Easy Access Terminal Block • Field Adjustable Calibration • Selectable °F or °C • Accuracy: ±1°F • Adjustable Temperature Differentials • Adjustable Maximum Heat/Minimum Cool Set Points • Keypad Lockout • Soft-Touch Controls • 2-Speed Fan • Hardwired • Manual Changeover www.amana-PTAC.com 2246003 Non-Programmable Thermostat Heat Pump or Electric Heat • 2-Stage Heat/1-Stage Cool Heat Pump • Manual Changeover • 2-Speed Fan Hardwired Other Amana® brand thermostats available: Dimensions: • 1-Stage Heat/ 5.50" 1-Stage Cool 1.12" •1-Stage Heat Pump Thermal Intrusion Barrier 3.75" 3.25" Specifications 1.68" Electrical Rating: • 24 VAC (18-30 VAC) • 1 amp maximum per terminal • 4 amp maximum total load • Easy access terminal block •4- or 5-Wire Compatible (C is Optional for NonHeat Pump Systems) •Manual Changeover • 2-Stage Heat/Cool or 2-Stage HP •Large Display with Backlight •Field Temperature Calibration Temperature Control Ranges: • 45°F to 90°F, Accuracy: ±1°F System Configurations: • 2-stage heat/1-stage cool heat pump Terminations: R, C, Y, W, O/B, GH, GL •2-stage Heat/Cool or 2-Stage HP •Large Display with Backlight •Field Temperature Calibration Patent No. Design: 424,953 Patent No. Thermal Intrusion Barrier: 6,597,275 Patented - SimpleSet™ Target Programming Technology: 7,575,179B2 Specifications subject to change without notice. www.amana-PTAC.com Our continuing commitment to quality products may mean a change in specifications without notice. © 2012 Goodman Company, L.P. Amana is a registered trademark of Maytag Corporation or its related companies and is used under license to Goodman Company, L.P., Houston, TX. USA. All rights reserved. PM-PSAT-003 10-12 2246003 To Remove Existing Thermostat ELECTRICAL SHOCK HAZARD – Turn off power at the main service panel by removing the fuse or switching the appropriate circuit breaker to the OFF position before removing the existing thermostat. Non-Programmable Electronic Thermostat Electric Heat or HP, Manual Changeover, Hardwired • Configurable • 2-Stage Heat Pump Systems • 1-Stage Electric Heat • Backlit Display • Field Calibration Feature 1. Turn off power to the heating and cooling system by removing the fuse or switching the appropriate circuit breaker off. 2. Remove cover of old thermostat. This should expose the wires. 3. Label the existing wires with the enclosed wire labels before removing wires. 4. After labeling wires, remove wires from wire terminals. 5. Remove existing thermostat base from wall. 6. Refer to the following section for instructions on how to install this thermostat. • Relay Outputs (minimum voltage drop in thermostat) To Install Thermostat • Ideally Suited for: – Residential (New Construction/Replacement) – Light Commercial ELECTRICAL SHOCK HAZARD – Turn off power at the main service panel by removing the fuse or switching the appropriate circuit breaker to the OFF position before removing the existing thermostat. IMPORTANT: Thermostat installation must conform to local and national building and electrical codes and ordinances. Note:Mount the thermostat about four feet above the floor. Do not mount the thermostat on an outside wall, in direct sunlight, behind a door, or in an area affected by a vent or duct. 1.Turn off power to the heating and cooling system by removing the fuse or switching the appropriate circuit breaker off. Installation, Operation & Application Guide www.amana-ptac.com 2. To remove cover, insert and twist a coin or screwdriver in the slots on top of the thermostat. 3. Put thermostat base against the wall where you plan to mount it (Be sure wires will feed through the wire opening in the base of the thermostat). Parts Diagram 4. Mark the placement of the mounting holes. 5. Set thermostat base and cover away from working area. 6. Using a 3/16” drill bit, drill holes in the places you have marked for mounting. 7. Use a hammer to tap supplied anchors in mounting holes. Up Button 8. Align thermostat base with mounting holes and feed the control wires through wire opening. 9. Use supplied screws to mount thermostat base to wall. Down Button 10.Insert stripped, labeled wires in matching wire terminals. See “Wiring Diagrams” section of this manual. Large Backlit Display CAUTION!: Be sure exposed portion of wires does not touch other wires. 11. Gently tug wire to be sure of proper connection. Double check that each wire is connected to the proper terminal. Reset Switch LEFT 12.Seal hole for wires behind thermostat with non-flammable insulation or putty. RIGHT RESET 13.Replace cover on thermostat by snapping it in place. 14.Turn on power to the system at the main service panel. 15.Test thermostat operation as described in “Testing the Thermostat”. Left Button Right Button Mode Switch Terminal Designator Descriptions Fan Switch Specifications Electrical rating: •24 VAC (18-30 VAC) •4 amp maximum total load •1 amp maximum per terminal Temperature control range: 45°F to 90°F (7°C to 32°C) Accuracy: ± 1°F (± 0.5°C) System configurations: 2-stage heat & 1-stage cool heat pump, 1-stage electric heat Timing: Anti-short Cycle: 4 minutes Backlight Operation: 10 seconds Terminations: R, C, O/B, Y, W, GH, GL Important Safety Information WARNING!: Always turn off power at the main power supply before installing, cleaning, or removing thermostat. •This thermostat is for 24 VAC applications only; do not use on voltages over 30 VAC •All wiring must conform to local and national electrical and building codes •Do not use air conditioning when the outdoor temperature is below 50 degrees; this can damage your A/C system and cause personal injuries •Use this thermostat only as described in this manual R – 24 VAC hot C – 24 VAC common O/B – Reversing valve Y – 1st stage cool, 1st stage HP heat for HP W – 2nd stage heat for HP, 1st stage electric heat GH – Fan High GL – Fan Low Output Chart 1ST Cool 1ST Heat HSo = Heat Pump (cool active reversing valve) Y, GL, O Y, GL 2ND Heat Y, GL, W HSb = Heat Pump (heat active reversing valve) Y, GL Y, GL, B Y, GL, B, W HSE = Electric Heat Y, GL W, GL W, GL Note:GL will be on during heating and cooling cycle when fan switch is set to Auto Wiring Diagram Conversions Cool & Electric Heat X Former Heat Pump X Former Reversing Valve Package Contents/Tools Required Package includes: Amana® 2246003 thermostat on base, thermostat cover, wiring labels, screws and wall anchors, Installation, Operation and Application Guide Tools required for installation: Drill with 3/16” bit, hammer, screwdriver Compressor Compressor Heat Auxiliary Heat Fan High Fan High Fan Low Fan Low Configuration Mode Testing the Thermostat The configuration mode is used to set the Amana 2246003 to match your heating/cooling system. ® To configure the Amana® 2246003 , perform the following steps: 1. Slide the Mode switch to the OFF position. 2. Remove the cover of the thermostat by gently pulling on one of the corners. 3. Simultaneously hold the LEFT & RIGHT buttons in for 2 seconds while the Amana® 2246003 is in OFF mode. 4. Press the down or up button to change settings within each screen. 5. Press the RIGHT button to advance to the next screen. Note: The LEFT button will return you to the previous screen. 6. To exit configuration mode, slide the Mode switch to Heat or Cool. Configuration Mode Settings The setup screens for Configuration Mode are as follows: 1. Temperature Scale (F or C) – Choose Fahrenheit or Celsius. Press the down or up button to select. Press the RIGHT button to advance to the next screen. HSb – Heat pump, heat active reversing valve Fan Test 1. Slide Fan switch to High position. 2. Indoor fan turns on in high speed. HSE – Electric heat system 3. Temperature Differential – Stage 1 – (1°F to 5°F) (0.5°C to 2.5°C) Set the number of degrees between your “setpoint” temperature and your “turn on” temperature for first stage. Press the down or up button to set differential value. Press the RIGHT button to advance to the next screen. DIFF Low Auto High 3. Slide Fan switch to Low position. 4. Indoor fan turns on in low speed. Low Auto High 5. Slide Fan switch to Auto position. 6. Indoor fan turns off. Low Auto High Mode of Operation 4. Temperature Differential – Stage 2 – (1°F to 5°F) (0.5°C to 2.5°C) (shows only for HP) Set the number of degrees between when stage 1 turns on and stage 2 turns on. Press the down or up button to set differential value. Press the RIGHT button to advance to the next screen. The Amana® 2246003 is a thermostat for 24 VAC systems. DIFF 5. Staged Off Outputs (shows only for HP) Select whether the outputs for heating and cooling are staged off independently or are satisfied simultaneously. 1 = Economy Mode – Outputs are staged on and off in accordance with set point and differential. 0 = Comfort Mode –Outputs are staged on and and all stages cycle off simultaneously when set point is satisfied. Press the down or up button to select. Press the RIGHT button to advance to the next screen. 6. Maximum Heat Setpoint (45°F to 90°F) (7.0°C to 32.0°C) Adjust to control the maximum Heat set temperature allowed. Press the down or up button to select. Press the RIGHT button to advance to the next screen. Cool Test 1. Slide Mode switch to Cool mode. Cool Off Heat 2. Adjust set temperature so it is 5 degrees below room temperature. 3. Air conditioning should come on within a few seconds. 4. Adjust the set temperature 2 degrees above the room temperature and the A/C should turn off. There may be a fan delay on your system. Note:There is a four minute time delay to protect the compressor after it turns off. To temporarily bypass the four minute delay, slide the Mode switch to OFF for 2 seconds and then back to Cool. Heat Test 1. Slide Mode switch to Heat mode. Cool Off Heat 2. Adjust the set temperature so it is 5 degrees above the room temperature. 3. Heat should come on within a few seconds. 4. Adjust the set temperature so it is 2 degrees below the room temperature and the heat should turn off. There may be a fan delay on your system. Note:For Heat pumps, there is a four minute time delay to protect the compressor after it turns off. To temporarily bypass the four minute delay, slide the Mode switch to OFF for 2 seconds and then back to Heat. 2. Heating System HSo – Heat pump, cool active reversing valve Once the thermostat is installed, it should be thoroughly tested. CAUTION!: Do not energize the air conditioning system when the outdoor temperature is below 50 degrees. It can result in equipment damage or personal injury. Heat Pump Operation The thermostat activates the heat pump when the room temperature is below the heat set temperature (by the differential temperature). Auxiliary heat will be activated if the room temperature continues to drop. The heat outputs are staged off (configurable, setting 5) as the room temperature increases. The thermostat will not let the compressor come on for four minutes after it turns off. This protects your compressor. Electric Heat Operation The thermostat activated the electric heat when the room temperature is below the heat set temperature (by the differential temperature). The heat is turned off when the room temperature raises to one degree above the heat set point temperature. When the room temperature is greater than the cool set temperature (by the differential temperature), the cooling device is activated. The thermostat will not let the compressor come on for four minutes after it turns off. This protects your compressor. The Amana® 2246003 has the following operating modes: Cool, Off, Heat. In OFF mode, the thermostat will not turn on heating or cooling devices. In the Heat mode, the thermostat controls the heating system. In the Cool mode, the thermostat controls the cooling system. The indoor fan can be turned on in all operating modes using the Fan switch. SET • Set fan to HIGH: for continuous high speed operation 7. Minimum Cool Setpoint (45°F to 90°F) (7.0°C to 32.0°C) Adjust to control the minimum Cool set temperature allowed. Press the down or up button to select. Press the RIGHT button to advance to the next screen. 8. Room temperature offset (+9°F to -9°F) (+4.5°C to -4.5°C) Adjust to calibrate displayed room temperature to match actual room temperature. Note: When not set to 0, ROOM will display. Press the down or up button to select. Slide Mode switch to Heat or Cool to exit configuration mode.. • Set fan to LOW: for continuous low speed operation • Set fan to AUTO: for low speed fan operation only during a heat or cool cycle SET Troubleshooting Symptom SET Check for 24 VAC at thermostat; display is blank when 24 VAC is not present System fan does not come on properly Verify wiring is correct Thermostat turns on and off too frequently Adjust temperature differential (see “Temperature Differential,” Stage 1, Step 3) Fan runs continuously Check fan Low/Auto/HIgh switch. Low or High position runs indoor fan continuously Room temperature is not correct Verify wall hole is plugged with putty or insulation; calibrate thermostat (see “Configuration,” Step 8) ROOM displays Room temperature offset is not zero (see “Configuration,” Step 8) Auxiliary heat not on soon enough Adjust differential for 2nd stage heating if required (see Configuration, Steps 3 & 4) Problem not listed above Press the Reset button once; display will be refreshed ROOM Starting the Thermostat CAUTION!: Do not use air conditioning when the outdoor temperature is below 50 degrees. This can damage your air conditioning system and cause personal injuries. 1. Move the High/Auto/Low switch to the Auto position. 2. Move the Cool/Off/Heat switch to Heat or Cool, depending on the season. ROOM Remedy No display LIAF173