1
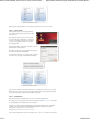
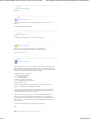
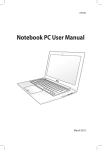
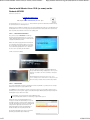
How to install Ubuntu Linux 12.04 (or newer) on the Zenboo...
1 of 5
http://webent.altervista.org/2012/09/16/how-to-install-ubuntu...
How to install Ubuntu Linux 12.04 (or newer) on the
Zenbook UX32VD
Posted on 16 settembre 2012
Linux Backup & Recovery
www.arkeia.com/linux
Fast, Easy-to-use And Affordable Backup For Linux. Try It!
As I already said in my italian review of a few days ago, Ubuntu 12.04 works very well on the ASUS Zenbook UX32VD. Currently,
the only missing features is the ambient light sensor.
Although the system is compatible, the installation process may be more difficult than expected because of the UEFI firmware and
the GPT partition scheme. Let’s see then, step by step, how to install it. I will refer to the current stable version of Ubuntu (12.04),
but the steps will be almost identical for next versions of the operating system.
S T E P 1 – P R E PA RATION AN D BOOT
First, you have to prepare a 64-bit Ubuntu Live USB. If you
already have Ubuntu installed somewhere else, you can use the
software “Startup Disk Creator“. Otherwise use Unetbootin, which
is available for both Windows and Linux.
When the Live USB is ready, plug it into the Zenbook and power
it on, repeatedly pressing the ESC key until you see a menu like
the one on the image on the right. From this menu is important to
select our USB device paying attention to choose, between the
two choices, the one preceded by the “UEFI” identifier.
You will see a black screen (GRUB):
We need to edit the boot information to avoid problems. While the first
item (“try ubuntu without installing”) is highlighted, press the “e” key on the
keyboard, so as to obtain a series of lines of text like those in the picture
on the left.
Move with the arrow keys to where it says “boot=casper quiet
splash“, and replace “splash” with “nomodeset“. Then press F10, and
after a few seconds you should be in front of the live desktop of Ubuntu.
S T E P 2 – P A R T I T I ONING
Do you want to install Ubuntu on the SSD or on the hard disk? You want to keep Windows, or you want to remove it? You better
think about it now, because we’re going to partition the disk.
Open gparted1, then create the partitions as you wish. I can’t help you a lot here (if you need, ask with a comment), because it
varies from person to person. In general, I suggest to resize (without moving it) the Windows partition (/dev/sda3) and using in the
following way the free space that has been created:
one swap partition, of size at least equal to the amount of RAM that you have.
one ext4 + journaling partition, that we’ll use for Ubuntu, large enough to fill all the space left.
Evaluate how much to resize the Windows partition to have
enough space for Ubuntu. The important thing is to not touch the
first partition of /dev/sda. If you wish to install the operating system
on the SSD, after doing the above steps move on the disk /dev/sdb
(using the box in the upper right corner) and create an ext4
partition with journaling. Personally I deleted all partitions on
/dev/sdb and I added a new one spanning the entire disk.
Tip: If the right touchpad button doesn’t work, you can perform a
right click by pressing with two fingers simultaneously.
15/08/13 22:24
How to install Ubuntu Linux 12.04 (or newer) on the Zenboo...
2 of 5
—
http://webent.altervista.org/2012/09/16/how-to-install-ubuntu...
Summary of the partitions. Click to enlarge.
Apply the changes and quit from gparted. If you have any questions about the above steps, ask me in the comments.
S T E P 3 – I N S T A L LA TION
Start the installation program. Choose the advanced partitioning
mode, and then assign a mount point to the partitions you created
in the previous step.
After setting up the swap area, if you chose to *not* use the SSD
then set the mount point of the other partition to “/”. Otherwise, that
is if you chose to install Ubuntu on the SSD, on the other partition
use “/home” and on the partition of the SSD use “/” (below you’ll
find an explanatory image).
Really important: in addition to the already processed partitions, set the first
partition (/dev/sda1) to “EFI boot partition”.
Finally, make sure that the device on which to install the bootloader (the last
item at the bottom of the main window) is /dev/sda.
This step is delicate and crucial too, so for any questions please contact me in
the comments. Once you are ready, continue with the Ubuntu installation.
—
Mount points to assign. Click to enlarge.
On the next reboot, the GRUB screen should appear with the choice of the operating system. From this screen, you can’t start
Windows due to a bug, so it is necessary to use the menu called up with “ESC” when the computer starts. Anyway, through the
bios you can switch the default boot entry between the two (Windows / Ubuntu-grub).
S T E P 4 – O PT IM I ZATION
At this point you should have a working Ubuntu. As you can see, there still are various optimizations to do.
First, I suggest you act on energy savings (you’ll get an extra hour of battery power) following these instructions. The instructions
also include upgrading the kernel, which by itself solves the most problems.
To adjust the screen brightness using the keyboard install Kernel 3.7 and edit, with root privileges, the file “/etc/default/grub”
inserting the “acpi_osi=” parameter between GRUB_CMDLINE_LINUX_DEFAULT’s quotation marks. For example,
GRUB_CMDLINE_LINUX_DEFAULT=”quiet splash” becomes
GRUB_CMDLINE_LINUX_DEFAULT=”quiet splash acpi_osi=”
In the event that something still doesn’t work, such as the touchpad, check here and here to see if a solution has been provided.
15/08/13 22:24
How to install Ubuntu Linux 12.04 (or newer) on the Zenboo...
3 of 5
http://webent.altervista.org/2012/09/16/how-to-install-ubuntu...
At the time of writing, the only thing that doesn’t work is the ambient light sensor.
If you enjoyed this article or it has been useful to you, consider offering me the equivalent of a cup of coffee :)
I will publicly thank you (with a link, if you want!) and you'll have contributed to get this website rid of advertising.
Post to Facebook
4
Like
4
4
1
2
You may also like:
Ragioni tecniche per cui
il registro di Windows fa
schifo...
Siamo andati sulla
Luna. Ecco le prove. |
WebEnt
Come crashare il tuo
Notepad++ | WebEnt
Installare e disinstallare
correttamente i software
via m...
Ubuntu 11.04: scrollbar
ridisegnate in Unity |
WebEnt
Note:
1. press the “windows” key on the keyboard and type gparted [↩]
Articoli simili:
1. Come installare Ubuntu Linux 12.04 (o successivo) sullo Zenbook UX32VD Come già detto nella mia recensione di qualche giorno fa,
Ubuntu 12.04 funziona molto bene sullo Zenbook UX32VD di Asus....
2. Ubuntu Linux e ASUS Zenbook UX32VD: come siamo messi? Ultimo aggiornamento: 26/12/2012 Ho da poco acquistato un nuovo notebook –
o meglio, ultrabook – e ci ho già messo...
3. How to get the nVidia Optimus card working on the Zenbook UX32VD (Ubuntu 12.04/12.10) NOTE: This guide assumes that your
bios version is 211 or higher. If you haven’t already done it, download the...
4. Come far funzionare la scheda nVidia Optimus sullo Zenbook UX32VD (Ubuntu 12.04/12.10) NOTA: questa guida assume che la
versione del bios sia 211 o superiore. Se non l’hai ancora fatto, scarica l’aggiornamento...
5. Ripristinare puntatore e boot screen di Ubuntu dopo aver installato kubuntu Se vi è capitato di installare pacchetti come kubuntu-desktop
per affiancare KDE al vostro Gnome, avrete notato che il boot...
Questo articolo è stato pubblicato in Informatica, Linux, Ubuntu e contrassegnato come asus, installation, lang-english,
Linux, ubuntu, ux32vd, zenbook da daniele . Aggiungi il permalink [http://webent.altervista.org/2012/09/16/how-to-installubuntu-linux-12-04-or-newer-on-the-zenbook-ux32vd/] ai segnalibri.
11 PENSIERI SU “HOW TO INSTALL UBUNTU LINUX 12.04 (OR NEWER) ON THE ZENBOOK UX32VD”
MwF
il 25 novembre 2012 alle 21:07 scrive:
Hi, at the step 3 I just can’t set de /dev/sda1/ to “EFI boot partition”.
There is no “EFI boot partition” in the list.
daniele
il 25 novembre 2012 alle 23:33 scrive:
Be sure to start the live usb with the “UEFI” option, like in the image: http://webent.altervista.org/wp-content
/uploads/2012/09/boot_device.jpg
Marcos
il 1 dicembre 2012 alle 23:14 scrive:
Hi, I try to change de mode but it write a message like that: “Fail to change mode ….”. What can I do? I’m
installing ubuntu 12.10, could be that?
15/08/13 22:24
How to install Ubuntu Linux 12.04 (or newer) on the Zenboo...
4 of 5
http://webent.altervista.org/2012/09/16/how-to-install-ubuntu...
daniele
il 2 dicembre 2012 alle 10:29 scrive:
What mode?
Lukas S
il 5 gennaio 2013 alle 12:02 scrive:
I can not see anything on display…instalation is working but my graphic card does not respond or… ? just
blank screen…
I have intel 4000hd i5 3317u asus zenbook ux32a
daniele
il 5 gennaio 2013 alle 15:29 scrive:
Try putting your pc in standby (via Fn+F1, if it’s like mine), then power it on again.
Judy
il 12 febbraio 2013 alle 07:23 scrive:
When someone writes an post he/she maintains the plan of a user in his/her brain
that how a user can understand it. Thus that’s why this piece of writing is great. Thanks!
Feel free to visit my web-site :: Judy
Matteo
il 23 febbraio 2013 alle 14:46 scrive:
Hi Daniele,
Many thanks for this guide. No more than two weeks ago, at my office, I was given a new UX32VD-R4010P
ultrabook (UEFI+Win8). I would like to install Ubuntu but, unfortunately, I am not allowed to completely remove
Win8 because this will invalidate the warranty. According to the tech specs of the seller this machine has a 256
Gb HDD and a 256 Gb SSD. The Win8 disk manager applet list 5 partitions :
num label layout Type Filesystem Status Size
1 – simple basic – UEFI partition 300 Mb
2 – ” ” – recovery partition 600 Mb
3 – ” ” – recovery partition 20.01 Gb
4 DATA(D:) ” ” NTFS primary partition 259.79 Gb
5 OS (C:) ” ” NTFS primary partition (boot) 187.20 Gb
(139.16 Gb available on OS (C:) )
Well, quite interestingly the WIN8 applet show that all these partitions belongs to a single drive (Drive0,
type_basic, size: 467.88 Gb). I thus suspect that the disks are in Raid.
I can boot the machine with a Ubuntu 12.04.02 live USB in UEFI mode (the usage of the 12.04.02 release
solved the problem reported by Lukas) so I’m able to complete STEP1 but at STEP2 gparted show only a
single 9 Gb unpartitioned disk … I must confess I’m stumped.
I write this comment only to ask you if you think there is some workaround to overcome this problem or,
alternatively, if you are aware of some guide/tutorial covering this topic because, after a fair amount of
googling, I’m still unable to install Ubuntu and, honestly, I can stand the idea to work only in Win8 (on my old
laptop I used Win no more than four times in three years). I don’t think Win is bad in general, but I prefer to
work in a *nix like OS.
Thanks in advance for any help you are able to provide, and sorry for this long post.
Matteo
Pingback: Ubuntu blackscreen while installation - Tech Forum Network
15/08/13 22:24
How to install Ubuntu Linux 12.04 (or newer) on the Zenboo...
5 of 5
http://webent.altervista.org/2012/09/16/how-to-install-ubuntu...
Pingback: Screen goes blank when installing Ubuntu on Asus Zenbook UX31A | Ubuntu InfoUbuntu Info
Pingback: Screen goes blank when installing Ubuntu on Asus Zenbook UX31A | James n Sheri.comJames n
Sheri.com
15/08/13 22:24