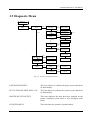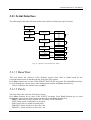
1
Compuprint
6314/6414
User Manual
rel. -002
Compuprint 6314/6414 - User Manual
Safety Instructions
Never use the printer, if the mains values do not correspond to those given on the rating plate of the printer. The rating
plate is located inside the printer.
The printer must be used only in environments corresponding to the instructions given in this manual.
Do not operate the printer parts, unless it is indicated inside this manual. Any intervention on the printer must be
performed strictly following the given instructions.
If the printer smokes, is particularly hot or produces unusual noise or smell, turn off the printer immediately and
remove the power cord. Do not use the printer and call Customer Service.
When moving the printer, hold it only at its base. Do not raise the printer holding it at the side grip, because the printer
cover may open, the printer fall harming the user and/or damaging the printer itself.
Sferal wwt srl
Via Martiri d'Italia, 26
10014 Caluso (TO)
Italy
©2007 Sferal wwt and the identifying product names and numbers herein are trademarks of Sferal wwt.
Copyright protection claimed includes all forms and matters of copyrightable materials and information now allowed by
statutory or judicial law or hereinafter granted, including without limitation material generated from the software
programs which are displayed on the screen such as icons, screen display tools, etc. Products names used in this manual
may be trademarks or registered trademarks of their respective companies and are hereby acknowledged. All non Sferal
brands and product names are trademarks or registered trademarks of their respective companies.
2
Compuprint 6314/6414 - User Manual
Contents
1 Introduction _________________________________________________________________ 6
1.1 Warnings And Special Information ____________________________________________________ 6
1.2 Important Warranty Information _____________________________________________________ 6
1.3 Features___________________________________________________________________________ 7
1.4 Thermal Printer Technology _________________________________________________________ 8
1.4.1 The Printing Process ______________________________________________________________________ 8
1.5 Thermal Consumables_______________________________________________________________ 8
1.5.1 Media Selection __________________________________________________________________________ 8
1.5.2 Ribbons ________________________________________________________________________________ 9
1.6 Thermal Features___________________________________________________________________ 9
1.6.1 Emulations ______________________________________________________________________________ 9
1.6.2 Hardware Options ________________________________________________________________________ 9
1.7 Setting Up The Printer _____________________________________________________________ 10
1.7.1 Unpacking The Printer ____________________________________________________________________ 10
1.7.2 Check List _____________________________________________________________________________ 11
1.8 Installation _______________________________________________________________________ 12
1.9 Installing The Print Head ___________________________________________________________ 14
1.9.1 Installing The Print Head __________________________________________________________________ 14
2 Operation___________________________________________________________________ 17
2.1 Using The Printer__________________________________________________________________ 17
2.1.1 Controls And Indicators ___________________________________________________________________ 17
2.1.2 Powering The Printer On __________________________________________________________________ 18
2.2 Loading Media And Ribbon _________________________________________________________ 18
2.2.1 Loading Labels Inside The Printer ___________________________________________________________ 19
2.2.2 Loading Labels From Outside The Printer_____________________________________________________ 22
2.2.3 Adjusting The Print Head Pressure __________________________________________________________ 23
2.2.4 Loading The Ribbon _____________________________________________________________________ 24
2.3 Printer Options____________________________________________________________________ 25
2.3.1 Tear-Off And Tear-Off Strip _______________________________________________________________ 25
2.3.2 Label Peel Off (Optional)__________________________________________________________________ 26
2.3.3 Label Batch Rewind (Optional) _____________________________________________________________ 28
2.3.4 Installing The Cutter (Optional)_____________________________________________________________ 29
2.3.5 Installing The NIC Board (Optional) _________________________________________________________ 30
2.4 Printing Adjustments_______________________________________________________________ 31
2.4.1 Label Variations And The TOF/Paper Out Sensor_______________________________________________ 31
2.4.2 Media Sensor Horizontal Adjustment ________________________________________________________ 31
2.4.3 Running The Calibrate Via The Menu ________________________________________________________ 32
2.5 Cleaning _________________________________________________________________________ 34
2.5.1 General ________________________________________________________________________________ 34
2.5.2 Print Head _____________________________________________________________________________ 34
3 Configuring the printer _______________________________________________________ 36
3.1 Control Panel _____________________________________________________________________ 36
3.1.1 Function Keys And LEDs _________________________________________________________________ 37
3.2 Configuring The Printer ____________________________________________________________ 38
3.2.1 Overview ______________________________________________________________________________ 38
3.2.2 Menu Navigation ________________________________________________________________________ 40
3
Compuprint 6314/6414 - User Manual
3.2.3 Setting Printer Configuration Parameters _____________________________________________________ 40
3.2.4 Moving Within The Configuration Menu _____________________________________________________ 41
3.3 File Menu _________________________________________________________________________ 43
3.3.1 Factory Reset Functions___________________________________________________________________ 44
3.3.2 Others Parameters _______________________________________________________________________ 45
3.4 Enabling and Modes ________________________________________________________________ 46
3.4.1 Emulation Selection______________________________________________________________________ 46
3.4.2 Set Printer Mode ________________________________________________________________________ 47
3.4.3 Paper Sensor Mode ______________________________________________________________________ 47
3.4.4 Print Method Mode ______________________________________________________________________ 47
3.4.5 Password Selection ______________________________________________________________________ 48
3.4.6 Power Up Configuration __________________________________________________________________ 48
3.4.7 Closing Head Action _____________________________________________________________________ 48
3.5 Printer Settings ____________________________________________________________________ 49
3.5.1 Vertical Offset Adjustment ________________________________________________________________ 50
3.5.2 Backfeed Adjustment_____________________________________________________________________ 50
3.5.3 Form Length Selection____________________________________________________________________ 50
3.5.4 Maximum Label Length Selection___________________________________________________________ 51
3.5.5 Maximum Label Width Selection ___________________________________________________________ 51
3.5.6 Print Speed Selection _____________________________________________________________________ 51
3.5.7 Slew Speed Selection_____________________________________________________________________ 51
3.5.8 Backfeed Speed Selection _________________________________________________________________ 52
3.5.9 Print Head Heat Selection _________________________________________________________________ 52
3.5.10 Cut Cycle Selection _____________________________________________________________________ 52
3.5.11 Paper Rewinder Torque __________________________________________________________________ 52
3.5.12 Ribbon Rewinder Torque_________________________________________________________________ 52
3.5.13 Horizontal Offset Adjustment _____________________________________________________________ 53
3.5.14 Set Time And Date _____________________________________________________________________ 53
3.5.15 Override Print Parameters ________________________________________________________________ 53
3.6 Emulation Parameters CDL Menu ____________________________________________________ 54
3.6.1 Vertical Offset __________________________________________________________________________ 54
3.6.2 Backfeed Offset _________________________________________________________________________ 55
3.6.3 Reference Offset ________________________________________________________________________ 55
3.6.4 Row Offset_____________________________________________________________________________ 55
3.6.5 Column Offset __________________________________________________________________________ 56
3.6.6 Select Final Character ____________________________________________________________________ 56
3.6.7 Control Codes __________________________________________________________________________ 56
3.7 Emulation Parameters CZL Menu ____________________________________________________ 57
3.7.1 Set Format Prefix________________________________________________________________________ 57
3.7.2 Set Control Prefix _______________________________________________________________________ 57
3.7.3 Set Delimiter Character ___________________________________________________________________ 58
3.7.4 Resolution Mode ________________________________________________________________________ 58
3.7.5 Label Length ___________________________________________________________________________ 58
3.7.6 Restore Unit Identifier ____________________________________________________________________ 58
3.8 Emulation Parameters CPL Menu ____________________________________________________ 59
3.8.1 X – Y Starting Point______________________________________________________________________ 59
3.8.2 Error Report ____________________________________________________________________________ 60
3.9 Diagnostic Menu ___________________________________________________________________ 61
3.9.1 Run Automatic Adjustment ________________________________________________________________ 62
3.9.2 Paper Sensor Mode ______________________________________________________________________ 62
3.9.3 Paper Sensor Control _____________________________________________________________________ 62
3.9.4 Run No Paper Calibration _________________________________________________________________ 62
3.9.5 Run Manual Adjustment __________________________________________________________________ 63
3.9.6 Run Automatic Present Sensor Calibration ____________________________________________________ 63
3.9.7 Printhead Type Detected __________________________________________________________________ 63
3.9.8 Counters Menu__________________________________________________________________________ 63
4
Compuprint 6314/6414 - User Manual
3.10 Communication Parameters Menu __________________________________________________ 64
3.11 Serial Interface ___________________________________________________________________ 65
3.11.1 Baud Rate_____________________________________________________________________________ 65
3.11.2 Parity ________________________________________________________________________________ 65
3.11.3 Data Bits Number_______________________________________________________________________ 66
3.11.4 Stop Bits Number_______________________________________________________________________ 66
3.11.5 Xon/Xoff Protoc. Selection _______________________________________________________________ 66
3.12 NIC Interface ____________________________________________________________________ 67
3.12.1 IP Assignment _________________________________________________________________________ 68
3.12.2 IP Address ____________________________________________________________________________ 68
3.12.3 Subnet Mask___________________________________________________________________________ 68
3.12.4 Gateway Address _______________________________________________________________________ 68
3.12.5 Host Name ____________________________________________________________________________ 68
3.12.6 Workgroup Name_______________________________________________________________________ 68
3.12.7 Enabling SMTP ________________________________________________________________________ 68
3.12.8 Mail Server Address_____________________________________________________________________ 69
3.12.9 Email Notification Address _______________________________________________________________ 69
3.12.10 Email Printer Address __________________________________________________________________ 69
3.12.11 Contact ______________________________________________________________________________ 69
3.12.12 Location _____________________________________________________________________________ 69
4 Troubleshooting _____________________________________________________________ 70
5 Printer Specifications _________________________________________________________ 72
6 Conformity Declaration _______________________________________________________ 75
6.1 EEC Regulations __________________________________________________________________ 75
6.2 FCC Part 15 Class A _______________________________________________________________ 75
7 Serial Port Wiring ___________________________________________________________ 76
8 Index Of Figures _____________________________________________________________ 77
9 Index Of Tables______________________________________________________________ 78
5
Compuprint 6314/6414 - User Manual
1 INTRODUCTION
Our new offer now includes a new line of thermal and thermal transfer printers that can provide the best
solution for every labeling need.
Highly responsive to our customers’ needs, we have introduced an unique innovation in the field of thermal
technology. The installation of memory units makes it possible to increase printer speed.
As a result, you no longer have to buy a new printer if your printing needs change.
Another exclusive system permits the operator to change the head simply and quickly, avoiding wasteful
downtime. CPG printers are also the best investment thanks to their robust and compact design, key features
when space is limited.
CPG thermal technology is ideal for anyone who wants to introduce or expand their own barcode
applications in virtually any field: tracking progress on the production line; tracking outflows, shipping and
receiving, and inventory in the warehouse; labeling of test tubes in medical and pharmaceutical laboratories;
code labeling of property, documents, invoices, and delivery notes in administrative offices.
1.1 Warnings And Special Information
For your safety and to protect valuable equipment, it is very important that you read and comply with all
information highlighted under special headings:
WARNING!
IMPORTANT!
NOTE!
Conditions that could harm you as well as damage the equipment.
Information vital to proper operation of the printer.
Information and helpful tips about printer operation.
1.2 Important Warranty Information
Printer Warranty
CPG International warrants to purchaser that under normal use and service, this printer (excluding the
thermal print head) purchased hereunder shall be free from defects in material and workmanship for a period
of ninety (90) days from the date of shipment from CPG International.
Consumable items such as media and ribbons are not covered under this warranty. This warranty does not
cover equipment or parts that have been misused, altered, or used for purposes other than those for which
they were manufactured. This warranty also does not cover loss, shipping damage, damage resulting from
accident or damages resulting from unauthorized service.
Thermal Print Head
CPG International warrants the print head for a period of ninety (90) days, or 1,000,000 linear inches
(Thermal Transfer/Direct Thermal) of use, whichever comes first. The warranty does not cover print heads
that have been misused, damaged due to improper cleaning, or damaged due to use of improper ribbons or
media.
Supplies
To reorder CPG International supplies, you can complete the reorder form that comes with your printer, or
call your local CPG International office.
6
Compuprint 6314/6414 - User Manual
1.3 Features
-
Thermal transfer and Direct thermal printing.
Supports over 17 types of bar codes.
Download forms, fonts and graphics to printer memory.
High-resolution print head for sharp graphics and text.
Optional Built-in label rewinder for label Peel-Off operation.
Label Taken Sensor for detecting removal of labels in Peel-Off or Tear-Off modes.
Peel-Off mode for peeling off labels one at a time, before printing the next label.
Tear-Off mode for positioning the label at the tear-off position and detecting its removal before
printing the next label.
- Tear-Off Strip mode for printing a specified number of labels and positioning the last label at the
tear-off position.
- 8MB DRAM memory.
- 4MB Flash memory.
The printer can be connected to communicate with the host via RS-232 and USB ver 2.00,
Centronics® -compatible parallel, IEEE® 1284 compliant parallel, and, optional connections of
Ethernet® 10/100 Base-T.
The interface cables needed to connect the printer to the host device is supplied by the user.
7
Compuprint 6314/6414 - User Manual
1.4 Thermal Printer Technology
Quiet and fast, with excellent print quality, your multifunction thermal printer uses an inline thermal
print head. The operation of a thermal printer is different from that of a line-matrix or laser printer.
The thermal printer uses a print head with heating elements and special paper or ribbon.
1.4.1 The Printing Process
The thermal print head allows two modes of operation:
- Direct Thermal
During direct thermal printing, the thermal print head selectively heats small, rectangular thermal
dots. When these contact the coated thermal paper, the dyes and developers in the coating react
to the heat and develop an image. This mode of printing is generally used for short-term labeling
applications.
- Thermal Transfer
During thermal transfer printing, the heated thermal dots contact a thermal ribbon. The heat
reacts with the ribbon and bonds the image to the paper. This method is used especially for
abrasive, long-storage applications and for specialized applications, such as in extreme
environmental conditions or where tamper-proofing is required.
1.5 Thermal Consumables
1.5.1 Media Selection
Since there are two print modes of operation, there are two kinds of thermal media:
- Direct thermal media.
- Thermal transfer media.
Direct thermal media is paper coated with special chemicals that act as an accelerator, acceptor dye
and binder. During direct thermal mode, the heat from the thermal print head contacts the paper and
causes a chemical reaction to take place.
There is a wide range thermal transfer media available, such as film or synthetic paper substitutes
that are excellent in their ability to transfer an image (print quality) and others in scratch resistance
(long storage). Most of these media options can be die-cut for easy label applications.
NOTE!
The term “media” used in this manual refers to all the different kinds of paper or tag stock that can be used in the
printer.
8
Compuprint 6314/6414 - User Manual
1.5.2 Ribbons
CPG International offers a range of ribbons that have been specifically engineered to enhance
printing capabilities and to prevent premature print head wear. Therefore, it is strongly
recommended that you use a CPG International Thermal Ribbon in your printer.
1.6 Thermal Features
1.6.1 Emulations
Your thermal printer has the standard CZL emulation which provides direct compatibility with
Zebra printers. In addition, the printer has co-resident: CDL emulation which provides direct
compatibility with Datamax printers and CPL emulation.
1.6.2 Hardware Options
Ask your authorized representative about the following options, which can enhance the versatility
of your printer.
- Fonts
A selection of fonts is available to extend the capabilities of the standard resident fonts.
- Media Cutter
The cutter is used to automatically cut printed media when the media exits the printer.
- Media Catcher Tray
Used with the Media Cutter option to catch the cut media and collect it away from the Media
Cutter Assembly.
- Peel Option
The Peel Option is used to peel adhesive labels from the liner.
- Powered Rewind Option
Used to automatically rewind the printed label and liner back on a roll for use at a later time.
- Network Interface Card (NIC) Servers
Allows the user to attach the printer to a LAN (Local Area Network) rather than attaching it
directly to a host system. NIC servers support Ethernet only. NIC servers are available as an
internally installed, mounted inside the printer with the 10/100Base-T (UTP) connection only.
9
Compuprint 6314/6414 - User Manual
1.7 Setting Up The Printer
1.7.1 Unpacking The Printer
The printer is shipped in a carton and protective bag. Keep all packing material in case you need to
move or re-ship the printer. Avoid touching the electrical connectors to prevent electrostatic
discharge damage while setting up the printer.
WARNING!
The discharge of electrostatic energy that accumulates on the surface of the human body or other surfaces can damage
or destroy the print head or electronic components used in this device.
WARNING!
Damage to the printer interface connector may result from placing the printer on its backside during unpacking or
handling.
Fig. 1 – The 6314-6414 printer
10
Compuprint 6314/6414 - User Manual
1.7.2 Check List
Your thermal printer kit contains the items listed below.
- The thermal printer.
- AC Power cord.
- User’s Manual.
- Quick Reference Manual.
- Software Starter Kit CD.
- Ribbon Take-Up Core (mounted in printer).
NOTE!
If any items are missing, contact your dealer for replacement parts.
11
Compuprint 6314/6414 - User Manual
1.8 Installation
The following sections will guide you through the installation of the printer.
- Place the printer in a suitable location on a flat level surface that allows easy access to all sides
of the printer. The printer should never be operated while resting on its side or upside down.
- Check that the printer power switch is in the OFF (O) position.
2
1
Fig. 2 – Power inlet and ON/OFF switch
Legend:
1) AC Power Receptacle
2) ON/OFF Power Switch
- Attach Interface (Fig. 3):
A. Parallel Interface
Attach a suitable parallel printer cable from the computer to the Centronics® interface connector
at the back of the printer. Snap the bail locks to the Centronics connector to secure the interface
cable to the printer.
B. Serial Interface
Attach a suitable serial printer cable from the computer to the DB-9 RS-232 Serial interface
connector at the back of the printer. For additional information on serial cable wiring, refer to
“Serial Port Wiring” section on page 76.
C. USB Interface
Attach a suitable USB cable from the computer to the USB interface connector at the back of the
printer.
12
Compuprint 6314/6414 - User Manual
NOTE!
The printer supports simultaneous connection of all available interfaces using the AUTOMATIC feature. The
AUTOMATIC feature is described on page 64.
B
A
C
Fig. 3 – Printer Interfaces
- Attach the AC power cord to the AC power receptacle in the rear of the printer (Fig. 4).
Fig. 4 – Connection of power cord and ON/OFF switch
13
Compuprint 6314/6414 - User Manual
1.9 Installing The Print Head
WARNING!
When the print head is already installed in the printer, it is fixed with a plastic latch.
Before using the printer cut this latch.
1.9.1 Installing The Print Head
WARNING!
Make sure that the printer is turned off before installing the print head.
The first step in setting up the printer is to install the thermal print head, if this has not already been
done.
Please follow the instructions below:
- Turn off the printer.
- Open the label loading area lifting the cover on the right side of the printer.
- Lift the print head group with the corresponding lever (see Fig. 5).
Fig. 5 – Lifting the print head group
14
Compuprint 6314/6414 - User Manual
- Place the print head next to the connection cables.
- Attach all cables to the corresponding connectors (see Fig. 6).
Fig. 6 – Connecting the print head
- Insert the guide pin in the corresponding hole on the print head group (see Fig. 7).
Fig. 7 – Guide hole
15
Compuprint 6314/6414 - User Manual
- Push the print head in and match the two markers on the top of the print head with the guide
holes on the print head group (see Fig. 8).
Fig. 8 – Front guide markers on the print head
- Close the print head group.
16
Compuprint 6314/6414 - User Manual
2 OPERATION
2.1 Using The Printer
2.1.1 Controls And Indicators
Fig. 9 – Controls and indicators
All printer controls and indicators, except for the power switch, are located on the front panel of the
printer. The power switch is located on the left hand panel at the rear of the printer.
The Control Panel is located at the top left of the printer. The panel has a back-lighted LiquidCrystal Display (LCD) with 2 rows of 16-characters each.
The Control Panel also contains the printer control keys. A summary of each key’s function is
provided on the following pages. Detailed descriptions of key functionality are provided in Chapter
3.
17
Compuprint 6314/6414 - User Manual
2.1.2 Powering The Printer On
When all cables have been connected and the labels and ribbon have been loaded as described
below, the printer is ready to be powered on.
The power switch is located on the back side near the power cable socket.
When powering the printer on, the display shows the message starting… and all three LED’s light
up. After a few seconds, the Check LED’s turn off, while the Ready remains lit together with the
Power LED; the display shows the ON LINE message.
2.2 Loading Media And Ribbon
The term “media” used in this manual refers to all the different kinds of paper, label, or tag stock
material that can be printed on by the printer. This section explains how to load roll media, fanfold
media, and transfer ribbon. Your thermal printer can print on continuous paper, adhesive backed
labels or non-adhesive tags packaged in roll or fanfold form.
WARNING!
DO NOT TOUCH the print head or the electronic components under the Print Head Assembly. The discharge of
electrostatic energy that accumulates on the surface of the human body or other surfaces can damage or destroy the
print head or electronic components used in this device.
IMPORTANT!
Adhesive backed labels that DO NOT lay flat on the backing liner may jam the printer. This can cause the label to peel
off the liner. The exposed edges may stick to the label guides and rollers inside the printer.
If you run out of labels while printing, do not turn the power switch to the OFF position while reloading labels. Lost
data may result.
18
Compuprint 6314/6414 - User Manual
2.2.1 Loading Labels Inside The Printer
You can open the label loading area by lifting the hinged media cover on the right side of the
Printer. Fig. 10 is affixed on the inside of the cover and illustrates the various parts of the printer
involved in labels and ribbon handling.
Fig. 10 – Paper and ribbon handling scheme
Legend:
1)
2)
3)
4)
5)
6)
7)
Ribbon rewinder
Ribbon unwinder
Paper unwinder
Paper roll lock lever
External paper way
Paper rewinder
Paper guide
8) Paper sensor group
9) Fastener for front option devices
10) Paper rewinding way
11) Print head lock lever (CLOSE)
12) Paper exit front
13) Print head lock lever
14) Print head lock lever (OPEN)
To install the labels roll, proceed as follows:
- Move the label roll lock lever (4) to the horizontal position and move it towards the external end
of the roll shaft, according to the width of the roll that will be installed.
19
Compuprint 6314/6414 - User Manual
- Move the print head lock lever (11) to the open position (14) (see Fig. 11).
4
11
14
Fig. 11 – Preliminary steps in loading label roll
- Insert the label roll (3) onto the corresponding roll shaft.
- Move the label roll lock lever (4) to the vertical position. Be careful not to block the movement
of the label roll itself.
- Then pass the free end of the label roll over the first media roller and under the second one, on
which the paper guide (7) is installed, then between the two sides of the paper sensor (see Fig.
12), and finally under the print head group through the label output (12).
20
Compuprint 6314/6414 - User Manual
4
3
12
7
Fig. 12 – Label roll insertion and detail of paper path/sensor
- Move the print head lock lever (11) to the closed position (13) (see Fig. 13).
11
Fig. 13 – Closing the print head assembly
21
Compuprint 6314/6414 - User Manual
- Slide the paper guide (7) into the printer until it touches the edge of the labels without blocking
their movement, as shown in Fig. 14.
7
Fig. 14 – Detail of the paper guide
- Close the loading area.
-
2.2.2 Loading Labels From Outside The Printer
If the label roll does not meet specifications or if the labels are on a continuous form, they are
loaded from outside the 6314/6414 printer (if a continuous form is used, they are stacked), and their
free end is fed through the rear paper input slot (see Fig. 15).
5
Fig. 15 – Rear paper input slot
22
Compuprint 6314/6414 - User Manual
For correct operation of the printer, perform the following steps after opening the label loading area
and studying the figure mounted inside the cover (see Fig. 10 on page 19):
- Move the print head lock lever (11) to the open position (14) (see Fig. 11 on page 20).
- Then insert the free end of the labels into the rear paper input slot (5). Pass it over the roll shaft,
over the first media roller, under the second one on which the paper guide (7) is mounted, and
then between the two sides of the paper sensor (see Fig. 12 on page 21), and finally under the
print head group and out of the label output (12).
- Move the print head lock lever (11) to the closed position (13).
- Slide the paper guide (7) into the printer until it touches the edge of the labels without blocking
their movement, as appears in Fig. 14 on page 22.
- Close the loading area and check that the paper passes unhindered through the rear paper input
(5).
2.2.3 Adjusting The Print Head Pressure
When labels less than 118 mm in width are used, the print head does not operate properly because
the right part of the print head, which is not covered by the labels, gets in direct contact with the
rubber roller and is thus subject to abrasion.
Therefore, the 6314/6414 printer is equipped with a numbered ratchet that can be used to adjust the
pressure of the print head on the right side (see Fig. 16).
Fig. 16 – The adjustment ratchet at position 0
The pressure decreases as the number on the ratchet increases, and therefore progressively narrower
labels require steadily higher numbers. The best adjustment position is the highest possible number
compatible with the print quality. The number 0 corresponds to labels with a width of 118 mm.
23
Compuprint 6314/6414 - User Manual
2.2.4 Loading The Ribbon
When printing by thermal transfer, the ribbon must be loaded as follows, after opening the label
loading area and studying the figure on the inner side of the cover (see Fig. 10 on page 19):
- Move the print head lock lever (11) to the open position (14) (see Fig. 11 on page 20).
- Insert the ribbon roll in the new ribbon unwinder (2).
- Insert an empty cardboard core in the printed ribbon rewinder (1).
- Then feed the free end of the ribbon under the first and second media rollers, under the print
head, and then onto the cardboard core installed on the printed ribbon rewinder (1), taking care
not to block the paper sensor.
- Manually wind the free end of the ribbon onto the printed ribbon rewinder (1) and manually turn
it until the ribbon is taut and straight.
- Move the print head lock lever (11) to the closed position (13) as shown in Fig. 17.
2
2
1
1
11
11
Fig. 17 – Loading of ribbon
- Close the loading area.
24
Compuprint 6314/6414 - User Manual
2.3 Printer Options
2.3.1 Tear-Off And Tear-Off Strip
Tear Off mode is where each label is printed and then positioned over the tear bar and waits for the
user to remove it before the next label is printed.
In Tear-Off Strip mode, labels are printed until the print buffer is empty and then the last label is
positioned over the tear bar for removal.
When using Tear-Off or Tear-Off Strip media handling, the user will need to tear the label
downward against the tear bar.
Fig. 18 – Front tear off plate
25
Compuprint 6314/6414 - User Manual
2.3.2 Label Peel Off (Optional)
The printer can be set up to automatically peel labels off the backing liner and dispense them one at
a time while rewinding the liner. This configuration requires routing the liner through the rollers on
the Peel/Tear assembly and the use of the printer’s internal rewinder.
- Open the media cover.
- Remove the tear bar assembly.
- To install the label peel-off system, remove the two screws on the back of the tear bar assembly
and tear blade by rotating the tear off plate. Replace the cutting blade with the peel-off system.
Fig. 19 – Removing the cutting blade
- Thread the liner over the peel bar and then through the slot of the front plate just below the
platen roller and into the printer.
26
Compuprint 6314/6414 - User Manual
Fig. 20 – Detail of the paper path in the peel-off system
- Manually position the leading edge of the first label to just behind the peel bar of the Peel/Tear
assembly.
- Thread the liner counterclockwise around the rewinder, and insert the liner end into one of the
slots in the rewinder.
- Rotate the rewinder release lever counterclockwise so it forms a ridge along the rewinder (rotate
the rewinder release lever clockwise to remove media.)
- With one hand holding the liner in the slot, rotate the rewinder counterclockwise until the liner is
taut on the rewinder spindle. Verify the leading edge of the first label is still behind the tear bar
of the Peel/Tear assembly.
- Close the print head.
27
Compuprint 6314/6414 - User Manual
Fig. 21 – Installed peel-off system
- Close the media cover.
- Under the Set Printer Mode in the Enabling And Modes Menu, set the printer to Peel Off Mode.
2.3.3 Label Batch Rewind (Optional)
The label batch rewind option enables you to print media and have it wrap around the rewinder.
To do this, route the media around the front of the media guide, between the paper path guides, and
slide the media through the opening below the front plate of the printer.
Adjust the paper path guides on the media guide to the width of the media. Attach the labels to the
rewinder as described in Label Peel Off.
28
Compuprint 6314/6414 - User Manual
Fig. 22 – Detail of the paper path in the rewinder guide
Under the Set Printer Mode in the Enabling And Modes Menu, set the printer to Rewinder Mode.
2.3.4 Installing The Cutter (Optional)
- Set the printer power switch to O (OFF).
- Remove the Peel/Tear Assembly, and replace it with the automatic cutter, taking care that the pin
and connector mounted on the side of the printer corresponds to the respective hole and
connector on the cutter itself.
Fig. 23 – The automatic cutter
29
Compuprint 6314/6414 - User Manual
When powering the printer on, the automatic cutter is automatically enabled and opens for paper
insertion. If the cutter is removed, it is automatically disabled.
You can disable the cutter, while it is installed. In this case it simply does not cut.
The automatic cutter cuts after n labels, where n is the parameter CUT CYCLE in the Configuration
Menu under Printer Settings Menu.
2.3.5 Installing The NIC Board (Optional)
How to installing the NIC board (networking interface communication).
- Set the printer power switch to O (OFF).
- To remove the two screw and the optional board mask. Insert the NIC board and to block it by
the screw. Insert the LAN cable in the NIC board connector and power on the printer. The NIC
board is automatically enabled and available for use.
Fig. 24 - Installing NIC board
30
Compuprint 6314/6414 - User Manual
2.4 Printing Adjustments
2.4.1 Label Variations And The TOF/Paper Out Sensor
Your printer is equipped with a sensor that is used to detect the TOF (Top-of-Form) position as well
as a paper out condition. Depending on the type of media used, the sensor will either “see through”
the label liner, index hole or notch in the media (Transmissive sensing) or detect a black horizontal
stripe on the media with reflective label backing (Reflective sensing).
In either case, the correct option must be selected under the Paper Sensor Mode of the Enabling
And Modes Menu of the Configuration Menu.
When Transmissive is selected, the TOF position is based on the trailing edge of the gap, notch, or
hole.
When Reflective is selected, the TOF position is based on the leading edge of the black stripe.
A third option, Continuous, is also available under the Paper Sensor Mode. The Continuous option
must be selected when continuous media with no gap, notch hole, or black stripe is installed. The
TOF will be based on the Max Label Length value set under the Maximum Label Length Selection
of the Printer Settings Menu of the Configuration Menu.
Length command is sent via host computer software.
NOTE!
When Gap Sense = Continuous, Calibrate should still be performed to automatically establish the optimum Paperout
Threshold value.
2.4.2 Media Sensor Horizontal Adjustment
In order to accurately detect the gap, hole, notch or narrow width black stripe, the Top-of-Form
sensor can be moved along the width of the media from the inner media edge to within 65 inches
from the maximum media width or the right side.
The position of the sensor is changed by using the knurled dial just behind the Print head Pressure
Adjustment ratchet to adjust the sensor to the desired position.
The actual location of the sensor is indicated by the Black Mark on the sensor finger when the print
head is in the open position.
31
Compuprint 6314/6414 - User Manual
Fig. 25 – Paper sensor adjustment knob
Perform the TOF sensor Calibrate procedure described below whenever a different type of media
sensing will be required (Transmissive or Reflective), when installing never-before-tried media, or
when the printer is experiencing loss of TOF position. Loss of Top-of-Form is usually followed by
a fault message on the LCD, such as “PAPER FAULT” or “PAPER OUT”.
2.4.3 Running The Calibrate Via The Menu
Sequence Of Operations
The printer is equipped with a paper sensor which is necessary for perfect alignment of the paper
under the print head.
Sequence of operations necessary for a correct calibration:
- To select what the paper sensor must be calibrate (Transmissive / Reflective).
- Remove paper and Run No Paper Calibration.
- Insert paper
- To move the paper sensor, using the appropriate knob, in a label zone where there aren’t any
printed logos or bar code etc.
- Run Automatic Adjustment.
NOTE!
Run No Paper Calibration function is necessary only:
1) at the first time we install the printer.
2) when we update the firmware.
3) when the printer come back from the repair center.
See the chapter 3.9 (Diagnostic Menu) for details.
32
Compuprint 6314/6414 - User Manual
Calibration
Calibration is enabled via the front panel by using the Enter key and navigating through the menu.
NOTE!
Verify that the media installed in the printer matches the Paper Sensor Mode option (Transmissive, Reflective, or
Continuous).
Verify that the Media sensor is horizontally positioned to permit sensing of the notch, gap, or black
stripe (see “Media Sensor Horizontal Adjustment” on page 31).
- Power On the printer.
- Press the Enter key once to take the printer Off Line.
- Press the Scroll and Esc keys simultaneously together to enter the “CONFIGURATION
MENU”.
- Press the Enter key once (FILE MENU).
- Press the Scroll key until “DIAGNOSTICS MENU” is displayed.
- Press the Enter key once.
- Press the Scroll key until “PAPER SENSOR MENU” is displayed.
- Press the Enter key (RUN AUTOMATIC ADJUSTMENT).
- Press the Scroll key until “RUN NO PAPER CALIBRATION” is displayed.
- Press the Enter key; the display will show “REMOVE PAPER….AND PRESS A KEY”
- Remove paper, press a key and wait. At the end of operation the display will show “RUN NO
PAPER CALIBRATION”.
- Insert the paper and press the Scroll key until “RUN AUTOMATIC ADJUSTMENT” is
displayed.
- Press the Enter key (the printer will display “RUNNING PAPER SENSOR ADJUST” and starts
to feed the paper until it detects the gap, notch, hole or Black Mark and then feeds 2 label
lengths).
- Wen the printer displays “ADJUSTMENT DONE” or “ADJUST FAILED”, press the Esc key
until “ON LINE” is displayed.
If calibration fails to determine the proper values and ends with a fault message displayed
“ADJUST FAILED”, you can either try it again or manually change the Gain and/or Threshold
values under the Diagnostic menu.
33
Compuprint 6314/6414 - User Manual
Manual Adjustment
This function enables the printer to calibrate the paper sensor manually. This function is useful in
problematic cases (e.g. transparent labels).
Refer to chapter 3 paragraph 3.9.3 (Paper Sensor Control).
Once the correct values are determined and the Max Label Length setting in the Printer Settings
Menu is equal to or slightly less than the physical label length, press the Scroll key to advance
media and determine if it consistently stops at the correct TOF position each time.
2.5 Cleaning
Depending on the media used, the printer may accumulate residues (media dust, adhesives, etc.) as
a by-product of the normal printing process. To maintain top printing quality, these residues should
be removed by a periodic cleaning of the printer.
2.5.1 General
Periodic cleaning should be performed on all rollers, guides, and assemblies.
Low pressure air can be used to remove dust in the printer. Isopropyl alcohol and a cotton swab
should be used to clean any areas where media dust, adhesives, etc. have accumulated. This general
cleaning will insure that all parts are free of residue which may degrade print quality. The media
path and print head should be cleaned each time a new roll of media is installed in the printer.
2.5.2 Print Head
As you use your printer, the print head may become dirty resulting in poor print quality. You should
clean the print head when replacing the ribbon or installing new media. Clean the print head with
the print head Cleaning Pen supplied with the printer. The print head heating elements (light brown
area) is most important. Keeping your print head clean will help to maintain its life.
- Open the Media access door and slide the Ribbon to one side.
34
Compuprint 6314/6414 - User Manual
Fig. 26 – Front of the printer with ribbon pushed to the side
- Gently rub a cotton swab with Isopropyl alcohol across the print head heating elements (light
brown area).
Fig. 27 – Front of the printer with the print head being cleaned
- Allow the print head to dry for one minute before reloading the labels.
35
Compuprint 6314/6414 - User Manual
3 CONFIGURING THE PRINTER
3.1 Control Panel
The printer is equipped with a control panel (see Fig. 28) containing three function keys, three
LEDs, and an alphanumeric display (2 lines x 16 characters) for operating messages.
Fig. 28 – Control panel
36
Compuprint 6314/6414 - User Manual
3.1.1 Function Keys And LEDs
The function of the keys and LEDs are indicated by the words printed next to them.
When the menu mode is enabled, the function of each key is indicated in the Table 1 below.
Function key Condition
Enter
Pressing this function key, the printer switches between the on line and off line condition.
When the printer is switched off line, it finishes the printout of current label and stops printing until it is brought
back on line.
In menu mode, this key perform the enter function to confirm the current parameters or to pass on the next menu
level.
In power off condition, if you press this key and hold it while power on the printer, enters the printer communication
menu.
Scroll
This key advances the label.
In menu mode, this key permits scrolling through the various headings of each menu or the numbers of numerical
parameters.
In off line mode, pressing this key and Esc key together, enters the printer configuration menu.
Esc
This key is used to cancel the current job and is always enabled. If it is pressed, the printer finishes the printout of
current label and cancels the remaining print job.
In menu mode, this key performs the esc function. Press it to exit from the menu item without saving the current
parameters or to return to the previous menu level.
In off line mode, pressing this key and Scroll key together, enters the printer configuration menu.
Table 1 – Function key functions
In addition to the three function key on the front panel of printer, there are three LEDs, which,
together with the display, indicate machine status as explained below in Table 2.
LED
Condition
Ready
Lit: the printer is on line. In this condition, the printer is ready to receive and print information, the display shows the
ON LINE message.
Blinking: the printer is off line. In this condition, the printer stores the received data in its memory, and prints it out
when brought back on line. The message OFF LINE appears on the display.
Off: the printer is in the off line following a check function (in this case the Check LED flashes) or the printer is in
menu mode.
Check
Off: normal operation condition.
Blinking: the printer is performing a check due to an error condition (e.g. out of paper). The printer goes off line, the
Ready LED turns off and the display shows a blinking error message (e.g. PAPER END).
Power
Lit: normal operating condition.
Off: the printed is off or the power cable is not properly connected.
Table 2 – LED functions
37
Compuprint 6314/6414 - User Manual
3.2 Configuring The Printer
3.2.1 Overview
The configuration process is carried out using the printer configuration keys on the control panel
and includes the following:
-
Configuring the printer for different host interface options.
Customizing label formats.
Checking printer status.
Running various maintenance tests.
NOTE!
Control codes sent by the host system will override the control panel settings.
38
Compuprint 6314/6414 - User Manual
Fig. 29 shows the menu map.
File
Menu
Enabling and
Modes
(off line mode)
SCROLL + ESC
(power off mode)
ENTER + POWER ON
Configuration
Menu
Communication
Parameters
Printer
Settings
Emulation
Parameters
Diagnostic
Menu
Load
Configuration
Emulation
Selection
Vertical Offset
Adjustment
Save
Configuration
Set Printer
Mode
Backfeed
Adjustment
Print
Configuration
Paper Sensor
Mode
Form Length
Selection
Printhead Type
Detect
Print File
Contents
Print Method
Mode
Maximum Label
Length Selection
Counters
Menu
Factory
Reset
Password
Selection
Maximum Label
Width Selection
Delete Flash
Contents
Power Up
Configuration
Print Speed
Selection
Closing
Head Action
Slew Speed
Selection
Depending on
choice about
Emulation
Selection
menu
Paper Sensor
Menu
Run Automatic
Pres. Sens. Cal.
Interface
Type
Serial
Interface
Nic
Interface
Factory
Reset
Backfeed Speed
Selection
Printhead Heat
Selection
Cut Cycle
Selection
Paper Rewinder
Torque
Ribbon Rewinder
Torque
Horizontal Offset
Adjustment
Set Time
and Date
Override Print
Parameters
Fig. 29 – Menu Map
39
Compuprint 6314/6414 - User Manual
3.2.2 Menu Navigation
This section explains how to use the control panel to change individual settings and save them as a
customized configuration. For details on the control panel keys and how they work, see “Function
Keys And LEDs” on page 37.
Pressing Scroll and Esc together enters the printer CONFIGURATION MENU (offline mode only)
and permits value selection.
Press Enter and hold it while Power On the printer. Enters the COMMUNICATION MENU and
permits value selection.
3.2.3 Setting Printer Configuration Parameters
Configuration parameters are set from the control panel or are retrieved from the printer’s memory.
The parameters define how the printer will respond to command and interface signals from the host
computer.
The configuration menu structure consists of top-level menus and various parameter selections
under each top-level menu.
IMPORTANT NOTES:
1) Many of the selectable configurations refer to printer options or features that may or may not
be present in your printer. Selecting an option or feature that is not present will result in no
action being performed by the printer.
2) In many settings it is necessary to set some numbers. About this operation to use the following
instructions:
- Use the Enter function key to move to the number you want to modify.
- Scroll through the numerals with the Scroll function key.
- Confirm with the Enter function key up to the last cursor position.
For example: the display shows a number “0230 i” and we must change it in 1230. The
selected number or character blinks; press the Enter function key and the 0 numeral blinks;
press Scroll function key and the “1230” appears on the display; press the Enter function key
and the “2” numeral blinks; press the Enter function key and the numeral “3” blinks; press the
Enter function key and the “0” numeral blinks; press the Enter function key to confirm the
change; the previously selected menu appears on the display. During the operation don’t press
Esc function key otherwise the changes will be looses.
3) At the power on, the printer display shows ON LINE or OFF LINE at the first line and the
series of 11 characters at the second line.
Each of this characters defines a characteristic of the printer:
- The first = the print density in dots per inch.
- The second = the maxim width of the print head (inch).
- The third and the fourth = the maximum print speed in inch per second.
- The fifth = the type of printer emulation.
- The sixth and the seventh = media type
- The eighth = the active interface
- The ninth, tenth and eleventh = the printhead temperature
40
Compuprint 6314/6414 - User Manual
Example: 2410Z DT P 30º
2 = print density (2 DPI).
4 = print head width (4 inch).
10 = max. print speed (10 IPS).
Z = type of printer emulation (CZL emulation).
DT = direct thermal (also may be TT = thermal transfer).
P = the active interface is Parallel Port (also may be S = Serial, U = USB, L = LAN).
30º = current print head temperature (when the temperature exceeds 60ºC the character “>”
is show on the left of the temperature number …… eg. “>60º”)
3.2.4 Moving Within The Configuration Menu
Movement within the configuration menu is controlled by using the appropriate navigation keys.
Table 3 shows how to move through the menu system. See “Function Keys And LEDs” on page 37,
for more details on the function of the operator panel keys. This example configures the printer for
Direct Thermal operation.
Use these basic guidelines to move throughout all the configuration menus.
You can select different options and save them as the power on default.
To configure the printer, it must be offline. If the Ready indicator is lit, press and release the Enter
key to place the printer offline. When the printer is offline, OFFLINE appears on the top line of the
LCD. Pressing the Scroll & Esc keys together causes the printer to enter the printer configuration
menu system and Configuration Menu appears in the LCD.
Step
Press
LCD
Notes
1
Enter
OFFLINE
2
Scroll & Esc
CONFIGURATION MENU
3
4
5
6
Enter
Scroll Until
Enter
Scroll Until
FILE MENU
ENABLING AND MODES
SET PRINTER MODE
PRINT METHOD SELECTION
7
Enter
PRINT MODE DIRECT THERMAL*
Indicates that Direct Thermal print is
currently selected.
8
Scroll
PRINT MODE THERMAL TRANSFER
Cycles through the choices.
9
Enter
PRINT MODE THERMAL TRANSFER*
Indicates that Thermal Transfer print is
now selected.
10
Esc Until
SAVE CHANGES?
11
Enter
Allows you to make configuration
changes.
Saves Changes that you have made.
Table 3 – How to configure the printer to Direct Thermal operation
41
Compuprint 6314/6414 - User Manual
Changing printer settings, such as print speed or emulation, is referred to as configuration. You can
configure the printer through the control panel via the following menus:
- File Menu
- Enabling And Modes
- Printer Settings
- Emulation Parameters
- Diagnostics
Under each of the above menu headings are subsequent menus that allow you to configure
individual items such as print speed, label size and print mode.
CESTINA
SCROLL
CONFIGURATION
MENU
SCROLL
ENGLISH
LANGUAGE
ENTER
FILE
MENU
ENTER
LOAD
CONFIGURATION
ENTER
SET PRINTER
MODE
ENTER
VERTICAL OFFSET
ADJUSTEMENT
ENTER
Depending on choice about
EMULATION SELECTION
menu
SCROLL
ENABLING
AND MODES
SCROLL
PRINTER
SETTINGS
SCROLL
EMULATION
PARAMETERS
SCROLL
DIAGNOSTICS
MENU
ENTER
PAPER SENSOR
MENU
Fig. 30 – Structure of Configuration Menu
42
Compuprint 6314/6414 - User Manual
3.3 File Menu
This menu contains all the commands for saving and/or loading the configuration in/from the nonvolatile memory of the printer.
CONFIGURATION
MENU
ENTER
ENTER
FILE
MENU
LOAD
CONFIGURATION
SCROLL
SCROLL
ENABLING AND
MODES
SAVE
CONFIGURATION
SCROLL
PRINT
CONFIGURATION
SCROLL
PRINT FILE
CONTENTS
SCROLL
FACTORY
RESET
SCROLL
DELETE FLASH
CONTENTS
ENTER
DELETE FILES
ALL
SCROLL
DELETE FILES
INDIVIDUAL
ENTER
DELETE FILE
xxxxx
SCROLL
DELETE FILE
OTHER
Fig. 31 – Structure of File Menu
LOAD CONFIGURATION
This item loads the last configuration saved, which becomes the
current one.
SAVE CONFIGURATION
This item saves the current configuration in EEPROM nonvolatile memory.
PRINT CONFIGURATION
This item prints the current configuration of the printer.
PRINT FILE CONTENTS
This item prints the current contents of the flash memory.
FACTORY RESET
This item resets the printer to factory parameters, which become
the current ones and are automatically saved.
This item allows you to delete, all or individually, the files
presents in the flash contents that have previously been stored on
the printer, such as label designs, and fonts or graphics.
DELETE FLASH CONTENTS
43
Compuprint 6314/6414 - User Manual
3.3.1 Factory Reset Functions
The factory reset function influences the following parameters:
PARAMETERS
DEFAUL VALUE
ENABLING AND MODES MENU
SET PRINTER MODE
TEAR OFF MODE
PAPER SENSOR MODE
TRANSMISSIVE
PRINT METHOD MODE
DIRECT THERMAL
POWER UP STATUS
ON LINE
POWER UP ACTION
NONE
CLOSING HEAD ACTION
NONE
PRINTER SETTINGS MENU
VERTICAL OFFSET ADJUSTMENT
0 i
BACKFEED ADJUSTMENT
0 i
FORM LENGTH SELECTION
394 i
MAXIMUM LABEL LENGTHSELECTION
3000 i
MAXIMUM LABEL WIDTH SELECTION
409 i
PRINT SPEED SELECTION
4 inch/sec
SLEW SPEED SELECTION
4 inch/sec
BACKFEED SPEED SELECTION
4 inch/sec
PRINTHEAD HEAT SELECTION
12
CUT CYCLE SELECTION
1
PAPER REWINDER TORQUE
4
RIBBON REWINDER TORQUE
4
HORIZ. OFFSET ADJUSTMENT
0 i
OVERRIDE HEAT PARAM
DISABLED
OVERRIDE PRINT SPEED
DISABLED
OVERRIDE SLEW SPEED
DISABLED
OVERRIDE BACKFEED SPEED
DISABLED
OVERRIDE OTHERS PARAM
DISABLED
DATAMAX PARAMETERS
VERTICAL OFFSET
210 i
BACKFEED OFFSET
210 i
REFERENCE OFFSET
210 i
ROW OFFSET
0 i
COLUMN OFFSET
0 i
SELECT FINAL CHAR
0D
CONTROL CODES
STANDARD CODES
ZEBRA PARAMETERS
SET FORMAT PREFIX
5E
SET CONTROL PREFIX
7E
RESOLUTION MODE
NOMINAL RESOLUTION
Table 4 – Parameters influenced by factory reset function
44
Compuprint 6314/6414 - User Manual
3.3.2 Others Parameters
The following parameters are automatically saved in NVM memory and are not influenced by the
factory reset function:
SELECT LANGUAGE
EMULATION SELECTION
PASSWORD SELECTION
LABEL LENGTH (in CZL emulation)
RESET USER COUNTER
45
Compuprint 6314/6414 - User Manual
3.4 Enabling and Modes
This menu contains all the items necessary for activating the sensors and optional features,
including the operating modes of the printer itself. Its structure is illustrated in the following figure.
FILE
MENU
SCROLL
ENABLING
AND MODES
SCROLL
PRINTER
SETTINGS
ENTER
EMULATION
SELECTION
ENTER
CDL*
CZL
CPL
SCROLL
SET
PRINTER MODE
ENTER
ENTER
PRINTER MODE
ENTER
SCROLL
SENSOR MODE
TRANSMISSIVE*
REFLECTIVE
CONTINUOUS
SCROLL
PRINT METHOD
MODE
SCROLL
TEAR OFF MODE*
CUTTING MODE
PEEL OFF MODE
REWINDER MODE
APPLICATOR MODE
SCROLL
PAPER SENSOR
MODE
EMULATION
SCROLL
PRINT MODE
DIRECT THERMAL*
THERMAL TRANSFER
SCROLL
SCROLL
PASSWORD
SELECTION
ENTER
NEW PASSWORD
nnnn
SCROLL
POWER UP
CONFIGURATION
ENTER
POWER UP
STATUS
ENTER
POWER UP STATUS
ON LINE*
OFF LINE
SCROLL
SCROLL
SCROLL
CLOSING
HEAD ACTION
POWER UP
ACTION
ENTER
ENTER
POWER UP ACTION
NONE*
PAPER FEED
PAPER SENS CALIB
SCROLL
CLOSING HEAD ACT
NONE*
PAPER FEED
PAPER SENS CALIB
SCROLL
Fig. 32 – Structure of Enabling And Modes Menu
3.4.1 Emulation Selection
This function sets the emulation protocol of the printer. Press Enter function key to enter the
EMULATION SELECTION sub-menu. Press Scroll function key to scroll through the various items
of this function:
- CDL*
- CZL
- CPL
46
Compuprint 6314/6414 - User Manual
3.4.2 Set Printer Mode
This function sets the operating modes of the printer. Press Enter function key to enter the
PRINTER MODE sub-menu. Press Scroll function key to scroll through the various items of this
function:
- TEAR OFF MODE*: this item tells the printer, that the tear-off bar is installed. The printed
labels will be torn off manually.
- CUTTING MODE: this item selects the label cut mode. It enables the optional. When the cutter
is installed, you should confirm that it has been enabled: if not, you must enable it, otherwise it
will not work. If the cutter has not been mounted but has been enabled, the machine will switch
to check; if it has been installed but not enabled, the cutter does not operate and the machine
prints without cutting.
- PEEL OFF MODE: this item selects the label peel-off mode. It enables the rewinder and the
present sensor.
- REWINDER MODE: this item enables the rewinder. The printed labels are thus rolled up.
- APPLICATOR MODE: this item provides the connection to an applicator. It enables the paper
rewinder and the present sensor (a special sensor mounted on the tear bar assembly/peel-off
system that detects the presence of a printed label).
3.4.3 Paper Sensor Mode
The printer is equipped with a paper sensor which is necessary for perfect alignment of the paper
under the head. This function enables this paper sensor and can operate in three different function
modes: in transmission mode, in reflection mode or in continuous mode.
Press Enter function key to enter the PAPER SENSOR MODE sub-menu. Press Scroll function key
to scroll through the various items of this function:
- TRANSMISSIVE*: this item enables the transmission mode and must be used when the labels
are marked off by a gap or a hole or more generally when there is an area with a net difference of
support transparency between one label and the other.
- REFLECTIVE: this item enables the reflection mode and must be used when the support is
completely opaque and there is a black tick mark on the back of the support itself.
- CONTINUOUS : this item disables the paper sensor and allows the printer to print a label of any
length.
3.4.4 Print Method Mode
Press Enter function key to enter the PRINT METHOD MODE sub-menu. Press Scroll function key
to scroll through the various items of this function:
- DIRECT THERMAL*: the direct thermal refers to printing directly on thermal paper. In this
case, the heat generated by the head alters the paper, which turns black in correspondence to the
printed characters without the need for any ribbon.
- THERMAL TRANSFER: the thermal transfer method is performed with a special ribbon, which
through the heat generated by the intelligent print head, applies the ink on the paper during
printing.
47
Compuprint 6314/6414 - User Manual
3.4.5 Password Selection
This function allows the creation of a security password to prevent non authorized personnel to
change the printer configuration.
Press Enter function key to enter in the PASSWORD SELECTION sub-menu.
NEW PASSWORD nnnn: this item allows you to create a password using a string composed of 4
numerical characters (nnnn). Press Scroll function key to scroll the numbers to be used for the
numerical string and then confirm pressing the Enter function key.
Notes: - insert a string of four “0” character to cancel the password
- all changeable parameters of all menu are dependent on the password.
3.4.6 Power Up Configuration
With this function it is possible to set the printer state and an action that the printer performs
automatically after the power up.
Press the Enter key to select the submenu POWER UP STATE.
At this point, pressing the Scroll key, you pass over to the second submenu POWER UP ACTION.
Pressing the Enter key you select the values for the POWER UP STATE submenu.
Power Up State
This function allows the setting of the printer state after the initialization:
- ON LINE*: after initializing, the printer turns on line.
- OFF LINE: after initializing, the printer turns offline.
Power Up Action
With this function it is possible to select an action that the printer performs automatically,
when turning on the printer:
- NONE*: the printer does not perform any action.
- PAPER FEED: at power on the printer performs a paper feed.
- PAPER SENSOR CALIBRATION: at power on the printer calibrates the paper sensor.
3.4.7 Closing Head Action
With this function it is possible to set the printer state and an action that the printer performs
automatically after the closing head.
Press the Enter key to select the CLOSING HEAD ACT sub-menu.
Press Scroll function key to scroll through the various items of this function:
- NONE*: the printer does not perform any action.
- PAPER FEED: closing the head the printer performs a paper feed.
- PAPER SENSOR CALIBRATION: closing the head the printer calibrates the paper sensor.
48
Compuprint 6314/6414 - User Manual
3.5 Printer Settings
The structure of this menu is illustrated in the following figure. The parameters in this menu
correspond to those printing parameters the printer uses as default, if it does not receive any other
value from software.
ENABLING AND
MODES
SCROLL
PRINTER
SETTING
ENTER
SCROLL
PAPER SENSOR
MENU
VERTICAL OFFSET
ADJUSTMENT
ENTER
SCROLL
BACKFEED
ADJUSTMENT
ENTER
SCROLL
FORM LENGTH
SELECTION
ENTER
SCROLL
MAXIMUM LABEL
LENGTH SELECTION
ENTER
SCROLL
MAXIMUM LABEL
WIDTH SELECTION
ENTER
SCROLL
PRINT SPEED
SELECTION
FINE OFFEST ADJ
+nn i*
+nn d
+nn m
BACKFEED ADJUST.
+nn i*
+nn d
+nn m
FORM LENGTH
nnnn i*
nnnn d
nnnn m
MAX LABEL LENGTH
nnnn i*
nnnn d
nnnn m
MAX LABEL WIDTH
nnn i*
nnn d
nnn m
ENTER
PRINT SPEED
4.0*
ENTER
SLEW SPEED
4.0*
ENTER
BACKFEED SPEED
4.0*
ENTER
PRINTHEAD HEAT
12*
ENTER
CUT CYCLE
nnnn
ENTER
PAPER REW TORQUE
04*
ENTER
RIBBON REW TORQ.
04*
SCROLL
SLEW SPEED
SELECTION
SCROLL
BACKFEED SPEED
SELECTION
SCROLL
PRINTHEAD HEAT
SELECTION
SCROLL
CUT CYCLE
SELECTION
SCROLL
PAPER REWINDER
TORQUE
SCROLL
RIBBON REWINDER
TORQUE
SCROLL
HORIZONTAL OFFS
HORIZ. OFFSET
ADJUSTMENT
ENTER
SCROLL
SET TIME
AND DATE
ENTER
SCROLL
OVERRIDE PRINT
PARAMETERS
ENTER
nnn i*
nnn d
nnn m
YEAR
MONTH
DATE
HOUR
MINUTE
OVERRIDE PARAM.
HEAD TEMP
PRINT SPEED
SLEW SPEED
OTHERS PARAM.
SCROLL
Fig. 33 – Structure of Printer Settings Menu
49
Compuprint 6314/6414 - User Manual
3.5.1 Vertical Offset Adjustment
This function sets the label edge offset adjustment, setting a “mechanical” offset (both positive and
negative) for the paper scroll position under the print head. This can be useful when you replace a
previously installed printer or you need to center all text on a pre-printed label without altering the
software
Press Enter function key to enter in the FINE OFFSET ADJ sub-menu:
- nn i (d,m): select the unit of measurement between i (the values are indicated in hundredths of an
inch), m (the values are indicated in tenths of a millimeter) or d (the values are indicated in dots)
using the Scroll function key. After having chosen the unit of measurement, use the Enter
function key to move to the number you want to modify, scroll through the numerals with the
Scroll function key, and then confirm with the Enter function key up to the last cursor
position, when the menu item appears.
3.5.2 Backfeed Adjustment
This function sets the backfeed adjustment.
Press Enter function key to enter in the BACKFEED ADJUSTM sub-menu:
- nn i (d,m): select the unit of measurement between i the values are indicated in hundredths of an
inch), m (the values are indicated in tenths of a millimeter ) or d (the values are indicated in dots)
using the Scroll function key. After having chosen the unit of measurement, use the Enter
function key to move to the number you want to modify, scroll through the numerals with the
Scroll function key, and then confirm with the Enter function key up to the last cursor
position, when the menu item appears.
3.5.3 Form Length Selection
This function sets the label length. The printer can print on labels that are separated by a reference
(gap, black mark or a hole) and on a continuous form. In this case you must inform the printer of the
length of the label to be printed (in dots, millimeters or inches).
Press Enter function key to enter in the FORM LENGTH sub-menu:
- nnnn i (d,m): select the unit of measurement between i (the values are indicated in hundredths of
an inch), m (the values are indicated in tenths of a millimeter) or d (the values are indicated in
dots) using the Scroll function key. After having chosen the unit of measurement, use the Enter
function key to move to the number you want to modify, scroll through the numerals with the
Scroll function key, and then confirm with the Enter function key up to the last cursor
position, when the menu item appears. If you select 0000, you can use labels marked off by a
gap or a hole as length reference.
50
Compuprint 6314/6414 - User Manual
3.5.4 Maximum Label Length Selection
This function sets the maximum length of the label.
Press Enter function key to enter in the MAX LABEL LENGTH sub-menu:
- nnnn i (d,m): select the unit of measurement between i (the values are indicated in hundredths of
an inch), m (the values are indicated in tenths of a millimeter) or d (the values are indicated in
dots) using the Scroll function key. After having chosen the unit of measurement, use the Enter
function key to move to the number you want to modify, scroll through the numerals with the
Scroll function key, and then confirm with the Enter function key up to the last cursor
position, when the menu item appears.
3.5.5 Maximum Label Width Selection
This function sets the maximum width of the label.
Press Enter function key to enter in the MAX LABEL WIDTH sub-menu:
- nnn i (d,m): select the unit of measurement between i (the values are indicated in hundredths of
an inch), m (the values are indicated in tenths of a millimeter) or d (the values are indicated in
dots) using the Scroll function key. After having chosen the unit of measurement, use the Enter
function key to move to the number you want to modify, scroll through the numerals with the
Scroll function key, and then confirm with the Enter function key up to the last cursor
position, when the menu item appears.
3.5.6 Print Speed Selection
This function sets the print speed.
Press Enter function key to enter in the PRINT SPEED sub-menu:
- nn: scroll through the numerals with the Scroll function key, and then confirm with the Enter
function key up to the last cursor position, when the menu item appears. The print speed is
indicated in inches per second (ips). The values range between 2 and 10, in steps of 0.5 ips
(depending on the model that you have).
3.5.7 Slew Speed Selection
This function sets the slew speed.
Press Enter function key to enter in the SLEW SPEED sub-menu:
- nn: scroll through the numerals with the Scroll function key, and then confirm with the Enter
function key up to the last cursor position, when the menu item appears. The slew speed is
indicated in inches per second (ips). The value range is between 2 and 10 in steps of 0.5 ips
(Depending on the model that you have).
51
Compuprint 6314/6414 - User Manual
3.5.8 Backfeed Speed Selection
This function sets the backfeed speed.
Press Enter function key to enter in the BACKFEED SPEED sub-menu:
- nn: scroll through the numerals with the Scroll function key, and then confirm with the Enter
function key up to the last cursor position, when the menu item appears. The backfeed speed is
indicated in inches per second (ips). The value range is between 2 and 10 in steps of 0.5 ips
(Depending on the model that you have).
3.5.9 Print Head Heat Selection
This function selects the temperature of the print head that directly affects print quality. The optimal
temperature depends on the type of ribbon and support used.
Press Enter function key to enter in the PRINTHEAD HEAT sub-menu:
- nn: the temperature can be adjusted with this parameter and with the Hnn software commands (a
description of which is found in the Programmer Manual of the current emulation). Scroll
through the numerals with the Scroll function key, and then confirm with the Enter function key
up to the last cursor position, when the menu item appears. The value range is between 01 and 20
(the default value is 12).
3.5.10 Cut Cycle Selection
This function sets the label cut cycle. When the cutter is installed and enabled, all labels, or each
group of n labels, can be cut.
Press Enter function key to enter in the CUT CYCLE sub-menu:
- nnnn: scroll through the numerals with the Scroll function key, and then confirm with the Enter
function key up to the last cursor position, when the menu item appears.
3.5.11 Paper Rewinder Torque
This function selects the label rewinder torque. The printed labels (or the silicon support when the
tear bar assembly/peel-off system is used) are rewound with a torque constant commanded motor to
guarantee uniform tension.
Press Enter function key to enter in the PAPER REW TORQUE sub-menu:
- nn: scroll through the numerals with the Scroll function key, and then confirm with the Enter
function key up to the last cursor position, when the menu item appears. The value range is
between 4 and 13.
3.5.12 Ribbon Rewinder Torque
This function selects the ribbon rewinder torque. The used ribbon is rewound with a torque constant
commanded motor to guarantee uniform tension.
Press Enter function key to enter in the RIBBON REW TORQ. sub-menu:
- nn: scroll through the numerals with the Scroll function key, and then confirm with the Enter
function key up to the last cursor position, when the menu item appears. The value range is
between 4 and 13.
52
Compuprint 6314/6414 - User Manual
3.5.13 Horizontal Offset Adjustment
This function sets the horizontal right shift.
Press Enter function key to enter in the HORIZONTAL OFFS sub-menu:
- nnn i (d,m): select the unit of measurement between i (the values are indicated in hundredths of
an inch), m (the values are indicated in tenths of a millimeter) or d (the values are indicated in
dots) using the Scroll function key. After having chosen the unit of measurement, use the Enter
function key to move to the number you want to modify, scroll through the numerals with the
Scroll function key, and then confirm with the Enter function key up to the last cursor
position, when the menu item appears. The horizontal right offset value must be positive.
3.5.14 Set Time And Date
With this function it is possible to set the time and the date for the printer, if an RTC (real time
clock) is installed. In case this function is selected when this device is not present, the display
shows a blinking warning message.
When the system clock is installed, date and time is displayed immediately at power on. Once time
and date are set with this function, the printer updates them then automatically.
Press Enter function key to select the TIME AND DATE submenu:
Press Enter function key to scroll the various items for this function:
- SET YEAR: press Scroll to select the year.
- SET MONTH: press Scroll to select the month, for example 5 for May.
- SET DATE: press Scroll to select the day.
- SET HOUR: press Scroll to select the hour.
- SET MINUTES: press Scroll to select minutes.
Press Enter function key to return to the SET TIME AND DATE submenu.
3.5.15 Override Print Parameters
With this function it is possible to override pre-programmed settings of an existing print job without
the need of reprogramming. The available options are:
- HEAT PARAM
- PRINTSPEED
- SLEW SPEED
- BACKFEED SPEED
- OTHERS PARAM.: includes the emulation parameters
53
Compuprint 6314/6414 - User Manual
3.6 Emulation Parameters CDL Menu
According to the emulation installed on the printer, it is necessary to set the corresponding
emulation parameters, which are different for all the emulations. Therefore the emulation
parameters menu differs according to the installed emulation.
PRINTER
SETTINGS
SCROLL
EMULATION
PARAMETERS
ENTER
VERTICAL
OFFSET SELECTION
ENTER
VERTICAL OFFSET
nnn i
nnn d
nnn m
SCROLL
SCROLL
DIAGNOSTIC
MENU
BACKFEED
OFFSET
ENTER
SCROLL
REFERENCE
OFFSET
ENTER
ENTER
ENTER
ROW OFFSET
COLUMN OFFSET
nnnn i
nnnn d
nnnn m
SCROLL
SELECT
FINAL CHAR
LABEL ZERO OFFST
nnnn i
nnnn d
nnnn m
SCROLL
COLUMN
OFFSET
nnn i
nnn d
nnn m
210*
220
110
SCROLL
ROW
OFFSET
BACKFEED OFFSET
ENTER
SET FINAL CHAR
0D*
SCROLL
CONTROL
CODES
ENTER
CONTROL CODES
STANDARD CODES*
ALTERNATE CODES
SCROLL
Fig. 34 – Structure of Emulation Parameters CDL Menu
3.6.1 Vertical Offset
This function sets the vertical offset, setting a “mechanical” offset (both positive and negative) for
the paper scroll position under the print head. This can be useful when you replace a previously
installed printer or you need to center all text on a pre-printed label without altering the software.
Press Enter function key to enter in the VERTICAL OFFSET sub-menu:
- nnn i (d,m): select the unit of measurement between i (the values are indicated in hundredths of
an inch), m (the values are indicated in tenths of a millimeter) or d (the values are indicated in
dots) using the Scroll function key. After having chosen the unit of measurement, use the Enter
function key to move to the number you want to modify, scroll through the numerals with the
Scroll function key, and then confirm with the Enter function key up to the last cursor
position, when the menu item appears.
54
Compuprint 6314/6414 - User Manual
3.6.2 Backfeed Offset
This function sets the value of the backfeed offset. In some cases the label must exit the print head
after having been printed so that the user or a print apply system can more easily remove it or align
it with the cutter. To resume printing, the label must return to its original position for proper
printing. The amount of forward/backward adjustment (nnn) is determined by this item and
indicates the amount of adjustment with respect to the REFERENCE OFFSET item (see 3.6.3
below).
Press Enter function key to enter in the BACKFEED OFFSET sub-menu:
- nnn i (m): select the unit of measurement between i (the values are indicated in hundredths of an
inch) and m (the values are indicated in tenths of a millimeter) using the Scroll function key.
After having chosen the unit of measurement, use the Enter function key to move to the number
you want to modify, scroll through the numerals with the Scroll function key, and then confirm
with the Enter function key up to the last cursor position, when the menu item appears.
3.6.3 Reference Offset
This function sets the value of the reference offset.
Press Enter function key to enter in the LABEL ZERO OFFSET sub-menu:
- This item, which refers to three standard printer models, can be set at 210*, 220 or 110, and sets
the zero of reference for offset commands that refer to it. In all cases, the coordinate of line 0
corresponds to the lower edge of the label.
3.6.4 Row Offset
This function sets the value of the row offset. It is possible to move the printout image respect to
physical edges of the label through the row offset. By this item (which can be overwritten via
software) you can move all the fields in the label up with respect to the left lower corner edge of the
form.
Press Enter function key to enter in the ROW OFFSET sub-menu:
- nnnn i (m): select the unit of measurement between i (the values are indicated in hundredths of
an inch) and m (the values are indicated in tenths of a millimeter) using the Scroll function key.
After having chosen the unit of measurement, use the Enter function key to move to the number
you want to modify, scroll through the numerals with the Scroll function key, and then confirm
with the Enter function key up to the last cursor position, when the menu item appears.
55
Compuprint 6314/6414 - User Manual
3.6.5 Column Offset
This function sets the value of the column offset. It is possible to move the printout image respect to
physical edges of the label through the column offset. By this item (which can be overwritten via
software) you can move all the fields in the label right with respect to the left lower corner edge of
the form.
Press Enter function key to enter in the COLUMN OFFSET sub-menu:
- nnnn i (m): select the unit of measurement between i (the values are indicated in hundredths of
an inch) and m (the values are indicated in tenths of a millimeter) using the Scroll function key.
After having chosen the unit of measurement, use the Enter function key to move to the number
you want to modify, scroll through the numerals with the Scroll function key, and then confirm
with the Enter function key up to the last cursor position, when the menu item appears.
3.6.6 Select Final Character
This function (FINAL CHARACTER) sets the command terminator. Press Enter function key to
enter in the SET FINAL CHAR sub-menu The default value is OD (hex) - carriage return.
Scroll through the numerals with the Scroll function key, and then confirm with the Enter function
key.
The value range is between 0D (hex) and FD (hex)
3.6.7 Control Codes
This function (CONTROL CODES) selects the control characters to be used before the commands.
Press Enter function key to enter in the CONTROL CODES sub-menu. Press Scroll function key to
scroll through the various items of this function:
- STANDARD CODES*: the control characters are those set by factory (SOH and STX).
- ALTERNATE CODES: the control characters sent are ^ (5EH) and ~ (7EH).
56
Compuprint 6314/6414 - User Manual
3.7 Emulation Parameters CZL Menu
According to the emulation installed on the printer, it is necessary to set the corresponding
emulation parameters, which are different for all the emulations. Therefore the emulation
parameters menu differs according to the installed emulation.
PRINTER
SETTINGS
SCROLL
EMULATION
PARAMETERS
ENTER
SET FORMAT
PREFIX
ENTER
FORMAT PREFIX H
5E
ENTER
CONTROL PREFIX H
7E
ENTER
DELIMITER CHAR
2C
SCROLL
SCROLL
DIAGNOSTIC
MENU
SET CONTROL
PREFIX
SCROLL
SET DELIMITER
CHARACTER
SCROLL
RESOLUTION
MODE
ENTER
GRAPHIC RESOLUT:
NOMINAL RESOLUT.*
REDUCED RESOLUT.
SCROLL
SCROLL
LABEL
LENGTH
ENTER
nnnn i
nnnn d
nnnn m
SCROLL
RESTORE UNIT
IDENTIFIER
LABEL LENGTH
ENTER
SAVED!
Fig. 35 – Structure of Emulation Parameters CZL Menu
3.7.1 Set Format Prefix
This function (FORMAT PREFIX) allows to change the default character ^ (5EH)
Press Enter function key to enter in the FORMAT PREFIX H sub-menu.
Scroll through the numerals with the Scroll function key, and then confirm with the Enter function
key.
The value range is between 2E (hex) and 7E (hex).
3.7.2 Set Control Prefix
This function (CONTROL PREFIX H) allows to change the default character ~ (7EH)
Press Enter function key to enter in the CONTROL PREFIX H sub-menu.
Scroll through the numerals with the Scroll function key, and then confirm with the Enter function
key.
The value range is between 2E (hex) and 7E (hex).
57
Compuprint 6314/6414 - User Manual
3.7.3 Set Delimiter Character
This function (SET DELIMITER CHARACTER) allows to change the default character 2C (hex).
Press Enter function key to enter in the DELIMITER CHAR sub-menu.
Scroll through the numerals with the Scroll function key, and then confirm with the Enter function
key.
The available values are: 2C, 3C, 4C, 5C, 6C, 7C (hex).
3.7.4 Resolution Mode
This function selects the print resolution modes.
Press Enter function key to enter in the GRAPHIC RESOLUT. sub-menu. Press Scroll function key
to scroll through the various items of this function:
- NOMINAL RESOLUT.*: this parameter selects the nominal resolution.
- REDUCED RESOLUT.: this parameter selects the reduced resolution.
3.7.5 Label Length
This function sets the length of the label.
Press Enter function key to enter in the LABEL LENGTH sub-menu:
- nnnn i (d,m): select the unit of measurement between i (the values are indicated in hundredths of
an inch), m (the values are indicated in tenths of a millimeter) or d (the values are indicated in
dots) using the Scroll function key. After having chosen the unit of measurement, use the Enter
function key to move to the number you want to modify, scroll through the numerals with the
Scroll function key, and then confirm with the Enter function key up to the last cursor
position, when the menu item appears.
3.7.6 Restore Unit Identifier
This function restore the printer unit identifier.
Press Enter function key to enter in the SAVED! sub-menu:
Press Enter function key to restore the unit identifier code.
The display shows the blinking word “SAVED!”.
58
Compuprint 6314/6414 - User Manual
3.8 Emulation Parameters CPL Menu
According to the emulation installed on the printer, it is necessary to set the corresponding
emulation parameters, which are different for all the emulations. Therefore the emulation
parameters menu differs according to the installed emulation.
PRINTER
SETTINGS
SCROLL
EMULATION
PARAMETERS
ENTER
X - Y STARTING
POINT
ENTER
STARTING POINT
X: nnnn i
nnnn d
nnn m
SCROLL
ESC
SCROLL
DIAGNOSTIC
MENU
STARTING POINT
Y: nnnn i
nnnn d
nnn m
ERROR
REPORT
ENTER
ERROR REPORT
DISABLED*
ENABLED
SCROLL
Fig. 36 – Structure of Emulation Parameters CPL Menu
3.8.1 X – Y Starting Point
This function sets the origin of the label.
Press Enter function key to enter in the STARTING POINT X sub-menu:
- nnnn i (d,m): select the unit of measurement between i (the values are indicated in hundredths of
an inch), m (the values are indicated in tenths of a millimeter) or d (the values are indicated in
dots) using the Scroll function key. After having chosen the unit of measurement, use the Enter
function key to move to the number you want to modify, scroll through the numerals with the
Scroll function key, and then confirm with the Enter function key up to the last cursor
position, when the menu item appears.
Press Esc function key to enter in the STARTING POINT Y sub-menu:
- nnnn i (d,m): select the unit of measurement between i (the values are indicated in hundredths of
an inch), m (the values are indicated in tenths of a millimeter) or d (the values are indicated in
dots) using the Scroll function key. After having chosen the unit of measurement, use the Enter
function key to move to the number you want to modify, scroll through the numerals with the
Scroll function key, and then confirm with the Enter function key up to the last cursor
position, when the menu item appears.
59
Compuprint 6314/6414 - User Manual
3.8.2 Error Report
This function allows, if enabled, to print an error report on the label.
Press Enter function key to enter in the ERROR REPORT. sub-menu. Press Scroll function key to
scroll through the various items of this function:
- DISABLED.*: this parameter disables the error report.
- ENABLED: this parameter enables the error report.
60
Compuprint 6314/6414 - User Manual
3.9 Diagnostic Menu
EMULATION
PARAMETERS
SCROLL
DIAGNOSTIC
MENU
ENTER
ENTER
PAPER SENSOR
MENU
RUN AUTOMATIC
ADJUSTMENT
ENTER
RUNNING PAPER
SENSOR ADJUST
ENTER
PAPER SENSOR MOD
SCROLL
PAPER SENSOR
MODE
SCROLL
TRANSMISSIVE*
REFLECTIVE
SCROLL
SCROLL
PAPER SENSOR
CONTROL
ENTER
Sens Value: nnnn mV
Gain: nnn Off: nnn
ESC
SCROLL
RUN NO PAPER
CALIBRATION
Sens Value: nnnn mV
Threshold: nnn
ENTER
REMOVE PAPER
AND PRESS A KEY
ENTER
INSERT LINER
AND PRESS A KEY
SCROLL
RUN MANUAL
ADJUSTMENT
KEY
INSERT PAPER
AND PRESS A KEY
RUN AUTOMATIC
PRES. SENS. CAL.
ENTER
INSERT PAPER
AND PRESS A KEY
KEY
PAPER SENSOR
CALIBRATION DONE
SCROLL
PRINTHEAD TYPE
DETECTED
ENTER
PRINTHEAD TYPE
xxx……….xxx
SCROLL
COUNTERS
MENU
ENTER
DISPLAY
COUNTERS
ENTER
USER COUN: x
RESERVED: x
ENTER
RESET IN
PROGRESS …
SCROLL
RESET
USER COUNTERS?
Fig. 37 – Structure of Diagnostic Menu
PAPER SENSOR MENU
This item allows to calibrate the paper sensor and check
its functionality.
RUN AUTOMATIC PRES. SENS. CAL.
This item allows to calibrate the present sensor and check
its functionality.
PRINTHEAD TYPE DETECT
This item indicates the print head type installed on the
printer (intelligent print head or not intelligent print
head).
COUNTERS MENU
This item show the quantity of printed labels.
61
Compuprint 6314/6414 - User Manual
3.9.1 Run Automatic Adjustment
This function enables the printer automatically to adjust the sensitivity of the paper sensor
according to the paper used. The paper must be properly installed and the PAPER SENSOR MODE
item (see 3.9.2 below) must be selected depending on whether the gap or the black tick mark are
present. At this point, the printer performs a series of actions, at the end of which, if the calibration
sequence is successful, the display shows the blinking message PAPER SENSOR ADJUSTMENT
DONE, otherwise FAILED.
3.9.2 Paper Sensor Mode
This diagnostic function allows the choice of paper sensor.
Press Enter function key to enter in the PAPER SENSOR MODE sub-menu. Press Scroll function
key to scroll through the various items of this function:
- TRANSMISSIVE*: this item enables the transmission mode and must be used when the labels
are marked off by a gap or a hole or more generally when there is an area with a net difference of
support transparency between one label and the other.
- REFLECTIVE: this item enables the reflection mode and must be used when the support is
completely opaque and there is a black tick mark on the back of the support itself.
3.9.3 Paper Sensor Control
This function enables the printer to calibrate the paper sensor manually. This function is useful in
the case of problematic media (e.g. transparent labels).
Press Enter function key and display shows: “Sens Value: nnnn mV” “Gain: nnn Off: nnn”.
Press Scroll function key to change value of “n”.
Press Enter function key to change position of “n”.
Press Esc function key and display shows: “Sens Value: nnnn mV” “Threshold: nnn”.
Press Scroll function key to change value of “n”.
Press Enter function key to change position of “n”.
Press Esc function key to exit.
The value detected by the paper sensor is shown on the first line of the display. To determine the
correct adjustment, it is necessary to maximize the difference between the value detected with a gap
under the sensor and the value with a label. The value (transmissive sensor) is approximately 1200
when there is a gap, 3300 when there is a label and 500 when there is a paper out condition. In any
event, the gap value must be far from that of the paper out value (when nothing appears under the
sensor). Example: Gain: 045 -- Off: 059 Sens Value: label = 3300 gap = 1260 paper out =
550.
The trheshold value must be the Sens Value with label minus 500.
Example: Sens Value: 3300mV
Threshold: 280.
3.9.4 Run No Paper Calibration
This function enables the printer to calibrate the paper sensor in paper out condition. This function
is necessary to allows a correct automatic sensor adjustment operation.
Press Enter function key to enter in the NO PAPER CALIBRATION function. At the end of
operation the display shows PAPER SENSOR CALIBRATION DONE or FAIL.
62
Compuprint 6314/6414 - User Manual
3.9.5 Run Manual Adjustment
This function enables the printer to calibrate the paper sensor manually. This function is useful in
the case of problematic media (e.g. preprinted labels).
Press Enter function key and follow the instructions shown on the display.
3.9.6 Run Automatic Present Sensor Calibration
This function enables the printer to calibrate, in automatic mode, the present paper sensor. This
function is necessary to allows a correct automatic present sensor adjustment operation.
Press Enter function key to enter in the AUTOMATIC PRES. SENS. CAL. function. At the end of
operation the display show PRESENT SENSOR CALIBRAT. DONE or FAIL.
3.9.7 Printhead Type Detected
This item indicates the print head type installed on the printer (intelligent print head or not
intelligent print head).
3.9.8 Counters Menu
Pressing the Enter function key, when this function is displayed, you gain access to two submenu:
- DISPLAY COUNTERS: press Enter function key and, on the first line of the display, appears
USER COUN: nn and in the second line appears RESERVED: nn.
The value displayed near the message USER COUN shows the quantity of printed labels after the
last user reset; RESERVED, instead, shows the absolute quantity of printed labels (in meters).
Pressing the Scroll function key to enter in:
- RESET USER COUNTER?: press Enter function key and, on the display, appears RESET IN
PROGRESS for a few second. This selection sets the user counter of the printed labels to zero.
63
Compuprint 6314/6414 - User Manual
3.10 Communication Parameters Menu
Press Enter function key and hold it while Power On the printer to enter in the COMMUNICATION
MENU and be able to value selection.
COMMUNICATION
PARAMETERS
ENTER
INTERFACE
TYPE
ENTER
CENTRONIX*
SERIAL
USB
NIC
AUTOMATIC
SCROLL
SERIAL
INTERFACE
INTERFACE TYPE
ENTER
BAUD RATE
SELECTION
ENTER
IP
ASSIGNMENT
SCROLL
SCROLL
NIC
INTERFACE
SCROLL
FACTORY
RESET
Fig. 38 – Structure of Communication Parameters Menu
SERIAL INTERFACE
This item allows you to select the different parameters for the serial port
communication.
NIC INTERFACE
This item allows you to select the different parameters for the
networking port communication.
FACTORY RESET
This item resets the printer to factory parameters.
64
Compuprint 6314/6414 - User Manual
3.11 Serial Interface
The following list describes all menu items in the Serial Port Functions top-level menu.
INTERFACE
TYPE
SCROLL
SERIAL
INTERFACE
SCROLL
ENTER
BAUD RATE
SELECTION
ENTER
9600*
19200
38400
1200
2400
4800
SCROLL
NIC
INTERFACE
PARITY
SELECTION
ENTER
ENTER
SCROLL
PARITY
NONE*
EVEN
ODD
FORCED 0
FORCED 1
SCROLL
DATA BITS NUMBER
SELECTION
BAUD RATE
SCROLL
DATA BIT
8*
7
SCROLL
SCROLL
STOP BITS NUMBER
SELECTION
ENTER
STOP BIT
1*
2
SCROLL
SCROLL
Xon/Xoff PROTOC.
SELECTION
ENTER
Xon/Xoff PROTOC.
DISABLED*
XON/XOFF+DTR
XON/XOFF ONLY
SCROLL
Fig. 39 – Structure of Serial Interface Menu
3.11.1 Baud Rate
This item allows the selection of the different speeds (from 1200 to 38400 baud) for the
reception/transmission of data through the serial port of the printer.
Press Enter function key to enter in the SELECT BAUD RATE sub-menu. Press Scroll function key
to scroll through the various items of this function and confirm with Enter function key:
- 1200 to 38400 bps: the default value is 9,600*.
3.11.2 Parity
This item allows the selection of the parity check.
Press Enter function key to enter in the PARITY sub-menu. Press Scroll function key to scroll
through the various items of this function and confirm with Enter function key:
- NONE*: Data does not have a parity bit. The parity check is disabled.
- EVEN: Parity check is enabled for even parity.
- ODD: Parity check is enabled for odd parity.
- FORCED 0: Parity check bit is forced to 0 bit.
- FORCED 1: Parity check bit is forced to 1 bit.
65
Compuprint 6314/6414 - User Manual
3.11.3 Data Bits Number
This item allows the selection of the number of data bits: 7 or 8 data bits.
Press Enter function key to enter in the DATA BIT sub-menu. Press Scroll function key to scroll
through the various items of this function and confirm with Enter function key:
- 8*: the number of data bits is set to 8.
- 7: the number of data bits is set to 7.
3.11.4 Stop Bits Number
This item allows the selection of the number of stop bits: 1 or 2 stop bits.
Press Enter function key to enter in the STOP BIT sub-menu. Press Scroll function key to scroll
through the various items of this function and confirm with Enter function key:
- 1*: the number of stop bits is 1.
- 2: the number of stop bits is 2.
3.11.5 Xon/Xoff Protoc. Selection
This item allows the selection of the handshaking protocol for the serial interface. The selections are
as follows:
- DISABLED*: the selection of the XON/XOFF protocol is disabled.
- Xon / Xoff+DTR: the flow control is performed using the DTR and XON/XOFF protocols.
- Xon / Xoff ONLY: the flow control is performed using only the XON/XOFF protocols.
NOTE!
The printer controls the flow of communication from the host by turning the transmission on and off. In some situations,
such as when the buffer is full or the timing of signals is too slow or too fast, the printer will tell the host to stop
transmission by sending an XOFF character. An XOFF character is sent when the number of empty bytes in the buffer
is less than or equal to 25 percent of the buffer size. If the host keeps sending data after an XOFF is sent, the printer
firmware will continue to send an XOFF for every 16 characters received. When cleared, the printer will resume
receiving data (XON). The data does not have any End of Text codes; XON / XOFF is a non-block protocol.
66
Compuprint 6314/6414 - User Manual
3.12 NIC Interface
This menu contains all the networking interface communication parameters.
SERIAL
INTERFACE
SCROLL
NIC
INTERFACE
ENTER
IP
ASSIGNMENT
ENTER
FIXED*
DHCP
ARP
SCROLL
SCROLL
SERIAL
INTERFACE
IP
ADDRESS
IP ASSIGNMENT
ENTER
IP ADDRESS
127.000.000.000
ENTER
SUBNET MASK
255.255.254.000
ENTER
GATEWAY ADDRESS
000.000.000.000
ENTER
HOST NAME
xxxx……….xxxx
ENTER
WORKGROUP NAME
xxxx………xxxx
ENTER
SMTP SERVICE
SCROLL
SCROLL
SUBNET
MASK
SCROLL
GATEWAY
ADDRESS
SCROLL
HOST
NAME
SCROLL
WORKGROUP
NAME
SCROLL
ENABLING
SMTP
DISABLED*
ENABLED
SCROLL
SCROLL
SMTP MAIL
SERVER ADDRESS
ENTER
SERVER ADDRESS
000.000.000.000
ENTER
NOTIF. ADDRESS
xxxx…………xxxx
ENTER
PRINTER ADDRESS
xxxx……….xxxx
SCROLL
EMAIL NOTIF.
ADDRESS
SCROLL
EMAIL PRINTER
ADDRESS
Fig. 40 – Structure of NIC Interface Menu
67
Compuprint 6314/6414 - User Manual
3.12.1 IP Assignment
IP address assignment mode.
- FIXED*: Assigns the static or fixed IP address.
- DHCP: Assigns the dynamic IP address (DHCP protocol).
- ARP: Assigns the user’s defined IP address (ARP protocol).
3.12.2 IP Address
These values set the INIT IP address. The IP address is represented by a decimal notation where the
decimal values are divided by points in four fields. Each field ranges between 0 and 255. Use the
Scroll function key to increase the values in one field and the Enter function key to move to the
next field. The default value is 127.000.000.000.
3.12.3 Subnet Mask
These values set the INIT net mask address. This number is represented by a decimal notation
where the decimal values are divided by points in four fields. Each field ranges between 0 and 255.
Use the Scroll function key to increase the values in one field and the Enter function key to move
to the next field. The default value is 255.255.254.000.
3.12.4 Gateway Address
These values set the ID default gateway number. This number is represented by a decimal notation
where the decimal values are divided by points in four fields. Each field ranges between 0 and 255.
Use the Scroll function key to increase the values in one field and the Enter function key to move
to the next field.
3.12.5 Host Name
The host is identified by a name. This function allows to create the name of the host using a 14character string. Use the Scroll function key to increase the values in one field and the Enter
function key to move to the next field.
3.12.6 Workgroup Name
The workgroup is identified by a name. This function allows to create the name of the workgroup
using a 14-character string. Use the Scroll function key to increase the values in one field and the
Enter function key to move to the next field.
3.12.7 Enabling SMTP
- DISABLE*: disables the SMTP (Simple Mail Transfer Protocol) service, that is disables the
reception/transfer/error service of the e-mail.
- ENABLE: enables the SMTP (Simple Mail Transfer Protocol) service, that is enables the
reception/transfer/error service of the e-mail.
68
Compuprint 6314/6414 - User Manual
3.12.8 Mail Server Address
This item is displayed only if the ENABLING SMTP function is selected in ENABLED mode.
These values set the mail server address. This number is represented by a decimal notation where
the decimal values are divided by points in four fields. Each field ranges between 0 and 255. Use
the Scroll function key to increase the values in one field and the Enter function key to move to the
next field.
3.12.9 Email Notification Address
This item is displayed only if the ENABLING SMTP function is selected in ENABLED mode.
This function allows to write the e-mail address where you can notify the failures. Use the Scroll
function key to increase the values in one field and the Enter function key to move to the next field.
3.12.10 Email Printer Address
This item is displayed only if the ENABLING SMTP function is selected in ENABLED mode.
This function identifies the address of the sender’s e-mail using a string of characters. Use the
Scroll function key to increase the values in one field and the Enter function key to move to the
next field.
3.12.11 Contact
The Contact is identified by a name. This function allows to create the name of the printer user;
using a 14-character string. Use the Scroll function key to increase the values in one field and the
Enter function key to move to the next field.
3.12.12 Location
The Location is identified by a name. This function allows to create the name of the Location were
there is installed the printer; using a 14-character string. Use the Scroll function key to increase the
values in one field and the Enter function key to move to the next field.
69
Compuprint 6314/6414 - User Manual
4 TROUBLESHOOTING
Problem
Possible causes
Solution
Blank labels are printed.
The commands were not properly
received.
Normal paper is being used instead
of thermal paper.
Check the configuration of the
printer.
Check that the paper being used is
thermal paper: the heat generated
by friction is enough to leave a
sign on the label. If it is not
thermal paper, replace it.
Select the thermal transfer print
mode and install the ribbon
according to the instructions in
section 2.2.4 page 24.
Bring the printer On Line by using
the special function key and restart
the printing job.
Replace the cable with another
suitable one.
Set the communication parameters
that are compatible with those of
the computer.
Change the current emulation.
You are trying to print on normal
paper in direct thermal mode
without the ribbon.
Nothing is printed and the paper The printer is Off Line.
does not move.
The serial, parallel or USB cable is
defective.
The communication parameters are
not compatible with those of the
computer.
The label is in the wrong position. The wrong emulation is being
used.
A horizontal or vertical offsets
with CDL emulation has been set.
A label is occasionally skipped.
The paper sensor is not correctly
calibrated.
It is not possible to calibrate the The paper sensor is obstructed.
sensor and/or the printer continues
indicating blocked paper.
The ribbon sticks to the bottom of The temperature of the print head
the print head.
is too high.
Check and possibly correct the
horizontal and vertical offsets.
Calibrate the sensor as explained
on page.32
Carefully eliminate any label
fragments that might have stick to
the paper sensor.
Reduce the temperature of the
print head using the Printhead Heat
Selection in the Printer Settings
Menu or with the commands
provided by each emulation
language; in this latter case, please
refer to the respective section of
programming manual.
A paper out message is shown on The paper is not passing through See section 2.2 on page 18, where
the display even though there the paper sensor.
the operations required for
actually is paper in the machine.
inserting the paper correctly are
described.
70
Compuprint 6314/6414 - User Manual
Problem
Possible causes
A ribbon out message is shown on The ribbon wrapped on the spindle
the display even though the ribbon (1) of Fig. 10 (page 19) is not
is loaded in the printer.
secured to the cardboard core, so
the spindle spins freely.
The cardboard core of the new
ribbon is not securely fixed to the
spindle (2) in Fig. 10 (page 19).
The paper gets stuck.
The paper in not properly loaded.
Print quality is poor.
The paper has not been properly
loaded.
There are wrinkles in the ribbon,
which affect print quality.
The printer does not power up.
The power cable has not been
properly connected.
Solution
Follow the procedure described in
section 2.2.4 on page 24 exactly;
making sure that the previously
printed ribbon is securely wound
on the cardboard core so that it can
actually be pulled when the spindle
moves. If there is free play
between the spindle and the core,
the tabs mounted for this specific
purpose can be adjusted. They
contain two screws; by loosening
these, their position can be
changed according to the actual
diameter of the core.
Follow the procedures described in
section 2.2.4 on page 24 exactly.
More specially, the spindle on
which the roll of ribbon is mounted
must actually be pulled when the
ribbon moves. If there is free play
between the spindle and the core,
the tabs mounted for this specific
purpose can be adjusted. They
contain two screws; by loosening
these, their position can be
changed according to the actual
diameter of the core.
Open the cover of the printer and
load the paper while carefully
following the instructions in
section 2.2 on page 18.
Open the cover of the printer and
load the paper while carefully
following the instructions in
section 2.2 on page 18.
Open the cover of the printer and
load the ribbon while carefully
following the instructions in
section 2.2.4 on page 24.
Repeat the power cable connection
procedure.
The messages on the display are The wrong language has been Choose a correct language in
the Configuration Menu.
in
an
incomprehensible selected.
language.
Table 5 – Troubleshooting
If the problem persists, contact your reseller and/or CPG INTERNATIONAL technical assistance.
71
Compuprint 6314/6414 - User Manual
5 PRINTER SPECIFICATIONS
TECHNICAL SPECIFICATIONS
Printing type
Direct thermal / Thermal transfer
Resolution
203 dpi or 300 dpi
Maximum printing speed
10 ips at 203 dpi
8 ips at 300 dpi
Flash memory
2 MB
Ram memory
8 MB or 16 MB
Data Flash
2 Mb
Maximum printing width
104 mm.
Maximum printing length w/standard memory
584 mm. at 203 dpi - 254 mm. at 300 dpi
Maximum printing length w/16MB exp. memory 2514 mm. at 203 dpi or at 300 dpi
Minimum size of dot
0.125 mm. (8 dot/mm.) or 0.0833 (11.8
dot/mm.)
Label back-up
Yes
Table 6 – Technical specifications
Length
Width
Height
Weight (net of packaging)
Noise level
PHYSICAL SPECIFICATIONS
360 mm.
270 mm.
270 mm.
11 Kg
< 70 db (A)
Table 7 – Physical specifications
PHYSICAL OPERATING LIMITS
Operating temperature
From +4ºC to +40ºC (39ºF to 104ºF)
Storage temperature
From +0ºC to +49ºC (32ºF to 120ºF)
Relative humidity
operating
20% - 85% non-condensing
Storage
5% - 85% non-condensing
Electromagnetic radiation
3 Volt/m.
Table 8 – Physical operating limits
Power source
Typical power output
Stand-by power consumption
ELECTRICAL SPECIFICATIONS
100-240 VAC RMS (50 – 60 Hz)
100 W
< 10 W
Table 9 – Electrical specifications
72
Compuprint 6314/6414 - User Manual
INTERFACES
Standard
Optional
Parallel
Serial RS232 (9 pin plug DB connector)
USB
Ethernet 1/100 Base T
Table 10 – Interfaces
EMULATIONS
Standard
CZL (Zebra)
CDL (Datamax)
CPL
Table 11 – Emulations
LABEL SPECIFICATIONS
Diameter of roll
Width
Height of gap/black tick
Size of hole
Maximum thickness
Internal label rewinder capacity
Recommended materials for labels
Sizes
38,1 mm. (1,5 inch) or 76,2 mm. (3 inch)
Max. 118 mm.
Min. 1,27 mm.
Min. 1,27 mm. – Max. 25,4 mm.
0,127 mm.
Max. Diameter:
81 mm. (3.2 inch) (Half Rewinder)
Thermal transfer:
− Premium Coated Paper, permanent acrylic
adhesive
− Premium Coated Paper, removable adhesive
− 7,0 mil coated paper tag-stock
− 4,0 mil white polyolefin, permanent acrylic
adhesive
− Smudge-proof white polyolefin, permanent acrylic
adhesive
− 8,5 mil smudge-proof poly tag-stock
− 2,0 mil polyster label-stock, white, bright and
matte chrome
− Direct thermal
− Ecomomy direct thermal paper, permanent acrylic
adhesive
− Premium direct thermal paper, permanent acrylic
adhesive
− IR scannable direct thermal paper, permanent
acrylic adhesive
− 7 mil direct thermal paper tag-stock
− 3,3 mil direct thermal film, permanent acrylic
adhesive
Roll or continuous form (with or without slots), labels,
cards, transparents
Table 12 – Label specifications
73
Compuprint 6314/6414 - User Manual
RIBBON SPECIFICATIONS
Length
Width
Ribbon types
450 meters
Max. 118 mm.
Wide Spectrum Wax Ribbon
Wax Resin Blend Ribbon
Specialty Resin Ribbon
Harsh Environment Resin Ribbon
Table 13 – Ribbon specifications
GRAPHIC CHARACTERISTICS
Bar codes
Fonts
Graphics
Codabar, Code 39, Code 93, Code 128A, Code 128B,
Code 128C, EAN-8, EAN-13, FIM, German
Interleaved 2 of 5, Interleaved 2 of 5, Logmars, MSI,
PDF-417, Postbar, Postnet, Royal Mail, Telepen,
UCC/EAN Code 128, UPC-A, UPC-E, UPC-EO,
UPC-E1, UPS 11, UPS Maxicode, Datamatrix.
CP 437 (USA/Western Europe), CP 850
(Multilingual), CP 851 (Greek), CP 852 (Eastern
Europe), CP 853 (Turkish), CP 855 (Russian), CP 858
(Euro PC Multilingual), CP 860 (Portugal), CP 863
(France/Canada), CP 864 (Arabic), CP 864E (Arabic),
CP 865 (Denmark/Norway), CP 866 Cyrillic, CP 867
(Turkish 2), Mazowia (Polish), Turkish, Greek,
Kamenicky, CWI, Roman 8, IN2, ISO 8859-1
(USA/Western Europe), ISO 8859-2 (Eastern Europe),
ISO 8859-3 (Southern Europe), ISO 8859-4 (Northern
Europe), ISO 8859-5 (Cyrillic), ISO 8859-6 (Cyrillic),
ISO 8859-7 (Greek), ISO 8859-8 (Hebrew), ISO
8859-9 (Western Europe 2), ISO 8859-15 (Western
Europe), Windows: 1250, 1251, 1252, 1253, 1254,
1255, 1256, 1257.
Additionally scaleable & Bitmapped Font typefaces
shall be downloadable to the printer from the host.
Lines and boxes, image in PCX, TIFF and BMP
formats.
Table 14 – Graphic characteristics
OPTIONS
Automatic cutter, internal media rewinder, peel-off dispenser, LAN Ethernet interface.
Table 15 – Options
STANDARDS
UL, CSA, TUV, CE.
Table 16 – Standards
74
Compuprint 6314/6414 - User Manual
6 CONFORMITY DECLARATION
6.1 EEC Regulations
This equipment conforms to the EEC Directive 89/392 (the sound pressure, measured according to
ISO 7779, does not exceed 70 dBA), EEC 89/336 for electromagnetic compatibility and EEC 73/23
for device safety.
WARNING!
This is a Class A product. In a domestic environment this product may cause radio interference in which case the user
may be required to take adequate measures.
6.2 FCC Part 15 Class A
This equipment has been tested and found to comply with the limits for Class A digital devices
pursuant to Part 15 of the FCC Rules. These limits are designed to provide reasonable protection
against harmful interference in a residential environment. This equipment generates, uses, and can
radiate radio frequency energy, and if not installed and used in accordance with the instruction
manual, may cause harmful interference to radio communications.
Operations of this equipment in a residential area is likely to cause harmful interference in which
case the user will be required to correct the interference at his own expense.
Changes or modifications to this equipment not expressly approved by us may void the user’s
authority to operate this equipment.
The use of a non-shielded interface cable with this device is prohibited.
Interface shielded cables are necessary in order for this product to comply with the limits for a Class
A digital device, pursuant to Part 15 of the FCC Rules.
75
Compuprint 6314/6414 - User Manual
7 SERIAL PORT WIRING
RS 232 serial port pin assignment (DB9 plug)
Pin number Signal
1
DCD
2
RXD
3
TXD
4
DTR
5
GND
6
DSR
7
RTS
8
CTS
9
SRTS
Table 17 – RS232 serial port pin assignment
76
Compuprint 6314/6414 - User Manual
8 INDEX OF FIGURES
FIG. 1 – THE 6314-6414 PRINTER ....................................................................................................................................... 10
FIG. 2 – POWER INLET AND ON/OFF SWITCH .................................................................................................................... 12
FIG. 3 – PRINTER INTERFACES ........................................................................................................................................... 13
FIG. 4 – CONNECTION OF POWER CORD AND ON/OFF SWITCH .......................................................................................... 13
FIG. 5 – LIFTING THE PRINT HEAD GROUP .......................................................................................................................... 14
FIG. 6 – CONNECTING THE PRINT HEAD .............................................................................................................................. 15
FIG. 7 – GUIDE HOLE.......................................................................................................................................................... 15
FIG. 8 – FRONT GUIDE MARKERS ON THE PRINT HEAD ........................................................................................................ 16
FIG. 9 – CONTROLS AND INDICATORS ................................................................................................................................ 17
FIG. 10 – PAPER AND RIBBON HANDLING SCHEME ............................................................................................................. 19
FIG. 11 – PRELIMINARY STEPS IN LOADING LABEL ROLL .................................................................................................... 20
FIG. 12 – LABEL ROLL INSERTION AND DETAIL OF PAPER PATH/SENSOR ............................................................................ 21
FIG. 13 – CLOSING THE PRINT HEAD ASSEMBLY ................................................................................................................. 21
FIG. 14 – DETAIL OF THE PAPER GUIDE .............................................................................................................................. 22
FIG. 15 – REAR PAPER INPUT SLOT ..................................................................................................................................... 22
FIG. 16 – THE ADJUSTMENT RATCHET AT POSITION 0......................................................................................................... 23
FIG. 17 – LOADING OF RIBBON ........................................................................................................................................... 24
FIG. 18 – FRONT TEAR OFF PLATE ...................................................................................................................................... 25
FIG. 19 – REMOVING THE CUTTING BLADE ......................................................................................................................... 26
FIG. 20 – DETAIL OF THE PAPER PATH IN THE PEEL-OFF SYSTEM ........................................................................................ 27
FIG. 21 – INSTALLED PEEL-OFF SYSTEM ............................................................................................................................. 28
FIG. 22 – DETAIL OF THE PAPER PATH IN THE REWINDER GUIDE ........................................................................................ 29
FIG. 23 – THE AUTOMATIC CUTTER .................................................................................................................................... 29
FIG. 24 -- INSTALLING NIC BOARD .................................................................................................................................... 30
FIG. 25 – PAPER SENSOR ADJUSTMENT KNOB ..................................................................................................................... 32
FIG. 26 – FRONT OF THE PRINTER WITH RIBBON PUSHED TO THE SIDE ................................................................................ 35
FIG. 27 – FRONT OF THE PRINTER WITH THE PRINT HEAD BEING CLEANED ......................................................................... 35
FIG. 28 – CONTROL PANEL ................................................................................................................................................. 36
FIG. 29 – MENU MAP ......................................................................................................................................................... 39
FIG. 30 – STRUCTURE OF CONFIGURATION MENU ............................................................................................................. 42
FIG. 31 – STRUCTURE OF FILE MENU ................................................................................................................................. 43
FIG. 32 – STRUCTURE OF ENABLING AND MODES MENU .................................................................................................. 46
FIG. 33 – STRUCTURE OF PRINTER SETTINGS MENU .......................................................................................................... 49
FIG. 34 – STRUCTURE OF EMULATION PARAMETERS CDL MENU...................................................................................... 54
FIG. 35 – STRUCTURE OF EMULATION PARAMETERS CZL MENU ...................................................................................... 57
FIG. 36 – STRUCTURE OF EMULATION PARAMETERS CPL MENU ...................................................................................... 59
FIG. 37 – STRUCTURE OF DIAGNOSTIC MENU .................................................................................................................... 61
FIG. 38 – STRUCTURE OF COMMUNICATION PARAMETERS MENU ..................................................................................... 64
FIG. 39 – STRUCTURE OF SERIAL INTERFACE MENU .......................................................................................................... 65
FIG. 40 – STRUCTURE OF NIC INTERFACE MENU............................................................................................................... 67
77
Compuprint 6314/6414 - User Manual
9 INDEX OF TABLES
TABLE 1 – FUNCTION KEY FUNCTIONS .............................................................................................................................. 37
TABLE 2 – LED FUNCTIONS .............................................................................................................................................. 37
TABLE 3 – HOW TO CONFIGURE THE PRINTER TO DIRECT THERMAL OPERATION .............................................................. 41
TABLE 4 – PARAMETERS INFLUENCED BY FACTORY RESET FUNCTION .............................................................................. 44
TABLE 5 – TROUBLESHOOTING ......................................................................................................................................... 71
TABLE 6 – TECHNICAL SPECIFICATIONS ............................................................................................................................ 72
TABLE 7 – PHYSICAL SPECIFICATIONS ............................................................................................................................... 72
TABLE 8 – PHYSICAL OPERATING LIMITS ........................................................................................................................... 72
TABLE 9 – ELECTRICAL SPECIFICATIONS ........................................................................................................................... 72
TABLE 10 – INTERFACES ................................................................................................................................................... 73
TABLE 11 – EMULATIONS .................................................................................................................................................. 73
TABLE 12 – LABEL SPECIFICATIONS .................................................................................................................................. 73
TABLE 13 – RIBBON SPECIFICATIONS ................................................................................................................................ 74
TABLE 14 – GRAPHIC CHARACTERISTICS........................................................................................................................... 74
TABLE 15 – OPTIONS ......................................................................................................................................................... 74
TABLE 16 – STANDARDS ................................................................................................................................................... 74
TABLE 17 – RS232 SERIAL PORT PIN ASSIGNMENT ............................................................................................................ 76
78