1
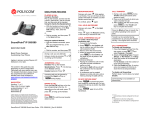
Evolved Handset Quick Reference - User
Evolve IP Handset Key:
1) Corp Directory
2) Call Log
3) Call Forwarding
4) More
5) Menu
6) Voicemail
7) DND
8) Mute
9) Headset
10) Speaker
11) Volume
12) Hold
13) Redial
14) Call Transfer
15) Conference
Evolve IP Handset –Polycom 650
2
1
3
4
5
15
6
14
7
8
9
13
1) Corporate Directory
(a) Press the “Corp Directory” button.
(b) Use the up and down arrow to select to search by last
or first name and hit the check icon.
(c) Using the dial key pad, enter the first few letters of the
name you wish to search.
(d) When finished push the down arrow to select “Search
Directory”.
(e) If a match is found, it will return a list of names with
the letters that you entered.
(f) Once person is selected, press the “Dial” icon button
on your screen to make the call.
(g) If you want to see all of the caller’s phone numbers
select the “Details” button.
2) Call Log
(a) Place the “Call Log” button to view all of your Missed,
Received or Placed Calls.
(b) When you have selected the call log you wish to view,
the call information of each call will be displayed.
(c) From this screen, select:
-Edit to amend the contact number before dialing.
-Dial to place the call.
-More and select Info, Save, or Clear.
3) Call Forwarding
(a) Press the “Forward” button or press “Menu” and
select Features>Forward from the Menu button.
(b) Select a Forwarding Type: Forward, No Answer or
Busy.
(c) For all types, enter a number to forward all future calls
to. For No Answer, enter the number of rings before
forwarding.
(d) Press the Enable soft key to confirm Call Forwarding. A
moving arrow icon will appear for that line.
(e) To disable call forwarding: Perform steps A and B, but
select Disable.
12
11
10
4) More (Call Park and Retrieve)
5) Menu
Call Park and Retrieve
The Menu button allows you to select several
options. Some of the options include but are
not limited to;
Parking A Call
(a) When on a call, press the “More”
button and select the “Call Park”
button.
(b) You will see a display that will ask you
what extension you would like to park
the call on.
(c) Enter either your extension or the coworker the call is for extension and
press the “Enter” button.
(d) You will hear a recoding that says
your call has been parked.
*After 60 seconds if the call is not
retrieved, the call will ring the original
phone and open up a line to answer.
Retrieving A Call
(e) To retrieve a call, press the
“Park/Retrieve” button.
(f) You will see a display on your screen
that will ask you what extension the
call was parked on.
(g) Enter the extension the call was
parked on and press the “Enter”
button.
(h) You will immediately be connected
with the call.
More (Intercom)
This feature will be included with all
Executive Assistant Packages only.
Press the “ICOM” button and add the
extension. Hit “Enter”.
(a) Distinctive Ringing/Call TreatmentYou can set distinctive incoming ringing
tones for different contacts in your local
directory: Press the Menu button and then
select Features>Contact Directory. Search
for the Contact Directory. Press the Edit soft
key and scroll down to Ring Type. Using the
left and right arrows, select the desired ring
tone. Press the Save soft key to accept the
change, and then press Menu to return to
idle screen.
(b) Ring Type – You can select different rings to
match your preferences and distinguish
between calls on lines. To change the
incoming ring, Press Menu and then select
Settings>Basic>Ring Type. Scroll to highlight
the desired ring type. Press the Play soft key
to hear it. Press the Select soft key to accept
the highlighted ring type, and then press
Menu to return the idle screen.
6) Messages (Voicemail)
(a) Press the “Messages” button.
(b) You will first be asked to enter in your 6 digit
pass code provided by your group administrator.
(c) Once default pass code is entered you will be
asked to enter in a new 6 digit pass code. This
will be your permanent pass code when
checking your voicemail.
(d) Follow the prompt to set up your greetings.
*Please consult the Voicemail Quick Reference
guide for further assistance.
eDot | 3075 Tollview Drive | Rolling Meadows, IL | 847.847.4500 | www.edotsolutions.com
Evolved Handset Quick Reference - User
7) Do Not Disturb
14) Call Transfer
Do Not Disturb prevents your phone from
ringing when a call comes in.
To initiate a transfer:
To activate DND- Press the “Do Not Disturb”
button. An icon appears for all lines to confirm
that DND is enabled.
To deactivate DND – Press the “Do Not
Disturb” button again.
8) Mute
(a) Press the “Mute” button to mute your
phone.
(b) Press the button again to take your phone
off mute.
9) Headset Setting
For frequent of full-time headset users, there
is an option to default all calls to the headset.
To enable Headset Memory Mode:
(a)Press the “Menu” button and select
Settings followed by Basic, Preferences,
Headset, and Headset Memory.
(b) Scroll down to Enable and press the
“Select” “ soft key.
To activate Headset Memory Mode (if
enabled) Press the “Headset” button twice.
10) Speaker
(a) To activate the speaker button, press the
“Speaker” button.
(b) To end speaker, press the “Speaker”
button again.
When on an active call, press the “Transfer” button.
This will automatically put the calling party on hold
and open an additional line to place a call.
There are 3 types of transfer: Consulted, Blind
and Voicemail.
(a) Consulted Transfer: Allows users to consult with
the third party before completing the transfer. To
perform a consulted transfer, press the “Transfer”
key on the handset display.
Dial the extension or 10 digit number of the party to
whom you want to transfer the call. When the last
digit of the phone number is dialed the phone will
automatically dial the second caller or press “Send”
to call the second party. Once caller is announced hit
the “Transfer” key again and the transfer is
completed. To pull call back, hit the “Cancel” button
and you will immediately be connected to the
original caller.
(b)Blind Transfer: Transfers a call without
consultation. To complete the transfer without
consultation, press the “Transfer” key on handset
display and then the “Blind” key. Dial the extension
or 10 digit number to whom you want to transfer the
call to. When the last digit of the phone number is
dialed, the phone will automatically dial the second
caller or press “Send” and the call has been
transferred.
(c) Voicemail Transfer: Transfers a call straight into
voicemail.
When on a call press the “Transfer” button. Dial *55
and the extension of the party’s voicemail the caller
would like to go to followed by “#”.
This will automatically send the caller into
voicemail.
11) Volume
(a) Press the left volume button on the phone
to decrease the volume; press the right
volume button to increase the volume.
(b) This will adjust your ringer, handset, or
speaker volume depending on which state you
are in.
12) Hold
(a) When on a call, put the caller on hold by
pressing the “Hold” button.
(b) By default, music will be played for the
caller when you press the hold button.
(c) To take a caller off of hold, press the line
that the caller is on or the “Resume” button.
13) Redial
(a) The “Redial” button will call the most
recently dialed number.
15) Conferencing (Three Way Calling)
To create a three-way conference call:
(a)Connect to the first party.
(b) Press the “Confrnc” soft key to create a new call
(the active call is placed on hold).
(c) Place a call to the second party.
(d)When the second party answers, press the
“Confrnc” soft key again to join all parties in the
conference.
To establish a conference with 2 existing calls:
(a) Placing the conference call on hold will place the
other conference parties on hold.
(b)Pressing the “Split” soft key will split the
conference into two separate calls on hold.
(c) A conference may be created between an active
call and a call on hold by pressing the “Join” soft key.
ADDITIONAL INFORMATION
A) Speed Dials
Setting up speed dials using the Contact
Directory:
(a)Press the Menu key, and then select
Features>Contact Directory.
(b)Press the “More” soft key, and then the “Add”
soft Key.
(c)Enter the first and/or last name from the dial
pad.
(d) Enter the extension or 10 digit number of the
contact.
(e)Press the “Save” soft key to confirm the
changes, then press “Menu” twice to return to
the idle screen.
To Edit:
(a)Pres the “Edit” soft key and make the
necessary changes.
(b)Press the “Save” soft key to confirm changes.
Contacts can be easily added from the Call Log by
selecting the contact and hitting the “Save” soft
key.
Setting up speed dials using star codes:
*For single digit speed dialing (8 or less speed
dials).
(a) Press *74
(b) Select a number between 2 and 9 to configure
as a speed dial key.
(c) Enter the extension or 10-digits you want as
the speed dial and then press the pound key “#”.
(d) To dial, press the configured speed dial digit
and then press “Dial”
*For two digit speed dialing (more than 8 speed
dials).
(a) Press *75
(b) Select a number between 00 and 99 to
configure as a speed dial key.
(c) Enter the extension or 10-digits you want as
the speed dial and then press the pound key “#”.
(d) To dial, press # and then the configured two
digit speed dial digits and then press “Dial”.
B) Phone Lines
Each user receives 6 phone lines: By default each
line can take up to 2 calls.
Answering a call; Pick up the handset. Press the
Speakerphone button or Headset (optional) icon.
Incoming calls may be ignored by pressing the
Reject soft key during ringing.
eDot | 3075 Tollview Drive | Rolling Meadows, IL | 847.847.4500 | www.edotsolutions.com