1
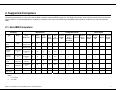
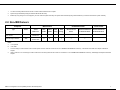
Remote Deployment Manager 3.2
Compatibility and Configuration Guide
for Non-IBM Systems
Updated January 28, 2003
Note: Before using this information and the product it supports, be sure to read the notes and trademark information in the Appendix.
Table of Contents
1. About the Guide
1.1. RDM Licensing
1.2. How to Find Your Way Around
1.3. Further Reference
2. Supported Computers
2.1. Non-IBM Computers
2.2. Non-IBM Servers
1
1
1
2
3
3
4
3. Network Adapters
5
4. Using RDM to Deploy Non-IBM Systems
6
4.1. Compaq Systems
4.2. Dell Systems
4.3. Gateway Systems
4.4. Hewlett Packard Systems
Appendix. Notices and Trademarks
RDM 3.2 Compatibility and Configuration Guide for Non-IBM Systems
6
7
8
9
12
i
1. About the Guide
This document includes information about the non-IBM hardware and software that IBM® Remote Deployment Manager (RDM) supports. You will find tables that
detail which non-IBM systems are supported as RDM systems. Supported network interface cards (NICs) are listed here as well. RDM requires certain levels of
firmware for both system hardware and network adapter to function properly. Please check the tables for proper BIOS levels.
Although one of the features of RDM is to distribute software to systems across a LAN, the terms and conditions of the IBM International Program License
Agreement for RDM do not grant any license to install, copy, or use any application software or operating system software not provided with RDM. This includes,
but is not limited to, Microsoft® Windows® 3.1, Windows 95, Windows 95 OSR2, Windows 98, Windows NT® 4.0, Windows 2000 Professional, Windows 2000
Server and Advanced Server, Windows XP Professional, and DOS. Always ensure that you have obtained suitable licenses for any software you intend to use with
RDM.
1.1. RDM Licensing
IBM Remote Deployment Manager is a part of the IBM System Installation Tool Kit, which is released as an Option By IBM. You must have a valid Proof of
Entitlement (POE) licenses to use RDM on non-IBM systems. POE licenses for non-IBM systems are available for a fee from IBM Business Partners or directly
from IBM. You must have a valid POE license for each non-IBM system that utilizes RDM. To order additional IBM System Installation Tool Kit POE licenses, use
the following part numbers:
Part Number
Description
19K0985
Basic License CD, includes 20 System POE (including a CD with deployment tools)
19K0986
Additional License 20 System POE Certificate
19K0987
Additional License 100 System POE Certificate
19K0988
Additional License 1,000 System POE Certificate
1.2. How to Find Your Way Around
This guide is organized in numbered chapters and sections. The Table of Contents above lists the different sections and corresponding page numbers. If you are
viewing the guide on-line with Acrobat Reader, you can easily navigate the document by clicking the hyperlinked text in the Table of Contents as well as the
references to the World Wide Web. You will notice that the cursor changes when you move it above hyperlinked text.
RDM 3.2 Configuration and Compatibility Guide for Non-IBM Systems
1
1.3. Further Reference
In addition to this guide, there are various other sources that you can consult on RDM:
Context-sensitive help provided with RDM. From the main window, select the Help menu and click the Help Index.
The User’s Guide, downloadable from the RDM home page at http://www.ibm.com/servers/eserver/xseries/systems_management/sys_migration/rdm.html.
The compatibility and configuration guide for IBM systems. Please visit the RDM home page.
Last minute updates and changes are given in ReadMe files. Please visit the RDM home page.
Subscribe to the RDM Users Forum to discuss problems and solutions with fellow users. Please see http://www7.pc.ibm.com/~UMS/.
Get technical support. Support is available for supported systems (IBM and non-IBM) through e-mail or fee-based telephone support. Telephone support is
not available in all countries. For more information about the fee-based telephone support, see http://www.ibm.com/support or
http://service.software.ibm.com/supportline.html. For more information about e-mail support, please visit the RDM home page.
To purchase the System Installation Tool Kit to use RDM on non-IBM systems, please visit http://www.pc.ibm.com/ww/solutions/lcc/sit.html.
RDM 3.2 Configuration and Compatibility Guide for Non-IBM Systems
2
2. Supported Computers
The following information is a list of all of the non-IBM computers tested with RDM version 3.2. The BIOS levels shown in the matrices indicate the levels that were
used in testing. It is recommended that you update your systems to the most recent BIOS level using RDM. Other systems, not listed here, may also work with
RDM.
2.1. Non-IBM Computers
Computer
Type
Model
Maintenance
Tested
WOL
BIOS Level
Unattended Install
Clone Install
BIOS
CMOS
Pass-
Asset
Windows
Windows
Windows
Windows
Windows
Windows
Windows
Windows
Update
Update
word
ID
98 & 98
NT 4.0
2000 Pro
XP Pro
95 & 95
98 &98
2000 Pro
XP Pro
Update
Support
SE
Workstation
32-bit
OSR2
SE
32-bit
(SP4-SP6A)
Dell OptiPlex
GX110
DCM
PhoenixBIOS
Revision A02
N
N
N
N
N/A
Y
1,2
Y
Y
Y
Y
Dell OptiPlex
GX300
MMP
PhoenixBIOS
Revision A03
N
N
N
N
N/A
Y
1,2
Y
Y
Y
Y
HP Vectra
VLI8 DT
Vectra VLI8
DT
PhoenixBIOS
4.0 Release
6.0
N
N
N
N
N/A
Y
1
Y
Y
Y
Y
HP Vectra
VL600 DT
Vectra VL600
DT
PhoenixBIOS
4.0 Release
6.0
N
N
N
N
N/A
Y
1
Y
Y
Y
Y
Gateway
E-4400
VHA
E-4400-733
FB82010A.15A
.006.P04
N
N
N
N
N/A
Y
1
Y
Y
Y
Y
Gateway
3
E-3200
MAV
E-3200-550
PhoenixBIOS
4.0 Release
6.0
N
N
N
N
N/A
Y
1
Y
Y
Y
Y
Compaq iPAQ
C500/810e
686J5 v1.09
Y
N
N
N
N/A
N/A
Y
Y
N/A
N/A
Compaq iPAQ
Legacy-Free
C500/810e
686J5 v1.09
Y
N
N
N
N/A
N/A
Y
Y
N/A
N/A
Notes:
Y
= Yes, passed
N
= No, failed
RDM 3.2 Configuration and Compatibility Guide for Non-IBM Systems
3
1.
You must manually install the drivers for the on board network interface card or chipset.
2.
System hangs intermittently during the Windows 98 /98 SE GUI setup.
3.
E3200 may hang during scan. If this happens you must create the system manually. This system also intermittently hangs after FDISK and you will have to reboot the system manually.
2.2. Non-IBM Servers
Computer
Type
Maintenance
Model
Servers Based on L440 GX
Server boards
Dell Power Edge 2450/600
SMP
Unattended Install
Clone Install
Tested
BIOS
CMOS
ASM
RAID
Windows NT 4.0
Windows 2000 Server
Windows 2000 Server
BIOS Level
Update
Update
Config.
Config.
Server
& Advanced Server
& Advanced Server
PhoenixBIOS 4.0
Release 6.0
N
N
Y
Y
Y
PhoenixBIOS
Revision A03
N
N
Y
Y
Y
1
2
Y
Notes:
Y
= Yes, passed
N
= No, failed
1.
You must assign a model number to the scanned system and then create an LCA file for it in the C:\RDM\CLNTFILE\DEFAULT directory. L440 GX server boards have Adaptec 7896 SCSI
Chipset.
2.
Video is unknown. You must assign a model number to the scanned system and then create an LCA file for it in the C:\RDM\CLNTFILE\DEFAULT directory. PowerEdge has Adaptec 7899 SCSI
Chipset.
RDM 3.2 Configuration and Compatibility Guide for Non-IBM Systems
4
3. Network Adapters
RDM will automatically scan, configure, and recognize supported network cards. These network cards are listed in the Compatibility and Configuration Guide for
IBM Systems, available at http://www.ibm.com/servers/eserver/xseries/systems_management/sys_migration/rdm.html.
It is possible that RDM will work with an unsupported network adapter. These should adhere to the Wired for Management (WfM) baseline Version 2.0
specifications, and should support Preboot eXecute Environment (PXE) 1.0 specified in the NetPC Hardware Design Guidelines Version 1.0b or PXE 2.0, or later,
specified by Intel Corporation (12/98).
For RDM to recognize an adapter that is not included on the list, you need to edit the file called NETWORK.LST. Unless you do this, RDM won’t be able to identify
your adapter during the scan process. Modify NETWORK.LST with the update below for the non-IBM systems listed in the following pages. For more information
about NETWORK.LST, please see the User’s Guide:
3COM 3C905B based Adapter(Dell);44;44;LC3COM;OS2;BBLOCK\NDIS\EL90X.dos;10280092;00B0D02=1;XN2S;
3COM 3C905B based Adapter or NLX Riser (Gateway);45;45;LC3COM;OS2;BBLOCK\NDIS\EL90X.dos;107B7056;00E0B8=1;XN2S;
3COM 3C905B Fast EtherLink XL or NLX Riser (Gateway);46;46;LC3COM;OS2;BBLOCK\NDIS\EL90X.dos;107B4400;0050DA5=1;XN2S;
3COM 3C905B based Adapter(Dell);47;47;LC3COM;OS2;BBLOCK\NDIS\EL90X.dos;102800B4;00B0D04=1;XN2S;
3COM 3C905B based Adapter or NLX Riser (HP);48;48;LC3COM;OS2;BBLOCK\NDIS\EL90X.dos;10B79055;00504D=1;XN2S;
3COM Etherlink 10/100 PCI Adapter;57;57;LC3COM;OS2;BBLOCK\NDIS\EL90X.dos;10B79200;000103=1;XN2S;
Note: Each of the above lines should be entered without a hard-return midway in the text.
RDM 3.2 Configuration and Compatibility Guide for Non-IBM Systems
5
4. Using RDM to Deploy Non-IBM Systems
This section describes the procedure for setting up the non-IBM systems for RDM use and to make the systems known to the RDM server.
4.1. Compaq Systems
Models iPAQ (with legacy ports) C500/810e and iPAQ (Legacy-Free) C500/810e
1. Modify NETWORK.LST as described on page 5.
2. Close and reopen RDM server to enable the new NETWORK.LST.
3. Change the system’s BIOS settings to boot to the network in order to scan the system into RDM:
a)
To access the system’s set-up interface, boot the system and press F10. Select the Storage tab. In the Options menu select Boot Order. The two
default options are displayed:
Default Boot Sequence:
Hard Drive (1)
Intel Ethernet controller (2)
b)
Set the boot sequence to the following. Select the Æ, to make the change:
Boot Sequence:
Hard Drive (2)
Intel Ethernet controller (1)
c)
Select the Security tab and choose the Network Service Boot option. Make sure this option is set to Enable, which is the default setting.
d)
Select the Advanced tab and choose the Power-on option. Scroll down to Remote Wakeup Boot Source and change the default setting option from
Local Hard Drive to Remote Server - use the Æ to make the change. There is an arrow in front of First. The right arrow key toggles the sequence.
e)
Press F10 to save the settings.
4. Click the Scan button on the RDM server.
5. Power on the system to scan it. The system should appear in the Unassigned Systems panel of the Installation/Maintenance window on the RDM server.
RDM 3.2 Configuration and Compatibility Guide for Non-IBM Systems
6
4.2. Dell Systems
Models Dell OptiPlex GX110 and Dell OptiPlex GX300
1. Modify NETWORK.LST as described on page 5.
2. Close and reopen RDM server to enable the new NETWORK.LST.
3. Change the system BIOS settings to boot to the network in order to scan the system into RDM:
a)
To access the system’s set-up interface, boot the system and press F2. At the main menu, select the Boot Sequence option and press Enter. The
default boot-up selections are displayed as follows:
1. Disk Drive
2. Hard Drive C:
3. IDE CD-ROM device
4. MBA UNDI
b)
Change the default boot sequence to the following (select the -, or + to make the changes):
1. Disk Drive
2. MBA UNDI
3. Hard Disk C:
4. IDE CD-ROM Device
c)
Scroll down the main menu, select the option Integrated Devices - press Enter. The Network Interface controller should be set to ON w/ MBA instead of
ON.
4. Click the Scan button on the RDM server.
5. Power on the system to scan it. The system should appear in the Unassigned Systems panel of the Installation/Maintenance window on the RDM server.
This system does not support Wake on LAN®.
RDM 3.2 Configuration and Compatibility Guide for Non-IBM Systems
7
4.3. Gateway Systems
Model Gateway E4400
1. Modify NETWORK.LST as described on page 5.
2. Close and reopen RDM server to enable the new NETWORK.LST.
a)
Change the system’s BIOS settings to boot to the network in order to scan the system into RDM: To access the system’s set-up interface, boot the
systems and press F1. Select the Boot tab at the top of the main menu. (1st Boot Device – 4th Boot Device will appear near the bottom of the screen).
The default boot-up selections are displayed as follows:
1. Floppy
2. IDE-HDD
3. ATAPI CD-ROM
4. MBA UNDI
b)
Change the default boot sequence to the following (highlight the device and press Enter to make the changes):
1. Floppy
2. MBA UNDI
3. IDE-HDD
4. ATAPI CD-ROM
3. Click the Scan button on the RDM server.
4. Power on the system to scan it. The system should appear in the Unassigned Systems panel of the Installation/Maintenance window on the RDM server.
This system does not support Wake on LAN.
Model Gateway E3200
1. Modify NETWORK.LST as described on page 5.
2. Close and reopen RDM server to enable the new NETWORK.LST.
3. Change the system’s BIOS settings to boot to the network in order to scan the system into RDM:
a)
To access the system’s set-up interface, boot the system and press F1. Select the Boot tab at the top of the main menu. (1st Boot Device – 5th Boot
Device will appear near the bottom of the screen). The default boot-up selections are displayed as follows:
RDM 3.2 Configuration and Compatibility Guide for Non-IBM Systems
8
1. Removable Devices
2. Hard Drive
3. ATAPI CD-ROM
4. Network Boot
5. MBA
b)
Change the default boot sequence to the following (highlight the device and press Enter to make the changes):
1. Removable Devices
2. Network Boot
3. MBA
4. Hard Drive
5. CD-ROM
4. Click the Scan button on the RDM server.
5. Power on the system to scan it. The system should appear in the Unassigned Systems panel of the Installation/Maintenance window on the RDM server.
This system does not support Wake on LAN.
4.4. Hewlett Packard Systems
Model s Vectra Li8 DT D9771T #ABA and Vectra VL 600 DT D9469T #ABA
1. Modify NETWORK.LST as described on page 5.
2. Close and reopen RDM server to enable the new NETWORK.LST.
3. Change the system’s BIOS settings to boot to the network in order to scan the system into RDM:
a)
To access the system’s set-up interface, boot the system and press F2. From the main menu select the Security tab. In the options select Boot Devices
Security. Make sure that Start from Network is enabled.
b)
Select the Boot tab. In the boot tab option menu select Boot Device Priority. The default boot-up selections are displayed as follows:
1. Removable Devices
2. Hard Drive
RDM 3.2 Configuration and Compatibility Guide for Non-IBM Systems
9
3. ATAPI CD-ROM
4. Managed PC Boot Agent [MBA]
c)
Change the default boot sequence to the following (select the -, or + to make the changes):
1. Disk Drive
2. Managed PC Boot Agent [MBA]
3. Hard Drive
4. ATAPI CD-ROM
4. Click the Scan button on the RDM server.
5. Power on the system to scan it. The system should appear in the Unassigned Systems panel of the Installation/Maintenance window on the RDM server.
This System does not support Wake on LAN.
L440 GX server boards
(Servers based on L440 GX server boards Part # VAR-101679)
1. Modify NETWORK.LST as described on page 5.
2. Close and reopen RDM server to enable the new NETWORK.LST.
3. Change the system BIOS settings to boot to the network in order to scan the system into RDM.
a)
To access the system’s set-up interface, boot the system and press F2. Select the Boot tab, scroll down and select the Boot Device Priority option and
press Enter. The default boot sequence is displayed as follows:
1. Removable Devices
2. Hard Drive
3. CD-ROM
4. LANDesk ® Service Agent II
b)
To scan into RDM, change the default boot sequence to the following (select the -, or + to make the changes):
1. Removable Devices
2. LANDesk ® Service Agent II
3. Hard Drive
RDM 3.2 Configuration and Compatibility Guide for Non-IBM Systems
10
4. CD-ROM
4. Click the Scan button on the RDM server.
5. Power on the system to scan it. The system should appear in the Unassigned Systems panel of the Installation/Maintenance window on the RDM server.
Dell Power Edge2450
1. Modify NETWORK.LST as described on page 5.
2. Close and reopen the RDM server to enable the new NETWORK.LST.
3. Change the system’s BIOS settings to boot to the network in order to scan the system into RDM:
a)
To access the system’s set-up interface, boot the system and press F2. When the main menu appears, press Alt + P - this will take you to the Boot
Device Priority selection. The default boot sequence is displayed as follows:
1. Diskette Drive A:
2. CD-ROM device
3. Hard Drive C:
b)
To scan into RDM, change the default boot sequence to the following (select the Control + Up arrow or the down arrow to make the changes):
1. Diskette Drive A:
2. MBA UNDI
3. Hard Drive C:
4. CD-ROM
4. Click the Scan button on the RDM server.
5. Power on the system to scan it. The system should appear in the Unassigned Systems panel of the Installation/Maintenance window on the RDM server.
RDM 3.2 Configuration and Compatibility Guide for Non-IBM Systems
11
Appendix. Notices and Trademarks
Notices
References in this publication to IBM products, programs or other services do not imply that IBM intends to make these available in all countries in which IBM
operates. Any reference to an IBM product, program or service is not intended to state or imply that only that IBM product, program or service may be used.
Subject to IBM’s valid intellectual property or other legally protectable rights, any functionally equivalent product, program or service may be used instead of the
IBM product, program or service. The evaluation and verification of operation in conjunction with other products, except those expressly designated by IBM, are
the responsibility of the user.
IBM may have patents or pending patent applications covering subject matter in this document. The furnishing of this document does not give you any license to
these patents. you can send license inquiries, in writing, to:
IBM Director of Licensing
IBM Corporation
500 Columbus Avenue
Thornwood, NY 10594
USA
The following paragraph does not apply to the United Kingdom or any other country where such provisions are inconsistent with local law:
INTERNATIONAL BUSINESS MACHINES CORPORATION PROVIDES THIS PUBLICATION “AS IS” WITHOUT WARRANTY OF ANY KIND, EITHER EXPRESS
OR IMPLIED, INCLUDING, BUT NOT LIMITED TO, THE IMPLIED WARRANTIES OF NON-INFRINGEMENT, MERCHANTABILITY OR FITNESS FOR A
PARTICULAR PURPOSE. Some states do not allow disclaimer of express or implied warranties in certain transactions, therefore, this statement may not apply to
you.
This information could include technical inaccuracies or typographical errors. Changes are periodically made to the information herein; these changes will be
incorporated in new editions of the publication. IBM may make improvements and/or changes in the product(s) and/or the program(s) described in this publication
at any time without notice.
Any references in this information to non-IBM Web sites are provided for convenience only and do not in any manner serve as an endorsement of those Web sites.
The materials at those Web sites are not part of the materials for this IBM product and use of those Web sites is at your own risk.
IBM may use or distribute any of the information you supply in any way it believes appropriate without incurring any obligation to you.
Licensees of this program who wish to have information about it for the purpose of enabling: (i) the exchange of information between independently created
programs and other programs (including this one) and (ii) the mutual use of the information that has been exchanged should contact:
IBM Corporation
Department 80D, P.O. Box 12195
RDM 3.2 Configuration and Compatibility Guide for Non-IBM Systems
12
3039 Cornwallis
Research Triangle Park, NC 27709
USA
Such information may be available, subject to appropriate terms and conditions, including in some cases, payment of a fee.
Any performance data contained herein was determined in a controlled environment. Therefore, the results obtained in other operating environments may vary
significantly. Some measurements may have been made on development-level systems and there is no guarantee that these measurements will be the same on
generally available systems. Furthermore, some measurement may have been estimated through extrapolation. Actual results may vary. Users of this document
should verify the applicable data for their specific environment.
Information concerning non-IBM products was obtained from the suppliers of those products, their published announcements or other publicly available sources.
IBM has not tested those products and cannot confirm the accuracy of performance, compatibility or any other claims related to non-IBM products. Questions on
the capabilities of non-IBM products should be addressed to the suppliers of those products.
All statements regarding IBM’s future direction or intent are subject to change or withdrawal without notice, and represent goals and objectives only.
Trademarks
IBM, the IBM logo, AIX, AIX/6000, Alert on LAN, Aptiva, Asset ID, AS/400, DB2, ClusterProven, HelpCenter, IntelliStation, LANClient Control Manager, MQSeries,
Netfinity, Netfinity Director, Netfinity Manager, OS/2, OS/390, OS/400, PC 300, PowerPC, Remote Deployment Manager, RS/6000, S/390, ScrollPoint,
ServeRAID, System Migration Assistant, ThinkPad, Tivoli, TrackPoint, UltraBay, Ultrastar, UM Services, ViaVoice, Wake on LAN, and WorkPad are trademarks or
registered trademarks of International Business Machines Corporation in the United States and/or other countries.
The following terms are trademarks of other companies:
ActionMedia, Intel, Celeron, LANDesk, MMX, Pentium, and Pentium II Xeon, Pentium III Xeon, and ProShare are trademarks of Intel Corporation in the United
States, other countries, or both.
C-bus is a trademark of Corollary, Inc. in the United States, other countries, or both.
Ghost is a trademark of Symantec Corporation in the United States, other countries, or both.
Java and all Java-based trademarks are trademarks of Sun Microsystems, Inc., in the United States, other countries, or both.
Lotus, Lotus Notes, and SmartSuite are trademarks of Lotus Development Corporation and/or IBM Corporation.
Microsoft, SysPrep, Windows, Windows NT, and the Windows logo are trademarks of Microsoft Corporation in the United States, other countries, or both.
PC Direct is a trademark of Ziff Communications Company in the United States, other countries, or both.
PowerQuest, DriveImage Pro, and PartitionMagic are trademarks of PowerQuest Corporation.
RDM 3.2 Configuration and Compatibility Guide for Non-IBM Systems
13
UNIX is a registered trademark in the United States and other countries licensed exclusively through The Open Group.
Other company, product and service names may be trademarks or service marks of others.
RDM 3.2 Configuration and Compatibility Guide for Non-IBM Systems
14