1
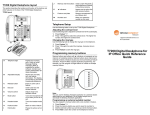
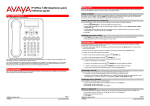
M7208 Digital Deskphone layout
This section describes the location and function of the buttons and
other features on the face of the M7208 Digital Deskphone.
M7208 layout
Changing the ring type
Use the following task to change the ring type on the telephone.
1. Press Feature * 6.
2. Press 1 through 4 to select the ring type. A preview tone is
played.
3. Press Feature to store the ring type.
Programming memory buttons
Memory buttons are buttons with indicators not assigned as line,
intercom or handsfree buttons. Memory buttons store internal and
external numbers or features to give you one touch dialing or feature
activation. Avaya IP Office supports duplicate programming. For
example, you can program a single feature or number to multiple
memory buttons.
A
Display
Shows the time, date,
and call information.
B
Indicators
Appear beside active
lines and features.
C
Feature button
Starts or ends a feature.
D
Release button
Cancels an active call.
E
Hold button
Places an active call on
hold.
F
Dial pad
Used to dial features and
extension.
G
Volume control
Adjusts handset and
ringer volume.
H
Memory and line buttons Used to store frequently
used telephone numbers
to the phone memory.
M7208 Digital Deskphone
for IP Office Quick
Reference Guide
Using display buttons
Three display buttons appear directly below the display. When
active, these buttons appear in capital letters on the second line of
the display. In this guide, display buttons appear as underlined,
capital letters: for example, OK.
Programming an external autodial number
You can program a memory button with a new number or feature.
1.
2.
3.
4.
5.
Press Feature * 1.
Press the memory button you want to save the number to.
Dial the external number you want to save to the memory button.
Press Hold to store the number to the telephone memory.
Label the memory button.
Programming an internal autodial number
Telephone Setup
Use the following tasks to set up the M7208 Digital Deskphone.
Adjusting the contrast level
Use the following task to adjust the contrast level of the LCD display.
1. Press Feature * 7.
2. Press 1 through 9 to select the contrast level. The higher the
number, the higher the contrast level.
You can program an internal autodial number to a memory button.
1. Press Feature * 2.
2. Press the memory button you want to store the number to.
3. Dial the extension you want to save to the memory button. If a
valid number is entered, it is saved automatically.
4. Label the memory button with a button label strip.
Programming a feature code — method 1
You can program a feature code to a memory button.
Feature
IP Office
Standard
Version
IP Office Quick Version/
PARTNER Version/Norstar
Version
Feature
IP Office
Standard
Version
IP Office Quick Version/
PARTNER Version/Norstar
Version
Store a
Personal
Speed Dial
Feature *4
Feature *3, Feature *480 to
*499.
Personal
Speed Dial
Feature 0,
*00 to *99
#80 to #99 (also Feature *4,
80 to 99).
System
Speed Dial
Feature 0,
001 to 999
Feature 0, 600 to 699
System Admin function only
Feature 2 /
Feature #2
AutCB works on phones with
soft keys.
Ringer
Sound
Feature *6
Ring Again
(Set/Clear)
Contrast
Feature *7
Feature *7
Conference
Feature 3
Feature 3
Ring Volume Feature *80
Feature *80
Forward All
On/Off
Feature 4 /
Feature #4
Feature 4 / Feature #4
Enbloc
Dialing On/
Off
Not supported Hot dial only.
Feature *82
Last Number Feature 5
Redial
Feature 5
Page
Feature 60
Prefix * to the extension/
group number.
Retrieve
Messages
Feature 65
or Feature
981
777 (own mailbox) or 778
(mailbox select)
Dial Voice
Call
Feature 66
Prefix * to the extension/
group number.
Priority Call
Feature 69
Not supported
Transfer
Feature 70
Feature 70
Call Park
Feature 74
Transfer call to own
extension number.
Call Unpark
Feature #74
<park slot
ID>
6<extension number
(whoever parked the call)>
Call Pickup
Group
Feature 75
66<pickup group number>
Direct Call
Pickup
Feature 76
6<extension number>
You can program a feature code to a memory button.
1. Press Feature * 3.
2. If prompted for a security code, enter your Hot Desking Login
password.
3. Scroll (using the “>>>” softkey or Volume Up/Down) through the
features list to find the feature you want to save to a button
4. Press Selct or HOLD at the feature you want to program.
5. Press the memory button you want to save the feature to.
6. If prompted with the existing programming on this button, press
Repla or HOLD to program the button. Press Back or dial-pad
‘0’ to cancel without saving the programming, and return to the
selected feature.
7. Repeat steps 3 through 6 for each additional button you want to
program. Press Rls when finished.
8. Label the programmed button with a button label strip.
Do Not
Disturb On/
Off
Feature 85 /
Feature #85
Feature 85 / Feature #85
Resetting memory buttons to default feature code
programming
Group Listen Feature
On/Off
802 /
Feature
#802
Not supported
Call Log
Feature 812
Feature 812
Button
Inspect
Feature *0
Use button programming.
Speed Dial
Button
Feature *1
Use button programming:
Auto Dial — Other
Internal Auto Feature *2
Dial
Use button programming:
Auto Dial — Intercom
Button
Feature *3
Programmin
g
Feature *3
1. Press Feature * 3.
2. Press the memory button you want to save the feature to.
3. Press Feature and enter the feature code. The feature code is
saved automatically.
4. Label the memory button with a button label strip.
Programming a feature code — method 2
You can return all programmed feature buttons on your phone to the
default feature programming for your phone model.
1. Press Feature * 3.
2. If prompted for a security code, enter your Hot Desking Login
password.
3. Press * twice.
4. Press Prog or Hold to return all feature buttons to the system
defaults.
5. Label the programmed button with a button label strip.
Erasing a memory button
You can delete the current memory button programming to
reprogram it with a different number or feature.
1. Press Feature * 1.
2. Press the memory button you want to erase.
3. Press Hold to delete the current memory button programming
from the telephone memory.
Displaying memory button programming
Use the following task to display the telephone number or feature
currently programmed to the memory button.
1. Press Feature * 0.
M7208 Digital Deskphone
for IP Office Quick
Reference Guide
2. Press the memory button you want to check.
3. Press Feature again to clear the LCD screen.
Making and answering calls
Use the following tasks to make and answer calls on your M7208
Digital Deskphone.
Making external calls using line buttons
Use the following task to make a call to an external telephone
number using a line button.
1. Lift the handset
2. Press a line button.
3. Dial the external telephone number.
Making a handsfree call
You system administrator must program the handsfree feature on
your telephone. The handsfree button is programmed to the bottom
right memory line button.
Press the handsfree/mute button on your telephone to make or
answer a call.
OR
To switch to handsfree/mute when you are on a call, press the
handsfree button and place the handset on the cradle. Lift the
handset off the cradle to turn off handsfree mode.
March 2011
Making external calls using intercom buttons
Use the following task to make a call to an external telephone
number using an intercom button.
Note:
Contact your system administrator for a list of external dialling
codes.
1. Lift the handset
2. Press an intercom button and enter an external dialling access
code.
3. Dial the external telephone number.
Making Internal calls using intercom buttons
Use the following task to make a call to an internal extension using
an intercom button.
Note:
Contact your system administrator for a list of extension numbers.
1. Lift the handset
2. Press an intercom button.
3. Dial the extension number.
Answering calls
An incoming call is available to be answered when your telephone
rings and the display light flashes, or when an intercom or line button
indicator flashes.
When an incoming call appears on your telephone, lift the
handset
OR
Press the button with the flashing indicator before you lift the
handset.
Placing a call on hold
Use the following task to place an active call on hold.
Note:
Calls are put on hold automatically when you switch from one line
to another.
1. While on a call, press Hold . The indicator for the line will flash.
2. Press the line button with the flashing indicator to retrieve the
call.
Muting a call
You can mute your voice on an active call. This task applies to
handset, handsfree, and headset calls.
1. While on a call, press Handsfree/Mute to turn the microphone
off. The indicator light next to the Mute button flashed when the
microphone is muted.
2. Press Handsfree/Mute again to turn the microphone on.
M7208 Digital Deskphone
for IP Office Quick
Reference Guide