1
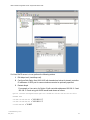
VIEW Certified Configuration Guide
Avaya
Avaya WLAN Series 8100
1725-86206-000 Rev: B
May 2013
VIEW Certified Configuration Guide: Avaya WLAN Series 8100
Copyright Notice
© 2011-2013 Spectralink Corporation All rights reserved. SpectralinkTM, the Spectralink logo and
the names and marks associated with Spectralink’s products are trademarks and/or service
marks of Spectralink Corporation and are common law marks in the United States and various
other countries. All other trademarks are property of their respective owners. No portion hereof
may be reproduced or transmitted in any form or by any means, for any purpose other than the
recipient’s personal use, without the express written permission of Spectralink.
All rights reserved under the International and pan-American Copyright Conventions. No part of
this manual, or the software described herein, may be reproduced or transmitted in any form or
by any means, or translated into another language or format, in whole or in part, without the
express written permission of Spectralink Corporation.
Do not remove (or allow any third party to remove) any product identification, copyright or other
notices.
Notice
Spectralink Corporation has prepared this document for use by Spectralink personnel and
customers. The drawings and specifications contained herein are the property of Spectralink
and shall be neither reproduced in whole or in part without the prior written approval of
Spectralink, nor be implied to grant any license to make, use, or sell equipment manufactured in
accordance herewith.
Spectralink reserves the right to make changes in specifications and other information contained
in this document without prior notice, and the reader should in all cases consult Spectralink to
determine whether any such changes have been made.
NO REPRESENTATION OR OTHER AFFIRMATION OF FACT CONTAINED IN THIS
DOCUMENT INCLUDING BUT NOT LIMITED TO STATEMENTS REGARDING CAPACITY,
RESPONSE-TIME PERFORMANCE, SUITABILITY FOR USE, OR PERFORMANCE OF
PRODUCTS DESCRIBED HEREIN SHALL BE DEEMED TO BE A WARRANTY BY
SPECTRALINK FOR ANY PURPOSE, OR GIVE RISE TO ANY LIABILITY OF SPECTRALINK
WHATSOEVER.
Contact Information
US Location
800-775-5330
Denmark Location
+45 7560 2850
Spectralink Corporation
1765 W. 121st Avenue
Westminster, CO 80234
Spectralink Europe ApS
Langmarksvej 34
8700 Horsens
[email protected]
[email protected]
1725-86206-001_B.docx
May 2013
2
Contents
Chapter 1: Overview ........................................................... 4
Certified Product Summary.............................................................................................. 4
Known Limitations ............................................................................................................ 5
Spectralink References .................................................................................................... 5
Product Support ............................................................................................................... 6
Network Topology............................................................................................................. 7
Chapter 2: Configuration for Wi-Fi Standard QoS ....................... 8
Connecting to Avaya Wireless Controller (WC8180) ...................................................... 8
Conventions used in the rest of this document ............................................................. 8
Basic Controller Configuration ........................................................................................ 9
Creating a Wireless Mobility Domain .............................................................................10
Access Point and Controller Discovery .........................................................................11
Chapter 3: AP Configuration Profiles ..................................... 15
Radius Authentication Profile .........................................................................................15
AP Radio Profiles .............................................................................................................16
AP Radio QoS ..................................................................................................................19
Configuring Network Profiles..........................................................................................19
Chapter 4: Configuring Security Settings ................................ 22
Configuring security None ..............................................................................................22
Configuring wep-static ....................................................................................................22
Configuring WLAN Settings/ WPA2-Enterprise .............................................................23
Configuring WLAN-Settings/ WPA-PSK .........................................................................23
Configuring WLAN-Settings/ WPA2-PSK .......................................................................23
WMM queue priority.........................................................................................................23
CLI to create an AP configuration: .................................................................................24
Configuring QoS settings: AP to WC through L3 cloud................................................25
Applying Changes to Access Points ..............................................................................25
1725-86206-001_B.docx
May 2013
3
Chapter 1: Overview
Spectralink’s Voice Interoperability for Enterprise Wireless (VIEW) Certification Program is
designed to ensure interoperability and high performance between Spectralink Wireless
Telephones and WLAN infrastructure products.
The products listed below have been thoroughly tested in Polycom’s lab and have passed VIEW
Certification. This guide describes the configuration of Avaya 8120 access point and 8180
controller with Spectralink 8020/8030 and 8400 Series Wireless Telephones.
Certified Product Summary
Manufacturer:
Avaya
(http://www.avaya.com/usa/product/wireless-lan8100-series)
Certified products:
Controllers:
WC8180
AP Radio(s):
2.4 GHz (802.11b/g/n), 5 GHz (802.11a/n)
Handset security:
WPA-PSK, WPA2-PSK, WPA2-Enterprise (EAPFAST, PEAPv0/MSCHAPv2)
QoS:
Wi-Fi Standard QoS**
AP and controller software
version tested:
2.0.0.084
Network topology:
Switched Ethernet (recommended)
Handset models tested:
Spectralink 8020/8030*
Handset radio mode:
802.11b & b/g mixed
802.11a
Meets VIEW minimum call
capacity per AP:
6
8
1725-86206-001_B.docx
May 2013
APs:
8120
4
VIEW Certified Configuration Guide: Avaya WLAN Series 8100
Handset models tested:
Spectralink 8440/8441/8450/8452/8453
Handset radio mode:
802.11b, g, bgn
802.11a, an
Meets VIEW minimum call
capacity per AP:
8
10
*Spectralink handset models and their OEM derivatives are verified compatible with the WLAN
hardware and software identified in the table. Throughout the remainder of this document they
will be referred to collectively as “Spectralink Wireless Telephones” or “handsets”.
** ONLY Release 3.0 capable handsets support WPA2-Enterprise and Wi-Fi Standard QoS.
Release 3.0 is not available for Spectralink handsets connecting to traditional PBXs.
Known Limitations
•
Changes to the Radio/AP Profiles configuration require a reset of the AP.
•
AP disconnects clients when config changes are applied.
•
Current versions of 8400 handset code use an access control call end statement at the
end of a call which is too short. The Avaya controller software and the handset
software both have targeted solutions for the problem for future releases. Until one or
both are available, if 8400 series handsets are in use, access control should be
disabled as shown in the AP Radio Profiles section of this manual. The problem is not
present in the 8020/8030 handsets, however for simplicity, it is recommended to disable
tspec in the controller at this time.
Spectralink References
All documents are available at http://support.spectralink.com. Use the Documents and
Downloads pane and select Voice as the Product Type and then for Product select Spectralink
8400 Series Wireless Telephone from the dropdown list. For other documents, use the
navigation pane on the left to locate the product and open the page.
For the Spectralink 8020/8030 Wireless Telephones, please refer to Best Practices Guide for
Deploying Spectralink 8020/8030 Wireless Telephones. This white paper covers the security,
coverage, capacity and QoS considerations necessary for ensuring excellent voice quality with
enterprise Wi-Fi networks.
For the Spectralink 8400 Series Wireless Telephones, please refer to Best Practices Guide for
Deploying Spectralink 8400 Series Wireless Telephones for detailed information on wireless
LAN layout, network infrastructure, QoS, security and subnets.
1725-86206-001_B.docx
May 2013
5
VIEW Certified Configuration Guide: Avaya WLAN Series 8100
These two white papers identify issues and solutions based on Spectralink’s extensive
experience in enterprise-class Wi-Fi telephony. It provides recommendations for ensuring that a
network environment is adequately optimized for use with Spectralink Wireless Telephones.
The Spectralink 8400 Series Wireless Telephone Administration Guide provides a
comprehensive list of every parameter available on Spectralink 8400 Series Wireless
Telephones.
The Spectralink 8400 Series Deployment Guide is your essential reference for provisioning and
deploying Spectralink 8400 handsets in any environment.
The Spectralink 8020/8030 Wireless Telephone Handset Administration Tool document explains
how to use a software interface to configure the handsets.
Product Support
To access Avaya technical documentation, search the knowledge base, or open a service
request online, please visit Avaya Technical Support on the web at:
http://www.avaya.com/support.
1725-86206-001_B.docx
May 2013
6
VIEW Certified Configuration Guide: Avaya WLAN Series 8100
Network Topology
Note
This configuration is not applicable to all customer environments.
1725-86206-001_B.docx
May 2013
7
Chapter 2: Configuration for Wi-Fi
Standard QoS
Connecting to Avaya Wireless Controller (WC8180)
You can connect to WC8180 through console connection or WMS (WLAN Management
Systems).
Creating a console connection
When a WC 8180 is first installed or restored to default settings, the user must connect to the
device through a console cable to perform initial configuration with a terminal emulation
program. Once a device has enough configurations to be reached through the network, it can be
managed through the management IP address. The following table lists the terminal connection
parameters necessary to make such a connection.
Terminal Setting
Value
Baud Rate
9600
Data Bits
8
Parity
N
Stop Bits
1
Conventions used in the rest of this document
There are several conventions used in the sections below. The position within the Command
Line Interface (CLI) tree is indicated, fixed syntax versus operator entry, the purpose of the
command, and additional parameters.
When a command is shown for the CLI, its position within the AP hierarchy configuration will be
indicated by showing the prompt string the AP should be displaying at the point the command is
executed. For example, when the command line interface is in Privileged command mode –
entered by pressing enable after logging in as an admin – the AP name is shown followed by a
“#” as in this example:
WC8180#configure terminal
When modes lower in the hierarchy of commands are shown, the prompts displayed will reflect
the change as in the following sequence of commands:
1725-86206-001_B.docx
May 2013
8
VIEW Certified Configuration Guide: Avaya WLAN Series 8100
WC8180#configure terminal
WC8180(config)#wireless
WC8180(config-wireless)#network-profile 1
WC8180(config-network-profile)#
…
A command will be shown with bold characters for fixed syntax items and <VLAN_name> and
characters in <> to indicate operator-selected entries. When VLAN_name is used in one place
in the document, it is expected to be replaced with the same operator entry string the next time
it appears in the document. For example, if VLAN_name is wirelessVLAN, it should be entered
as wireless_VLAN the next time it is shown in the document. The <> entries will sometime have
a parenthetical explanation for clarification as in: <Port_range (enter 1-26)>. The parenthetical
expression is present to aid in choosing an entry and is not part of the command syntax.
Each command or group of commands is preceded by a sentence indicating the purpose of the
command, as in:
Enable SNMP services.
WC8180(config)#snmp-server enable.
Some sections will show additional parameters for setup that are not necessary for handset
connection but may be useful in a given specific network situation. They are usually listed at the
beginning of a section and are optional.
Basic Controller Configuration
Perform the following procedure to place a basic configuration on a WC 8180 device:
1
Log into the controller. If the device is not yet running, make sure you have connected
serial cable and terminal emulation program. Power up the WC and terminal program
will show AVAYA logo on the screen after initial HW boot-up screen. It takes between 45 minutes to be network-ready after power-up/reset.
2
Press CTRL + Y and select Command Line Interface.
3
Enter Privileged mode using the enable command.
4
Enter General Configuration mode using the configure terminal command.
WC8180#configure terminal
5
Specify the system IP address, subnet mask, and default gateway using the IP address
command. The IP address configured is bound to the default vlan – VLAN #1.
6
WC8180(config)#ip address <ip_address> netmask <subnet_mask> default-gateway
<default_gateway>Enable SNMP services.
WC8180(config)#snmp-server enable.
7
Disable SNMP user lists
WC8180(config)#no ipmgr snmp.
1725-86206-001_B.docx
May 2013
9
VIEW Certified Configuration Guide: Avaya WLAN Series 8100
8
Enable IP routing capabilities
WC8180(config)#ip routing
9
Enter Wireless Configuration mode using the wireless command.
10 Specify the wireless IP address to be used for the controller
WC8180(config-wireless)#interface-ip <ip_address>
11 Enable wireless capabilities
WC8180(config-wireless)#enable
12 Enable MDC (mobility domain controller) capability
WC8180(config-wireless)#controller mdc-capable
13 Enter the domain password at the prompt.
AdminTip
When you are in need of CLI command help, type the command followed by a
<space>?, CLI will show list of options available for that command with help. For e.g.,
by typing “ip ?”
Note: if the WC 8180 controller is restored to default settings, the license file must be reinstalled
from the serial console using the following (The AP license file enables the WC 8180 controllers
in the domain to manage AP’s.):
14 Enter CTRL-Z to return to the admin login state.
15 Type
copy tftp license address <X.X.X.X (ip address of the TFTP server)
filename <license file name>.
16 Type
boot.
The rest of the settings in this manual may now be entered from a Telnet interface if desired.
Creating a Wireless Mobility Domain
Use the existing default VLAN to create a wireless mobility domain.
1
Define a wireless mobility domain. Add the wireless VLAN to it and assign the switch as
the active controller for the domain.
WC8180#config terminal
WC8180(config)#wireless
1725-86206-001_B.docx
May 2013
10
VIEW Certified Configuration Guide: Avaya WLAN Series 8100
WC8180(config-wireless)#domain mobility-vlan <mobility_vlan_name>
WC8180(config-wireless)#domain auto-promote-discovered-ap
WC8180(config-wireless)#switch vlan-map <mobility_vlan_name> LVID 1
WC8180(config-wireless)#domain ap <H.H.H (MAC address of AP)>
Entering domain AP (mac = XX:XX:XX:XX:XX:XX) configuration mode…
WC8180(config-domain-ap)#serial aaaaaaaaaaaaaa (serial ID of AP)
WC8180(config-domain-ap)#radio 1 channel xx (radio 1 is 5 GHz band
radio)
WC8180(config-domain-ap)#radio 2 channel xx (radio 2 is 2.4 GHz band
radio)
WC8180(config-domain-ap)#radio 1 power auto
WC8180(config-domain-ap)#radio 2 power auto
AdminTip
Spectralink handsets do not support channel change messages. If the Auto-RF automatic channel assignment - method is used on the AP, there may be some audio
drop as the handset roams to the new setting.
Repeat the domain ap commands for every AP that will be a member of the network.
WC8180(config-wireless)#domain ap-client-qos
2
Press Ctrl-Z to return to Privileged mode.
WC8180#wireless controller join-domain domain-name <domain_name>
mdc-address <H.H.H.H (ip address)>
Access Point and Controller Discovery
The WLAN 8100 solution supports DHCP-assisted discovery and DNS-assisted discovery of the
controllers by the AP. The AP does not provide any interface for static configuration of the
network parameters such as IP address, subnet, default gateway, DNS or domain name. A
DHCP server must be configured in the network to assign these network parameters to the AP.
Administrator must configure either “DHCP option 43” or DNS so that AP can obtain the IP
addresses of at least one active controller in the mobility domain. For redundancy in the
discovery process we recommend configuring at least two controllers on DHCP server or DNS.
When both DHCP option 43 and DNS servers are configured, an AP attempts connection with
controller IP’s determined from DHCP options before attempting to connect to those determined
from DNS queries.
1725-86206-001_B.docx
May 2013
11
VIEW Certified Configuration Guide: Avaya WLAN Series 8100
DHCP Option 43 configuration
Configuration is dependent on the type of DHCP server in use in the network environment.
Avaya recommends the use of either a Windows 2003 Server or Linux-based DHCP server.
If a Windows 2003 DHCP server is in use, perform the following actions:
1
Open the DHCP Server Manager.
2
Select DHCP > <your-DHCP-server> > Scope > Scope Option > Option 043.
3
Configure the vendor identifier – sub-option 8 – by typing in the ASCII code in
hexadecimal for the string “AVAYA AP” and the length of the string in bytes as 08 08 41
56 41 59 41 20 41 50.
4
Follow this by the option 01 with a length of 04 for the option string and the hexadecimal
for the IP address assigned to the MDC controller. In the picture below, the address
used for the controller is 172.29.108.100.
5
If desired, follow this by the option for the port for the UDP controller as 03 02 and the
hex for the port number (default is 61000 – not shown in screen shot).
6
Click OK.
1725-86206-001_B.docx
May 2013
12
VIEW Certified Configuration Guide: Avaya WLAN Series 8100
If a Linux DHCP server is in use, perform the following actions:
1
Edit dhcpd.conf (/root/dhcp.conf).
2
Configure Sub-Option 8 as AVAYA AP with hexadecimal values for domain controller
IP addresses. A UDP port for communications can also be optionally specified.
3
Restart dhcpd.
For example, a Linux entry for Option 43 with controller addresses 192.168.11.2 and
192.168.11.3 and using port 61000 would break down as follows:
option vendor-encapsulated-options 08:08:41:56:41:59:41:20:41:50 =
"AVAYA AP"
:01:04:c0:a8:0b:02 = "192.168.11.2"
:01:04:c0:a8:0b:03 = "192.168.11.3"
:03:02:EE:48 = "61000"
1725-86206-001_B.docx
May 2013
13
VIEW Certified Configuration Guide: Avaya WLAN Series 8100
The total Option 43 entry would be:
08:08:41:56:41:59:41:20:41:50:01:04:c0:a8:0b:02:01:04:c0:a8:0b:
03:03:02:EE:48
The access point will use UDP port 61000 by default if Option 43 does not include the UDP port
number.
1725-86206-001_B.docx
May 2013
14
Chapter 3: AP Configuration Profiles
The configuration of managed-APs is through the use of AP configuration profiles. There can be
several profiles defined on the Wireless Controller. You can apply each profile across multiple
controlled-APs.
Each AP profile can be composed a radio profile for each radio on the AP, a network profile,
and a radius authentication profile for 802.1x security.
The radius authentication, radio, and network profiles are defined first. They are then included in
the AP profiles. A selected AP profile is distributed to the managed AP(s) via the managing WC
8180 using the command:
WC8180#wireless controller config-sync
or by power cycling the AP(s).
AdminTip
The wireless controller config-sync command should be repeated every time it is
desired to distribute the changed configuration to the APs.
Radius Authentication Profile
Several overall security settings are possible, reached from the CLI (either console or Telnet)
using the following commands:
WC8180>enable
WC8180#configure terminal
WC8180(config)#wireless
WC8180(config-wireless)#security
WC8180(config-security)#?
WLAN overall security settings
default
Set default settings for security features
end
End wireless security configuration mode
exit
Exit wireless security configuration mode
mac-db
Configure black and white list
1725-86206-001_B.docx
May 2013
15
VIEW Certified Configuration Guide: Avaya WLAN Series 8100
no
Disable wireless security features
radius
Global RADIUS configuration
user-db
Local user configuration
wids
Configure Wireless Intrusion Detection
wips
Configure Wireless Intrusion Protection
The global radius configurations are used in the WPA2 Enterprise security WLAN security
settings within the handsets. In the Avaya 8180 AP, it is used when the security mode wpaenterprise is selected in a network profile. A radius profile must be set up before it can be used
in a network profile.
Set up a connection to a radius server as follows:
WC8180(config-security)#radius profile <radius_profile_name>
WC8180(config-security)#radius server <radius_server_IP (as X.X.X.X)
<radius_profile_name>-Auth secret
Enter server secret: ****
Verify server secret: ****
AP Radio Profiles
AP radio profiles group settings that can be applied to one of the AP radios.
WC8180>enable
WC8180#config terminal
WC8081(config)#wireless
WC8180(config-wireless)#radio-profile <radio_id>
Entering radio-profile (id = <radio_id>) configuration mode...
General Configure Radio profile parameters
apsd
Enable auto powersave delivery mode
beacon-interval
Set beacon interval for the radio profile
channel
Configure radio channel settings
data-rates
Configure basic/supported d ata rates
1725-86206-001_B.docx
May 2013
16
VIEW Certified Configuration Guide: Avaya WLAN Series 8100
default
Set default parameters for radio profile
dot11-mode
Configure physical mode of radio
dot11n
Set 802.11n related configuration for radio
profile
dot11n-protection-mode
Configure 802.11n protection mode
dtim-period
Configure Delivery Traffic Indication Map
(DTIM) period
end
End radio profile mode
exit
Exit out of radio profile mode
fragmentation-threshold
Configure packet fragmentation threshold
incorrect-frame-no-ack
Enable No-Ack for incorrectly received
frames on radio
load-balance
Configure load balancing parameters for
radio
max-clients
Configure max number of simulataneous
client associations allowed
multicast-tx-rate
Configure multicast transmit rate parameters
no
Disable radio profile parameters
power
Configure radio power settings
profile-name
Set radio profile name
qos
Configure Radio QoS queues
rate-limit
Enable broadcast/multicast rate limiting
rf-scan
Configure RF scan mode parameters
rrm
Enable RRM(Radio Resource Measurement)
rts-threshold
Configure RTS threshold - Below which
1725-86206-001_B.docx
May 2013
17
VIEW Certified Configuration Guide: Avaya WLAN Series 8100
MPDU RTS/CTS is not performed
station-isolation
Enable station isolation . Block wireless
communication between clients
tspec
Configure TSPEC settings for radio profile
wmm-mode
Enable WMM(Wi-Fi Multimedia) mode
Enable auto powersave delivery mode.
WC8180(config-radio-profile)#apsd
Set beacon interval for the radio profile (in ms).
WC8180(config-radio-profile)#beacon-interval 100
Configure Delivery Traffic Indication Map (DTIM) period (in number of beacon intervals).
WC8180(config-radio-profile)#dtim-period 2
Name the radio profile.
WC8180(config-radio-profile)#profile-name <radio_profile_name1>
Enable WMM(Wi-Fi Multimedia) mode.
WC8180(config-radio-profile)#wmm-mode
Disable TSPEC settings for radio profile. See Known Limitations.
WC8180(config-radio-profile)#no tspec
Disable RRM(Radio Resource Measurement).
WC8180(config-radio-profile)#no rrm
The following will configure the radio profile to be specific radio.
WC8180 (config-radio-profile)#dot11-mode <radio>
a
802.11a
a-n
802.11a/n
bg
802.11b/g
bg-n
802.11b/g/n
n-only-a
802.11n (5GHz only)
n-only-g
802.11n (2.4GHz only)
The following will set the power on the radios.
WC8180 (config-radio-profile)#power policy static
WC8180 (config-radio-profile)#tx-power xx
(power is in percent 1-100)
Set it so that the need for legacy protection while in 11n is determined by the controller.
1725-86206-001_B.docx
May 2013
18
VIEW Certified Configuration Guide: Avaya WLAN Series 8100
WC8180 (config-radio-profile)#dot11-protection-mode auto
AP Radio QoS
Within the radio profile, the Enhanced Distributed Channel Access (EDCA) parameters of an AP
affect downstream traffic from the AP to the client station. Station EDCA parameters affects
upstream traffic from the client station to an AP. The user has control over enabling and
disabling WMM mode. When it is disabled, QoS only applies to downstream traffic.
The default radio QoS (Hardware) settings are below:
WC8180(config-radio-profile)#show wireless radio-profile qos
-------------------------------------------------------------------Radio
AP-EDCA
Client EDCA
----------------------
----------------------
Queue
AIFS
Min-win
Max-win
AIFS
Min-win
Max-win
-----------
----
-------
-------
----
-------
-------
Profile
QOS
ID
------1
voice
1
3
7
2
3
7
1
video
1
7
15
2
7
15
1
best-effort
3
15
63
3
15
63
1
background
7
15
1023
7
15
1023
-------
----
-------
-------
-------
-----------
----
-------
Type the following CLI command for good quality voice call where data and voice competes for
resources.
WC8180(config-radio-profile)#qos best-effort station-edca maxcontention-window 1023
The radio related parameters can be verified using the following “Show” commands:
WC8180#show wireless radio-profile <radio-profile-id> detail
WC8180#show wireless radio-profile tspec radio-profile-id> detail
WC8180#show wireless radio-profile qos radio-profile-id>
Configuring Network Profiles
Network profiles must also be defined for AP management.
1725-86206-001_B.docx
May 2013
19
VIEW Certified Configuration Guide: Avaya WLAN Series 8100
WC8180(config-wireless)#network-profile <network_profile_id>
Network Profile Configuration Commands
arp-suppression
Enable wireless ARP supression for the network
captive-portal
Configure captive portal mapping on the network
client-qos
Configure network profile Client QoS settings
cos2wmm
WMM values for CoS mapping
default
Set a command to its default values
dot1x
Configure 802.1x parameters
end
End configuration mode
exit
Exit out of network profile config mode
hide-ssid
Enable SSID hiding in AP beacons for the network
mac-validation
Enable client authentication through Client MAC
address
mobility-vlan
Configure default mobility vlan for the network
no
Disable network profile parameters
probe-response
Enable response to broadcast probe request
profile-name
Configure network profile name
radius
Configure RADIUS related parameters
security-mode
Configure security mode
ssid
Configure SSID for the network
user-group
Configure local user group name for the network
user-validation
Configure user validation method if captive portal is
enabled
wep
Configure WEP related parameters
1725-86206-001_B.docx
May 2013
20
VIEW Certified Configuration Guide: Avaya WLAN Series 8100
wmm2cos
CoS mapping for WMM
wpa2
Configure WPA2 parameters
WC8180(config-network-profile)#profile-name <net_profile_name>
WC8180(config-network-profile)#mobility-vlan <mobility_vlan_name>
(from Creating a Wireless Mobility Domain)
WC8180(config-network-profile)#ssid <ssid_name>
WC8180(config-network-profile)#client-qos enable
1725-86206-001_B.docx
May 2013
21
Chapter 4: Configuring Security Settings
Network profiles contain security modes. There are five different security modes available in
WC8180.
WC8180(config-network-profile)#security-mode ?
open
Open access
wep-802dot1x
WEP 802.1x
wep-static
Static WEP
wpa-enterprise
WPA enterprise
wpa-personal
WPA personal
The Spectralink handsets do not support the wep-802dot1x mode of the Avaya 8180. Within
the wpa-personal security mode of the Avaya 8180, Spectralink handsets define two security
modes called WPA (TKIP cipher) personal and WPA2 (CCMP cipher) personal within the
handset menu system and its HAT(Handset Administration Tool). These handset security
modes and the commands to support them in the AP are defined below.
Configuring security None
WC8180(config-network-profile)#security-mode open
Configuring wep-static
WC8180(config-network-profile)#security-mode wep-static
WC8180(config-network-profile)#wep ?
key-length
Set the number of bits for the WEP keys
key-type
Set the type WEP key configured
key1
Set WEP key #1
key2
Set WEP key #2
key3
Set WEP key #3
key4
Set WEP key #4
transmit-key
Set WEP key index used for encryption
The Spectralink handsets support only hex key entry for WEP.
WC8180(config-network-profile)#wep key-length <40_or_128> key-type
hex key<key#> <key_hex_string> transmit-key <key#>
1725-86206-001_B.docx
May 2013
22
VIEW Certified Configuration Guide: Avaya WLAN Series 8100
Configuring WLAN Settings/ WPA2-Enterprise
WC8180(config-network-profile)#security-mode wpa-enterprise
WC8180(config-network-profile)#radius authentication-profile
<radius_authentication_profile
(as defined in section Radius Authentication Profile)
WC8180(config-network-profile)#wpa2 versions-supported wpa2 ciphersuite ccmp
Configuring WLAN-Settings/ WPA-PSK
WC8180(config-network-profile)#security-mode wpa-personal
WC8180(config-network-profile)#wpa versions-supported wpa2-and-wpa
cipher-suite ccmp-and-tkip
WC8180(config-network-profile)#wpa key <passphrase_key_string>
Note: only the handset’s passphrase method of WPA key definition is supported on the Avaya
8180 AP.)
Configuring WLAN-Settings/ WPA2-PSK
WC8180(config-network-profile)#security-mode wpa-personal
WC8180(config-network-profile)#wpa versions-supported wpa2 ciphersuite ccmp
WC8180(config-network-profile)#wpa key <passphrase_key_string>
Note: only the handset’s passphrase method of WPA2 key definition is supported on the Avaya
8180 AP.)
WMM queue priority
AP can remark WMM/CoS priority to prioritize legacy clients or clients with incorrect CoS/WMM
markings.
WC8180(config-network-profile)#wmm2cos 5 6
(CoS is set to 6 if WMM is video)
WC8180(config-network-profile)#cos2wmm 4 5
(if CoS is 4, packet is assigned to AC_VI)
1725-86206-001_B.docx
May 2013
23
VIEW Certified Configuration Guide: Avaya WLAN Series 8100
CLI to create an AP configuration:
Finally, using the radius-authentication, radio, and network profiles created, create a new AP
Profile and assign unique profile ID:
WC8180>enable
WC8180#config terminal
WC8180(config)#wireless
WC8180(config-wireless)#ap-profile <ap_profile_id>
AP Profile Configuration Commands
ap-model
Configure AP Model
cos2dscp
CoS to DSCP Mappings
default
Set a command to its default values
defaultprofile
Set current profile, as the default profile for an
AP
dscp2cos
DSCP to CoS QoS Mapping
end
End configure mode
exit
Exit from AP profile configuration mode
network
Configure Network Profile mapping on a radio
no
Disable AP profile parameters
profile-name
Set an AP profile name
radio
Configure Radio Profile mapping on a radio
Assign name to AP profile:
WC8180(config-ap-profile)#profile-name <ap_profile_name>
Assign a model to the AP profile:
WC8180(config-ap-profile)#ap-model ap8120
If Spectralink handsets are configured for 802.11a mode, enable the 5GHz radio and assign a
unique radio profile ID:
WC8180(config-ap-profile)#radio 1 enable
WC8180(config-ap-profile)#radio 1 profile-id <radio_profile_id>
1725-86206-001_B.docx
May 2013
24
VIEW Certified Configuration Guide: Avaya WLAN Series 8100
If Spectralink handsets are configured for 802.11b & b/g mixed mode, enabled 2.4GHz radio
and assign unique radio profile ID:
WC8180(config-ap-profile)#radio 2 enable
WC8180(config-ap-profile)#radio 2 profile-id <radio_profile_id>
Assign the network profile for the 5G radio:
WC8180(config-ap-profile)#network 1 1 profile-id <network_profile_id
(from Configuring Network Profiles)>
(Note: the VAP index (second “1” after network) is assumed to be 1. AP profiles may be
assigned to AP’s in VAP groups. In this case, the VAP index could be different.)
Assign the network profile for the 2.4G radio:
WC8180(config-ap-profile)#network 2 1 profile-id
<network_profile_id>
Configuring QoS settings: AP to WC through L3 cloud
The DSCP/CoS can be remarked at the AP in order to maintain end-to-end packet priority over
L2/L3 network. If Access Point is connected to WC8180 through L2/L3 cloud, use the following
CLI to remark DSCP/CoS mappings. The default values are for Avaya networks.
WC8180(config-ap-profile)#cos2dscp 6 48
{CoS to DSCP}
WC8180(config-ap-profile)#dscp2cos 48 6
{DSCP to CoS}
Applying Changes to Access Points
All the configuration changes made in WC are saved immediately but they are not applied to AP
by default. Type the following if AP needs to receive the configuration changes (AP, Radio,
Network profiles etc). The configuration is also applied if the power is cycled on the AP.
WC8180#wireless controller config-sync
1725-86206-001_B.docx
May 2013
25