1
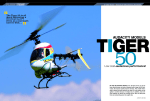
TIGER 50 (JUNE '05)
4/14/05
12:59 PM
Page 70
Feature
The Tiger 50 is a stable sport helicopter and well suited for beginners. When implemented with the
adjustments and 3-D set up described in the text it becomes a spirited 3-D trainer
Tiger 50
An in-depth look at Audacity Models Tiger 50
words: Tom Scully, photos: Tom Scully and James Wang
ello everyone, I've done a lot of
travelling since last time and I am glad
to be back and flying again. This month
we look at a 50-class helicopter newly
presented to the market by Audacity Models
and it is called the Tiger 50. Regulars will recall
Richard Morris reviewed the robbe Ornith in the
October 2003 MHW and may think it looks
familiar, but as it turns out, the Tiger 50 offers
many improvements. Though the same
company also OEMs the Tiger 50, they do so to
Audacity’s specifications and what results is as
distinct as Stevenson’s Dr. Jekyll from Mr.
Hyde. In short, while the Ornith is a mellow and
stable helicopter with which to perform basic
loop and roll manoeuvres; Audacity fed the
Tiger 50 some more testosterone. While it can
be tamed for beginners, in the hands of 3-D
pilots the Tiger 50 can perform Death Spirals,
Tick-Tocks and Pirouetting Flips, etc.
Audacity Models/Genesis Hobby Distributor
is based near Disney World in Orlando, Florida
in the USA. They are the exclusive distributor
H
The Tiger 50 is available in kit form or in ARF
(almost ready to fly) as shown here
70
MHW June 2005
for the Americas (Canada, USA, Mexico and
South America) as well as the UK, South Africa,
Australia and New Zealand. Audacity’s crew on
the other hand seem to be modellers first and
businessmen second. They laughed when I
asked why the Tiger 50 wasn’t released sooner
and said, “We really abused the Tiger 50 and
also destroyed several beyond repair. Then
we’d fix it and fly it some more!”. Audacity says
rather than rush to market, they subjected the
Tiger 50 to a rigorous and intensive R&D effort
and have been flying the stink out of it just to
see what breaks for more than a year. This
process resulted in somewhat extensive
(though occasionally subtle) changes and they
go far beyond merely re-christening it the Tiger
50 and making a new decal set. Ultimately, I
found the Tiger 50 well suited for 3-D pilots
searching for a ‘beater’ with which to practice
manoeuvres before risking their more
expensive helicopter.
Tiger 50 Description
I purchased the ARF version ($299.99 in the
USA) primarily to save building time and it
arrived in 30" x 16" x 10" box. After getting to
know my Tiger 50, I subsequently purchased a
kit version ($284.99), which arrived in a slightly
more compact 30" x 16" x 8" box. The Tiger 50
is a fun helicopter; repair parts are inexpensive
and the design is so simple that repairs are
easy. This encourages me to attempt more
manoeuvres - which I suspect is what Audacity
had in mind all along. Out of the box, the
mainframe and main rotor head are assembled
as a unit. The tail rotor and tail boom are also
an assembled unit. Even the landing gear is
Minimal parts count. Notice the fuel line comes
out though a keyhole in the right side-frame.
Pulling the fuel line forward shuts off the fuel
flow. This built-in feature eliminates the need for
a fuel shut off valve. All plastic framed
helicopters should have such a feature
already assembled. While I took 30 minutes to
add the landing gear, plug in the tail boom, slip
the belt over the pulley and then bolt on the tail
boom steadies and fins, this included time
looking over the manual.
Next I installed the fan and clutch to the
engine, bolted it to the engine mount and after
a quick session with the dial indicator slipped it
into the model. Installing the servos, adding
balls to the servo arms and sub trimming the
servos didn’t take long. I was pleasantly
surprised to discover the heavy duty
prefabricated 2.3 mm diameter pushrods (with
ball links installed at both ends instead of Zbends at the servos) resulted in my being ready
to program the model very quickly. By the time
I trimmed the canopy and added the decals I
had spent perhaps 8 hours - but this included
time for making notes. The kit takes more like
20 hours to complete. Balance the cost versus
the pleasure and make your choice.
You may be interested in knowing I went
through each and every bolt of my ARF with an
Allen driver and confirmed they were all tight. I
even removed the two setscrews securing the
tail rotor hub onto the tail output shaft to
confirm thread locker was used in the factory
assembly. The ARF workmanship is better than
that of average novice modellers and in fact,
Prototype electric Tiger 50 does not have an
engine start shaft so the front servo can be
located beneath the swashplate. The aluminium
side frames are for testing only, eventually
plastic frames will be made. The model will use
600 mm blades and similar in size and weight
as the Logo 20. No word on when the electric
version will be out
TIGER 50 (JUNE '05)
4/14/05
12:59 PM
Page 71
Tiger 50
Tiger 50 mechanics, note the exposed engine
heat sink head
the workmanship is more on par with what
would be expected from a careful helicopter
modeler with 3 to 5 years experience. Whoever
built these ARF models spends every day doing
it and is obviously quite expert as their
methodology and assembly skill are consistent.
After 40 flights on one Tiger 50, nothing has
loosened up. A nice touch is the Tiger 50
features 3 mm Allen-head bolts throughout
instead of cheaper crosshead Phillips screws.
This is a definite plus with me because they
don’t slip as easily as the Phillips do and I
prefer Allen head bolts everywhere. For
example, on my Freya 60 I replaced the four
crosshead bolts that clamp the tail boom with
four 3 mm Allen bolts. Long ago I also invested
in a good quality set of hardened-tip Allen
drivers with handles. Unlike L-shaped Allen
wrenches, the hardened-tip Allen drivers are
less likely to round out the hex socket of an
Allen head bolts.
Tiger Detail
Like many of you, we have occasionally
furrowed our brow wondering what helicopter
manual writers had in mind, so as usual we first
turned to the Tiger’s manual. It is quite obvious
the Tiger 50 manual has been authored in
English and is both fairly detailed and includes
many nifty ‘Pro Tips’. Native speakers of the
Queen’s English will have no difficulties.
Noteworthy changes from an Ornith are found
in the areas of the tail, the head, cyclic controls,
side frames and the power train. Seemingly, the
whole thing has been revised.
Examples of changes in the model abound;
let’s begin with the tail. Audacity Models
specified a larger and beefier steel tail rotor hub
(AH-0520) that is 2 mm larger in OD than that
found on the Ornith. This isn’t a big deal unless
a model spits the whole thing off which, of
course, requires a successful autorotation to
prevent destruction. To encompass new, longer
(600 mm) main rotor blades (AH-1519), the tail
boom (AH-1518) is longer, as is the tail drive
belt (AH-0508). Another modification, to
increase the speed of the tail rotor, results in a
different front tail belt pulley (AH-0502)
assembly.
Let’s move to the head. Unnoticed by the
naked eye, the main rotor grips (AH-0546) have
a higher glass fibre content that increases their
strength and keep them from prematurely
wallowing out from hard use. Furthermore, and
in keeping with the spirited nature of the class
of manoeuvres Audacity anticipate Tiger pilots
will subject their models to, thrust bearings
(AH-1506) are specified. The Tiger 50 blade
spindle diameter is 5 mm, which is the same as
the Hirobo Shuttle and Raptor 30/50 V1, while
the Evo 30/50 and Raptor 30/50 V2 use 6 mm
spindles. However, Audacity maintains the 5
mm spindle will reduce collateral damage from
a crash: the 5 mm spindle will be the sacrificial
part instead of the rotor head parts. There is
merit in this because at $5.92 (US hobby store
cost), the spindle shaft is very inexpensive,
however an optional 6 mm spindle kit (AH0516) is available.
Furthermore, while both the Ornith and the
Tiger 50 use 70 Durometer rubber dampers for
main rotor blade spindle restraint to provide
tighter control. In addition, there are optional
bright yellow urethane 80 durometer (harder)
dampers (AH-0518) available. This makes it
very easy to fine tune the model to your liking.
The Tiger 50 hovers and feels very smooth in
flight - almost like an FAI-type helicopter and its
tamed nature makes it well suited for novices,
but to make it a wild 3-D ship requires different
adjustments and I will detail these next.
It’s unusual to find these adjustable
capabilities in one machine; much less at a
price point encroaching on 30-class
helicopters. The sports set up configuration
leads one to great confidence in circuit flying
because like a fixed wing pattern aeroplane, in
fast forward flight the Tiger 50 tracks very true,
i.e. without a strong ‘pitch up’ tendency. Make
a few field adjustments and the Tiger 50 can
become a 3-D trainer.
As mentioned, the Tiger 50 is a very
adjustable helicopter. This is important because
it permits the pilot to tune the Tiger to their
preferred style of flight. Let’s examine the
changes that resulted to the Tiger 50 control
The engine, servos and all bearings are embedded
on two moulded side frames. Very convenient, but
if any area of the frame is cracked after a crash, the
entire mechanics must be taken apart and rebuilt
All 3 eCCPM servos mount directly to the plastic
side frame. Fore/aft cyclic servo on the front and
two roll servo beneath the main shaft. Notice the
pulley and pinion for the belt drive tail rotor
system
Conventional floating axle main rotor and straight
forward 120º electronic CCPM control system
with direct pushrod link between roll servos and
swashplate. The main gear drives the pinion and
pulley for the belt drive tail rotor. CSM 200 gyro
tested here
June 2005 MHW
71
TIGER 50 (JUNE '05)
4/14/05
1:00 PM
Page 72
Feature
Two plastic mounting plates are used for each
servo; the Tiger 50 comes with improved back
plates that will not slide
sub-system that make it so readily adjustable.
For example, to tame the model down, a
beginner may add the supplied lead rod to the
leading edge of the hollow flybar paddles and
perhaps move the ball in one hole on the
washout arms. The 3-D maven will wish to go in
the opposite direction. The Audacious crew’s
R&D also developed a different seesaw (AH0548) with provisions for adjustable Bell-Hiller
ratios.
The revised seesaw features two Bell-Hiller
ratios instead of one, novice and intermediate
pilots will leave the ball in the outer position,
resulting in a 1:1 (100%) Bell-Hiller ratio. Pilots
seeking to practice 3-D manoeuvres will prefer
the faster 0.7:1 (70%) Bell-Hiller ratio.
Experienced modellers know a flybar functions
like a mechanical rate gyro to help stabilise
helicopters pitching and rolling motions. When
a numerically lower ratio flybar tilts, there is less
main blade pitch angle change, so reducing
Bell-Hiller mixing ratios are similar to lowering
the ‘gain’ setting on a gyroscope. The frugal
amongst us will undoubtedly think simply
drilling new holes in an Ornith seesaw
accomplishes the same thing. That’s true, but
don't do it because as with the main blade
grips, the new seesaw also has higher glass
fibre content, and there are moulded in
reinforcing bosses as well. These greatly
increase the strength where the ball screws in.
There are other helicopters on the market
that permit pilots to choose different Bell-Hiller
mixing ratios to suit varying flying requirements.
High end helicopters like the X-Cell and Fury
models manufactured by Miniature Aircraft use
different length steel ball studs on the Bell-Hiller
mixing arm attached to the blade grip. Hirobo’s
Freya and Evo, as well as Thunder Tiger’s
Raptor 90, are similar to the Tiger 50 because
they use additional pivoting position for the
Bell-Hiller mixing arm to vary the Bell-Hiller
mixing ratio. This is advantageous because the
arm can be easily moved at the field without
need for additional parts.
The ball placement at the inner ring of the
swashplate also affects the control feel of the
model. The Tiger 50 includes two 12 mm x 2
mm bolts and two 3 mm x 2 mm i.d. bushings
for moving two of the control balls on the
swashplate further out. On the inner ring of the
swashplate there are four control balls. The two
balls that are further out are connected to the
72
MHW June 2005
The model uses 6 mm hex starting system, which
is similar to many popular helicopters. Futaba GY240, GY-401 and CSM 200 gyros were tried, see
text for result. Mount the gyro on the front to
alleviate tail heaviness
washout arms. The two balls that are closer in
are connected via long pushrods to the BellHiller mixing arms. Adding the bushings move
these two balls further out resulting in a longer
lever giving greater main rotor blade angle
change as the swashplate tilts (this is Bell
command) which is often just what a 3-D pilot
is seeking.
Moving on to the frame, Audacity soon
discovered that what works quite well in chilly
Nova Scotia will be utterly inadequate during
the sweltering summers of Texas or Florida. As
The plastic clamp for the tail boom supports and
for mounting the horizontal fin. It would have
been even better if the two 3 mm bolt for the
clamp were tightened from below then the
horizontal fin does not need to be removed
The stock paddle has a hole in the leading edge
for inserting lead weight. Only total beginners
should use the lead weight because even without
the lead, the helicopter is very stable and the
cyclics are not fast enough for aggressive 3-D.
Need to buy lighter paddles and a threaded 3 mm
flybar to speed up cyclic for 3-D flying
Throttle linkage shown here. The engine can be
easily removed from underneath the helicopter,
remove the muffler and the carburettor first
a result, engine cooling is an area that received
Audacity’s close scrutiny. An examination of
the side frame reveals subtle changes – some
are downstream of the head and do not really
affect cooling, but add a bit of strength instead!
Look just above the forward landing gear boss
to see where a lightening hole has been
blocked off. A side-by-side comparison of
photos from the Oct 2003 Ornith review and
pictures here, of the cooling shroud
demonstrates how the Tiger 50 side frame
extends a bit further past the head. So it seems
the crew at Audacity Models didn’t miss a trick
in their search for improvements before
releasing the Tiger 50.
Further changes to the side frame area are
to the snap in servo bosses. When in place,
these innovative little bits provide for
adjustment amongst varying servo dimensions.
Audacity insisted on yet another seemingly
minor design change, the newly revised servo
boss set (AH-1512) preserves the critical brass
eyelet (to prevent over compression of the
servo rubber vibration isolator) while
simultaneously preventing movement of the
servos under load.
Yet another change to the Tiger 50 frame is
a new, longer, radio platform (AH-0530). This is
due to the Ornith 30-class heritage that, when
stretched to accommodate a 50-class engine’s
power, needs a longer boom to accommodate
the longer blades. Naturally, the longer platform
facilitates a more forward placement of
equipment to assist balance and thus help
compensate for the longer tail boom.
Speaking of the increased power of a 50,
Audacity quickly found that while the Ornith
clutch was adequate for a 30-class engine, or
even an inexpensive 46, it simply couldn’t cut
the mustard when stressed by a more potent
50-class engine. All Tiger 50s comes with a
larger engine mount (AH-0534) to accept the
OS 50SX, TT Pro 50H or Weston 50H. The kit
also includes a larger clutch (AH-0538), as well
a larger clutch bell assembly (AH-0526) and
new lining (AH-1510). There’s also a new pinion
gear (AH-0526) too. Physically, the clutch and
the clutch bell diameter are larger, and as a
quick visual reference, the Tiger 50 clutch bell
assembly does not have holes machined in it.
The gear ratio is better suited to a powerful 50
(the Ornith has a 9-tooth pinion matched to an
89-tooth ring gear resulting in a 9.89 gear ratio
TIGER 50 (JUNE '05)
4/14/05
1:00 PM
Page 73
Tiger 50
Receiver switch is attached to the side frame
directly and two rubber grommets are used to
isolate the switch from engine induced vibrations
on the side frames
suited to a 30-class helicopter) while the Tiger
has a 10-tooth pinion results in the 8.9:1 gear
ratio more suited to the significantly greater
torque of a 50-class engine.
In total, 18 individual substantive changes to
the tail, head, cyclic controls, frames, and drive
train result in the Tiger 50 being a completely
different animal and definitely worth a look.
3-D Flight Set Up
For intermediates pilots wishing to use the
Tiger to practice 3-D, then the following steps
should be performed. Move the ball to the inner
hole of the seesaw (70% Bell-Hiller mixing
ratio). Add the small bushings to move two
short swashplate control balls of the inner ring
of the swashplate further out (as described
previously). Use 80 Durometer rubber dampers
because they make the rotor system feel more
rigid and responsive. Run the main rotor speed
at 1850 to 1900 rpm because for 3-D flying, it is
a must to use high rotor speed and harder
rubber dampers as otherwise, cyclic
performance is slower and the main rotor
blades may actually hit the tail boom in
Pirouetting Flips. Plus, when the main rotor is at
1850 rpm, the 8.9 to 1 gear ratio puts the
engine at 16,465 rpm, which is perfectly at the
power peak for most modern 50-size helicopter
engines.
Additionally, add the optional lightweight 3D paddles and a shorter 3 mm flybar from
Audacity Models will really speed up the cyclic
response and make it ready for rock and roll.
The fore/aft servo cannot be below the swashplate
because the engine starting shaft is in the way - a
90º swing arm is used to connect the front
eCCPM servo to the swashplate
The main rotor hub is similar to the Hirobo
Shuttle: a plastic hub is used in conjunction with
a metal centre post. A 5 mm spindle is used and
each blade grip has two radial bearings and one
thrust bearing. The Shuttle rubber damper with 5
mm i.d. will fit the Tiger 50
The optional lightweight 3-D paddles have two
mounting holes. Using the hole near the leading
edge gives more controllable 3-D and using the
hole toward the trailing edge makes the
response more snappy and should be reserved
for the crazy 3-D pilots. Finally, maximise the
swashplate tilt mechanically and you’re ready
to 3-D.
The 5-point throttle curve values I use for
Normal mode are 0-28-55-78-100. The 5-point
pitch curve values for Normal mode are 15-3560-78-100. These values are suitable for novice
and advanced sport pilots. The Tiger hovers
best at 1550 to 1600 rpm. Ask a friend to use
an optical tach to check the rotor speed for
you.
The 5-point throttle curve values I use for
Idle-Up mode are 100-75-70-80-100. The 5point pitch curve values for Idle-Up mode are
0-25-50-75-100, which give +10.5º to –10.5º
collective pitch. You can use the exact same
values. Novices should inhibit the Idle-Up
feature to prevent accidentally activating it.
eCCPM and Servo Set Up
The Tiger 50 helicopter side frame design
and 120º eCCPM layout are similar in concept
and layout to the XeroG Model Product’s
CCPM Raptor 50 conversion kit as reviewed by
in February 2005 MHW. Except the Tiger
frames are plastic and the XeroG frames are
carbon, however the Tiger 50 is much cheaper.
The 3 eCCPM servos on the Tiger 50 are
located very close to the swashplate so the
control linkage set up could not be simpler; the
two servo arms should each be approximately
20 mm long, while the forward servo should
use a 23 mm arm to compensate for the 15%
reduction in the linkage to clear the start shaft.
With such a long servo arm (20 mm), it is
almost a must to use servos with zero-backlash
in the gear train. Personally, I think it is better to
use a non-digital servo that has zero backlash,
than to use a cheap digital servo with freeplay
in the gear train. Three Hitec HS-635 analog
servos are used because they are inexpensive
(only $40 in the US) and have Hitec’s new
Karbonite resin gears. James showed me these
servos because he found they have zero
The entire main rotor head including the seesaw
and flybar control ring is similar to the Hirobo
Shuttle. As described in the text, install the
longer ball studs on the swashplate inner ring to
maximise the swashplate output for 3-D so the
flybar control ring almost touches the bottom of
the blade grip as shown here
freeplay and at 4.8 volts, has a travel speed of
0.18 second/60 degrees and 69 in-oz of torque.
These inexpensive servos are good for even
up to 60-size sport helicopters. If a little more
gusto is needed, then the other excellent ‘value
choice’ is the HS-5475, which is a digital
version of the HS-635 with Karbonite gears, is
US $45 and has 0.23 second travel speed and
61 in-oz torque which is great for 30 and 50size machines. For the tail rotor, James showed
me a new Hitec HS-6965 that he has been
using with the Futaba GY-401 gyro and JR-500
gyro. The HS-6965 is almost as fast as the
Futaba tail servo but has almost twice the
torque of either the Futaba 9253 or Futaba
9254 and will work with any gyro except the
Futaba GY-601 that uses a non-standard pulse
width.
The easiest way to set up an eCCPM
helicopter is to do it on the workbench with
Idle-Up turned on and leave the
throttle/collective stick in the centre position.
Mount the servo arms on the spline output
shaft so the arms are as close to perpendicular
to the servo case as possible. You may need to
use the transmitter Sub trim feature to fine tune
the servo arm position. JR, Futaba, Airtronics
(Sanwa) and Hitec radios all have 120º eCCPM
mode and in the swashplate mode menu
permit choosing the travel throw for the three
control actions: fore/aft cyclic, roll cyclic and
The 120º eCCPM makes control hook up very
easy. The model should be very light because of
fewer parts. Tail rotor control servo mounts
directly to the plastic side-frame. A Z-bend in the
tail control pushrod is required to clear the frame
June 2005 MHW
73
TIGER 50 (JUNE '05)
4/14/05
1:01 PM
Page 74
Feature
The Korean company that makes
the robbe Ornith produces the Tiger
50. But the Tiger 50 features many
changes requested by Audacity Models
so it is an enhanced and newer model
The fan hub must rest on a prop thrust washer.
Unfortunately newer helicopter engines, such as
the OS 50 Hyper head, TT 50H, Webra 50H and
Weston 50H no longer include a prop thrust
washer. I had many thrust washers lying around
from my aeroplane days. Audacity offers an
optional AH-0537 clutch hub that has a longer
stem thereby eliminates the need for a thrust
washer. Maybe Audacity can include a thrust
washer in each kit?
collective. Set them all to 75%, which is
enough to give maximum swashplate tilt and
provide 20º of collective travel when 20 mm
long servo arms are used for all three eCCPM
servos.
We do wish to point out that while
expensive high performance helicopters like the
90-size Fury, Vigor, and Acrobat also use 120º
eCCPM, they use intermediate T-style
bellcranks between each of the three servos
and the swashplate. To keep the Tiger 50
simple, a very short pushrod connects the two
aft servos directly to the swashplate. The
forward swashplate servo employs a 90º
bellcrank because the engine start coupler
interferes with placing a servo under the
swashplate (this bellcrank gives a 15%
reduction in throw, hence the use of a 23 mm
servo arm to compensate). Using intermediate
bellcranks provide three advantages: (1)
permits a push-pull set up, (2) allows using the
bellcrank geometry to amplify control throw,
and (3) blade loads feeding back through the
swashplate will be partially absorbed by the
bellcrank support system.
Of course there is no free lunch and as a
result, there are disadvantages too. These are
increased complexity, weight and cost. For a
50-class “beater helicopter” such as the Tiger
50, the designer made the right choice by
selecting simple, light and cheap for connecting
servos to the swashplate – a further benefit is
it’s simple to build and set up. All five servos
are mounted directly on two moulded plastic
side frames. The frames are quite sturdy,
maybe too sturdy. Even with a few more
lightening holes, they should still be plenty
strong.
A Futaba GY-401, GY-240 and CSM 200
gyro were tested on this model, the GY-401
has the highest price and the CSM is the least
expensive. Interestingly, their performances
ended up exactly like their price: the GY-401
performed the best and could lock the tail
solidly even in 40 mph backward flight, while
74
MHW June 2005
the inexpensive CSM-200 would blow out in
high-speed backward flight and would not hold
a constant spin rate in Piro Flips; as always,
you get what you pay for. Pilots wishing to
practice 3-D manoeuvres will find the GY-401
with the HS-6965 servo is great value, the GY240 and CSM 200 are inexpensive heading
hold gyros and adequate for beginners. A good
place to mount the gyro is to double sided tape
it on top of the forward eCCPM servo. The new
high end CSM 560 mini gyro will also fit nicely,
but I did not try it because I only have the old
CSM 560, which is too big to fit there.
Assembly Tips
The Tiger 50 is supplied with four tail
pushrod supports. We had better results using
three as it makes it easier to line up the tail
pushrod for a straight shot at the linkage. A
small Z-bend is still needed about three inches
ahead of the tail rotor servo otherwise the
pushrod will scrape the side frame. Pay
attention that the tail pushrod must not touch
the aluminium tail boom support, or the nut and
bolt for the tail boom support, because metalto-metal contact may cause a radio glitch.
The instruction recommends checking the fan hub
trueness with a dial indicator. I had to elongate
the fan hub hole slightly to bring the runout down
to .002 inch
The Tiger 50 ended up slightly tail heavy, so
we used a half pound 2400 mAh NiCd battery
to bring the CG under the main shaft. Without
fuel the model weighed 7 pounds 6 ounces,
which is heavier than the Raptor 50 and on par
with the Venture 50 or Sceadu/Evo 50.
The ball links fit perfectly on the balls, no
sizing required however, they fit tightly on 2.3
mm threaded rods. I used a ball link tool to
make them easier to turn.
Drive Train
Inside the inexpensive muffler - it fits the Tiger
50 without cutting the canopy
A Dremel Mototool with carbide cutting wheel
was used to bevel the intake port to make the
exhaust flow smoother
The design of this helicopter is
straightforward and it is clear the designer was
trying to come up with a rugged utility
helicopter and not going for some
revolutionary new model. The end result is a
user-friendly and easy to service helicopter.
The engine can drop out the bottom without
removing the landing gear (but you must first
remove the muffler and carburettor). The fan
shroud does not cover the engine heat sink
head but the fan shroud intake hole has been
enlarged so the Tiger 50 does not have
overheating problems. The engine mount
accepts the ‘standard’ OS 50 SX-H size
engines and not 46-class engines (the Ornith
uses a smaller 46-size engine mount that have
a narrower crankcase). The price of 50-size
engines have come down quite a bit and are
far easier to tune than some 46-size engines
and make more power; I suggest using a 50size engine instead of a 46-size engine. I am
using a TT 50H engine because it is 30% to
40% less expensive than an OS 50 and in the
last few years, after using many different TT
50H and OS 50SX-H engines, I discovered the
TIGER 50 (JUNE '05)
4/14/05
1:01 PM
Page 75
Tiger 50
Indent on the 10 mm main rotor shaft just like
Raptor 30/50. This is a good idea because the
setscrews will not damage the 10 mm diameter
portion of the shaft
TT 50H is just as powerful and user-friendly as
the OS 50SX-H. I think the TT 50H is not
getting a fair shake because the first TT
helicopter engine, the TT 36H (from 10 years
ago) developed a poor reputation for lousy
throttle transition from idle to mid-range. The
new TT 50H is a completely new engine with a
different carburettor and uses a ringed piston
making it easier to start than ABC designs. The
TT Pro 50H mounting dimension, crankshaft
thread size, and exhaust hole pattern are
identical to OS 50H.
The Tiger 50 requires using a propeller drive
washer between the engine and the fan hub
(take a look at the picture). Unfortunately the
OS 50 Hyper, the TT 50H, Webra 50H and
Weston UK 50H do not include a drive washer
with the engine and only come with a 2 mm thin
washer for the crankshaft. Luckily, I have some
left over drive washers and placed the 2 mm
washer between the engine front bearing and
the drive washer. The hole in the Tiger 50 fan
hub is slightly tight and requires slight reaming
to fit on the crankshaft. The instructions
suggest after installing the fan hub to check the
run out of the fan hub with a dial indicator; I
checked it and mine was out by 0.010 inch. A
Dremel Mototool was used to elongate the hole
in the fan hub and then manoeuvre the fan hub
until the dial indicator registers less than 0.002
inch run out. I was even able to get it down to
less than 0.002 inch, but only after 40 minutes
of repeatedly tightening, loosening and
adjusting the fan hub position. A trick to help
with this is to use a dab of anti-seize when
assembling the clutch hub to the engine.
Novices may not have a dial indicator at
home so I suggest either borrowing one, or do
the best you can manually by placing a short
piece of music wire near the fan hub and watch
the gap between the stick tip and the fan hub
while rotating the fun hub by hand. Dial
indicators are less than $50 and are a
worthwhile tool in your arsenal. Audacity
announced there is an optional clutch hub (AH0537) available for engines not supplied with a
prop drive washer, where the aluminium hub
portion is taller replacing the drive washer.
Audacity Models offer an inexpensive
muffler (PRO-0068) that fits the Tiger 50
perfectly and the Evo 50 and even the Raptor
Optional limited slip unit for autorotation. The
aluminium collar presses the O-ring against the
autorotation hub so when the main rotor shaft
spins during autorotation, it will drive the main
gear and thus the tail rotor
50. This cast muffler has two chambers to
reduce noise, is held together with a very long 3
mm through bolt. A 3 mm nut is used at the
end to hold the two cast aluminium pieces
together; adding an extra 3 mm nut will help
guarantee the first nut does not come loose.
Amazingly, this muffler is not only reasonably
quiet, but works much better than expected!
The exhaust hole diameter was enlarged by 1.5
mm with a large drill bit and that helped raised
the engine power output with a slight penalty in
noise. Be careful not to crack the exhaust tube
when drilling out the exhaust tube.
Tail Rotor
The tail rotor system uses a Canadianmanufactured black neoprene toothed belt.
During the first few flights, check the belt
tension after every flight because the belt will
warm up and stretch as it wears in, then
readjust the tail boom for proper tension. The
horizontal fin clamp uses separate bolts, and
not the two bolts for the fin, to clamp down on
the tail boom. This is a wonderful idea, but it
will be even better if the two bolts are inserted
from ‘below’ the tail boom, then you do not
have to disturb the horizontal fin when we want
to pull on the tail boom.
Do not push the engine too far up so the clutch
rubs against the clutch bell. Here we can see I
pushed the clutch too far up and the clutch bell
was wearing the top surface of the clutch. This is
true for many helicopters - I suggest adding a 6
mm i.d. shim washer on the starting shaft
between the clutch and the clutch bell
Bottom view of the Tiger 50 rotor head. We can
see the Bell-Hiller mixing arm attached to the
70% ratio location (closer to the centre of the
main rotor shaft)
The Ornith Seesaw and Bell-Hiller arm, add some
Loctite on the bushing and the 3 mm bolt will
eliminate all freeplay. I learned this trick from the
Raptor 90 instruction manual
Canopy
The edges on the canopy came precut
which is a time saver, so I only had to cut the
window and add the windshield. The opening
on the bottom of the canopy is big enough to fit
a Pocket NiStarter for the glow plug, so a
remote glow plug extension is not needed. This
is a plus because extensions seem to fail at the
most inopportune time. Use a new X-Acto knife
to cut the decals, wash the canopy with
dishwashing detergent and then wipe dry.
These decals are easy to move around - not
like the Hirobo decals that are super thin but
super sticky so you have only one chance.
However, the Tiger 50 decals do not go around
the sharp curves of the nose. There is a trick
however, to putting on the decals; use a heat
gun and gently warm up both the decals and
canopy while pushing down on the decals at
The Tiger 50 seesaw has more fibre content than
the Ornith and also has two sets of holes for two
different Bell-Hiller mixing ratios, 100% and 70%
June 2005 MHW
75
TIGER 50 (JUNE '05)
4/14/05
1:02 PM
Page 76
Feature
Tail rotor pitch control bellcrank is the only
bellcrank that is not supported by ball bearings,
all other mixing arms and control arms are
supported by ball bearings, and there are not that
many bellcranks
New Tiger 50 helicopter produced in Korea and distributed in the US by Audacity Models/Genesis
Hobby in Florida, USA
the same time. This softens the decals a little
and helps them go around curves and also
helps melt the glue making them stick even
better.
The Tiger 50 is very stable and well suited as
a sport helicopter. What I like best is it exhibits
no pitch-up tendency in high-speed forward
flight. The canopy profile is bigger than other 30
and 50-size helicopters so it can more easily be
seen from a distance. The excellent visibility
and high stability makes it a good machine to
learn forward flight. With the supplied
symmetrical weighted 600 mm wood blades,
the helicopter climbs very fast right side up or
upside down. Switch to a pair of Thunder Tiger
600 mm carbon blades or V-Blades 600 mm
carbon blades and the Tiger 50 becomes even
better. Audacity offers an optional ‘Limited Slip’
clutch for the autorotation hub. It is an O-ring
design that creates friction between the main
rotor shaft and the main gear hence, driving the
tail rotor during autorotation. The slipper clutch
is fine for 180º autos, but not really sufficient for
high-speed backward autos. Audacity Models
says an optional driven gear system is under
consideration. In any case, I do not view this as
a liability as 50-class helicopters do not
typically have the reserve of blade energy that
60/90-class models do.
I already mentioned how to set up the Tiger
50 for 3-D flying. It is capable of Pirouetting
Flips, Death Spirals and Tick-Tocks. Just make
sure to install harder dampers and perhaps
some 5 mm i.d. shims between the grips and
the dampers to further stiffen things up to
forestall striking the tail boom during high-G 3D manoeuvres. I like my Tiger 50 for practicing
new manoeuvres because it is a lot less
intimidating, less stressful and inexpensive in
the eventuality I make an error.
The replacement parts are extremely
inexpensive (tail booms are a mere $7.88, main
shafts just $6.94, 600 mm wood blades are
$27.99, etc.) so people can fly this helicopter
with less apprehension. The Tiger 50 has no
handling vices, and the very reasonable cost
really makes it excellent for both 3-D practice
and sport flying. Novices can dial down the
responsiveness while they learn to hover by
adding the supplied weights to the flybar
paddles, and then adjust for more responsive
performance later. After all, novices are not
learning to hover forever, and what’s especially
nice is everyone can enjoy the rush of the 90class power-to-weight ratio the 50-class engine
delivers while benefiting from the 30-class
price.
Last thing, it seems Audacity have their
finger firmly on the pulse of the future as
demonstrated by the sneak peak exclusive to
MHW. This is a prototype electric version of the
Tiger. We were excited of the prospects of CNC
aluminium frames, but they quickly dashed
hopes with mention of mill-time measured in
days instead of hours! As they explained,
production pieces will be lighter when made of
plastic – though not as hot looking. Looks like
we will foresee interesting developments from
the folks at Audacity Models. ■
This rendering clearly shows the design of the
Tiger 50 flybar control ring and seesaw with
mounting holes for two different Bell-Hiller ratios
These two pictures explain what 70% Bell-Hiller mean. Set the main rotor blade pitch to zero degree
and level the flybar. Then tilt the flybar 10º in either direction. If the main rotor blade pitch angle
changes by 7º, then it means the Bell-Hiller mixing ration is 70%. See text for more explanation
Flying
76
MHW June 2005
Specification
PRODUCT: Tiger 50
MARKETPLACE: 50-size beginner/sport
US IMPORTER/DISTRIBUTOR: Audacity
Models, PO Box 952765, Lake Mary, FL
32795, USA
Tel: +407-302-3361, Fax: +407-302-3363
MAIN ROTOR DIAMETER: 1235 mm
TAIL ROTOR DIAMETER (max): 245 mm
OVERALL LENGTH: 1150 mm
ALL-UP WEIGHT (without blades):
3,345 g (7 lb 6 oz)
STANDARD MAIN GEAR RATIO: 8.9:1
STANDARD TAIL GEAR RATIO: 1:5.2
CONTROL REQUIREMENTS: 5 servo heli
radio and gyro
POWER REQUIREMENT: .50 cu in.
2-stroke model helicopter engine
CURRENT US RRP:
ARTF Tiger 50 $299.99 plus P&P
Tiger 50 kit $284.99 plus P&P
Verdict
Great value for money with very
reasonably priced spares with docile
flying characteristics making it a good
choice for the beginner.
With a powerful 50 engine and a few
simple ‘tweaks’, the Tiger 50 is a great
model to learn new tricks including
advanced 3-D manoeuvres.