1
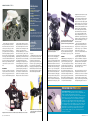
FLIGHTTEST
“
“
BY MIKE McGEE > PHOTOS BY MIKE McGEE & JIM SPEARS
The Tiger 50 is all
about delivering a
HIGH-QUALITY
HELI at a cost that’s
hard to beat.…
AUDACITY MODELS
TIGER
50
Low cost–audacious performance!
IN THE HELICOPTER WORLD, the .50-class heli is one of the
best values around, and when compared with a larger .60/.90 helicopter, the reasons quickly become obvious. This smaller heli is
easy to afford and less expensive to repair, it’s very stable, and its
agility is excellent because it weighs less. In addition, most .50class engines are almost as powerful as the .60s, and this gives
them an outstanding power-to-weight ratio.
AUGUST 2005 51
>>>
AUDACITY MODELS TIGER 50
SPECIFICATIONS
MODEL: Tiger 50
MANUFACTURER: Audacity Models
DISTRIBUTOR: Genesis Hobby
Distributors
MAIN ROTOR DIAMETER: 52.5 in.
(1,335mm)
LENGTH: 42.5 in. (1,232mm)
WEIGHT: 7 lb. 5 oz.
RADIO REQ’D: 5-channel heli w/120degree CCPM
PRICE: $285 kit; $299 ARF
>>>
COMMENTS
At last—a heli that’s well suited to both
beginners and experts. Low-cost and
easy to build and set up, the Tiger 50 is
the perfect heli for learning new tricks.
>>>
Four guides support the tail-rotor pushrod along the
length of the tail boom. Note the bead that the
pushrod rides in and how the guide firmly captures it.
HIGHLIGHTS
The latest heli in the .50-size market is
the Tiger 50 manufactured by Audacity
Models. This excellent, low-cost model is
certain to give the “other guys” a run for
their money. And don’t be fooled by its
price tag ($285 kit; $299 ARF; the Tiger 50
delivers heart-pounding 3D performance
right out of the box by using the simplicity
of 120-degree cyclic/collective pitch mixing
(CCPM) and a reliable belt-driven tail rotor.
As I found out, the Tiger 50 is a high-quality
heli that’s easy to build and fun to fly at a
cost that’s hard to beat. Read on to learn
more.
KIT OVERVIEW
The Tiger 50 comes in two versions: almostready-to-fly (ARF) and as a kit (the subject of
this review). To apply the term “kit” to the
Tiger 50 is somewhat misleading because all
its major assemblies (with the exception of
the engine/clutch, chassis and tail rotor) are
factory-built; the pushrods have even been
assembled to their correct lengths for a symmetrical 3D setup. This feature alone
demonstrates that the Tiger 50 is a cut above
the rest. And it doesn’t stop there, as it has
some features that are usually found only on
high-end helicopters. The main rotor head is
fully assembled and uses two radial bearings.
It also includes thrust bearings for the
demanding rigors of 3D flight. The seesaw
carrier is fully ball-raced for smooth operation, and the kit includes a set of finished
600mm wooden blades. I know that a lot of
experienced heli pilots prefer fiberglass or
carbon blades and won’t use the wooden
ones, but they are a welcome inclusion for
beginners. Also for beginners, the washoutmixing arms can be tuned to soften the con-
>Excellent manual
>Easy to build
>Low cost
>Outstanding flight characteristics
The sturdy rotor head is well designed for
responsive and smooth operation.
trol response.
The aluminum tail boom is well supported by two braces that are attached to the
bottom of the chassis for maximum stiffness; this helps to make the tail rotor
responsive and precise. The tail rotor has
more than 60 degrees of pitch range, and to
keep it under control, the pitch slider is
bearing-supported and guided by a dual-pin
bellcrank assembly. Another nice feature is
that each tail-rotor blade grip is equipped
with dual ball bearings. The fuel tank,
mounted on vibration-absorbing grommets,
is a massive 14 ounces for long flights, so
you can really wring this wildcat out.
The 58-page instruction manual is a highlight that deserves special mention: it’s very
well illustrated and lists the items needed to
complete the heli and the required assembly
tools. Further, almost every assembly stage
contains a “Pro tip.” It also clearly explains
the mechanical and electronic setups of 120degree CCPM and how they interact with
each other. To illustrates this, many graphs
show examples of throttle and pitch curves
for hovering and 3D aerobatics. If you’ve
never used CCPM, this is an excellent guide.
The manual also shows the precise position
of the servo arms, where the balls need to be
on the servo arms and the lengths of the
pushrods. As you can see, Audacity Models
has spent considerable time and energy to
make the Tiger 50 setup as easy as possible.
ASSEMBLY
>Chassis The Tiger 50 builds quickly, so I’ll
only highlight items and not recite a blowby-blow of “screw this part to that part.”
Most of the assembly centers on the chassis, which is molded of tough, reinforced
plastic that will survive many crashes. The
first items are the clutch bell and the tail
drive; both are factory assembled, so we’re
already ahead of the game! Attach the elevator link to the swashplate arm with a steel
pin that’s tapped into place. Make sure that
the mold marks on the link face toward the
rear of the heli, as the molded-in ball link is
a one-way link. Fuel-tank assembly is
straightforward; check the tank for any tiny
scraps of plastic in it before you seal it.
Instead of having to fiddle with separate
nuts to secure the servos, one-piece servo
boss plates are used. They’re simply pushed
into place wherever a servo is mounted and
make servo installation a snap. To assemble
the chassis, add the subassemblies and screw
the frames together. I really like that the
frames are held together with socket-head
bolts and locknuts instead of sheet-metal
screws; no stripped mounting holes here!
When you mate the frames, be sure to use
the main shaft to perfectly align its bearings.
Add the radio and gyro platform, the canopy
mounts and the landing gear to complete
the basic chassis build.
When you add the main shaft and the
main gear, make sure they’re oriented correctly, and be sure to use the proper shoulder bolt on the gear. A groove is machined
into the shaft for the mast stopper’s
setscrews. A lot of helis don’t have this welcome little detail.
The most difficult assembly task was
adding the cooling fan and clutch to the
engine, as the fan hub uses a straight hole
instead of a tapered collet and both must be
dial-indicated for a smooth-running heli.
When you add the engine to the chassis,
insert the start shaft first, or you’ll have to
remove the engine to add it.
>Main rotor and tail rotor. The rotor head,
swashplate and washout unit are factoryassembled, so all you need to do is add them
to the heli. Then install and center the flybar and its paddles, and snap the pushrods
into place. You have the option of installing
lead weight in the paddles for a softer con-
FROM TAME CAT TO WILDCAT
IN STOCK FORM, THE TIGER 50 is a real pussycat that can satisfy pilots of
This right-side view of the chassis shows a neat and orderly layout. Note the clips for the servos leads.
52 MODEL AIRPLANE NEWS
The pitch slider has two bearings for reliable
operation, and it’s guided by forked bellcrank
that uses dual pins.
different skill levels. To really unleash this cat, however, Audacity Models offers
a range of inexpensive parts that increase the heli’s prowess.
First is the 3D seesaw (flybar carrier). This part is included with the kit, and it
has an extra set of holes in it. This has the advantage of offering both the 1:1
and 0.7:1 Bell-Hiller mixing ratios (inner holes) that are used for 3D flight.
Audacity also offers harder 3D dampers that allow stiffer damping, and that, in
turn, permits more aggressive flight. To get more leverage from the swashplate,
a set of 3D ball extensions is offered and takes only a couple of minutes to add
to the swashplate. Top this off with a 3D flybar and paddles, and you’ll have a
heli that allows you a customized control response better suited for extreme
3D maneuvers. Just remember, though, that with increased control throw
comes the possibility of binding, so be sure to check for any interference at
the extremes of throw travel.
FEBRUARY 2002 13
>>>
IN THE AIR
With everything checked and double-checked, it was time to get this cat
airborne. All flying was done with the stock wooden blades, and we used
Morgan 30% heli fuel. For hovering and sport aerobatics, we used the
stock paddles with the lead weights installed, while the more advanced
maneuvers were performed with the stock setup and we then added the
3D parts for a direct comparison.
PITCH CURVES (IN DEGREES)
Low stick
Mid stick
Normal
-3
+5
Idle up 1
-5
+4
Idle up 2
-10
0
Throttle hold -5
+5
High stick
+10
+10
+10
+12
HOVER STABILITY
The first hover was a very pleasant surprise, as almost no trim changes
were needed. The head speed at around 1,400 to 1,500rpm felt very good,
and the blade tracking was perfect. Not bad for factory-adjusted links.
In wind gusts, holding a steady hover was easy because the Tiger is very
solid. The cyclic controls are well balanced, and the tail rotor has plenty of
authority to hold the Tiger firmly in a strong crosswind.
SPORT AEROBATICS
The stock setup of head damping and weighted paddles provides a
somewhat soft feel, but this helps the Tiger attain a stable hover and
feel. Pushing the Tiger into forward flight showed that it tracks superbly.
trol response, which is great for beginners.
The ball links are designed to fit one way
only and are supposed to have the letters
“HD” molded on their fronts, but for some
reason, the “HD” is missing. If you look
closely at the link, however, you’ll see a ring
that’s molded around the ball hole; this is
>>
GEAR USED
RADIO: JR 10X transmitter & JR 649 receiver,
3 JR 8231 digital servos
(cyclic & collective), 1
JR 2700G (rudder), 1
JR 4001 servo (throttle),
JR 500T Ring gyro
ENGINE: O.S. .50SX-H
Hyper
MUFFLER: K&S 50
Competition
FUEL: Morgan 30% heli
54 MODEL AIRPLANE NEWS
Starting with some stall turns, the Tiger’s vertical climb is impressive
and seems to last quite long. Moving on to loops, the Tiger performs them
at will and at any diameter you wish. Rolls were equally easy to do, but
they do require a little fore/aft correction through the maneuver to make
them axial. Mild 3D maneuvers such as flips and tumbles revealed that the
Tiger handles them well, but it tends to slow down as it rotates through
them; this was mainly due to the stock damping and weighted paddles.
3D AEROBATICS
I added Audacity’s 3D upgrade parts and cranked up the head speed to
around 1,700rpm. I would have liked to use a higher speed of 1,800 to
1,850rpm, but I didn’t want to over-stress the stock wooden blades.
With the higher rotor speed, the Tiger still ran smoothly and was a lot
more responsive. Punching the throttle, the model climbed aggressively
without fanfare. The collective response was splendid, and as we put it
through its paces, the cyclic response was tight and quick. Climbing to altitude, consecutive flips and tumbles were a lot more rapid, and it was easy
to time cyclic inputs. Other maneuvers such as point rolls and flips were
positive and sharp. It was easy to quickly master the Tiger.
I like to finish my flights with some autorotations, and the Tiger is easygoing in this flight mode. With the optional Limited Slip Drive installed,
pirouetting and backward autos are possible. Be aware, though, that in
calm conditions the stock blades will run out of inertia and not leave much
room for errors.
The Tiger 50 is an impressive model that’s capable of a lot of performance. I’m having a ball with mine!
the back side of the link that faces the servo
arm.
Assembling the tail rotor and tail boom is
quick and easy; just follow the instructions.
Be sure that you orient the drive belt correctly before it is tensioned, or the tail rotor
will turn backward.
>Radio installation and setup. Like the rest
of the heli, radio installation is painless. As
you install the servos, you’ll appreciate the
servo bosses you installed earlier. Route the
servo leads to the front of the heli, and
make sure that they don’t contact any moving parts. Molded-in clips on the right side
of the chassis firmly hold the leads. When
you install the tail-rotor pushrod, place a
shallow Z-bend toward the front of it so it
lines up with the servo arm. Also adjust the
pushrod guides so the pushrod moves without binding.
Now build the servos arms and place
them on the servos. Space the balls 20mm
from the center of the servo spline, but
place the ball on the elevator servo arm at
23mm to prevent any interaction as the
swashplate moves up and down. As mentioned, the pushrods come assembled, and
they are right on the money. Install your
receiver, gyro and battery, and the heli is
complete, except for the canopy.
If you have followed the directions,
when you turn on the radio system for the
first time, the linkages will be almost perfect; mine were. To achieve a basic setup, I
didn’t need to do very much radio programming. This really shows that Audacity paid
attention to the details.
PARTING THOUGHTS
You cannot go wrong when you start out
with the Tiger 50 or add it to your hangar.
This is a high-quality heli that has a solid
chassis design, coupled with excellent flight
characteristics. It will please even the most
demanding 3D pilot. The Audacity Models
Tiger 50 is one cat that really roars! See the Source Guide on page XXX for manufacturers’
contact information.