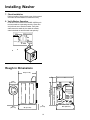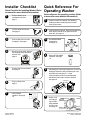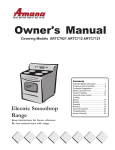
1
Installation And
Operating Instructions
For Front Loading
Washers
Keep these instructions for future reference. Be sure this manual stays
with washer.
Attention Installer
Wait until washer is within 4 feet of installation area to
remove shipping brace and shock sleeve.
Shipping brace and shock sleeve must be removed
prior to operating machine.
Para recibir un manual en español gratis, envíe por correo o por fax su
nombre, dirección, y número de modelo a:
Amana Appliances
Consumer Communications/Spanish Manual
2800 220th Trail
Amana, Iowa 52204-0001
USA
Número de fax 1-319-522-8158
Contents
Service ........................................................................ 2
Asure™ Extended Service Plan .................................. 2
Parts and Accessories ................................................ 2
Important Safety Instructions ....................................... 2
Model Identification ..................................................... 4
Electrical ..................................................................... 4
Tools ........................................................................... 4
Electrical Requirements .............................................. 5
Grounding Instructions ................................................ 5
Service
Keep a copy of sales receipt for future reference or in
case warranty service is required. Any questions or to
locate an authorized servicer, call 1-800-NAT-LSVC
(1-800-628-5782) inside U.S.A. 319-622-5511 outside
U.S.A. Warranty service must be performed by an
authorized servicer. Amana Appliances, also recommends
contacting an authorized servicer if service is required
after warranty expires.
Installing Washer
Water Supply Requirements .................................... 5
Water Temperature .................................................. 6
Water Pressure ........................................................ 6
Risers ...................................................................... 6
Installation Procedure .............................................. 6
Rough in Dimensions ............................................. 10
Asure™ Extended Service
Plan
Amana Appliances offers long-term service protection for
this new washer. Asure™ Extended Service Plan is
specially designed to supplement a strong warranty. This
plan covers functional parts, labor, and travel charges. Call
1-800-528-2682 for information.
Operating Washer
Helpful Hints .......................................................... 11
Pauses ............................................................... 11
Boosted Hot Wash Temperature ......................... 11
Locking Door ...................................................... 11
Adding Clothes During Wash Cycle .................... 11
Detergents .......................................................... 11
Spin Cycle .......................................................... 11
Operating Instructions ............................................ 12
Determine Proper Cycle ...................................... 12
Wash Cycles ...................................................... 13
Operating Procedures ......................................... 14
Timer .................................................................. 16
“Door Locked” Light ............................................ 16
“Heater On” Light ................................................ 16
Out of Balance Load ........................................... 16
End of Cycle Signal ............................................ 16
Dispenser Drawer ................................................... 16
Child Lock .......................................................... 16
Detergent Compartment ...................................... 16
Liquid Bleach Compartment ................................ 17
Fabric Softener Compartment ............................. 17
To Clean the Dispenser ....................................... 17
Care and Cleaning ..................................................... 18
Cold Weather Care ................................................ 18
Care Of Your Washer ............................................. 18
Vacations and Extended Non-Use .......................... 18
Reinstallation of Shipping Materials ........................ 18
Before Calling Service ............................................ 19
Common Washer Sounds ...................................... 20
Warranty ................................................................... 21
Installer Checklist ...................................................... 22
Parts and Accessories
Purchase replacement parts and additional accessories
over the phone. To order accessories for your Amana
product, call 1-800-843-0304 inside U.S.A. or
319-622-5511 outside U.S.A.
For more information on this and other
Amana products, visit our web site:
www.amana.com
Important Safety Instructions
!
WARNING
For your safety and to reduce the risk of fire or an
explosion, do not store or use gasoline or other
flammable vapors and liquids in the vicinity of this or
any other appliance.
2
!
15. Install the washer according to the Installation
Instructions. All connections for water, drain,
electrical power and grounding must comply with
local codes and be made by licensed personnel
when required. Do not do it yourself unless you
know how!
16. To reduce the risk of fire, clothes which have
traces of any flammable substances such as
vegetable oil, cooking oil, machine oil, flammable
chemicals, thinner, etc. or anything containing wax
or chemicals such as in mops and cleaning cloths,
must not be put into the washer. These flammable
substances may cause the fabric to catch on fire
by itself.
17. Do not use fabric softeners or products to eliminate static unless recommended by the manufacturer of the fabric softener or product.
18. Keep your washer in good condition. Bumping or
dropping the washer can damage safety features. If
this occurs, have your washer checked by a
qualified service person.
19. Replace worn power cords and/or loose plugs.
20. Be sure water connections have a shut-off valve
and that fill hose connections are tight. Close the
shut-off valves at the end of each wash day.
21. Loading door must be closed any time the washer
is to fill, tumble or spin. Do not attempt to bypass
the loading door switch by permitting the washer to
operate with the loading door open.
22. Always read and follow manufacturer’s instructions
on packages of laundry and cleaning aids. Heed all
warnings or precautions. To reduce the risk of
poisoning or chemical burns, keep them out of the
reach of children at all times (preferably in a locked
cabinet).
23. Always follow the fabric care instructions supplied
by the garment manufacturer.
24. Never operate the washer with any guards and/or
panels removed.
25. Do not operate the washer with missing or broken
parts.
26. Do not bypass any safety devices.
27. Failure to install, maintain, and/or operate this
washer according to the manufacturer’s instructions may result in conditions which can produce
bodily injury and/or property damage.
WARNING
To reduce the risk of fire, electric shock, serious injury
or death to persons when using your washer, follow
these basic precautions:
1. Read all instructions before using the washer.
2. Refer to the Grounding Instructions in the Installation Manual for the proper grounding of the washer.
3. Do not wash articles that have been previously
cleaned in, washed in, soaked in, or spotted with
gasoline, dry-cleaning solvents, or other flammable
or explosive substances as they give off vapors
that could ignite or explode.
4. Do not add gasoline, dry-cleaning solvents, or
other flammable or explosive substances to the
wash water. These substances give off vapors that
could ignite or explode.
5. Under certain conditions, hydrogen gas may be
produced in a hot water system that has not been
used for two weeks or more. Hydrogen gas is
explosive. If the hot water system has not been
used for such a period, before using a washing
machine or combination washer-dryer, turn on all
hot water faucets and let the water flow from each
for several minutes. This will release any accumulated hydrogen gas. The gas is flammable, do not
smoke or use an open flame during this time.
6. Do not allow children to play on or in the washer.
Close supervision of children is necessary when
the washer is used near children. This is a safety
rule for all appliances.
7. Before the washer is removed from service or
discarded, remove the door to the washing compartment.
8. Do not reach into the washer if the wash tub is
moving.
9. Do not install or store the washer where it will be
exposed to water and/or weather.
10. Do not tamper with the controls.
11. Do not repair or replace any part of the washer, or
attempt any servicing unless specifically recommended in the User-Maintenance instructions or in
published user-repair instructions that you understand and have the skills to carry out.
12. To reduce the risk of an electric shock or fire, do
not use an extension cord or an adapter to connect the washer to the electrical power source.
13. Use your washer only for its intended purpose,
washing clothes.
14. Always disconnect the washer from electrical
supply before attempting any service. Disconnect
the power cord by grasping the plug, not the cord.
Note: The Warning and Important Safety Instructions
appearing in this manual are not meant to cover all
possible conditions and situations that may occur.
Common sense, caution and care must be exercised
when installing, maintaining, or operating the washer.
Always contact your dealer, distributor, service agent or
the manufacturer about any problems or conditions you
do not understand.
3
Model Identification
Accessories Bag
Thank you for purchasing this washer. Please read these
Installation Instructions thoroughly. This manual provides
proper maintenance information. Any questions, call the
Consumer Affairs Department at 1-800-843-0304 inside
U.S.A. and 1-319-622-5511 outside the U.S.A.
An accessory bag has been shipped inside your washer.
It includes:
• Two inlet hoses with washers
• Four rubber feet
• Beaded Tie-Down Strap
• Installation and Operating Instructions
• Washing Guide
• Bag for storing shipping materials
• Video
Retain accessories bag to store shipping brace and
shock sleeve for future use when moving washer.
Complete registration card and promptly return. If
registration card is missing, call the Consumer Affairs
Department. Appliance can also be registered through
out website www.aman.com.
When contacting Amana Appliances, provide product
information. Product information is on the serial plate.
Record the following information.
Tools
Tools required:
9
/16" wrench or adjustable wrench
Screwdriver, Phillips and blade
Level
Pliers
9
/16" socket wrenches, and 5/16" socket wrench
Deep Socket 9/16" socket wrenches for rear leveling legs
Serial Plate
Model Number:
_________________________
Screwdriver
Manufacturing Number: _________________________
Date of Purchase:
_________________________
6"
9/1
_________________________
6"
9/1
S/N or Serial Number:
Dealer's name and address: ______________________
________________________________________________
Wrench
Pliers
Level
Note:
Deep
socket
wrench
Socket
wrench
Translation may sometimes cause variations in
meaning. In all cases where meaning varies, the
most accurate meaning will be the English
version of this document.
Electrical
Refer to serial plate for specific electrical requirements.
For more detailed information refer to section on electrical
requirements. Serial plate is located in area shown.
Water
Washer needs two standard 3/4" (19.05) mm) water
supply faucets with a pressure between 20 –120 pounds
per square inch (138 to 827 kPa). For more detailed
information refer to section on Water Supply
Requirements.
4
Installing Washer
NOTE: Have a qualified electrician check the polarity of
the wall receptacle. If a voltage reading is
measured other than that illustrated, the qualified
electrician should correct the problem.
Electrical Requirements
Washer requires 120 volt, 60 hertz and a 3-prong
grounding plug.
NOTE: Wiring diagram is located in the control hood.
!
STANDARD 120 VOLT,
60 HERTZ, 3-WIRE
EFFECTIVELY GROUNDED CIRCUIT
WARNING
L1
NEUTRAL
GROUND
To reduce the risk of fire, electrical shock or personal
injury, all wiring must conform with the latest edition of
the National Electrical Code, ANSI/NFPA 70, and such
local regulations as might apply. It is the customer’s
responsibility to have the wiring, fuses and circuit
breakers checked by a qualified electrician to make
sure your home has adequate electrical power to
operate the washer.
120 ± 12
V.A.C.
NEUTRAL
SIDE
DO NOT
OVERLOAD
CIRCUITS
0
V.A.C.
120 ± 12
V.A.C.
ROUND
GROUNDING
PRONG
DO NOT
USE AN
ADAPTER
DO NOT
USE AN
EXTENSION
CORD
Water Supply Requirements
Grounding Instructions
!
Washer must be grounded. In the event of malfunction or
breakdown, grounding will reduce the risk of electric
shock by providing a path of least resistance for electric
current. The washer is equipped with a cord having an
equipment-grounding conductor and a 3-prong grounding
plug. The plug must be plugged into an appropriate outlet
that is properly installed and grounded in accordance with
all local codes and ordinances.
!
WARNING
Under certain conditions, hydrogen gas may be
produced in a hot water system that has not been
used for two weeks or more. HYDROGEN GAS IS
EXPLOSIVE. If the hot water system has not been
used for such a period and before using the washer,
turn on all hot water faucets and let the water flow from
each for several minutes. This will release any
accumulated hydrogen gas. The gas is flammable, do
not smoke or use an open flame during this time.
WARNING
Improper connection of the equipment-grounding
conductor can result in a risk of electric shock. Check
with a qualified electrician or serviceman if you are in
doubt as to whether the washer is properly grounded.
NOTE: Water supply faucets must fit standard 3/4"
(19.05 mm) female garden hose couplings. Do
not use slip-on or clamp-on connections.
Do not modify the plug provided with the washer – if it will
not fit the outlet, have a proper outlet installed by a
qualified electrician.
5
Installing Washer
NOTE: Water supply faucets should be readily
accessible to permit turning them off when
washer is not being used.
Risers
Risers (or air cushions) may have to be installed if the
pipes knock or pound when flow of water stops. The risers
are more efficient when installed as close as possible to
the water supply faucets.
NOTE: Longer inlet hoses are available (optional at extra
cost) if hoses supplied with the washer are not
long enough for the installation. Order hoses as
follows:
A
No. 20617 Inlet Hose, 8 feet (2.44 m)
No. 20618 Inlet Hose, 10 feet (3.05 m)
B
B
A
C
A. Risers (air cushions)
Risers
B.
Water supply faucets
Installation Procedure
or
1. Position washer near installation area.
Position washer so it is within 4 feet of desired area
of installation.
D
E
A. Water supply faucets
C. Hot water connection
E. Water inlet hoses
Water hookup
B.
D.
!
Cold water connection
Water mixing valve
CAUTION
To avoid damage to washer, never move washer more
then 4 feet without installing shipping brace and shock
sleeves.
Water Temperature
Cold:
Recommended cold water temperature is 60° to 80°
Fahrenheit, 10° to 24° Celsius.
2. Connect Water Inlet Hoses.
Remove two plain rubber washers from accessories
bag. Install according to illustration below.
Hot:
Recommended hot water temperature is 120° to 140°
Fahrenheit, 60° to 66° Celsius.
A
Warm:
Mixture of hot and cold water. (Warm water temperature is
dependent upon the water temperature and the pressure
of both the hot and cold water supply lines).
A
B
IMPORTANT: Turn off water supply faucets after checkout
and demonstration. Owner should turn off water supply
whenever there will be an extended period of non-use.
A. Rubber washer
Water supply hoses
B.
Inlet hose
Turn on water supply faucets and flush lines for
approximately two minutes to remove any foreign
materials that could clog filter screens in water
mixing valve.
Water Pressure
Pressure must be a minimum of 20 to a maximum of 120
pounds per square inch (138 to 827 kPa) static pressure
measured at the faucet.
NOTE: When installing in newly constructed or
renovated building, it is very important to flush
the lines since build-up may have occurred
during construction.
NOTE: Water pressure under 20 pounds per square inch
(138 kPa) will cause an extended fill time in the
washer and may not properly flush out the
detergent dispenser.
6
Installing Washer
IMPORTANT: To prevent siphoning, do not place any
ribbed portion of the drain hose into the
standpipe.
IMPORTANT: Thread hose couplings onto valve
connections finger-tight, then approximately 1/4
turn with pliers. DO NOT cross thread or
overtighten couplings.
B
Turn water on and check for leaks. If leaks are found,
retighten the hose couplings. Continue tightening and
rechecking until no leaks are found.
3. Connect Drain Hose to Drain Receptacle
C
Remove drain hose from its shipping position on the
rear of the washer by unhooking the hose from the
retainer clamp.
E
D
Ribbed portion or drain hose
Drain hose sleeve
24" to 36" (91.44 cm) recommended height, it is not
recommended to install drain pipe outside the recommended
height range.
D. Standpipe 2" (5.08 cm) or 11/2" (4 cm)
E. Beaded tie-down strap
Standpipe installation
A
A.
B.
C.
B
A. Retainer clamp
B.
Preparing drain hose for installation
A
Sink Installation
For this type of installation, use the beaded tie-down
strap (supplied in accessories bag), or use a large
wire tie (available from your local hardware store) and
secure the drain hose to the cabinet top hinge (see
illustration). This will prevent the drain hose from
dislodging.
Drain hose
Find the instructions that are appropriate for your
type of drain receptacle (standpipe, sink, wall, or
laundry tub). Follow these instructions to properly
install the drain hose.
A
B
IMPORTANT: Drain receptacle must be capable of
handling a minimum of 1 1/4" (32 cm) outside
diameter drain hose.
C
Standpipe Installation:
Place the drain hose into the standpipe. Remove the
beaded tie-down strap from accessories bag and
place around standpipe and drain hose and tighten
strap to hold hose to standpipe. This will prevent the
drain hose from dislodging from drain receptacle
during use.
A.
C.
Drain hose
B. Tie-down strap or wire tie
24" to 36" (91.44 cm) recommended height, it is not
recommended to install drain pipe outside the recommended
height range.
Sink installation
In The Wall Installation
For installation of this type, the drain hose MUST be
secured to one of the inlet hoses using the beaded
tie-down strap from accessories bag.
7
Installing Washer
NOTE: End of drain hose must be 24" to 36" above the
floor. Without 24" to 36" high elevation, water
may run out of washer prematurely.
4. Remove Shock Sleeves and Shipping
Brace
Remove 2 front access panel screws to remove
access panel. Save screws.
A
B
A
B
C
A. Front access panel
Access panel removal
A. Drain hose
B. Tie-down strap (tape if necessary)
C. Inlet hoses
In wall water hook up
Access panel screws
Remove five bolts and five washers from yellow
marked shipping brace with a 9/16" socket wrench and
remove brace. Remove label from outside access
panel and place on inside of access panel.
Laundry Tub Installation
For this type of installation, the drain hose must be
secured to the stationary tub to prevent hose from
dislodging during use. Use the beaded tie-down strap
(supplied in accessories bag) to secure hose.
A
B
B
B
A. Drain hose
Laundry tub installation
B.
A
B.
Tie-down strap
A. Shipping brace
Removing shipping brace
8
B.
Bolts and washers
Installing Washer
Loosen inside locknuts using a 9/16" deep socket.
Adjust level legs with a 1/4" socket on top of leg.
Adjust legs until machine is level front to back, side
to side and does not rock. Tighten locknuts using the
9
/16" deep socket. If locknuts are not tight, washer will
move out of position during operation.
• On front legs an open or box end wrench can be
used in place of deep socket. Hold leg still with 1/4"
socket on top of leg. use 9/16" wrench to tighten
locknut.
Remove both front shock sleeves and both rear
shock sleeves by pulling on the yellow rope.
A
NOTE: Level must rest on raised portion of top panel.
See illustration.
A
B
B
A. Shock sleeve
B. Pull on cord to remove 4 shock sleeves
Shock sleeve removal
C
F
NOTE: 5 Bolts, shipping brace, 5 washers and shock
sleeves should be saved and must be
reinstalled whenever the washer is moved
more than four feet. Do not lift or transport
washer from front or sides or without shipping
materials installed.
E
D
A. Level, washer should be level front to back and side to side
B. 1/4" hex, top of leveling leg
C. Locknut
D. Leveling leg
E. Rubber foot
F. Washer base
Leveling washer
Store shipping materials in Accessories Bag. Save
materials for use whenever the washer is moved.
Refer to Shipping Brace Removal and Installation
section for instructions on installation.
Reinstall front access panel.
5. Position and Level Washer
6. Electrical Connection
Position washer on a clean, firm, and level floor.
Remove rubber feet from accessories bag. Place
rubber feet on all four leveling legs.
Refer to section on Electrical Requirements, and plug
in washer.
Installing washer on any type of carpeting or soft
vinyl flooring is not recommended. These surfaces
contribute to vibration and a tendency for the washer
to move during the spin cycle.
NOTE: Do not slide washer across floor if leveling legs
have been extended or rubber feet have been
installed, legs and base could become damaged.
Plug in washer
NOTE: Use of the dispenser drawer, door or control
panel as a handle in moving of washer may
cause damage to these parts.
9
Installing Washer
7. Check Installation
Refer to Installer Check on back cover of this manual
and make sure that washer is installed correctly.
8. Verify Washer Operation
Push timer knob in and turn to RINSE & SPIN cycle
to ensure washer is operating correctly. Close door
and pull knob out to start the washer. Verify that
water enters the wash tub, the wash tub rotates,
water is drained out and the wash tub spins dry.
Verify washer operation
Rough in Dimensions
28" (71.1 cm)
14.6"
(37.1 cm)
28" (71.1 cm)
2"
(5.1 cm)
10
30.9" (78.5 cm)
43.6" (110.7 cm)
36.6" (93 cm)
16.8"
(42.7 cm)
26.9" (68.3 cm)
Operating Washer
Helpful Hints
Adding Clothes During Wash Cycle
To avoid delays to wash cycle make sure all items are
placed in washer before starting washer. If it is necessary
to add or remove items from the washer while it is
operating, perform the following steps:
There is no agitator on this washer. Instead, clothing
gently tumbles through water. Wash action consists of a
period of tumbling in one direction, a brief pause, then a
reverse tumble in opposite direction. Pauses are part of
tumble action and add to the unique soaking and cleaning
action of the washer. Do not attempt to turn timer through
these pauses. Pauses are part of the wash cycles.
1. Push timer knob in to stop the wash cycle.
2. Wait until “Door Locked” light goes off (“Door Locked”
light will take a minimum of 45 seconds to shut off
when the wash cycle has been interrupted.)
3. Open door. Add or remove items, close door.
• Water level will be below the level of the door so
overflow out of door will not occur.
4. Adjust timer knob (if needed) and pull timer knob out
to restart cycle.
Pauses
This washer has pauses in its operation that are part of its
normal operation. Pauses occur at the following times:
• During washing and rinsing tumble action there is a 8
to 10 second pause while the tumbling action reverses.
• Washer is heating water during the Boosted Hot
setting. Washer will heat for approximately 55 seconds
perform a 5 second tumble and then repeat until water
is correct temperature.
• Between wash and rinse cycles for 15 to 30 seconds.
Detergents
See Dispenser Drawer instructions for adding detergents.
• Low sudsing detergents are recommended for use with
high efficiency or front loading washing. To identify
these detergents look for High Efficiency (HE) graphic
on the detergent package.
• If using detergents made for topload washers, avoid
oversudsing by using 1/3 the recommended detergent
amount. Cleaning performance may be affected when
using the lesser amount.
Boosted Hot Wash Temperature
• When Boosted Hot setting is selected, the built-in
heating element will boost the water temperature in the
wash tub to 140°. When the heating element is
operating the “HEATER ON” light will come on. The
timer will not advance until the water temperature
reaches 140°. (See setting WASH/RINSE temperature
instructions for temperature selection)
• Time needed to reach 140° depends on the load size
and the temperature of the incoming water. This can
vary from 30 to 60 minutes.
• Boosted Hot setting can be turned off by rotating the
WASH/RINSE TEMPERATURE selector to any other
setting (rotating the cycle will cause a pause in the
cycle of approximately one minute.)
NOTE: The glass door allows viewing of suds level. The
normal level of suds should be below the center
of the door. If suds level is too high, the amount
of detergent used should be reduced during next
cycle. Extra Rinse cycle may also be selected.
Spin Cycle
When washer goes into its spin cycle, there will be a
noticeable increasing and decreasing of the spin speed of
the washer wash tub. The washer will slowly tumble the
clothing items between rapid spins. During the final spin,
there will be a noticeable increase in the spin speed
before the washer goes into a final fluff.
Locking Door
• Door locking mechanism is a safety feature that keeps
the door securely shut during operation. Door can not
be opened while washer is in operation.
• The “Door Locked” light must be on for the unit to
operate.
• If power to washer is interrupted or there is a power
outage during operation, there will be a minimum of 45
second delay before door can be opened even if DOOR
LOCKED light goes off.
Loading Washer
This front load washer operates best when fully loaded.
Maintaining a balanced load is important for proper
operation. A single item or very small load can not be
evenly balanced. Make sure several items are in the wash
tub when starting cycle.
11
Operating Washer
Operating Instructions
!
Permanent Press/Knit Cycle
Use for permanent press items and synthetics. Wash
time selection will depend upon type of fabric and amount
of soil. There are two settings in the PERMANENT
PRESS/KNITS cycle—Normal and Light. Number shown
next to these settings is length of tumbling in minutes.
(For example: Setting timer on Normal will be a nine
minute tumble, including pauses.)
WARNING
To reduce the risk of fire, electrical shock, serious
injury or death to persons, read the IMPORTANT
SAFETY INSTRUCTIONS on pages 3 and 4 before
operating your washer.
Determine Proper Cycle
Delicate Cycle
Wash delicate items that typically get washed by hand, in
this cycle. There are two settings in the DELICATE
cycle—Normal and Light. Number shown next to these
settings is length of tumbling in minutes. (For example:
Setting timer on Normal will be a seven minute tumble,
including pauses.)
Regular Cycle
Use for sturdy items, play or work clothes, towels,
T-shirts, etc. Wash time selection will depend on type of
fabric and amount of soil. When cleaning heavily soiled
items, use prewash setting and a longer wash time (15
minutes maximum). Lightly soiled items require less
wash time.
Rinse and Spin Cycle
Use for items that only need to be rinsed. This cycle is
also useful in ridding your washer of suds when too much
detergent has been used.
Regular Cycle contains four settings—Prewash, Heavy,
Normal and Light. Prewash setting is for heavily soiled or
stained clothing. Number shown next to Heavy, Normal,
and Light settings is the length of tumbling in minutes.
(For example: Setting timer on Heavy will be a 15 minute
tumble, including pauses.)
NOTE: Rinse and Spin setting can be used to help
completely remove excess soap from any wash
setting.
NOTE: Detergent will not be dispensed during the
Prewash setting. Use a spot remover directly on
stains when using this setting. To add detergent
during a Prewash cycle, add powder into the
wash tub, add liquid detergent into the detergent
dispenser. If liquid detergent is used, you will
need to add detergent to the dispenser during the
wash portion of the cycle also.
12
Operating Washer
Wash Cycles
Each wash cycle includes several different settings. The following chart lists what can be expected during the cycles
selected.
Regular Cycle
Activity
Prewash (Optional)
Fill, Tumble, Rinse & Drain
Heavy, Normal, Light
Fill & Tumble
Spin
Pulse Spin
Rinse 1
Fill & Tumble
Spin
Pulse Spin
Rinse 2
Fill & Tumble
Final Spin*
Medium & Fast Spin
Extra Rinse (Optional)
Fill & Tumble
Spin
Medium & Fast Spin
Fluff
Tumble
48 minute total cycle time, cycle time will vary with fill rate.
Water Temperature
Boosted Hot, Hot, Warm or Cold
Boosted Hot, Hot, Warm or Cold
Cold
Warm or Cold*
Warm or Cold
Rinse and Spin
Rinse
Spin
17 minute total cycle time.
Fill & Tumble
Medium & Fast Spin, Tumble
Warm or Cold
Permanent Press/Knits Cycle
Normal, Light
Fill & Tumble
Spin
Pulse Spin
Rinse 1
Fill & Tumble
Spin
Pulse Spin
Rinse 2
Fill & Tumble
Final Spin*
Slow & Medium Spin
Extra Rinse (Optional)
Fill & Tumble
Spin
Medium Spin
Fluff
Tumble
38 minute total cycle time, cycle time will vary with fill rate.
Boosted Hot, Hot, Warm or Cold
Cold
Warm or Cold*
Warm or Cold
Delicate Cycle
Normal, Light
Fill & Slow Tumble
Boosted Hot, Hot, Warm or Cold
Spin
Pulse Spin
Rinse 1
Fill & Slow Tumble
Cold
Spin
Pulse Spin
Rinse 2
Fill & Slow Tumble
Warm or Cold*
Spin
Slow Spin
Extra Rinse (Optional)
Fill & Slow Tumble
Warm & Cold
Spin
Slow Spin
Fluff
Slow Tumble
33 minute total cycle time, cycle time will vary with fill rate.
* If extra rinse is selected the final spin will be medium speed only.
* Rinse 2 will give a cold rinse when the optional Extra Rinse is selected. Extra Rinse adds
approximately 15 minutes to the cycle time.
13
Operating Washer
Operating Procedures
!
!
WARNING
To reduce risk of serious injury, do not attempt to
bypass loading door switch permitting washer to
tumble or spin with the loading door open.
Caution
To prevent property damage or damaging washer verify
the following before using the washer:
• Washer cord is plugged into a 120 volt electrical
outlet that has the proper grounding and polarity.
• Washer hoses are connected to the hot and cold
water faucets and faucets are turned on.
• Drain hose is not kinked and is inserted into a drain.
5. Set WASH/RINSE temperature.
See Installation section of this manual for proper washer
installation.
IMPORTANT: Prior to first wash, use an all-purpose
cleaner, or a detergent and water solution with a
damp cloth to remove shipping dust from inside
washtub.
1. Prepare clothes for washing. Sort items into separate
loads, empty pockets and cuffs, pretreat stains and
heavily soiled areas. See Washing Guide provided in
literature packet for wash preparation instructions.
2. Measure and add high efficiency (HE) detergent,
fabric softener, and bleach to the dispenser drawer.
See Dispenser Drawer instructions for dispenser
usage.
3. Load clothes into wash tub.
• Washer has automatic water level adjustment.
Water level will be adjusted to the size of
each load.
• When loading washer, clothes should fill the wash
tub but should not be packed.
• Wash loads can be too small. Wash load should
be large enough so that clothes can be evenly
distributed around the drum during spin.
4. Close loading door tightly. Washer will not operate
with the door open.
Water temperature dial
There are five WASH/RINSE temperatures available—
Boosted Hot Wash/Cold Rinse, Hot Wash/Cold
Rinse, Warm Wash/ Cold Rinse, Warm Wash/Warm
Rinse, and Cold Wash/Cold Rinse.
See chart below for temperatures that work best for
your garments.
!
WARNING
To prevent personal injury do not touch door glass
when Boosted Hot and Hot wash cycles are selected.
Windows may be hot.
NOTE: Always follow Manufacturer’s Care Labels.
NOTE: Energy Saver settings, marked with a dot (•),
show which temperature settings will use the
least energy.
14
Operating Washer
Boosted Hot
Approximately 140° F
Hot
Approximately 120° F
(Or as determined by home
hot water supply)
Warm
Approximately 100° F
•
•
•
•
•
•
•
•
•
•
•
•
Cold
Approximately 65° F
•
•
•
•
6. Select “EXTRA RINSE” if desired.
Sturdy whites and
colorfast items
Work Clothes
Heavily soiled items
Diapers
Sturdy whites and
colorfast items
Work clothes
Soiled items
Diapers
Light and moderately
soiled items
Non-colorfast or dark
colors.
Permanent press
Silks, woolens, nylon,
acrylic
Rinsing of some items
Non-colorfast items
Extra delicate clothing
Rinsing of most items
Extra Rinse control is useful for people with detergent
sensitive skin. By pressing the “Extra Rinse” to “ON”,
the Regular, Permanent Press/Knits, or Delicate
cycles will each provide an additional rinse. When
extra rinse is not wanted, “OFF” should be selected.
Extra Rinse will add approximately 10 to 15 minutes
to the total cycle time.
• Extra Rinse is useful for removing detergent for
sensitive skin.
Extra rinse button
7. Select cycle according to type of fabric being
washed. Push timer knob in and turn clockwise to
desired cycle and wash time. Use indicator dot on
knob as a guide.
Boosted Hot Wash
Boosted Hot Wash will boost water temperature in
tub to 140° F and is useful for improved cleaning of
some loads. “Heater On” light will be on when the
heating element is on. Timer will not advance until
140°F has been reached. Time needed to reach this
temperature may add an additional 30 to 60 minutes
to the cycle time. Hot water is the most effective for
cleaning but it is not recommended for all fabric types
(read labels).
NOTE: Boosted Hot Wash can be turned off by rotating
the WASH/RINSE temperature to another
setting. (The washer may pause for a short time
when this change is made.)
Cycle knob
NOTE: There will be extended pauses with tumbling
action when BOOSTED HOT WASH is selected
because water is being heated.
8. Pull timer knob out to start washer. “DOOR
LOCKED” light will come on after a short delay, water
fill will begin, and wash tub will begin tumbling.
NOTE: Washer door MUST be closed tightly to start
washer.
Adding Items during wash cycle
If adding items after a cycle has already started perform
the following steps:
• Push timer knob in. There will be approximately a
minute delay as “Door Locked” light goes out.
• Open door and add or remove items.
• Adjust timer knob (if desired) and pull timer knob back
out to restart cycle.
15
Operating Washer
Timer
Dispenser Drawer
Although wash cycles are automatic, the timer may be
reset to lengthen, shorten or repeat a portion of a cycle.
Child Lock
Dispenser drawer has a child lock. Slide the latch
(located inside the handle) to the right to lock the drawer,
if desired. Slide latch to the left to unlock door.
To set or reset the timer, push timer knob in to stop the
washer. Hold timer knob in firmly while slowly turning it
clockwise to the setting desired. Pull timer knob out to
start washer.
“Door Locked” Light
When washer is started the “Door Locked” light will come
on after a short delay. Light will turn off when the cycle is
complete.
“Heater On” Light
This light comes on during the Boosted Hot setting only.
While the washer is heating the “Heater On” light will turn
on. The light will go off when the washer tumbles and will
come back on when the heater is on.
A
A. Child Lock
Child lock location
Out of Balance Load
If at the end of the cycle, the load is noticably wet,
washer has limited the spin speed. Limiting the spin
speed will prevent damage to the washer if there is a
severely unbalanced load.
Detergent Compartment
Detergent compartment is located on the right side of the
dispenser drawer.
High Efficiency (HE) powdered or liquid detergents are
recommended for use with front loading washers.
Powdered bleach can also be used in the dispenser along
with the detergent.
If this condition occurs, redistribute the load manually and
repeat the cycle beginning at the last rinse.
If the condition persists, consider steps discussed in the
Washing Tips section of Washing Guide.
Compartments for detergent, fabric softener and bleach
are larger than what is needed per load to help avoid
spills. Do not overfill dispenser with detergent. Filling
dispenser cavity completely with detergent will result in
oversudsing and a decrease in cleanability. Use only
amount of detergent recommended by detergent
manufacturer.
Wash loads can be too small. Wash load should be
large enough so that clothes are evenly distributed around
the drum during spin. If load is too small, add clothes to
wash tub.
End of Cycle Signal
NOTE: If using detergents made for topload washers,
avoid oversudsing by using 1/3 of the
recommended amount. Cleaning performance
may be affected when using lesser amounts.
Use care when adding detergent so as not to spill into the
other compartments. Detergent mixed with fabric softener
can make the softner gummy.
NOTE: The normal level of suds should be below center
of the door.
End of cycle signal
Volume of the signal tone may be set on OFF, LOUD or
between the two selections. If a volume level is selected,
the signal tone will buzz on and off when the cycle is
completed. Signal will stop when the door is opened or
when the timer has advanced to an OFF position.
16
Operating Washer
Fabric Softener Compartment
A
The fabric softener compartment is located in the left rear
corner of the dispenser drawer.
A
A. Detergent compartment
Detergent dispenser location
A. Fabric softner dispenser
Fabric softner dispenser location
Liquid Bleach Compartment
Bleach compartment is located in the left front corner of
the dispenser drawer. It has been designed to prevent the
dispensing of undiluted bleach onto the clothes load.
Use no more than the maximum level indicated for the
fabric softener compartment. Adding more than the
maximum amount could result in early dispensing of the
product and possible staining of fabrics.
A
Add fabric softener to compartment before beginning
washload. The fabric softener will be dispensed during the
last rinse cycle.
Carefully close dispenser door. Do not allow softener to
spill into other compartments.
To Clean the Dispenser
A. Bleach compartment
Bleach dispenser
Remove the dispenser drawer from the washer by firmly
pulling the drawer straight out, past the stop position.
Rinse dispenser drawer in hot water. A small brush may
be used to thoroughly clean out any residue. After
cleaning, reinstall the dispenser drawer.
Use liquid bleach in the dispenser. Powdered bleach must
not be used in this compartment. Powdered bleach can
be used in the detergent compartment only and can be
added along with the detergent.
Small amounts of water may be discovered in the
dispenser drawer. This condition is normal. Water
may be removed by removing the dispenser drawer
and pouring the water out.
DO NOT use more than the maximum level indicated for
the bleach compartment. Adding more than the maximum
amount could result in early dispensing of the product and
possible damage to fabrics.
Carefully pour recommended amount of bleach into the
compartment before starting wash load.
Be careful not to spill undiluted bleach. It is a strong
chemical and can damage some fabrics if it is not
properly diluted. Follow bleach manufacturer’s label for
proper use.
Carefully close dispenser door. Do not allow bleach to
spill into other compartments.
17
Care and Cleaning
Cold Weather Care
2. Place the shock sleeves on all four shock absorbers.
(See illustration)
If the washer is delivered on a cold day (below freezing),
or is stored in an unheated room or area during the cold
months, do not attempt to operate it until the washer has
had a chance to warm up to room temperature.
A
Care Of Your Washer
B
• Use only a damp or sudsy cloth for cleaning the control
panel. Some cleaning product sprays may harm the
finish on the control panel or damage the interior of the
hood.
• Wipe the washer cabinet as needed. If detergent,
bleach or other washing products are spilled on the
cabinet, wipe immediately. Some products will cause
permanent damage if spilled on the cabinet.
• Do not use scouring pads or abrasive cleansers.
• Do not lay sharp or rough objects on or against the
washer. The finish could be damaged.
• The wash tub and window will need no particular care
although they may need rinsing or wiping after an
unusual load has been washed. Outside of window can
be cleaned with household window cleaner.
• Leave the loading door open to allow the inside of the
washer to dry out after use. This helps prevent musty
odors from developing.
• Do not allow small children to play on or around the
washer.
• Do not move washer without reinstalling shipping
brace. See instructions below for shipping brace
installation.
A. Shock sleeve
Reinstalling shock sleeves
B.
Shock absorber
3. Insert hooked end of shipping brace into the open
slot of the motor mount. Attach with bolts and
washers to anchor bracket to machine. (See
illustration)
B
B
Vacations and Extended Non-Use
Important: To avoid possible property damage due to
flooding, turn off the water supply to the washer whenever
there will be an extended period of non-use. Leave door
open so that moisture inside machine can evaporate
preventing mold or mildew from growing.
A
B
A
C
A. Shipping brace
B. Bolts and washers
C. Cut-away view of washer cabinet to illustrate location of
shipping brace
Reinstalling shipping brace
Reinstallation of Shipping Materials
1. Remove front access panel by removing two screws.
4. Reinstall front access panel.
Refer to the Installation Instructions for proper procedures
whenever the washer is moved.
A
B
A. Front access panel
Access panel removal
B.
Access panel screws
18
Care and Cleaning
Door will not open or close.
• Make sure control knob is all the way pushed in when
stopping washer.
• Wait. It will take at least 45 seconds for the door lock
mechanism to disengage.
• Weight of wet clothes may be pushing on inside of
door. Push in slightly on door and then try to open.
Before Calling Service
You may save time and money by checking the
items listed below. If you have a question not
explained below contact Amana Consumer
Information at 1/800-843-0304.
Washer will not fill.
• Close the door tightly.
• Check the house circuit breaker to make sure the
breaker does not need replacement.
• Make sure washer is plugged into a live electrical
outlet.
• Verify that inlet hoses are not pinched preventing water
from entering washer.
• Make sure both hot and cold faucets are turned on
completely.
• Clean the filter screens in valve openings. Owner is
responsible for service calls regarding cleaning of the
screens.
Washer stops.
• This may be a pause in the cycle, a soak period, or
washer may be heating water. Wait and it may start.
• Check the house circuit breaker to make sure the
breaker does not need replacement.
• Make sure electrical cord is plugged all the way into
electrical outlet.
Washer leaks water.
• Make sure hose connections are tight.
• Make sure end of drain hose is correctly inserted and
secured to drain facility.
• Make sure washer was not overloaded, or too much
detergent was put in dispenser.
• If washer drains to a standpipe, make sure standpipe is
not overflowing during drain portion of cycle.
Washer will not start.
• Be sure power cord is plugged all the way into the
electrical outlet.
• Close the loading door tightly.
• Check the house circuit breaker to make sure the
breaker does not need replacement.
• Pull timer knob out to start the washer. Check to make
sure timer is not set at an OFF position.
Washer is excessively noisy.
• See Common Operating Sounds section in this
manual.
• Clanging heard during tumbling can be caused by loose
change or buckles. Check for loose change in wash tub
and remove. Make sure all clothing has zippers zipped
up, clothing with buckles must be turned inside out.
• Make sure shipping brace and shock sleeves have
been removed.
• Make sure washer is level. See “Installation
Instructions” for leveling.
• Floor may not be strong enough for washer. See
Installation Instructions for recommended type of floor.
• If noise persists in successive loads, or a loud banging
develops, contact an authorized Amana technician.
Washer will not tumble
• Close door tightly.
• Check the house circuit breaker to make sure the
breaker does not need replacement.
• Are controls properly set. See Operating Instructions
for setting controls.
• Drive belt may be broken. Call Amana technician.
Washer will not spin
• Close door tightly.
• Wash load may be out of balance, stop load and
redistribute clothing, or add clothing if load is too small.
• Check the house circuit breaker to make sure the
breaker does not need replacement.
• Are controls properly set. See Operating Instructions
for setting controls.
• Drive belt may be broken. Call Amana technician.
Washer fills with the wrong temperature water.
• Make sure both faucets are turned on fully.
• Make sure temperature control knob is turned to
desired setting.
• Make sure water inlet hoses are connected to correct
faucets and inlet connections.
• Check water heater setting. Water heater should be set
to a minimum of 120°.
Washer will not drain
• Make sure drain hose is not twisted or kinked.
• Make sure drain hose is installed within recommended
height range. See Installation Instructions for
recommended height range.
19
Care and Cleaning
Washer signal comes on and remains on
• Unplug washer wait approximately 5 seconds and plug
washer back in.
• Washer may not be getting enough water. Make sure
faucets are turned on fully. This situation should be
accompanied with a signal warning.
• Make sure water inlet hoses are connected to correct
faucets and inlet connections.
• Make sure something in washload is not tangled
preventing wash load from tumbling.
• After checking these items and washer signal is still
on, unplug washer, shut off water and contact a service
person.
If after reviewing this information you are still unable to
solve problem contact an authorized servicer. If you are
unable to locate an authorized service center or are
unsatisfied with the service performed on your washer,
contact:
Amana Appliances
2800 220th Trail
Amana, Iowa 52204-0001
Phone: 1-800-843-0304
Fax:
(319) 622-2977
!
Clothes are still wet after cycle is complete
• Wash load may have been out of balance. Redistribute
clothes and put clothes through an extra spin cycle. If
washer has not completed its cycle, EXTRA RINSE
cycle can be selected.
• If a power outage occurred during cycle, may not have
been able to go through complete spin. Extra spin
should be selected to remove moisture.
• May have been too much detergent. Reduce detergent
amount for next cycle.
WARNING
To reduce the risk of serious injury or death, do not
repair or replace any part of the washer or attempt any
servicing unless specifically recommended in the usermaintenance instructions or in published user-repair
instructions that you understand and have the skills to
carry out.
If power is disconnected from washer
• When power is disconnected from the washer, door can
not be opened immediately. There will be a minimum of
a 45 second delay before door will unlock.
• Clothes may still be wet when removing from washer. A
disconnection from power will often not allow washer to
go through a complete spin cycle. Extra spin should be
selected or push in control knob and turn control knob
back to spin setting.
Washer is Vibrating excessively
• Make sure washer is level. See Installing Washer for
leveling information.
• Check wash load. If wash load is not evenly distributed
rearrange wash load for a more even clothing
distribution.
• May not be enough clothing in the washer. Wash loads
can be too small. It may be neccesary to add clothing
items to the wash load. There should be enough
clothes in the washer to evenly distribute around wash
tub when spinning.
• Floor may not be strong enough for washer. See
Installing Washer for type of floor recommended.
• Make sure shipping brace and shock sleeves have
been removed before using washer. See Installing
Washer for shipping brace and shock sleeves removal.
• Make sure locknut is tightened on leveling leg.
• Make sure rubber feet are placed underneath leveling
legs.
20
Care and Cleaning
Common Washer Sounds
1. Accelerating
Sound is heard during the spin
portion of every cycle. Spin speed
will increase and decrease during the
spin cycle. The washer will reach the
highest spin speed during the end of
the cycle.
2. Tapping
These sharp sounds may come from
metal fasteners, zippers, belt
buckles or coins hitting the wash
tub or door glass.
3. Thumping
Washer may be out of balance.
Washer is designed to balance the
load. If the washer is severely
unbalanced, push timer knob in
to stop washer, wait for door to
unlock, and redistribute the load.
4. Rumbling
Washer may not be level. Stop
washer and adjust leveling legs. See
Installation Instructions for details.
5. Flushing
Water enters the dispenser to flush
detergent, bleach and/or fabric
softener into the tumbler during the
appropriate time of the cycle.
6. Water Running This washer adjusts the water level
automatically. Water is added at the
beginning of the cycle until the wash
tub contains the needed amount of
water. If noise is in dispenser area
see “Flushing” above.
3
5
4
6
2
1
21
Warranty
Home Laundry Tumble Action Washer Product
Full Two Year Warranty
Full Five Year Warranty on Drive System
Limited Five Year Warranty on Cabinet
Limited Twenty Year Warranty on Stainless Steel Inner and Outer Wash tub
Warranty Provides For:
FIRST TWO YEARS Amana Appliances will repair or replace any defective part free of charge.
FIRST FIVE YEARS Amana Appliances will replace any defective drive system assembly free of charge. Drive
system includes motor, belt, pulleys and shaft assembly.
THIRD THRU FIFTH YEARS Amana Appliances will provide a free replacement part, f.o.b. Amana, Iowa for
any cabinet which proves defective to rust.
THIRD THRU TWENTIETH YEAR Amana Appliances will provide a free replacement part, f.o.b. Amana, Iowa
for any defective stainless steel inner and outer wash tub.
WARRANTY LIMITATIONS
• Warranty begins at date of original purchase.
• Applies only to product used within the United
States or in Canada if product is approved by
Canadian Standards Association when shipped
from factory.
• Products used on a commercial, rental, or leased
basis are not covered by this warranty.
• Service must be performed by an authorized Amana
service.
• Adjustments covered during the first year only.
WARRANTY IS VOID IF:
• Serial plate is defaced
• Product has defect or damage due to product
alteration, connection to an improper electrical
supply, shipping and handling, accident, fire, floods,
lightning or other conditions beyond the control of
Amana.
• Product is improperly installed or applied.
Owner’s Responsibilities
• Provide proof of purchase (sales receipt).
• Normal care and maintenance
• Having the product reasonably accessible for
service.
• Pay for service calls related to product installation
or usage instructions.
• Pay for premium service costs, over normal service
charges, if servicer is requested to perform service
outside servicer’s normal business hours.
IN NO EVENT SHALL AMANA BE LIABLE FOR
INCIDENTAL OR CONSEQUENTIAL DAMAGES*
*This warranty gives you specific legal rights, and you may have others which vary from state to state. For
example, some states do not allow the exclusion or limitation of incidental or consequential damages, so this
exclusion may not apply to you.
For warranty service, contact an authorized Amana servicer. Should you have a service problem that is not
resolved locally,
Write: Amana Appliances
2800 220th Trail
P.O. Box 8901
Amana, IA 52204
Or Phone in U.S.A.: 1-800-843-0304
If outside U.S.A.: (319)-622-5511
Installer Checklist
Quick Checklist for Installing Washer (Refer
to manual for more detailed information)
1
2
3
4
5
Quick Reference For
Operating Washer
Quick reference for operating washer (Refer
to manual for more detailed information)
• Position Washer near
Installation Area. See
page 6.
1
• Prepare clothes for washing. See Washing
Guide provided in literature packet for wash
sorting instructions.
• Connect water inlet hoses.
See page 6.
2
• Load clothes in wash tub. Clothes should fill the
wash tub but should not be packed into the
wash tub. See page 14.
• Connect drain hose to drain
receptacle. See page 7.
3
• Set WASH/RINSE
temperature.
See page 14.
• Remove access panel. Remove
the shipping brace and shock
sleeves. See
page 8.
4
• Position and level the washer.
See page 9.
5
• Select EXTRA RINSE
if desired. See page
15.
• Add detergent to detergent dispenser. Do not fill
detergent dispenser cavity with detergent. Use
high efficiency detergent or 1/3 of the
recommended amount of regular detergent.
• Add bleach and/or fabric softner if desired.
See page 16.
6
• Plug in washer. See
page 9.
7
• Verify Washer
operation. See page
10.
Part No. 686938
Printed in U.S.A.
Detergent
dispenser
CPW13 0C
6
• Select cycle
according to
type of fabric
being washed.
Pull out knob.
See page 15.
©1998 Amana Appliances
Amana, Iowa 52204