1
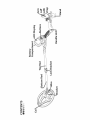
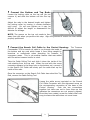
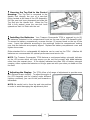
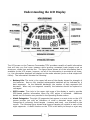
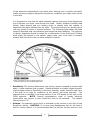
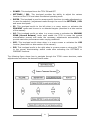
S iRobe rts onS i gnatureE di ti on TREASURE COMMANDE R T C2 XMe t alDe te ct or T C2 X Ope rati ngManual Table of Contents CONGRATULATIONS! ...................................................................................................... 1 Getting Started ................................................................................................................ 2 Assembly ......................................................................................................................... 2 Understanding the LCD Display ........................................................................................ 5 Touchpad Operation ........................................................................................................ 7 Operating Modes ............................................................................................................. 9 Identifying Targets Before You Dig..................................................................................11 Using the GPS Function ...................................................................................................11 Getting Started the Right Way ........................................................................................12 Let's Find Something .......................................................................................................13 Target Recovery ..............................................................................................................14 Detecting Tips .................................................................................................................14 Care & Maintenance .......................................................................................................15 Troubleshooting .............................................................................................................16 Treasure Commander TC2X Specifications ......................................................................17 Treasure Hunters Code of Ethics .....................................................................................17 Warranty & Service Information .....................................................................................18 CONGRATULATIONS! Your new Treasure Commander TM TC2X metal detector is part of a new series of metal detectors designed to help you find treasure no matter where you live and what your experience level is when it comes to treasure hunting. Designed by an experienced engineering team using input from veteran treasure hunters including Si Robertson of the Duck Commanders TV show, the Treasure Commander TM series will let you start finding lost valuables as soon as you unpack the box. The Treasure Commander Series are Si Robertson Signature Edition Digital Metal Detectors used by and endorsed by Si Robertson himself. He sums them up in the following sentence - "These metal detectors are all I wanted them to be, easy-to-tune, easy-to-use and they come equipped with a newly designed 10 inch deep searching search coil that lets you find treasure while eliminating trash and junk." We welcome you to America’s fastest growing sport - hunting for treasures with a metal detector. Metal Detecting is an Adventure that you and your family will enjoy for years to come. It’s fun and exciting to find old valuable silver and gold coins, gold and diamond rings and gold jewelry. Recover relics from the Civil War and other historic battles. Discover lost and hidden buried treasures. All these treasures and more are waiting to be found with the latest and most advanced metal detectors now available. Your Treasure Commander TM TC2X is capable of meeting your needs in a wide range of treasure hunting situations. As with any other metal detector, familiarity with this instrument is probably the limiting factor in determining how successful you can be. I recommend that you read this manual and fully understand how to operate this detector before attempting to use it in the field. As you become more familiar with your detector through practice, your rate of success will increase dramatically. Your new Treasure Commander TM TC2X is a quality piece of equipment that will last for years. We hope your adventure is one that brings excitement every time you use your new metal detector! Si Robertson and the Kellyco staff! 1 Getting Started Your Treasure Commander TC2X comes complete and ready to use. The first step is to unpack the box and check to make sure you have all the items needed to quickly assemble the detector. You should find the following parts inside the box: Handle Unit with Arm Cuff and Stand Top Rod with Locking Collar Bottom Rod Search Coil with Bolt Assembly Cable Pulling Tool Operator Instruction Manual Warranty Card If any of these items are missing, contact Kellyco Detectors immediately. It is recommended that you make a record of your detector's serial number and store it along with your proof of purchase in a safe place in case you ever need this information for warranty service. Assembly Assembly of your new Treasure Commander TC2X is very simple and requires no special tools. 1 Connect the Search Coil and Bottom Rod: Unscrew the bracket from the bottom rod as it comes shipped from the factory. Place the bottom rod inside the tabs on the search coil and insert the bolt through the hole. Tighten the bolt until snug but take care not to over tighten it as you can damage the coil or the bolt. NOTE: The large hole in the end of bottom rod must be facing downwards is where the search coil cable will enter rod and be fed upwards to connect into control housing. the this the the 2 2 Connect the Bottom and Top Rods: Loosen the locking collar on the top rod (do not remove it) and slide the bottom rod into the top rod. Adjust the rods to the desired length and tighten the locking collar by turning it counter-clockwise until snug. Do not over tighten as it may be difficult to adjust the length or disassemble the detector for storage. NOTE: The groove on the top rod needs to face away from you when you perform this step. Align the grooves to ensure the rods remain properly positioned. 3 Connect the Search Coil Cable to the Control Housing: The Treasure Commander TC2X's search coil cable is run through the inside of the bottom and top rods which keeps it from being caught by branches or underbrush when searching for treasure in overgrown areas. This is yet another feature that was added with the active treasure hunter in mind. Take the Cable Pulling Tool and slide it down the inside of the rods starting from the top end. When the end with the screw connector appears in the large hole on the bottom rod, connect it to the Search Coil Cable and slowly pull the cable back up the inside of the rods. Once the connector on the Search Coil Cable has exited the Top Rod, remove the Cable Pulling Tool. Lineup the white arrow imprinted on the Search Coil Cable Connector with the alignment arrow on the corresponding connection at the base of the Control Housing. Push the two connections together but take care not to force them as this indicates the connectors are not properly aligned. Once they have mated, screw the metal collar until snug to ensure the cable does not come loose. 3 4 Securing the Top Rod to the Control Housing: The Top Rod is connected to the Handle Unit through the use of a cam-lock fitting located at the base of the LCD Assembly. Pull the cam-lock lever downward and slide the Top Rod into the Handle Unit. When the Top Rod is fully seated, press the cam-lock lever upwards so that it is flush with the rod. 5 Installing the Batteries: Your Treasure Commander TC2X is powered by six (6) AA batteries contained in the compartment found on the rear of the LCD Assembly pod. To access the battery compartment, unscrew the two (2) screws found on the top of the cover. Insert the batteries according to the markings inside the compartment making sure that the batteries are properly aligned. Replace the battery compartment cover and tighten the screws. Either standard AA or rechargeable AA batteries can be used on the TC2X. Alkaline AA batteries are recommended for optimal performance and service life. NOTE: The Treasure Commander TC2X features a continuous battery strength indicator on the LCD screen which will help ensure you do not find yourself with dead batteries miles from the nearest store. If the display indicates less than 25% of battery strength remains, either replace the batteries or bring a spare set with you when you head out into the field. 6 Adjusting the Display: The TC2X offers a full range of adjustment to provide users with optimal screen visibility. To adjust the angle of the LCD Assembly pod for viewing under different lighting conditions, you can tilt the pod forwards or backwards. NOTE: Be careful not to force the pod into position in order to avoid damaging the adjustment point. 4 Understanding the LCD Display The LCD screen on the Treasure Commander TC2X provides a wealth of useful information that will help you find more treasure while ignoring unwanted trash targets such as aluminum, rusted iron and the like. The figure above shows all of the information that is available on the LCD screen; however, not all of the information is provided at all times; i.e., the information displayed will depend on the mode selected (more on that subject will follow). The information includes the following: Battery Life: The circle in the upper left area of the display shows the strength of the batteries. New or fully charged rechargeable batteries will be indicated by 4 dark segments. As the batteries discharge, the number of dark segments will decrease. When only one segment remains, the batteries should be replaced or recharged. GPS Locator: The circle in the upper right area of the display is used to provide GPS-based position information when the GPS option is activated. Additional details on this function are provided in the Operating Modes section. Metal Categories: The eight (8) segments that appear in a semi-circle on the LCD screen provide you with an indication of what a detected target might be. Categories of commonly found targets - treasure and trash - are provided on the screen. The following figure shows what types of targets will register in each of the eight segments. A useful function on the TC2X is the ability to accept or reject any 5 of the segments independently from each other allowing you to quickly and easily create a custom program designed to handle any conditions you might come across in the field. It is important to note that the eight segments capture commonly found targets but not all targets you might come across are listed. Military artifacts including lead bullets, brass buttons and iron artillery shells or cannon balls can register in segments that might indicate they are trash. The same holds true for jewelry which can vary greatly in terms of content and size. The following figure shows the wide range of segments that can indicate a gold target has been detected. The rejection of specific segments should be based on a combination of the likelihood of finding what might be rejected in the specific search area, how much trash is actually present and how much time you have available to search. Sensitivity: This function determines how strong a signal is needed to produce and audio / visual response from a target. Detecting deeper or smaller targets typically require higher levels of Sensitivity to be used; however, erratic operation can occur if the level is too high for conditions at the specific site being searched. The selected level is indicated in the lower section of the LCD display to the right of the IRON segment. NOTE: Ground mineralization, trash or nearby electrical interference can require a lower Sensitivity level to be selected.. The default factory value is "8". Volume: The selected volume level is indicated by the number to the right of the Sensitivity setting. CAUTION: If you are using headphones that do not have a built-in volume control, it is recommended that you set the Volume level at a low 6 value before plugging the headphones in. Adjust the volume to a comfortable level by sweeping the coil across a target. The default factory value is "4". Depth: When a target is detected and the Pinpoint mode is activated, the target’s approximate depth will be displayed in inches on the right side of the LCD next to the QUARTER segment. NOTE: This indication assumes the target is coin-sized so a larger target will appear to be shallower that it really is and a smaller target will appear deeper than it really is. Use this as a guide to avoid damaging targets when recovering them but recognize that the accuracy depends on the size of the target. Settings / Detect Modes and Discrimination / Notch Modes: The lower area of the LCD screen will indicate which mode you are in as well as when searching, which of the four (4) discrimination programs are active. Signal Strength: Located just beneath the P-TAB / S-CAP segments, this icon will provide indication of how strong the signal from a detected target is. Combined with the Depth indication, the Signal Strength indication can help you determine the relative size and depth of a target before you recover it. Identification: Located in the center of the LCD screen, this will provide an 8-digit identifier active when the GPS function is selected. It will be covered in more detail later in the manual. Touchpad Operation While the Treasure Commander TC2X offers a high level of performance under a wide range of conditions, all of its functions are controlled through the use of just seven (7) touchpads. The four (4) touchpads located around the ENTER touchpad serve dual functions; i.e., they allow you to navigate through and adjust specific features when in the SETTINGS mode and activate specific functions when used by themselves. 7 POWER: This touchpad turns the TC2X ON and OFF SETTINGS / DEL: This touchpad provides the ability to adjust the various functions of the TC2X and select the desired operating mode ENTER: This touchpad is used to access specific functions to make adjustments or to save the selection / adjustment made through the use of the SETTINGS / DEL and arrow touchpads. PP: This touchpad scrolls to the left when in a menu screen or activates the PINPOINT mode used to zero-in on detected targets (described in a later section of the manual). GG: This touchpad scrolls up when in a menu screen or activates the GROUND GRAB (Ground Balance) mode used enable the TC2X to sense the ground mineralization present and make the necessary adjustments automatically to provide maximum performance under varying conditions. GPS: This touchpad scrolls down when in a menu screen or activates the GPS function (described in a later section of the manual). DIS: This touchpad scrolls to the right when in a menu screen or returns the TC2X to the normal discriminating search mode after activating the SETTINGS or PINPOINT functions. The following figure shows how to navigate through the TC2X's menu structure, make adjustments and return the desired Search mode: 8 Operating Modes The Treasure Commander TC2X has five (5) operating modes which are described below. 1 GROUND GRAB (Ground Balance): All soil contains minerals which can impact the ability for any metal detector to locate small or deeply buried targets. The TC2X has been designed to sense the actual ground mineralization present at the search location and automatically calibrate itself to reduce or eliminate the effect the mineralization would otherwise have on detection depth and sensitivity. This ensures you obtain maximum performance from your detector under a wide range of soil conditions. The following steps cover the proper method of using the GROUND GRAB (Ground Balance) function: Find an area that is free of metal - use the ALL METAL option to check the area before proceeding Hold the search coil about 6 inches above the ground and press the "GG" touchpad and then the ENTER touchpad to activate the GROUND GRAB (Ground Balance) function Lower the coil to the ground and raise it back up several times until you receive the message "GRAB OK." If you receive the "GRAB ER" message, either repeat the process or try a different location as there may be metal or some other problem at the spot you initially attempted to calibrate the coil to the ground conditions with the GROUND GRAB (Ground Balance) function. Remember, optimal performance of your detector will depend on its proper calibration through the use of the GROUND GRAB (Ground Balance) function. It is recommended that you occasionally repeat the process to ensure that changes in ground conditions are being compensated for as conditions can change even at the same location. 2 DISCRIMINATION: A metal detector by its design locates all metals; however, it is not possible to recover every piece of metal in a given site. The DISCRIMINATION mode is the one that is used for actual searching and allows you to select what targets will be accepted or rejected. You can adjust the level of rejection from none (all metal objects will produce a response) to a level at which most unwanted targets will be rejected (silver coins, silver jewelry and similar targets will produce a response). Sweep speed can affect the ability of the detector to accurately identify and discriminate targets. Sweeping too slow can impact detection depth and discrimination capabilities of your TC2X. 9 3 NOTCH DISCRIMINATION: The TC2X was designed with ease-of-use in mind and the NOTCH DISCRIMINATION function allows you to quickly select a predefined program designed to let you find treasure and dig less trash. Unlike conventional discrimination circuits where rejecting targets is done starting at iron and moving upwards in a clockwise manner (see the figure on page 6), NOTCH DISCRIMINATION allows you to select which of the eight segments are accepted or rejected individually. For example, if you want to reject pull tabs using DISCRIMINATION, you would need to also reject the iron, foil and nickel segments. NOTCH DISCRIMINATION allows you to only reject the pull tab segment while still accepting the other seven segments. The TC2X comes with three predefined programs along with one that can be customized to meet your specific needs. The Treasure Commander’s programs include: ALL METALS: This mode is designed to be used when you are looking for any type of metal that might be present. Treasure hunters searching for old military or settler artifacts made of iron often use this to ensure no relics are inadvertently overlooked. It is also a good choice when trying to find where a site used to be and no visible signs remain. Once metal objects are located indicating you are in the right area, additional discrimination can be applied. COIN: This mode is designed for coin hunters that want to find coins and other items while rejecting iron and tinfoil that are often found in the areas where coins are recovered. JEWELRY: This mode is designed to eliminate some trash while ensuring gold and silver jewelry including rings, pendants, chains, earrings and other items are detected. CUSTOM: This mode is designed to allow you to define what type of targets you want to find by accepting or rejecting any or all of the eight metal category segments. 4 PINPOINT: When you want to zero-in on a target that has been detected, switching to the PINPOINT mode will enable you to quickly identify where to dig in order to recover the target. Press and hold the "PP" touchpad while sweeping the coil across the area containing the target. The target depth in inches will be shown on the LCD screen. To return to the DISCRIMINATE search mode, simply release the "PP" touchpad. 5 GPS: This function allows you to save the coordinates of a site that you might want to revisit through the power of Global Positioning System technology. The farthest it will read from your destination is 999 yards or approximately 0.6 miles. The indicated distance will decrease as you get closer to the saved location. NOTE: When using this mode, ensure the control box is kept away from metal objects such as a shovel as they can affect the accuracy of the TC2X’s internal compass. 10 Identifying Targets Before You Dig The Treasure Commander TC2X provides you with two ways to identify targets before recovering them. The first is the indication on the LCD screen via the eight Metal Category segments. In addition to the visual indication, the audio response will vary based on the type of metal that has been located. The four tones and the metals that correspond to each are defined below: Bass Tone: Ferrous metals such as nails, smaller bolts, stainless steel, cast iron and very small pieces of gold Low Tone: Tinfoil, aluminum, nickels, newer pull tabs (rectangular style) and some gold jewelry Medium Tone: Older pull tabs (winged style), bottle and screw caps, newer U.S. pennies (post 1982), newer Canadian $1 and $2 coins, small silver jewelry, most gold jewelry and military artifacts such as bullets and buttons High Tone: Older pennies (pre-1982), dimes, quarters, half dollars, dollars, and silver jewelry Using the GPS Function The Treasure Commander TC2X incorporates Global Positioning System (GPS) technology which allows you to relocate sites that you have discovered. To save the coordinates of a site you want to revisit, press the "GPS" touchpad. A message prompting you save the location will appear on the LCD screen. Press the ENTER touchpad and then use the arrow keys (, , and ) to name the location for easy reference. Each name can have up to eight characters. To return to a saved location, press the "GPS" touchpad and use the or touchpads to scroll through list of saved locations. When you find the location you want to visit, press the ENTER touchpad. The GPS icon (upper right circle on the LCD screen) will show you which direction to head with an arrow and how many yards remain to the location. The arrow and distance will change as you approach the location. 11 Once you arrive at the location, the arrow will disappear and the distance displayed will read "000". Getting Started the Right Way Spending a little time getting familiar with the response of your Treasure Commander TC2X before you head out in search of treasure will make your time in the field more enjoyable and productive. The first activity you should try is to perform bench testing using a sample of targets. This will help you learn what response various targets will produce and how to eliminate those you do not wish to recover. Collect items including a nail, a wad of tin foil, a pull tab, a nickel, a zinc penny (from 1983 and later), a dime and a quarter. If you have additional items that you might be seeking such as gold / silver jewelry or relics, include them in your sample pile. Place the TC2X on a table (non-metal) with the coil hanging over the edge. Ensure the coil is not near any metal objects. Remove your watch and any jewelry you might have on such as rings. Turn the detector on and select the ALL METAL mode. Pass each object across the search coil and take note of the indication on the LCD screen as well as the different tones each produces. Switch to the COINS and then the JEWELRY mode and repeat the test. Note which targets are rejected by the detector in each of the modes. The CUSTOM mode allow you to select which of the eight segments are accepted or rejected and is very useful when you find yourself bothered by a specific piece of trash and want to ignore it. Make a record of what your test results show so that you can refer back to them if you have questions in the field on actual targets. Many successful treasure hunters take the bench testing concept to the next level and construct a test garden in their yard. By burying a range of targets, you can see how ground impacts signal response and practice pinpointing targets which will improve your recovery rate in the field. Bury several items at depths of 2 to 4 inches. Place them at least 18 inches apart so that you are not detecting more than one target at the same time. Mark the location of each target (golf tees work well for this) so that you know where each item was buried. NOTE: Freshly buried targets will be harder to detect than those that have been buried for years. Take the time to see the impact different settings; i.e., Sensitivity, Volume and Discrimination, as well as the coil sweep speed have on the response you receive from the various targets. 12 Let's Find Something So you have spent some time getting familiar with your new Treasure Commander TC2X detector and are ready to head out and see what you can discover. Let's get started! 1. Extend the rods to the desired length. ground about 2-3 feet in front of you. The detector should be resting on the 2. Turn the TC2X on by pressing the POWER touchpad 3. Press the SETTINGS / DEL touchpad and adjust the SENSITIVITY and VOLUME to the desired values which will be dependent on site conditions and personal preferences. Once the adjustments have been made, press ENTER to save them. 4. Press the SETTINGS / DEL touchpad again and select either DISCRIMINATION or NOTCH. Select the option desired and press ENTER. Make the selection using the "< / PP" and "> / DIS" touchpads to determine what segments will be accepted or rejected. Once you have made your changes, press ENTER to save them. 5. Press the GG touchpad to enable the detector to determine the ground mineralization present and calibrate the circuitry to provide maximum performance. Press the ENTER touchpad and follow the on-screen prompts until you receive the message "GRAB OK" which indicates the calibration was successful. 6. Sweep the coil over the ground in a side-to-side motion. The optimum sweep speed is 3 to 5 seconds per pass (left-to-right or right-to-left). Remember, it is not a race to see how quickly you can cover an area but rather how thoroughly you cover the area to ensure you have not overlooked any valuables. Most good targets will produce a clear, repeatable signal. Trash targets (those that are being rejected) generally do not produce a signal or will only give a broken or nonrepeatable response. Experience will tell you when to investigate those marginal signals but initially, focus on repeatable signals that produce consistent indications on the LCD screen. 7. When a target has been detected, move the coil off to one side and press and hold the "PP" touchpad. Move the coil over the area where the target is buried in an “X” shaped pattern. Observe the Target Depth indication and listen to the audio response. When the indicated depth is the shallowest and the audio volume is the loudest, the target should be directly beneath the center of the search coil. 13 8. Carefully recover the target and be sure to replace the soil / grass before moving on to the next target. Target Recovery Once you have established the exact location of the target, the next step is to dig a small hole to recover it. In order to preserve the environment and keep from having areas closed to metal detecting, it is essential to make the hole as small as possible and always replace the soil / grass before moving on. Recommended tools for target recovery include a sand scoop when searching sandy areas or a small knife / small gardening trowel when searching grassy areas such as parks, schools, private yards or ball fields. To recover a target from grassy areas, use a sharp tool (knife / trowel) and cut a plug leaving a portion connected. Fold the plug out of the hole and pass the search coil over both the plug and the hole to determine where the target is. If the target is still in the hole, start removing dirt and place it on a sheet of plastic or a rag which makes it easier to replace the loose dirt when you have found the target. Once you have recovered the target, check the hole to ensure there are no additional targets before refilling the hole. Put the loose dirt back in the hole, fold the plug back in-place and step down on the area to compact the soil. TIP: The use of an electronic pinpointer probe will reduce the time it takes to locate and recover targets. This is an accessory that most treasure hunters have found to be invaluable and is highly recommended. Detecting Tips Your success will increase as you gain experience in the field but the following tips can help you shorten the learning curve and reduce frustration that may arise. The search coil must be moving in order to detect a target; however, only a slight motion is required. If you stop moving the coil, the signal will be lost. At times you might receive a signal from a target that is not repeatable and produces varying audio signals. This may be caused by trash or multiple targets beneath the coil. Switch to the ALL METAL mode and sweep the coil across the target area in different directions to see if you can isolate the signals. If you determine that there is more than one target present, switch back to the DISCRIMINATION or NOTCH mode and try sweeping the coil at different angles to 14 avoid going over more than one target at a time. This will allow you to identify each one and determine if it is worth recovering. If the trash in an area is so much that you are getting numerous choppy or nonrepeatable signals, you can improve performance of the detector by slowing your sweep speed down or reducing the Sensitivity level. Sweep the search coil carefully, especially when using around rocks and building foundations. Avoid hitting the search coil against hard, solid objects and surfaces. Keep your search coil slightly off of the ground during the sweep, especially when using in gravel or hard, rocky dirt. Care & Maintenance Your Treasure Commander TC2X has been built to last but proper care and maintenance will ensure you receive years of trouble free operation. It is recommended that you observe the following tips. Keep it Clean - Take a few minutes after each use to remove dirt and dust. Wipe the case clean. Wash the loop, especially if it has been dipped in saltwater. 15 Keep it Cool - Never keep your detector in an extremely hot environment such as the trunk of your vehicle in the summer for extended periods of time. Damage to the electronics and the LCD display screen can occur. Keep it Safe - Never transport your detector in a way that it can be subjected to sudden shock or dropped. Cushion the detector with a blanket or use a carrying case that can be purchased to carry the detector and accessories. Protect the Electronics - A plastic bag placed over the LCD control pod will keep rain from reaching the electronics or at an ocean beach, will help protect the detector from blowing sand and prevent corrosion from the salt air. Remember, the coil is waterproof but the electronics are not! Storage - When storing your detector for more than a month, remove the batteries to prevent them from leaking and damaging the electronics. Troubleshooting PROBLEM POSSIBLE SOLUTION(S) The detector won't turn ON There is no sound The detector operates erratically LCD indication does not lock on Multiple tones are produced when the coil passes over a spot Ensure the batteries are new or charged Check that the batteries are installed properly Check that all connections are secure If using headphones, unplug them to check for sound from the internal speaker (headphones may be defective) Check that all connections are secure Lower the Sensitivity level Try searching in a different location as electrical interference at the current site may be causing the erratic operation. This includes high-voltage power lines, electric transformers and even underground cables and pet containment fences Multiple targets may be present - move the coil slowly at different angles in order to seperate them from one another The Sensitivity may be set too high for the conditions at the search area, reduce the setting and resweep the area 16 Treasure Commander TC2X Specifications Licensed RealTree Xtra Camo Finish GPS Technology (GEO-X) allows saving and locating up to 10 locations Durable lightweight poly carbonate construction Large simple to use digital backlit interface 8 metal categories and adjustable discrimination 4 elimination modes: All-Metal, Coin, Jewelry and Custom . . . let's you find treasures rather than junk. 4 individual audio tones to aid in target identification Over 60 different elimination possibilities Signal strength and depth indicators in pin point mode. Locates "Targets" Quickly. Quick release extension rod design, adds up to 7" to shaft for "tall" users. Adjustable arm guard with strap External 3.5mm headphone jack (headphones not included) Lightweight, perfectly balanced adjustable 10" search coil Right or Left handed use Uses 6 AA-Cell Alkaline batteries (not included) 1–Year warranty Treasure Hunters Code of Ethics I Will respect private property and will not treasure hunt without the owner's permission. I Will Not destroy private property, buildings, or what is left of ghost towns and deserted structures. 17 I Will Not litter and will pick up any trash that I dig up or find on the ground while treasure hunting. I Will leave gates as found. I Will Not contaminate wells, creeks, or other water supplies. I Will fill all excavations that are made while treasure hunting. I Will Not tamper with signs, structural facilities or equipment. I Will appreciate and protect our heritage of natural resources, wildlife, and private property. I Will use thoughtfulness, consideration and courtesy at all times. I Will protect my hobby, and always act as a goodwill ambassador. Be polite and informative to those who inquire about your hobby - you are the ambassador of a pastime we want to protect and we will be judged by how you act & respond. Warranty & Service Information For the warranty to be in effect, you MUST completely fill out and mail the warranty card along with your proof of purchase to WGI Innovations, LTD within 14 days after the date of purchase. As an alternative, you may also visit the WGI Innovations website and register your purchase at http://www.groundefx.com (you are still required to mail WGI Innovations your proof of purchase before the warranty is placed in effect.) Follow the onscreen directions to complete the process. WGI Innovations, LTD will replace all workmanship defects free of charge for one (1) year after the date of purchase as long as your warranty is in effect. This warranty does not cover damage, expense or injury caused by unauthorized repairs, alternations, improper assembly, shipping, abuse, theft, accident, neglect or collateral loss. When returning product(s) for service you must obtain a Return Merchandise Authorization (RMA) number from WGI Innovations, LTD. Please include your name, UPS address (no P.O. Box), telephone number, RMA number and a complete description of the problem on all enclosed correspondence. When possible, pack the equipment carefully in the original carton. Customers are responsible for any shipping costs to WGI Innovations, LTD. WGI Innovations, LTD will pay for the shipping cost of replacement product to the customer. WGI Innovations, LTD is not responsible for damage incurred in returning items for repair. For product service send product(s) to: WGI Innovations, LTD 602 Fountain Parkway Grand Prairie, TX 5050 (800) 847-8269 Thank you for your purchase! 18 LEARNEVERYTHI NGABOUT METALDETECTI NG ATKELLYCO’ SNEW ONLI NELI BRARY Ever ymet aldet ect oruserhasponder edt hese! Goodf oryourheal t h,f un,f ami l yor i ent edhas ext endedt oal mostt went y! Ever yt hi ngf r om oper at i ont osear chcoi l s,headphones, bat t er i esandmor e! Theol dert heyar et hemor eval uabl eand i nt er est i ngyourt r easur ewi l lbe! AnAt oZsour cef oral lwor dsr el at edt omet aldet ect i ng At hor oughl i stoft het opsi t esf orany t r easur ehunt er ! Compr ehensi vegui deont het opar east ost ar tyour sear chf ort r easur e! Char l esGar r et t ,mast ert r easur ehunt erand aut hor ,of f er sbasi csf orbegi nner s. Wi t ht heset i ps,t henovi cedet ect or i stcanbebusyf or qui t eawhi l e! Doyouknow ayoungst eri nt er est edi nmet al det ect i ngorachi l di nyourf ami l yt hat ’ sdyi ngt o got r easur ehunt i ng? Thepr i ceofGol di sgoi ngup,up,up!Andt hemor eus det ect or i st sf i nd,t hesoonerourmachi nesar epai df or ! St epsshowi nghow t obecomeagr eatr el i c hunt erwr i t t enbyAndySabi sch. Thewho,what ,wher e,whenandwhyoff i ndi ngaf al l enst ar ! Thi ngst okeepi nmi ndwhi l et r easur ehunt i ng! Know whatt ol ookf oratpossi bl eGol dsi t es! How t obecomeagr eatwat erhunt erbyA.Sabi sch LookForTheBestPl acesToHunt ! Met hodst ocl eancoi nswi t houtcausi ngdamage. Met aldet ect or scanunear t hsomeoft hewor l dsmost beaut i f ult r easur es. I nf or mat i vevi deost ohel pyoul ear nandbecome bet t erdet ect or i st . Vi si tKel l ycoMet al Det ect or s. Com t oday Notes: Available From: Visit us at: www.kellycodetectors.com Call Us Toll Free At: 1-888-535-5926 1085 Belle Avenue, Winter Springs, FL 32708 19