1
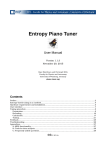
Precision Strobe
Tuner
Operation Manual
PST-4
Table of Contents:
1.0 PST-4 Operations Summary
2.0 General Operation
2.1 Getting Started
2.2 Calibration Adjustment
2.3 Filter Modes
2.4 Auto Track Mode
2.5 Programmable Memory Operation
2.6 Save Settings Mode and Power Down Timer
2.7 Battery Charger Operation
3.0 Applications
3.1 Guitar Tuning
3.2 Guitar Intonation Adjustment
3.3 Piano Tuning Tips
3.4 Piano Tuning Background
3.5 Piano Tuning Operations
3.6 Piano Stretch Curve Construction
3.7 PST-4 Stretch Curve Function
Appendices:
A, The Equal Tempered Scale
B, Piano Stretch Curve Data
C, Alternative Temperaments
D, Cents to A Frequency Conversion Table
E, Other Instrument Tunings
F, Further Reading
G, PST-4 Specifications
1.0 PST-4 Operation Summary
Mode Button
When in Note Display Mode, press the Mode Button momentarily to select the Operation/Filter
Mode display. Press the Mode Button again to return to Note Display Mode. When in Calibration
Display Mode, press the Mode Button to return to Note Display Mode. When in Note Display
Mode, click the Mode Button quickly to change to Octave Index Mode. The Octave digit will begin
flashing. Rotating the Adjust Knob will now index the Note Octave. Click the Mode button again
to return back to Normal Index Mode.
Operation/Filter Modes
To change the Operation/Filter Mode, press the Mode Button momentarily while in Note Display
Mode. The display will change to show the current Operation/Filter Mode. Rotate the Adjust
Knob to cycle through the filter modes:
[ bb ]
Band Pass, Base Boost Enable, Chromatic
[ AP ]
All Pass, Chromatic
[ LP ]
Low Pass, Chromatic
[ bP ]
Band Pass, Chromatic
[ gu ]
Auto, Guitar Mode
[bass]
Auto, Bass Guitar Mode
Press the Mode Button again to return to Note Display Mode.
Auto Button
Press the Auto Button to enable Auto Track Mode. The Auto Indicator will light, and the PST-4
will automatically track the input note. Press again to disable.
Strobe Display
Programmable Memory Operations
The outside ring of LEDs forms the Strobe Display. When the Input Pitch is within about a semitone of the internal Reference Pitch (Note Setting), a two group pinwheel of LEDs opposite each
other will appear to rotate in the Strobe Display. The rotation direction indicates whether the input
tone is sharp or flat and rotation speed indicates degree of error. The speed of rotation decreases
as the Input Pitch is brought in tune and appears stationary when the Note Setting is exactly
matched.
The Programmable Memory allows the user to preset a Temperament into the PST-4 by
programming a separate Calibration Adjustment setting for each of the 88 notes. The
Temperament is defined in terms of cents deviation from the Equal Tempered scale. This can be
setup however a user desires, for example, a Just Toned scale can be configured, or the stretch
of a piano can be programmed. 40 pages of memory are provided, each containing 88 notes.
Sharp/Flat Indicator Display
Select Memory Bank
Indicates coarse tuning error, much like a needle type tuner. Use this for coarse tuning direction
when the Strobe Display pattern rotation is too fast to be perceptible.
Note/Octave Display Rings
Read the Note and Octave Setting from Note and Octave Indicators inside the Strobe Display.
Hold the Mem Button down, the display will show: [b 1]. Rotate the Adjust Knob while holding the
Mem button down to index through, and select one of the 40 Memory Banks. Release the Mem
button. The Mem indicator LED will be lit to signify a Bank is active. As the Note setting is
changed, the corresponding calibration value from the selected Bank will be updated to the Cal
display. These banks must be programmed by the user.
Pitch Offset
Numeric Display
Press the Cal button to display and adjust calibration:
[ 00.0]: Calibration Setting Display in Cents
Press the Mode button to display and adjust the Note/Octave Setting:
[A 5]: Note Setting, A, 5th Octave
Adjust Knob
In Note Display Mode, rotate to change Note Setting. In Calibrate Mode rotate to change the
tuner calibration as indicated in cents. In other modes rotate to index the displayed parameter.
Cal Button
Press to change to Calibration Display Mode. The Numeric Display will change to [ 00.0], with
one of the digits flashing. Calibration is displayed in cents deviation from an equal tempered
based on a 440Hz A with flat designated “-“. Rotate the Adjust Knob to change the value of the
flashing digit. Click the Cal Button to change which digit is flashing. When a Memory Bank is
enabled, holding the Cal Button down displays and allows adjustment of the Calibration Offset.
1
Pitch Offset is used to shift the entire Memory Bank Sharp or Flat. The Offset is displayed while
the Cal Button is held down. To adjust the offset, turn the Adjust Knob while holding down the
Cal Button. The flashing digit will be indexed. When the button is released, the memory setting
for the current note will be restored to the display. Click the Cal button to change which digit is
flashing.
Programming a Memory Bank
Select the desired Bank to be programmed as described above. Unlock the selected Bank by
pressing the Cal Button while holding down the Mem Button. The Mem and Unlock indicators
should both light. Each of the notes in the selected Bank can now be changed. Press the Mode
button if needed to return to Note Display Mode and select the first note to be programmed, next
press the Cal button and adjust the calibration for the selected note. Repeat, setting each note to
the desired value. When done, click the Cal button while holding the Mem button down to relock
the memory.
2
2.0 General Operation
2.3 Operation/Filter Modes
2.1 Getting Started
The PST-4 provides several Operation and Filter Modes which can be selected to
optimize operation for different tuning situations. To change the Operation/Filter
Mode, press the Mode Button momentarily while in Note Display Mode. The
Numeric Display will change to one of the following:
Plug the external power transformer cord into the Power Jack and hold the On/Off
Button down until the display becomes active.
Select the note to be tuned by rotating the Adjust Knob until the desired note and
octave are shown in the Numeric Display. The Note and Octave are also shown
by the Note and Octave indicators inside of the Strobe Display ring.
Plug the instrument or microphone into the Signal Input Jack, or play directly into
the built in Microphone.
Play a note on the instrument being tuned and watch the Indicator Bar at the top
of the tuner, it indicates sharp and flat much like a needle type tuning indicator.
When the instrument pitch is within about a note of the Note Setting, a two group
“pinwheel” pattern of lit LED's will become visible, opposite each other across the
Strobe Display:
[ AP ]
[ LP ]
[ bP ]
[ bb ]
[ gu ]
[bass]
Chromatic All Pass
Chromatic Low Pass
Chromatic Band Pass
Chromatic Band Pass, Base Boost Enable
Guitar Mode, Auto.
Bass Guitar Mode, Auto
Rotate the Adjust Knob to select the mode. Press the Mode Button again to return
to Note Display Mode.
Band Pass [ bp ] and Low Pass [ Lp ] Modes provide the best display for general
tuning. Band Pass can be used to measure the individual harmonics of a piano
string.
Bass Boost [ bb ], Mode is useful to improve the display when tuning the
fundamental of piano strings in the lowest octave.
All Pass Mode applies the full bandwidth input signal to the display, and is useful
for intonation training where good tone quality is conveyed in the Strobe Display
as a crisper display pattern.
This pattern will rotate left if the instrument is flat, and right if sharp. Use the
Strobe Display rotation for final tuning, adjusting the instrument until the rotation
is stopped. The instrument is now exactly matched to the tuner Note Setting.
2.2 Calibration Adjustment
The calibration of the PST-4 can be adjusted to match the tuner to a pitch, or to
tune to scales based on an A of other than 440Hz.
To adjust the calibration, press the Cal Button. The numeric display will change
to indicate the calibration in Units of Cents: [ 00.0]. Each cent shifts the
calibration one percent of a note interval. Initially the center digit will be flashing.
Rotate the Adjust knob to adjust this digit sharp or flat. Clicking the Cal button will
change which is indexed when the Adjust Knob is rotated, providing fine and
coarse adjustment. Pressing the Mode Button will return to Note Display Mode.
To set the PST-4 to a reference pitch, or to measure the tuning error of a pitch,
play the note and adjust the calibration until the Strobe Display rotation is
stopped. The tuning error, or calibration, is read from the Numeric Display
directly in Cents.
Guitar [ gu ], and Bass [bass] Modes provide the best Auto Mode stability when
tuning using a standard E tuning.
To use the Filter Modes effectively, it is helpful to understand how the Strobe
Display works. In operation, only one LED in the Strobe Display is lit at a time.
The tuner electronically rotates the Strobe Display by enabling each LED
successively, around and around the circle. The speed of this rotation is setup by
the selected Note Setting such that the display rotates once for every two cycles of
the selected note. The brightness of the enabled LED is controlled by the level of
the input signal. When input pitch is the same as the Note Setting Reference
Pitch, the two are synchronized, and the effect is a display of the positive peaks of
two cycles of the input pitch as two stationary groups in the display. Input tones
which are sharp or flat generate a strobe display which is rotating, as the phase
between the Reference Pitch and the Input Pitch changes. This is just like in a
movie, when the spokes on a wagon wheel appear to stand still or go backwards!
When the filter Mode is set to All Pass, and tones much sharper or flatter than the
tuner setting are input, other patterns appear. The harmonic relationship of the
input pitch to the reference frequency determines these patterns:
To tune to pitch standards other than an A of 440Hz, refer to Appendix C. For
example, to tune to an A of 438Hz, set the calibration to 7.9 Cents Flat [-7.9].
3
4
When operating in Memory Bank Mode, the entire Bank can be offset Sharp or
Flat. To adjust the Calibration Offset, press and hold the Cal Button, then rotate
the Adjust Knob. Clicking the Cal Button will change which digit is flashing and
adjusted when rotating the Adjust Knob.
With the PST-4 set in All Pass filter mode, instruments producing tones with high
harmonic content will produce a Strobe Display with all these harmonics
superimposed. The resulting display may be very garbled looking and difficult to
interpret, particularly during the attack. For example, a guitar string plucked near
the bridge will produce a complex display, which settles to the two group
fundamental pattern as the overtones decay. A guitar string gently plucked in the
center produces a two group display from the start. The Low Pass and Band Pass
Filter Modes are used to obtain a clear two group pinwheel display right from the
note start.
Using the Band Pass Mode it is possible to individually measure the harmonics of
a tone. This is useful for measuring string inharmonicity. Inharmonicity is the
degree to which the frequencies of overtones differ from whole multiples of the
fundamental frequency. For example, to measure the octave harmonic (2nd
partial) of the 4A string, set the PST-4 to 4A and tune the string until rotation is
stopped. Next, set the tuner to 5A and play the 4A string. The string fundamental
will be filtered out, leaving only the 2nd partial in the display. Notice that the
octave harmonic is slightly sharp. Adjust the tuner Calibration until rotation is
stopped. The calibration setting is the level of inharmonicity for the 2nd partial.
2.4 Auto Mode
To program a Memory Bank, first select and enable one of the 40 Banks. The
Mem Indicator should be lit. Next, press and hold the Mem Button, then click the
Cal Button to unlock the Bank. Now the Unlock Indicator should be lit as well.
Press the Mode Button if not in Note Display Mode, and select the first note to be
programmed. Press the Cal Button to change to Calibration Display Mode and
then adjust the calibration for the given note to the desired value. Press the Mode
Button again to return to Note Display Mode and repeat until all the desired notes
are programmed. Press and hold the Cal Button and click the Cal Button to relock
the Memory Bank.
There is also a Bank Copy feature to allow you to copy a Memory Bank into
another Bank. To use this function:
1.
2.
3.
[CS n] – Copy Source Bank n
[CD n] – Copy Destination n
[CE -] – Copy Enable
4.
In Auto Mode the PST-4 tracks the input Note, allowing hands free operation for
most tuning operations. Press the Auto Button to enable Auto Mode and the Auto
LED indicator in the center of the display will light. Press the Auto Button again to
disable. In some situations with very high harmonic content, such as the very low
end of the piano, Auto Mode may not track well and jump between octaves. In
this case, disable Auto Mode and manually select the Note Setting.
5.
6.
7.
2.5 Programmable Temperament Operation
8.
The PST-4 provides 40 user programmable Memory Banks. This allows the user
to program a separate calibration setting for each of the 88 notes. These
calibration settings are recalled whenever the Note Setting is changed. This is
useful for storing piano stretch curves, or for tuning to alternate temperaments.
To enable and select a Memory Bank, press down and hold the Mem Button. The
display will change to [b 1], which signifies Bank 1. While holding the Mem
Button, rotate the Adjust Knob to index to the desired Bank. Release the Mem
Button, and the Mem Indicator in the center of the display will light, showing that a
Memory Bank is enabled. Now press the Cal Button, and note that the calibration
is not adjustable, as it is now set to whatever value is in the Memory Bank. When
in Memory Bank Mode and Calibration Display Mode, the Adjust Knob indexes the
selected Note, as shown by the Note/Octave Indicators inside the Strobe Display.
5
Hold down the Temp Button while turning the power on. Keep it down
until the PST-4 is running. The Copy Bank Mode is now enabled.
Next, press the Mode button. The display changes to [CS 1], which
signifies Copy Source Bank parameter setup.
Press the Mode Button to index through the parameters:
Use the Mode Button to index to Copy Source display [CS x] and rotate
the adjust knob to select the Source Bank.
Use the Mode Button to index to Copy Destination display [CD x] and
rotate the adjust knob to select the Destination Bank.
Use the Mode Button to index to Copy Enable display [CE -] and rotate
the adjust knob to select [CE C].
Initiate the copy operation by pressing and holding the Mode Button
down until the display shows [coPy]. When the display shows [donE] the
copy is complete.
Turn the Power off, and then on, to return to normal operation mode.
To zero out a previously programmed bank, follow the above procedure using
bank zero as the Source Bank, and the Bank to be zeroed as the Destination
Bank.
2.6 Output Jack Function Selection
The Output Jack can be configured to either output the internal reference
frequency to an amplifier, or pass the Input Jack signal thru to the Output Jack.
Internal jumpers JP8 (2 pins, between the Input and Output Jack), and JP9 (4
pins, below the Output Jack) on the circuit board must be moved to change the
configuration. For signal Input thru to Output configuration, place one shorting
jumper on JP9 and one jumper in the center position of JP8 (shorting pins 2-3).
For Reference Tone output to the Output Jack, remove the jumper from JP9, and
place both jumpers on JP8, shorting pins 1-2 and 3-4.
6
2.7 Save Settings Mode and Power Down Timer
3.0 Applications
The PST-4 can be configured to retain the last Note and Mode settings on power
up. It can also be configured to automatically turn off after a period of inactivity to
save batteries. To enable Save Settings Mode or the Power Down Timer Mode:
3.1 Guitar Tuning
1.
2.
3.
Hold down the Mode Button while turning the power on. Keep
until the PST-4 is running, then release. The Settings Mode
enabled.
Press and hold the Mode Button until the display changes to
which signifies Save Settings Mode is set to disabled.
Notice that at this point you can press the Mode Button to index
the parameters:
it down
is now
[SS d],
through
[SS x] – Setting Save
[Pd x] – Power Down
4.
5.
6.
To change the Settings Save Mode, use the Mode Button to index so the
display shows[SS d], rotate the Adjust Knob to change between Enabled
(E) and disabled (d).
To change the Power Down Timer Mode, use the Mode Button to index to
the display [Pd 0], rotate the Adjust Knob to change between 0 (off), 5,
10 and 30 minutes.
Turn the Power off, and then on, to return to normal operation.
2.8 Battery Charger Operation
The PST-4 will operate from either an external power supply or internal batteries.
Six AA batteries are required. A built in battery charger for NiMH type batteries is
provided. The PST-4 will operate for 10 to 15 hours from 1800mAH batteries.
The battery charger is a timed charger and will charge 1800mAH batteries in 15
hours. To initiate a charge cycle, first plug in the external power supply and turn
the tuner on. Then, press and hold the On/Off button for about three seconds until
the display shows [Chrg]. Release the On/Off button. The display will alternate
between the [Chrg] message, and the remaining charge time. Rotate the Adjust
Knob to select a charge time of 1, 3, 5, 10 or 15 hours.
A discharged set of 1800mAH capacity batteries will be fully charged in 15 hours.
Service lifetime of NiMH batteries will be reduced if repeatedly overcharged, so
only charge for the full 15 hours when the batteries have been fully discharged.
The batteries should be charged about 1.5 hours for every hour of tuner operation
to top off the battery charge.
To install or change the batteries, unscrew the 4 rubber feet and remove the back
cover. Install the batteries and make sure the battery wire is plugged in correctly
(Red wire toward the + marking on the PCB). If alkaline batteries are installed,
you MUST move the shorting bar on JP7 (3 pin, above power jack) to the OFF
position to disable the charger. Set it to the ON position for NiMH batteries.
Warning: Do not attempt to charge alkaline batteries. If you do, very bad things
may happen which might not please you. Be advised.
7
The Note Settings to use for E tuning of the guitar and base guitar strings are:
Guitar
[E 2] Low E String
[A 3] A String
[D 3] D String
[G 4] G String
[B 4] B String
[E 4] High E String
Bass
[E 1] Low E String
[A 2] A String
[D 2] D String
[G 2] G String
Plug an electric guitar directly into the Signal Input Jack. Hold an acoustic close to
the Mic input. Pluck the string and tune to stop Strobe Display rotation. When
using Auto Mode while tuning an acoustic with bright strings, the tuner may jump
to string harmonics during the attack. If this is a problem, use Guitar Operation
Mode [ gu ], to improve note detection stability. Use Bass Operation Mode [bass],
for optimal stability when tuning bass guitars.
3.2 Guitar Intonation Adjustment
Guitar Intonation setup involves adjusting the length of the strings at the tailpiece
such that a note played on the twelfth fret of each string is a true octave of the
open string. If the length is adjusted too short, the fretted octave will ring sharp
compared to the open string. The tail-piece is adjusted to correct the fretted
octave. Alternately, All Pass filter Mode can be used for this measurement to view
the fretted octave as a harmonic of the open string frequency directly. Enable All
Pass Filter Mode, turn Auto Mode off, set the Note Setting to the open string note
and pluck lightly in the string center to view it’s fundamental. Then, play at the
twelfth fret, and read the four group octave display pattern in the Strobe Display.
3.3 Piano Tuning Tips
Piano strings in the low octave tend to ring with the fundamental at a much lower
level than the harmonics. Use the Bass Boost Filter Mode [ bb ], to improve the
Strobe Display in this range. It is also recommended that an external microphone
with good low frequency response be used when measuring the fundamental of
strings in low octave of a piano.
3.4 Piano Tuning Background
A skilled technician can tune the middle C string of a piano to a single tuning fork
and then tune all the remaining strings, doing this entirely by ear. The first step is
tuning the temperament octave. It is done by listening to the beats produced
between the partials of certain intervals and tuning that interval by tuning the beat
to the proper rate. Once the temperament octave has been tuned, the remaining
strings are tuned to it. This is done by progressively playing octave intervals up
and down the keyboard, while tuning to remove the beat. The origin of the beat,
and how they are used in this process is explained in detail in many books on the
subject. See Appendix D.
8
Once a piano has been tuned by this method, if you measure all of the notes
against an equal tempered scale and plot the data, you will find an interesting
result. Toward the high end of the piano, the notes will progressively get sharper,
with the highest note perhaps 30 cents sharp, there is also a similar flattening of
the lowest notes, although not as pronounced.
This is due to the inharmonicity of ringing strings. A string can ring in several
modes of vibration, the fundamental, and a series of harmonics over integer
division subsections of the string. Note A3 produces the approximate harmonic
series of 110 Hz, 220 Hz, 330 Hz etc. The frequencies are determined by string
length, mass, tension and stiffness.
The harmonics ring on shorter sections of
string which have a higher thickness to length ratio, and are therefore stiffer. This
extra stiffness causes the harmonics to ring slightly sharper than the ideal
harmonics.
The actual frequencies which ring are known as partials. The fundamental is
called the 1st partial, and the first octave harmonic the 2nd partial etc. How much
sharper the partials are than ideal harmonics depends on the string geometry.
When a tuner is tuning the octave intervals up the keyboard, they are generally
listening to the beat produced between the fundamental of the higher string, and
the 2nd partial of the lower string. This generates a slightly sharp octave when
comparing the fundamentals, which accumulates up the keyboard, resulting in the
tuning stretch curve for a piano. This stretch curve varies from piano to piano,
depending on the string arrangement.
3.6 Manual Piano Stretch Curve Construction
The stretch curve for a given piano can be tuned using a series of string partial
measurements. The temperament octave is first tuned directly to 0.0 cents. Then
the strings are tuned up the keyboard by tuning each string fundamental to the
2nd partial of the string an octave lower. This curve can be stored in one of the
PST-4 Temperament Banks, and used for directly tuning the string fundamentals
again later. The following procedure is based on the one given by Reblitz (See
Appendix D).
1.
2.
3.
4.
5.
6.
3.5 Piano Tuning Operations
Pianos have groups of up to three strings per note, which are known as unisons.
When tuning the temperament only the center string of each unison is tuned. This
can be done using rubber wedges to damp out the two outside strings while tuning
the middle string. Then these can be removed one at a time while tuning the
outside string to the center string, a process call tuning the unisons. A length of
felt can also be folded and tucked into the space between unisons to damp the
outside strings over an interval. This is handy when setting the temperament
octave.
Final tuning of the unisons can be performed by ear by playing each outside string
along with the center string, then tuning the outside string while listening to the
beat and tuning to remove it. When playing two strings at once into the PST-4,
the rotation of both notes are displayed, superimposed, giving a pulsing display,
settling to a stable two group pinwheel when the beat is stopped. The remaining
unison strings can also be tuned separately, tuning each to stop the rotation.
7.
8.
Using a felt strip, damp out the outside strings from E3 to E4.
If saving results in a Temperament Bank, select which one, and zero it.
Verify Calibration is set to 0.0 and tune the center strings of the temperament
octave unisons from F3 to E4.
Beginning with note F3, measure the string 2nd partial, and tune the string
one octave higher, F4, to this value.
1. Set the Note Setting to [F 4].
2. Play note F3 and measure its 2nd partial by adjusting the Calibration
until rotation is stopped.
3. Play note F4 and tune it’s fundamental to stop rotation.
4. Program this value into Bank Setting [F 4] if desired.
Repeat step (4) for each progressive note up the keyboard until you have
tuned up to [C 8].
Beginning with [Eb 3], tune it such that it’s 2nd partial is matched to the
fundamental of the string one octave higher, [Eb 4].
1. Set the Tuner to [Eb 4]. Play Eb4 and adjust the Tuner Calibration until
rotation is stopped.
2. Play the Eb3 note and tune it’s first partial to stop rotation.
3. Set the Tuner to [Eb 3].
4. Play the Eb3 note, and adjust the Tuner Calibration to stop rotation. This
is the Cal Setting to tune the [Eb 3] fundamental to. Program this value
into the [Eb 3] Bank if desired.
Repeat step (6) progressively down the keyboard until you have tuned down
to [A 1]. The stretch curve for the piano has been set into the Temperament
Bank.
Tune all of the remaining strings of the unisons.
3.7 PST-4 Stretch Curve Construction
The stretch curve for a given piano can also be determined directly from a set of
differential measurements, without actually tuning the piano first. This can be
done by measuring the fundamental and the 2nd partial of each string, then taking
the difference to find the 2nd partial inharmonicity of each string. These values
can then be used to construct the stretch curve. This can be done by hand, using
a spreadsheet, or by using the PST-4 special Bank Copy function.
9
10
The PST-4 has a special Bank Copy Mode which will construct a stretch curve
from two sets of measurements. The first is a set of measurements of the
fundamental of strings A1 up to C7. The second is a set of measurements of the
2nd partial of each of these strings. These two measurement sets are stored in
special purpose Banks. Bank 41 is used for the fundamental measurements.
Bank 42 is used for the 2nd partial measurements. The stretch curve is then
automatically figured from these two Memory Banks by the PST-4 using the
special Bank Copy function, which stores the result in Bank 43.
1.
2.
3.
4.
5.
6.
Measure the fundamental of stings A1 to C7 and store into Temperament
Bank 41.
1. Select Temperament Bank 41 and Unlock the Bank.
2. Set the PST-4 to note A1. Play note A1 and adjust the Calibration Knob
until Strobe Display rotation is stopped.
3. Repeat step (1.2) up the keyboard to Note C7. The tuning of the
fundamental note of all but the high Octave is now stored in
Temperament Bank 41.
Measure the 2nd partial of strings A1 to C7 and store as notes A2 to C8 in
Temperament Bank 42.
1. Select Temperament Bank 42 and Unlock the Bank.
2. Set the PST-4 to note A2. Play note A1 and adjust the Calibration Knob
until Strobe Display rotation is stopped.
3. Repeat step (2.2) up the keyboard to Note C7 ending with this partial
being stored into Note C7. The tuning of the 2nd partial of the lower 7
octaves are now stored into Temperament Bank 42, starting at note A2
up to note C8.
You are now ready to use the PST-4 to generate the stretch curve and put
into Temperament Bank 43.
Enable the Copy Bank Functions: Turn the PST-4 off. Hold down the Temp
button down while turning the power on, keeping it held down until the PST-4
becomes active, then release.
Perform the differential copy to generate the stretch curve. The PST-4 must
first be turned on with the Temp Button held down to enable the Bank Copy
functions.
1. Press and hold the Mode Button until the display changes to [CS 1].
2. Press and release the Mode Button and index until the display shows
[CE -].
3. Rotate the Adjust Knob to index to [CE d], which signifies differential
Copy Mode.
4. Press and hold the Mode Button until the display changes to [dstr]. The
process is complete when the Display flashes [donE].
The stretch curve is now stored in Temperament Bank 43. You can copy it
down to some other Bank for permanent storage, and use it to tune the
fundamental of each note to the stretch curve.
Appendix A, The Equal Tempered Scale
N
0
1
2
3
4
5
6
7
8
9
10
11
12
13
14
15
16
17
18
19
20
21
22
23
24
25
26
27
28
29
30
31
32
33
34
35
Not
e
A1
Bb1
Bb1
C1
Db1
D1
Eb1
E1
F1
Gb1
G1
Ab1
A2
Bb2
Bb2
C2
Db2
D2
Eb2
E2
F2
Gb2
G2
Ab2
A3
Bb3
Bb3
C3
Db3
D3
Eb3
E3
F3
Gb3
G3
Ab3
Freq
27.500
29.135
30.868
32.703
34.648
36.708
38.891
41.203
43.654
46.249
48.999
51.913
55.000
58.270
61.735
65.406
69.296
73.416
77.782
82.407
87.307
92.499
97.999
103.83
110.00
116.54
123.47
130.81
138.59
146.83
155.56
164.81
174.61
185.00
196.00
207.65
N
36
37
38
39
40
41
42
43
44
45
46
47
48
49
50
51
52
53
54
55
56
57
58
59
60
61
62
63
64
65
66
67
68
69
70
71
F(N) = 27.5 * 2^(N/12)
11
Not
e
A4
Bb4
Bb4
C4
Db4
D4
Eb4
E4
F4
Gb4
G4
Ab4
A5
Bb5
Bb5
C5
Db5
D5
Eb5
E5
F5
Gb5
G5
Ab5
A6
Bb6
Bb6
C6
Db6
D6
Eb6
E6
F6
Gb6
G6
Ab6
Freq
220.00
233.08
246.94
261.63
277.18
293.66
311.13
329.63
349.23
369.99
392.00
415.30
440.00
466.16
493.88
523.25
554.37
587.33
622.25
659.26
698.46
739.99
783.99
830.61
880.00
932.33
987.77
1046.50
1108.73
1174.66
1244.51
1318.51
1396.91
1479.98
1567.98
1661.22
N
72
73
74
75
76
77
78
79
80
81
82
83
84
85
86
87
Not
e
A7
Bb7
Bb7
C7
Db7
D7
Eb7
E7
F7
Gb7
G7
Ab7
A8
Bb8
Bb8
C8
Freq
1760.00
1864.66
1975.53
2093.00
2217.46
2349.32
2489.02
2637.02
2793.83
2959.96
3135.96
3322.44
3520.00
3729.31
3951.07
4186.01
N(F) = (12/ln(2)) * ln(F/27.5)
12
Appendix B, Piano Stretch Curve Example, Yamaha Upright
A- Yamaha Upright
25.0
20.0
15.0
10.0
5.0
0.0
-5.0
Note
A1
Bb1
Bb1
C1
Db1
D1
Eb1
E1
F1
Gb1
G1
Ab1
A2
Bb2
Bb2
C2
Db2
D2
Eb2
E2
F2
Gb2
G2
Ab2
A3
Bb3
Bb3
C3
Db3
D3
Eb3
E3
F3
Gb3
G3
Ab3
1
13
Cents
-3.4
-3.3
-3.2
-3.2
-3.2
-3.1
-3.1
-3.1
-3.1
-3.1
-3.1
-3.0
-3.0
-3.0
-3.0
-2.9
-2.8
-2.8
-2.7
-2.6
-2.5
-2.4
-2.3
-2.2
-2.1
-1.9
-1.8
-1.7
-1.5
-1.4
-1.2
-1.1
-0.9
-0.8
-0.6
-0.5
25
37
Note
A4
Bb4
Bb4
C4
Db4
D4
Eb4
E4
F4
Gb4
G4
Ab4
A5
Bb5
Bb5
C5
Db5
D5
Eb5
E5
F5
Gb5
G5
Ab5
A6
Bb6
Bb6
C6
Db6
D6
Eb6
E6
F6
Gb6
G6
Ab6
49
Cents
-0.3
-0.2
-0.1
0.0
0.2
0.3
0.4
0.5
0.5
0.6
0.7
0.8
0.8
0.9
1.0
1.0
1.1
1.2
1.2
1.3
1.4
1.5
1.6
1.7
1.9
2.1
2.2
2.5
2.7
3.0
3.3
3.7
4.1
4.5
5.0
5.6
61
73
Note
A7
Bb7
Bb7
C7
Db7
D7
Eb7
E7
F7
Gb7
G7
Ab7
A8
Bb8
Bb8
C8
85
Cents
6.2
6.8
7.5
8.3
9.1
10.0
11.0
12.0
13.1
14.3
15.5
16.8
18.1
19.5
20.9
22.4
Appendix C, Alternative Temperaments
Note
A
Bb
B
C
Db
D
Eb
E
F
Gb
G
Ab
Equal
0.0
0.0
0.0
0.0
0.0
0.0
0.0
0.0
0.0
0.0
0.0
0.0
Just
0.0
33.2
3.9
15.6
-13.7
19.6
31.3
2.0
13.7
-15.6
17.6
-11.7
Pythagorean
0.0
-9.8
3.9
-5.9
7.8
-2.0
-11.8
2.0
-7.8
5.9
-3.9
9.8
Mean
0.0
17.6
-6.4
10.4
-13.3
3.6
20.7
-3.3
13.6
-9.7
7.0
-17.0
Appendix D, Cents to A Frequency Conversion Table
F(A)
430.0
430.5
431.0
431.5
432.0
432.5
433.0
433.5
434.0
434.5
Cents
-39.8
-37.8
-35.8
-33.8
-31.8
-29.8
-27.8
-25.8
-23.8
-21.8
f(A)
435.0
435.5
436.0
436.5
437.0
437.5
438.0
438.5
439.0
439.5
Cents
-19.8
-17.8
-15.8
-13.8
-11.8
-9.9
-7.9
-5.9
-3.9
-2.0
f(A)
440.0
440.5
441.0
441.5
442.0
442.5
443.0
443.5
444.0
444.5
Cents
0.0
2.0
3.9
5.9
7.9
9.8
11.8
13.7
15.7
17.6
Appendix E, Other Instrument Tunings
Violin: G3, D4, A5, G5.
Banjo C Tuning: G4, C3, G3, B4, D4
13
14
F(A)
445.0
445.5
446.0
446.5
447.0
447.5
448.0
448.5
449.0
449.5
450.0
Cents
19.6
21.5
23.4
25.4
27.3
29.3
31.2
33.1
35.1
37.0
38.9
Appendix F, Further Reading
Piano Servicing Tuning & Rebuilding
Arthur A. Reblitz (1993), The Vestal Press
PIANO TUNING, A Simple and Accurate Method for Amateurs
J. Cree Fischer (1907)
The Science of Sound
Thomas D. Rossing (1982), Addison-Wesley Publishing
The Acoustical Foundations of Music
John Backus (1977), W W Norton and Company
The Equal Tempered Scale and Some Peculiarities of Piano Tuning
http://www.precisionstrobe.com/apps/pianotemp/temper.html
"The Endangered Piano Technician"
Essay, James Boyk, Scientific American December 1995
THE SEVENTH DRAGON: The Riddle of Equal Temperament
Anita T. Sullivan (1985), Metamorphous Press.
Appendix G, PST-4 Specifications
Dimensions: 3.5 x 5.6 x 1.4 inches
(excluding knob)
Power Supply: 12 Volts DC, 300 mA
(Center Pin Positive)
Accuracy:
Temperament (Note Spacing); better than .01 Cent
Absolute; .1 Cent.
Temperature
Drift: Less than .1 Cent over
0° C to 40° C.
Tuning Range: A1 to C8
Calibration Range: ± 80 Cents in
.1 Cent Increments
Temperament Memories: 40 Banks, 88 Notes Each
Software Version: 1.0
(Manual Rev 4B)
Jim Campbell
Ann Arbor, MI
www.precisionstrobe.com
US Pat 5777248
15
16