1
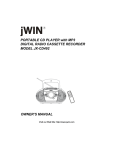
JX-CD 4300D
MICRO COMPONENT SYSTEM
INSTRUCTION MANUAL
Web site: http://www.jwin com
CAUTION
RISK OF ELECTRIC SHOCK
DO NOT OPEN
CAUTION: TO PREVENT THE RISK OF ELECTRIC SHOCK, DO NOT REMOVE COVER
(OR BACK). NO USER-SERVICEABLE PARTS INSIDE. REFER SERVICING TO QUALIFIED
SERVICE PERSONNEL.
This symbol indicates that there
are important operating and
maintenance instructions in the
literature accompany-ing this unit.
This symbol indicates that
dangerous voltage constituting
a risk of electric shock is present
within this unit.
WARNING: TO PREVENT FIRE OR SHOCK HAZARD, DO NOT EXPOSE
THIS APPLIANCE TO RAIN OR MOISTURE.
CAUTION - USE OF CONTROLS OR ADJUSTMENTS OR PERFORMANCE OF PROCEDURES
OTHER THAN THOSE SPECIFIED IN THE OPERATING INSTRUCTIONS MAY RESULT IN
HAZARDOUS RADIATION EXPOSURE.
1. CLASS 1 LASER PRODUCT
2. DANGER: Invisible laser radiation when open and interlock failed or defeated. Avoid direct exposure
to beam.
3. CAUTION: Do not open the top cover. There are no user serviceable parts inside the Unit; leave all
servicing to qualified service personnel.
FCC INFORMATION
This device complies with Part 15 of the FCC Rules.
Operation is subject to the following two conditions.
(1) This device may not cause harmful interference, and (2) this device must accept any interference
received. including interferencde that may cause undesired operation.
CAUTION:
WHEN INSTALLING THE BATTERIES
To prevent leakage from the batteries, which
is corrosive and can cause personal injury
and damage to the unit, observe the following
precautions:
1. The batteries must be installed correctly,
Match the polarities (+ and - signs) on the
batteries to the polarities shown on the back
of the unit.
2. Do not mix new batteries with old used
batteries.
3. Only use batteries of the same type and
brand.
1
4. If the unit will not be used for an extended
period of time, remove the batteries and store
them in a cool place.
5. Carefully follow the battery manufacturer's
instructions for proper use and disposal.
6. DO NOT ALLOW YOUNG CHILDREN TO
HANDLE BATTERIES.
NOTE:
When the batteries have become discharged,
they must be disposed of in a safe manner
that complies with all applicable laws.
IMPORTANT SAFETY INSTRUCTIONS
1. Read Instructions - All the safety and operating instructions should be road before the product
is operated
2. Retain Instructions - The safety and operating Instructions should be retained for future
reference.
3. Heed Warnings - All warnings on the product and in the operating instructions should be
adhered to.
4. Follow Instructions - All operating and use instructions should be followed.
5. Cleaning - Unplug this product from the wall outlet before cleaning. Do not use liquid cleaners or
aerosol cleaners. Use a damp cloth for cleaning.
6. Attachments - Do not use attachments not recommended by the product manufacturer as they
may cause hazards.
7. Water and Moisture - Do not use this product near water - for example, near a bath tub, wash
bowl, kitchen sink, or laundry tub; in a wet basement; or near a swimming pool; and the like.
8. Accessories - Do not place this product on an unstable cart, stand, tripod, bracket, or table. The
product may fall, causing serious injury to a child or adult, and serious damage to the product.
Use only with a cart, stand, tripod, bracket or table recommended by the manufacturer, or soid
with the product. Any mounting of the product should follow the manufacturer's instructions, and
should use a mounting accessory recommended by the manufacturer.
A product and cart combination should be moved with care.
Quick stops, excessive force, and uneven surfaces may cause
the product and cart combination to overturn(Figure 131.2)
9. Ventilation - Slots and openings in the cabinet are provided
for ventilation and to ensure reliable operation of the product and
to protect it from overheating, and these openings must not be
blocked or covered. The openings should never be blocked by
Figure 131.2
placing the product on a bed, sofa, rug, or other similar surface.
This product should not be placed in a built-in installation such as a bookcase or rack unless
proper ventilation is provided or the manufacturer's instructions have been adhered to.
10. Power Sources - This product should be operated only from the type of power source indicated
on the marking label. If you are not sure of the type of power supply to your home, consult your
product dealer or local power company. For products intended to operate from battery power, or
other sources, refer to the operating instructions.
11. Grounding or Polarization - This product may be equipped with a polarized alternating-current
lone plug (a plug having one blade wider than the other). This plug will fir into the power outlet
only one way. This is a safety feature. If you are unable to insert the plug fully into the outlet, try
reversing the plug. If the plug should still fail to fit, contact your electrician to replace your
obsolete outlet. Do not defeat the safety purpose of the polarized plug.
12. Power-Cord Protection - Power-supply cords should be routed so that they are not likely to be
walked on or pinched by items placed upon or against them, playing particular attention to cords
at plugs, convenience receptacles, and the point where they exit from the product.
2
13. Outdoor Antenna Grounding - If an outside antenna or cable system is connected to the
product, be sure the antenna or cable system is grounded so as to provide some protection
against voltage surges and built-up static charges. Article
810 of the National Electrical Code, ANSI/NFPA 70,
provides information with regard to proper grounding
of the mast and supporting structure, grounding of
the lead-in wire to an antenna discharge unit, size of
grounding conductors, location of antenna-discharge
unit, connection to grounding electrodes, and
requirements for the grounding electrode.(Figure 131.1)
14. Lightning - For added protection for this product
during a lightning storm, or when it is left unattended
Figure 131.1
and unused for long periods of time, unplug it from the wall
outlet and disconnect the antenna or cable system. This will prevent damage to the product due
to lightning and power-line surges.
15. Power Lines - An outside antenna system should not be located in the vicinity of overhead
power lines or other electric light or power circuits, or where it can fall into such power lines or
circuits. When installing an outside antenna system, extreme care should be taken to keep from
touching such power lines or circuits as contact with them might be fatal.
16. Overloading - Do not overload wall outlets, extension cords or integral convenience receptacles
as this can result in a risk of fire or electric shook.
17. Object and Liquid Entry - Never push objects of any kind into this product though openings as
they may touch dangerous voltage points or short-out parts that could result in a fire or electric
shock, Never spill liquid of any kind on the product.
18. Servicing - Do not attempt to service this product yourself as opening or removing covers may
expose you to dangerous voltage or other hazards. Refer all servicing to qualified service
personnel.
19. Damage Requiring Service - Unplug this product from the wall outlet and refer servicing to
qualified service personnel under the following conditions:
a) when the power-supply cord or plug is damaged,
b) If liquid has been spilled, or objets to have fallen into the product,
c) If the product has been exposed to rain or water,
d) If the product does not operate normally by following the operating instructions. Adjust only those
controls that are covered by the operating instructions as an improper adjustment of other
controls may result in damage and will often require extensive work by a qualified technician to
restore the product its normal operation.
e) If the product has been dropped or damaged in any way, and
f) when the product exhibits a distinct change in performance-this indicates a need for service.
20. Replacement Parts - When replacement parts are required, be sure the service technician has
used replacement parts specified by the manufacturer or have the same characteristic as the
original part. Unauthorized substitutions may result in fire, electric shook, or other hazards.
21. Safety Check - Upon completion of any service or repairs to this product, ask the service
technician to perform safety checks to determine that the product is in proper operating condition.
22. Heat - The product should be situated away from heat sources such as radiators, heat registers,
stoves, or other products (including amplifiers) that produce heat.
FIGURE 1
EXAMPLE OF ANTENNA GROUNDING
AS PER NATIONAL
ELECTRICAL CODE
ANTENNA
LEAD IN
WERE
GROUND
CLAMP
ANTENNA
DISCHARGE UNIT
(NEC SECTION 810-20)
ELECTRONIC
SERVICE
EQUIPMENT
GROUNDING CONDUCTORS
(NEC SECTION 810-21)
GROUND CLAMPS
POWER SERVICE GROUNDING
ELECTRODE SYSTEM
(NEC ART 250. PART H)
3
7 8
9
10
6
4
3
11
5
2
13
1
12
14
FM MODE /BEAT CANCEL
20
18
19
16
17
15
22
MONO
1
ST
2
21
23
24
25
28 27 26
25
Fig.1
VOLTAGE
110
VOLTAGE
220
240
120
220
~
~
SELECTOR
~
~
120
110
240
SELECTOR
(For dual voltage model only!)
Fig.2
4
Fig. 3a
Fig. 3b
Fig. 3c
Fig.4
5
Fig.5
Fig.7
Fig.6
Fig.8
Fig.9
6
ENGLISH
PRECAUTIONS
The apparatus shall not be exposed to dripping or splashing.
Do not use where there are extremes of temperature (below 5 C or exceeding 35 C).
Because of the CD player's extremely low
noise and wide dynamic range, there might
be a tendency to set the volume on the amplifier unnecessarily high. Doing so may produce an excessively large output from the
amplifier which could damage your speakers.
Sudden changes in the ambient temperature
may cause condensation to from on the optical lens inside the unit. If this happens, take
out the disc, leave the unit for about 1 hour,
and then proceed to operate.
Do not install this equipment in a confined
space, such as a book case or built in
cabinet.
The rating label is located on the back of the
unit.
7
SPEAKERS
Speakers connections (Fig. 3a)
To detach the speaker enclosures (Fig. 3b)
To attach the speaker enclosures (Fig. 3c)
POWER SUPPLY
AC POWER
Before use, be sure the corresponds with you
local voltage. Connect one end of the mains lead to
the AC INPUT socket and the other end to an AC
outlet.
Note:
The installed batteries are automatically disconnected when the mains lead is connected
to the unit.
The FUNCTION switch is mounted on the
secondary side. The unit is not disconnected
from mains, even switched off.
CONTROLS (Fig. 1)
1. Function switch (FUNCTION)
2. Repeat button (REPEAT)
3. Volume control (VOLUME)
4. Skip/Search buttons (
,
5. Stop button ( )
6. Bass expander button (DBBS)
7. CD track number display (TRACK NO.)
8. Indicator (STEREO)
9. CD compartment
10. Tuning control (TUNING)
11. Memory button (MEMORY)
12. Radio band switch (BAND)
13. Play/ Pause button (
)
14. Cassette holder
15. Pause button (PAUSE)
16. Stop/ Eject button (STOP/EJECT)
17. Fast forward button (FFWD)
18. Rewind button (REW)
19. Play button (PLAY)
20. Record button (REC)
21. Telescopic aerial
22. FM mode/ Beat cancel switch
(FM MODE/BEAT CANCEL)
23. Headphones socket (PHONES)
24. Speaker terminals (SPEAKERS)
25. Speaker release levers
26. Voltage selector (Option)
27. AC input socket (AC INPUT)
28. Battery compartment lid
)
BATTERY POWER
Installing batteries
Install eight "R20/D" batteries (not supplied) as
shown in Fig. 4.
Cautions on batteries
To prevent battery electrolyte leakage, which may
result in injury and damage to the unit or other
objects, observe the following precautions:
1. All batteries must be installed with the proper
polarity (see diagram on the rear of the unit).
2. Do not mix new with old or used batteries.
3. Only use batteries of the same type and
brand.
4. Remove the batteries when they are not to
be used for a long period time.
5. Wh en th e b a t ter ies hav e bec ome
discharged, they must be disposed of in a
safe manner which complies with all applicable laws.
GENERAL OPERATION
CD PLAY
Adjusting the volume
Turn the VOLUME control.
Use compact discs bearing the symbol shown in
Fig. 5 In addition to conventional 12 cm CDs, this
system can be used to play 8 cm CDs without an
adapter.
Bass expander button
Press the DBBS button to ON to enhance the
bass sound.
Headphones
Connect stereo headphones (not supplied) to the
PHONES socket for monitoring or for private
listening. The speakers are automatically
disconnected when headphones are connected.
1. Set the FUNCTION switch to CD.
2. Press the CD compartment lid (CD OPEN/
CLOSE portion) to open it.
3. Place the disc with the label facing up on the
turntable (Fig. 6). (Place only one disc at a
time.)
4. Press the CD compartment lid (CD OPEN/
CLOSE portion) to close it.
The total number of tracks on the disc appears on the TRACK NO. display.
5. Press the
button.
- To start play from the desired track, select the track by using the
or
buttons, then press the
button.
Note:
If a disc is loaded upside down, or if no disc
is loaded, 00 appears and the CD player
will not operare.
6. Press the button to end disc play.
When the last track has been played, the
player stops automatically.
7. To turn the CD Player off, set the function
switch to TAPE/OFF.
Note:
- Do not open the CD compartment during CD
play. Always press the button and wait for
the disc to top rotating betore opening the CD
compartment.
- This unit can play back the CD-R/RW as well.
however, some CD-R/RWS can not be played
back depending on the recording conditions.
8
Notes on handling compact discs
- Do not expose the disc to direct sunlight,
high humidity or high temperatures for extended periods of time.
Discs should be returned to their cases after
use.
Do not apply paper or write anything on the
disc surface.
Handle the disc by its edge. Do not touch the
playing surface (glossy side).
Fingerprints and dust should be carefully
wiped off the playing surface of the disc with
a soft cloth.
Wipe in a straight motion from the centre to
the outside of the disc.
Never use chemicals such as record cleaning sprays, antistatic sprays or fluids, benzene or thinner to clean compact dises.
Temporarily stopping play
Press the
button. The CD PLAY indicator
blinks.To resume play, press the button again.
Skip play
To skip to track 6 while track 3 is playing,press the
button repeatedly until 6 appears on
the display. To skip back to track 3 while track 6 is
playing, press the
button repeatedly until
3 appears.
Search(forward/reverse)
If the
or
button is pressed
during play, the player will search at high speed in
the forward or reverse direction while the button is
being pressed. When the button is released
normal play will continue.
Repeat play
Press the REPEAT button before or during play.
Each time the button is pressed,the repeat mode
changes.
9
PROGRAMMED PLAY
Up to 20 tracks on a disc can be programmed for
play in any order.
- To begin the programming procedure, select
CD function first.
- The same track can be programmed more
than once.
- Load a disc that you want to programme before starting programmed play.
1. Press the
button if necessary.
2. Press the MEMORY button
3. Select a track by using the
and
buttons.
4. Press the MEMORY button.
5. Repeat steps 3 - 4 to programme additional
tracks.
6. Press the
button to start play. When
all programmed tracks have been played,
the player stops automatically.
The programme contents are retained in
memory.
-
To cancel programmed play, press the
button twice.
Checking the programme
Press the MEMORY button twice in the stop
mode, the programmed tracks sequentially
appear on the display.
Changing the programme
To add a new selection to a programme:
1. In the stop mode, press the MEMORY
button.
2. Select the track number as explained above.
3. Press the MEMORY button.
WHAT TO DO IF...
If an abnormal display indication or an operating
problem occurs, dcisconnect the mains lead and
remove all batteries. Wait at least 5 seconds, then
reconnect the mains lead and reinstall the
batteries. Resume the operation.
LISTENING TO TAPES
LISTENING TO THE RADIO
1. Set the FUNCTION switch to TAPE.
2. Press the STOP/EJECT button. The cassette holder opens.
3. Load the cassette into the cassette holder
(Fig.7). After loading the cassette, press the
cassette holder back into position.
4. Press the PLAY button to begin playback.
5. Press the STOP/EJECT button to stop playback at any time. Press it again to remove
the cassette.
1. Set the FUNCTION switch to RADIO.
2. Set the BAND switch to FM or AM as desired.
3. Tune in a desired station by turning the TUNING control.
4. To turn the radio off, set the FUNCTION
switch to TAPE/OFF.
Note:
- Use the normal tape (TYPE 1).
- Endless tapes cannot be used.
- Do not use C- 100 (or longer) tapes. They
may jam in the mechanism.
Pause
Press the PAUSE button to temporarily stop
playback or recording. Press it again to resume
operation.
To receive FM stereo broadcasts
Set the FM MODE switch to ST.
- If the signal from an FM stereo station is weak
and reception is poor, set the FM MODE
switch to MONO. The reception may be
improved, but the sound will be monaural.
To improve reception
FM: Pull out the telescopic aerial and adjust its
position.
AM: Rotate the unit.
Fast forward and rewind
Press the FFWD or REW button. When the
desired location has been reached, press the
STOP/EJECT button.
10
RECORDING
MAINTENANCE
Recording copyright material without permission
of the copyright owners is usually an infringement.
If you wish to record copyright material,
permission from the copyright owner is necessary.
jWIN does not approve of, and cannot be held
responsible for, any unlawful use of this machine.
Cleaning the tape heads
To ensure continued high performance, use a
cleaning tape (available f rom your local audio
dealer) to clean the head block of the deck after
about every 10 hours of use
Re cording com pact discs
1. Load a blank cassette.
2. Select CD function.
3. Load the disc to be recorded.
Select the track number if required.
For programmed recording, programme
the material in advance (as described
under PROGRAMMED PLAY ).
Press CD PLAY button.
4. Press the REC button. The PLAY button is
engaged simultaneously and CD recording
starts.
5. Press the STOP/EJECT button to stop
recording.
Recording from the radio
1. Load a blank cassette.
2. Tune in the radio station to be recorded.
3. Press the REC button to start recording.
4. Press the STOP/EJECT button to stop
recording.
When beat is heard
Beat (a high pitched noise) may sometimes be
heard during the recording of radio broadcasts.If
this occurs, set the BEAT CANCEL switch to the
position that reduces the level of the beat noise.
Safeguards against accidental erasure
To protect side A, break out tab (1).To protect side
B, break out tab (2) (Fig.8).
To erase or record a protected cassette,
cover the tab openings with adhesive tape
(3).
Note:
The REC button cannot be depressed when using
a protected cassette.
11
Cleaning the unit
Clean the outside of the unit with a clean soft cloth,
mois tened with lukewarm water. Do not use
benzene, thinner, or alcohol since they will mar
the finish of the surfaces.
Cleaning the CD player lens
The lens should never be touched. If dust is on the
lens, blow it off using a camera lens blower. (Fig.
9). (Consult your dealer.)
12
5
6
Esta unidad tambien puede reproducir el CD-R/
RW. sin embargo. y dependiendo de las condiciones de grabacion, algunos CD-R/RW no pueden
reproducirse.
13
20
14
7
15
9
8
16
SPECIFICATIONS
CD Player
Channels:
2-channel stereo
Sampling frequency:
44.1 kHz
Pick-up:
Semiconductor laser
Laser output:
0.6 mW (Continuous wave max.)
Wave length:
790 nm
Wow/Flutter:
Below measurable limits
Radio
Reception frequency:
FM 88 - 108 MHz
AM 530 - 1710 KHz
General
Output power:
4W x 2 (RMS)
Speakers:
12 cm x 2 (4 ohms)
Terminal:
PHONES: 32 ohms
Power source:
AC: 110/220V 60/50Hz
DC: 12V (UM -1X8) batteries
Dimensions:
555(W) x 250(H) x 230 (D) mm
Weight:
Approx. 5.1 kg (without batteries)
Specifications subject to change without notice.
Cassette deck
Track system:
4-track, 2 - channel stereo
Erasing system:
Magnet erase
Tape speed:
4.75 cm/sec.
Frequency response:
80 ~ 12,000 Hz
Fast forward/rewind time:
Approx. 110 sec. (C-60)
For future reterence, fill in the space provided for model number and serial number.
Model No.:
Serial No.:
17