1
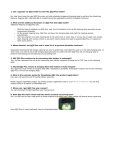
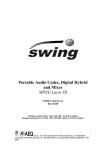
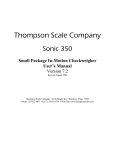
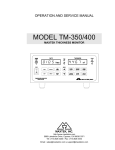
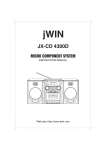
Introduction 1 Safety Instructions 1 Product Features 2 Cautions 3 Main Unit and Accessories 4 Main Unit Features 5 Unit Operations and Panel Display 6 Remote Control 9 Safe Usage Guidelines on Remote Control 10 Battery Installation and Removal 11 Sonic Wall Setup 12 Self-Charging Station 14 Recharging the Battery 15 Scheduler Operations 16 Installing Accessories 19 General Operation 21 Cleaning and Maintenance 22 Setting Accessories ID with Main Unit 24 Useful Tips 26 Specifications 28 Frequently Asked Questions 29 Error Code Display 30 Troubleshooting 31 Warranty Policy 33 Spot- Spot- Spot- Spot- 4 QQ5 Plus Sonic Wall Setup QQ5 Plus Sonic Wall Setup The Sonic Wall device creates an invisible barrier that QQ5 will not cross, so you can confine the QQ5 to perform cleaning job in certain area. Self-Charging Base Power Indicator LED Charging Port Power Switch Sonic Wall Slide Plug Lock Sonic Receiver Sonic Receiver Charging Plug Charging Port Battery Cover Instructions: 1.This CleanMate Sonic Wall is powered by 2 AA rechargeable batteries (included). Make sure to install the batteries in correct polarity. 2.To turn on the Sonic Wall, slide its Power switch to ON position. 3.After the Sonic Wall is turned on, the blue LED light will lit up in soid for 70 sec., then the LED light will be off and the Sonic Wall will enter a power saving standby mode. 4.After QQ5 starts working for 6 seconds, it will wake up Sonic Wall and blue LED light will be on. The effective distance of Sonic Wall barrier is about 10 ft (3 meters). 5.When the LED indicator on Sonic Wall is blinking, it indicates that battery power is low and it is time to re-charge its batteries. 6. You can charge Sonic Wall batteries using CleanMate charging base (see steps below). Step 1: The power switch of Sonic Wall, must set "ON" position. Step 2: Press and Slide out the "Slide switch" from charging base. Step 3: Plug the charging plug into charging port on Sonic Wall. Step 4: Blue LED is blinking. When charging is complete, LED will light steady. 7. When QQ5 is cleaning, the Sonic Wall position should be at least 3 ft (1m) away from charging base, and avoid facing the Sonic Wall towards charging base. When cleaning is done, power Sonic Wall down by sliding its Power switch to "OFF" position. When QQ5 detects the invisible barrier from Sonic Wall, it will turn around and move to another direction. 12 13 QQ5 Plus Self-Charging Station Preparations It is recommend to put the Self-Charging Station(home charging base) on hard floor in the room. Leave at least 2ft clearance around the charging base. First, plug the battery charger to Power Input socket on the back of charging base. Then, place the charging base securely against the wall. Don’t leave loose wire around the base. Finally, plug battery charger to power outlet on the wall. LCD display on the charging be will be turned on, and it is ready to charge the CleanMate unit. Power Input socket Battery Charging Methods Auto Charging: Note: Before manual charging, please refer to the diagram below and follow the correct sequence to avoid sparks. After plugging the charger to the QQ5, then plug in the Charger to the wall outlet Cable sliding slot Please settle down the wire of charger into the back side slot of base. CleanMate QQ5 can automatically return to the charging base to charge itself when battery runs low. User can also press “HOME” on remote control to let it return to the base at any time. Manual Charging: Users can always plug the battery charger to side charging socket on CleanMate QQ5 to charge it manually. 2ft 2 ft QQ5 Plus Recharging the Battery Second Testing the Self-Charging Station 1. Put the QQ5 on the floor in front of Self-Charging Station (a few feet away) and turn it on, then press "Home" on remote control. The QQ5 should return to the Self-Charging Station automatically for selfcharging. 2.Make adjustments to the base if QQ5 does not dock properly. Charger plug-in socket First Plug the AC Charger into the plug-in Socket 14 15 Scheduler Operations QQ5 Plus Week Mo Tu We Th Fr Time setting Scheduler Sa Su Full Auto cleaning The scheduling function of CleanMate QQ5 is integrated to the charging base. The scheduler LCD display window is on the top of charging-base. Before setting up the clock and cleaning schedule, user needs to plug CleanMate battery charger (AC adapter) to the home charging base to power it up. Users can set up the scheduler to let CleanMate start doing the cleaning job at a specific time every day, or on any given day(s) of week that user selects. Upon the pre-set time, CleanMate QQ5 will automatically leave the charging base and start cleaning by itself. Setting Up Clock: Before using the schedule functions, users need to set up the clock first. Press “Clock setting” button to enter clock mode, and LCD display will show Time Setting on it. Then, enter the Hour, Min. and Day of week values by pressing corresponding buttons on the left of LCD display. Finally, to confirm your clock settings, press “Clock setting” button again to save it to memory and clock will start running. Press "Hour" to set hour in 24-hour format (00, 01, 02, …., 23) Press "Min." to set minute (00, 01, 02, …., 59) Press "Week" to select a day of week (Monday, Tuesday, …, Sunday); 16 QQ5 Plus Scheduler Operations Note: Press and hold above buttons will have their values changed rapidly. Clock setting can be recovered even when the charging base temporarily loses its power. Normally, the LCD window will only display Hour and Min values. Press “Clock” again at a later time will show current Weekday, Hour, and Min. values. Setting Up Scheduler: Step 1. Press “Scheduler” button to enter scheduler mode, and LCD display will show “Scheduler”. After setting up your cleaning schedule, press this button again to confirm and save it to memory. Step 2. Press "Week" button, LCD window will show a blinking "Mo" (Monday) and waits for user confirmation. If "Week" button is pressed within 8 sec., Monday will be selected and saved. If "Week" button is NOT pressed within 8 sec., then it will be skipped to the next and show a blinking "Tu" (Tuesday). Press “Week” within 8 sec. to select Tuesday (or any day of week). Otherwise, it will jump to the next day of week option. . You can select any combination of day of week (up to 7 days a week) and save your cleaning schedule to memory. Step 3. Use "Hour" and “Min” to select and save hour and min. values to scheduler in similar ways. Press “Scheduler” to confirm & save the settings after you are done. How do I disable scheduler function? If you want to disable scheduler settings, press “Scheduler” to enter scheduler mode, then press “Hour” to select the 4 disable bars “--:--” display (Hour value will show …, 22, 23, --:--, 00, 01, etc in this mode). Finally, press “Scheduler” again to confirm. 17 Scheduler Operations QQ5 Plus NOTE: User needs to correctly set up all the Hour, Min and Day of week values on the scheduler for it to work. CleanMate will not start the cleaning by itself in case scheduler setting is not complete. QQ5 Plus Installing Accessories Side Brush Installation and Removal Step 4. After you properly set up the clock and scheduler, the LCD display will return to normal display mode that shows both clock and scheduled day of week value(s). Auto Cleaning Function: Press “Start” button on charging base once, and the CleanMate QQ5 unit will automatically start cleaning once its battery is fully charged on the charging base. When CleanMate unit is being charged on the base, if user presses “Start” on charging base and hold it for more than 3 sec., CleanMate will leave the base and begin cleaning immediately. When CleanMate unit is being charged on the base, user can always presses the “Start” button on remote control to let CleanMate leave the base and begin cleaning immediately (even when the battery is not fully charged). Other Display Icons on LCD : To remove the side brush, firmly hold its base and pull the brush out. To install the side brush, push it down to mounting hole until it clicks. Roller Brush Installation and Removal To remove roller brush, press and hold the roller brush button (one in white, and other other in black) with one hand, pull the brush back a little forwarding the brush button. Then, lift the other end of roller brush up and remove the brush. 1 2 1. When you push "Start" button (just once), the"Auto" icon will appear on the LCD. 2. After CleanMate QQ5 is fully charged, the battery "Full" icon will appear on LCD. Black Please note that half of roller brush is in white, and the other half in black. White 18 19 QQ5 Plus Installing Accessories Roller Brush Installation and Removal To install the roller brush, user needs to match the brush end color with the color on the brush release button. 1 Press and hold the brush release button, 2 insert the roller brush from the brush button side first, 3 align it at the other end. Release the brush button when the brush is locked into the proper position. General Operations QQ5 Plus Make sure to charge the battery overnight before using it for the first time. Room Preparation: Pick up all large loose items from the floor. Remove loose power cords or wires that could tangled in the cleaner. Remove items that could be easily knocked over. Roll loose rug fringe under the rug. Start Cleaning: 1 2 3 Roller Brush Button Have the battery fully charged and clean the dust bin and filter if it has been used before. Put CleanMate QQ5 in the middle of room. Press Power switch button on the main unit to turn it on. Set the timer to decide how long the cleaning time is. The default timer setting is 80 min. It is changed by pressing the Timer button on remote control. NOTE: Actual running time my vary depends on battery power level and floor type.. Press Start button on the main unit or remote control. The CleanMate QQ5 unit will start cleaning automatically in the default auto cleaning mode. When cleaning is completed or battery power gets low, the QQ5 unit will shut down the vacuum motor and return to the charging base. If the CleanMate is too far away from the base, it will move along the wall until it reaches the base detection range, and start the docking to the charging base. If QQ5 low battery light is blinking, its battery needs to be charged before using it again. Stop Cleaning: If you want to stop the cleaning at any time, press the Power switch button to shut it down, or press the Stop button on remote control to stop the unit. 20 21 Cleaning and Maintenance QQ5 Plus Cleaning and Maintenance To maintain the top performance of your CleanMate QQ5 unit, please make sure to follow the steps below after each use. 1. Empty the dust bin and clean the filter. 2. Remove anything tangled around roller brushes and side brushes. 3. Remove anything tangled around wheels. 4. Remove any debris that stuck on vacuum inlet openings. Cleaning and Maintenance QQ5 Plus Cleaning Roller Brush Roller brush cleaning tool is embedded on the back side of QQ5 charging base (Fig. 12). Use it to remove the hairs and other debris on the roller brushes. Fig 12 Fig 13 Cleaning Dust Bin and Filter Press the button on the top of Dust Bin to remove it from the main unit (Fig. 1), then press the button on its left side to open it (Fig. 2). Dump the debris and clean Filter using the small brush embedded on the top of Dust Bin. Fig 1 Fig 2 Fig 3 Fig4 General Cleaning Tips Fig 5 Fig 6 After the CleanMate is used for a period of time, dust might accumulate on the vacuum entry or other area on the QQ5 unit. Do not spread water directly on your CleanMate to avoid potential electrical damage to the unit. Use canned air and hand brush provided to clean it. If you use a damp cloth to remove the dust, and wipe it dry before next use. Fig 7 Washing Dust Bin and Filer User can wash Dust Bin and Filter with tap water if necessary. Slide the Dust Bin base up along the arrow direction (on the right of Dust Bin) to remove the dust container. Make sure let them dry before next use. Fig 8 Fig 9 Fig 10 Slot Fig 11 Fig 12 Slot 22 23 Setting Accessories ID with Main unit QQ5 Plus CleanMate QQ5 unit can work with up to 3 Sonic Walls, 2 Charging Bases, and 1 Remote Control. All the parts included in the QQ5 retail package are ready for use out of box, so you can skip this section. . Any extra (or replacement) Sonic Wall, Charging Base & Remote Control must be properly configured in order to use it with the QQ5 unit. Please follow the easy Study steps below to check set up a new accessory device. Setting Accessories ID with Main unit QQ5 Plus Setting up an extra Sonic Wall: Step 1. Power on the Sonic Wall. Step 2. Insert a toothpick into the hole on the back on Sonic Wall, pressing down and hold it untill you hear beeping sounds. One of the Sonic Wall icon that was OFF before should become ON now, which means that the new (or replacement) Sonic Wall has been properly configured to be used with your QQ5 unit. NOTE: If all 3 Sonic Wall indicators are ON, then you need to clear previous ID saved on QQ5 main unit first in order to add an extra Sonic Wall. Sonic Wall 3 Sonic Wall 2 Sonic Charging Wall 1 Base 2 Charging Remote Base 1 Control LED On -- device ID has been used LED Off -- device ID not in use Entering Study mode: Press Power button on QQ5 main unit to turn it on, then press and hold Start/Stop button till you hear 2 beeping sounds. The QQ5 display will show , which means that it has entered Study mode. Setting up an extra Charging Base: If one of the Charging Base icons is does not light up (OFF) on the QQ5 main unit, you can add an extra Charging Base. Step 1: Power on the extra Charging Base. Step 2: Press and hold the Time Setting button until you hear 2 beeping sounds. Now, the corresponding Charging Base icon will become ON, which means that the new (or replacement) Charging Base has been properly configured to be used with your QQ5 unit. Setting up a new Remote Control: Step 1. Remove the battery from Remote Control. Step 2. Press the Left and Right buttons at the same time. (Do not press any other buttons). Step 3. Re-install the battery to remote control while holding down the Left and Right buttons. Step 4. After you hear the beeping sounds and Remote Control indicator is ON. It means that it means new Remote Control has been properly configured to be used with your QQ5 unit. Exiting Study mode: Press the Power button on QQ5 main unit to exit Study mode, and save the new device ID(s) to the QQ5 unit. Clearing previously saved device ID: In Study mode with displayed on QQ5, press and hold Start/Stop button on QQ5 main unit until you hear beeping sounds. All the 6 devices indicators will be OFF, and previously saved ID’s are all cleared now. Once old devices ID’s are cleared, you must reset device ID (see steps above) in order to use them with the QQ5 again. NOTE: If both Charging Base indicators are ON, then you need to clear previous ID saved on QQ5 main unit in order to add an extra Charging Base. 24 25 Useful Tips QQ5 Plus Tip 1: Prepare the cleaning area and remove large debris, loose cables, wires, and items that can be easily tangles with brush or knocked over. Remove vases, glasses, or small lamps, etc. Remove small items that might obstruct CleanMate operation for faster and better cleaning. QQ5 Plus Useful Tips Tip 4: Fixing jams: If some object gets caught with roller brush or side brush, turn the QQ5’s power off immediately. Remove anything that caused the jam before using the cleaner again. QQ5 will make a beeping sound when jammed. Turn it upside down, and remove the objects. Clean the vacuum entry Tip 2: Leave enough clearance space (15” or more) for CleanMate to operate. 15 in Tip 5: Block off certain areas with Sonic Wall (or other objects) to get better cleaning result. Sonic Wall will create a barrier and redirect QQ5 to a different direction. Tip 3: Do not let loose edges of rugs, drapes, table cloths, etc to get caught by QQ5 brushes. Roll the loose edges of rugs underneath. Remove plastic bags and long string or loose wires from floor. Fold the rug edges that have loose ends under it 26 27 28 8.6 lbs (3.9 kg) 13” (Diameter) x 3.2” (H) or 33cm (Diameter) x 8cm (H) QQ5 Plus Regarding the length of cleaning time Q. When QQ5 has been charged once, how long can it clean? A. It depends on the condition of the battery and floor type. With a new battery and hardwood floor, it can clean about 90 minutes. Regarding climb up height Q. How high of carpet can QQ5 climb? A. About 0.4” ( 1 cm) from the floor Regarding how to prevent falling Q. Will QQ5 fall from stairs? A. We cannot 100% guarantees that there will be no dropping or falling. QQ5 may malfunction if the drop sensor is dirty or exposed to direct sunlight or other special types of light waves. We recommend placing the attached sonic wall around the stairs. Regarding floor damage Q. Will QQ5 leave marks on the floor? A. Although the wheels are made of rubber, we cannot guarantee there will be no damage. In general, we recommend avoiding usage on rugs made of soft materials, new floors, dark floors or reflective surfaces. Q. How long should the battery charging take place? A. It depends on the remaining charge left in the battery, however at most it needs to be charged up to 3.5 hours Regarding the battery and its recharging time Q. How long is the life of the battery? A. The target lifespan is 400-500 charging cycles. Replacement batteries are also sold separately. Q. If the battery is not used at all, how to handle battery? A. Remove battery if unit will not be used for long period of time. Weight 4 ft/sec (1.2/sec); 11500 rpm Suction Power Speed & Vac Motor Speed Frequently Asked Questions Q. In between returning to the charging station, if the battery dies and it stops how should the QQ5 be recharged? A. Please use the AC adapter to do manual re- charge. Dimension 5 types: Spot Spiral, Special Bounce, Along Wall, S shape, and Polygonal Spiral Moving Patterns RF signal with up to 32 ft (10 m) range Remote Control Range 7~8 in/sec (19 ~ 21 cm/sec) Unit Moving Speed 0.32 liter Dust Bin Capacity 6000 hours UV Light Lamp Life 65dB at distance of 3 ft. QQ5 Plus Noise Level 14.4V, 2.8Ah NIMH Rechargeable Battery; Up to 3.5 hours of charging time Battery Output: 20Vdc 1000mA Input: 100 - 240V 50 - 60 Hz AC Adapter/ Battery Charger Item Specifications Description Specifications Regarding the remote control Q. Is there a need to line up the charging station exactly against the wall? A. In order to ensure the charging connection does not get disrupted, the charging station must be stabilized against the wall. Q. I removed the clear protector sheet, but I still cannot use the remote control. A. You must turn the power switch on QQ5 after the protector sheet has been removed. Q. Why can’t QQ5 power switch be turned on by remote? A. Operation must be started. Please refer to Page 6 “The QQ5 operation panel and how to start operation of QQ5.” 29 Error Code Display QQ5 Plus In the following instances, the red “!” error indicator may light up and one of the error codes may appear on QQ5 display panel. Please read the below for fixes. Error Code Meaning E1: The front drop sensor detection is not working E2: QQ5 is lifted off the ground E3: The front bumper is not working E4: The placement of the dust bin is off E5: The left wheel problem E6: The right wheel problem E7: The side brush problem E8: The roller brush problem E9: Vacuum motor problem E10: Batter charging error E11: Battery overheated 30 Things To Do Please check to see if the drop sensor is dirty or if trash is stuck to it Check to see whether the QQ5 is hovering Check to see if trash is attached to the bumper Please check dust bin is installed correctly Please check to see if the left wheel is stuck Please check to see if the right wheel is stuck Please check to see if there is trash stuck on the side brush Please checked to see if there is trash stuck on the roller brush Please check to see if vacuum motor is stuck Please check to see if the charging station is properly connected Please check battery condition and let it cool down Troubleshooting Problem Symptoms QQ5 can not be powered on & start cleaning Red ! error indicator ON. Refer to error codes meaning on Page 30 QQ5 Plus Possible Cause 1. The battery is not properly connected Things To Do 1. Check battery connection or reinstall battery. 1. The battery power is too 1. Recharge the low battery 2. The sensor detected 2. Remove the something abnormal or foreign object if a stuck object necessary 3. Direct sunlight (or other 3. Block the sunlight strong light) may affect and continue use the the machine machine 4. A microwave oven, TV, 4. Use it far away from the or radio is nearby. interference source. Battery won’t 1. Bad battery connection. charge; Power light is 2. Bad AC adapter not on during connection or defective charging process adapter/charger (E10) 3. The charging station may not be placed correctly 4. The battery is overheated (E11) Remote control does not work 1. The insulation sheet under remote battery has not been removed. 2. The remote control battery is dead; or battery is not installed properly 3. Operation is affected by a nearby microwave oven, etc. 31 1. Check battery connection or re-install battery 2. Make sure AC adapter is well connected; replace defective AC adapter. 3. Check the placement of charging station and adjust it if necessary 4. Please wait until the battery has cooled 1. Remove the battery insulation sheet 2. Re-install a new battery (words on battery facing up) 3. Turn off the microwave oven Troubleshooting Problem Symptoms QQ5 can not return & dock to the charging base After being fully charged, QQ5 is not self starting After charging the battery for a few times, the actual cleaning time is still shorter than the pre-set time on timer The roller brush and side brush are not working well (E7&E8) QQ5 will only move backward QQ5 is moving in circles (E5&E6) QQ5 Plus Possible Cause 1. Charging station is not properly placed against the wall 2. An object is in between the charging station and QQ5 3. Battery level is too low (LO shown on display) 4. Something might stuck on QQ5. 1. The “automatic start” function is not properly set up. 2. Battery may be overheated Things To Do 1. Place the charging station securely against the wall. 2. Please remove the object that blocks the signal. 3. Charge the QQ5 manually. 4. Remove debris stuck to the wheels & brushes 1. Please set up the “automatic start” function again 2. Wait until the battery is cooled down before using it again 1. Battery has not 1. Charge the battery been fully charged manually (bypass the base) for 48 hours. If it 2. The battery is old and works, something needs to be replaced might be wrong with the charging base. 2. Replace the battery 1. Something got tangled 1. Clean the brushes; around brushes, or the replace them if brush might be worn-out necessary them 1. The drop sensors may be dirty 1. Something stuck on the wheel 2. One of the wheels may be defective 32 1. Clean the drop sensors. Contact tech support if it is still does not work. 1. Clean the wheel 2. Replace the defective wheel. Warranty Policy QQ5 Plus Please fill in your warranty card completely and submit it to your local customer service center. Infinuvo provides you, as the owner of this Infinuvo product, with the following Limited Warranty Policy. Warranty Policy One year Product Warranty: Infinuvo warrants to the original purchaser of this Infinuvo product that the product is free from defects in original materials and workmanship for a period of up to one year from the date of initial purchase. This warranty is only valid if the product has been properly installed and is used in the way for which it is intended, and has received only factory-authorized repairs, servicing or alterations. Under-warranty products that meet these conditions and that function improperly will be repaired or replaced, at the discretion of Infinuvo. Six months Battery Warranty: Infinuvo warrants to the original purchaser of this Infinuvo product that the original batteries contained within this product will function for a period of six months. This warranty is only valid if the product has been properly installed and is used in the way of which it is intended, and has received only factory-authorized repairs, servicing, or alterations. Under-warranty batteries that meet these conditions and that function improperly will be repaired or replaced, at the discretion of Infinuvo. These warranties contain the sole express warranty of Infinuvo, which makes no other warranties, expressed or implied. These warranties are made in lieu of any implied warranties of merchantability or fitness for a particular purpose. These warranties give you specific legal rights. You may also have other rights, which vary from state to state. WHEN YOU RETURN A CLEANMATE PRODUCT OR BATTERY UNDER THIS WARRANTY, you must first obtain an RMA number by calling your local customer service center or www. infinuvo.com Infinuvo reserves the right to request that you submit a letter describing the circumstances under which the problem occurred and that you submit invoice and any other supporting evidence and documentation. 33