1
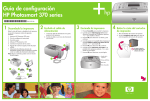
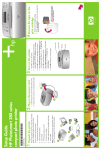
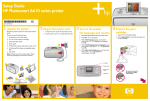
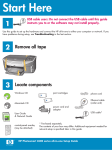
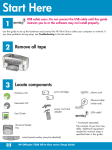
Setup Guide
HP Photosmart 370 series
*Q3419-90167* Q3419-90167
1 Unpack the printer
2 Plug in the power cord
3 Turn on the printer
4 Remove the tape on the
Remove the tape from inside and around the printer.
1. Connect the power cord to the back of the printer.
1. Press On to turn on the printer.
The printer box contains the following items:
2. Plug the power cord into a working electrical
outlet.
2. When Select language appears on the printer
screen, press or to highlight your language.
1. HP Photosmart 370 series printer
2. Setup Guide (this poster)
3. Press OK to select your language and continue.
3. User’s Guide
4. When Set LCD language to (your language)
appears on the printer screen, press or to
highlight Yes.
4. HP Photosmart software on CD
2
5. Tri-color print cartridge
7. Power supply (power supplies may vary in
appearance or have an additional power cord)
6. When Select country/region appears on the
printer screen, press or to highlight your
country/region.
Note: Some contents may vary by country/region.
7. Press OK to select your country/region.
2
1
Printer screen
Arrow buttons
OK button
3
4
5
6
7
1. Open the print cartridge package.
2. Pull the pink pull-tab to remove the clear tape from
the print cartridge.
5. Press OK to select Yes and continue.
6. Sample media pack and resealable media bag
1
print cartridge
On button
Do not touch or remove
the ink nozzles or the
copper-colored contacts!
5 Install the print cartridge
6 Print an alignment page
1. Open the Out tray, then open the print cartridge
access door.
1. Open the In tray as far as it will go.
2. Insert the Tri-color print cartridge into the print
cartridge cradle with the label on top, the coppercolored contacts facing toward the inside of the
printer, and the ink nozzles facing down.
3. Adjust the paper-width guide to fit close to the
edges of the index card without bending the card.
3. Push the print cartridge into the cradle until it
snaps into place.
4. Close the print cartridge access door.
2. Load an index card from the sample pack.
4. Press OK. An alignment page prints on the index
card. Printing an alignment page ensures high
print quality.
5. Discard the page.
7 Print your first photo
1. Place a few sheets of photo paper in the In tray
with the glossy side facing toward you. If you are
using tabbed paper, insert it so the tabbed end
feeds in last.
2. Adjust the paper-width guide to fit close to the
edges of the paper without bending the paper.
For more information, see the following:
HP Photosmart 370 series User’s Guide
3. Insert a memory card into the correct Memory
Card slot.
Note: The memory card will not insert all the way
into the printer. When the memory card is inserted
correctly, the Memory Card light flashes and then
remains solid green.
1
Need more information?
Onscreen HP Photosmart Printer Help
4. Press or to view the photos.
Print cartridge
access door
5. Press OK to select a photo, then press Print to print
your first photo.
Paper-width guide
www.hp.com/support
In tray
Print button
2
Arrow buttons
Print cartridge
cradle
Memory
Card slots
Memory
Card light
Printed in USA 06/04 v1.0.0 • Printed on recycled paper
© 2004 Hewlett-Packard Development Company, L.P.