1
0
Ot¯
imageCLASS 2300
Basic Guide
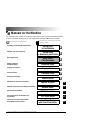
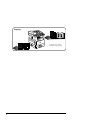
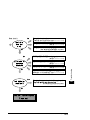
Manuals for the Machine
The manuals for this machine are divided as follows. Please refer to them for detailed information.
Some of the manuals listed below are only supplied with the Network Model of this machine.
Guides with this symbol are printed manuals.
CD-ROM
Installing and Setting Up the Machine
Network and Printer Settings
Basic Operations
Machine Settings
Troubleshooting
Copying Instructions
Fax Instructions
Sending Instructions
Remote User Interface Instructions
Network Connectivity and Setup Instructions
PCL Printer Instructions
PCL Printer Driver Installation and
Instructions
Fax Driver and Cover Sheet Editor
Installation and Instructions
The machine illustration on the cover may differ slightly from your machine.
Guides with this symbol are PDF manuals included on the
accompanying CD-ROM.
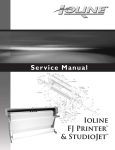
Set-Up Sheet
for the Machine
Set-Up Sheet
for Networking and Printing
Basic Guide
(This Document)
Reference Guide
Copying Guide
Facsimile Guide
Sending Guide
Remote UI Guide
CD-ROM
Network Guide
CD-ROM
PCL Printer Guide
CD-ROM
PCL Driver Guide
CD-ROM
Fax Driver Guide
with Cover Sheet Editor
CD-ROM
How This Manual Is Organized
Chapter 1
Introduction
Chapter 2
Documents
Chapter 3
Print Media
Chapter 4
Copying - Basic Operations
Chapter 5
Faxing - Basic Operations
Chapter 6
Printer/Fax Driver Software
Chapter 7
I-Fax - Basic Operations
Chapter 8
Printing - Basic Operations
Chapter 9
Maintenance
Chapter 10 Troubleshooting
Chapter 11 Appendix
Includes the specifications and index.
Considerable effort has been made to ensure that this manual is free of inaccuracies and omissions. However, as we are constantly improving our
products, if you need an exact specification, please contact Canon.
Contents
Preface . . . . . . . . . . . . . . . . . . . . . . . . . . . . . . . . . . . . . . . . . . . . . . . . . . . . . . . . .viii
How to Use This Manual . . . . . . . . . . . . . . . . . . . . . . . . . . . . . . . . . . . . . . . . . . .viii
Symbols Used in This Manual . . . . . . . . . . . . . . . . . . . . . . . . . . . . . . . . . . . . . viii
Keys Used in This Manual . . . . . . . . . . . . . . . . . . . . . . . . . . . . . . . . . . . . . . . . viii
Operations and Terms Used in This Manual . . . . . . . . . . . . . . . . . . . . . . . . . . . .ix
Legal Notices . . . . . . . . . . . . . . . . . . . . . . . . . . . . . . . . . . . . . . . . . . . . . . . . . . . . .xi
Laser Safety . . . . . . . . . . . . . . . . . . . . . . . . . . . . . . . . . . . . . . . . . . . . . . . . . . . . xi
CDRH Regulations . . . . . . . . . . . . . . . . . . . . . . . . . . . . . . . . . . . . . . . . . . . . . . xii
International Energy Star Program. . . . . . . . . . . . . . . . . . . . . . . . . . . . . . . . . . xiii
Trademarks. . . . . . . . . . . . . . . . . . . . . . . . . . . . . . . . . . . . . . . . . . . . . . . . . . . . xiii
Copyright . . . . . . . . . . . . . . . . . . . . . . . . . . . . . . . . . . . . . . . . . . . . . . . . . . . . . xiii
Disclaimers. . . . . . . . . . . . . . . . . . . . . . . . . . . . . . . . . . . . . . . . . . . . . . . . . . . . xiv
Legal Limitations on the Usage of Your Product and the Use of Images . . . . . xiv
Important Safety Instructions . . . . . . . . . . . . . . . . . . . . . . . . . . . . . . . . . . . . . . . xv
Installation . . . . . . . . . . . . . . . . . . . . . . . . . . . . . . . . . . . . . . . . . . . . . . . . . . . . xv
Power Supply . . . . . . . . . . . . . . . . . . . . . . . . . . . . . . . . . . . . . . . . . . . . . . . . . . xvi
Handling . . . . . . . . . . . . . . . . . . . . . . . . . . . . . . . . . . . . . . . . . . . . . . . . . . . . . xvii
Maintenance and Inspections . . . . . . . . . . . . . . . . . . . . . . . . . . . . . . . . . . . . xviii
Consumables . . . . . . . . . . . . . . . . . . . . . . . . . . . . . . . . . . . . . . . . . . . . . . . . . . xix
Other Warnings . . . . . . . . . . . . . . . . . . . . . . . . . . . . . . . . . . . . . . . . . . . . . . . . xx
Set-Up Help & Product Registration (USA) . . . . . . . . . . . . . . . . . . . . . . . . . . . xx
Canon Canada Information/Service Center . . . . . . . . . . . . . . . . . . . . . . . . . . . xx
Supplies & Accessories . . . . . . . . . . . . . . . . . . . . . . . . . . . . . . . . . . . . . . . . . . xx
Chapter 1
Introduction
Where to Find Help . . . . . . . . . . . . . . . . . . . . . . . . . . . . . . . . . . . . . . . . . . . . . . 1-2
Set-Up Sheets . . . . . . . . . . . . . . . . . . . . . . . . . . . . . . . . . . . . . . . . . . . . . . . . 1-2
Book Manuals. . . . . . . . . . . . . . . . . . . . . . . . . . . . . . . . . . . . . . . . . . . . . . . . . 1-3
PDF Manuals and Software (CD-ROMs) . . . . . . . . . . . . . . . . . . . . . . . . . . . . 1-4
Features of the imageCLASS 2300. . . . . . . . . . . . . . . . . . . . . . . . . . . . . . . . . . 1-5
Model Configurations . . . . . . . . . . . . . . . . . . . . . . . . . . . . . . . . . . . . . . . . . . . 1-5
Setting Up Machine Functions . . . . . . . . . . . . . . . . . . . . . . . . . . . . . . . . . . . . . 1-6
Parts and Their Functions . . . . . . . . . . . . . . . . . . . . . . . . . . . . . . . . . . . . . . . . . 1-7
External View . . . . . . . . . . . . . . . . . . . . . . . . . . . . . . . . . . . . . . . . . . . . . . . . . 1-7
Internal View. . . . . . . . . . . . . . . . . . . . . . . . . . . . . . . . . . . . . . . . . . . . . . . . . . 1-8
iv
Control Panel Parts and Functions . . . . . . . . . . . . . . . . . . . . . . . . . . . . . . . . .1-9
Chapter 2
Documents
Placing Originals (For Copying, Faxing, Scanning) . . . . . . . . . . . . . . . . . . . . .2-2
Orientation . . . . . . . . . . . . . . . . . . . . . . . . . . . . . . . . . . . . . . . . . . . . . . . . . . . .2-3
Platen Glass. . . . . . . . . . . . . . . . . . . . . . . . . . . . . . . . . . . . . . . . . . . . . . . . . . .2-4
Feeder . . . . . . . . . . . . . . . . . . . . . . . . . . . . . . . . . . . . . . . . . . . . . . . . . . . . . . .2-6
Chapter 3
Print Media
Paper Type . . . . . . . . . . . . . . . . . . . . . . . . . . . . . . . . . . . . . . . . . . . . . . . . . . . . . .3-2
Loading Paper . . . . . . . . . . . . . . . . . . . . . . . . . . . . . . . . . . . . . . . . . . . . . . . . . . .3-4
Adjusting the Paper Drawer Guides. . . . . . . . . . . . . . . . . . . . . . . . . . . . . . . . .3-8
Chapter 4
Copying - Basic Operations
Overview of Copying Operations . . . . . . . . . . . . . . . . . . . . . . . . . . . . . . . . . . . .4-2
Copy Operations . . . . . . . . . . . . . . . . . . . . . . . . . . . . . . . . . . . . . . . . . . . . . . . . .4-4
More Information . . . . . . . . . . . . . . . . . . . . . . . . . . . . . . . . . . . . . . . . . . . . . . .4-9
Chapter 5
Faxing - Basic Operations
Overview of Fax Operations . . . . . . . . . . . . . . . . . . . . . . . . . . . . . . . . . . . . . . . .5-2
Setting Up the Machine for FAX Operations . . . . . . . . . . . . . . . . . . . . . . . . . . .5-4
Connecting the Telephone Line . . . . . . . . . . . . . . . . . . . . . . . . . . . . . . . . . . . .5-4
Setting the Current Date and Time . . . . . . . . . . . . . . . . . . . . . . . . . . . . . . . . .5-5
Registering the Required Sender Information . . . . . . . . . . . . . . . . . . . . . . . . .5-7
Registering the Machine's Fax Number . . . . . . . . . . . . . . . . . . . . . . . . . . . . . .5-8
Registering the Unit's Name . . . . . . . . . . . . . . . . . . . . . . . . . . . . . . . . . . . . .5-10
Registering the Sender Information (TX Terminal ID) . . . . . . . . . . . . . . . . . .5-12
Fax Sending Operations . . . . . . . . . . . . . . . . . . . . . . . . . . . . . . . . . . . . . . . . . .5-15
More Information . . . . . . . . . . . . . . . . . . . . . . . . . . . . . . . . . . . . . . . . . . . . . .5-18
v
Chapter 6
Printer/Fax Driver Software
Introduction . . . . . . . . . . . . . . . . . . . . . . . . . . . . . . . . . . . . . . . . . . . . . . . . . . . . 6-2
System Requirements . . . . . . . . . . . . . . . . . . . . . . . . . . . . . . . . . . . . . . . . . . . . 6-3
Installing the Software. . . . . . . . . . . . . . . . . . . . . . . . . . . . . . . . . . . . . . . . . . . . 6-4
More Infomation . . . . . . . . . . . . . . . . . . . . . . . . . . . . . . . . . . . . . . . . . . . . . . . 6-4
Chapter 7
I-Fax - Basic Operations
Overview of the I-Fax Functions. . . . . . . . . . . . . . . . . . . . . . . . . . . . . . . . . . . . 7-2
Setting Up the Machine for Using I-Fax . . . . . . . . . . . . . . . . . . . . . . . . . . . . . . 7-3
Sendig and Receiving I-Fax . . . . . . . . . . . . . . . . . . . . . . . . . . . . . . . . . . . . . . . 7-4
Sending I-Fax by One-Touch Speed Dialing, Coded Speed Dialing,
or Access Code . . . . . . . . . . . . . . . . . . . . . . . . . . . . . . . . . . . . . . . . . . . . . . . 7-4
Manual I-Fax Sending . . . . . . . . . . . . . . . . . . . . . . . . . . . . . . . . . . . . . . . . . . 7-6
Receiving I-Fax . . . . . . . . . . . . . . . . . . . . . . . . . . . . . . . . . . . . . . . . . . . . . . . 7-8
More Information . . . . . . . . . . . . . . . . . . . . . . . . . . . . . . . . . . . . . . . . . . . . . . 7-9
Chapter 8
Printing - Basic Operations
Features of the Printer. . . . . . . . . . . . . . . . . . . . . . . . . . . . . . . . . . . . . . . . . . . . 8-2
Connecting to a Computer . . . . . . . . . . . . . . . . . . . . . . . . . . . . . . . . . . . . . . . . 8-4
Connecting to a Network . . . . . . . . . . . . . . . . . . . . . . . . . . . . . . . . . . . . . . . . 8-4
Connecting through a Parallel Interface . . . . . . . . . . . . . . . . . . . . . . . . . . . . . 8-5
Connecting through a USB Interface . . . . . . . . . . . . . . . . . . . . . . . . . . . . . . . 8-5
Printing a Document . . . . . . . . . . . . . . . . . . . . . . . . . . . . . . . . . . . . . . . . . . . . . 8-6
Canceling a Print Job . . . . . . . . . . . . . . . . . . . . . . . . . . . . . . . . . . . . . . . . . . . . 8-7
Chapter 9
Maintenance
Replacing the Toner Cartridge . . . . . . . . . . . . . . . . . . . . . . . . . . . . . . . . . . . . . 9-2
Routine Cleaning . . . . . . . . . . . . . . . . . . . . . . . . . . . . . . . . . . . . . . . . . . . . . . . 9-10
Platen Glass and Cover . . . . . . . . . . . . . . . . . . . . . . . . . . . . . . . . . . . . . . . . 9-10
Feeder Cleaning. . . . . . . . . . . . . . . . . . . . . . . . . . . . . . . . . . . . . . . . . . . . . . 9-11
Roller Cleaning. . . . . . . . . . . . . . . . . . . . . . . . . . . . . . . . . . . . . . . . . . . . . . . 9-15
More Information . . . . . . . . . . . . . . . . . . . . . . . . . . . . . . . . . . . . . . . . . . . . . 9-17
vi
Chapter 10 Troubleshooting
List of Error Messages . . . . . . . . . . . . . . . . . . . . . . . . . . . . . . . . . . . . . . . . . . .10-2
Self-Diagnostic Display . . . . . . . . . . . . . . . . . . . . . . . . . . . . . . . . . . . . . . . . .10-2
When Problems Occur during Fax Operations. . . . . . . . . . . . . . . . . . . . . . . .10-8
Sending Documents. . . . . . . . . . . . . . . . . . . . . . . . . . . . . . . . . . . . . . . . . . . .10-8
Receiving Documents . . . . . . . . . . . . . . . . . . . . . . . . . . . . . . . . . . . . . . . . .10-11
Other Problems . . . . . . . . . . . . . . . . . . . . . . . . . . . . . . . . . . . . . . . . . . . . . .10-13
When You Have Trouble Printing . . . . . . . . . . . . . . . . . . . . . . . . . . . . . . . . . .10-14
Service Call Message . . . . . . . . . . . . . . . . . . . . . . . . . . . . . . . . . . . . . . . . . . .10-16
If You Cannot Solve the Problem . . . . . . . . . . . . . . . . . . . . . . . . . . . . . . . . . .10-17
Chapter 11 Appendix
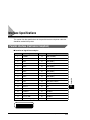
Machine Specifications. . . . . . . . . . . . . . . . . . . . . . . . . . . . . . . . . . . . . . . . . . .11-2
Main Unit . . . . . . . . . . . . . . . . . . . . . . . . . . . . . . . . . . . . . . . . . . . . . . . . . . . .11-2
Feeder . . . . . . . . . . . . . . . . . . . . . . . . . . . . . . . . . . . . . . . . . . . . . . . . . . . . . .11-4
Fax Specifications . . . . . . . . . . . . . . . . . . . . . . . . . . . . . . . . . . . . . . . . . . . . . . .11-5
Printer Specifications . . . . . . . . . . . . . . . . . . . . . . . . . . . . . . . . . . . . . . . . . . . .11-6
Control Specifications . . . . . . . . . . . . . . . . . . . . . . . . . . . . . . . . . . . . . . . . . .11-6
Software Specifications . . . . . . . . . . . . . . . . . . . . . . . . . . . . . . . . . . . . . . . . .11-6
Interface Specifications . . . . . . . . . . . . . . . . . . . . . . . . . . . . . . . . . . . . . . . . . .11-7
Parallel Interface (Centronics Compliant) . . . . . . . . . . . . . . . . . . . . . . . . . . .11-7
Index . . . . . . . . . . . . . . . . . . . . . . . . . . . . . . . . . . . . . . . . . . . . . . . . . . . . . . . . . .11-8
vii
Preface
Thank you for purchasing the Canon imageCLASS 2300. Please read this manual to
familiarize yourself with the basic operation of all functions of your machine. After reading
this manual, keep it handy for easy reference.
How to Use This Manual
Symbols Used in This Manual
The following symbols are used in this manual to explain procedures, restrictions,
handling precautions, and instructions that should be observed for safety.
.
WARNING
Indicates a warning concerning operations that may lead to death or
injury to persons if not performed correctly. In order to use the machine
safely, always pay attention to these warnings.
.
CAUTION
Indicates a caution concerning operations that may lead to injury to
persons, or damage to property if not performed correctly. In order to
use the machine safely, always pay attention to these cautions.
.
IMPORTANT
Indicates operational requirements and restrictions. Be sure to read
these items carefully in order to operate the machine correctly, and to
avoid damage to the machine.
NOTE
Indicates a clarification of an operation, or contains additional
explanations for a procedure. Reading these notes is highly
recommended.
.
Keys Used in This Manual
The following symbols and key names are a few examples of how keys to be
pressed are expressed in this manual:
Control Panel Keys: <Key icon> + (Key Name)
Example:
(Start)
(Stop)
Function Keys: <Key icon> + (Key Function)
Example:
viii
F3
Press [F3] (DENSITY)
F4
Press [F4] (▲)
Operations and Terms Used in This Manual
This machine makes effective use of memory in order to perform print operations
efficiently. For example, as soon as the machine has scanned the original that you
want to copy, it can immediately scan the next person's original. You can also print
from this machine, using a function other than the Copy function. In this machine,
these operations take place in a complex way, so that not only copies, but also
various kinds of prints may sometimes have to wait their turn before they can be
output.
To avoid confusion when reading this manual, the terms "scanning", "printing", and
"copying" used throughout this manual are defined as set out below. There are
some cases in which the scanning of an original when making a copy, and the
process of making a print, are described separately.
Scanning
Scanning an original to be copied,
or scanning an original to be
stored as data in a mailbox.
Printing
Outputting a copy, or outputting data sent
from a personal computer to the machine.
ix
Copying
Scanning of an original,
printing through finishing.
x
Legal Notices
Laser Safety
This product complies with 21 CFR Chapter 1 Subchapter J as a Class 1 laser
product under the U.S. Department of Health and Human Services (DHHS)
Radiation Performance Standard according to the Radiation Control for Health and
Safety Act of 1968. Class 1 levels of laser radiation are not considered to be
hazardous.
Since radiation emitted inside the product is completely confined within protective
housings and external covers, the laser beam cannot escape from the machine
during any phase of user operation. Do not remove protective housings or external
covers, except as directed by the equipment's Reference Guide.
xi
CDRH Regulations
The Center for Devices and Radiological Health (CDRH) of the U.S. Food and Drug
Administration implemented regulations for laser products on August 2, 1976.
These regulations apply to laser products manufactured since August 1, 1976.
Compliance is mandatory for products marketed in the United States. The label
shown below indicates compliance with the CDRH regulations and must be
attached to laser products marketed in the United States.
CANON INC.
3-30-2 SHIMOMARUKO, OHTA-KU, TOKYO, JAPAN
CANON U.S.A., INC.
ONE CANON PLAZA, LAKE SUCCESS, N.Y. 11042, U.S.A.
CANON CANADA INC.
3128 ORLANDO DRIVE, UNIT#1, BUILDING F, MISSISSAUGA, ONTARIO,
L4V1R5, CANADA
MANUFACTURED:
THIS PRODUCT CONFORMS WITH DHHS RADIATION PERFORMANCE
STANDARD, 21 CFR CHAPTER 1 SUBCHAPTER J.
The label shown below is attached to the laser scanner unit inside the machine.
DANGER-
Invisible laser radiation when opening the cover,
removing developing assembly, or cartridges.
AVOID DIRECT EXPOSURE TO BEAM.
DANGER-
THE COVER, REMOVING DEVELOPING ASSEMBLY.
AVOID EXPOSURE TO BEAM.
AVOID EXPOSURE TO BEAM.
ATTENTION - RAYONNEMENT LASER INVISIBLE EN CAS D’OUVERTURE. EXPOSITION
DANGEREUSE AU FAISCEAU.
ATTENTION - RAYONNEMENT LASER INVISIBLE EN CAS D’OUVERTURE DU COUVERCLE.
DU DÉMONTAGE DE L’ENSEMBLE DE DÉVELOPPEMENT.
EVITER TOUTE EXPOSITION DIRECTE AVEC LE FAISCEAU.
VORSICHT
ATTENZIONE
PRECAUCIÓN
VARO!
VARNING!
ADVARSEL!
ADVARSEL
- UNSICHTBARE LASERSTRAHLUNG, WENN ABDECKUNG GEÖFFNET.
NICHT DEM STRAHL AUSSETZEN.
- EMISSIONE DI UN RAGGIO LASER INVISIBILE A SEGUITO DELL’ APERTURA
DELLA COPERTURA O DELLA RIMOZIONE DEL GRUPPO DI SVILUPPO.
EVITARE L’ESPOSIZIONE DIRETTA AL RAGGIO LASER.
- RADIACIÓN LÁSER INVISIBLE EN CASO DE ABRIR LA CUBIERTA Y RETIRAR
LA UNIDAD REVELADORA. EVITE LA EXPOSICIÓN AL HAZ LÁSER.
- AVATTAESSA KEHITYSYKSIKÖN POISSAOLLESSA OLET ALTTINA
NÄKYMÄTTÖMÄLLE LASERSÄTEILYLLE. ÄLÄ KATSO SÄTEESEEN.
- OSYNLIG LASERSTRÄLNING NÄR DENNA DELÄR ÖPPNAD OCH.
FRAMKALLAREN ÄRURTAGEN. BETRAKTA EJ STRÄLEN.
- USYNLIG LASER STRÅLING, NÅR DÆKSLET ÅBNES FOR AT FJERNE
FRAMKALLALDEREN. UNDGÅAT BLIVE RAMT AFSTRÅLEN.
- USYNLIG LASERSTRÅLING NÅR DEKSELEÍ ÅPNES OG.
LASERENHETEN TASUT. IKKE SE DIREKTE PÅ STRÅLEN.
Invisible laser radiation when open.
AVOID DIRECT EXPOSURE TO BEAM.
CAUTION- INVISIBLE LASER RADIATION WHEN OPEN.
CAUTION- INVISIBLE LASER RADIATION WHEN OPENING
VORSICHT
- UNSICHTBARE LASERSTRAHLUNG, WENN ABDECKUNG GEÖFFNET. NICHT
DEM STRAHL AUSSETZEN.
ATTENZIONE - RADIAZIONE LASER INVISIBLE IN CASO DI APERTURA. EVITARE
L’ESPOSIZIONE AL FASCIO.
PRECAUCION - RADIACION LASER INVISIBLE CUANDO SE ABRE. EVITAR EXPONERSE AL
RAYO.
VARO!
- AVATTAESSA OLET ALTTIINA NÄKYMÄTTÖMÄLLE LASERSÄTEILYLLE.
VARNING!
- OSYNLIG LASERSTRÄLNING NAR DENNA DELÄR ÖPPNAD.
ÄLÄ KATSO SÄTEESEEN.
BETRAKTA EJ STRÄLEN.
ADVARSEL! - USYNLIG LASER STRÅLING, NÅR DENNE ER ÅBEN.
UNDGÅ BESTRÅLING.
ADVARSEL - USYNLIG LASERSTRÅLING NÅR DEKSEL ÅPNES.
UNNGÅ EKSPONERING FOR STRÅLEN.
CAUTION
Use of controls, adjustments, or performance of procedures other than those
specified in this manual may result in hazardous radiation exposure.
xii
International Energy Star Program
As an ENERGY STAR® Partner, Canon USA, Inc. has determined that
this copier model meets the ENERGY STAR® Program for energy
efficiency.
The International ENERGY STAR® Office Equipment Program is an
international program that promotes energy saving through the use of
computers and other office equipment. The program backs the
development and dissemination of products with functions that effectively
reduce energy consumption. It is an open system in which business
proprietors can participate voluntarily. The targeted products are office
equipment, such as computers, displays, printers, facsimiles, and copiers.
The standards and logos are uniform among participating nations.
Trademarks
Canon, the Canon logo, and imageCLASS are trademarks of Canon Inc.
Other product and company names herein may be the trademarks of their
respective owners.
Copyright
Copyright 2003 by Canon Inc. All rights reserved.
No part of this publication may be reproduced or transmitted in any form or by any
means, electronic or mechanical, including photocopying and recording, or by any
information storage or retrieval system without the prior written permission of
Canon Inc.
xiii
Disclaimers
The information in this document is subject to change without notice.
CANON INC. MAKES NO WARRANTY OF ANY KIND WITH REGARD TO THIS
MATERIAL, EITHER EXPRESS OR IMPLIED, EXCEPT AS PROVIDED HEREIN,
INCLUDING WITHOUT LIMITATION, THEREOF, WARRANTIES AS TO
MARKETABILITY, MERCHANTABILITY, FITNESS FOR A PARTICULAR
PURPOSE OF USE OR AGAINST INFRINGEMENT OF ANY PATENT. CANON
INC. SHALL NOT BE LIABLE FOR ANY DIRECT, INCIDENTAL, OR
CONSEQUENTIAL DAMAGES OF ANY NATURE, OR LOSSES OR EXPENSES
RESULTING FROM THE USE OF THIS MATERIAL.
Legal Limitations on the Usage of Your Product and the
Use of Images
Using your product to scan, print or otherwise reproduce certain documents, and
the use of such images as scanned, printed or otherwise reproduced by your
product, may be prohibited by law and may result in criminal and/or civil liability. A
non-exhaustive list of these documents is set forth below. This list is intended to be
a guide only. If you are uncertain about the legality of using your product to scan,
print or otherwise reproduce any particular document, and/or of the use of the
images scanned, printed or otherwise reproduced, you should consult in advance
with your legal advisor for guidance.
xiv
Paper Money
Traveles Checks
Money Orders
Food Stamps
Certificates of Deposit
Passports
Postage Stamps
(canceled or uncanceled)
Immigration Papers
Identifying Badges or Insignias
Internal Revenue Stamps
(canceled or uncanceled)
Selective Service or Draft
Papers
Bonds or Other Certificates of Indebtedness
Checks or Drafts Issued by
Governmental Agencies
Stock Certificates
Motor Vehicle Licenses and
Certificates of Title
Copyrighted Works/Works of Art without
Permission of Copyright Owner
Important Safety Instructions
Please read these "Important Safety Instructions" thoroughly before operating the
machine. As these instructions are intended to prevent injury to the user or other
persons or destruction of property, always pay attention to these instructions. Also,
since it may result in unexpected accidents or injuries, do not perform any operation
unless otherwise specified in the manual. Improper operation or use of this
machine could result in personal injury and/or damage requiring extensive repair
that may not be covered under your Limited Warranty.
Installation
WARNING
Do not install the machine near alcohol, paint thinner or other flammable substances.
If flammable substances come into contact with electrical parts inside the machine, it
may result in a fire or electrical shock.
Do not place the following items on the machine. If these items come into contact
with a high-voltage area inside the machine, it may result in a fire or electrical shock.
If these items are dropped or spilled inside the machine, immediately turn OFF the
main power switch, and disconnect the power cord from the power outlet. Then,
contact your service representative.
- Necklaces and other metal objects
- Cups, vases, flowerpots, and other containers filled with water or liquids
CAUTION
Do not install the machine in unstable locations, such as unsteady platforms or
inclined floors, or in locations subject to excessive vibrations, as this may cause the
machine to fall or tip over, resulting in personal injury.
Never block the ventilation slots and louvers on the machine. These openings are
provided for proper ventilation of working parts inside the machine. Blocking these
openings can cause the machine to overheat. Never place the machine on a soft
surface, such as a sofa or rug.
xv
Do not install the machine in the following locations:
- A damp or dusty location
- A location near water faucets or water
- A location exposed to direct sunlight
- A location subject to high temperatures
- A location near open flames
Power Supply
WARNING
Do not damage or modify the power cord. Also, do not place heavy objects on the
power cord, or pull on or excessively bend it, as this could cause electrical damage
and result in a fire or electrical shock.
Keep the power cord away from a heat source; failure to do this may cause the power
cord coating to melt, resulting in a fire or electrical shock.
Do not connect or disconnect the power cord with wet hands, as this may result in
electrical shock.
Do not connect the power cord to a multiplug power strip, as this may cause a fire or
electrical shock.
Do not bundle up or tie the power cord in a knot, as this may result in a fire or
electrical shock.
Insert the power plug completely into the power outlet, as failure to do so may result
in a fire or electrical shock.
Do not use power cords other than the power cord provided, as this may result in a
fire or electrical shock.
As a general rule, do not use extension cords. Using an extension cord may result in
a fire or electrical shock. If an extension cord must be used, however, use one rated
for voltages of 120 V AC and over, untie the cord binding, and insert the power plug
completely into the extension cord outlet to ensure a firm connection between the
power cord and the extension cord.
CAUTION
Do not use power supplies with voltages other than those specified herein, as this
may result in a fire or electrical shock.
Always grasp the power plug when disconnecting the power cord. Pulling on the
power cord may expose or snap the core wire, or otherwise damage the power cord.
If the power cord is damaged, this could cause current to leak, resulting in a fire or
electrical shock.
Leave sufficient space around the power plug so that it can be unplugged easily. If
objects are placed around the power plug, you will be unable to unplug it in an
emergency.
xvi
Handling
WARNING
Do not attempt to disassemble or modify the machine. There are high-temperature
and high-voltage components inside the machine which may result in a fire or
electrical shock.
If the machine makes strange noises, or gives off smoke, heat, or strange smells,
immediately turn OFF the main power switch, and disconnect the power cord from
the power outlet. Then, contact your service representative. Continued use of the
machine in this condition may result in a fire or electrical shock.
Do not use highly flammable sprays near the machine. If gas from these sprays
comes into contact with the electrical components inside the machine, it may result
in a fire or electrical shock.
To avoid damage to the power cord and creating a fire hazard, always turn OFF the
main power switch, and unplug the interface cable when moving the machine.
Otherwise, the power cord or interface cable may be damaged, resulting in a fire or
electrical shock.
Do not drop paper clips, staples, or other metal objects inside the machine. Also, do
not spill water, liquids, or flammable substances (alcohol, benzene, paint thinner,
etc.) inside the machine. If these items come into contact with a high-voltage area
inside the machine, it may result in a fire or electrical shock. If these items are
dropped or spilled inside the machine, immediately turn OFF the main power switch,
and disconnect the power cord from the power outlet. Then, contact your service
representative.
CAUTION
Do not place heavy objects on the machine, as they may tip over or fall resulting in
personal injury.
Close the feeder/platen glass cover gently to avoid catching your hands, as this may
result in personal injury.
Do not press down hard on the feeder/platen glass cover when using the platen glass
to make copies of thick books, etc. Doing so may damage the platen glass and result
in personal injury.
Do not touch the paper output area while the machine is copying or printing, as this
may result in personal injury.
xvii
Turn OFF the main power switch for safety when the machine will not be used for a
long period of time, such as overnight. Also, disconnect the power cord for safety
when the machine will not be used for an extended period of time, such as during
consecutive holidays.
The laser beam can be harmful to human bodies. Since radiation emitted inside the
product is completely confined within protective housings and external covers, the
laser beam cannot escape from the machine during any phase of user operation.
Read the following remarks and instructions for safety.
Never open covers other than those instructed in this manual.
Do not remove the caution label attached to the cover of the laser scanner unit.
If the laser beam escapes from the machine, exposure may cause serious damage to
your eyes.
Maintenance and Inspections
WARNING
When cleaning the machine, first turn OFF the main power switch, then disconnect
the power cord. Failure to observe these steps may result in a fire or electrical shock.
Disconnect the power cord from the power outlet regularly, and clean the area around
the base of the power plug's metal pins and the power outlet with a dry cloth to
ensure that all dust and grime is removed. If the power cord is connected for a long
period of time in a damp, dusty, or smoky location, dust can build up around the
power plug and become damp. This may cause a short circuit and result in a fire.
Clean the machine using a slightly dampened cloth with a mild detergent mixed with
water. Do not use alcohol, benzene, paint thinner, or other flammable substances.
Check detergent for flammability prior to use. If flammable substances come into
contact with a high-voltage area inside the machine, it may result in a fire or electrical
shock.
There are some areas inside the machine which are subject to high-voltages. When
removing jammed paper or when inspecting the inside of the machine, do not allow
necklaces, bracelets, or other metal objects to touch the inside of the machine, as
this may result in burns or electrical shock.
Do not burn or throw used toner cartridges into open flames, as this may cause the
toner remaining inside the cartridge to ignite, resulting in burns or a fire.
xviii
CAUTION
The fixing unit and its surroundings inside the machine may become hot during use.
When removing jammed paper or when inspecting the inside of the machine, do not
touch the fixing unit and its surroundings, as doing so may result in burns or
electrical shock.
When removing jammed paper or replacing the toner cartridge, take care not to allow
the toner to come into contact with your hands or clothing, as this will dirty your
hands or clothing. If they become dirty, wash them immediately with cold water.
Washing them with warm water will set the toner, and make it impossible to remove
the toner stains.
When removing paper which has become jammed inside the machine, remove the
jammed paper gently to prevent the toner on the paper from scattering and getting
into your eyes or mouth. If the toner gets into your eyes or mouth, wash them
immediately with cold water and immediately consult a physician.
When loading paper or removing jammed originals or paper, take care not to cut your
hands on the edges of the originals or paper.
When removing a used toner cartridge, remove the cartridge carefully to prevent the
toner from scattering and getting into your eyes or mouth. If the toner gets into your
eyes or mouth, wash them immediately with cold water and immediately consult a
physician.
Consumables
WARNING
Do not burn or throw used toner cartridges into open flames, as this may cause the
toner remaining inside the cartridges to ignite, resulting in burns or a fire.
Do not store toner cartridges or copy paper in places exposed to open flames, as this
may cause the toner or paper to ignite, resulting in burns or a fire.
When discarding used toner cartridges, put the cartridges in a bag to prevent the
toner remaining inside the cartridges from scattering, and dispose of them in a
location away from open flames.
CAUTION
Keep toner and other consumables out of the reach of small children. If these items
are ingested, consult a physician immediately.
xix
Other Warnings
WARNING
For cardiac pacemaker users:
This product generates a low level magnetic field. If you use a cardiac pacemaker and
feel abnormalities, please move away from the product and consult your doctor.
Set-Up Help & Product Registration (USA)
Before you unpack your new machine, CALL 1-800-828-4040 for help with set-up
and operation. You can also register your machine with us. Call the Canon USA
Consumer Products Information Center between 8 a.m. and 8 p.m. EST, Monday
through Friday, except holidays.
Machine Model: imageCLASS 2300
Serial Number: (located on the label at the back of the machine)
If you have any problems with your machine, DO NOT return it to your retailer.
Call 1-800-828-4040.
Canon Canada Information/Service Center
Should service be necessary please call the following number for information
regarding Personal Copier Authorized Service Facilities.
Canon Canada, Inc. 6390 Dixie Road, Mississauga, Ontario L5T 1P7
Call 1-800-263-1121.
Supplies & Accessories
Call or visit your local retailer/dealer for genuine Canon supplies. You can also order
genuine supplies and accessories for your machine from Canon. Call us at:
1-800-828-4040
Canon USA Consumer Products Information Center
1-800-OK-CANON
Canon Canada Information/Service Center
Please have your credit card ready. Local sales tax, shipping and handling charges
are added to each other. Express shipments are available.
Cartridges
Canon Cartridge P
xx
Transparencies
Canon Type E
Power Cord
NOTE
All items are subject to availability. Accessories are also available for other Canon
consumer products.
xxi
xxii
Introduction
1
CHAPTER
This chapter describes the features of the machine, and the parts and their functions.
Where to Find Help. . . . . . . . . . . . . . . . . . . . . . . . . . . . . . . . . . . . . . . . . . . . . . . . . . . . . . 1-2
Set-Up Sheets . . . . . . . . . . . . . . . . . . . . . . . . . . . . . . . . . . . . . . . . . . . . . . . . . . . . . . . . . . . . . . .1-2
Book Manuals. . . . . . . . . . . . . . . . . . . . . . . . . . . . . . . . . . . . . . . . . . . . . . . . . . . . . . . . . . . . . . . .1-3
PDF Manuals and Software (CD-ROMs) . . . . . . . . . . . . . . . . . . . . . . . . . . . . . . . . . . . . . . . . . . .1-4
Features of the imageCLASS 2300 . . . . . . . . . . . . . . . . . . . . . . . . . . . . . . . . . . . . . . . . . 1-5
Model Configurations . . . . . . . . . . . . . . . . . . . . . . . . . . . . . . . . . . . . . . . . . . . . . . . . . . . . . . . . . .1-5
Settint Up Machine Functions. . . . . . . . . . . . . . . . . . . . . . . . . . . . . . . . . . . . . . . . . . . . . . 1-6
Parts and Their Functions. . . . . . . . . . . . . . . . . . . . . . . . . . . . . . . . . . . . . . . . . . . . . . . . . 1-7
External View . . . . . . . . . . . . . . . . . . . . . . . . . . . . . . . . . . . . . . . . . . . . . . . . . . . . . . . . . . . . . . . .1-7
Internal View . . . . . . . . . . . . . . . . . . . . . . . . . . . . . . . . . . . . . . . . . . . . . . . . . . . . . . . . . . . . . . . . .1-8
Control Panel Parts and Functions . . . . . . . . . . . . . . . . . . . . . . . . . . . . . . . . . . . . . . . . . . . . . . . .1-9
1-1
Where to Find Help
1
The documentations for the imageCLASS 2300 are provided in the following forms:
Introduction
Set-Up Sheets
Book Manuals
PDF Manuals and Software (CD-ROMs)
NOTE
The PDF manuals and software are only provided with the Network Model of this
machine.
Set-Up Sheets
The Set-Up Sheets are only used once at the very beginning to install and set up
the machine.
■ Set-Up Sheet for the Machine
This is the first documentation you should refer to for installing and setting up the
machine. It is located on the feeder cover on top of the machine.
■ Set-Up Sheet for Networking and Printing
Refer to this documentation to connect and set up the imageCLASS 2300 Network Model
for networking and printing functions.
NOTE
Set-Up Sheet for Networking and Printing is only provided with the Network Model of this
machine.
1-2
Where to Find Help
Book Manuals
The following book manuals are provided with the machine:
■ Basic Guide (This Document)
■ Reference Guide
Explains the machine operations common to all functions (i.e., entering characters). Also
covers the machine settings, maintenance, and troubleshooting.
■ Copying Guide
Covers the copying function of the machine in detail.
■ Facsimile Guide
Covers the fax function of the machine in detail.
■ Sending Guide
Explains how to set up the machine to send and receive Internet Fax (I-Fax).
NOTE
The Sending Guide is only provided with the Network Model of this machine.
Where to Find Help
1-3
1
Introduction
Explains the basic operations of the machine's major functions. Keep this manual handy
for easy reference.
PDF Manuals and Software (CD-ROMs)
The imageCLASS 2300 Network Model comes with two CD-ROMs: Driver Software
CD-ROM and Network User Software CD-ROM.
■ Driver Software CD-ROM
1
Introduction
The Driver Software CD-ROM contains the following manuals and software:
PCL Printer Guide
PCL Driver Guide
Fax Driver Guide with Cover Sheet Editor
Adobe Acrobat Reader
CD-ROM Menu
Printer Drivers
Fax Driver
Fonts
■ Network User Software CD-ROM
The Network User Software CD-ROM contains the following manuals and software:
Network Guide
Remote UI Guide
Adobe Acrobat Reader
Utility Software
NOTE
For details on the software listed above, refer to the PDF manuals and readme.txt files in
each program folder on the CD-ROM.
1-4
Where to Find Help
Features of the imageCLASS 2300
The imageCLASS 2300 comes in two configurations: the standard imageCLASS
2300 and the imageCLASS 2300 Network Model.
■ imageCLASS 2300
The standard imageCLASS 2300 lets you copy and fax documents placed on the
machine. It can perform multiple jobs without waiting for the current job to be finished. For
example, you can copy a document while the machine is sending a fax document
scanned into the memory.
■ imageCLASS 2300 Network Model
In addition to what the standard imageCLASS 2300 offers, the Network Model also
features:
Sending and receiving Internet Fax (I-Fax)
Printing directly from a computer and through a network
Setting and monitoring the network status of the machine from the Remote User
Interface (Remote UI)
Features of the imageCLASS 2300
1-5
Introduction
1
Model Configurations
Setting Up Machine Functions
1
Introduction
It is necessary to set up certain functions before using it on a network, as a printer,
and with the Fax and I-Fax function.
To set up the functions, refer to the following instructions:
■ Setting Up and Connecting to the Network
See the Network Guide.
■ Installing the Printer Driver
See the PCL Driver Guide.
■ Installing the Fax Driver
See the Fax Driver Guide with Cover Sheet Editor.
■ Date and Time Settings
See "Setting the Current Date and Time," on p. 5-5.
■ System Manager Settings
See Chapter 5, "System Manager Settings," in the Reference Guide.
1-6
Setting Up Machine Functions
Parts and Their Functions
1
Introduction
This section provides you with the names and functions of all the parts on the
outside and inside of the main unit, and the control panel.
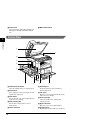
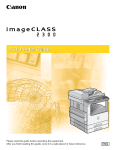
External View
F ro n t V i ew
a Control Panel
Includes the keys, LCD display, and indicators
required for operating the machine. (See
"Control Panel Parts and Functions," on p. 1-9.)
b Feeder
You can place a stack of originals in the original
supply tray, and they are automatically fed to the
platen glass for copying.
c Original Supply Tray
Originals can be automatically sent to the platen
glass by placing them in the original supply tray.
d Original Output Area
Originals scanned from the original supply tray
are output to the original output area.
R e a r V i ew
e Paper Drawers
Each paper drawer holds up 250 sheets of paper
(20 lb bond (80 g/m2))
f Ventilation Slot
Heat produced in the machine escapes from
here.
g Telephone Line Jack
Connect the telephone line to this jack for fax
operations.
h 10Base-T/100Base-TX Port
Connect the LAN cable to this port for network
printing and I-Fax operations. Available in the
Network Model only.
Parts and Their Functions
1-7
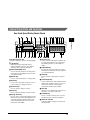
i Printer Ports
j Main Power Switch
Connect the printer cable (USB or parallel) to the
matching port. Available in the Network Model
only.
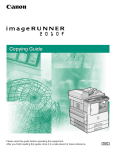
Internal View
Introduction
1
1
2
0
9
8
7
6
5
a Underside of the Feeder
This holds originals in place on the platen glass.
b Platen Glass
Place originals here when scanning books, thick
originals, thin originals, etc.
c Front Cover
You can open this cover to clear paper jams and
replace the toner cartridge.
d Paper Feeding Dial
Turn this dial counterclockwise to remove
jammed paper.
e Lower Left Cover
4
3
f Stack Bypass
Feeds transparencies and nonstandard or
alternate paper stock.
g Left Cover
Open this cover to remove jammed paper and to
replace the toner cartridge.
h Toner Cartridge
Pull out the handle of this cartridge when
replacing the toner.
i Upper Left Cover
Open this cover to remove jammed paper.
j Scanning Area
Originals placed in the feeder are scanned here.
1-8
Parts and Their Functions
Control Panel Parts and Functions
One-Touch Speed Dialing Panels Closed
Display Contrast
Energy Saver
Monitor
COPY
FAX
Directory
Collate
Special Features
Reset
@.
DEF
Clear
1
2
3
C
Enlarge
Additional Functions
GHI
JKL
MNO
4
5
6
PRS
TUV
WXY
7
8
9
OPER
SYMBOLS
2
Interrupt
Two Page Separation Frame Erase
3
4
F1
F2
Hook
Pause/
Redial
Tone
Line/Mail Direct TX
PRINT
Reduce
1
Coded
Dial
Introduction
1
F3
F4
BACK
OK
ABC
0
In Use Memory
a Display Contrast dial
Rotate to adjust the contrast of the LCD display.
b LCD display
Displays messages and prompts during
operation. Displays selections, text, numbers,
and names when registering information.
c COPY, FAX, PRINT keys
Press to switch the machine to the Copy, Fax or
Printer functions. The PRINT key only functions
in the Network Model.
d Monitor key
Press to check the transaction or copying status.
e Reset key
Press to return to the Basic Features screen, or
to stop scanning or sending documents.
f Numeric keys
Press to enter the numbers or letters.
g Clear key
Press to delete the numbers or letters entered.
h Energy Saver key
Press to enter or cancel the Energy Saver mode.
When the machine is in the Energy Saver mode,
only the Energy Saver indicator and the main
power indicator light and the other keys and
indicators are turned OFF.
Stop
Start
01
02
03
04
05
06
07
08
09
10
11
12
13
14
15
16
17
18
19
20
21
ID
Power
Alarm
43~63
22~42
i Directory key
Press to search for fax/telephone numbers by
the name under which they are registered for
speed dialing and then use the number for
dialing.
j Coded Dial key
Press this key and a three-digit code to dial a
fax/telephone number that you have registered
for coded speed dialing.
k Hook key
Press to activate or deactivate the telephone
line.
l Pause/Redial key
Press to redial the last number dialed when the
display shows the Basic Features screen or to
enter a pause between or after dialing or
registering the telephone/fax numbers.
m Tone key
Switches to tone dialing temporarily when your
machine is connected to a pulse line.
n Line/Mail key
Press to select the telephone line or send an
I-fax. Only functions in the Network Model.
o Direct TX indicator
Lights when Direct Sending is selected as the
sending method.
Parts and Their Functions
1-9
p Direct TX key
Press to use the Direct Sending method, which
enables you to send a document ahead of other
documents stored in memory.
q One-touch speed dialing panels
The first panel displays keys 01 to 21. Open the
first panel to access keys 22 to 42. Open the
second panel to access keys 43 to 63. Open the
third panel to access the Fax function keys.
Introduction
1
r One-touch speed dialing keys
Press to dial numbers registered under
one-touch speed dialing keys or access the Fax
functions when registered as program-one-touch
keys.
s Main Power indicator
Lights when the main power is turned ON.
t Stop key
Press to return to the Basic Features screen, or
to stop scanning, printing copies or sending a
fax.
u Start key
Press to start an operation.
v ID key
Press in order to use the Department ID
Management function.
w Alarm lamp
Lights or blinks red when an error occurs. If the
alarm lamp blinks, solve the problem by following
the instructions on the LCD display. If the alarm
lamp maintains a steady red light, contact your
service representative.
x In Use Memory lamp
A light that blinks red or maintains a steady
green light when the machine is copying or there
are documents stored in memory.
y Interrupt key
Press to interrupt a continuous copy job when
you need to make priority copies.
z Additional Functions key
Press to enter the Additional Functions menu.
A OK key
Press to set a mode or function.
B BACK key
Press to go back to the previous screen when
adjusting settings in a menu.
C Function keys (F1 to F4)
Select options that appear on the LCD display.
D Special Features key
Press to set special copying features, such as
Two-Page Separation, Image Combination,
Margin, and Frame Erase.
E Copy shortcut keys (1 to 4)
Press to use registered special copying features.
The default settings are as follows:
1: Reduce
2: Enlarge
3: Two-Page Separation
4: Frame Erase
You can change the Copy Shortcut keys settings
in the Copy Settings menu from the Additional
Functions menu.
F Collate key
Press to turn ON/OFF the finishing functions,
such as Collate or Rotate.
1-10
Parts and Their Functions
One-Touch Speed Dialing Panels Opened
1
3
2
Delayed
Advanced
Transmission Communication
5
4
Transfer
7
6
Memory
Reception
Delete
1
Report
TTI Selector
Stack Bypass
Settings
Stamp
Pin Code
G F ED C B
a Delayed Transmission key
Press to set a time for delayed sending.
b Advanced Communication key
Press to set a document for advanced
communications such as polling sending/
receiving, confidential mailbox, relay broadcast,
and subaddress/password transmission.
c Transfer key
Press to use the transfer mode, or to cancel it.
d Memory Reception key
Press to turn ON/OFF the memory reception
function.
e Space key
Enters a space between letters and numbers
when registering information.
f Speaker volume switch
Adjusts the speaker Volume in four levels.
g Delete key
During a step when you are registering a name,
press this key to delete the character you
entered last.
h OK key
Press to set a mode or function.
i
,
, ▲, ▼ Cursor keys
Press to scroll through options and selections in
the menus on the display during data
registration, or to move the cursor left or right
during data registration.
Space
+
Clear
A
0
Introduction
Memory
Reference
OK
9
8
j Clear key
Clears an entire entry during information
registration.
k + key
Press this key to enter a plus sign in a fax
number.
l Pin Code key
Displays the PIN code message so you can
enter a PIN code when dialing through a PBX
(Public Branch Exchange).
m TTI Selector key
Enters a registered sender's name which is
printed at the top of the document you are
sending.
n Stamp key
Switches the machine in and out of the Stamp
mode.
o Report key
Prints reports about information registered in the
machine.
p Stack Bypass Settings key
Press to set the paper size for the stack bypass.
q Memory Reference key
Performs operations with documents currently
stored in memory, including printing a list of
documents, printing documents, sending
documents to another destination, or deleting
documents.
Parts and Their Functions
1-11
Introduction
1
1-12
Parts and Their Functions
Documents
2
CHAPTER
This chapter describes how to place original documents, and the types of documents you can
load on the machine.
Placing Originals (For Copying, Faxing, Scanning) . . . . . . . . . . . . . . . . . . . . . . . . . . . . . 2-2
Orientation . . . . . . . . . . . . . . . . . . . . . . . . . . . . . . . . . . . . . . . . . . . . . . . . . . . . . . . . . . . . . . . . . .2-3
Platen Glass . . . . . . . . . . . . . . . . . . . . . . . . . . . . . . . . . . . . . . . . . . . . . . . . . . . . . . . . . . . . . . . . .2-4
Feeder . . . . . . . . . . . . . . . . . . . . . . . . . . . . . . . . . . . . . . . . . . . . . . . . . . . . . . . . . . . . . . . . . . . . .2-6
2-1
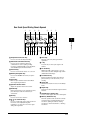
Placing Originals (For Copying, Faxing, Scanning)
You can place originals on the platen glass or in the feeder, depending on the size
and type of paper that you are using, and the settings that you have specified.
2
■ Platen Glass
Documents
Place originals on the platen glass when scanning bound originals (such as books and
magazines), originals on heavy or lightweight paper, and transparencies.
■ Feeder
Place a stack of originals in the feeder ➞ press [Start]. The machine automatically scans
them into memory.
2-2
Placing Originals (For Copying, Faxing, Scanning)
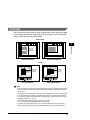
Orientation
You can place an original either vertically or horizontally. Always align the top edge
of your original with the back edge of the platen glass (by the arrow in the top left
corner), or with the back edge of the feeder.
Platen Glass
Documents
2
Place the
original
face down.
Place the original face down.
Vertical Placement
Horizontal Placement
Feeder
ABC
Place the
original
face up.
Vertical Placement
ABC
Place the
original
face up.
Horizontal Placement
NOTE
If the top edge of the original is not aligned with the back edge of the platen glass (by the
arrow in the top left corner), prints may not be made correctly, depending on the mode
you have set.
LTR originals can be placed either vertically or horizontally. However, the scanning speed
for horizontally placed originals is somewhat slower than for vertically placed originals.
You can place originals horizontally when scanning with a Preset Zoom, such as when
enlarging LTR to 11" x 17" .
Horizontally placed LTR originals are referred to as LTR .
11" x 17" and LGL originals must be placed horizontally.
To get the same output result when you are using the feeder as when the original is
placed on the platen glass, place the original upside-down and face up in the feeder.
Placing Originals (For Copying, Faxing, Scanning)
2-3
Platen Glass
You should use the platen glass when scanning bound originals (such as books
and magazines), originals on heavy or lightweight paper, and transparencies.
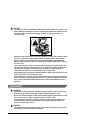
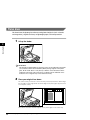
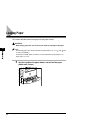
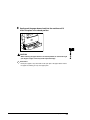
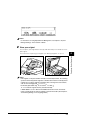
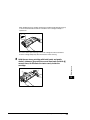
1
Lift up the feeder.
Documents
2
IMPORTANT
This machine is equipped with an open/close sensor on the underside of the feeder
(see circled area in the above illustration). When placing originals on the platen
glass, lift the feeder about 11 7/8" (30 cm) so that the sensor detaches from the
underside of the feeder. If the sensor does not detach from the underside of the
feeder, the size of originals may not be detected correctly.
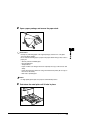
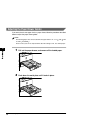
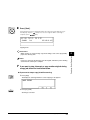
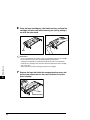
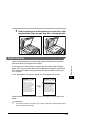
2
Place your original face down.
The surface that you want to scan into memory must be placed face down. Align
the top edge of your original with the back edge of the platen glass (by the arrow
in the top left corner).
Place books and other bound originals on the platen glass in the same way.
2-4
Placing Originals (For Copying, Faxing, Scanning)
If you are enlarging an STMT or LTR original to 11" x 17" or LGL paper, place the
original horizontally on the platen glass, and align it with the STMT or LTR
marks.
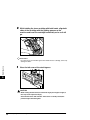
Gently lower the feeder.
2
Documents
3
CAUTION
Close the feeder gently, to avoid catching your hand, as this may result in
personal injury.
Do not press down hard on the feeder when using the platen glass to make
copies of thick books. Doing so may damage the platen glass and result in
personal injury.
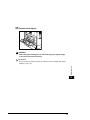
IMPORTANT
If you are placing originals on the platen glass, the size of the original is detected
after the feeder has been lowered. Be sure to lower the feeder before copying.
STMT originals and postcards cannot be detected. Follow the instructions on the
display and specify the original size or select the paper size.
NOTE
Remove the original from the platen glass when scanning is complete.
Placing Originals (For Copying, Faxing, Scanning)
2-5
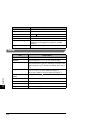
Feeder
Place a stack of originals in the feeder, and press [Start]. The machine
automatically scans them.
You can place the following originals in the original supply tray:
Specifications
2
Weight
Documents
Item
10 to 32 lb bond (37 to 128 g/m2)
Place very thin originals 10 to 14 lb bond (37 to 51 g/m2), or very thick
originals 28 to 32 lb bond (105 to 128 g/m2) into the feeder one at a time.
Size
11" x 17"
, LGL
, LTR
, LTR
, or STMT
.
Tray Capacity 50 sheets (LTR or smaller)
25 sheets (LGL or larger)
IMPORTANT
Do not place the following types of originals in the feeder:
- Originals with tears or large binding holes
- Severely curled originals or originals with sharp folds
- Clipped or stapled originals
- Carbon backed paper or other originals that might not feed smoothly
- Transparencies and other highly transparent originals
Avoid scanning the same original using the feeder more than approximately 30 times.
Scanning the same original repeatedly may result in the original becoming folded or torn,
which in turn could cause a paper jam.
If the feeder rollers are dirty from scanning an original written in pencil, perform the
feeder cleaning procedure. (See Chapter 6, "Routine Maintenance," in the Reference
Guide.)
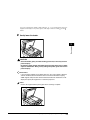
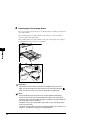
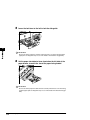
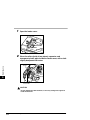
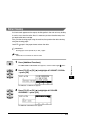
1
Neatly place your originals face up in the original supply tray.
If you are enlarging LTR
originals horizontally.
2-6
originals to 11" x 17"
Placing Originals (For Copying, Faxing, Scanning)
or LGL
paper, place your
Place your originals as far into the feeder as they will go.
2
Display
Contras
t
Special
Feature
Documents
Collate
COPY
s
FAX
A beep sounds when the originals are set correctly.
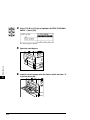
2
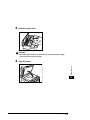
Adjust the slide guides to fit the size of your originals.
Display
Contras
t
Collate
Special
Feature
COPY
s
FAX
IMPORTANT
Do not add or remove originals while they are being scanned.
Do not place objects in the original output area. Blocking the paper delivery slot
may damage the originals.
When scanning is complete, remove the originals from the original output tray to
avoid paper jams.
Original Output Tray
Display
Contras
t
Collate
Special
Feature
s
COPY
FAX
Placing Originals (For Copying, Faxing, Scanning)
2-7
NOTE
The scanned originals are output face down to the original output tray.
You can place different size originals (i.e., LTR and 11" x 17" , STMT and
LTR ) together in one group in the feeder when you set the Different Size
Originals mode. (See Chapter 3, "Special Copying Features," in the Copying
Guide.)
Documents
2
2-8
Placing Originals (For Copying, Faxing, Scanning)
Print Media
3
CHAPTER
This chapter describes the types of paper you can use with the machine and how to load them.
Paper Type . . . . . . . . . . . . . . . . . . . . . . . . . . . . . . . . . . . . . . . . . . . . . . . . . . . . . . . . . . . . 3-2
Loading Paper . . . . . . . . . . . . . . . . . . . . . . . . . . . . . . . . . . . . . . . . . . . . . . . . . . . . . . . . . 3-4
Adjusting the Paper Drawer Guides. . . . . . . . . . . . . . . . . . . . . . . . . . . . . . . . . . . . . . . . . . . . . . .3-8
3-1
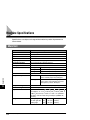
Paper Type
Paper types which can be used with this machine are shown in the following table.
Location
Paper Type
3
Paper Drawer
Print Media
Plain *1
Heavy *2
Recycled *1
Transparency
-
Labels *3
-
Envelope
-
*1 16 to 24 lb bond (60 to 90 g/m2)
*2 24 to 32 lb bond (90 to 128 g/m2)
*3 Only one sheet at the same time.
: Available
- : Unavailable
3-2
Paper Type
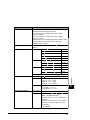
Stack Bypass
Location
Length x Width
Paper Drawer Stack
1 and 2
Bypass
11" x 17"
11" x 17" (279 mm x 432 mm)
LGL
8 1/2" x 14" (216 mm x 356 mm)
LTR
11" x 8 1/2" (279 mm x 216 mm)
LTR
8 1/2" x 11" (216 mm x 279 mm)
STMT
8 1/2" x 5 1/2" (216 mm x 140 mm)
STMT
5 1/2" x 8 1/2" (140 mm x 216 mm)
-
COM10
4 1/8" x 9 1/2" (104.7 mm x 241.3 mm)
-
DL
4 1/4" x 8 5/8" (110 mm x 220 mm)
-
Monarch
3 7/8" x 7 1/2" (98.4 mm x 190.5 mm)
-
4" x 5 3/4" to 11 5/8" x 17"
(100 mm x 148 mm to 297 mm x 432
mm)
-
Envelope
Free Size
3
Print Media
Paper Size
: Available
- : Unavailable
IMPORTANT
It is recommended not to use the back side of preprinted paper. It may cause a paper
jam.
NOTE
For instructions on how to load paper, see the following pages:
- Paper drawer: "Loading Paper," on p. 3-4.
- Stack bypass: Chapter 2, "Basic Operations," in the Reference Guide.
Paper Type
3-3
Loading Paper
This section describes how to load paper into the paper drawers.
CAUTION
When loading paper, take care not to cut your hands on the edges of the paper.
3
Print Media
NOTE
The following paper sizes can be loaded into the paper drawers: 11" x 17" , LGL , LTR
, LTR , and STMT .
For details of available paper stock which can be loaded into the paper drawers, see
"Paper Type," on p. 3-2.
1
3-4
Grip the handle of the paper drawer, and pull out the paper
drawer until it stops.
Loading Paper
2
Open a paper package, and remove the paper stack.
IMPORTANT
Rewrap any remaining paper in its original package, and store it in a dry place
away from direct sunlight.
Do not load the following types of paper in the paper drawer. Doing so may cause a
paper jam.
- Severely curled or wrinkled paper
- Heavyweight paper
- Transparencies
- Paper on which color images have been copied (do not copy on the reverse side
either)
- Paper which has been printed on using a thermal transfer printer (do not copy on
the reverse side either)
- Back side of printed paper
NOTE
For high-quality print output, use paper recommended by Canon.
3
Push down the metal plate until it locks in place.
Loading Paper
3-5
Print Media
3
4
Load the paper into the paper drawer.
Even out the edges of the paper stack. Load the paper stack against the right wall
of the paper drawer.
When loading paper in the paper drawer for the first time, set the size plate to
match the paper size being loaded.
When loading paper in the paper drawer, make sure that the paper size setting of
the paper drawer matches the size of the paper.
Print Media
3
IMPORTANT
Paper which has been rolled or curled must be straightened out prior to use.
Make sure that the height of the paper stack does not exceed the limit mark
Make sure that the corners of the stack are held under the guiding tabs.
.
NOTE
Each paper drawer holds about 250 sheets of paper (20 lb bond (80 g/m2)).
If there are instructions on the paper package about which side of the paper to
load, follow those instructions. When the paper is loaded into the paper drawer, the
side facing down is the one printed on.
If problems, such as poor print quality or paper jams occur, try turning the paper
stack over and reload it.
For details of the print direction of paper already printed with logos or patterns, see
Chapter 1, "Introduction to Copying," in the Copying Guide.
3-6
Loading Paper
Gently push the paper drawer back into the machine until it
clicks into place in the closed position.
3
CAUTION
When returning the paper drawer to its closed position, be careful not to get
your fingers caught, as this may result in personal injury.
IMPORTANT
Never place paper or any other items in the open part of the paper drawer next to
the paper stack. Doing so may cause paper jams.
Loading Paper
3-7
Print Media
5
Adjusting the Paper Drawer Guides
If you want to load a new paper size in a paper drawer, follow the procedure described
below to adjust the paper drawer guides.
NOTE
The following paper sizes can be loaded into the paper drawers: 11" x 17" , LGL , LTR
, LTR , and STMT .
Please contact your service representative about the settings for U1, U2, and U3 paper.
Print Media
3
3-8
1
Pull out the paper drawer, and remove all the loaded paper.
2
Push down the metal plate until it locks in place.
Loading Paper
3
Detach the paper end guide by pushing it to the left and pulling
up, and attach it again aligning it with the mark for the desired
paper size.
NOTE
Attach the end guide while pressing down the point indicated with "A".
If you are setting for 11" x 17" paper, attach the end guide to the 11" x 17" indicator
on the right rear side of the paper drawer.
4
Lift the lock lever vertically, and slide the side guide to align it
with the mark for the size of the paper you are loading.
Loading Paper
3-9
Print Media
3
5
Lower the lock lever to the left to lock the side guide.
Print Media
3
IMPORTANT
Be sure to set the lock lever correctly. If the lock lever is set to the wrong position,
paper jams or dirty prints may occur, or the inside of the machine may get dirty.
6
Set the paper size detector lever, located on the left side of the
paper drawer, to match the size of the paper being loaded.
MT
ST
R
R T
LT L
7
1
L 1X
LG 1
5
B
U2 U
U1
IMPORTANT
Be sure to set the paper size detector lever correctly. If the lever is set to the wrong
position, paper jams or dirty prints may occur, or the inside of the machine may get
dirty.
3-10
Loading Paper
7
Attach the appropriate paper size label onto the paper size plate.
Remove the protecting plastic sheet and attach the label for the paper size you are
loading.
LTR
9
Change the paper size plate, so that it matches the new paper
size being loaded.
Gently push the paper drawer back into the machine until it
clicks into place in the closed position.
Loading Paper
3-11
Print Media
8
3
CAUTION
When returning the paper drawer to its closed position, be careful not to get
your fingers caught, as this may result in personal injury.
Print Media
3
3-12
Loading Paper
Copying - Basic Operations
4
CHAPTER
This chapter describes the overview and flow of copying operations.
Overview of Copying Operations . . . . . . . . . . . . . . . . . . . . . . . . . . . . . . . . . . . . . . . . . . . 4-2
Copy Operations . . . . . . . . . . . . . . . . . . . . . . . . . . . . . . . . . . . . . . . . . . . . . . . . . . . . . . . . 4-4
More Information . . . . . . . . . . . . . . . . . . . . . . . . . . . . . . . . . . . . . . . . . . . . . . . . . . . . . . . . . . . . .4-9
4-1
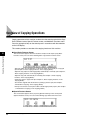
Overview of Copying Operations
Copying operations of this machine are done from the control panel with the Copy
Basic Features screen, Special Features screen, and Additional Functions menu.
Press the appropriate keys on the control panel in accordance with the selections
on the LCD display.
This section provides an overview of the copying functions of this machine.
■ Copy Basic Features Screen
4
Copying - Basic Operations
The screen below appears when the machine is ready to make copies (Copy Basic
Features screen). You can set the following basic copy features from this screen:
Select the paper size automatically, or specify the paper size manually for a copy job.
(See Chapter 2, "Basic Copying Features," in the Copying Guide.)
Adjust the copy exposure and image quality automatically or manually. (See Chapter 2,
"Basic Copying Features," in the Copying Guide.)
Adjust the copy ratio automatically or manually. (See Chapter 2, "Basic Copying
Features," in the Copying Guide.)
Collate the copies in page order. (See Chapter 2, "Basic Copying Features," in the
Copying Guide.)
Scan another original while the machine is printing a previous job. (See Chapter 1,
"Introduction to Copying," in the Copying Guide.)
Interrupt a reserved or current job in order to make higher priority copies. (See Chapter
1, "Introduction to Copying," in the Copying Guide.)
■ Special Features Screen
The screen below appears when you press [Special Features] on the control panel
(Special Features screen). You can set the following copy modes from this screen:
4-2
Overview of Copying Operations
[Two-Page Separation]: This mode enables you to copy facing pages of an opened book
onto separate copy sheets. (See Chapter 3, "Special Copying Features," in the Copying
Guide.)
[Margin]: Select to create margins along the sides of a copy sheet. (See Chapter 3,
"Special Copying Features," in the Copying Guide.)
[Frame Erase]: Eliminates dark border areas and lines that appear around original
images or shadows from punched holes. (See Chapter 3, "Special Copying Features," in
the Copying Guide.)
[Image Combination]: Automatically reduce two or four originals to fit onto a single copy
sheet. (See Chapter 3, "Special Copying Features," in the Copying Guide.)
[Different Size Originals]: Make copies by feeding different size originals together in one
group, by placing them in the feeder. (See Chapter 3, "Special Copying Features," in the
Copying Guide.)
The screen below appears when you press [Additional Functions] (Additional Functions
menu). You can customize the following settings from this menu:
Store settings, such as image quality and copy ratio as the Standard Settings. (See
Chapter 4, "Customizing Settings," in the Copying Guide.)
Make copies of original images reproduced with a sharper or softer contrast. (See
Chapter 4, "Customizing Settings," in the Copying Guide.)
Assign the most frequently used copy functions to Shortcut keys. (See Chapter 4,
"Customizing Settings," in the Copying Guide.)
Overview of Copying Operations
4-3
4
Copying - Basic Operations
■ Additional Functions Menu
Copy Operations
This section describes the flow of basic copy operations. Understanding the flow of
copy operations is useful to learn the machine's basic features, and how to find
more information in the Copying Guide.
NOTE
For the following items:
- Main power and the Energy Saver mode, see Chapter 1, "Before You Start Using This
Machine," in the Reference Guide.
- Routine maintenance, see Chapter 6, "Routine Maintenance," in the Reference Guide.
If the platen glass is dirty, the output quality may deteriorate. Always keep the platen
glass clean. (See Chapter 6, "Routine Maintenance," in the Reference Guide.)
Do not touch the platen glass cover while copying. Moving the cover can distort the
image being copied.
If large amounts of documents are stored in memory, you may not be able to make a
copy. If the message <MEMORY FULL> appears on the LCD display while making a
copy, print the received documents that are stored in memory, or wait until the current
document transmission completes, and try copying again.
Copying - Basic Operations
4
COPY
1
Press [COPY] to display the Copy Basic Features screen.
● If the message <ENTER DEPARTMENT ID AND PASSWORD>
appears:
ID
❑ Enter the Department ID and password ➞ press [ID].
The Copy Basic Features screen appears.
4-4
Copy Operations
NOTE
For instructions on using Department ID Management, see Chapter 5, "System
Manager Settings," in the Reference Guide.
Place your original.
You can place your original both vertically and horizontally in the feeder or on the
platen glass.
4
For instructions on placing your original, see "Placing Originals," on p. 2-2.
Copying - Basic Operations
2
Display
Contras
t
Collate
Special
Feature
s
COPY
FAX
NOTE
LTR originals can be placed either vertically or horizontally. However, the scanning
speed for horizontally placed originals is somewhat slower than for vertically placed
originals. You can place originals horizontally when scanning with a Preset Zoom,
such as when enlarging LTR to 11" x 17" .
Horizontally placed LTR originals are referred to as LTR .
11" x 17" and LGL originals must be placed horizontally.
If AUTO SORT is set to '1 ON' from the Additional Functions menu, the Collate
mode is automatically set when the original is placed in the feeder. (See Chapter 4,
"Customizing Settings," in the Copying Guide.)
Copy Operations
4-5
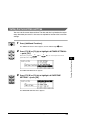
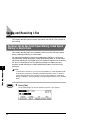
3
Set the desired copy mode on the Copy Basic Features
screen.
NOTE
On the Copy Basic Features screen, you can select the copy ratio, paper size, and
copy exposure and image quality settings.
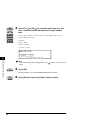
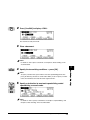
4
Copying - Basic Operations
4
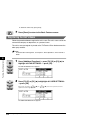
Set the desired copy modes on the Special Features screen.
❑ Press [Special Features].
Special Features
❑ Press the function keys under the modes that appear on the LCD display, and
which correspond to the copy modes you want to set.
NOTE
On the Special Features screen, you can select the following copy modes:
Two-Page Separation, Margin, Frame Erase, and Image Combination.
For instructions on setting each copy mode from the Special Features screen, see
Chapter 3, "Special Copying Features," in the Copying Guide.
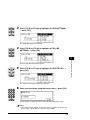
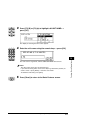
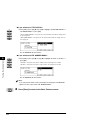
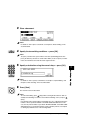
5
Enter the copy quantity.
For instructions on setting the number of copies, see Chapter 2, "Basic Copying
Features," in the Copying Guide.
4-6
Copy Operations
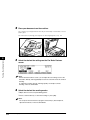
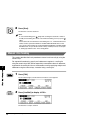
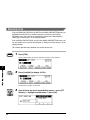
Start
6
Press [Start].
If the following screen is displayed, follow the instructions that appear on the
LCD display ➞ press
(Start) once for each original. When scanning is
complete, press
(OK).
Copying starts.
NOTE
If there is a current job, the machine scans the original, and waits to print it. Printing
starts when the current job is complete.
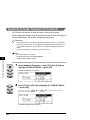
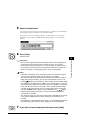
7
If you want to stop, interrupt, or copy another original during
a copy job, follow the instruction below.
● If you want to stop a copy job while scanning:
Stop
❑ Press [Stop].
The display for selecting whether to cancel copying or not appears.
F3
❑ Press [F3] (YES).
Scanning is canceled.
Copy Operations
4-7
4
Copying - Basic Operations
IMPORTANT
While copying, you cannot change copy mode settings, such as the copy quantity,
paper size, and copy ratio.
● If you want to cancel a copy job in the standby mode:
❑ Press [Stop].
Stop
The display for selecting a copy job to cancel appears.
❑ Press [F2] (▼) or [F3] (▲) to select the copy job you want to cancel ➞ press
F2
[F4] (CANCEL).
F3
The selected job is canceled.
F4
NOTE
After pressing
(Stop), several copies may continue to print out.
You can also cancel a copy job from the System Monitor screen. (See Chapter 1,
"Introduction to Copying," in the Copying Guide.)
Copying - Basic Operations
4
● If you want to interrupt a copy job:
❑ To interrupt a copy job when you need to make priority copies, press [Interrupt].
Interrupt
For instructions on interrupting a copy job, see Chapter 1, "Introduction to
Copying," in the Copying Guide.
The message <ABLE TO PERFORM INTERRUPT JOB> appears on the LCD
display.
● If you want to reserve a copy job and scan an original while the
machine is printing:
❑ Place your original ➞ press [Start].
Start
For instructions on reserving a copy job, see Chapter 1, "Introduction to
Copying," in the Copying Guide.
ID
8
When scanning is complete, remove your original.
9
If you have set Department ID Management, press [ID].
For instructions on using Department ID Management, see Chapter 5, "System
Manager Settings," in the Reference Guide.
4-8
Copy Operations
More Information
For detailed information on all copying functions, see the Copying Guide.
Copying - Basic Operations
4
Copy Operations
4-9
Copying - Basic Operations
4
4-10
Copy Operations
Faxing - Basic Operations
5
CHAPTER
This chapter describes the overview of the fax functions, how to set up the machine, and the
flow of fax operations.
Overview of Fax Operations . . . . . . . . . . . . . . . . . . . . . . . . . . . . . . . . . . . . . . . . . . . . . . . 5-2
Setting Up the Machine for Fax Operation . . . . . . . . . . . . . . . . . . . . . . . . . . . . . . . . . . . . 5-4
Connecting the Telephone Line . . . . . . . . . . . . . . . . . . . . . . . . . . . . . . . . . . . . . . . . . . . . . . . . . .5-4
Setting the Current Date and Time. . . . . . . . . . . . . . . . . . . . . . . . . . . . . . . . . . . . . . . . . . . . . . . .5-5
Registering the Required Sender Information . . . . . . . . . . . . . . . . . . . . . . . . . . . . . . . . . 5-7
Registering The Machine's Fax Number . . . . . . . . . . . . . . . . . . . . . . . . . . . . . . . . . . . . . . . . . . .5-8
Registering the Unit's Name. . . . . . . . . . . . . . . . . . . . . . . . . . . . . . . . . . . . . . . . . . . . . . . . . . . .5-10
Registering the Sender Information (TX Terminal ID). . . . . . . . . . . . . . . . . . . . . . . . . . . . . . . . .5-12
Fax Sending Operations . . . . . . . . . . . . . . . . . . . . . . . . . . . . . . . . . . . . . . . . . . . . . . . . . 5-15
More Information . . . . . . . . . . . . . . . . . . . . . . . . . . . . . . . . . . . . . . . . . . . . . . . . . . . . . . . . . . . .5-18
5-1
Overview of Fax Operations
This section provides an overview of the fax functions of this machine.
■ Various Fax Features
When sending, you can set the document resolution, image quality and contrast suitable
to the original. (See Chapter 3, "Basic Sending," in the Facsimile Guide.)
You can select from Book, Memory, or Direct Sending.
(See Chapter 3, "Basic Sending," in the Facsimile Guide.)
You can set the timer to automatically send a fax at a specified time. (See Chapter 4,
"Additional Sending Features," in the Facsimile Guide.)
You can perform several jobs without waiting for the current job to be finished. For
example, you can print a received document while sending a document stored in the
memory.
Faxing - Basic Operations
5
■ Easy to Use
You can store up to 63 numbers for one-touch speed dialing, enabling you to send a fax
by pressing a single key. You can also store 137 numbers for coded speed dialing, by
designating a three-digit code for each of them. Multiple one-touch and coded speed
dialing entries can be registered in a group. Additionally, you can quickly find a fax
number by entering the destination's name you have registered. (See Chapter 2, "Speed
Dialing," in the Facsimile Guide.)
You can register an access code from two to five digits to represent a fax number. (See
Chapter 2, "Speed Dialing," in the Facsimile Guide.)
You can register a frequently used setting to a program one-touch key so you can
automatically perform a routine procedure with the press of a single key. (See Chapter
10, "Special Fax Features," in the Facsimile Guide.)
■ Fax/Telephone Information Services
A range of fax/telephone information services, including business and tourism related
services, can be easily accessed. (See Chapter 10, "Special Fax Features," in the
Facsimile Guide.)
■ Efficient and Confidential Transactions
Memory Box features (confidential, relay, polling and transfer boxes) enable you to make
efficient and confidential transactions. (See Chapter 6, "Memory Features," in the
Facsimile Guide.)
By specifying the ITU-T subaddress and password, you can perform a highly confidential
transaction. (See Chapter 4, "Additional Sending Features," in the Facsimile Guide.)
5-2
Overview of Fax Operations
■ Monitoring Transactions and Checking Settings
You can check a list of documents being sent or waiting to be sent by simply pressing
[Monitor]. (See Chapter 3, "Basic Sending," in the Facsimile Guide.)
You can print various kinds of reports. (See Chapter 11, "Printing Reports and Lists," in
the Facsimile Guide.)
■ Fax Transmissions over Internet (Network Model Only)
If you have the Network Model, you can send and receive documents to/from an e-mail
address. Sent documents are attached to the e-mail as image files. This enables the
receiving party to view the contents of the documents on their computer monitor. (See the
Sending Guide.)
Faxing - Basic Operations
5
Overview of Fax Operations
5-3
Setting Up the Machine for Fax Operations
After installation, you need to set up the machine to use the fax function. If the
connection or registered information is not correct, the machine will not function
properly.
Connecting the Telephone Line
Before turning the power ON, connect the telephone line to the machine.
1
Faxing - Basic Operations
5
Connect one end of the telephone line to the line jack marked
.
Line Jack
2
5-4
Connect the other end of the telephone line to your wall
telephone jack.
Setting Up the Machine for Fax Operations
Setting the Current Date and Time
You must set the current date and time. The date and time is printed on the top of
every document you send. It is also used as required for functions that have timer
settings.
1
Press [Additional Functions].
The Additional Functions menu appears, and the indicator light
F3
2
F4
Press [F3] (▼) or [F4] (▲) to highlight <05 TIMER SETTINGS>
➞ press [OK].
F3
Each time you press
(▼) or
option becomes highlighted.
OK
blinks.
F4
(▲), the next or previous menu
5
Faxing - Basic Operations
Additional Functions
The TIMER SETTINGS menu appears.
F3
F4
3
Press [F3] (▼) or [F4] (▲) to highlight <01 DATE/TIME
SETTING> ➞ press [OK].
OK
The DATE/TIME SETTING menu appears.
Setting Up the Machine for Fax Operations
5-5
4
F2
F3
@.
ABC
1
2
3
GHI
JKL
MNO
4
5
6
PRS
TUV
WXY
7
8
9
OPER
SYMBOLS
DEF
Press [F2] ( ) or [F3] ( ) to select the month, day, year, and
time ➞ enter the current date and time using the numeric
keys.
Enter the date, and time in 24-hour notation, with four digits and no space.
Enter two digits for the year.
Examples:
0
May 6 ➞ 0506
7:05 a.m. ➞ 0705
11:18 p.m. ➞ 2318
Faxing - Basic Operations
5
NOTE
If you make a mistake when entering values, press
values.
OK
5
C
(Clear) ➞ enter the correct
Press [OK].
The date and time is set, and the TIMER SETTINGS menu returns.
Reset
5-6
6
Press [Reset] to return to the Basic Features screen.
Setting Up the Machine for Fax Operations
Registering the Required Sender Information
According to recent amendments to the FCC (Federal Communications
Commission) rules governing the use of facsimile equipment in the United States,
the following sender information must be printed on every facsimile transmission.
Your fax number
Your personal name or company's name
Date and time of transmission
The sender information you register is printed as shown below.
If the TX TERMINAL ID is set to 'OUTSIDE IMAGE':
Date and Time Fax Number
02/03/2003 10:07
FAX 111 2222
Unit's Name or
Sender's Name
JOHN
Page Number/ Total
Number of Pages
001/001
If the TX TERMINAL ID is set to 'INSIDE IMAGE':
Date and Time Fax Number
02/03/2003 10:07
FAX 111 2222
Unit's Name or
Sender's Name
JOHN
Page Number/ Total
Number of Pages
001/001
NOTE
If there are unregistered items, only the registered items and the page number are
printed on the documents.
Registering the Required Sender Information
5-7
5
Faxing - Basic Operations
After your fax is received, the other party knows immediately where it came from
because your sender information is printed at the top of every page you send.
■ Date and Time
Date and time of the transmission.
■ Fax Number
Your fax number.
■ Unit's Name or Sender's Name
Select a unit's name or a sender's name by pressing [TTI Selector] before scanning a
document for sending.
■ Page Number/Total Number of Pages
The page number of the document out of the total number of pages.
Registering the Machine's Fax Number
Follow the procedure below to register the number of your machine.
Faxing - Basic Operations
5
Additional Functions
1
Press [Additional Functions].
The ADDITIONAL FUNCTIONS menu appears.
F3
F4
2
Press [F3] (▼) or [F4] (▲) to highlight <03 FAX SETTINGS> ➞
press [OK].
F3
OK
Each time you press
(▼) or
option becomes highlighted.
The FAX SETTINGS menu appears.
5-8
Registering the Required Sender Information
F4
(▲), the next or previous menu
3
F3
F4
Press [F3] (▼) or [F4] (▲) to highlight <01 USER SETTINGS>
➞ press [OK].
OK
The USER SETTINGS menu appears.
4
F3
F4
Press [F3] (▼) or [F4] (▲) to highlight <01 TEL LINE
SETTINGS> ➞ press [OK].
OK
The TEL LINE SETTINGS menu appears.
5
F3
F3
F4
F4
Press [F3] (▼) or [F4] (▲) to highlight <01 USER TEL NO.> ➞
press [OK].
OK
OK
The display for entering your fax number appears.
@.
ABC
DEF
1
2
3
GHI
JKL
MNO
4
5
6
PRS
TUV
WXY
7
8
9
OPER
SYMBOLS
6
Enter your fax number using the numeric keys ➞ press [OK].
0
OK
Your fax number is registered, and the TEL LINE SETTINGS menu returns.
NOTE
If you entered a wrong number, use the cursor keys to go back to the position you
want to correct ➞ press [Delete] ➞ enter the correct number.
Registering the Required Sender Information
5-9
Faxing - Basic Operations
5
To delete the entire entry, press [Clear].
7
Reset
Press [Reset] to return to the Basic Features screen.
Registering the Unit's Name
Follow the procedure below to register the unit's name. The unit's name can be the
name of the company or department, or a personal name.
The unit's name you register is printed as the TX Terminal ID on the document the
other party receives.
NOTE
For details about entering letters, see Chapter 2, "Basic Operations," in the Reference
Guide.
Faxing - Basic Operations
5
Additional Functions
1
F3
Press [Additional Functions] ➞ press [F3] (▼) or [F4] (▲) to
highlight <03 FAX SETTINGS> ➞ press [OK].
The FAX SETTINGS menu appears.
F4
OK
F3
F4
2
Press [F3] (▼) or [F4] (▲) to highlight <01 USER SETTINGS>
➞ press [OK].
F3
OK
Each time you press
(▼) or
option becomes highlighted.
The USER SETTINGS menu appears.
5-10
Registering the Required Sender Information
F4
(▲), the next or previous menu
3
F3
F4
Press [F3] (▼) or [F4] (▲) to highlight <02 UNIT NAME> ➞
press [OK].
OK
The display for entering the unit's name appears.
@.
ABC
1
2
3
GHI
JKL
MNO
DEF
4
5
6
PRS
TUV
WXY
7
8
9
OPER
SYMBOLS
4
Enter the unit's name using the numeric keys ➞ press [OK].
0
The unit's name is registered, and the USER SETTINGS menu returns.
NOTE
The unit's name can be up to 24 characters long.
If you entered a wrong letter, use the cursor keys to go back to the position you
want to correct ➞ press [Delete] ➞ enter the correct letter.
To delete the entire entry, press [Clear].
Reset
5
Press [Reset] to return to the Basic Features screen.
Registering the Required Sender Information
5-11
Faxing - Basic Operations
5
OK
Registering the Sender Information (TX Terminal ID)
The TX Terminal ID tells the recipient the sender's name and fax number.
Follow the procedure below to select the position where the TX Terminal ID appears
on the recording paper, and to select a Telephone Number Mark.
IMPORTANT
• In the United States, the TX Terminal ID must be printed on the top of every page the
other party receives. Please see "Registering the Required Sender Information" on p.
5-7 for details on FCC rules governing the use of facsimile equipment in the United
States.
• If you do not specify these settings, you cannot send a fax.
NOTE
The default settings are as follows:
- TX Terminal ID position: '01 OUTSIDE IMAGE'
- Telephone Number Mark: '01 FAX'
Faxing - Basic Operations
5
Additional Functions
1
Press [Additional Functions] ➞ press [F3] (▼) or [F4] (▲) to
highlight <03 FAX SETTINGS> ➞ press [OK].
F3
The FAX SETTINGS menu appears.
F4
OK
F3
F4
2
Press [F3] (▼) or [F4] (▲) to highlight <01 USER SETTINGS>
➞ press [OK].
F3
OK
Each time you press
(▼) or
option becomes highlighted.
The USER SETTINGS menu appears.
5-12
Registering the Required Sender Information
F4
(▲), the next or previous menu
F3
3
F4
Press [F3] (▼) or [F4] (▲) to highlight <04 TX TERMINAL ID> ➞
press [OK].
OK
The TX TERMINAL ID menu appears.
F3
4
F4
Press [F3] (▼) or [F4] (▲) to highlight the transmission type ➞
press [OK].
OK
The transmission type settings menu appears.
NOTE
The I-Fax function is only available in the Network Model of this machine.
F3
F4
5
Press [F3] (▼) or [F4] (▲) to highlight <01 TTI POSITON> or
<02 TEL NUMBER MARK>.
Registering the Required Sender Information
5-13
Faxing - Basic Operations
5
● If you selected <01 TTI POSITION>:
❑ Press [OK] ➞ press [F3] (▼) or [F4] (▲) to highlight <01 OUTSIDE IMAGE> or
OK
<02 INSIDE IMAGE> ➞ press [OK].
F3
<01 OUTSIDE IMAGE>: This prints the TX Terminal ID outside the image area
on the output fax.
F4
OK
<02 INSIDE IMAGE>: This prints the TX Terminal ID inside the image area on
the output fax.
The TX TERMINAL ID menu returns.
● If you selected <02 TEL NUMBER MARK>:
Faxing - Basic Operations
5
❑ Press [OK] ➞ press [F3] (▼) or [F4] (▲) to highlight <01 FAX> or <02 TEL> ➞
OK
press [OK].
F3
<01 FAX>: This prints the letters <FAX> before the telephone number.
F4
<02 TEL>: This prints the letters <TEL> before the telephone number.
OK
The TX TERMINAL ID menu returns.
NOTE
If you selected <02 I-FAX> in step 4, the display for selecting the TTI POSITION
appears. You also cannot select <TEL NUMBER MARK>.
Reset
5-14
6
Press [Reset] to return to the Basic Features screen.
Registering the Required Sender Information
Fax Sending Operations
This section describes the flow of basic fax sending operations.
NOTE
For the following items:
- Main power and the Energy Saver mode, see Chapter 1, "Before You Start Using this
Machine," in the Reference Guide.
- Routine maintenance, see Chapter 9, "Maintenance," in this manual, or Chapter 6,
"Routine Maintenance," in the Reference Guide.
1
5
Press [FAX] to enter the Fax Basic Features screen.
Faxing - Basic Operations
FAX
● If the message <ENTER DEPARTMENT ID AND PASSWORD>
appears:
ID
❑ Enter the Department ID and password ➞ press [ID].
The Fax Basic Features screen appears.
NOTE
For instructions on using Department ID Management, see Chapter 5, "System
Manager Settings," in the Reference Guide.
Fax Sending Operations
5-15
2
Place your documents on the machine.
You can place your original either vertically or horizontally in the feeder or on the
platen glass.
For instructions on placing your original, see "Placing Originals," on p. 2-2.
Display
Collate
5
Faxing - Basic Operations
3
Special
Contras
t
Features
COPY
FAX
Select the desired fax settings on the Fax Basic Features
screen.
NOTE
On the Fax Basic Features screen, you can adjust the scan settings, such as the
Resolution, Density, and Image Quality. You can also select the sheet size for Book
Sending.
To adjust the resolution, density, and image quality, see Chapter 3, "Basic
Sending," in the Facsimile Guide.
4
Select the desired fax sending modes.
❑ Open all three one-touch speed dialing panels.
❑ Press a Fax function key ➞ select their settings ➞ press [OK].
NOTE
You can preset the fax functions to program one-touch keys. (See Chapter 10,
"Special Fax Features," in the Facsimile Guide.
5-16
Fax Sending Operations
5
Specify the destination.
For instructions on how to specify a destination, see Chapter 2, "Speed Dialing,"
and Chapter 3, "Basic Sending," in the Facsimile Guide.
If you want to set other sending conditions, set them before you specify the
destination. (See Chapter 4, "Additional Sending Features," in the Facsimile
Guide.)
6
Press [Start].
Scanning starts.
5
IMPORTANT
The size of the original is detected automatically. However, if the output paper in
the machine at the receiving end does not match the size of your scanned
document, the machine reduces the size of your document, or separates it into
several pages to match the paper size loaded in the recipient's fax machine. For
details, see Chapter 5, "Receiving Documents," in the Facsimile Guide.
NOTE
If prior jobs are being processed, the machine returns to the Fax Basic Features
screen, and your document will be sent once the jobs are complete.
The machine usually sends documents through memory transmission (sends an
image after storing it in memory). You can also send documents one by one, by
pressing
(Direct TX). (See Chapter 3, "Basic Sending," in the Facsimile Guide.)
The machine has enough memory (16 MB) to store up to 100 pages* of sent and
received documents (fewer if the document contains many graphics or particularly
dense text). *Based on the use of ITU-T No.1 chart, using the standard settings.
If the memory becomes full while you are scanning a document for sending, the
message <MEMORY FULL> appears on the LCD display. Press
(OK) so
that the paper remaining in the feeder can be put out. All the pages you were
scanning will be cancelled.
The number of pages you can store into memory differs depending on the amount
of free memory remaining in the machine and the type of document you are
scanning.
Press [Monitor] to check the transmission result, or cancel sending the documents
stored in memory. (See Chapter 3, "Basic Sending," in the Facsimile Guide.)
Stop
7
If you want to cancel sending the document, press [Stop].
Fax Sending Operations
5-17
Faxing - Basic Operations
Start
ID
8
When scanning is complete, remove your document.
9
If you have set Department ID Management, press [ID].
For instructions on using Department ID Management, see Chapter 5, "System
Manager Settings," in the Reference Guide.
More Information
For detailed information on all fax functions, see the Facsimile Guide.
Faxing - Basic Operations
5
5-18
Fax Sending Operations
Printer/Fax Driver Software
6
CHAPTER
This chapter briefly describes the PCL printer driver and fax driver software.
Introduction . . . . . . . . . . . . . . . . . . . . . . . . . . . . . . . . . . . . . . . . . . . . . . . . . . . . . . . . . . . . 6-2
System Requirements . . . . . . . . . . . . . . . . . . . . . . . . . . . . . . . . . . . . . . . . . . . . . . . . . . . 6-3
Installing the Software . . . . . . . . . . . . . . . . . . . . . . . . . . . . . . . . . . . . . . . . . . . . . . . . . . . 6-4
More Infomation . . . . . . . . . . . . . . . . . . . . . . . . . . . . . . . . . . . . . . . . . . . . . . . . . . . . . . . . . . . . . .6-4
6-1
Introduction
The Canon PCL5e and PCL6 printer drivers and fax driver give users of Microsoft
Windows 95, Windows 98, Windows Millennium Edition, Windows NT Version 4.0,
Windows 2000, or Windows XP (hereafter called Windows 95/98/Me/NT 4.0/2000/
XP) operating systems the ability to make full use of the printer. The printer drivers
enable you to print documents from any Windows application to your printer using
Hewlett-Packard's PCL5e or PCL6 data format.
In Windows 95/98/Me/NT 4.0/2000/XP environments, you can use both printer
drivers. The PCL6 printer driver is recommended for printing image data. The
PCL5e printer driver is recommended for printing text data.
NOTE
The printer function is only available in the Network Model of this machine.
Printer/Fax Driver Software
6
6-2
Introduction
System Requirements
The printer and fax drivers for Windows 95/98/Me/NT 4.0/2000/XP can be used in
the following system environments.
■ Software
Microsoft Windows 95, Microsoft Windows 98, Microsoft Windows Me, Microsoft Windows
NT 4.0, Microsoft Windows 2000, or Microsoft Windows XP.
■ Computer
Any computer on which Microsoft Windows 95, Microsoft Windows 98, Microsoft Windows
Me, Microsoft Windows NT 4.0, Microsoft Windows 2000, or Microsoft Windows XP runs
properly.
Printer/Fax Driver Software
6
System Requirements
6-3
Installing the Software
The Set-Up Sheet for Networking and Printing explains the standard installation procedures
for the printer and fax drivers. For detailed information on different installation procedures,
see the PCL Driver Guide and/or Fax Driver Guide.
More Infomation
For detailed information on all features of the printer driver and fax driver software, see
the PCL Driver Guide and Fax Driver Guide with Cover Sheet Editor, respectively.
Printer/Fax Driver Software
6
6-4
Installing the Software
I-Fax - Basic Operations
7
CHAPTER
This chapter describes the overview of the I-Fax functions, setting up the machine, and
sending and receiving I-Fax.
Overview of the I-Fax Functions . . . . . . . . . . . . . . . . . . . . . . . . . . . . . . . . . . . . . . . . . . . . 7-2
Setting Up the Machine for Using I-Fax . . . . . . . . . . . . . . . . . . . . . . . . . . . . . . . . . . . . . . 7-3
Sendig and Receiving I-Fax . . . . . . . . . . . . . . . . . . . . . . . . . . . . . . . . . . . . . . . . . . . . . . . 7-4
Sending I-Fax by One-Touch Speed Dialing, Coded Speed Dialing, or Access Code . . . . . . . .7-4
Manual I-Fax Sending . . . . . . . . . . . . . . . . . . . . . . . . . . . . . . . . . . . . . . . . . . . . . . . . . . . . . . . . .7-6
Receiving I-Fax. . . . . . . . . . . . . . . . . . . . . . . . . . . . . . . . . . . . . . . . . . . . . . . . . . . . . . . . . . . . . . .7-8
More Information . . . . . . . . . . . . . . . . . . . . . . . . . . . . . . . . . . . . . . . . . . . . . . . . . . . . . . . . . . . . .7-9
7-1
Overview of the I-Fax Functions
I-Fax (Internet Facsimile) enables you to transmit and receive a scanned original
document converted to TIFF (Tag Image File Format) image data or PDF (Portable
Document Format) as an attachment of an e-mail, to/from any facsimile with I-Fax
capability or any personal computer with e-mail through the Internet. I-Fax has two
transmission modes: the Simple Mode and the E-Mail Mode.
■ Simple Mode
In the Simple Mode, a scanned original document is converted to TIFF (MH) image data.
Size of the converted image data is limited to LTR, and its resolution is fixed to 200 x 200
dpi or 100 x 200 dpi, adhering to the common I-Fax standard. The image format, image
size, and resolution are restricted in the Simple Mode.
To exchange image data with other facsimiles with I-Fax capability, select the <SIMPLE
MODE> when specifying the transmission mode. (In case it is between imageCLASS
2300 with I-Fax, you can exchange image data, except for PDF in the 'E-Mail Mode'). You
can also exchange image data with personal computers with e-mail.
7
I-Fax - Basic Operations
■ E-Mail Mode
In the E-Mail Mode, a scanned original document is converted to PDF, TIFF (MMR
(Modified Modified Read)), TIFF (MR (Modified Read)) or TIFF (MH (Modified Huffman))
image data. To select an image data format, see Chapter 4, "Checking Settings and
Registering Destinations," in the Sending Guide.
If you select 'E-Mail Mode' as the transmission mode, you can exchange image data with
personal computers with e-mail.
To specify a transmission mode, see Chapter 3, "Setting Up a Mail Account," and Chapter
4, "Checking Settings and Registering Destinations," in the Sending Guide. You can
specify a transmission mode in two ways: by registering one-touch speed dialing/coded
speed dialing, or specifying the mail user settings. The transmission mode specified by
registering one-touch speed dialing/coded speed dialing has higher priority.
Furthermore, I-Fax enables you to:
Select POP3 or SMTP as a reception protocol.
Set the machine to check mail periodically.
Set the timer to transmit I-Fax, up to five times a day for time setting. Settings for the
same day every week is also possible.
Upload image data to an FTP server.
NOTE
The I-Fax function is only available in the Network Model of this machine.
7-2
Overview of the I-Fax Functions
Setting Up the Machine for Using I-Fax
Before using I-Fax, it is necessary to specify the following settings from the
machine's control panel.
1. Network Settings
2. Mail Transmission/Reception Settings
3. Registering mail addresses in one-touch speed dialing and coded speed dialing.
■ Network Settings
Specify the machine's parameters in the network. To transmit/receive data using I-Fax on
the network, specify settings for the TCP/IP communication protocol. (See Chapter 2,
"Setting the Network,"in the Sending Guide.)
■ Mail Transmission/Reception Settings
■ Registering Mail Addresses in the One-Touch/Coded Speed Dialing
Register mail addresses, so that you can transmit mail with I-Fax by specifying the
destinations with one-touch/coded speed dialing or access code. You can also register the
transmission start time, transmission mode, etc., as well as the mail addresses in each
one-touch or coded speed dial address. (See Chapter 4, "Checking Settings and
Registering Destinations," in the Sending Guide.)
Setting Up the Machine for Using I-Fax
7-3
7
I-Fax - Basic Operations
Specify settings of a subject, message text, signature, etc. for each registered mail
address. Also, specify items related to e-mail transmission and reception. (See Chapter 3,
"Setting Up a Mail Account," in the Sending Guide.) For values of the network settings,
contact a network administrator.
Sendig and Receiving I-Fax
This section describes how to transmit and receive mail with the I-Fax functions of
the machine.
Sending I-Fax by One-Touch Speed Dialing, Coded Speed
Dialing, or Access Code
This section describes the basic procedure to transmit mail by one-touch speed
dialing, coded speed dialing, or access code.
For sequential broadcasting, specify mail addresses to register in a mailing list
using one-touch speed dialing keys, coded speed dialing codes, or access codes.
Mail will be sequentially transmitted to the mail addresses registered in the mailing
list. You can also broadcast mail by specifying multiple mail addresses using
one-touch speed dialing keys or coded speed dialing codes, instead of using a
mailing list.
7
I-Fax - Basic Operations
NOTE
If a transmission start time is set in one-touch speed dialing or coded speed dialing with
the destination specified, the mail will be transmitted at that preset time. For details on
setting a delayed transmission start time for one-touch speed dialing or coded speed
dialing, see Chapter 4, "Checking Settings and Registering Destinations," in the Sending
Guide.
FAX
1
Press [FAX].
The fax indicator lights up, and the Fax Basic Features screen appears.
7-4
Sendig and Receiving I-Fax
Line/Mail
2
Press [Line/Mail] to display <I-FAX>.
The machine is ready to transmit.
3
Place a document.
NOTE
For details on how to place a document, see Chapter 3, "Basic Sending," in the
Facsimile Guide.
4
7
Specify the transmitting conditions ➞ press [OK].
NOTE
To specify a sender name, open all three one-touch speed dialing panels, then
press [TTI Selector] and select a sender name. When you do not specify a sender
name, the mail will be sent under the name registered in '01'.
01
63
5
Specify a destination by one-touch speed dialing, coded
speed dialing, or access code.
Coded
Dial
NOTE
For details on how to specify a destination, see Chapter 2, "Speed Dialing," and
Chapter 3, "Basic Sending," in the Facsimile Guide.
Sendig and Receiving I-Fax
7-5
I-Fax - Basic Operations
OK
6
Start
Press [Start].
The machine scans the document.
NOTE
To cancel transmitting, press
(Stop) while scanning the document or while on
standby for transmitting. You cannot cancel while transmitting, even if you press
(Stop).
If the machine fails to transmit due to transmitting error, etc., it will retransmit for the
number of times specified in RETRY of the MAIL USER SETTING menu. In this
case, the retry interval will be as specified in RETRY INTERVAL of the MAIL USER
SETTING menu. For specification details of Retry and Retry Interval, see Chapter
3, "Setting Up a Mail Account," in the Sendig Guide.
Manual I-Fax Sending
This section describes the basic procedure to transmit mail manually by using the
numeric keys.
For sequential broadcasting, specify mail addresses to register in a mailing list
using the numeric keys. Mail will be sequentially transmitted to the mail addresses
registered in the mailing list. You can also broadcast mail by specifying multiple mail
addresses using the numeric keys, instead of using a mailing list.
I-Fax - Basic Operations
7
1
FAX
Press [FAX].
The fax indicator lights, and the Fax Basic Features screen appears.
Line/Mail
2
Press [Line/Mail] to display <I-FAX>.
The machine is ready to transmit.
7-6
Sendig and Receiving I-Fax
3
Place a document.
NOTE
For details on how to place a document, see Chapter 3, "Basic Sending," in the
Facsimile Guide.
4
OK
Specify the transmitting conditions ➞ press [OK].
NOTE
To specify a sender name, open all three one-touch speed dialing panels, then
press [TTI Selector] and select a sender name. When you do not specify a sender
name, the mail will be sent under the name registered in '01'.
ABC
1
2
3
GHI
JKL
MNO
DEF
4
5
6
PRS
TUV
WXY
7
8
9
OPER
SYMBOLS
5
Specify a destination using the numeric keys ➞ press [OK].
7
0
OK
NOTE
For details on how to specify a destination, see Chapter 2, "Speed Dialing," and
Chapter 3, "Basic Sending," in the Facsimile Guide.
Start
6
Press [Start].
The machine scans the document.
NOTE
To cancel transmitting, press
(Stop) while scanning the document or while on
standby for transmitting. You cannot cancel while transmitting, even if you press
(Stop).
If the machine fails to transmit due to transmitting error, etc., it will retransmit for the
number of times specified in RETRY of the MAIL USER SETTING menu. In this
case, the retry interval will be as specified in RETRY INTERVAL of the MAIL USER
SETTING menu. For specification details of Retry and Retry Interval, see Chapter
3, "Setting Up a Mail Account," in the Sending Guide.
Sendig and Receiving I-Fax
7-7
I-Fax - Basic Operations
@.
Receiving I-Fax
If you set EMAIL RX PROTOCOL to SMTP on the MAIL USER SETTING menu, or
set EMAIL RX PROTOCOL to POP3 and specify an interval in the CHECK
INTERVAL menu, the machine will automatically receive mail. (See Chapter 3,
"Setting Up a Mail Account," in the Sending Guide.)
If you set EMAIL RX PROTOCOL to POP3 in the MAIL USER SETTING menu, you
can also receive mail manually. (See Chapter 3, "Setting Up a Mail Account," in the
Sending Guide.)
This section describes the procedure to manually receive mail.
1
FAX
Press [FAX].
The fax indicator lights up, and the Fax Basic Features screen appears.
I-Fax - Basic Operations
7
Line/Mail
2
Press [Line/Mail] to display <I-FAX>.
The machine is ready to receive mail.
TTI Selector
OK
7-8
3
Open all three one-touch speed dialing panels ➞ press [TTI
Selector] ➞ highlight a sender name ➞ press [OK].
Sendig and Receiving I-Fax
NOTE
If you do not specify a sender name, the machine will receive mail transmitted to
the mail address of the sender registered in '01'.
4
Press [Start].
The machine receives mail.
NOTE
To cancel receiving mail, press
(Stop). When "CANCEL DURING TX/RX?" is
displayed, press
(OK).
If data size of the transmitted mail is larger than that specified at MAX. RX DATA
SIZE of the MAIL USER SETTING menu, the machine will not receive that mail,
and skips to the next mail. (See Chapter 3, "Setting Up a Mail Account," in the
Sending Guide.)
More Information
For detailed information on all I-Fax functions, see the Sending Guide.
I-Fax - Basic Operations
7
Sendig and Receiving I-Fax
7-9
I-Fax - Basic Operations
7
7-10
Sendig and Receiving I-Fax
Printing - Basic Operations
8
CHAPTER
This chapter describes the features and basic operations of the printer.
Features of the Printer . . . . . . . . . . . . . . . . . . . . . . . . . . . . . . . . . . . . . . . . . . . . . . . . . . . 8-2
Connecting to a Computer . . . . . . . . . . . . . . . . . . . . . . . . . . . . . . . . . . . . . . . . . . . . . . . . 8-4
Connecting to a Network . . . . . . . . . . . . . . . . . . . . . . . . . . . . . . . . . . . . . . . . . . . . . . . . . . . . . . .8-4
Connecting through a Parallel Interface. . . . . . . . . . . . . . . . . . . . . . . . . . . . . . . . . . . . . . . . . . . .8-5
Connecting through a USB Interface . . . . . . . . . . . . . . . . . . . . . . . . . . . . . . . . . . . . . . . . . . . . . .8-5
Printing a Document . . . . . . . . . . . . . . . . . . . . . . . . . . . . . . . . . . . . . . . . . . . . . . . . . . . . . 8-6
Canceling a Print Job . . . . . . . . . . . . . . . . . . . . . . . . . . . . . . . . . . . . . . . . . . . . . . . . . . . . 8-7
8-1
Features of the Printer
Your printer offers fast printing speed, superior print quality, sophisticated paper
handling, and ecology and energy sensitive features. The printer also supports
network printing. The printer function is only available in the Network Model of this
machine.
■ Superior Print Quality
Printing-Basic Operations
High resolution printing at 600 dpi (dots per inch) is further enhanced by Automatic Image
Refinement to smooth jagged edges along with the use of super fine toner. Combined,
these will ensure superior reproduction quality of text and graphics.
■ Software Compatibility
The printer supports Hewlett-Packard's PCL 5e and PCL6 printer languages, which
enables the printer to work with a wide variety of software applications supporting PCL.
■ Memory Saving Technology
Memory Reduction Technology accomplishes 600 dpi printing with only 8 MB of memory
for letter printing. Complex page data is compressed to optimize available resources.
8
■ Paper Handling
Each paper drawer holds 250 sheets of paper while the Stack Bypass holds about 100
sheets of standard paper. The Stack Bypass can hold a variety of media for automatic
feeding and operate as a manual feed station.
■ Energy Saving
The on-demand fusing technology of the printer provides improved energy efficiency.
Because of this power saving feature, the printer meets the guidelines for the International
Energy Star Program.
■ Interface Features
The printer has a standard IEEE-1284 compatible parallel interface, which supports ECP
and Compatible/Nibble protocols. It also supports Microsoft's Plug & Play technology. The
printer also has a USB port for easy connection to a personal computer or other USB
devices. This printer also features a 10Base-T/100Base-TX port to enable network
printing.
8-2
Features of the Printer
■ Typefaces
The printer comes with 45 scalable typefaces in 14 typeface families (Agfa 45 MicroType
fonts) and 32 additional TrueType fonts (barcode and OCR fonts), all compatible with
application software supporting Microsoft Windows. In addition, 9 bitmapped typefaces of
the Line Printer family are also included. The printer uses the Universal Font Scaling
Technology (UFST) for outline fonts, provided under license from Agfa-Gevaert Japan,
Ltd. Also supplied with the printer are the TrueType screen fonts for 96 font solution and
Canon Font Manager for easy management of installed fonts in Microsoft® Windows® 95/
98/Me/2000/XP and Windows NT version 4.0. A list of typeface samples is provided in
Chapter 5, "Apendix," in the PCL Printer Guide.
■ Printer drivers and Utilities
■ Remote UI Support
The printer supports a Remote UI (User Interface) function that allows you to monitor the
status of the printer or change the printer settings from a personal computer. (See
Chapter 1, "Using the Remote UI," in the Remote UI Guide.)
Printing-Basic Operations
The printer comes with PCL printer drivers for Microsoft Windows 95/98/Me, Windows
2000/XP, and Windows NT 4.0. This allows you to control most printer settings from the
Windows driver screens.
8
Features of the Printer
8-3
Connecting to a Computer
Connect the machine to a computer or network using an interface cable supporting
bidirectional communication or a 100Base-TX or 10Base-T Ethernet cable.
Printing-Basic Operations
IMPORTANT
To avoid risk of a shock hazard, turn OFF the main power switch located on the right side
of the machine and unplug the power cord from the power outlet, before connecting an
interface cable or network cable. (See Chapter 1, "Before You Start Using This Machine,"
in the Reference Guide.)
NOTE
This machine is not supplied with an interface cable or a network cable. Please
purchase the cable to match your computer or network.
For how to connect the interface or network cable to the machine, see the Set-Up Sheet
for Networking and Printing.
Connecting to a Network
8
This machine has a built-in print server that is compatible with TCP/IP to allow use
as a network printer for UNIX and Windows. The print server is supplied with a
100Base-TX/10Base-T port, therefore you can simply connect it to a LAN.
You need a LAN cable and hub to connect the machine to your network.
NOTE
The print server of this machine is compatible with a NetWare® network. For details,
contact your service representative.
The print server of this machine automatically detects the connected 100Base-TX or
10Base-T interface.
After connecting the network cable, perform the following setups. For details of each
setup, consult the corresponding manual.
- Installing the printer driver. (See Chapter1, "Before You Start Using This Machine," in
the PCL Printer Guide.)
- Date/time setting and system management setting. (See Chapter 3, "Selecting and
Storing Settings," and Chapter 5, "System Manager Settings," in the Reference Guide.)
- Print server and network settings. (See Chapter 2, "Using a TCP/IP Network (Windows/
UNIX)," in the Network Guide.)
8-4
Connecting to a Computer
Connecting through a Parallel Interface
This machine can connect to a computer through a parallel interface. After
connection, install the supplied printer driver and utility software to match the OS of
your computer.
For installing the printer driver and utility software, see Chapter1, "Before You Start
Using This Machine," in the PCL Printer Guide.
IMPORTANT
If you have connected a computer to the parallel port of this machine, some utility
software cannot be used. For details, contact your service representative.
Connecting through a USB Interface
This machine can connect to a computer through a USB interface. After
connection, install the supplied printer driver and utility software to match the OS of
your computer.
For installing the printer driver and utility software, see Chapter1, "Before You Start
Using This Machine," in the PCL Printer Guide.
IMPORTANT
If you have connected a computer to the USB port of this machine, some utility software
cannot be used. For details, contact your service representative.
Connecting to a Computer
8-5
Printing-Basic Operations
C
8
Printing a Document
To print a document, follow the procedure below.
1
Printing-Basic Operations
2
In the application, with the document open, select [Print] to
print your document.
In the [Print] dialog box, select your printer from [Name], and
then click the [Properties] button.
The [Properties] dialog box opens.
3
Specify the various print settings in the [Properties] dialog
box. To switch between sheets, click the tabs for the [Page
Setup], [Finishing], [Paper Source], and [Quality] sheets.
You can also specify the various print settings by selecting a profile.
8
NOTE
For more information on using the print options, see Chapter 3, "Using the Print
Option," in the PCL Driver Guide, or the online Help.
4
5
After specifying all the print settings, click the [OK] button in
the [Properties] dialog box.
Click the [OK] button in the [Print] dialog box.
The document is printed under the settings you specified.
8-6
Printing a Document
Canceling a Print Job
After you cancel a print job from your software application, the printer may still have
data remaining in the printer memory. Follow the procedure below to cancel a print
job from the printer control panel.
1
Cancel the print job with your software application. For
details, refer to your software application user's guide.
If you do not take care to stop the flow of data from the host computer, the printer
will continue to print out any data it receives after <READY> has appeared.
PRINT
2
Press [PRINT].
The indicator of the key lights up.
Printing-Basic Operations
NOTE
You can also cancel print jobs from the Remote UI. For details, see Chapter 2, "Remote
UI Functions," in the Remote UI Guide.
8
OK
BACK
F4
3
4
Press [OK] to take the printer offline.
Press [BACK] ➞ [F4] (ENTER) to cancel the print job being
processed.
The print job is canceled, and the message <READY> appears on the display.
Canceling a Print Job
8-7
Printing-Basic Operations
8
8-8
Canceling a Print Job
Maintenance
9
CHAPTER
This chapter describes how to replace the toner cartridge and perform routine cleaning.
Replacing the Toner Cartridge . . . . . . . . . . . . . . . . . . . . . . . . . . . . . . . . . . . . . . . . . . . . . 9-2
Routine Cleaning . . . . . . . . . . . . . . . . . . . . . . . . . . . . . . . . . . . . . . . . . . . . . . . . . . . . . . 9-10
Platen Glass and Cover . . . . . . . . . . . . . . . . . . . . . . . . . . . . . . . . . . . . . . . . . . . . . . . . . . . . . . .9-10
Feeder Cleaning. . . . . . . . . . . . . . . . . . . . . . . . . . . . . . . . . . . . . . . . . . . . . . . . . . . . . . . . . . . . .9-11
Roller Cleaning . . . . . . . . . . . . . . . . . . . . . . . . . . . . . . . . . . . . . . . . . . . . . . . . . . . . . . . . . . . . . .9-15
More Information . . . . . . . . . . . . . . . . . . . . . . . . . . . . . . . . . . . . . . . . . . . . . . . . . . . . . . . . . . . .9-17
9-1
Replacing the Toner Cartridge
When the machine runs out of toner, the alarm lamp blinks and the message
<REPLACE CARTRIDGE> appears on the display. When this happens, remove the
toner cartridge from the machine and slowly shake it sideways to redistribute toner.
Reinstall the toner cartridge in the machine and print out a test page. If the error
message still appears, replace the toner cartridge.
WARNING
Maintenance
Do not burn or throw used toner cartridges into open flames, as they may cause
the toner remaining inside the cartridges to ignite, resulting in burns or a fire.
IMPORTANT
Use only the toner cartridge recommended for use with this machine.
Replace the toner cartridge after the message <REPLACE CARTRIDGE> is displayed.
Do not expose the toner cartridge to direct sunlight or strong light.
Do not leave the left cover open for a long time after the toner cartridge is installed.
9
NOTE
After the message <REPLACE CARTRIDGE> appears, approximately 150 prints can still
be made. However, since this number may vary depending upon the original, it is
recommended to replace the toner cartridge soon after the <REPLACE CARTRIDGE>
message appears.
If the toner runs out during a print job, the machine will start printing the remaining pages
automatically after you replace the toner cartridge.
A copy/print job will not stop until it is completed, but some fading might occur on the
printout as the toner cartridge becomes empty. If you set <TONER SUPPLY LOW> to '01
RX TO MEMORY', the fax job stops. If you set it to '02 KEEP PRINTING', the fax job
continues, but the printout will be faint or illegible.
9-2
Replacing the Toner Cartridge
Open the stack bypass.
2
Pull out the left cover of the stack bypass.
Maintenance
1
9
CAUTION
Grasp the handle and pull out the left cover horizontally to the left.
(Be careful not to pull it upward as it may easily come off.)
Replacing the Toner Cartridge
9-3
3
Cut the protective bag of the new toner cartridge with
scissors, and remove it from the bag.
Maintenance
4
While gripping the handles (marked with blue) of the toner
cartridge, pull it out horizontally.
9
IMPORTANT
Use only the toner cartridge recommended for use with this machine.
9-4
Replacing the Toner Cartridge
When handling the toner cartridge, hold it by the handles with the triangle facing up
as shown in the illustration below. Do not hold the toner cartridge vertically or
upside down.
Do not discard the protective bag for the toner cartridge. You will need it later to
store the cartridge temporarily when the machine needs servicing.
Hold the new toner cartridge with both hands and gently
shake it sideways a several times, and then back and forth b
several times, to distribute the toner evenly inside the
cartridge.
2
Maintenance
5
1
9
1
Replacing the Toner Cartridge
9-5
6
Place the toner cartridge on a flat stable surface, and hold the
cartridge with one hand while removing the seal by pulling it
out with the other hand.
Seal
Maintenance
IMPORTANT
Do not stop pulling the seal until it is removed completely from the toner cartridge
because the toner may scatter and printing quality may deteriorate.
Pulling the seal upwards or downwards may break the seal. If the seal breaks
inside the toner cartridge and cannot be removed completely, the toner cartridge
may not be used.
Throw away the seal after removing it from the toner cartridge.
7
9
Remove the tape that holds the orange protective cover, and
pull the two release tabs on the cover to detach it from the
toner cartridge.
Tabs
Protective cover
9-6
Replacing the Toner Cartridge
CAUTION
When removing the protective cover, be careful not to touch the toothed
wheels on the covered side of the toner cartridge, as this may result in
personal injury.
Toothed wheel
Maintenance
IMPORTANT
Do not reattach the protective cover on the toner cartridge, as this may damage the
drum inside the cartridge.
Be careful not to touch the blue-green drum inside the toner cartridge.
9
Drum
Replacing the Toner Cartridge
9-7
8
While holding the toner cartridge with both hands, align both
sides of the cartridge with the guiding grooves on the
machine and insert the cartridge horizontally as far as it will
go.
1
IMPORTANT
Be careful not to touch the blue-green drum inside the toner cartridge, as this may
damage the drum.
Maintenance
9
Close the left cover of the stack bypass.
9
CAUTION
When closing the left cover, be careful not to get your fingers caught, as
this may result in personal injury.
Close the left cover until it latches. If the cover is not fully closed, the
printout might come out lighter.
9-8
Replacing the Toner Cartridge
10 Close the stack bypass.
CAUTION
When closing the stack bypass, be careful not to get your fingers caught,
as this may result in personal injury.
Maintenance
IMPORTANT
Be sure to clean the roller every time you replace the toner cartridge. (See "Roller
Cleaning," on p. 9-15.)
9
Replacing the Toner Cartridge
9-9
Routine Cleaning
If the original is not copied clearly, clean the following parts of the machine. For high
quality output, we recommend cleaning these parts once a month.
Platen Glass
Underside of the Feeder
Feeder Scanning Area
Roller
WARNING
Maintenance
When cleaning the machine, first turn OFF the main power switch and
disconnect the power cord. Failure to do so may result in a fire or electrical
shock.
Do not use alcohol, benzene, paint thinner, or other solvents for cleaning. Doing
so might result in plastic parts becoming deformed.
Disconnect the power cord from the power outlet regularly, and clean the area
around the base of the power plug's metal pins and the power outlet with a dry
cloth to ensure that all dust and grime is removed. If the power cord is
connected for along period of time in a damp, dusty, or smoky location, dust
can build up around the power plug and become damp. This may cause a short
circuit and result in a fire.
9
Platen Glass and Cover
Clean the platen glass and the platen glass cover by following the procedure below.
IMPORTANT
If the platen glass or the platen glass cover is dirty, the original may not be scanned
cleanly, or the size of the original may be detected incorrectly.
9-10
Routine Cleaning
1
Clean the platen glass and the platen glass cover with a cloth
dampened with water, and wipe them with a soft and dry cloth.
Feeder Cleaning
When scanning the original using the feeder, some streaked lines which do not
exist on the original may appear on the output.
Maintenance
If your originals have black streaks or appear dirty after copying them using the
feeder, this may be caused by pencil writing rubbing off the originals and onto the
roller. Perform this feeder cleaning procedure to clean the feeder scanning area,
film, and roller.
If such lines appear, the original scanning area of the feeder may be dirty.
9
RESORT PLAN
RESORT PLAN
The world’s coral reefs, where
brilliantly colored fish and a
myriad of other tropical creatures
come together. Aptly nicknamed
“Tropical Forests under the sea”,
these spots of breathtaking
beauty serve as home to
countless varieties of life, and to
us of the land, this alluring,
dream-like world forms a tropical
paradise filled with romance.
Follow the procedure described below to clean the original scanning area of the
feeder.
IMPORTANT
If the feeder scanning area is dirty, it may result in a paper jam or blemished print output.
Clean the roller while spinning it.
Routine Cleaning
9-11
1
2
Open the feeder cover.
Clean the rollers (total of two places), separator, and
transparent plastic plate inside the feeder cover, with a cloth
slightly dampened with water.
Maintenance
Rollers
9
Transparent
Plastic Plate
Separator
CAUTION
Do not dampen the cloth too much, as this may damage the original or
break the machine.
9-12
Routine Cleaning
3
Close the feeder cover.
CAUTION
When closing the feeder cover, be careful not to get your fingers caught,
as this may result in personal injury.
Open the feeder.
Maintenance
4
9
Routine Cleaning
9-13
5
Clean the feeder scanning area (platen glass) and the
document feeding roller, with a cloth dampened with water.
Document Feeding Roller
Scanning Area
CAUTION
Do not dampen the cloth too much, as this may damage the original or
break the machine.
Close the feeder.
Maintenance
6
9
CAUTION
When closing the feeder, be careful not to get your fingers caught, as this
may result in personal injury.
9-14
Routine Cleaning
Roller Cleaning
If a black streak appears on the output, the fixing roller in the main unit may be dirty.
In such a case, clean the roller. Also, it is necessary to clean the roller every time
you replace the toner cartridge.
First, print the cleaning paper using the machine, then perform the roller cleaning
using the cleaning paper.
Load LTR
paper in the paper drawer to clean the roller.
IMPORTANT
Cleaning paper can be printed only on LTR
paper.
NOTE
It takes about 2 1/2 minutes to clean the roller.
1
Press [Additional Functions].
The ADDITIONAL FUNCTIONS menu appears, and the indicator light
F3
2
F4
blinks.
Maintenance
Additional Functions
Press [F3] (▼) or [F4] (▲) to highlight <07 ADJUST / CLEAN>
➞ press [OK].
OK
9
The ADJUST / CLEAN menu appears.
F3
F4
3
Press [F3] (▼) or [F4] (▲) to highlight <01 ROLLER
CLEANING> ➞ press [OK].
OK
The ROLLER CLEANING menu appears.
Routine Cleaning
9-15
F3
4
F4
Press [F3] (▼) or [F4] (▲) to highlight <02 PRNT CLEANING
PAPR> ➞ press [OK].
OK
The cleaning paper is printed.
Maintenance
5
6
9
9-16
Open the stack bypass.
Load the cleaning paper with the side on which the letter "V"
is printed facing up.
Routine Cleaning
F3
F4
7
Repeat steps 1 to 3 ➞ press [F3] (▼) or [F4] (▲) to highlight
<01 START CLEANING> ➞ press [OK].
OK
The machine starts cleaning the roller.
NOTE
If a cleaning paper jam occurs, the alarm indicator blinks red. Press
remove the jammed cleaning paper.
Discard the cleaning paper after use.
(Stop) ➞
More Information
Maintenance
For more information on the routine maintenance of the machine, see Chapter 6,
"Routine Maintenance," in the Reference Guide.
9
Routine Cleaning
9-17
Maintenance
9
9-18
Routine Cleaning
Troubleshooting
10
CHAPTER
This chapter highlights any problems that may occur during the operation of the machine, and
solutions that may be helpful in fixing them.
List of Error Messages . . . . . . . . . . . . . . . . . . . . . . . . . . . . . . . . . . . . . . . . . . . . . . . . . . 10-2
Self-Diagnostic Display . . . . . . . . . . . . . . . . . . . . . . . . . . . . . . . . . . . . . . . . . . . . . . . . . . . . . . .10-2
When Problems Occur during Fax Operations . . . . . . . . . . . . . . . . . . . . . . . . . . . . . . . . 10-8
Sending Documents. . . . . . . . . . . . . . . . . . . . . . . . . . . . . . . . . . . . . . . . . . . . . . . . . . . . . . . . . .10-8
Receiving Documents . . . . . . . . . . . . . . . . . . . . . . . . . . . . . . . . . . . . . . . . . . . . . . . . . . . . . . .10-11
Other Problems . . . . . . . . . . . . . . . . . . . . . . . . . . . . . . . . . . . . . . . . . . . . . . . . . . . . . . . . . . . .10-13
When You Have Trouble Printing. . . . . . . . . . . . . . . . . . . . . . . . . . . . . . . . . . . . . . . . . . 10-14
Service Call Message. . . . . . . . . . . . . . . . . . . . . . . . . . . . . . . . . . . . . . . . . . . . . . . . . . 10-16
If You Cannot Solve the Problem . . . . . . . . . . . . . . . . . . . . . . . . . . . . . . . . . . . . . . . . . 10-17
10-1
List of Error Messages
Self-Diagnostic Display
The machine is equipped with the self-diagnostic function.
Self-diagnostic (error) messages appear on the display when:
Printing cannot be performed because of an operational error.
You need to make a judgement or take some action during scanning or printing.
The following is a list of self-diagnostic messages, along with possible causes and
remedies.
Troubleshooting
# ALREADY IN USE
Cause
You attempted to create a polling box, preset polling box, transfer box,
confidential box, or relay box, but that box is already created.
Remedy
Change your setting or choose another box.
AUTO REDIAL
10
Cause
You are waiting to redial because the party you dialed was engaged when you
used direct sending.
Remedy
In memory sending, no auto redial message appears.
CANNOT DELETE
Cause
You attempted to delete the box that contains a document.
Remedy
You cannot delete the box.
CHECK DOCUMENT
10-2
Cause
A paper jam may have occurred in the feeder.
Remedy
Remove the jammed document.
List of Error Messages
CHECK PRINTER
Cause
The machine is detecting an error in the printer area.
Remedy
Please contact your service representative.
CHECK PRINTER COVER
Cause
One or more covers are open.
Remedy
Close all the covers.
DATA ERROR
Cause
The machine may have trouble.
Remedy
Contact your service representative.
DOCUMENT SCAN ERROR
The machine detected an 11" x 17" original as LTR
because of its curl, and
the TX rotation is activated. This stops scanning. Another possibility is that a
paper jam occurred during scanning.
Remedy
Press [F4] (OK) ➞ set the original again.
Troubleshooting
Cause
DOCUMENT TOO LONG
Cause
You have tried to copy an original that is too long using the feeder.
Remedy
Scan it on the platen glass.
10
INSTALL CARTRIDGE
Cause
The toner cartridge is not installed.
Remedy
Install the toner cartridge.
LIMIT REACHED
Cause
Printing has been restricted.
Remedy
Set <RESTRICT PRINTING> from the DEPT. ID MANAGEMENT menu to
'OFF'. (See Chapter 5, "System Manager Settings," in the Reference Guide.)
List of Error Messages
10-3
LOAD THE APPROPRIATE SIZE PAPER
Cause
Although <AUTO PAPER> is selected when copying, appropriate size paper is
not set in the paper drawer or on the stack bypass.
Remedy
Select the paper size, or set the copy ratio.
If you press [Start] while this message is displayed, the paper with the smallest
margin is selected automatically and printing starts.
MEMORY FULL
Cause 1
The machine's memory is full of documents received in memory reception and
confidential reception.
Remedy
Print the original stored in memory.
Cause 2
The machine's memory is full of scanned documents.
Remedy
Divide the original into some stacks and scan them one by one.
Troubleshooting
NO TEL #
Cause
The telephone number you attempted to dial using one-touch speed dialing,
coded speed dialing, or group dialing was not registered.
Remedy
Register the telephone number before using it.
NOT AVAILABLE NOW
10
Cause 1
You pressed the coded speed dialing key that has already been registered,
while you perform group dial registration.
Remedy
Check the information registered under the coded speed dialing key before
using it.
Cause 2
You pressed the one-touch speed dialing key that has already been registered,
while you perform group dial registration.
Remedy
Check the information registered under the one-touch speed dialing key before
using it.
NOT FOUND, TRY AGAIN
10-4
Cause
You wish to change the settings of the polling box, preset polling box, transfer
box, confidential box, or relay box but no such box has been registered.
Remedy
Check the boxes once again.
List of Error Messages
OPEN THE FRONT COVER
Cause
A paper jam has occurred.
Remedy
Open the front cover, and follow the procedure described on the label inside the
cover to remove the jammed paper.
OUTPUT TRAY FULL
Cause
The output tray is full of paper.
Remedy
Remove the prints from the output tray.
PLEASE WAIT
Cause
This message is displayed when the main power is turned ON. Also, when the
machine is not ready to print, this display appears.
Remedy
Wait until the message disappears.
Cause
The paper loaded is a different size to the document stored in memory.
Remedy
If you do not mind printing the document on different size paper, select <YES>.
If not, select <NO> or press [Stop] ➞ replace the paper ➞ press [Start].
REC. PAPER JAM
Cause
An original jam or paper jam has occurred, preventing you from making prints.
Remedy
Remove paper from the machine following the guidance. If you open a cover
during printing, this message also appears. In such a case, open the cover
again and check if there is any jammed paper. If you find any, remove it, and
close the cover. Then the message disappears.
RECEIVED IN MAILBOX
Cause
A document was received in the confidential mailbox.
Remedy
Enter the subaddress and password of the confidential mailbox in which the
document was received, and print out the document stored in memory.
List of Error Messages
10-5
Troubleshooting
PRINT DIFFERENT PAPER SIZE
10
RECEIVED IN MEMORY
Cause
A document was received in memory because the toner or paper has run out.
Remedy
Replace the toner cartridge or replenish the paper, then print out the document
stored in memory.
REPLACE CARTRIDGE
Cause
The toner cartridge has run out of toner.
Remedy
Replace the toner cartridge. (See "Replacing the Toner Cartridge," on p. 9-2.)
START AGAIN
Cause 1
A transmission error occurred because the line condition was poor.
Remedy
Try again from the beginning.
Cause 2
The paper jammed or ran out during the printing of a report.
Remedy
Remove the jammed paper or replenish the paper. Then try again from the
beginning.
Troubleshooting
STOP KEY PRESSED/PRESS OK KEY
Cause
[Stop] has been pressed while scanning the original using the feeder.
Remedy
Press [OK] ➞ set the original again.
SYSTEM ERROR/E100
10
Cause
A malfunction has occurred in the machine.
Remedy
Please contact your service representative.
SUPPLY REC. PAPER
Cause
The paper drawer is out of paper, or not inserted correctly.
Remedy
Insert the paper drawer into the machine as far as it will go or load paper.
THERE IS PAPER ON PLATEN GLASS
10-6
Cause
A document that has already been sent or copied remains on the platen glass.
Remedy
Remove the document from the platen glass, and try again.
List of Error Messages
TRANSMITTING...
Cause 1
During the current transmission, your machine may have tried to send a
document identified from the list of documents in memory.
Remedy
Resend the document when transmission of the first document is complete.
Cause 2
You tried to send a document using direct sending while sending another
document from memory.
Remedy
Wait until the transmission from memory is complete. Then resend the
document using direct sending.
TX LIMIT REACHED
Cause
Sending has been restricted.
Remedy
Set <RESTRICT TX> from the DEPT. ID MANAGEMENT menu to 'OFF'. (See
Chapter 5, "System Manager Settings," in the Reference Guide.)
Cause
It is possible that the paper size detected automatically by the paper drawer
does not match the actual paper size. Another possibility is that the paper size
selected for the stack bypass in the USE STACK BYPASS menu does not
match the paper size actually set on the stack bypass.
Remedy
Make sure the actual paper size matches the selected paper size. Set the
correct paper size and open the front cover, then close it.
Troubleshooting
WRONG PAPER SIZE SETTING
10
List of Error Messages
10-7
When Problems Occur during Fax Operations
If an error occurs during fax operations, check the following points.
Sending Documents
Troubleshooting
You cannot send a document after dialing.
10
Cause 1
Is your machine set to the correct telephone line type (pulse or tone)?
Remedy
Check the telephone line type and set the machine to the correct type.
Cause 2
Is your machine in copy mode?
Remedy
Press [FAX] to light the FAX indicator.
Cause 3
Is the document set properly?
Remedy
Reset the document and try sending again.
Cause 4
Did you dial the right telephone number?
Remedy
Try dialing the number again. If the number is registered for one-touch or coded
speed dialing, check that the number is correct.
Cause 5
Is the other party's fax machine out of paper?
Remedy
Contact the other party to check whether their fax machine is out of paper.
Cause 6
Is the other party's line busy with sending, receiving, or a voice call?
Remedy
Contact your carrier to check whether the line is busy or not.
Memory fills up immediately when you try to send.
Cause 1
Are you sending with the resolution set to 'SUPER FINE' or 'ULTRA FINE', or
image quality set to 'PHOTO' or 'TEXT/PHOTO'?
Remedy 1 If your document does not contain fine text or photographs, set the resolution to
'STANDARD' and image quality to 'TEXT'.
Remedy 2 If your document contains fine text or photographs, send it directly rather than
using a memory transmission.
10-8
When Problems Occur during Fax Operations
Cause 2
Is a document occupying your memory space?
Remedy
Either print out any documents received in memory or wait until any documents
stored in memory for sending have been sent, then resend your document.
Documents are streaked with lines when they print on the other party's fax machine.
Cause
Is your machine's platen glass clean?
Remedy
Copy a document on your machine and see if the document is streaked or dirty.
If the copy is streaked, clean the scanning glass.
Your documents are printed out at a reduced size on the other party's fax machine.
Cause 1
Are your slide guides adjusted for the size of the document you are faxing?
Remedy
Adjust the guides to the size of the document you are faxing and resend.
Cause 2
Is the other party's paper smaller than the size of the document you sent?
Remedy
If the other party is using small-size paper, your machine automatically reduces
the size of the document in accordance with the other party's paper.
Cause
Is your document set in the correct direction?
Remedy
Set your document in the correct direction and resend.
Troubleshooting
Part of the document is cut off when the other party receives it.
The documents you sent are too light.
Cause 1
Is the density set to 'LIGHT'?
Remedy
Select 'DARK' for the 'DENSITY' setting.
Cause 2
Is the image quality set to 'PHOTO' or 'TEXT/PHOTO'?
Remedy
Select 'TEXT' for the 'IMAGEQUALITY' setting.
Cause 3
Is your machine's platen glass clean?
Remedy
Copy a document on your machine and see if the document is streaked or dirty.
If the copy is streaked, clean the platen glass.
10
When Problems Occur during Fax Operations
10-9
You cannot perform polling.
Cause
Is the polling box set?
Remedy
For polling to send, the polling box must first be set. Set the polling box and
resend the document.
Troubleshooting
You cannot perform confidential sending.
10
Cause 1
Has the other party set up a confidential mailbox in memory?
Remedy
Contact the other party and resend on confirmation that their confidential
mailbox is set.
Cause 2
Does the other party's fax machine support ITU-T subaddress/password
transactions?
Remedy
Contact the other party and check.
Cause 3
Did you specify the other party's subaddress or password correctly?
Remedy
Check the other party's registered subaddress or password and specify the
same number.
Cause 4
Did you make a mistake in the subaddress or password registered for one-touch
or coded speed dialing?
Remedy
Check your one-touch or coded speed dialing settings.
Cause 5
Is the memory of the other party's machine full?
Remedy
Contact the other party and check.
You cannot relay a document from another fax machine.
10-10
Cause 1
Has the other party set up a memory box for relay transmission?
Remedy
Contact the other party and resend on confirmation that they have set up a box
for relay transmission, and have registered destinations to relay to.
Cause 2
Does the other party's fax machine support ITU-T subaddress/password
transactions?
Remedy
Contact the other party and check.
Cause 3
Did you specify the other party's subaddress or password correctly?
Remedy
Check the other party's registered subaddress or password and specify the
same number.
When Problems Occur during Fax Operations
Cause 4
Did you make a mistake in the subaddress or password registered for one-touch
or coded speed dialing?
Remedy
Check your one-touch or coded speed dialing settings.
Cause 5
Is the memory of the other fax machine full?
Remedy
Contact the other party and check.
You cannot send a document with a subaddress/password.
Does the other party's fax machine support ITU-T subaddress/password
transactions?
Remedy
Contact the other party and check.
Cause 2
Did you specify the other party's subaddress or password correctly?
Remedy
Check the other party's registered subaddress or password and specify the
same number.
Cause 3
Did you make a mistake in the subaddress or password registered for one-touch
or coded speed dialing?
Remedy
Check your one-touch or coded speed dialing settings.
Cause 4
Is the memory of the other party's machine full?
Remedy
Contact the other party and check.
Troubleshooting
Cause 1
Receiving Documents
10
Part of the documents you receive are cut off.
Cause 1
Are the slide guides in your stack bypass set to the size of the paper?
Remedy
Set the guides in the stack bypass to the size of the paper.
Cause 2
Have you specified the correct stack bypass paper size?
Remedy
Specify the correct stack bypass paper size.
Cause 3
Is the ROTATE PRINT mode set to 'OFF'?
Remedy
Set the ROTATE PRINT mode to 'ON'.
When Problems Occur during Fax Operations
10-11
The documents you received are of poor quality.
Cause 1
Is your toner cartridge running low on toner?
Remedy
Remove your toner cartridge and gently tilt it from side to side five or six times
to redistribute the remaining toner. If this does not solve the problem, replace
with a new toner cartridge.
Cause 2
Is the platen glass of the other party's fax machine clean?
Remedy
Copy a document on your machine. If the document is clean, the problem lies
with the sender's fax machine. Contact the sender, and ask them to clean their
fax machine.
Your machine switches to memory substitution reception even though paper is present.
Cause
Are the setting options to select the DRAWER ELIGIBLTY correct?
Remedy
Correct the fax reception options for selecting the DRAWER ELIGIBLTY.
Troubleshooting
You cannot receive a confidential document in your confidential mailbox.
Cause 1
Is a confidential mailbox set?
Remedy
Check your confidential mailbox settings.
Cause 2
Did the other party specify the correct subaddress and password for your
confidential mailbox?
Remedy
Contact the other party and check.
You cannot perform polling.
10
10-12
Cause 1
Did you specify the other party's subaddress or password correctly?
Remedy
Check the other party's registered subaddress or password and specify the
same number.
Cause 2
Is the other party's fax machine set to automatic reception?
Remedy
Contact the other party and check.
Cause 3
Is a document set on the other party's machine?
Remedy
Contact the other party and check.
When Problems Occur during Fax Operations
Other Problems
Sending and receiving of documents is too slow.
Cause 1
Is the resolution set to 'FINE', 'SUPER FINE', or 'ULTRA FINE'?
Remedy
Setting the resolution to 'STANDARD' reduces the sending time. However, any
fine text in the document will also be harder to read.
Cause 2
Is the picture quality set to 'PHOTO' or 'TEXT/PHOTO'?
Remedy
Press [F3] (IMAGEQUALITY) to select 'TEXT'.
Cause 3
Is ECM (Error Correction Mode) set to 'ON'?
Remedy
Because ECM corrects errors during a transmission, any problems on the line
can mean that the transmission will take extra time. Set ECM to 'OFF'.
Cause 1
Is your machine set to the tone dialing type of the telephone line?
Remedy
Press [Tone] to set the dialing type to 'TONE'.
Cause 2
Were there any instructions from the other party, such as to set to receive?
Remedy
Just before receiving, press [Start].
You cannot perform transactions using memory boxes.
Cause
Did you specify the other party's subaddress or password correctly?
Remedy
Specify a different subaddress for each memory box.
When Problems Occur during Fax Operations
Troubleshooting
You cannot get documents from information services.
10
10-13
When You Have Trouble Printing
If your printer is unable to print or you have problems with the printer or print quality,
use this map to find the appropriate page for help.
Yes
Printer is
unable to print
To the right
No
Yes
Troubleshooting
Layout
problems
(See the PCL Driver Guide.)
Fonts are replaced.
(See the PCL Driver Guide.)
The printer settings in the application software do not match the layout.
No
(See the manual for the application software.)
Yes
10
The media setting does not match the layout.
Print quality
problems
No
Print results are changed because of a memory
(Contact your service representative.)
shortage.
An incorrect media type is loaded.
(See the Reference Guide.)
The toner cartridge is almost out of toner.
(See the Reference Guide.)
Other problems
See Chapter 4, "Troubleshooting," in the PCL Printer Guide.
10-14
When You Have Trouble Printing
Yes
The Printer
does not
work
The printer is not online.
(See Chapter 2, "Using the Printer," in the PCL Printer Guide.)
The printer is not turned on.
(See the Reference Guide.)
The cable is not connected properly.
(See "Connecting to a Computer." on p. 8-4.)
No
<SUPPLY REC. PAPER> is displayed.
Yes
(See the Reference Guide.)
Error code or
message displayed
<REC. PAPER JAM> is displayed.
(See the Reference Guide.)
<REPLACE TONER> is displayed.
(See the Reference Guide.)
No
Troubleshooting
From the left
Other error code or message is displayed.
(See Chapter 4, "Troubleshooting," in the PCL Printer Guide.)
Job indicator
remains lit
Yes
The data from a previous job still remains and
the printer cannot print the next job.
10
(See "Canceling a Print Job," on p. 8-7.)
No
The printer is processing data
Please wait.
When You Have Trouble Printing
10-15
Service Call Message
If a malfunction occurs to the machine, service call messages appear on the
display.
WARNING
Do not connect or disconnect the power cord with wet hands, as this may result
in electrical shock.
CAUTION
Always grasp the power plug when disconnecting the power cord. Pulling on
the power cord may expose or snap the core wire, or otherwise damage the
power cord. If the power cord is damaged, this could cause current to leak,
resulting in a fire or electrical shock.
IMPORTANT
Troubleshooting
If you turn OFF the main power when there is any queued job, its data will be deleted.
10
10-16
Service Call Message
If You Cannot Solve the Problem
If you have a problem with your machine that you cannot solve with the information
provided in this chapter, contact your service representative.
If you contact your service representative, make sure you have the following
information ready:
Product name: imageCLASS 2300
Serial number (located on the label at the back of the machine)
Details of the problem
Steps taken to try to resolve the problem and the results
CAUTION
If the machine makes strange noises, emits smoke or strange smells, unplug it
immediately and contact your service representative. Do not attempt to
disassemble or repair the machine yourself.
Troubleshooting
IMPORTANT
Attempting to repair the machine yourself may void the limited warranty.
10
If You Cannot Solve the Problem
10-17
Troubleshooting
10
10-18
If You Cannot Solve the Problem
Appendix
11
CHAPTER
Machine Specifications . . . . . . . . . . . . . . . . . . . . . . . . . . . . . . . . . . . . . . . . . . . . . . . . . . 11-2
Main Unit . . . . . . . . . . . . . . . . . . . . . . . . . . . . . . . . . . . . . . . . . . . . . . . . . . . . . . . . . . . . . . . . . .11-2
Feeder . . . . . . . . . . . . . . . . . . . . . . . . . . . . . . . . . . . . . . . . . . . . . . . . . . . . . . . . . . . . . . . . . . . .11-4
Fax Specifications. . . . . . . . . . . . . . . . . . . . . . . . . . . . . . . . . . . . . . . . . . . . . . . . . . . . . . 11-5
Printer Specifications . . . . . . . . . . . . . . . . . . . . . . . . . . . . . . . . . . . . . . . . . . . . . . . . . . . 11-6
Controller Specifications . . . . . . . . . . . . . . . . . . . . . . . . . . . . . . . . . . . . . . . . . . . . . . . . . . . . . .11-6
Software Specifications . . . . . . . . . . . . . . . . . . . . . . . . . . . . . . . . . . . . . . . . . . . . . . . . . . . . . . .11-6
Interface Specifications. . . . . . . . . . . . . . . . . . . . . . . . . . . . . . . . . . . . . . . . . . . . . . . . . . 11-7
Parallel Interface (Centronics Compliant) . . . . . . . . . . . . . . . . . . . . . . . . . . . . . . . . . . . . . . . . .11-7
Index . . . . . . . . . . . . . . . . . . . . . . . . . . . . . . . . . . . . . . . . . . . . . . . . . . . . . . . . . . . . . . . . 11-8
11-1
Machine Specifications
Specifications are subject to change without notice for product improvement or
future release.
Main Unit
Item
Canon imageCLASS 2300
Type
Desktop
Platen
Stationary
Photoconductive Material
OPC
Copying System
Indirect electrostatic copying
Developing System
One component dry jumping exposure
Fixing System
Heat Roller Fusing
Resolution
Reading
600 dpi x 600 dpi
Writing
approx. 1200 dpi x 600 dpi
Printing
approx. 2400 dpi x 600 dpi
Number of Tones
256
Acceptable Paper Stock
Paper drawer
16 to 24 lb bond (60 to 90 g/m2)
Plain, Colored paper, Recycled paper
Stack bypass
16 to 32 lb bond (60 to 128 g/m2)
Plain, Heavy, Colored paper, Recycled,
Transparency, Labels, Envelopes
Appendix
11
11-2
Specifications
Name
Acceptable Originals
Sheet, Books, three dimensional objects (Up to approx. 2 kg)
Maximum Original Size
11 5/8" x 17" (297 mm x 432 mm)
Paper Sizes
Paper drawer: 11" x 17" , LGL , LTR , LTR , STMT
Stack bypass: 11" x 17" , LGL , LTR , LTR , STMT ,
STMT , Free-size (4" x 5 3/4" to 11 5/8" x 17" (100 mm x
148 mm to 297 mm x 432 mm)), Envelopes (COM10, DL,
Monarch)
Margin Areas
Leading edge:
Left and right side:
Trailing edge:
Machine Specifications
1/8"
1/8"
1/8"
1/16" (3.0
1/16" (3.0
1/16" (3.0
2.0 mm)
2.0 mm)
2.0 mm)
Item
Specifications
Warm-Up Time
When main power is turned ON: approx. 30 seconds
Activation time from Energy Saver mode:
Power Consumption at Energy Saver mode: <LOW>:
approx. 30 seconds
Power Consumption at Energy Saver mode: <HIGH>:
approx. 10 seconds
*Activation time may vary depending on the conditions under
which the machine is used. (In all cases, at a room
temperature of 68˚F (20˚C).)
First Copy Time
Platen glass selected: 8.3 seconds (LTR
drawer 1)
Copy Speed
Direct
Reduction
Enlargement
, direct, paper
11" x 17"
9 cpm
LGL
10 cpm
LTR
20 cpm
LTR
16 cpm
STMT
20 cpm
LGL
➞ LTR
16 cpm
(78%)
11" x 17"
➞ LGL
(73%)
10 cpm
11" x 17"
➞ LTR
(64%)
16 cpm
LGL
➞ 11" x 17"
(121%)
9 cpm
LTR
➞ 11" x 17"
(129%)
9 cpm
STMT
➞ 11" x 17"
(200%)
9 cpm
Paper Feeding System
Direct
1:1 ( 0.5%)
Reduction
1:0.78 (LGL ➞ LTR)
1:0.73 (11" x 17" ➞ LGL)
1:0.64 (11" x 17" ➞ LTR)
1:0.50 (11" x 17" ➞ STMT)
Appendix
Except when paper is fed from the stack bypass.
Magnification
Enlargement
1:1.21 (LGL ➞ 11" x 17")
1:1.29 (LTR ➞ 11" x 17")
1:2.00 (STMT ➞ 11" x 17")
11
Paper drawer: 250 sheets x 2 drawers (20 lb bond (80 g/m2))
Stack bypass: 100 sheets (LTR , LTR , STMT ,
STMT , 20 lb bond (80 g/m2))
50 sheets (LGL ,11" x 17 , 20 lb bond
(80 g/m2))
50 sheets (Transparencies, Heavy weight
paper, 24 to 32 lb bond (90 to 128 g/m2))
10 envelopes
1 sheet (Labels)
Machine Specifications
11-3
Item
Specifications
Exposure Control
Automatic or manual exposure control
Multiple Copies
99 sheets maximum
Power Source
120 V AC
Max Power Consumption
940W max.
Dimensions (H x W x D)
29 2/5" x 24 1/4" x 24 3/4" (747 mm x 615 mm x 631 mm)
Installation Space (W x D)
33 1/2 x 24 3/4" (852 mm x 631 mm)
(Dimensions of stack bypass tray is given for extended
condition.)
Weight
Approx. 109 lb (49.5 kg)
10% (50/60 Hz)
Feeder
Item
Specifications
Type
Automatic Document Feeder
Originals
Original supply tray: 11" x 17"
, LGL
, LTR
, LTR
Appendix
Original Paper Weights 10 to 32 lb bond (37 to 128 g/m2) (One-page scanning for 10 to
14 lb bond (37 to 51 g/m2) and 28 to 32 lb bond (105 to 128 g/
m2))
Original Tray Capacity
11"x 17" , LGL : 25 sheets (20 lb bond (80 g/m2))
LTR , LTR , STMT : 50 sheets (20 lb bond (80 g/m2))
Original Replacement
Speed
20 sheets/minute (LTR
Power Source
From main unit
Power Consumption
Maximum 30W
)
Dimensions (H x W x D) 4 3/4" x 23 1/4" x 19" (122 mm x 592 mm x 484 mm)
11
Weight
11-4
Machine Specifications
Approx. 16 lb (7.1 kg)
Fax Specifications
The following are the principal specifications of the fax functions of this machine.
Specifications are subject to change without notice for product improvement or
future releases.
Item
Name
Specifications
Canon Super G3 Fax Board
Sending Sizes or Original Sizes 11" x 17" to STMT
Transmission Time
Approx. 3 sec./page* (V. 34 33.6 Kbps + ECM - MMR)
(Based on Canon FAX standard chart No. 1, standard
mode)
Fax Scanning Line Density
(Scanning and Transmission)
STANDARD: 200 x 100 dpi
FINE: 200 x 200 dpi
SUPER FINE: 200 x 400 dpi
ULTRA FINE: 400 x 400 dpi
Applicable Telephone Line
Subscriber telephone circuit (PSTN)
Autodial Function
200 numbers
* Approximately 3 seconds per page for transmission time based on Canon FAX standard Chart No. 1 (ECM-MMR,
Standard Mode) at 33.6 Kbps modem speed. The Public Switched Telephone Network (PSTN) currently supports
28.8 Kbps modem speed or lower, depending on the telephone line conditions.
Appendix
Paper Sizes or Recording Sizes 11" x 17" to STMT
11
Fax Specifications
11-5
Printer Specifications
This section lists the specifications for the printer.
Controller Specifications
CPU
Power PC405 (200 MHz)
Memory (RAM)
8MB
Host interface
One parallel connector (Centronics compliant/ bidirectional)
One USB connector (V 1.1)
Two expansion board slots
RAM socket
1
ROM socket
2
Software Specifications
Printer Languages PCL® 5e, 6 emulation
Appendix
Resident Fonts
45 scalable fonts and 8 bitmap fonts
Effective Printable Reduced to 1/5" (5 mm) (3/8" (10 mm) for envelopes) each from top,
Area
bottom, right and left edges.
11
11-6
Printer Specifications
Interface Specifications
This section lists the specifications for the parallel interface and printer cable that
should be used with the printer.
Parallel Interface (Centronics Compliant)
■ Location of signal lines and pins
Signal
Pin number
Signal
1
STROBE
19
GND (STROBE)
2
DATA0
20
GND (DATA0)
3
DATA1
21
GND (DATA1)
4
DATA2
22
GND (DATA2)
5
DATA3
23
GND (DATA3)
6
DATA4
24
GND (DATA4)
7
DATA5
25
GND (DATA5)
8
DATA6
26
GND (DATA6)
9
DATA7
27
GND (DATA7)
10
ACK
28
GND (PERROR, SELECT, ACK)
11
BUSY
29
GND (BUSY, FAULT)
12
PERROR
30
GND (AUTOFD, SELECT IN, INIT)
13
SELECT
31
INIT
14
AUTOFD
32
FAULT
15
AUXOUT1
33
AUXOUT2
16
Logic GND
34
AUXOUT3
17
Chassis GND
35
AUXOUT4
18
Peripheral Logic High
36
SELECT IN
18
1
36
19
Appendix
Pin number
11
Interface Specifications
11-7
Index
Symbols
Copy operations, 4-4
+ key, 1-11
Cursor keys, 1-11
Numerics
D
10Base-T/100Base-TX Port, 1-7
Date and time, setting, 5-5
Copy shortcut keys, 1-10
Delayed transmission, 7-4
Delayed Transmission key, 1-11
A
Delete key, 1-11
Additional Functions key, 1-10, 4-3
Additional Functions menu, 4-3
Advanced Communication key, 1-11
Alarm lamp, 1-10
Appendix
Automatic Image Refinement, 8-2
Department ID, 4-4, 5-15
Direct TX indicator, 1-10
Direct TX key, 1-10
Directory key, 1-9
Display Contrast dial, 1-9
E
B
BACK key, 1-10
Energy Saver key, 1-9
Energy Saver mode, 4-4, 5-15
Error messages, 10-2
11
External view, 1-7
C
Canceling a print job, 8-7
Centronics, 11-7
Clear key, 1-9, 1-11
Coded Dial key, 1-9
Collate key, 1-10
Connecting telephone line, 5-4
Connecting to network, 8-4
Control panel, 1-7
Copy Basic Features screen, 4-2
COPY key, 1-9
11-8
Index
F
FAX key, 1-9
Fax sending operations, 5-15
Features of the printer, 8-2
Feeder, 1-7, 2-2, 2-6
Font Manager, 8-3
Front cover, 1-8
FTP server, 7-2
Function keys, 1-10
H
Modified Read (MR), 7-2
Monitor key, 1-9
Hook key, 1-9
Horizontal placement, 2-3
N
I
Network Model, 1-5, 7-2
ID key, 1-10
Numeric keys, 1-9
Network settings, 7-3
If you cannot solve a problem, 10-17
I-Fax, 7-2, 7-4
E-Mail mode, 7-2
O
Simple mode, 7-2
In Use Memory lamp, 1-10
OK key, 1-10, 1-11
Installing driver software, 6-4
One-touch speed dialing keys, 1-10
Interface cable, 8-4
One-touch speed dialing panels, 1-10
Internal view, 1-8
Orientation, 2-3
Interrupt key, 1-10
Horizontal placement, 2-3
Vertical placement, 2-3
Original output area, 1-7
L
Original supply tray, 1-7
LCD display, 1-9
Overview of fax operations, 5-2
Overview of copy operations, 4-2
Left cover, 1-8
Loading paper, 3-4
Appendix
Line/Mail key, 1-10
P
Lower left cover, 1-8
Paper drawers, 1-7
Paper feeding dial, 1-8
M
Parallel interface, 8-2, 8-5
Machine's fax number, registering, 5-8
Password, 4-4, 5-15
Mail reception settings, 7-3
Pause/Redial key, 1-9
Mail transmission settings, 7-3
PCL printer drivers, 8-3
Main power, 4-4
PDF, 7-2
Main Power indicator, 1-10
Pin Code key, 1-11
Main power switch, 1-8
Placing originals, 2-2
Memory Reception key, 1-11
Feeder, 2-6
Memory Reference key, 1-11
Orientation, 2-3
Modified Huffman (MH), 7-2
Platen glass, 2-4
Modified Modified Read (MMR), 7-2
11
Parts and their functions, 1-7
Platen glass, 1-8, 2-2
Index
11-9
Plug & Play, 8-2
System Manager settings, 1-6
POP3, 7-2
Setting up the machine for I-Fax, 7-3
Preset time, 7-4
SMTP, 7-2
PRINT key, 1-9
Space key, 1-11
Printer Ports, 1-8
Speaker volume switch, 1-11
Printing a document, 8-6
Special Features key, 1-10
Special Features screen, 4-2
Specifications
R
Fax, 11-5
Receive mail automatically, 7-8
Receive mail manually, 7-8
Receiving I-Fax, 7-8
Registering mail addresses, 7-3
Remote UI Support, 8-3
Report key, 1-11
Reset key, 1-9
Resolution, 8-2
Retransmit, 7-6, 7-7
Interface, 11-7
Machine, 11-2
Printer, 11-6
Stack bypass, 1-8, 8-2
Stack Bypass Settings key, 1-11
Stamp key, 1-11
Start key, 1-10
Stop key, 1-10
System requirements for driver software, 6-3
Routine cleaning, 9-10
Feeder, 9-11
Platen glass and cover, 9-10
Roller, 9-15
T
Telephone Line Jack, 1-7
Appendix
TIFF, 7-2
Timer, 7-2
S
Tone key, 1-9
Scalable typefaces, 8-3
Scanning area, 1-9
11
Sender information, registering, 5-7
Date and time, 5-8
Fax number, 5-8
Page number/total number of pages, 5-8
Unit's name or sender's name, 5-8
Sequential broadcasting, 7-4, 7-6
Setting up the machine, 1-6
Date and time settings, 1-6
Installing fax driver, 1-6
Installing printer driver, 1-6
Setting up and connecting to network, 1-6
11-10
Index
Toner cartridge, 1-8
Replacing, 9-2
Transfer key, 1-11
Transmission mode, 7-2
Transmitting I-Fax, 7-4
Access code, 7-4
Coded speed dialing, 7-4
Manually, 7-6
One-touch speed dialing, 7-4
Trouble printing, 10-14
TrueType, 8-3
TTI Selector key, 1-11
TX Terminal ID, 5-12
Typefaces, 8-3
U
Underside of the feeder, 1-8
Unit's name, registering, 5-10
Upper left cover, 1-8
USB interface, 8-5
USB port, 8-2, 8-5
V
Ventilation slot, 1-7
Vertical placement, 2-3
W
When problems occur during fax operations, 10-8
Other problems, 10-13
Receiving documents, 10-11
Appendix
Sending ducuments, 10-8
11
Index
11-11
Canon U.S.A., Inc.
Limited Warranty - U.S. Only
The limited warranty set forth below is given by Canon U.S.A., Inc. ("Canon USA") with respect to the Canon imageCLASS 2300 Series
product and accessories packaged with this limited warranty (collectively, the "Product") when purchased and used in the United States.
THIS LIMITED WARRANTY DOES NOT COVER THE CARTRIDGE P FOR WHICH A SEPARATE WARRANTY IS GIVEN. PLEASE
CONTACT CANON USA IMMEDIATELY IF YOU HAVE NOT RECEIVED A COPY OF THE CARTRIDGE P LIMITED WARRANTY.
Canon USA warrants the Product to be free from defects in workmanship and materials under normal use and service for a period of one year
after delivery to the original purchaser ("Purchaser") by Canon USA or its authorized dealer. During the relevant warranty period, Canon USA
shall repair or replace, without charge, any defective part with a new or comparable rebuilt part. Warranty replacement shall not extend the
warranty period of the malfunctioning Product. This warranty shall not extend to consumables, such as paper, as to which there shall be no
warranty or replacement.
Canon USA shall provide assistance for installation, operation and support of the Product as follows:
(a) Toll-free telephone support for troubleshooting issues at 1-800-423-2366, Monday through Friday from 8:00 a.m. to 8:00 p.m. E.T.
(b) E-mail support via our Web site at www.usa.canon.com
If Canon USA's remote assistance cannot fix your Product's malfunction, Canon USA shall schedule an on-site service call, except where the
malfunction involves a user replaceable item, in which case Canon USA will send you a replacement part with installation instructions. You will
be responsible for installing the user replaceable items in your Product.
If on-site service is performed, and (1) the Product malfunction is not covered by this limited warranty, or (2) the applicable warranty period has
expired or has not been sufficiently established by appropriate documentation, then you will be charged for such service at the then-current
service call rates of Canon USA or any authorized Canon USA service provider (the "Service Provider").
This warranty shall only apply if the Product is used in conjunction with compatible computers, peripheral equipment and software. Canon
USA shall have no responsibility for such items except for compatible Canon brand peripheral equipment covered by a separate warranty
("Separate Warranty"). Repairs of such Canon brand peripheral equipment shall be governed by the terms of the Separate Warranty.
NON-CANON BRAND COMPUTERS, PERIPHERAL EQUIPMENT AND SOFTWARE WHICH MAY BE DISTRIBUTED WITH THE PRODUCT
ARE SOLD AS IS, WITHOUT WARRANTY OF ANY KIND BY CANON USA, INCLUDING ANY IMPLIED WARRANTY OF
MERCHANTABILITY OR FITNESS FOR A PARTICULAR PURPOSE. The sole warranty, if any, with respect to such non-Canon brand item is
given by the manufacturer or producer thereof.
THIS WARRANTY IS IN LIEU OF ALL OTHER WARRANTIES, EXPRESS OR IMPLIED, INCLUDING ANY IMPLIED WARRANTY OF
MERCHANTABILITY OR FITNESS FOR A PARTICULAR PURPOSE, RELATING TO THE USE OR PERFORMANCE OF THE PRODUCT.
NO OTHER EXPRESS WARRANTY, EXCEPT AS MENTIONED ABOVE, GIVEN BY ANY PERSON, FIRM OR CORPORATION WITH
RESPECT TO THE PRODUCT SHALL BIND CANON USA OR ANY SERVICE PROVIDER. NO WARRANTY IS GIVEN ON ANY USED
PRODUCT.
This warranty shall be void and of no force and effect if the Product is damaged as a result of (a) abuse, neglect, mishandling, alteration,
electric current fluctuation or accident, (b) improper use, including failure to follow operating or maintenance instructions in, or environmental
conditions prescribed in, Canon USA's operator's manual or other documentation, (c) installation or repair by other than authorized service
representatives qualified by Canon USA who are acting in accordance with Canon USA's service bulletins, (d) use of supplies or parts (other
than those distributed by Canon USA) which damage the Product or cause abnormally frequent service calls or service problems, or (e) use of
the Product with non-compatible computers, peripheral equipment or software, including the use of the Product in any system configuration not
recommended in any manual distributed with the Product. Nor does this warranty extend to any Product on which the original identification
marks or serial numbers have been defaced, removed, or altered.
ANY SYSTEM SOFTWARE (WHETHER FACTORY LOADED ON THE PRODUCT OR CONTAINED ON THE SOFTWARE DISKETTES OR
CD-ROM'S ENCLOSED WITH, OR ACCOMPANYING, THE PRODUCT), AND ANY UTILITY SOFTWARE, DISTRIBUTED WITH OR FOR
THE PRODUCT, IS SOLD "AS IS" AND WITHOUT WARRANTY BY CANON USA. THE SOLE WARRANTY WITH RESPECT TO SUCH
SOFTWARE IS CONTAINED IN THE SOFTWARE MANUFACTURER'S LICENSE AGREEMENT DISTRIBUTED THEREWITH, INCLUDING
ANY LIMITATIONS AND DISCLAIMERS THEREON. PLEASE CONTACT CANON USA IMMEDIATELY IF YOU HAVE NOT RECEIVED A
COPY OF THE SOFTWARE MANUFACTURER'S LICENSE AGREEMENT.
NEITHER CANON USA NOR ANY AUTHORIZED SERVICE PROVIDER SHALL BE LIABLE FOR PERSONAL INJURY OR PROPERTY
DAMAGE (UNLESS CAUSED SOLELY AND DIRECTLY BY THE NEGLIGENCE OF CANON USA OR ANY AUTHORIZED SERVICE
PROVIDER), LOSS OF REVENUE OR PROFIT, FAILURE TO REALIZE SAVINGS OR OTHER BENEFITS, EXPENDITURES FOR
SUBSTITUTE EQUIPMENT OR SERVICES, LOSS OR CORRUPTION OF DATA, INCLUDING, WITHOUT LIMITATION, STORAGE
CHARGES OR OTHER SPECIAL, INCIDENTAL OR CONSEQUENTIAL DAMAGES CAUSED BY THE USE, MISUSE OR INABILITY TO USE
THE PRODUCT, REGARDLESS OF THE LEGAL THEORY ON WHICH THE CLAIM IS BASED AND EVEN IF CANON USA OR ANY
AUTHORIZED SERVICE PROVIDER HAS BEEN ADVISED OF THE POSSIBILITY OF SUCH DAMAGES. NOR SHALL RECOVERY OF
ANY KIND AGAINST CANON USA OR ANY AUTHORIZED SERVICE PROVIDER BE GREATER IN AMOUNT THAN THE PURCAHSE
PRICE OF THE PRODUCT CAUSING THE ALLEGED DAMAGE. WITHOUT LIMITING THE FOREGOING, THE PURCHASER ASSUMES
ALL RISKS AND LIABILITY FOR LOSS, DAMAGE OR INJURY TO PERSONS AND PROPERTY OF THE PURCHASER OR OTHERS
ARISING OUT OF THE POSSESSION, USE, MISUSE, OR INABILITY TO USE THE PRODUCT NOT CAUSED SOLELY AND DIRECTLY BY
THE NEGLIGENCE OF CANON USA OR ANY AUTHORIZED SERVICE PROVIDER. THIS WARRANTY SHALL NOT EXTEND TO ANYONE
OTHER THAN THE ORIGINAL PURCHASER OF THE PRODUCT AND STATES SUCH PURCHASER'S EXCLUSIVE REMEDY.
CONDITIONS OF WARRANTY
Defective parts must be returned to Canon USA or a Service Provider with all necessary documentation.
THIS WARRANTY APPLIES TO PRODUCTS PURCHASED AND USED IN THE UNITED STATES ONLY.
CANON U.S.A., INC.
One Canon Plaza
Lake Success, New York 11042-1198
CANON CANADA, INC.
6390 DIXIE ROAD
MISSISSAUGA, ONTARIO L5T 1P7
Canada
Canon is a trademark of Canon Inc.
CANON CARTRIDGE P LIMITED WARRANTY
Canon U.S.A., Inc. and Canon Canada Inc., (collectively "Canon") warrant to the original purchaser ("the Purchaser") of the
Canon Cartridge P, packaged with this limited warranty (the "Cartridge"), when used in a compatible* Canon-brand product
(the "Product") to be free from defects in workmanship and materials under normal use and service for a period of fifteen
(15) days from the date of original purchase. A defective Cartridge returned to a Canon U.S.A. or a Canon Canada
Authorized Service Facility or Dealer from whom you purchased the Cartridge ("Service Provider") within the fifteen (15)
day warranty period and proven to be defective upon inspection will be exchanged for a new Cartridge. Warranty exchange
shall not extend the original warranty period of the Cartridge.
When returning any Cartridge under this limited warranty, you must pack the Cartridge in its original carton with a copy of
the bill of sale (or invoice of purchase), together with a complete explanation of the problem and return it to a Service
Provider. Shipping charges, if any, must be prepaid. Cartridges covered by this limited warranty will be returned to you
without charge by a Service Provider. A listing of Canon U.S.A. CONSUMER PRODUCTS INFORMATION CENTERS and
CANON INFORMATION/SERVICE CENTERS in Canada is enclosed with the Cartridge. The Canon U.S.A. CONSUMER
PRODUCTS INFORMATION CENTER and CANON CANADA INFORMATION/SERVICE CENTER will refer you to the
nearest Service Provider.
NO IMPLIED WARRANTY OR CONDITION**, INCLUDING ANY IMPLIED WARRANTY OR CONDITION** OF
MERCHANTABILITY OR FITNESS FOR A PARTICULAR PURPOSE, APPLIES TO THE CARTRIDGE AFTER THE
APPLICABLE PERIOD OF THE EXPRESS LIMITED WARRANTY STATED ABOVE, AND NO OTHER EXPRESS
WARRANTY, CONDITION** OR GUARANTY, EXCEPT AS MENTIONED ABOVE, GIVEN BY ANY PERSON OR ENTITY
WITH RESPECT TO THE CARTRIDGE SHALL BIND CANON OR ANY SERVICE PROVIDER (SOME STATES AND
PROVINCES DO NOT ALLOW LIMITATIONS ON HOW LONG AN IMPLIED WARRANTY LASTS, SO THE ABOVE
LIMITATION MAY NOT APPLY TO YOU). NO WARRANTY IS GIVEN ON ANY USED CARTRIDGE
This limited warranty does not apply to, and does not guarantee any particular cartridge yield (i.e., number of copies per
Cartridge). Cartridge yield will vary depending on average density of originals copied and other factors. See Canon U.S.A.'s
or Canon Canada's operator manual for the Product for further information.
This warranty is void and of no force and effect if the Cartridge is damaged as a result of (a) abuse, neglect, mishandling, or
alteration of the Cartridge, a Product Accessory or a Product in which the Cartridge is incorporated, electric current
fluctuation, exposure to light, or accident, (b) improper use, including failure to follow operating or maintenance instructions,
or environmental conditions, prescribed in Canon's operator's manual or other documentation, (c) installation or repair by
other than service representatives qualified by Canon who are acting in accordance with Canon's service bulletins, or (d)
use of supplies or parts (other than those distributed by Canon) which damage the Cartridge or cause abnormally frequent
service calls or service problems. Nor does this warranty extend to any Cartridge on which the original lot numbers or
dating have been defaced, removed, or altered.
NEITHER CANON NOR ANY SERVICE PROVIDER SHALL BE LIABLE FOR PERSONAL INJURY OR PROPERTY
DAMAGE (UNLESS CAUSED SOLELY AND DIRECTLY BY THE NEGLIGENCE OF CANON OR ANY SERVICE
PROVIDER), LOSS OF REVENUE OR PROFIT, FAILURE TO REALIZE SAVINGS OR OTHER BENEFITS,
EXPENDITURES FOR SUBSTITUTE EQUIPMENT OR SERVICES, LOSS OR CORRUPTION OF DATA, STORAGE
CHARGES OR OTHER SPECIAL, INCIDENTAL OR CONSEQUENTIAL DAMAGES CAUSED BY THE USE, MISUSE OR
INABILITY TO USE THE CARTRIDGE, REGARDLESS OF THE LEGAL THEORY ON WHICH THE CLAIM IS BASED AND
EVEN IF CANON OR ANY SERVICE PROVIDER HAS BEEN ADVISED OF THE POSSIBILITY OF SUCH DAMAGES.
NOR SHALL RECOVERY OF ANY KIND AGAINST CANON OR ANY SERVICE PROVIDER BE GREATER IN AMOUNT
THAN THE PURCHASE PRICE OF THE CARTRIDGE CAUSING THE ALLEGED DAMAGE. WITHOUT LIMITING THE
FOREGOING, THE PURCHASER ASSUMES ALL RISKS AND LIABILITY FOR LOSS, DAMAGE OR INJURY TO
PERSONS AND PROPERTY OF THE PURCHASER OR OTHERS ARISING OUT OF THE POSSESSION, USE, MISUSE,
OR INABILITY TO USE ANY CARTRIDGE SOLD BY CANON NOT CAUSED SOLELY AND DIRECTLY BY THE
NEGLIGENCE OF CANON OR ANY SERVICE PROVIDER. THIS WARRANTY SHALL NOT EXTEND TO ANYONE
OTHER THAN THE ORIGINAL PURCHASER OF THE CARTRIDGE.
This limited warranty gives you specific legal rights, and you may also have other rights which vary from state to state or
province to province.
THIS WARRANTY APPLIES TO CARTRIDGES SOLD AND USED IN THE U.S.A. AND CANADA ONLY.
* As specified in the Product's operator's manual.
** In Canada
CAUTION:
Keep out of reach of children.
Keep from contact with oxidizing materials.
Refer to instructions for handling and storing.
CANON U.S.A., INC.
One Canon Plaza
Lake Success, New York 11042-1198
CANON CANADA, INC.
6390 DIXIE ROAD
MISSISSAUGA, ONTARIO L5T 1P7
Canada
Canon is a trademark of Canon Inc.
GARANTIE RESTREINTE DES CARTRIDGE P DE CANON
Canon U.S.A., Inc. et Canon Canada Inc. (collectivement " Canon ") certifient à l'acheteur initial (" l'Acheteur ") que la Car tridge P de Canon, livrée
avec la présente garantie restreinte (la " Cartouche "), utilisée avec un produit compatible* de marque Canon (le " Produit ") est sans vices de matière et de fabrication, dans des conditions d'utilisation et de ser vice normales pendant une période de quinze (15) jours à compter de la date de
l'achat initial.
Une Cartouche défectueuse qui est retournée à un Centre d'entretien et après-vente autorisé Canon U.S.A. ou Canon Canada ou à un détaillant
chez qui vous avez acheté la Cartouche (" Fournisseur de service ") pendant la période de garantie de quinze (15) jours, et dont l'inspection confirme une défectuosité, sera échangée contre une Cartouche neuve. La période de garantie pour l'échange ne peut dépasser la pér iode de garantie initiale de la Cartouche.
Toute Cartouche retournée, encore couverte par la présente garantie restreinte, doit être emballée dans sa boîte d'origine avec une copie de l'acte
de vente (ou de la facture de l'achat), accompagnée d'une descr iption complète du problème, et doit être retournée au Fournisseur de service.
Les frais d'expédition, s'il y a lieu, doivent être payés à l'avance. Les Cartouches couvertes par la présente garantie restreinte vous seront
retournées sans frais par un Fournisseur de service. Une liste des CENTRES D'INFORMATION SUR LES PRODUITS DE CONSOMMATION
Canon U.S.A. et des CENTRES DE SERVICE ET D'INFORMATION CANON au Canada est incluse dans la boîte de la Car touche. Le CENTRE
D'INFORMATION SUR LES PRODUITS DE CONSOMMATION Canon U.S.A. et le CENTRE DE SERVICE ET D'INFORMATION CANON CANADA vous référeront au Fournisseur de service le plus proche.
AUCUNE GARANTIE OU CONDITION** IMPLICITE, Y COMPRIS TOUTE GARANTIE OU CONDITION** IMPLICITE À L'ÉGARD DE LA Q UALITÉ MARCHANDE OU DE L'APTITUDE À UNE FIN PARTICULIÈRE, NE S'APPLIQUE À LA CARTOUCHE APRÈS LA PÉRIODE PRESCRITE
DE LA GARANTIE RESTREINTE EXPRESSE SUSMENTIONNÉE. AUCUNE AUTRE GARANTIE OU CONDITION** EXPRESSE OU GARANTIE, À L'EXCEPTION DE LA GARANTIE RESTREINTE EXPRESSE SUSMENTIONNÉE, A CCORDÉE PAR TOUTE PERSONNE OU ENTITÉ À
L'ÉGARD DE LA CARTOUCHE N'AURA POUR EFFET DE LIER CANON OU TOUT FOURNISSEUR DE SERVICE À L'ÉGARD DE TOUTE
OBLIGATION, QUELLE QU'ELLE SOIT. (CERTAINS ÉTATS ET PROVINCES N'AUTORISENT AUCUNE RESTRICTION SUR LA DURÉE D'UNE
GARANTIE IMPLICITE ; AINSI, IL EST POSSIBLE QUE LA RESTRICTION ÉNONCÉE CI-DESSUS NE S'APPLIQ UE PAS DANS VOTRE CAS.)
LES CARTOUCHES USÉES NE SONT COUVERTES PAR AUCUNE GARANTIE.
La présente garantie restreinte ne s'applique pas au rendement par ticulier de la Cartouche et ne garantit pas son rendement (par exemple, le
nombre de copies par Cartouche). Le rendement de la Cartouche dépend de la densité moyenne des originaux reproduits et d'autres facteurs.
Pour obtenir de plus amples renseignements, consultez le manuel d'utilisation du Produit de Canon U.S.A. ou de Canon Canada.
La présente garantie sera considérée comme nulle et non avenue si la Cartouche est endommagée à la suite de (a) l'usage abusif, la négligence,
la manipulation négligente, ou la modification de la Cartouche, de l'Accessoire d'un Produit ou un Produit dans lequel la Car touche est insérée, les
variations de courant électrique, l'exposition à la lumière ou les accidents, (b) l'utilisation impropre, y compris l'omission d'observer les directives à
l'égard de l'utilisation ou des conditions d'entretien et du milieu ambiant énoncées dans le man uel d'utilisation de Canon ou dans d'autres documents, (c) l'installation ou la réparation effectuées par d'autres personnes que les représentants au ser vice autorisés de Canon qui agissent selon
les calendriers de service Canon, ou (d) l'utilisation de pièces ou de fournitures (autres que celles distribuées par Canon) qui endommagent la
Cartouche et qui causent une fréquence anor malement élevée d'appels de service et de problèmes d'entretien. La présente garantie ne couvre
pas les Cartouches dont les numéros de lot initiaux ou les datations ont été défigurés, enlevés ou modifiés.
NI CANON NI AUCUN FOURNISSEUR DE SERVICE N'ASSUME DE RESPONSABILITÉ À L'ÉGARD DES BLESSURES
CORPORELLES OU DES DOMMAGES MATÉRIELS (SAUF S'ILS SONT CAUSÉS UNIQUEMENT ET DIRECTEMENT PAR LA NÉGLIGENCE
DE CANON OU D'UN FOURNISSEUR DE SERVICE), DE LA PERTE DE PRODUITS D'EXPLOITATION OU DE PROFITS, NI À L'ÉGARD DES
ÉCONOMIES OU DES PROFITS NON RÉALISÉS, NI À L'ÉGARD DES FRAIS ENGAGÉS POUR DE L'ÉQUIPEMENT DE REMPLACEMENT ET
DES SERVICES D'ENTRETIEN ET APRÈS-VENTE, LA PERTE OU L'ALTÉRATION DE DONNÉES, NI À L'ÉGARD DES FRAIS D'ENTREPOSAGE OU DE TOUT DOMMAGE INDIRECT, PARTICULIER OU CONSÉCUTIF DÉCOULANT DE L'USAGE, DE L'USAGE IMPROPRE OU DE
L'IMPOSSIBILITÉ D'UTILISER LA CARTOUCHE, QUELLE QUE SOIT L'ARGUMENTATION JURIDIQUE SUR LAQUELLE S'APPUIE LA
DEMANDE ET MÊME SI CANON OU TOUT FOURNISSEUR DE SERVICE ONT ÉTÉ INFORMÉS DE LA POSSIBILITÉ DE TELS DOMMAGES.
AUCUN RECOUVREMENT, QUELLE QU'EN SOIT LA FORME, CONTRE CANON OU LE FOURNISSEUR DE SER VICE NE SERA
SUPÉRIEUR AU MONTANT DU PRIX D'ACHAT DE LA CARTOUCHE À L'ORIGINE DES DOMMAGES PRÉSUMÉS. SANS SE LIMITER À CE
QUI PRÉCÈDE, L'ACHETEUR ASSUME TOUS LES RISQUES ET TOUTE LA RESPONSABILITÉ À L'ÉGARD DES PERTES, DES DOMMAGES
MATÉRIELS ET DES BLESSURES CORPORELLES SUBIS PAR L'ACHETEUR, SA PROPRIÉTÉ OU D'AUTRES PERSONNES OU LEUR PROPRIÉTÉ EN RAISON DE LA POSSESSION, DE L'USAGE, DE L'USAGE IMPROPRE OU DE L'IMPOSSIBILITÉ D'UTILISER TOUTE CARTOUCHE VENDUE PAR CANON, À MOINS QUE LESDITS DOMMAGES MATÉRIELS, PERTES ET BLESSURES CORPORELLES N'AIENT ÉTÉ
CAUSÉS UNIQUEMENT ET DIRECTEMENT PAR LA NÉGLIGENCE DE CANON OU D'UN FOURNISSEUR DE SERVICE. LA PRÉSENTE
GARANTIE N'EST PAS ACCORDÉE À D'AUTRES PERSONNES QUE L'ACHETEUR INITIAL DE LA CARTOUCHE.
La présente garantie restreinte vous accorde des droits particuliers reconnus par la loi et il se peut que vous disposiez d'autres droits qui peuvent
varier d'un État ou d'une province à l'autre.
LA PRÉSENTE GARANTIE S'APPLIQUE AUX CARTOUCHES VENDUES ET UTILISÉES AUX ÉTATS-UNIS ET AU CANADA SEULEMENT.
* Tel que précisé dans le manuel d'utilisation du Produit.
** Au Canada
MISE EN GARDE :
Garder hors de la portée des enfants.
Éviter de mettre en contact avec des oxydants.
Se reporter aux directives pour la manipulation et l'entreposage.
CANON U.S.A., INC.
One Canon Plaza
Lake Success, New York 11042-1198
CANON CANADA, INC.
6390 DIXIE ROAD
MISSISSAUGA, ONTARIO L5T 1P7
Canada
Canon is a trademark of Canon Inc.