1
TEAC8x8x32.book Page 9 Thursday, October 19, 2000 9:56 PM
Installing the CD-RW Drive
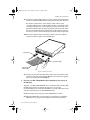
4c) Locate the secondary IDE connector on your system’s motherboard and
connect one end of the IDE interface cable provided with your TEAC kit.
Be certain to connect Pin-1 of the interface cable to Pin-1 on the
secondary IDE connector on the motherboard. (Pin-1 on interface cable
is usually designated by a color strip along one edge of the cable. Also,
the interface ribbon cable connector may feature a tab on one side. Insert
the cable so that the tab aligns with the notch on the interface connector.
Do not use excessive force while trying to insert the cable into position).
4d) Connect the opposite end of the interface ribbon cable to the interface
connector on the rear panel of the CD-RW drive.
audio cable
notch
power cable
pin 1
IDE interface
ribbon cable
tab
Figure 7. Cable Connections
4e) Connect one end of the included analog audio cable to the analog audio
connector on the rear panel of the CD-RW drive and connect the opposite
end to your sound card. (Go to Step 6.)
5.
If you have an IDE CD-ROM/DVD drive installed on your system, do
the following:
Typically, your IDE CD-ROM/DVD drive is connected to the secondary IDE
motherboard connector as a Master. In such cases, it is strongly
recommended that you connect the CD-RW drive as a Slave drive to the same
cable that currently hosts your CD-ROM/DVD drive.
5a) Set the jumper on the rear panel of the CD-RW drive to Slave.
5b) Slide the CD-RW drive into the empty 5.25-inch drive bay. Install the
CD-RW drive in your personal computer in a horizontal orientation
TEAC CD-RW Drive User’s Manual
9