1
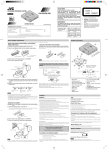
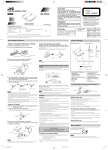
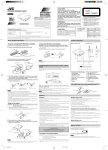
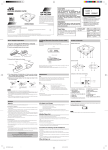
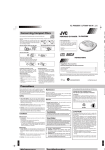
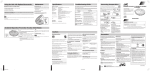
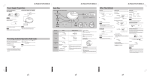
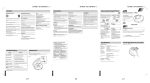
CAUTION!
THIS PRODUCT UTILIZES A LASER.
USE OF CONTROLS OR ADJUSTMENTS OR
PERFORMANCE OF PROCEDURES OTHER
THAN THOSE SPECIFIED HEREIN MAY RESULT
IN HAZARDOUS RADIATION EXPOSURE.
DO NOT OPEN COVERS AND DO NOT REPAIR
YOURSELF. REFER SERVICING TO QUALIFIED
PERSONNEL.
PORTABLE MINIDISC PLAYER
XM-PJ1BU
ENGLISH
TO REDUCE THE RISK OF FIRE OR ELECTRIC
SHOCK, DO NOT EXPOSE THIS APPLIANCE TO
RAIN OR MOISTURE.
LVT0122-001A [E]
Supplied Accessories
Check the packing carton for these accessories.
AC adaptor (AA-R9017)
Headphones
Wired remote control
Charger/adaptor (AC-R124)
1 pc.
1 pc.
1 pc.
1 pc.
Nickel metal hydride battery (rechargeable) (BN-R127)
Carrying pouch
1
LASER
PRODUCT
1. CLASS 1 LASER PRODUCT
2. DANGER: Invisible laser radiation
when open and interlock failed or
defeated. Avoid direct exposure to
beam.
3. CAUTION: Do not open the top cover.
There are no user serviceable parts
inside the Unit; leave all servicing to
qualified service personnel.
WARNING:
INSTRUCTIONS
CLASS
WARNING LABEL,
PLACED INSIDE
THE UNIT
1 pc.
1 pc.
Remove the rechargeable battery from its case before use.
Use numbers indicated in parentheses when asking for replacement parts.
Thank you for purchasing this JVC product. Please read these instructions carefully before starting operation to be sure to obtain optimum performance and a longer service life from the unit.
Power Supply Preparations
Refer to the specifications for information on operating times when using rechargeable battery,
dry-cell battery, or both together.
PO
This function prevents the unit from accidental button operation.
The unit and remote control have the HOLD switches, each of which works independently.
R
TA
BL
E
M
IN
ID
IS
C
Bottom of the unit
YE
R
XM
-P
J
1
1
2
Location of Controls
PL
A
Using nickel metal hydride battery (rechargeable
battery) (BN-R127)
Accidental Operation Prevention Function (Hold
Mode)
VOLUME
Remove the supplied rechargeable battery from its case.
EJE
CT
Insert the rechargeable battery into the supplied charger/adaptor.
LOCK
Top panel of the remote control
HOLD
Charger/Adaptor
BN-R127
Rechargeable battery (BN-R127)
3
4
Set the switch of the charger/adaptor to “CHARGER”.
Slide the HOLD switch in the direction shown by the arrow to activate it.
Connect the supplied AC adaptor.
A.C.BASS
VOL
When the HOLD switch of the unit or remote control is activated, no button operation is possible in the unit or the remote control.
To operate the unit or remote control normally, return the HOLD switch.
Charger/Adaptor
JOG
MODE
[Indicators on the display
of the remote control]
Accidental Opening Prevention Function
AC adaptor
To prevent the lid from the accidental opening, turn the EJECT button to the right in order to
lock it.
Charge indicator
T
EC
EJ
LOCK
FAV
• To open the lid, return the EJECT button to the original
position and then press it.
• It is recommended to lock the lid when moving the batteries.
Repeat
Battery
Disc mark
BASS
Battery Indicator
5
6
The charge indicator lights in red and it will go out when recharging
is completed. Unplug the AC adaptor from the AC outlet and the charger/
adaptor.
The battery indicator appears on the display of the remote control. When the indication
changes as follows, power will be shut off a short while after.
Rechargeable battery: Recharge it.
Remove the recharged battery from the charger /adaptor and insert
it into the unit.
BN-R127
Dry-cell battery: Replace it with new one.
OPEN
OPEN
Ribbon
Open the battery cover.
Insert the battery .
A
B
C
D
E
F
G
H
I
HOLD switch
J
K
Play / pause / stop button (38 /7) L
M
EJECT button
DISPLAY button
Headphones jack ( )
Play / pause /stop button (38 /7 )
Skip / search button (¢
)
Volume +, – & Skip / search button
Skip / search button (4
)
Volume +, – button
HOLD switch
Display
FAV (Favorite) button
JOG dial
(4 ¢
)
N JOG MODE button
O A.C.BASS (Active Clear Bass) button
P P.MODE (Play Mode) button
Slide the cover slightly
upward, then close it.
Position the ribbon under the battery in order to easily remove the battery from the case.
Notes:
• You cannot use the MD player during charging the rechargeable battery.
• It takes approximately 1.5 hours to recharge the rechargeable batteries.
• Rechargeable battery has a service life of approximately 300 charge-discharge cycles. If the
operating time on one full charge becomes noticeably shorter than it used to be, the battery
has reached the end of its service life and should be replaced.
• The AC adaptor and rechargeable batteries may become warm while recharging is in
progress. This is not a malfunction.
Cautions
Batteries
Unit
• Before replacing batteries, always turn off the unit.
No altering or remodeling
Rechargeable nickel metal hydride battery (BN-R127):
This can cause malfunctioning.
• Use only the rechargeable battery (BN-R127) supplied with the unit.
No dropping or strong impacts
• If the power delivered by the battery lasts for a very short time after recharging, it means
that the battery’s service life is over. Do not use it any more.
This may damage the unit.
• Recharging already charged battery will shorten its service life.
Avoid using the unit in the following locations since they can cause malfunctioning.
1. Bathrooms and other moisture-prone places.
Set the switch of the charger/adaptor to “ADAPTOR”.
• When recharging battery for the first time or when it has not been used for a long period of
time, the play time may be shorter than usual. In a case like this, repeatedly recharge and
discharge the battery. This will restore it to its regular state.
Connect the supplied AC adaptor and charger/adaptor.
• Do not allow any metal objects to touch the terminals of rechargeable battery since this may
cause short-circuiting which is dangerous.
Using the AC adaptor
CAUTION: Be sure no battery is inserted into the unit.
1
2
Notes:
• The battery indicator appears when an MD is loaded in the unit.
• The battery indicator also appears when the AC adaptor is used. However, it has no meaning.
MONO
Random
• Recharging shall be made at the temperature from 10°C to 35°C.
Locations to be avoided
2. Warehouses and other dusty places
3. Very hot places near heating appliances, etc.
Do not leave the unit exposed to direct sunlight for long periods of time
This may deform or discolor the cabinet and may also cause malfunctioning.
Dry cell battery and rechargeable battery:
To prevent damage to the batteries and electrolyte leakage, heed the following points.
• Align the » and Æ polarities properly when inserting the batteries.
AC adaptor
Charger/Adaptor
• Remove the batteries if you do not plan to use the unit for a long period of time.
• Do not throw batteries into a fire, and do not short-circuit, disassemble or subject them to
excessive heat.
• If you experience a ringing in your ears, reduce volume or discontinue use.
• Do not attempt to recharge dry cell batteries.
• Do not use while operating a motorized vehicle. It may create traffic hazard and is illegal in
many areas.
Carrying batteries:
• You should use extreme caution or temporarily discontinue use in potentially hazardous
situations.
When putting dry cell or rechargeable batteries in a pocket or bag, ensure that no other metal
objects such as a necklace are placed together with them. Contact with metal may cause shortcircuiting which, in turn, may cause a fire.
Be absolutely sure to carry the rechargeable battery in the battery carrying case.
Note:
The unit is in the standby condition when the AC adaptor and charger/adaptor are connected.
The primary circuit is always “live” as long as the AC adaptor is connected to an electrical outlet.
Using dry-cell battery (not included)
CAUTION: Do not use the dry-cell battery together with the AC adaptor.
Open the battery cover and insert a LR6 (UM-3) alkaline battery into the battery compartment.
Position the ribbon under
the battery in order to easily remove the battery from
the case.
Alkaline battery (Not supplied)
Notice about the rechargeable battery
The battery is designated recyclable.
Please follow your local recycling regulations.
AC adaptor and charger/adaptor
• Handle the AC adaptor and charger/adaptor carefully. Improper handling is dangerous.
• Do not touch them with wet hands.
• Do not place heavy objects on top of them.
• Do not forcibly bend them.
• Be sure to connect only the AC adaptor and charger/adaptor provided with the unit.
Ribbon
Note:
To lengthen the battery life, you can use both rechargeable battery and the dry-cell battery.
Precautions for Listening with the headphones
• Do not play your headset at a high volume. Hearing experts advise against continuous extended play.
• Disconnect the AC adaptor from the power outlet if the unit is not going to be used for a
long time.
• Even if your headphones are an open-air type designed to let you hear outside sounds, don’t
turn up the volume so high that you can’t hear what’s around you.
When driving a car
In the interest of traffic safety, do not operate the unit while driving.
Normal Play
ENGLISH
Follow the numbers in the figure to normal-play.
1
2
3
4
Connect the headphones plug firmly.
Connect the remote control plug firmly.
Release the HOLD switches.
Load an MD.
HOLD
HOLD
R
TA
BL
E
M
IN
ID
IS
VOLUME
C
PL
AY
ER
XM
-P
J
1
5
PO
• Press the EJECT button to open the lid.
• Insert the MD into the MD slot, with its label side facing up. Insert the MD until it stops.
Be sure % or ] mark on the MD directs as shown in the figure.
• Close the lid.
“Toc Reading” appears on the display. Then the track number and playback time appear.
VOLUME
EJEC
T
LOCK
EJE
CT
LOCK
A.C.BASS
VOL
Adjust the volume level between 0 and 25.
JOG
MODE
Press the Volume +, – button on the unit or turn the JOG dial to the right or left. To continuously change the volume leve l, depress the volume button or keep turning the JOG dial.
6
Press the 38 /7 button.
Playback starts from the first track and ends after playing all the tracks of the MD.
Disc mark turns.
Setting the FAV (Favorite) Music
Number of tracks being played
Playing time
Notes:
• If no MD is loaded, “NO DISC” appears on the display and the power will be automatically
shut off after approx. 10 seconds.
• If the MD is recorded in Monaural mode, “MONO” will appear on the display.
• To eject the MD, press the EJECT button to open the lid. Then, the MD comes out.
Reinforcing the Bass Sound (A.C.BASS)
Press the A.C.BASS button to activate the active clear bass function.
The "BASS" indicator appears on the display. The bass level is automatically controlled in conjunction with the sound volume.
To cancel the function, press the same button again to light off the “BASS” indicator.
A.C.BASS
A.C.BASS
A.C.BASS button
VOL
JOG
MODE
Press during play.
To pause play
You can register the music to be played at the beginning of MD playback. You can see whether
this function is set or not from the “FAV” indicator on the display.
This function allows you to listen from the beginning of the track where play stopped because
of the unit was set to Stop mode.
Play the desired track and press the FAV button for 1 second or more.
Press the 38 /7 button.
The “FAV” indicator blinks on the display while the track is being played. After that, it stays lit.
Showing the Disc Information
S
VOL
Each time you press the DISPLAY button in Stop mode or during playback, the disc information is displayed as follows.
JOG
MODE
To play the FAV music, play the MD in which FAV information is registered. The “FAV” indicator blinks on the display and your favorite music is firstly played. After the FAV music, the
first track of the MD is played.
To cancel the FAV music, in Stop mode, press the FAV button for 1 second or more. “FAV
DELETE” blinks on the display twice.
Notes:
• You can register only 1 track as for FAV music. New registration will overwrite the previous
setting.
• The FAV information on the MD will be deleted if additional recording or editing such as
MOVE and ERASE is made with the other MD recorders.
• If you start to play the MD with FAV music after removing it once, the FAV music may not
firstly start though the “FAV” indicator lights up. In this case, press the FAV button to play
the FAV music.
Display/reference
Button
Operation
Resume Play
or
VOL
JOG
MODE
In Stop mode:
Disc title* = Total track number and total playback time of the MD = Track title* = Track
number and its playback time = (back to the beginning)
During Playback:
Track title* = Track number and its playing time = (back to the beginning)
*: The disc title or track title will scroll if it consists of 11 characters or more. If no title is given,
“NO TITLE” appears on the display.
Operation
Button
Press again to restart play.
If nothing is done for 2 minutes, the
power will be automatically shut off.
Blinks.
C.BASS
Display/reference
Forward
Reverse
Skip function (unit)
• During Random Play, the skip buttons cannot be used to skip back to
tracks that were played previously
in the random sequence.
Press during play or in Stop mode.
Search function (unit)
Keep depressed during play.
Press during play for 1 second or more.
Press again to restart play (Resume
Play).
The current track will be played from
the beginning. (See “Resume Play”.)
If nothing is done for 45 seconds, the
power will be automatically shut off.
Stops.
To stop play
or
(Stop mode)
In Stop mode, press for 1 second or more.
During play mode or in Stop mode, press the JOG MODE button
and briefly turn the JOG dial to the right or left.
reverse
Search function (remote control)
During play mode, press the JOG MODE
button and continuously turn the JOG dial
to the right or left.
The power is shut off after “POWER
OFF” appears on the display.
To turn on the unit, press the same
button again.
To turn off the unit
or
(Off mode)
Skip function (remote control)
Fast forward/
Within 5 seconds
(Blank)
Repeat Play and Random Play
You can select Repeat Play or Random Play. In Repeat Play, you can repeat all the tracks or
individual track as many times as you like. In Random Play, you can play all the tracks in random order.
Selecting Repeat Play and Random Play in Stop mode
In Stop mode, press the P.MODE button. Each time you press the button, the play mode
changes as follows.
P
P
P
1=
P
P
1 RDM =
P
To mute the pip tone, while pressing and holding the JOG MODE button in Stop mode or during playback, press the P.MODE button. “BEEP OFF” appears on the display.
To turn off the backlight, while pressing and holding the JOG MODE button in Stop mode or
during playback, press the DISPLAY button. “LIGHT OFF” appears on the display.
C.BASS
A.C.BASS
VOL
JOG
MODE
: Repeats all the tracks.
: Random play
JOG
MODE
1 RDM : Repeats one track randomly selected.
To resume a pip sound, do the same operation again. “BEEP ON” will appear on the display.
To resume backlighting, do the same operation again. “LIGHT ON” appears on the display.
Turning off the unit will also resume backlighting.
RDM : Repeats all the tracks in random order.
For example, to start Random Play, press the P.MODE button until "RDM" indicator appears
and then start playback.
To exit Repeat Play or Random Play, stop the MD and then press the P.MODE button until
the display returns to the original one.
Repeat Play during Playback
During Normal Play:
Each time you press the P.MODE button, the play mode changes as follows.
1=
P
Using the Unit with Optional Accessories
Using the unit with an audio system
You can listen to MDs through your audio system.
CAUTION:
Before connecting the car adaptor, remove the rechargeable battery and the alkaline
battery from the unit.
•
•
•
•
• Connect the car adaptor as shown below.
• Connect the car audio cassette adaptor between the remote control and the cassette slot of
your car audio system.
• Adjust the volume level of the unit to an appropriate level.
Connect a stereo connection cable (not supplied) as shown below after turning off the amplifier.
Adjust the volume level of the unit to an appropriate level.
Adjust the volume level on the amplifier.
Use the unit’s buttons for operation. (The remote control will issue a pip tone.)
= Original display = (back to the beginning)
Car adaptor (CA-R153)
Select “P 1” to repeatedly play the current track. Select “P ” to repeat all the tracks.
Amplifier
A.C.BASS
VOL
During Random Play:
Each time you press the P.MODE button, the play mode changes as follows.
P
When you turn off the backlight, you can save the battery life.
RDM = Original display = (back to the beginning)
: Repeats 1 track.
After selecting one of the above modes, press the 38 /7 button.
P
Turning off the backlight
Muting a pip tone
When you press the buttons on the remote control, a pip tone is issued except for the
A.C.BASS and VOLUME +, – buttons.
VOL
1
RDM
P
P
= RDM =
Selecting the Operational Options of Remote Control
1 RDM =
P
JOG
MODE
or
RDM = Original display = (back to the beginning)
A.C.BASS
Select “P 1 RDM” to repeatedly play a randomly selected track. Select “P RDM” to repeat
all the tracks in random order.
To exit Repeat Play, stop the MD and then press the P.MODE button until the display returns
to the original one.
VOL
JOG
MODE
• Direct connection without passing through the remote control may generate noise.
Using the unit with a car audio system
You can listen to an MD through your car audio system. The following options are available
for your car audio system.
Troubleshooting Guide
Before requesting service for this unit, check the chart below for a possible cause of the problem you are experiencing. Some simple checks or a minor adjustment on your part may eliminate the problem and restore proper operation.
If you are in doubt about some of the check points, or if the remedies indicated in the chart do
not solve the problem, refer to the directory of Authorized Service Centers (enclosed with this
unit) to locate a convenient service center, or consult your dealer for instructions.
Problem
Stereo connection
cable (not supplied)
Check this
Cannot operate.
Is the MD loaded? If not loaded “NO DISC” will appear.
Cannot play the MD.
• Is the HOLD switch released?
• Is the battery low?
• Is there moisture condensation on the lens?
(Wait for about an hour and then try again.)
Tracks on MD do not play in order, starting with the first track.
• Is the Repeat Play or Random Play selected?
• Is the FAV function activated?
Cannot hear music—too noisy.
• Is the headphones plug inserted all the way?
• Is the plug dirty? (Wipe away dirt on the plug.)
• Is music recorded on the MD? If not, “BLANK DISC”
will appear.
TV picture is distorted.
Radio reception is noisy.
Is the unit too near a TV or tuner? (If the TV or tuner is
connected to a simple indoor antenna, connect it to an
outdoor antenna.)
Power is not turned on.
• With both HOLD switches activated, the battery was
changed during playback. (Release both HOLD switches
and try to operate again.)
FAV registration is impossible.
• After FAV music registration, you have changed the
battery without stopping the MD. (Turn off the power
before changing the battery.)
Charging indicator does not light Is the charger too hat?
(If so, disconnect the AC adaptor and leave the charger
during charging.
for a while.)
• Car adaptor (CA-R153)
• Car audio cassette adaptor
Maintenance
Car audio cassette adaptor
(3.5 mm dia. stereo plug)
Notes:
• Since the insertion direction of the car audio cassette adaptor is limited, be sure whether it
can be inserted into the cassette slot of your car audio system.
• Depending on the vehicle used, noise may occur. In this case, it is recommended to connect a
noise filter available on the market between the remote control and car audio cassette adaptor.
• If your car audio system is equipped with a LINE IN or AUX IN jack, you can connect the
output of the remote control to the jack using a stereo mini plug signal cord (not supplied).
In this case, you do not need the optional car audio cassette adaptor.
Specifications
Unit:
Portable MINIDISC player
Wipe the unit and remote control with a soft cloth. Remove stubborn dirt using a cloth which
has been dipped in water or soapy water and wrung out, and then wipe dry.
Type
:
Sampling frequency
:
Compression/expansion
method
:
Number of channels
:
Frequency response
:
Wow & flutter
:
Output
:
• If you intend to use a chemically treated cleaning cloth, read its directions first.
• Do not use alcohol or paint thinners.
MDs:
If the MD cartridge is dirty wipe it with a damp cloth and then wipe dry.
When storing MDs, avoid locations which are
• Exposed to direct sunlight.
• Susceptible to high levels of humidity or dust.
• Directly exposed to heat from a heating appliance.
• On top of a car dashboard or near the rear window.
Duration of battery
:
Power requirements
:
Minidisc digital audio system
44.1 kHz
ATRAC method
2 channels (stereo)
20 Hz to 20,000 Hz
Unmeasurable
Headphone (3.5 mm dia. stereo × 1)
5 mW/ch at 10% THD/16 ohms to 47 kohms
Approx. 7 hours when using a rechargeable battery
(BN-R127) charged for 1.5 hours,
Approx. 7 hours when using an alkaline battery (LR6-Panasonic)
Approx. 16 hours when using a rechargeable battery and
alkaline battery together
* Above duration may differ depending on the ambient temperature and conditions.
DC 1.2 V (rechargeable battery), DC 1.5 V (R6 size battery)
DC IN 1.5 V
82.9 ×18.5× 103 mm
(Excluding buttons and controls)
Approx. 124 g (without battery)
Handling the MDs
• Do not open the shutter. The shutter is usually locked to prevent opening. Do not force to
open it or the disc may be destroyed.
Dimensions (W × H × D) :
MD Messages:
AC adaptor (AA-R9017)
Messages
Meaning
Action
DISC ERROR
There is a problem (damage) with the disc.
Replace the disc.
READ ERROR
Cannot read data.
Remove the MD and
reinsert it.
Mass
:
Input power source
Output voltage
: AC 230 V, 50 Hz
: DC 9 V, 500 mA
Charger/adaptor (AC-R124)
Input power source
Output voltage
: DC 9 V, 0.5 A
: DC1.5 V, 0.7 A
Design and specifications are subject to change without notice.
US and foreign patents licensed from Dolby Laboratories Licensing Corporation.
En, Sp, It
Printed in Japan
1298MNMCREOZK