1
!
Introduction
2
Before using for the first time
5
Basic operations
7
Various playback patterns
11
General informations
13
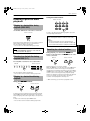
OPEN/
CLOSE STANDBY/ON
REPEAT
RANDOM PROGRAM CANCEL
CALL
DISC 1
DISC 2
DISC 3
DISC 4
DISC 5
DISC 6
DISC 7
DISCSKIP
1
2
3
5
6
7
9
10
4
8
DISC 1
DISC 2
DISC 3
DISC 4
DISC 5
DISC 6
+10
DISC 7
OPEN/CLOSE
EXCHANGE/DISC SKIP
PLAY
STANDBY
STANDBY/ON
STOP
7-DISC
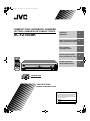
XL-FZ700 COMPACT DISC AUTOMATIC CHANGER
PAUSE
SKIP
PLAY & EXCHANGE
RM-SXLFZ700J
REMOTE CONTROL
CD-R/RW PLAYBACK
1BIT P . E . M D . D . CONVERTER
,16758&7,216
!"#
$%&
!
Warnings, Cautions and Others
Mises en garde, précautions et indications diverses
CAUTION
RISK OF ELECTRIC SHOCK
DO NOT OPEN
TO REDUCE THE RISK OF ELECTRIC SHOCK.
DO NOT REMOVE COVER (OR BACK)
NO USER SERVICEABLE PARTS INSIDE.
REFER SERVICING TO QUALIFIED SERVICE PERSONNEL.
CAUTION
To reduce the risk of electrical shocks, fire, etc.:
1. Do not remove screws, covers or cabinet.
2. Do not expose this appliance to rain or moisture.
CAUTION:
The lightning flash with arrowhead symbol,
within an equilateral triangle is intended to
alert the user to the presence of uninsulated
"dangerous voltage" within the product's
enclosure that may be of sufficient
magnitude to constitute a risk of electric
shock to persons.
The exclamation point within an equilateral
triangle is intended to alert the user to the
presence of important operating and
maintenance (servicing) instructions in the
literature accompanying the appliance.
ATTENTION
Afin d’éviter tout risque d’électrocution, d’incendie, etc.:
1. Ne pas enlever les vis ni les panneaux et ne pas ouvrir le coffret de
l’appareil.
2. Ne pas exposer l’appareil à la pluie ni à l’humidité.
Caution –– STANDBY/ON
switch!
Disconnect the mains plug to shut the power off completely. The
switch in any position does not disconnect the
STANDBY/ON
mains line. The power can be remote controlled.
!
Attention –– Commutateur STANDBY/ON
Déconnecter la fiche de secteur pour couper complètement le courant.
ne coupe jamais complètement la
Le commutateur STANDBY/ON
ligne de secteur, quelle que soit sa position. Le courant peut être
télécommandé.
For U.S.A.
This equipment has been tested and found to comply with the limits
for a Class B digital device, pursuant to part 15 of the FCC Rules.
These limits are designed to provide reasonable protection against
harmful interference in a residential installation.
This equipment generates, uses and can radiate radio frequency
energy and, if not installed and used in accordance with the
instructions, may cause harmful interference to radio
communications. However, there is no guarantee that interference
will not occur in a particular installation. If this equipment does cause
harmful interference to radio or television reception, which can be
determined by turning the equipment off and on, the user is
encouraged to try to correct the interference by one or more of the
following measures:
Reorient or relocate the receiving antenna.
Increase the separation between the equipment and receiver.
Connect the equipment into an outlet on a circuit different from that
to which the receiver is connected.
Consult the dealer or an experienced radio/TV technician for help.
WARNING: TO REDUCE THE RISK OF FIRE
OR ELECTRIC SHOCK, DO NOT EXPOSE
THIS APPLIANCE TO RAIN OR MOISTURE.
For Canada/pour le Canada
CAUTION: TO PREVENT ELECTRIC SHOCK, MATCH WIDE
BLADE OF PLUG TO WIDE SLOT, FULLY INSERT
ATTENTION: POUR EVITER LES CHOCS ELECTRIQUES,
INTRODUIRE LA LAME LA PLUS LARGE DE LA FICHE DANS LA
BORNE CORRESPONDANTE DE LA PRISE ET POUSSER
JUSQUAU FOND
For Canada / Pour le Canada
THIS DIGITAL APPARATUS DOES NOT EXCEED THE CLASS B
LIMITS FOR RADIO NOISE EMISSIONS FORM DIGITAL
APPARATUS AS SET OUT IN THE INTERFERENCE-CAUSING
EQUIPMENT STANDARD ENTITLED “DIGITAL APPARATUS,” ICES003 OF THE DEPARTMENT OF COMMUNICATIONS.
CET APPAREIL NUMERIQUE RESPECTE LES LIMITES DE BRUITS
RADIOELECTRIQUES APPLICABLES AUX APPAREILS
NUMERIQUES DE CLASSE B PRESCRITES DANS LA NORME
SUR LE MATERIEL BROUILLEUR: “APPAREILS NUMERIQUES”,
NMB-003 EDICTEE PAR LE MINISTRE DES COMMUNICATIONS.
IMPORTANT FOR LASER PRODUCTS
IMPORTANT POUR LES PRODUITS LASER
1. CLASS 1 LASER PRODUCT
2. DANGER: Visible laser radiation when open and interlock failed or
defeated. Avoid direct exposure to beam.
3. CAUTION: Do not open the top cover. There are no user serviceable parts inside the Unit; leave all servicing to qualified service
personnel.
1. PRODUIT LASER CLASSE 1
2. ATTENTION: Radiation laser visible quand l'appareil est ouvert ou
que le verrouillage est en panne ou désactivé. Eviter une exposition
directe au rayon.
3. ATTENTION: Ne pas ouvrir le couvercle du dessus. Il n'y a aucune
pièce utilisable à l'intérieur. Laisser à un personnel qualifié le soin
de réparer votre appareil.
!
We would like to thank you for purchasing one of our
JVC products.
Before connecting this unit to the wall outlet, please read
the instructions carefully to ensure that you obtain the
best possible performance.
If you have any questions, please consult your JVC
dealer.
English
English
Table of Contents
Introduction
Page 2
Precautions......................................................................... 2
About this manual ............................................................. 2
Names of buttons .............................................................. 3
Main unit...................................................................................3
Remote control unit .................................................................4
Display window........................................................................4
Before using for the first time
Page 5
Installing the unit............................................................... 5
Connecting to the Analog Output Jacks ......................... 5
Connecting to the Digital Output Jack............................ 5
Supplying the power......................................................... 5
To connect the AC power cord of the main unit ...................5
To install the batteries in the remote control unit.................6
COMPU LINK connection .................................................. 6
Basic operations
Page 7
Basic functions for disc playback .................................... 7
Turning on the power of this unit...........................................7
Remote control operation .......................................................7
Inserting and removing discs .................................................7
Playing a disc ...........................................................................8
Stopping playback ...................................................................8
Locating a point to start playback .................................. 9
Skipping to a desired disc during playback (DISC SKIP) ......9
Changing to a desired disc during playback DISC (1-7) .......9
Skipping to a desired track during playback .........................9
Searching for a desired section ..............................................9
Specifying a desired track in stop mode..............................10
Changing discs during playback (EXCHANGE)............. 10
Playing tracks in a order of disc/track number............. 10
Various playback patterns
Page 11
Playing tracks in a desired order (Program Play) ......... 11
Playing tracks in a random order (Random Play) ......... 12
Playing repeatedly (Repeat Play) ................................... 12
Repeating all the tracks of a disc ..........................................12
Repeating one track ...............................................................12
General informations
Page 13
COMPU LINK remote control system ............................ 13
Care and handling............................................................ 14
Troubleshooting .............................................................. 15
Specifications................................................................... 15
1
!
Introduction
Precautions
About this manual
Load compact discs only
This manual covers the operating instructions for the
compact disc automatic changer XL-FZ700BK.
Introduction
Never insert anything other than compact discs into any
part of the player.
If a problem persists
This manual is organized as follows:
If something goes wrong, turn off the power
immediately. If the same problem reoccurs when the
power is turned on once more, turn off the power again
and consult your JVC dealer.
The first part, “Introduction”, gives you the precautions
when using this unit, and shows you the names of
buttons on the main unit and the remote control unit.
Handling the power cord
When unplugging from the wall socket, always pull the
plug body, never the power cable.
Volume settings
A CD player has almost zero background noise. Because
of this, the technique of listening to the background level
and then setting the volume before the music starts, as
used with analog turntables or tape decks, cannot be
used. If you raise the volume level too high, speaker
damage may result.
Condensation
The CD player uses optical components. If it is moved
from a cold location to a warm one, or is used in a room
subject to excessive humidity or where a fire has just
been lit, condensation could form on the optical
components.
This may prevent the laser beam from being properly
transmitted and thus causes noise or even a
malfunction.
If condensation has formed and the CD player does not
function correctly, we recommend that you leave it
turned on for an hour or two. If at the end of this time the
CD player still does not function properly, please consult
your JVC dealer.
Transporting the unit
When carrying this unit, it is best to avoid either
tilting or turning it upside-down. When you cannot
avoid doing so, please remove the discs first.
Using compact discs
Compact discs are made of plastic and can easily be
damaged. If the disc is dirty, scratched, warped or
otherwise damaged, the digital information may not be
picked up correctly.
Applicable discs
This unit can only be used with compact discs bearing
the marks below. Never use discs of other types.
Recordable
ReWritable
CD-R and CD-RW discs recorded with the Audio CD format
can be played back, though some may not be played back
because of the disc characteristics or recording condition.
NOTE
• CD-R and CD-RW discs must be finalized.
2
The second part, “Before using for the first time”, tells
you what kind of operations you should do before
playing discs. This part describes where to place the unit
for best results, how to install batteries in the remote
control unit and how to connect this unit to the amplifier/
receiver and other components.
The third part, “Basic operations”, describes how to load
discs, and convenient basic functions for playing discs.
The fourth part, “Various playback patterns”, describes
various functions for playing discs.
The fifth part, “General informations”, describes the
COMPU LINK remote control system which facilitates
various operations between JVC components, and
explains how to take care of discs.
This part also includes “Troubleshooting”, which tells
you how to check the unit when a malfunction occurs,
and the technical informations regarding this unit.
" !
Introduction
English
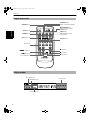
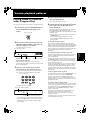
Names of buttons
Main unit
3 PLAY button
DISC (1-7) buttons
DISC 1
Introduction
8 PAUSE button
EXCHANGE/DISC SKIP button
0 OPEN/CLOSE button
STANDBY indicator
% STANDBY/ON button
DISC 2
DISC 3
DISC 4
DISC 5
DISC 6
DISC 7
OPEN/CLOSE
EXCHANGE/DISC SKIP
PLAY
STANDBY
STANDBY/ON
STOP
7- DISC
XL-FZ700 COMPACT DISC AUTOMATIC CHANGER
PAUSE
SKIP
PLAY & EXCHANGE
CD-R/RW PLAYBACK
1BIT P . E . M D . D . CONVERTER
Display window
remote sensor
7 STOP button
Carousel
4/¢
¢ SKIP buttons
DIGITAL OUT OPTICAL jack
DIGITAL
OUT
OPTICAL
COMPU LINK - 3
OUTPUT
RIGHT
AC IN
(SYNCHRO)
LEFT
OUTPUT (RIGHT/LEFT) jacks
COMPU LINK-3
(SYNCHRO) jacks
AC IN connector
3
# !
Introduction
Remote control unit
OPEN/CLOSE button
Remote control signal transmitter
PROGRAM button
OPEN/
CLOSE STANDBY/ON
REPEAT
Introduction
% STANDBY/ON button
Turns on the unit or puts it in
STANDBY mode
REPEAT button
RANDOM PROGRAM CANCEL
CANCEL button
CALL
RANDOM button
DISC (1-7) buttons
DISC 1
DISC 2
DISC 3
DISC 5
DISC 6
DISC 7 DISC SKIP
CALL: displaying program
contents button
DISC 4
DISC SKIP button
Track buttons
1
2
3
4
5
6
7
8
9
10
+10
3: Play button
4/¢
¢: skip buttons
7: Stop button
1/¡
¡: backward/
fast forward buttons
8: Pause button
RM-SXLFZ700J
REMOTE CONTROL
Display window
Disc indicators (1-7)
Music calendar
EXCHANGE indicator
1
2
5
3
6
4
7
EXCHANGE DISC
REPEAT1
PROGRAM
RANDOM
Play mode indicators
4
TRACK TOTALTIME
STEP
1 2 3 4 5 6
7 8 9 10 11 12
13 14 15 16 17 18
!
Before using for the first time
Installing the unit
Best location
Select a location which is level, dry and neither too cold
nor too hot (temperature range 5°C (41°F) to 35°C (95°F)).
Also, avoid dusty locations or any location subject to
vibration.
Connecting to the Digital
Output Jack
English
It is possible to transmit a digital sound signal from this
unit directly to a MD recorder, etc.
NOTES
If this unit is placed near a tuner or a radio receiver tuned
to AM frequencies, interference may occur. If this
happens, we recommend either that you move this unit
as far as possible from the tuner or receiver or briefly
turn off the power of this unit.
• Never connect the digital output cable except to the
digital input jack.
• An optical digital cord (optional) is required to make
this connection. Refer to the instruction manual of the
MD recorder, etc. for details.
Before using for
the first time
If interference occurs
Rear panel of this unit
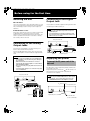
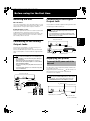
Connecting to the Analog
Output Jacks
DIGITAL
OUT
OPTICAL
COMPU LINK - 3
(SYNCHRO)
OUTPUT
RIGHT
AC IN
LEFT
MD recorder, etc.
Connecting to an amplifier or receiver allows you to
listen to the sound from the speakers.
Connect the OUTPUT jacks of this unit to the line input
jacks of an amplifier or receiver with the supplied audio
cord.
NOTES
• Never connect the OUTPUT jacks to the PHONO jacks
of the amplifier or receiver. This may cause damage to
the components.
• Make sure that the same channels are connected
between this unit and the amplifier or receiver: LEFT to
LEFT and RIGHT to RIGHT.
• Do not connect the power plug until all connections are
complete.
• Connect the plugs firmly. Loose connections may cause
noise or malfunction.
Optical digital cord (optional)
DIGITAL OUT
(OPTICAL)
To digital input jacks
Supplying the power
To connect the AC power cord of the
main unit
The AC power cord is supplied separately and must be
connected to the unit.
Plug the AC power cord into the
AC IN connector of
this unit and connect to the wall outlet after all
connections are complete.
Rear panel of this unit
NOTE
DIGITAL
OUT
OPTICAL
OUTPUT
RIGHT
COMPU LINK - 3
(SYNCHRO)
• When using the COMPU LINK Remote Control System
(see page 6), do not connect the power cord to the
SWITCHED AC OUTLET of an amplifier or receiver.
AC IN
LEFT
OUTPUT
Amplifier or receiver
RIGHT LEFT
AC IN connector
Rear panel of this unit
To audio input jacks
DIGITAL
OUT
OPTICAL
OUTPUT
RIGHT
COMPU LINK - 3
(SYNCHRO)
AC IN
LEFT
Audio cord
Speaker unit
Supplied AC power cord
To the wall outlet
(to be continued)
5
$ !
Before using for the first time
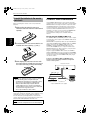
To install the batteries in the remote
control unit
Before operating the remote control unit, install two
batteries.
1 While pushing the tab of the rear cover,
remove the rear cover from the remote control
upwardly.
COMPU LINK connection
JVC’s COMPU LINK Remote Control System provides
unified control over system components connected with
COMPU LINK. Connecting JVC audio components with
the COMPU LINK jacks automatically controls relative
operations between components and facilitates various
operations. With the COMPU LINK connection to an
amplifier or receiver, you can operate XL-FZ700BK with
the amplifier or receiver’s remote control unit.
Synchronized recording is also available with this
feature.
Before using for
the first time
Connecting the COMPU LINK cord
2 Install batteries. Be sure that the batteries are
installed with correct polarity, (+) and (–).
3 While aligning the end of the rear cover with
The COMPU LINK-3 (SYNCHRO) jacks are used to output
and input the control signal for the COMPU LINK remote
control system.
COMPU LINK-compatible products are provided with the
jacks marked COMPU LINK-1, COMPU LINK-2 or COMPU
LINK-3, referring to the COMPU LINK version. XLFZ700BK is equipped with COMPU LINK-3. You can
connect XL-FZ700BK also to a component with lower
COMPU LINK versions. But, in that case, only the lower
versions’ features will be available.
Plug the supplied COMPU LINK cord into the COMPU
LINK-3 (SYNCHRO) jack on the rear panel of XL-FZ700BK.
Plug the other end into the COMPU LINK jack of the other
component. If there are two COMPU LINK jacks, plug it
into either of them.
Connect to the COMPU LINK-3 (SYNCHRO) jack of
another component equipped with the Compu Link
remote control system.
the remote control, assemble the rear cover on
the remote control by pushing it downwardly.
Rear panel of this unit
DIGITAL
OUT
OPTICAL
COMPU LINK - 3
(SYNCHRO)
OUTPUT
RIGHT
AC IN
LEFT
COMPU LINK cord*
NOTES
Incorrect use of batteries can cause corrosion or damage.
Note the following points to lengthen battery life.
• Install batteries observing the correct polarity, (+) and (–).
Amplifier or receiver
Cassette deck
• Do not use new and old batteries simultaneously.
• Batteries with similar shapes may have different
voltage ratings. Be sure to use the correct batteries.
• Remove batteries from the remote control unit if it will
not be used for a long period of time.
• Do not expose batteries to heat or flame.
Battery replacement
Service life of batteries depends on the condition of use;
standard life is about one year. When the batteries
become weak, the operating distance of the remote
control unit becomes short. If this happens, replace the
batteries R6P(SUM-3)/AA(15F) with new ones.
NOTE
• The lower the temperature, the shorter the battery life.
6
* Only one COMPU LINK cord is supplied.
Turntable
!
Basic operations
English
Basic functions for disc
playback
4
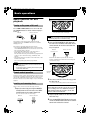
Turning on the power of this unit
3
Press the % STANDBY/ON button to turn on this unit.
The STANDBY indicator is turned off and the display is
turned on.
Main unit
The number written on the carousel corresponds
to the disc number shown on the display
Remote control unit
STANDBY
STANDBY/ON
NOTE
• From the second time on, the carousel opens with the
previously played disc on the left-front tray.
Press again to turn off the power and activate the
standby mode. The STANDBY indicator is lit and the
display goes out.
The power is automatically turned on also by;
• Pressing the 0 OPEN/CLOSE button on the main unit
or the OPEN/CLOSE button on the remote control unit.
The carousel will be opened.
• Pressing the 3 PLAY button on the main unit or
the 3 button on the remote control unit.
The disc that was lastly selected will be played back. If
no disc is set in all the disc trays, “NO DISC” will
appear.
• Pressing the DISC (1-7) button on the main unit or the
remote control unit.
The corresponding disc will be played back.
2 Press the EXCHANGE/DISC SKIP button on
the main unit or the DISC SKIP button on the
remote control unit to select accessible disc
trays if required.
Main unit
Remote control unit
EXCHANGE/DISC SKIP
DISC SKIP
Basic operations
STANDBY/ON
Each time the button is pressed, the carousel
rotates clockwise by an amount for accessing the
next two disc trays.
NOTES
• A small amount of power (3.0 W) is consumed even in
the standby mode.
• To turn off the power completely, disconnect the power
cord from the wall outlet.
Remote control operation
Point the remote control unit towards the remote sensor
and operate it steadily and carefully. The remote control
unit can be used within a range of about 7 m (23 feet)
from the remote sensor, and at angles of up to about 30
degrees.
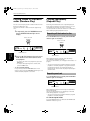
Inserting and removing discs
Up to 7 discs can be set on the disc tray carousel.
1 Open the carousel by pressing the 0 OPEN/
CLOSE button on the main unit or the OPEN/
CLOSE button on the remote control unit.
You can access to two of seven trays.
Main unit
Remote control unit
OPEN/CLOSE
OPEN/
CLOSE
6
Label
side up
5
3 Place one or two discs in the disc tray(s) with
the label side up.
• To insert an 8-cm disc, place it in the inner recess.
CAUTION
When loading discs in the disc tray, be sure to put the
discs according to the recess. Otherwise, the discs
will be damaged when the carousel is closed, and
cannot be removed from the unit.
4 Repeat steps 2 and 3 to set more discs onto
other disc trays.
5 Press the 0 OPEN/CLOSE button on the main
unit or the OPEN/CLOSE button on the remote
control unit to close the carousel.
7
% !
Basic operations
Disc to be played back
The disc set in the front-left disc tray when the carousel
closes is loaded for playback. If no disc is set in the frontleft disc tray when the carousel closed, the unit rotates
the carousel clockwise until it finds a disc. If no disc is set
at all in the carousel, “NO DISC” will appear on the
display.
To stop playback temporarily
Press the 8 PAUSE button on the main unit or the 8
button on the remote control unit. The 8 indicator lights
on the display and playback stops temporarily.
To resume playback, press the 3 PLAY button on the
main unit or the 3 button on the remote control unit
again.
Playback operation before closing the carousel
• By pressing the 3 PLAY button on the main unit or the
3 button on the remote control unit, the carousel
closes and the disc to be played back firstly will be
played back.
• By pressing the DISC (1-7) buttons on the main unit or
the remote control unit, the specified disc will be
played back.
Stopping playback
Press the 7 STOP button on the main unit or
the 7 button on the remote control unit.
Main unit
Remote control unit
STOP
Playing a disc
Playing a disc
Basic operations
Press the 3 PLAY button on the main unit or
the 3 button on the remote control unit.
The 3 indicator lights on the display and playback starts.
Main unit
1 2 3 4
5 6 7
DISC
TRACK TOTALTIME
Total track number
A few seconds later
1 2 3 4
5 6 7
DISC
2
5
3
6
1 2 3 4 5 6
7 8 9 10 11 12
13 14 15 16 17 18
Total Playback time
Remote control unit
PLAY
1
STEP
PROGRAM
RANDOM
TRACK
TIME
STEP
4
7
1 2 3 4 5 6
7 8 9 10 11 12
13 14 15 16 17 18
Playback elapsed time
DISC number being played back
DISC
TRACK
TIME
STEP
PROGRAM
RANDOM
1 2 3 4 5 6
7 8 9 10 11 12
13 14 15 16 17 18
About the DISC (1-7) indicators
Each DISC indicator shows the current status of the
corresponding tray as follows:
• The circle of the DISC indicator will light if a disc is set
in the corresponding disc tray. (The numbers 1-7 are
always lit.)
• The circle is unlit if no disc is set in the corresponding
disc tray.
NOTE
• All available discs are sequentially played back.
Playback will continue until you stop it. (See “Stopping
playback” on this page.)
Playing a desired disc
Press a desired DISC (1-7) button.
The 3 indicator lights on the display and playback starts.
Main unit
DISC 1
DISC 2
Remote control unit
DISC 3
DISC 4
DISC 5
DISC 6
DISC 7
DISC 1
DISC 2
DISC 3
DISC 5
DISC 6
DISC 7
DISC 4
NOTES
• Inserted disc is detected when the carousel is turned.
So, until then, the unit cannot know the disc presence
status of the disc tray. For such disc trays, the unit
temporarily turns on the corresponding indicators.
• During program play mode, the number shows the
presence of disc and the circle shows the disc being
programed.
• During random play mode, the number shows the
presence of disc and the circle shows the disc being
played back for random play.
About the music calendar
• The DISC (1-7) button without the circle in the DISC
indicator does not work.
When a disc to be played back is read, the contents (track
numbers) of the disc appear on the music calendar. As
the track is finished to play back or skipped, the track
number will disappear from the music calendar.
NOTE
• During program play mode, only the programed tracks
appear on the music calendar.
8
& !
Basic operations
Using the track buttons
Locating a point to start
playback
English
Remote control unit
Skipping to a desired disc during
playback (DISC SKIP)
1
2
3
4
5
6
7
8
9
10
+10
Use the DISC SKIP button on the remote control unit.
To skip to the desired track during playback, press the
corresponding track buttons.
DISC SKIP
Each time the DISC SKIP button is pressed, the selected
DISC number changes from 1 to 7, then back to 1.
The selected disc will be played back.
• You can also use this button during stop mode.
NOTE
• The EXCHANGE/DISC SKIP button on the main unit
does not work for this purpose.
[How to use the track buttons]
When selecting track number 11 or above, use the [+10]
button.
Example:
To select track number 12, press [+10] and then [2].
To select track number 25, press [+10] twice and then [5].
To select track number 30, press [+10] twice and then [10].
Basic operations
Remote control unit
Searching for a desired section
During playback, press and hold the 4/¢
¢ SKIP
buttons on the main unit or the 1/¡
¡ buttons on the
remote control unit.
Changing to a desired disc during
playback DISC (1-7)
Main unit
Remote control unit
SKIP
Press any DISC (1-7) button to select a desired disc.
Main unit
DISC 1
DISC 2
Remote control unit
DISC 3
DISC 4
DISC 5
DISC 6
DISC 7
DISC 1
DISC 2
DISC 3
DISC 5
DISC 6
DISC 7
DISC 4
The selected disc will be played back.
• You can also use these buttons during stop mode.
Skipping to a desired track during
playback
Playback advances or reverses rapidly.
While the 4 button on the main unit or the 1 button
on the remote control unit is kept pressed, playback
rapidly reverses toward the beginning of the track. While
the ¢ button on the main unit or the ¡ button on the
remote control unit is kept pressed, playback rapidly
advances toward the end of the track. When the desired
section is reached, release the button. The player
resumes normal playback from that point.
• While searching, you can hear a playback sound.
Using the 4/¢
¢ buttons
Main unit
Remote control unit
SKIP
To skip back to the beginning of the track being played,
tap the 4 button. When the beginning of the track is
reached, tapping this button again skips to the previous
track.
To skip to the next track, tap the ¢ button.
• You can also use these buttons during stop mode.
9
!
Basic operations
Specifying a desired track in stop mode
To specify the desired track number, use the track
buttons (1-10, +10).
You can continuously play all the loaded discs, starting
from any track on any disc.
Remote control unit
1
2
3
4
5
6
7
8
9
10
1 Press the 3 PLAY button on the main unit or
the 3 button on the remote control unit to
start playback.
+10
The unit searches for the selected track and playback
starts automatically.
To specify the track number with the track buttons, see
“How to use the track buttons” on page 9.
Basic operations
Playing tracks in a order of
disc/track number
Playback starts from the current disc.
The following display appears.
DISC
1
2
5
6
TRACK
Changing discs during
playback (EXCHANGE)
Press the EXCHANGE/DISC SKIP button on the main unit.
The carousel opens and you can change the discs inside.
The EXCHANGE indicator lights on the display.
Main unit
7
NOTE
• When the carousel is opened by pressing the
EXCHANGE/DISC SKIP button on the main unit, it is not
possible to close it by pushing it back with hand.
Always press the 0 OPEN/CLOSE button to close the
carousel.
1 2 3 4 5 6
7 8 9 10 11 12
13 14 15 16 17 18
Playback elapsed time
Track number being played back
or the remote control unit to select the disc
number which contains the first track you
want to play.
When you want to play from the first track on the
selected disc, it is not necessary to select the track
number. In this case, omit the next step.
3 Select the track number with the 4/¢
buttons on the main unit or the remote control
unit or the track buttons on the remote control
unit.
The selected track number appears on the display
and playback starts from the selected track
automatically.
To select the track number with the track buttons,
see “How to use the track buttons” on page 9.
DISC
1
2
5
It is also possible to change the discs during program
playback or random playback, following the above
procedure.
STEP
2 Use the DISC (1-7) buttons on the main unit
EXCHANGE/DISC SKIP
To change the discs loaded in the far end of the disc tray,
press the EXCHANGE/DISC SKIP button on the main unit
or the DISC SKIP button on the remote control unit to
make the carousel rotate. After changing the discs, press
the 0 OPEN/CLOSE button to close the carousel. Then,
the EXCHANGE indicator goes out on the display.
TIME
4
Selected disc number
During playback of a disc, you can change other discs in
the disc trays without stopping playback.
10
3
3
6
4
7
TRACK
TIME
STEP
6
7 8 9 10 11 12
13 14 15 16 17 18
Track number being played back
!
Various playback patterns
You can play only the favorite tracks in any desired order.
1 In stop mode, press the PROGRAM button so
that the PROGRAM indicator lights on the
display.
Remote control unit
PROGRAM
2 Select the disc which contains the track to be
programmed with the DISC (1-7) button. “AL”
(all tracks) appears on the display.
ex.) When disc 4 is selected.
Shows that a disc is loaded
DISC
1
2
5
3
6
4
7
TRACK
TIME
STEP
PROGRAM
PROGRAM indicator
1 2 3 4 5 6
7 8 9 10 11 12
13 14 15 16 17 18
Program step number
AL (all tracks)
To program the entire disc
When the track number is not specified after
selecting the disc number, all tracks on the selected
disc are programmed.
3 Select the track number by pressing the
track buttons on the remote control unit.
To select the track number with the track buttons,
see “How to use the track buttons” on page 9.
Remote control unit
1
2
3
4
5
6
7
8
9
10
+10
ex.) When track 5 is selected.
Shows the disc being programmed
DISC
1
2
5
3
6
4
7
PROGRAM
TRACK
TIME
STEP
1 2 3 4 5 6
7 8 9 10 11 12
13 14 15 16 17 18
Track number selected for the program step 1
4 Repeat steps 2 and 3 for other tracks and/or
English
discs to be programmed.
You can program up to 32 steps.
5 Start playback by pressing the 3 PLAY button
on the main unit or the 3 button on the
remote control unit.
The programmed tracks and/or discs are played in
the programmed order and, when all the
programmed tracks/discs are played back, program
playback stops.
• You can skip to a desired program step with the
4/¢ buttons.
If you have programmed all discs as “AL”,
pressing ¢ (or 4) will skip to the next (or
previous) disc.
• To check the program contents
In stop mode or during playback, press the CALL
button on the remote control unit. Each time the CALL
button is pressed, the program contents are displayed
in the programmed order. (After pressing the CALL
button, perform the next button operation within five
seconds (during the program step number is
blinking).)
• To modify the program contents in stop mode
To add a new program step to the last step, enter the
new disc number and/or track number referring to
steps 2 and 3 above.
To delete the program step from the last step, press
the CANCEL button on the remote control unit. Each
time the CANCEL button is pressed, the last program
step is deleted one by one.
To delete any program step, press the CALL button to
locate the program step number you want to delete,
and then press the CANCEL button. (After pressing
the CALL button, perform the next button operation
within five seconds (during the program step number
is blinking).)
Various playback
patterns
Playing tracks in a desired
order (Program Play)
• To exit program mode in stop mode
To exit program mode, press the PROGRAM button on
the remote control unit so that the PROGRAM
indicator goes out on the display. However, the
program contents are not erased and, whenever the
program mode is selected, you can play the tracks in
programmed order.
• To clear the entire program contents
In stop mode, press the CANCEL button on the remote
control unit repeatedly until entire program contents
are deleted. Or, press the 0 OPEN/CLOSE button on
the main unit or the OPEN/CLOSE button on the
remote control unit.
Even after the entire program contents have been
cleared, the unit remains in program mode.
Note that turning off the unit does not clear the
program contents.
If the AC power cord is disconnected from the outlet,
the program will be erased.
• If you want to cancel the displayed program step,
press the CANCEL button on the remote control
unit and then enter a new disc number and/or
track number.
11
!
Various playback patterns
Playing tracks in a random
order (Random Play)
Playing repeatedly
(Repeat Play)
You can select and play tracks in random order from all
the discs loaded in the unit.
Selections are made so that each track is played only
once.
Normally, all available discs are sequentially played
back. However, with the repeat play function, you can
repeatedly play all tracks of a disc or one track.
It is also possible to utilize this function in combination
with random/program playback function.
1 In stop mode, press the RANDOM button so
that the RANDOM indicator lights on the
display.
Repeating all the tracks of a disc
Press the REPEAT button repeatedly until the REPEAT
indicator lights on the display.
Remote control unit
RANDOM
Remote control unit
REPEAT
DISC
1
2
Various playback
patterns
5
3
6
4
7
TRACK
PROGRAM
RANDOM
TIME
STEP
1 2 3 4 5 6
7 8 9 10 11 12
13 14 15 16 17 18
RANDOM indicator
1 2 3 4
5 6 7
• To skip to the track to be played next, press the
¢ button.
• To skip to the beginning of the current track,
press the 4 button.
• To cancel random playback
In stop mode, press the RANDOM button on the
remote control unit. The RANDOM indicator goes out
and the random playback is cancelled.
DISC
TRACK
TIME
STEP
1 2 3 4 5 6
7 8 9 10 11 12
13 14 15 16 17 18
REPEAT indicator
2 Press the 3 PLAY button on the main unit or
the 3 button on the remote control unit to
start playback.
REPEAT1
PROGRAM
RANDOM
When playback starts, all tracks of the disc being
selected will be played repeatedly.
(To select a desired disc, see “Playing a desired disc” on
page 8.)
• You can use this function together with the program
playback or random playback. In program mode, the
programmed contents are played repeatedly. In
random mode, all the tracks are played repeatedly in
random order.
Repeating one track
Press the REPEAT button repeatedly until the REPEAT 1
indicator lights on the display.
1 2 3 4
5 6 7
REPEAT1
PROGRAM
RANDOM
DISC
TRACK
TIME
STEP
1 2 3 4 5 6
7 8 9 10 11 12
13 14 15 16 17 18
REPEAT1 indicator
When playback starts, the track being selected will be
played repeatedly.
(To select a desired track, see “Skipping to a desired
track during playback” on page 9.)
• You can use this function together with the program
playback or random playback.
To cancel repeat mode
Press the REPEAT button so that both the REPEAT and
REPEAT 1 indicators go out.
12
" !
General informations
COMPU LINK remote control system
English
The COMPU LINK Remote Control System controls relative operations between components automatically and
facilitates various operations.
This is a system originated and developed by JVC for facilitating various system operations.
The following is a brief explanation of this system:
Automatic source selection
When the supplied COMPU LINK cord is utilized to connect this unit to others equipped with COMPU LINK jacks,
switching-in of each system component can be performed with a single touch on the source selector button located on a
JVC amplifier or receiver.
When selection is carried out in this manner, the corresponding unit will automatically start operation.
Upon pressing of the play button, the source selector of the amplifier or receiver changes automatically. When a new
unit is switched in, the previously selected component stops operation within five seconds.
Synchronized recording
Synchronized recording refers to the process in which a JVC cassette deck starts recording, synchronized with this unit.
Synchronized recording is carried out as follows:
1 Set the cassette deck to the recording pause mode in accordance with its instructions.
2 To record only certain tracks or discs, program the tracks in any order, as desired.
3 Press the 3 PLAY button on the front panel of this unit. The cassette deck automatically starts recording, synchronized
with this unit.
NOTES
• Synchronized recording stops automatically when this unit stops playback.
• To properly operate the synchronized recording, the buttons/controls other than % STANDBY/ON, 7 STOP and 0 OPEN/
CLOSE buttons do not function.
• If the recording pause mode is set on the cassette deck by pressing the 8 PAUSE button after pressing the ¶ REC and 3 PLAY
buttons simultaneously, synchronized recording is not possible. For details, refer to the instructions for the cassette deck.
General
informations
• To cancel synchronized recording, press the stop button of this unit or the cassette deck.
Automatic power on/off function
This function is to control the power on/off of the receiver/amplifier or this unit respectively as the following.
• When this unit enters playback mode, the power of the receiver or amplifier is turned on.
• When the source selector of the receiver/amplifier is set to CD function mode, the power of this unit is turned on.
NOTES
• Abnormal operation may result if the power supply of the component(s) is interrupted. If this happens, you must start over
again.
• Ensure that the COMPU LINK jacks of the each component are connected with the supplied COMPU LINK cord. Also, be sure to
fully read the instructions for each component.
• When the power of the amplifier or receiver is switched off, this unit is also turned off automatically.
13
# !
General informations
Care and handling
How to handle CDs
When handling compact discs, do not touch the surface of the disc (reflective silver side — the side without the label).
Since compact discs are made of plastic, they are easily damaged. If the disc gets dirty, dusty, scratched or warped, the
sound will not be picked up correctly and, in addition, such discs may cause the CD player to malfunction.
Even on label side
Do not damage the label side, stick paper to or use any adhesive on the surface.
Storage
Make sure that discs are kept in their cases. If discs are piled one on top of another without their protective cases, they
can be damaged.
Do not put discs in any location where they can be exposed to direct sunlight, or in any place where humidity or
temperature is high. Avoid leaving discs in your car!
General
informations
Maintenance of discs
14
When there are fingerprints or other dirt adhering to a disc, wipe the disc with a soft, dry cloth with a movement going
from the center outwards.
If difficult to clean, wipe the disc with a cloth moistened with water.
Never use record cleaners, petrol, alcohol or any anti-static agents.
!
General informations
English
Troubleshooting
What appears to be a malfunction may not always be serious. Please go through the following list before requesting service.
Symptom
Possible case
Remedy
Power plug is disconnected from the AC
outlet.
Connect the plug to the AC outlet.
The unit is not operative.
Discs are not loaded.
Load discs in the disc tray.
Disc is inserted upside down.
Load the disc with its label-side up in the disc
tray.
Disc is not loaded in the correct position.
Load the disc according to the groove of the
disc tray.
Moisture is condensed inside the unit.
Leave the unit turned on until the moisture
evaporates.
Disc is not finalized.
Finalize the disc.
The reproduced sound includes
noise.
Disc is dirty.
Wipe off the disc surface with a soft cloth.
Disc is warped.
Replace the disc with a new one.
The sound is intermittent.
Disc is scratched.
Replace the disc with a new one.
Batteries are exhausted.
Replace both batteries.
There is an obstacle between remote
control unit and the remote sensor of the
main unit.
Remove the obstacle.
Direct sunlight shines on the remote sensor
of the main unit.
Shade the unit from the direct sunlight.
The remote control unit does not
function.
General
informations
Playback is not possible.
Specifications
Accessories
General
Format:
Signal detection system:
CD capacity:
Sampling frequency:
Power requirements:
Power consumption:
Dimensions (W x H x D):
Mass:
Compact disc digital audio
Non-contact optical detection
7 discs
44.1 kHz
AC 120 V
, 60 Hz
7.0 W (POWER ON)
3.0 W (STANDBY mode)
435 mm x 102 mm x 448 mm
(17-3/16 in. x 4-1/16 in.
x 17-11/16 in.)
Approx. 5.5 k (12.2 lbs)
AC power cord (1)
Audio cord (1)
COMPU LINK cord (1)
Remote control unit (RM-SXLFZ700J) (1)
Batteries R6P(SUM-3)/AA(15F) (2)
* Designs and specifications are subject to change
without notice.
Audio performance
Frequency response:
Dynamic range:
Signal to noise ratio:
Total harmonic distortion:
Wow and flutter:
Output level:
2 Hz to 20,000 Hz (±1 dB)
98.0 dB (at 1 kHz)
108.0 dB
0.002% (at 1 kHz)
Less than measurable limit
2.0 Vrms
15
!
Authorized Service Centers
®
QUALITY
SERVICE
HOW TO LOCATE YOUR JVC SERVICE CENTER
TOLL FREE: 1 (800) 537-5722
http://www.jvc.com
Dear Customer,
In order to receive the most satisfaction from your purchase,please read the instruction booklet before
operating the unit.In the event that repairs are necessary, please call 1 (800)537-5722 for your nearest
authorized servicer or visit our website at www.JVC.com
Remember to retain your Bill of Sale for Warranty Service.
Do not service the television yourself
Caution
To prevent electrical shock,do not open the cabinet.There are no user serviceable
parts inside.Please refer to qualified service personnel for repairs.
Accessories
To purchase accessories for your JVC product,please call toll free:1 (800)882-2345 or
on the web at www.JVC.com
BT-51001-5
(0301)
% !
LIMITED WARRANTY
AUDIO-1
JVC COMPANY OF AMERICA warrants this product and all parts thereof, except as set forth below ONLY TO THE
ORIGINAL PURCHASER AT RETAIL to be FREE FROM DEFECTIVE MATERIALS AND WORKMANSHIP from the date
of original retail purchase for the period as shown below. ("The Warranty Period")
PARTS
1
LABOR
YR
1
YR
THIS LIMITED WARRANTY IS VALID ONLY IN THE FIFTY (50) UNITED STATES, THE DISTRICT OF COLUMBIA AND
IN COMMONWEALTH OF PUERTO RICO.
WHAT WE WILL DO:
If this product is found to be defective, JVC will repair or replace defective parts at no charge to the original owner.
Such repair and replacement services shall be rendered by JVC during normal business hours at JVC authorized service
centers. Parts used for replacement are warranted only for the remainder of the Warranty Period. All products and parts
thereof may be brought to a JVC authorized service center on a carry-in basis except for Television sets having a screen
size 25 inches and above which are covered on an in-home basis.
WHAT YOU MUST DO FOR WARRANTY SERVICE:
Return your product to a JVC authorized service center with a copy of your bill of sale. For your nearest JVC authorized
service center, please call toll free: (800) 537-5722.
If service is not available locally, box the product carefully, preferably in the original carton, and ship, insured, with
a copy of your bill of sale plus a letter of explanation of the problem to the nearest JVC Factory Service Center, the
name and location of which will be given to you by the toll-free number.
If you have any questions concerning your JVC Product, please contact our Customer Relations Department.
WHAT IS NOT COVERED:
This limited warranty provided by JVC does not cover:
1. Products which have been subject to abuse, accident, alteration, modification, tampering, negligence, misuse, faulty
installation, lack of reasonable care, or if repaired or serviced by anyone other than a service facility authorized by
JVC to render such service, or if affixed to any attachment not provided with the products, or if the model number
or serial number has been altered, tampered with, defaced or removed;
2. Initial installation and installation and removal for repair;
3. Operational adjustments covered in the Owner's Manual, normal maintenance, video and audio head cleaning;
4. Damage that occurs in shipment, due to act of God, and cosmetic damage;
5. Signal reception problems and failures due to line power surge;
6. Video Pick-up Tubes/CCD Image Sensor, Cartridge, Stylus (Needle) are covered for 90 days from the date of purchase;
7. Accessories
8. Batteries (except that Rechargeable Batteries are covered for 90 days from the date of purchase);
There are no express warranties except as listed above.
THE DURATION OF ANY IMPLIED WARRANTIES, INCLUDING THE IMPLIED WARRANTY OF MERCHANTABILITY, IS
LIMITED TO THE DURATION OF THE EXPRESS WARRANTY HEREIN.
JVC SHALL NOT BE LIABLE FOR THE LOSS OF USE OF THE PRODUCT, INCONVENIENCE, LOSS OR ANY OTHER
DAMAGES, WHETHER DIRECT, INCIDENTAL OR CONSEQUENTIAL (INCLUDING, WITHOUT LIMITATION, DAMAGE
TO TAPES, RECORDS OR DISCS) RESULTING FROM THE USE OF THIS PRODUCT, OR ARISING OUT OF ANY BREACH
OF THIS WARRANTY. ALL EXPRESS AND IMPLIED WARRANTIES, INCLUDING THE WARRANTIES OF MERCHANTABILITY AND FITNESS FOR PARTICULAR PURPOSE, ARE LIMITED TO THE WARRANTY PERIOD SET FORTH ABOVE.
Some states do not allow the exclusion of incidental or consequential damages or limitations on how long an
implied warranty lasts, so these limitations or exclusions may not apply to you. This warranty gives you specific
legal rights and you may also have other rights which vary from state to state.
JVC COMPANY OF AMERICA
DIVISION OF JVC AMERICAS CORP.
1700 Valley Road
Wayne, NJ 07470
REFURBISHED PRODUCTS CARRY A SEPARATE WARRANTY, THIS WARRANTY DOES NOT APPLY. FOR DETAILS OF
REFURBISHED PRODUCT WARRANTY, PLEASE REFER TO THE REFURBISHED PRODUCT WARRANTY INFORMATION
PACKAGED WITH EACH REFURBISHED PRODUCT.
For customer use:
Enter below the Model No. which is located either on the rear, bottom or side of the cabinet. Retain this information
for future reference.
Model No. :
Serial No. :
Purchase data :
Name of dealer :
& !
VICTOR COMPANY OF JAPAN, LIMITED
EN
V
J
C
0202AOMCREJEM
!" #!$$$%$&'
Introduction
Introduction
2
Before using for the first time
Avant la première utilisation
5
Basic operations
Opérations de base
7
Various playback patterns
Diverses possibilites de lecture
11
General informations
Renseignements divers
13
OPEN/
CLOSE STANDBY/ON
REPEAT
RANDOM PROGRAM CANCEL
CALL
DISC 1
DISC 2
DISC 3
DISC 4
DISC 5
DISC 6
DISC 7
DISCSKIP
1
2
3
5
6
7
9
10
4
8
DISC 1
+10
DISC 2
DISC 3
DISC 4
DISC 5
DISC 6
DISC 7
OPEN/CLOSE
EXCHANGE/DISC SKIP
PLAY
STANDBY
STANDBY/ON
STOP
XL-FZ700 COMPACT DISC AUTOMATIC CHANGER
7-DISC
PLAY & EXCHANGE
PAUSE
SKIP
RM-SXLFZ700J
REMOTE CONTROL
CD-R/RW PLAYBACK
1BIT P . E . M D . D . CONVERTER
!
!"#
$%&
!" #!$$$%$&'
Warnings, Cautions and Others
Mises en garde, précautions et indications diverses
CAUTION
RISK OF ELECTRIC SHOCK
DO NOT OPEN
TO REDUCE THE RISK OF ELECTRIC SHOCK.
DO NOT REMOVE COVER (OR BACK)
NO USER SERVICEABLE PARTS INSIDE.
REFER SERVICING TO QUALIFIED SERVICE PERSONNEL.
CAUTION
To reduce the risk of electrical shocks, fire, etc.:
1. Do not remove screws, covers or cabinet.
2. Do not expose this appliance to rain or moisture.
CAUTION:
The lightning flash with arrowhead symbol,
within an equilateral triangle is intended to
alert the user to the presence of uninsulated
"dangerous voltage" within the product's
enclosure that may be of sufficient
magnitude to constitute a risk of electric
shock to persons.
The exclamation point within an equilateral
triangle is intended to alert the user to the
presence of important operating and
maintenance (servicing) instructions in the
literature accompanying the appliance.
ATTENTION
Afin d’éviter tout risque d’électrocution, d’incendie, etc.:
1. Ne pas enlever les vis ni les panneaux et ne pas ouvrir le coffret de
l’appareil.
2. Ne pas exposer l’appareil à la pluie ni à l’humidité.
Caution –– STANDBY/ON
switch!
Disconnect the mains plug to shut the power off completely. The
switch in any position does not disconnect the
STANDBY/ON
mains line. The power can be remote controlled.
!
Attention –– Commutateur STANDBY/ON
Déconnecter la fiche de secteur pour couper complètement le courant.
ne coupe jamais complètement la
Le commutateur STANDBY/ON
ligne de secteur, quelle que soit sa position. Le courant peut être
télécommandé.
For U.S.A.
This equipment has been tested and found to comply with the limits
for a Class B digital device, pursuant to part 15 of the FCC Rules.
These limits are designed to provide reasonable protection against
harmful interference in a residential installation.
This equipment generates, uses and can radiate radio frequency
energy and, if not installed and used in accordance with the
instructions, may cause harmful interference to radio
communications. However, there is no guarantee that interference
will not occur in a particular installation. If this equipment does cause
harmful interference to radio or television reception, which can be
determined by turning the equipment off and on, the user is
encouraged to try to correct the interference by one or more of the
following measures:
Reorient or relocate the receiving antenna.
Increase the separation between the equipment and receiver.
Connect the equipment into an outlet on a circuit different from that
to which the receiver is connected.
Consult the dealer or an experienced radio/TV technician for help.
WARNING: TO REDUCE THE RISK OF FIRE
OR ELECTRIC SHOCK, DO NOT EXPOSE
THIS APPLIANCE TO RAIN OR MOISTURE.
For Canada/pour le Canada
CAUTION: TO PREVENT ELECTRIC SHOCK, MATCH WIDE
BLADE OF PLUG TO WIDE SLOT, FULLY INSERT
ATTENTION: POUR EVITER LES CHOCS ELECTRIQUES,
INTRODUIRE LA LAME LA PLUS LARGE DE LA FICHE DANS LA
BORNE CORRESPONDANTE DE LA PRISE ET POUSSER
JUSQUAU FOND
For Canada / Pour le Canada
THIS DIGITAL APPARATUS DOES NOT EXCEED THE CLASS B
LIMITS FOR RADIO NOISE EMISSIONS FORM DIGITAL
APPARATUS AS SET OUT IN THE INTERFERENCE-CAUSING
EQUIPMENT STANDARD ENTITLED “DIGITAL APPARATUS,” ICES003 OF THE DEPARTMENT OF COMMUNICATIONS.
CET APPAREIL NUMERIQUE RESPECTE LES LIMITES DE BRUITS
RADIOELECTRIQUES APPLICABLES AUX APPAREILS
NUMERIQUES DE CLASSE B PRESCRITES DANS LA NORME
SUR LE MATERIEL BROUILLEUR: “APPAREILS NUMERIQUES”,
NMB-003 EDICTEE PAR LE MINISTRE DES COMMUNICATIONS.
IMPORTANT FOR LASER PRODUCTS
IMPORTANT POUR LES PRODUITS LASER
1. CLASS 1 LASER PRODUCT
2. DANGER: Visible laser radiation when open and interlock failed or
defeated. Avoid direct exposure to beam.
3. CAUTION: Do not open the top cover. There are no user serviceable parts inside the Unit; leave all servicing to qualified service
personnel.
1. PRODUIT LASER CLASSE 1
2. ATTENTION: Radiation laser visible quand l'appareil est ouvert ou
que le verrouillage est en panne ou désactivé. Eviter une exposition
directe au rayon.
3. ATTENTION: Ne pas ouvrir le couvercle du dessus. Il n'y a aucune
pièce utilisable à l'intérieur. Laisser à un personnel qualifié le soin
de réparer votre appareil.
!" #!$$$%$&'
We would like to thank you for purchasing one of our
JVC products.
Before connecting this unit to the wall outlet, please read
the instructions carefully to ensure that you obtain the
best possible performance.
If you have any questions, please consult your JVC
dealer.
English
English
Table of Contents
Introduction
Page 2
Precautions......................................................................... 2
About this manual ............................................................. 2
Names of buttons .............................................................. 3
Main unit...................................................................................3
Remote control unit .................................................................4
Display window........................................................................4
Before using for the first time
Page 5
Installing the unit............................................................... 5
Connecting to the Analog Output Jacks ......................... 5
Connecting to the Digital Output Jack............................ 5
Supplying the power......................................................... 5
To connect the AC power cord of the main unit ...................5
To install the batteries in the remote control unit.................6
COMPU LINK connection .................................................. 6
Basic operations
Page 7
Basic functions for disc playback .................................... 7
Turning on the power of this unit...........................................7
Remote control operation .......................................................7
Inserting and removing discs .................................................7
Playing a disc ...........................................................................8
Stopping playback ...................................................................8
Locating a point to start playback .................................. 9
Skipping to a desired disc during playback (DISC SKIP) ......9
Changing to a desired disc during playback DISC (1-7) .......9
Skipping to a desired track during playback .........................9
Searching for a desired section ..............................................9
Specifying a desired track in stop mode..............................10
Changing discs during playback (EXCHANGE)............. 10
Playing tracks in a order of disc/track number............. 10
Various playback patterns
Page 11
Playing tracks in a desired order (Program Play) ......... 11
Playing tracks in a random order (Random Play) ......... 12
Playing repeatedly (Repeat Play) ................................... 12
Repeating all the tracks of a disc ..........................................12
Repeating one track ...............................................................12
General informations
Page 13
COMPU LINK remote control system ............................ 13
Care and handling............................................................ 14
Troubleshooting .............................................................. 15
Specifications................................................................... 16
1
$ !" #!$$$%$&'
Introduction
Precautions
About this manual
Load compact discs only
This manual covers the operating instructions for the
compact disc automatic changer XL-FZ700BK.
Introduction
Never insert anything other than compact discs into any
part of the player.
If a problem persists
This manual is organized as follows:
If something goes wrong, turn off the power
immediately. If the same problem reoccurs when the
power is turned on once more, turn off the power again
and consult your JVC dealer.
The first part, “Introduction”, gives you the precautions
when using this unit, and shows you the names of
buttons on the main unit and the remote control unit.
Handling the power cord
When unplugging from the wall socket, always pull the
plug body, never the power cable.
Volume settings
A CD player has almost zero background noise. Because
of this, the technique of listening to the background level
and then setting the volume before the music starts, as
used with analog turntables or tape decks, cannot be
used. If you raise the volume level too high, speaker
damage may result.
Condensation
The CD player uses optical components. If it is moved
from a cold location to a warm one, or is used in a room
subject to excessive humidity or where a fire has just
been lit, condensation could form on the optical
components.
This may prevent the laser beam from being properly
transmitted and thus causes noise or even a
malfunction.
If condensation has formed and the CD player does not
function correctly, we recommend that you leave it
turned on for an hour or two. If at the end of this time the
CD player still does not function properly, please consult
your JVC dealer.
Transporting the unit
When carrying this unit, it is best to avoid either
tilting or turning it upside-down. When you cannot
avoid doing so, please remove the discs first.
Using compact discs
Compact discs are made of plastic and can easily be
damaged. If the disc is dirty, scratched, warped or
otherwise damaged, the digital information may not be
picked up correctly.
Applicable discs
This unit can only be used with compact discs bearing
the marks below. Never use discs of other types.
Recordable
ReWritable
CD-R and CD-RW discs recorded with the Audio CD format
can be played back, though some may not be played back
because of the disc characteristics or recording condition.
NOTE
• CD-R and CD-RW discs must be finalized.
2
The second part, “Before using for the first time”, tells
you what kind of operations you should do before
playing discs. This part describes where to place the unit
for best results, how to install batteries in the remote
control unit and how to connect this unit to the amplifier/
receiver and other components.
The third part, “Basic operations”, describes how to load
discs, and convenient basic functions for playing discs.
The fourth part, “Various playback patterns”, describes
various functions for playing discs.
The fifth part, “General informations”, describes the
COMPU LINK remote control system which facilitates
various operations between JVC components, and
explains how to take care of discs.
This part also includes “Troubleshooting”, which tells
you how to check the unit when a malfunction occurs,
and the technical informations regarding this unit.
# !" #!$$$%$&'
Introduction
English
Names of buttons
Main unit
3 PLAY button
DISC (1-7) buttons
DISC 1
Introduction
8 PAUSE button
EXCHANGE/DISC SKIP button
0 OPEN/CLOSE button
STANDBY indicator
% STANDBY/ON button
DISC 2
DISC 3
DISC 4
DISC 5
DISC 6
DISC 7
OPEN/CLOSE
EXCHANGE/DISC SKIP
PLAY
STANDBY
STANDBY/ON
STOP
7- DISC
XL-FZ700 COMPACT DISC AUTOMATIC CHANGER
PLAY & EXCHANGE
PAUSE
SKIP
CD-R/RW PLAYBACK
1BIT P . E . M D . D . CONVERTER
Display window
remote sensor
7 STOP button
Carousel
4/¢
¢ SKIP buttons
DIGITAL OUT OPTICAL jack
DIGITAL
OUT
OPTICAL
COMPU LINK - 3
OUTPUT
RIGHT
AC IN
(SYNCHRO)
LEFT
OUTPUT (RIGHT/LEFT) jacks
COMPU LINK-3
(SYNCHRO) jacks
AC IN connector
3
( !" #!$$$%$&'
Introduction
Remote control unit
OPEN/CLOSE button
Remote control signal transmitter
PROGRAM button
OPEN/
CLOSE STANDBY/ON
REPEAT
Introduction
% STANDBY/ON button
Turns on the unit or puts it in
STANDBY mode
REPEAT button
RANDOM PROGRAM CANCEL
CANCEL button
CALL
RANDOM button
DISC (1-7) buttons
DISC 1
DISC 2
DISC 3
DISC 5
DISC 6
DISC 7 DISC SKIP
CALL: displaying program
contents button
DISC 4
DISC SKIP button
Track buttons
1
2
3
4
5
6
7
8
9
10
+10
3: Play button
4/¢
¢: skip buttons
7: Stop button
1/¡
¡: backward/
fast forward buttons
8: Pause button
RM-SXLFZ700J
REMOTE CONTROL
Display window
Disc indicators (1-7)
Music calendar
EXCHANGE indicator
1
2
5
3
6
4
7
EXCHANGE DISC
REPEAT1
PROGRAM
RANDOM
Play mode indicators
4
TRACK TOTALTIME
STEP
1 2 3 4 5 6
7 8 9 10 11 12
13 14 15 16 17 18
) !" #!$$$%$&'
Before using for the first time
Best location
Select a location which is level, dry and neither too cold
nor too hot (temperature range 5°C to 35°C). Also, avoid
dusty locations or any location subject to vibration.
If interference occurs
If this unit is placed near a tuner or a radio receiver tuned
to AM frequencies, interference may occur. If this
happens, we recommend either that you move this unit
as far as possible from the tuner or receiver or briefly
turn off the power of this unit.
Connecting to the Digital
Output Jack
English
It is possible to transmit a digital sound signal from this
unit directly to a MD recorder, etc.
NOTES
• Never connect the digital output cable except to the
digital input jack.
• An optical digital cord (optional) is required to make
this connection. Refer to the instruction manual of the
MD recorder, etc. for details.
Before using for
the first time
Installing the unit
Rear panel of this unit
Connecting to the Analog
Output Jacks
DIGITAL
OUT
OPTICAL
COMPU LINK - 3
(SYNCHRO)
OUTPUT
RIGHT
AC IN
LEFT
MD recorder, etc.
Connecting to an amplifier or receiver allows you to
listen to the sound from the speakers.
Connect the OUTPUT jacks of this unit to the line input
jacks of an amplifier or receiver with the supplied audio
cord.
Optical digital cord (optional)
DIGITAL OUT
(OPTICAL)
To digital input jacks
NOTES
• Never connect the OUTPUT jacks to the PHONO jacks
of the amplifier or receiver. This may cause damage to
the components.
• Make sure that the same channels are connected
between this unit and the amplifier or receiver: LEFT to
LEFT and RIGHT to RIGHT.
• Do not connect the power plug until all connections are
complete.
• Connect the plugs firmly. Loose connections may cause
noise or malfunction.
Rear panel of this unit
Supplying the power
To connect the AC power cord of the
main unit
The AC power cord is supplied separately and must be
connected to the unit.
Plug the AC power cord into the
AC IN connector of
this unit and connect to the wall outlet after all
connections are complete.
NOTE
DIGITAL
OUT
OPTICAL
OUTPUT
RIGHT
COMPU LINK - 3
(SYNCHRO)
AC IN
• When using the COMPU LINK Remote Control System
(see page 6), do not connect the power cord to the
SWITCHED AC OUTLET of an amplifier or receiver.
LEFT
OUTPUT
Amplifier or receiver
RIGHT LEFT
AC IN connector
Rear panel of this unit
To audio input jacks
DIGITAL
OUT
Audio cord
OPTICAL
OUTPUT
RIGHT
COMPU LINK - 3
(SYNCHRO)
AC IN
LEFT
Speaker unit
Supplied AC power cord
To the wall outlet
(to be continued)
5
* !" #!$$$%$&'
Before using for the first time
To install the batteries in the remote
control unit
Before operating the remote control unit, install two
batteries.
1 While pushing the tab of the rear cover,
remove the rear cover from the remote control
upwardly.
COMPU LINK connection
JVC’s COMPU LINK Remote Control System provides
unified control over system components connected with
COMPU LINK. Connecting JVC audio components with
the COMPU LINK jacks automatically controls relative
operations between components and facilitates various
operations. With the COMPU LINK connection to an
amplifier or receiver, you can operate XL-FZ700BK with
the amplifier or receiver’s remote control unit.
Synchronized recording is also available with this
feature.
Before using for
the first time
Connecting the COMPU LINK cord
2 Install batteries. Be sure that the batteries are
installed with correct polarity, (+) and (–).
3 While aligning the end of the rear cover with
The COMPU LINK-3 (SYNCHRO) jacks are used to output
and input the control signal for the COMPU LINK remote
control system.
COMPU LINK-compatible products are provided with the
jacks marked COMPU LINK-1, COMPU LINK-2 or COMPU
LINK-3, referring to the COMPU LINK version. XLFZ700BK is equipped with COMPU LINK-3. You can
connect XL-FZ700BK also to a component with lower
COMPU LINK versions. But, in that case, only the lower
versions’ features will be available.
Plug the supplied COMPU LINK cord into the COMPU
LINK-3 (SYNCHRO) jack on the rear panel of XL-FZ700BK.
Plug the other end into the COMPU LINK jack of the other
component. If there are two COMPU LINK jacks, plug it
into either of them.
Connect to the COMPU LINK-3 (SYNCHRO) jack of
another component equipped with the Compu Link
remote control system.
the remote control, assemble the rear cover on
the remote control by pushing it downwardly.
Rear panel of this unit
DIGITAL
OUT
OPTICAL
COMPU LINK - 3
(SYNCHRO)
OUTPUT
RIGHT
AC IN
LEFT
COMPU LINK cord*
NOTES
Incorrect use of batteries can cause corrosion or damage.
Note the following points to lengthen battery life.
• Install batteries observing the correct polarity, (+) and (–).
Amplifier or receiver
Cassette deck
• Do not use new and old batteries simultaneously.
• Batteries with similar shapes may have different
voltage ratings. Be sure to use the correct batteries.
• Remove batteries from the remote control unit if it will
not be used for a long period of time.
• Do not expose batteries to heat or flame.
Battery replacement
Service life of batteries depends on the condition of use;
standard life is about one year. When the batteries
become weak, the operating distance of the remote
control unit becomes short. If this happens, replace the
batteries R6P(SUM-3)/AA(15F) with new ones.
NOTE
• The lower the temperature, the shorter the battery life.
6
* Only one COMPU LINK cord is supplied.
Turntable
!" #!$$$%$&'
Basic operations
English
Basic functions for disc
playback
4
Turning on the power of this unit
3
Press the % STANDBY/ON button to turn on this unit.
The STANDBY indicator is turned off and the display is
turned on.
Main unit
The number written on the carousel corresponds
to the disc number shown on the display
Remote control unit
STANDBY
STANDBY/ON
NOTE
• From the second time on, the carousel opens with the
previously played disc on the left-front tray.
Press again to turn off the power and activate the
standby mode. The STANDBY indicator is lit and the
display goes out.
The power is automatically turned on also by;
• Pressing the 0 OPEN/CLOSE button on the main unit
or the OPEN/CLOSE button on the remote control unit.
The carousel will be opened.
• Pressing the 3 PLAY button on the main unit or
the 3 button on the remote control unit.
The disc that was lastly selected will be played back. If
no disc is set in all the disc trays, “NO DISC” will
appear.
• Pressing the DISC (1-7) button on the main unit or the
remote control unit.
The corresponding disc will be played back.
2 Press the EXCHANGE/DISC SKIP button on
the main unit or the DISC SKIP button on the
remote control unit to select accessible disc
trays if required.
Main unit
Remote control unit
EXCHANGE/DISC SKIP
DISC SKIP
Basic operations
STANDBY/ON
Each time the button is pressed, the carousel
rotates clockwise by an amount for accessing the
next two disc trays.
NOTES
• A small amount of power (3.0 W) is consumed even in
the standby mode.
• To turn off the power completely, disconnect the power
cord from the wall outlet.
Remote control operation
Point the remote control unit towards the remote sensor
and operate it steadily and carefully. The remote control
unit can be used within a range of about 7 m from the
remote sensor, and at angles of up to about 30 degrees.
Inserting and removing discs
Up to 7 discs can be set on the disc tray carousel.
1 Open the carousel by pressing the 0 OPEN/
CLOSE button on the main unit or the OPEN/
CLOSE button on the remote control unit.
6
Label
side up
5
3 Place one or two discs in the disc tray(s) with
the label side up.
• To insert an 8-cm disc, place it in the inner recess.
CAUTION
When loading discs in the disc tray, be sure to put the
discs according to the recess. Otherwise, the discs
will be damaged when the carousel is closed, and
cannot be removed from the unit.
You can access to two of seven trays.
Main unit
Remote control unit
OPEN/CLOSE
OPEN/
CLOSE
4 Repeat steps 2 and 3 to set more discs onto
other disc trays.
5 Press the 0 OPEN/CLOSE button on the main
unit or the OPEN/CLOSE button on the remote
control unit to close the carousel.
7
& !" #!$$$%$&'
Basic operations
Disc to be played back
The disc set in the front-left disc tray when the carousel
closes is loaded for playback. If no disc is set in the frontleft disc tray when the carousel closed, the unit rotates
the carousel clockwise until it finds a disc. If no disc is set
at all in the carousel, “NO DISC” will appear on the
display.
To stop playback temporarily
Press the 8 PAUSE button on the main unit or the 8
button on the remote control unit. The 8 indicator lights
on the display and playback stops temporarily.
To resume playback, press the 3 PLAY button on the
main unit or the 3 button on the remote control unit
again.
Playback operation before closing the carousel
• By pressing the 3 PLAY button on the main unit or the
3 button on the remote control unit, the carousel
closes and the disc to be played back firstly will be
played back.
• By pressing the DISC (1-7) buttons on the main unit or
the remote control unit, the specified disc will be
played back.
Stopping playback
Press the 7 STOP button on the main unit or
the 7 button on the remote control unit.
Main unit
Remote control unit
STOP
Playing a disc
Playing a disc
Basic operations
Press the 3 PLAY button on the main unit or
the 3 button on the remote control unit.
The 3 indicator lights on the display and playback starts.
Main unit
1 2 3 4
5 6 7
DISC
TRACK TOTALTIME
Total track number
A few seconds later
1 2 3 4
5 6 7
DISC
2
5
3
6
1 2 3 4 5 6
7 8 9 10 11 12
13 14 15 16 17 18
Total Playback time
Remote control unit
PLAY
1
STEP
PROGRAM
RANDOM
TRACK
TIME
STEP
4
7
1 2 3 4 5 6
7 8 9 10 11 12
13 14 15 16 17 18
Playback elapsed time
DISC number being played back
DISC
TRACK
TIME
STEP
PROGRAM
RANDOM
1 2 3 4 5 6
7 8 9 10 11 12
13 14 15 16 17 18
About the DISC (1-7) indicators
Each DISC indicator shows the current status of the
corresponding tray as follows:
• The circle of the DISC indicator will light if a disc is set
in the corresponding disc tray. (The numbers 1-7 are
always lit.)
• The circle is unlit if no disc is set in the corresponding
disc tray.
NOTE
• All available discs are sequentially played back.
Playback will continue until you stop it. (See “Stopping
playback” on this page.)
Playing a desired disc
Press a desired DISC (1-7) button.
The 3 indicator lights on the display and playback starts.
Main unit
DISC 1
DISC 2
Remote control unit
DISC 3
DISC 4
DISC 5
DISC 6
DISC 7
DISC 1
DISC 2
DISC 3
DISC 5
DISC 6
DISC 7
DISC 4
NOTES
• Inserted disc is detected when the carousel is turned.
So, until then, the unit cannot know the disc presence
status of the disc tray. For such disc trays, the unit
temporarily turns on the corresponding indicators.
• During program play mode, the number shows the
presence of disc and the circle shows the disc being
programed.
• During random play mode, the number shows the
presence of disc and the circle shows the disc being
played back for random play.
About the music calendar
• The DISC (1-7) button without the circle in the DISC
indicator does not work.
When a disc to be played back is read, the contents (track
numbers) of the disc appear on the music calendar. As
the track is finished to play back or skipped, the track
number will disappear from the music calendar.
NOTE
• During program play mode, only the programed tracks
appear on the music calendar.
8
+ !" #!$$$%$&'
Basic operations
Using the track buttons
Locating a point to start
playback
English
Remote control unit
Skipping to a desired disc during
playback (DISC SKIP)
1
2
3
4
5
6
7
8
9
10
+10
Use the DISC SKIP button on the remote control unit.
To skip to the desired track during playback, press the
corresponding track buttons.
DISC SKIP
Each time the DISC SKIP button is pressed, the selected
DISC number changes from 1 to 7, then back to 1.
The selected disc will be played back.
• You can also use this button during stop mode.
NOTE
• The EXCHANGE/DISC SKIP button on the main unit
does not work for this purpose.
[How to use the track buttons]
When selecting track number 11 or above, use the [+10]
button.
Example:
To select track number 12, press [+10] and then [2].
To select track number 25, press [+10] twice and then [5].
To select track number 30, press [+10] twice and then [10].
Basic operations
Remote control unit
Searching for a desired section
During playback, press and hold the 4/¢
¢ SKIP
buttons on the main unit or the 1/¡
¡ buttons on the
remote control unit.
Changing to a desired disc during
playback DISC (1-7)
Main unit
Remote control unit
SKIP
Press any DISC (1-7) button to select a desired disc.
Main unit
DISC 1
DISC 2
Remote control unit
DISC 3
DISC 4
DISC 5
DISC 6
DISC 7
DISC 1
DISC 2
DISC 3
DISC 5
DISC 6
DISC 7
DISC 4
The selected disc will be played back.
• You can also use these buttons during stop mode.
Skipping to a desired track during
playback
Playback advances or reverses rapidly.
While the 4 button on the main unit or the 1 button
on the remote control unit is kept pressed, playback
rapidly reverses toward the beginning of the track. While
the ¢ button on the main unit or the ¡ button on the
remote control unit is kept pressed, playback rapidly
advances toward the end of the track. When the desired
section is reached, release the button. The player
resumes normal playback from that point.
• While searching, you can hear a playback sound.
Using the 4/¢
¢ buttons
Main unit
Remote control unit
SKIP
To skip back to the beginning of the track being played,
tap the 4 button. When the beginning of the track is
reached, tapping this button again skips to the previous
track.
To skip to the next track, tap the ¢ button.
• You can also use these buttons during stop mode.
9
!" #!$$$%$&'
Basic operations
Specifying a desired track in stop mode
To specify the desired track number, use the track
buttons (1-10, +10).
You can continuously play all the loaded discs, starting
from any track on any disc.
Remote control unit
1
2
3
4
5
6
7
8
9
10
1 Press the 3 PLAY button on the main unit or
the 3 button on the remote control unit to
start playback.
+10
The unit searches for the selected track and playback
starts automatically.
To specify the track number with the track buttons, see
“How to use the track buttons” on page 9.
Basic operations
Playing tracks in a order of
disc/track number
Playback starts from the current disc.
The following display appears.
DISC
1
2
5
6
TRACK
Changing discs during
playback (EXCHANGE)
Press the EXCHANGE/DISC SKIP button on the main unit.
The carousel opens and you can change the discs inside.
The EXCHANGE indicator lights on the display.
Main unit
7
NOTE
• When the carousel is opened by pressing the
EXCHANGE/DISC SKIP button on the main unit, it is not
possible to close it by pushing it back with hand.
Always press the 0 OPEN/CLOSE button to close the
carousel.
1 2 3 4 5 6
7 8 9 10 11 12
13 14 15 16 17 18
Playback elapsed time
Track number being played back
or the remote control unit to select the disc
number which contains the first track you
want to play.
When you want to play from the first track on the
selected disc, it is not necessary to select the track
number. In this case, omit the next step.
3 Select the track number with the 4/¢
buttons on the main unit or the remote control
unit or the track buttons on the remote control
unit.
The selected track number appears on the display
and playback starts from the selected track
automatically.
To select the track number with the track buttons,
see “How to use the track buttons” on page 9.
DISC
1
2
5
It is also possible to change the discs during program
playback or random playback, following the above
procedure.
STEP
2 Use the DISC (1-7) buttons on the main unit
EXCHANGE/DISC SKIP
To change the discs loaded in the far end of the disc tray,
press the EXCHANGE/DISC SKIP button on the main unit
or the DISC SKIP button on the remote control unit to
make the carousel rotate. After changing the discs, press
the 0 OPEN/CLOSE button to close the carousel. Then,
the EXCHANGE indicator goes out on the display.
TIME
4
Selected disc number
During playback of a disc, you can change other discs in
the disc trays without stopping playback.
10
3
3
6
4
7
TRACK
TIME
STEP
6
7 8 9 10 11 12
13 14 15 16 17 18
Track number being played back
!" #!$$$%$&'
Various playback patterns
You can play only the favorite tracks in any desired order.
1 In stop mode, press the PROGRAM button so
that the PROGRAM indicator lights on the
display.
Remote control unit
PROGRAM
2 Select the disc which contains the track to be
programmed with the DISC (1-7) button. “AL”
(all tracks) appears on the display.
ex.) When disc 4 is selected.
Shows that a disc is loaded
DISC
1
2
5
3
6
4
7
TRACK
TIME
STEP
PROGRAM
PROGRAM indicator
1 2 3 4 5 6
7 8 9 10 11 12
13 14 15 16 17 18
Program step number
AL (all tracks)
To program the entire disc
When the track number is not specified after
selecting the disc number, all tracks on the selected
disc are programmed.
3 Select the track number by pressing the
track buttons on the remote control unit.
To select the track number with the track buttons,
see “How to use the track buttons” on page 9.
Remote control unit
1
2
3
4
5
6
7
8
9
10
+10
ex.) When track 5 is selected.
Shows the disc being programmed
DISC
1
2
5
3
6
4
7
PROGRAM
TRACK
TIME
STEP
1 2 3 4 5 6
7 8 9 10 11 12
13 14 15 16 17 18
Track number selected for the program step 1
4 Repeat steps 2 and 3 for other tracks and/or
English
discs to be programmed.
You can program up to 32 steps.
5 Start playback by pressing the 3 PLAY button
on the main unit or the 3 button on the
remote control unit.
The programmed tracks and/or discs are played in
the programmed order and, when all the
programmed tracks/discs are played back, program
playback stops.
• You can skip to a desired program step with the
4/¢ buttons.
If you have programmed all discs as “AL”,
pressing ¢ (or 4) will skip to the next (or
previous) disc.
• To check the program contents
In stop mode or during playback, press the CALL
button on the remote control unit. Each time the CALL
button is pressed, the program contents are displayed
in the programmed order. (After pressing the CALL
button, perform the next button operation within five
seconds (during the program step number is
blinking).)
• To modify the program contents in stop mode
To add a new program step to the last step, enter the
new disc number and/or track number referring to
steps 2 and 3 above.
To delete the program step from the last step, press
the CANCEL button on the remote control unit. Each
time the CANCEL button is pressed, the last program
step is deleted one by one.
To delete any program step, press the CALL button to
locate the program step number you want to delete,
and then press the CANCEL button. (After pressing
the CALL button, perform the next button operation
within five seconds (during the program step number
is blinking).)
Various playback
patterns
Playing tracks in a desired
order (Program Play)
• To exit program mode in stop mode
To exit program mode, press the PROGRAM button on
the remote control unit so that the PROGRAM
indicator goes out on the display. However, the
program contents are not erased and, whenever the
program mode is selected, you can play the tracks in
programmed order.
• To clear the entire program contents
In stop mode, press the CANCEL button on the remote
control unit repeatedly until entire program contents
are deleted. Or, press the 0 OPEN/CLOSE button on
the main unit or the OPEN/CLOSE button on the
remote control unit.
Even after the entire program contents have been
cleared, the unit remains in program mode.
Note that turning off the unit does not clear the
program contents.
If the AC power cord is disconnected from the outlet,
the program will be erased.
• If you want to cancel the displayed program step,
press the CANCEL button on the remote control
unit and then enter a new disc number and/or
track number.
11
$ !" #!$$$%$&'
Various playback patterns
Playing tracks in a random
order (Random Play)
Playing repeatedly
(Repeat Play)
You can select and play tracks in random order from all
the discs loaded in the unit.
Selections are made so that each track is played only
once.
Normally, all available discs are sequentially played
back. However, with the repeat play function, you can
repeatedly play all tracks of a disc or one track.
It is also possible to utilize this function in combination
with random/program playback function.
1 In stop mode, press the RANDOM button so
that the RANDOM indicator lights on the
display.
Repeating all the tracks of a disc
Press the REPEAT button repeatedly until the REPEAT
indicator lights on the display.
Remote control unit
RANDOM
Remote control unit
REPEAT
DISC
1
2
Various playback
patterns
5
3
6
4
7
TRACK
PROGRAM
RANDOM
TIME
STEP
1 2 3 4 5 6
7 8 9 10 11 12
13 14 15 16 17 18
RANDOM indicator
1 2 3 4
5 6 7
• To skip to the track to be played next, press the
¢ button.
• To skip to the beginning of the current track,
press the 4 button.
• To cancel random playback
In stop mode, press the RANDOM button on the
remote control unit. The RANDOM indicator goes out
and the random playback is cancelled.
DISC
TRACK
TIME
STEP
1 2 3 4 5 6
7 8 9 10 11 12
13 14 15 16 17 18
REPEAT indicator
2 Press the 3 PLAY button on the main unit or
the 3 button on the remote control unit to
start playback.
REPEAT1
PROGRAM
RANDOM
When playback starts, all tracks of the disc being
selected will be played repeatedly.
(To select a desired disc, see “Playing a desired disc” on
page 8.)
• You can use this function together with the program
playback or random playback. In program mode, the
programmed contents are played repeatedly. In
random mode, all the tracks are played repeatedly in
random order.
Repeating one track
Press the REPEAT button repeatedly until the REPEAT 1
indicator lights on the display.
1 2 3 4
5 6 7
REPEAT1
PROGRAM
RANDOM
DISC
TRACK
TIME
STEP
1 2 3 4 5 6
7 8 9 10 11 12
13 14 15 16 17 18
REPEAT1 indicator
When playback starts, the track being selected will be
played repeatedly.
(To select a desired track, see “Skipping to a desired
track during playback” on page 9.)
• You can use this function together with the program
playback or random playback.
To cancel repeat mode
Press the REPEAT button so that both the REPEAT and
REPEAT 1 indicators go out.
12
# !" #!$$$%$&'
General informations
COMPU LINK remote control system
English
The COMPU LINK Remote Control System controls relative operations between components automatically and
facilitates various operations.
This is a system originated and developed by JVC for facilitating various system operations.
The following is a brief explanation of this system:
Automatic source selection
When the supplied COMPU LINK cord is utilized to connect this unit to others equipped with COMPU LINK jacks,
switching-in of each system component can be performed with a single touch on the source selector button located on a
JVC amplifier or receiver.
When selection is carried out in this manner, the corresponding unit will automatically start operation.
Upon pressing of the play button, the source selector of the amplifier or receiver changes automatically. When a new
unit is switched in, the previously selected component stops operation within five seconds.
Synchronized recording
Synchronized recording refers to the process in which a JVC cassette deck starts recording, synchronized with this unit.
Synchronized recording is carried out as follows:
1 Set the cassette deck to the recording pause mode in accordance with its instructions.
2 To record only certain tracks or discs, program the tracks in any order, as desired.
3 Press the 3 PLAY button on the front panel of this unit. The cassette deck automatically starts recording, synchronized
with this unit.
NOTES
• Synchronized recording stops automatically when this unit stops playback.
• To properly operate the synchronized recording, the buttons/controls other than % STANDBY/ON, 7 STOP and 0 OPEN/
CLOSE buttons do not function.
• If the recording pause mode is set on the cassette deck by pressing the 8 PAUSE button after pressing the ¶ REC and 3 PLAY
buttons simultaneously, synchronized recording is not possible. For details, refer to the instructions for the cassette deck.
General
informations
• To cancel synchronized recording, press the stop button of this unit or the cassette deck.
Automatic power on/off function
This function is to control the power on/off of the receiver/amplifier or this unit respectively as the following.
• When this unit enters playback mode, the power of the receiver or amplifier is turned on.
• When the source selector of the receiver/amplifier is set to CD function mode, the power of this unit is turned on.
NOTES
• Abnormal operation may result if the power supply of the component(s) is interrupted. If this happens, you must start over
again.
• Ensure that the COMPU LINK jacks of the each component are connected with the supplied COMPU LINK cord. Also, be sure to
fully read the instructions for each component.
• When the power of the amplifier or receiver is switched off, this unit is also turned off automatically.
13
( !" #!$$$%$&'
General informations
Care and handling
How to handle CDs
When handling compact discs, do not touch the surface of the disc (reflective silver side — the side without the label).
Since compact discs are made of plastic, they are easily damaged. If the disc gets dirty, dusty, scratched or warped, the
sound will not be picked up correctly and, in addition, such discs may cause the CD player to malfunction.
Even on label side
Do not damage the label side, stick paper to or use any adhesive on the surface.
Storage
Make sure that discs are kept in their cases. If discs are piled one on top of another without their protective cases, they
can be damaged.
Do not put discs in any location where they can be exposed to direct sunlight, or in any place where humidity or
temperature is high. Avoid leaving discs in your car!
General
informations
Maintenance of discs
14
When there are fingerprints or other dirt adhering to a disc, wipe the disc with a soft, dry cloth with a movement going
from the center outwards.
If difficult to clean, wipe the disc with a cloth moistened with water.
Never use record cleaners, petrol, alcohol or any anti-static agents.
) !" #!$$$%$&'
General informations
English
Troubleshooting
Symptom
Possible case
Remedy
Power plug is disconnected from the AC
outlet.
Connect the plug to the AC outlet.
The unit is not operative.
Discs are not loaded.
Load discs in the disc tray.
Disc is inserted upside down.
Load the disc with its label-side up in the disc
tray.
Disc is not loaded in the correct position.
Load the disc according to the groove of the
disc tray.
Moisture is condensed inside the unit.
Leave the unit turned on until the moisture
evaporates.
Disc is not finalized.
Finalize the disc.
The reproduced sound includes
noise.
Disc is dirty.
Wipe off the disc surface with a soft cloth.
Disc is warped.
Replace the disc with a new one.
The sound is intermittent.
Disc is scratched.
Replace the disc with a new one.
Batteries are exhausted.
Replace both batteries.
There is an obstacle between remote
control unit and the remote sensor of the
main unit.
Remove the obstacle.
Direct sunlight shines on the remote sensor
of the main unit.
Shade the unit from the direct sunlight.
Playback is not possible.
The remote control unit does not
function.
General
informations
What appears to be a malfunction may not always be serious. Please go through the following list before requesting service.
15
* !" #!$$$%$&'
General informations
Specifications
Accessories
General
Format:
Signal detection system:
CD capacity:
Sampling frequency:
Power requirements:
Power consumption:
Dimensions (W x H x D):
Mass:
Compact disc digital audio
Non-contact optical detection
7 discs
44.1 kHz
AC 120 V
, 60 Hz
7.0 W (POWER ON)
3.0 W (STANDBY mode)
435 mm x 102 mm x 448 mm
Approx. 5.5 k
Audio performance
General
informations
Frequency response:
Dynamic range:
Signal to noise ratio:
Total harmonic distortion:
Wow and flutter:
Output level:
16
2 Hz to 20 000 Hz (±1 dB)
98.0 dB (at 1 kHz)
108.0 dB
0.002% (at 1 kHz)
Less than measurable limit
2.0 Vrms
AC power cord (1)
Audio cord (1)
COMPU LINK cord (1)
Remote control unit (RM-SXLFZ700J) (1)
Batteries R6P(SUM-3)/AA(15F) (2)
* Designs and specifications are subject to change
without notice.
+ !" #!$$$%$&'
VICTOR COMPANY OF JAPAN, LIMITED
EN, FR
V
J
C
0202AOMCREJEM